
Chapter 6. Modules in JavaScript
A module is a function or object that presents an interface but that hides its state and implementation.Douglas Crockford, JavaScript: The Good Parts
In this chapter, we’ll take several actions that clean up and improve our JavaScript code. We’ll separate our test code from our production code using JavaScript modules. There are several ways to write modules in JavaScript — we’ll look at four different styles and their applicability to our code. We’ll turn our attention to how our test code is organized and improve how it runs and the output it produces. Finally, we’ll remove some redundancy in our tests. That’s a lot of work, so let’s get to it!
Separating our code into Modules
Let’s separate the Money and Portfolio classes from the test code. We create two new files named money.js and portfolio.js in the same folder as test_money.js and move the relevant code there. Here’s our new folder structure:
js
├── money.js
├── portfolio.js
└── test_money.js
This is how portfolio.js looks:
classPortfolio{constructor(){this.moneys=[];}add(){this.moneys=this.moneys.concat(Array.prototype.slice.call(arguments));}evaluate(currency){lettotal=this.moneys.reduce((sum,money)=>{returnsum+money.amount;},0);returnnewMoney(total,currency);}}
The file money.js, not shown here, similarly contains the Money class and its methods.
When we now run our tests by executing node js/test_money.js from the Project Root folder, we get our old friend, ReferenceError:
ReferenceError:Moneyisnotdefined
By moving the classes Money and Portfolio into their own files, they are no longer accessible from the test code. What to do?
We take a hint in our test code: we use the require statement to access the assert library. Can we require both Money and Portfolio?
Yes, we can! However, before we do that, we first have to export those classes from their respective files.
At the very end of money.js, let’s add line to export the Money class:
module.exports=Money;
Similarly, we add a module.exports statement at the end of portfolio.js file:
module.exports=Portfolio;
Now, at the top of test_money.js, let’s add two require statements:
constMoney=require('./money');constPortfolio=require('./portfolio');
What happens when we run our tests now? We get the ReferenceError again:
.../portfolio.js:14returnnewMoney(total,currency);^ReferenceError:Moneyisnotdefined
Wait: the error is now being reported in the portfolio.js file. Of course! Portfolio depends on Money, so we need to specify this dependency at the add top of portfolio.js file, too:
constMoney=require('./money');
After all these changes, our tests are passing again. Yay!
Separating our code into module s makes the dependency tree of our code clearer. Figure 6-1 shows the dependencies.
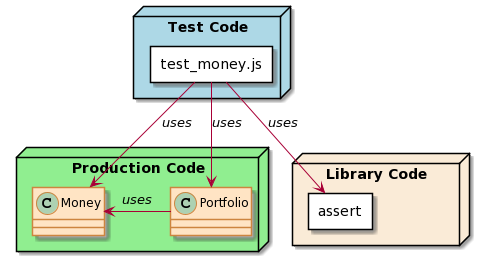
Figure 6-1. The dependency diagram of our JavaScript code after separating it into three source files
A segue into JavaScript Modules
Modules — components of code packaged as a unit to promote reuse — are a well-understood concept in many programming languages. JavaScript is no different. Except, perhaps, in having multiple ways in which modules can be specified and (re)used.
ES5 and earlier editions of ECMAScript did not define modules. However, the need to modularize code was very pressing and very real, therefore, different flavors of modules emerged over time.
CommonJS
CommonJS is the style favored by Node.js. It’s also the style used in the JavaScript code shown in this chapter.
CommonJS uses a module.exports statement in each source file (i.e. module) containing an object — which could be a class, a function, a constant — that other modules need. Those other modules then have an require statement before they can use that dependent object. Although the require statement can be put anywhere before the first use of the dependency, it’s customary to put all require statements in a group at the top of the file.
Asynchronous Module Definition (AMD)
The AMD specification, as its name implies, facilitates the asynchronous loading of multiple modules. This means modules can be loaded separately (and many at a time, if possible) instead of sequentially (one after the other). This asynchronous loading is highly desireable when JavaScript code runs in a web browser, as it can noticeably improve the responsiveness of web pages and web sites. This is shown in Figure 6-2.

Figure 6-2. Asynchronous Module Definition allows modules to be loaded separately and concurrently (image from Wikipedia.org, courtesy Ле Лой)
AMD is not supported out-of-the-box by Node.js. A couple of popular implementations of AMD are RequireJS and Dojo Toolkit. RequireJS is available as a Node.js package, whereas Dojo Toolkit can be installed via Bower, which is yet another package management system (similar to Node.js).
From the previous paragraph, it may appear that grafting AMD on top of a Node.js app is a bit of work. That is because of a couple of fundamental decisions that the designers of Node.js and AMD have taken about the respective styles:
-
Server-side module management: optimized for correctness. Node.js, whose runtime is designed for building server-side apps outside the confines of a web browser 1, strongly favors CommonJS style of defining module dependencies. CommonJS ensures deterministic loading of modules, which means that modules may wait on other modules to load. This is best illustrated by the way Node.js’s CommonJS implementation ensures that even cyclical dependencies — which are, in general, a bad choice — are resolved predictably. This waiting is less of a concern on the server, because there are other mechanisms to improve application performance (e.g statelessness and horizontal scaling).
-
Client-side module management: optimized for speed. The AMD style, which is optimized for use in browsers, is built around the idea of asynchronous loading — it’s right there in the name! Loading modules as fast as possible is vital in JavaScript code that runs in a web browser, because any latency due to slow loading is painfully obvious to the human user.
Because of the contrasting needs of running JavaScript on a server vs. running it inside a web browser, the two module definition styles — CommonJS and AMD — are optimized in different ways.
This book does not show the AMD style of module management because its JavaScript code is of a server-side flavor — it’s not intended to be run inside a web browser.
Universal Module Definition (UMD)
UMD is a design pattern and not an official specification. Think of a it as a societal convention (like shaking hands with the right hand) and not a law (like driving on the left side of the road in Ireland). The pattern consists of two parts: an immediately-invoked function expression (IIFE) and an anonymous function that creates a module. A robust implementation of this design pattern accounts for different libraries (such as AMD or CommonJS) and exports the function accordingly. Implementing AMD with such fallback features usually results in more lines of code. The code snippet below shows how to use UMD to export and import the Money class: 2
// ------------------------------------// money.js (entire file)// ------------------------------------(function(root,factory){if(typeofdefine==="function"&&define.amd){define("Money",[],factory);}else{root.Money=factory();}}(this,function(){classMoney{constructor(amount,currency){this.amount=amountthis.currency=currency}times(multiplier){returnnewMoney(this.amount*multiplier,this.currency)}divide(divisor){returnnewMoney(this.amount/divisor,this.currency)}};returnMoney;}));// ------------------------------------// test_money.js (one example usage)// ------------------------------------constm=require('./money');fiveDollars=newm.Money(5,"USD");
Because of the relative verbosity of the UMD pattern, this book eschews its use.
ESModules
As the name implies, ESModules is the standard promoted by ECMAScript. It is syntactically similar to CommonJS with a few differences. There is an export keyword, which can be used to export anything — e.g. a class, var, or function — from a module. Instead of require, an import statement allows a dependent module to import and use another module which it needs.
Node.js has supported ESModules for a few versions. Versions v14 and v16, referenced in this book, support it fully. To use ESModules instead of the default CommonJS, we need to do the following steps.
-
Either rename our source files to end in
.mjsinstead of.jsor add apackage.jsonfile with{ "type": "module" }in our source folder. -
Declare and export modules using directives like
export class Money. -
Import modules using directives like
import {Money} from './money.mjs';.
The code snippet below shows how to use ESModules in our code. This snippet shows the files as renamed to end with .mjs (which is simpler inasmuch as it does not require the creation of a package.json file).
// ------------------------------------// portfolio.mjs (entire file)// ------------------------------------import{Money}from'./money.mjs';exportclassPortfolio{constructor(){this.moneys=[];}add(){this.moneys=this.moneys.concat(Array.prototype.slice.call(arguments));}evaluate(currency){vartotal=this.moneys.reduce((sum,money)=>{returnsum+money.amount;},0);returnnewMoney(total,currency);}}// ------------------------------------// test_money.mjs (example usage only)// ------------------------------------import*asassertfrom'assert';import{Money}from'./money.mjs';import{Portfolio}from'./portfolio.mjs';letfifteenDollars=newMoney(15,"USD");letportfolio=newPortfolio();portfolio.add(fiveDollars,tenDollars);assert.deepStrictEqual(portfolio.evaluate("USD"),fifteenDollars);
Notice that we have to declare variables with the let keyword in test_money.mjs, in strict compliance with ES6 rules, since the file is now an ES6 file (ending in .mjs).
Important
ES2015 introduced the let and const keywords that allow block scope
Improving Our Tests
The most obvious problem plaguing our tests is that they have a loose, almost accidental structure. There is no organization in test functions, no encapsulation of data used by each test. We have one JavaScript file with almost two dozen statements, four of which happen to be calls to assert methods. That’s about it.
Another smaller problem is that we have two tests for multiplication, and one each for division and addition. The two tests for multiplication test the same feature, albeit with different currencies.
JavaScript has several test libraries and frameworks. Appendix B describes a few of them. As stated in Chapter 0 - Introduction & Setup, we eschew the use of any of these, settling on using the assert package within Node. Without the structure enforced by a library or framework, how can we add structure to our code to make it modular?
In particular, we’d like the items listed in Table 6-1.
| Item | Description |
|---|---|
1 |
Remove one of the two multiplication tests |
2 |
Organize tests in a class comprising test methods with names that reflect the intent of each test |
3 |
Allow us to run all the test methods automatically, including any future tests we write |
4 |
Produce succinct output when tests run successfully (while preserving the verbose messages we already get when tests fail) |
5 |
Run all subsequent tests even if an earlier ones fails with an |
Let’s take a brief sojourn to incorporating these improvements to our test code. What’s more, we’ll use TDD to accomplish the above-mentioned goals. (That should come as no surprise, since we’re roughly halfway into a book on TDD!)
Removing redundancy in tests
Let’s first delete the line of code that asserts multiplication in dollars, taking care to not delete the variables named fiveDollars and tenDollars which we need for our Portfolio test. Let’s move these variables closer to that Portfolio test. We now have three tests, segmented out by empty lines:
constassert=require('assert');constMoney=require('./money');constPortfolio=require('./portfolio');tenEuros=newMoney(10,"EUR");twentyEuros=newMoney(20,"EUR");assert.deepStrictEqual(tenEuros.times(2),twentyEuros);originalMoney=newMoney(4002,"KRW")expectedMoneyAfterDivision=newMoney(1000.5,"KRW")assert.deepStrictEqual(originalMoney.divide(4),expectedMoneyAfterDivision)fiveDollars=newMoney(5,"USD");tenDollars=newMoney(10,"USD");fifteenDollars=newMoney(15,"USD");portfolio=newPortfolio();portfolio.add(fiveDollars,tenDollars);assert.deepStrictEqual(portfolio.evaluate("USD"),fifteenDollars);
This is a good starting point for adding some structure.
Adding a test class and test methods
How should we make changes to our test code, using the principles of test-driven development?
We have one thing going for us: we have green tests right now. We can do refactoring and add new behavior using TDD as long as we run our tests frequently.
The current behavior of tests is that if we don’t get any output, it could indicate one of these scenarios:
-
All tests ran successfully
OR
-
One or more broken tests didn’t run.
That’s why item 3 in Table 6-1 is important.
Since silence ≠ success, we’ll adopt a TDD strategy tailored to our situation as shown in Table 6-2:
| Step | Description | RGR Phase |
|---|---|---|
1 |
Run our tests first before we make any changes, verifying that all tests pass. |
GREEN |
2 |
Improve our test code, with a preference to keeping all changes small. Run our tests again, observing if there are any failures. |
REFACTOR |
3 |
If there are no failures, we deliberately break our tests one at a time by modifying the |
RED |
4 |
When we are satisfied that the tests indeed produce output when broken, we revert the deliberately induced errors. This ensures the tests pass again. We’re ready to recommence the RGR cycle. |
GREEN |
Notice that the three phases of RGR still occur and in the same order. The only difference is that, because our tests are currently silent when they pass, we will deliberately break them in the RED phase to ensure that we’re making progress.
Tip
Temporarily changing production code to deliberately break a unit test is a nifty trick. It reassures us that the test is reliably run as part of the suite and that it indeed executes the particular line(s) of production code. Remember to revert the production code so the test returns to green!
We’ll repeat the steps listed in Table 6-2 until we accomplish all remaining items in Table 6-1.
Let’s add a class named MoneyTest in test_money.js. Let’s also move the three code blocks into three methods named testMultiplication, testDivision and testAddition respectively. Since we’re now using full ECMAScript semantics, we’ll need to declare all variables with the let keyword. Here’s how our newly minted class looks:
constassert=require('assert');constMoney=require('./money');constPortfolio=require('./portfolio');classMoneyTest{testMultiplication(){lettenEuros=newMoney(10,"EUR");lettwentyEuros=newMoney(20,"EUR");assert.deepStrictEqual(tenEuros.times(2),twentyEuros);}testDivision(){letoriginalMoney=newMoney(4002,"KRW")letexpectedMoneyAfterDivision=newMoney(1000.5,"KRW")assert.deepStrictEqual(originalMoney.divide(4),expectedMoneyAfterDivision)}testAddition(){letfiveDollars=newMoney(5,"USD");lettenDollars=newMoney(10,"USD");letfifteenDollars=newMoney(15,"USD");letportfolio=newPortfolio();portfolio.add(fiveDollars,tenDollars);assert.deepStrictEqual(portfolio.evaluate("USD"),fifteenDollars);}}
This runs so silently that we wonder if it’s running at all! Let’s follow the modified RGR cycle described in Table 6-2 and break one of the assertions deliberately. In testMultiplication, we change the 2 to 2000:
assert.deepStrictEqual(tenEuros.times(2000),twentyEuros);
There is still no output. This proves that we’re not running any of the tests. Let’s add a runAllTests() methods to the class and call it outside the class:
classMoneyTest{testMultiplication(){...}testDivision(){...}testAddition(){...}runAllTests(){this.testMultiplication();this.testDivision();this.testAddition();}}newMoneyTest().runAllTests();
Now we get the expected error from our deliberately broken test:
code:'ERR_ASSERTION',actual:Money{amount:20000,currency:'EUR'},expected:Money{amount:20,currency:'EUR'},
When we run our class now, the tests run. We’ve accomplished item 2 in Table 6-1.
Discovering and running tests automatically
We’d like to create a mechanism whereby we can automatically discover all the tests and then run them. This can be broken down into two parts:
-
Discover the names of all the test methods in our class (i.e. methods that start with
testbecause that’s our naming convention); -
Execute these methods one by one.
Let’s tackle the second part first. If we had the names of all our test methods in an array, we could use the Reflect object in standard library to execute them.
Tip
The Reflect object in ES6 provides Reflection capabilities. It allows us to write code that can inspect, execute, and even modify itself.
Let’s add a new method to MoneyTest that simply returns an array of strings, where each string is the name of one of our test methods.
getAllTestMethods(){lettestMethods=['testMultiplication','testDivision','testAddition'];returntestMethods;}
Yes, this is not “discovering the names of all the test methods” that we said in Part I! We’ll get to this shortly.
We can now call Reflect.get and Reflect.apply in runAllTests to call our test methods in succession:
runAllTests(){lettestMethods=this.getAllTestMethods();testMethods.forEach(m=>{letmethod=Reflect.get(this,m);Reflect.apply(method,this,[]);});}

Get names of all test methods

Get the
methodobject for each test method name via reflection
Invoke the test method with no arguments on
thisobject
We first call the getAllTestsMethods to get the test method names. For each name, we get the method object by calling Reflect.get. We invoke this method by calling Reflect.apply. The second parameter to Reflect.apply is the object on which the method is invoked, which is this instance of TestMoney. The last parameter to Reflect.apply is an array of any parameters required to invoke method — which, in our case, is always an empty array because none of our tests methods require any parameters.
When we run our tests now, they still run. Deliberately breaking the tests one by one — pursuant to the strategy described in Table 6-2 — yields the expected error messages.
Turning our attention to Part I: we’re executing our tests methods using reflection, but we’re not finding their names automatically. Let’s improve our getAllTestMethods method to discover all methods whose names start with test.
getAllTestMethods(){letmoneyPrototype=MoneyTest.prototype;letallProps=Object.getOwnPropertyNames(moneyPrototype);lettestMethods=allProps.filter(p=>{returntypeofmoneyPrototype[p]==='function'&&p.startsWith("test");});returntestMethods;}
Get the prototype for this
MoneyTestobjectGet all the properties defined on the
MoneyTestprototype (but not any inherited ones)Retain only those functions whose names start with
test, filtering out all the rest
Tip
The Object.getOwnPropertyNames method returns an array of all properties — including methods — found directly in a given object. It does not return inherited properties.
We call the Object.getOwnPropertyNames to get all the properties defined for MoneyTest.prototype. Why the prototype and not simply MoneyTest? It is because JavaScript (as well as ES6) has Prototype-based Inheritance, not class-based inheritance as in many other languages. The methods declared within the MoneyTest class are in reality attached to the object reachable via the prototype property of MoneyTest.
Important
ECMAScript is a language with Prototype-based inheritance.
Next, we iterate over all the properties of MoneyTest and select all (and only) those that are of type function and start with test. Because of our naming convention, these are our test methods. We return this array.
Running our tests validates that all of the are indeed still being executing. We verify by deliberately breaking each of them and observing the assertion failures show up. That’s the top three items in Table 6-1 accomplished.
Produce output when tests run successfully
Throughout this section, as we worked through the items described in Table 6-1, we had to deliberately break our tests to verify that they were still running as we made changes to test_money.js. This is the modified RGR cycle described in Table 6-2. It would be really nice if we got a brief output upon success, instead of the absolute silence we currently have when the tests are green. (There is a “Soylent Green” joke in there somewhere!)
Let’s add a simple output line to the runAllTests method that prints the name of each test before executing it:
runAllTests(){lettestMethods=this.getAllTestMethods();testMethods.forEach(m=>{console.log("Running: %s()",m);letmethod=Reflect.get(this,m);Reflect.apply(method,this,[]);});}
Print the name of the method before invoking it
Now, when we run our tests, we get a short and meaningful message even when tests are green:
Running:testMultiplication()Running:testDivision()Running:testAddition()
Run all tests even when an earlier test assertion fails
As we were following the modified RGR cycle described in Table 6-2, we noticed that when we deliberately break a test that ran first (e.g. TestMultiplication), the subsequent tests don’t run at all. This can be misleading because the first failing test may not be the only failing test. When test-driving code, it’s vital to be aware of the broad impact of any change, not a myopic perspective that gets us fixated on the first problem that shows up.
We’d like our test class to run all the tests, even when one or more of them fail.
The reason the first assertion failure stops the test execution is because we’re not handling the AssertionError`s that are thrown. We could catch `AssertionError s and log them to the console. Let’s add a try ... catch block around the Reflect.apply call in our runAllTests method to do just that:
runAllTests(){lettestMethods=this.getAllTestMethods();testMethods.forEach(m=>{console.log("Running: %s()",m);letmethod=Reflect.get(this,m);try{Reflect.apply(method,this,[]);}catch(e){if(einstanceofassert.AssertionError){console.log(e);}else{throwe;}}});}
Surround the method invocation in a
try ... catchblockLog only
AssertionErrorsRethrow all other errors
We catch all errors. However, we only output `AssertionError`s to the console; we rethrow the rest. (We do not want to inadvertently interfere with other errors, such as the `TypeError`s and `ReferenceError`s we’ve already seen.)
After this change, all our tests run every time we run MoneyTest. For example, when we deliberately break testMultiplication, the other tests — testDivision and testAddition — run successfully after the assertion error.
Running:testMultiplication()AssertionError[ERR_ASSERTION]:Expectedvaluestobestrictlydeep-equal:+actual-expectedMoney{+amount:20,-amount:2000,currency:'EUR'}...Running:testDivision()Running:testAddition()
Sweet! We’ve accomplished all the items in Table 6-1.
Committing Our Changes
We have added new files and redistributed code among them. This is a particularly good time to commit our changes to our local Git repository.
git add .
git commit -m "refactor: created Money and Portfolio modules; improved test design"
The output should validate our changes:
[main5781251]refactor:createdMoneyandPortfoliomodules;improvedtestdesign3fileschanged,84insertions(+),50deletions(-)createmode100644js/money.jscreatemode100644js/portfolio.jsrewritejs/test_money.js(96%)
The 96% is the similarity index: the percentage of the file that’s unchanged
Where We Are
In this chapter, we separated our code by creating modules for Money and Portfolio. The separation allowed us to explicitly specify our dependencies and to ensure there are no dependencies from production code to test code.
Of the several module definition styles and standards available in JavaScript, we chose the CommonJS style — which is the default for NodeJS apps. Going forward, we’ll keep this style of module definition for the remainder of this book.
We also saw how to adopt the UMD and ESModules styles in our code.
We improved the organization of our tests by introducing a test class, test methods, and a mechanism to run all tests automatically. The tests now produce output when they pass (succinctly) and when they fail (verbosely). We also ensured that all tests run even when some of them fail early due to assertion errors. Finally, we cleansed our code by removing a redundant multiplication test.
1 The “Hello World” example on Node.js is an HTTP server, betraying its preference for backend apps https://nodejs.org/en/docs/guides/getting-started-guide/
2 This UMD pattern is inspired by the code sample https://riptutorial.com/javascript/example/16339/universal-module-definition—umd-