Mac OS X makes it easy for users on the same system to share files and directories. For instance, everyone in a group can read documents stored in one of their manager’s directories without needing to make their own copies, if the manager has allowed access. There might be no need to fill peoples’ email inboxes with file attachments if everyone can access those files directly through the Unix filesystem.
Here’s a brief introduction to file security and sharing. If you have critical security needs, or you just want more information, talk to your system staff or see an up-to-date book on Unix security such as Practical Unix and Internet Security (O’Reilly).
Warning
Note that any Admin user can use the sudo command (see Section 2.3, later in this chapter) to do anything to any file at any time, no matter what its permissions are. So, access permissions won’t keep your private information safe from everyone — although let’s hope that you can trust the other folks who share your Macintosh!
A directory’s access permissions help to control access to the files and subdirectories in that directory:
If a directory has read permission, a user can run
lsto see what’s in the directory and use wildcards to match files in it.A directory that has write permission allows users to add, rename, and delete files in the directory.
To access a directory (that is, to read or write the files in the directory or to run the files if they’re programs) a user needs execute permission on that directory. Note that to access a directory, a user must also have execute permission to all its parent directories, all the way up to the root.
The access permissions on a file control what can be done to the file’s contents. The access permissions on the directory where the file is kept control whether the file can be renamed or removed. (If this seems confusing, think of it this way: the directory is actually a list of files. Adding, renaming, or removing a file changes the contents of the directory. If the directory isn’t writable, you can’t change that list.)
Read permission controls whether you can read a file’s contents. Write permission lets you change a file’s contents. A file shouldn’t have execute permission unless it’s a program or a script.
Once you
know what permissions a file or directory needs — and if
you’re the owner (listed in the third column of
ls -l output) — you can change the permissions
with the chmod program. If you select a file or
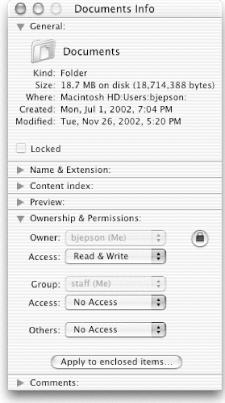
directory in the Finder, and then choose File → Get Info
(
-I), you can also change the permissions using the Ownership & Permissions section of the Get Info dialog (see Figure 2-6).
There are two ways to change
permissions: by specifying the permissions to add or delete, or by
specifying the exact permissions. For instance, if a
directory’s permissions are almost correct, but you
also need to make it writable by its group, tell
chmod to add group-write permission. But if you
need to make more than one change to the permissions — for
instance, if you want to add read and execute permission but delete
write permission — it’s easier to set all
permissions explicitly instead of changing them one-by-one. The
syntax is:
chmod permissions file(s)
Let’s start with
the rules; we see examples next. The
permissions argument has three parts,
which you must give in order with no space between.
The category of permission you want to change. There are three: the owner’s permission (which
chmodcalls “user,” abbreviatedu), the group’s permission (g), or others’ permission (o). To change more than one category, string the letters together, such asgofor “group and others,” or simply useato mean “all” (same asugo).Whether you want to add (
+) the permission, delete (-) it, or specify it exactly (=).What permissions you want to affect: read (
r), write (w), or execute (x). To change more than one permission, string the letters together — for example,rwfor “read and write.”
Some examples should make this clearer! In the following command
lines, you can replace dirname or
filename with the pathname (absolute or
relative) of the directory or file. An easy way to change permissions
on the working directory is by using its relative pathname,
. (dot), as in chmod
o-w
.. You can combine two
permission changes in the same chmod command by
separating them with a comma (,), as shown in the
final example.
To protect a file from accidental editing, delete everyone’s write permission with the command:
chmod a-w
filenameOn the other hand, if you own an unwritable file that you want to edit, but you don’t want to change other peoples’ write permissions, you can add “user” (owner) write permission with:
chmod u+w
filenameTo keep yourself from accidentally removing files (or adding or renaming files) in an important directory of yours, delete your own write permission with the command:
chmod u-w
dirnameIf other users have that permission too, you could delete everyone’s write permission with:
chmod a-w
dirnameIf you want you and your group to be able to read and write all the files in your working directory — but those files have various permissions now, so adding and deleting the permissions individually would be a pain — this is a good place to use the
=operator to set the exact permissions you want. Use the filename wildcard*, which means “everything in this directory” (explained in Section 3.2) and type:chmod ug=rw *
If your working directory had any subdirectories, though, that command would be wrong because it takes away execute permission from the subdirectories, so the subdirectories couldn’t be accessed anymore. In that case, you could try a more specific wildcard. Or, instead of a wildcard, you can simply list the filenames you want to change, separated by spaces, as in:
chmod ug=rw afile bfile cfile
To protect the files in a directory and all its subdirectories from everyone else on your system, but still keep the access permissions you have there, you could use:
chmod go-rwx
dirnameto delete all “group” and “others” permission to read, write, and execute. A simpler way is to use the command
chmod go=
dirnameto set “group” and “others” permission to exactly nothing.
You want full access to a directory. Other people on the system should be able to see what’s in the directory (and read or edit the files if the file permissions allow it) but not rename, remove, or add files. To do that, give yourself all permissions, but give “group” and “others” only read and execute permission. Use the command:
chmod u=rwx,go=rx
dirname
After you change permissions, it’s a good idea to
check your work with ls
-l
filename or ls
-ld
dirname (without
the -d option, ls will list the contents of the
directory instead of its permissions and other information).
- I get the message “chmod: Not owner.”
Only the owner of a file or directory (or the superuser) can set its permissions. Use
ls -lto find the owner or use superuser privileges (see Section 2.3, later in this chapter).- A file is writable, but my program says it can’t be written.
First, check the file permissions with
ls -land be sure you’re in the category (user, group, or others) that has write permission.The problem may also be in the permissions of the file’s directory. Some programs need permission to write more files into the same directory (for example, temporary files), or to rename files (for instance, making a file into a backup) while editing. If it’s safe to add write permission to the directory (if other files in the directory don’t need protection from removal or renaming) try that. Otherwise, copy the file to a writable directory (with
cp), edit it there, then copy it back to the original directory.
Group
ownership lets a certain group of users
have access to a file or directory. You might need to let a different
group have access. The chgrp program sets the
group owner of a file or directory. You can set the group to any of
the groups to which you belong. Because you’re
likely going to be administering your system, you can control the
list of groups you’re in. (In some situations, the
system administrator controls the list of groups
you’re in.) The groups program
lists your groups.
For example, if you’re a designer creating a directory named images for several illustrators, the directory’s original group owner might be admin. You’d like the illustrators, all of whom are in the group named staff, to access the directory; members of other groups should have no access. Use commands such as:
% groups
admin staff
% mkdir images
% ls -ld images
drwxr-xr-x    2 roberts  admin          68 Nov  6 09:53 images
% chgrp staff images
% chmod o= images
% ls -ld images
drwxr-x---    2 roberts  staff          68 Nov  6 09:53 images
Tip
Many Unix systems also let you set a directory’s
group ownership so that any files you later create in that directory
will be owned by the same group as the directory. Try the command
chmod g+s
dirname. The
permissions listing from ls -ld will now show an
s in place of the second x,
such as drwxr-s---.
The
chown
program changes the owner of a file or
directory. Only the superuser can use chown (see
Section 2.3, later in this
chapter).[3]
%chown eric imageschown: changing ownership of `images': Operation not permitted %sudo chown eric imagesPassword: %
The ownership and permissions system described in this chapter depends on the security of your username and password. If others get your username and password, they can log into your account and do anything you can. They can read private information, corrupt or delete important files, send email messages as if they came from you, and more. If your computer is connected to a network, whether it be the Internet or a local network inside your organization, intruders may also be able to log in without sitting at your keyboard! See Section 7.1 in Chapter 7 for one way this can be done.
Anyone may be able to get your username — it’s usually part of your email address, for instance, or shows up as a file’s owner in a long directory listing. Your password is what keeps others from logging in as you. Don’t leave your password anywhere around your computer. Don’t give your password to anyone who asks you for it unless you’re sure he’ll preserve your account security. Also don’t send your password by email; it can be stored, unprotected, on other systems and on backup tapes, where other people may find it and then break into your account.
If you think that someone knows your password, you should probably change it right away — although if you suspect that a computer “cracker” (or “hacker”) is using your account to break into your system, you should ask your system administrator for advice first, if possible. You should also change your password periodically. Every few months is recommended.
A password should be easy for you to remember but hard for other people (or password-guessing programs) to guess. Here are some guidelines. A password should be between six and eight characters long. It should not be a word in any language, a proper name, your phone number, your address, or anything anyone else might know or guess that you’d use as a password. It’s best to mix upper- and lowercase letters, punctuation, and numbers. A good way to come up with a unique but memorable password is to think of a phrase that only you might know, and use the first letters of each word (and punctuation) to create the password. For example, consider the password mlwsiF! (“My laptop was stolen in Florence!”).
To change your
password,
you can use System Preferences → Accounts, but you can also
change it from the command line using the passwd
command. After you enter the command, it prompts you to enter your
old password. If the password is correct, it asks you to enter the
new password — twice, to be sure there is no typing mistake. For
security, neither the old nor the new passwords appear as you type
them.
[3] If you have permission to read another
user’s file, you can make a copy of it (with
cp; see Section 3.4.2).
You’ll own the copy.