Chapter 6: DNS Services on Linux
The Domain Name System (DNS) is a major underpinning of today's information-based society. A proverb used within the technical community (phrased in haiku format) is shown here:
It's not DNS
There is no way it's DNS
It was DNS
This describes more technical problems than you might think, up to widespread internet or cloud service outages. It also nicely describes the progression of how a problem is solved, with the answer: "The root problem is always DNS." This nicely illustrates just how important this service is to almost every facet of today's corporate networks and public internet.
In this chapter, we'll cover several topics that involve DNS basics, then build—and finally, troubleshoot—DNS services. We'll look at the following areas:
- What is DNS?
- Two main DNS server implementations
- Common DNS implementations
- DNS troubleshooting and reconnaissance
Then, with the DNS basics covered, we'll discuss the following two entirely new DNS implementations that are seeing rapid adoption:
- DNS over HyperText Transfer Protocol Secure (HTTPS), known as DoH
- DNS over Transport Layer Security (TLS), known as DoT
We'll also discuss the DNS Security Extensions (DNSSEC) implementation, which cryptographically signs DNS responses to prove that they are verified and haven't been tampered with.
Technical requirements
You should be able to continue working with your existing Linux host or virtual machine (VM) as we go through the examples in this chapter. There are no additional requirements.
What is DNS?
DNS is essentially a translator between what people want and what a network needs to make that happen. People, for the most part, understand text names of hosts and services—for instance, google.com or paypal.com. However, these names don't mean anything to the underlying network. What DNS does is take those "fully qualified hostnames" that someone might type into an application, such as their browser at Open Systems Interconnection (OSI) Layer 7 (remember the OSI layers in Chapter 3, Using Linux and Linux Tools for Network Diagnostics), and translates them into Internet Protocol (IP) addresses that can then be used to route the application request at OSI Layers 3 and 4.
In the reverse direction, DNS can also translate an IP address into a fully qualified domain name (FQDN), using what's called a pointer (PTR) request (for a DNS PTR record) or "reverse lookup". This can be important to technical folks, but these requests are not as commonly seen by regular people running their browsers and other applications.
Two main DNS server implementations
DNS has a large and complex infrastructure on the internet (which we'll touch on in this section). This is made up of 13 root name servers (which are each a reliable cluster of servers), a group of commonly used name servers (for instance, the servers we use at Google or Cloudflare), and a series of registrars who will, for a fee, register a DNS domain name for you—for instance, your organization's domain name.
However, for the most part, most administrators are working with the needs of their organization—working with their internal DNS name servers that face their internal folks, or with their external DNS name servers that face the internet. It is these two use cases that we'll be focusing on in this chapter. You will see as we build these examples out how the Google or Cloudflare DNS infrastructure, or even the root DNS servers, are not all that different.
An organization's "internal" DNS server (and a DNS overview)
The most common DNS service that organizations deploy is an internal DNS server for their own people's use. This server likely has a zone file populated with DNS records for internal DNS resolution. This file can either be populated manually by editing the zone file or can be populated automatically, using auto-registration by the clients or from Dynamic Host Configuration Protocol (DHCP) leases. Often, all three methods are combined.
The basic request flow is simple. A client makes a DNS request. If that request is for a host that's internal to the organization and the request is to an internal DNS server, the DNS response is supplied immediately since it's on that local DNS server.
If it's for an external host, then things are bit more complex—for instance, let's query for www.example.com. Before we start, note that the following diagram shows the worst case, but there is a caching process at almost every step that usually allows for one or more steps to be skipped along the way:
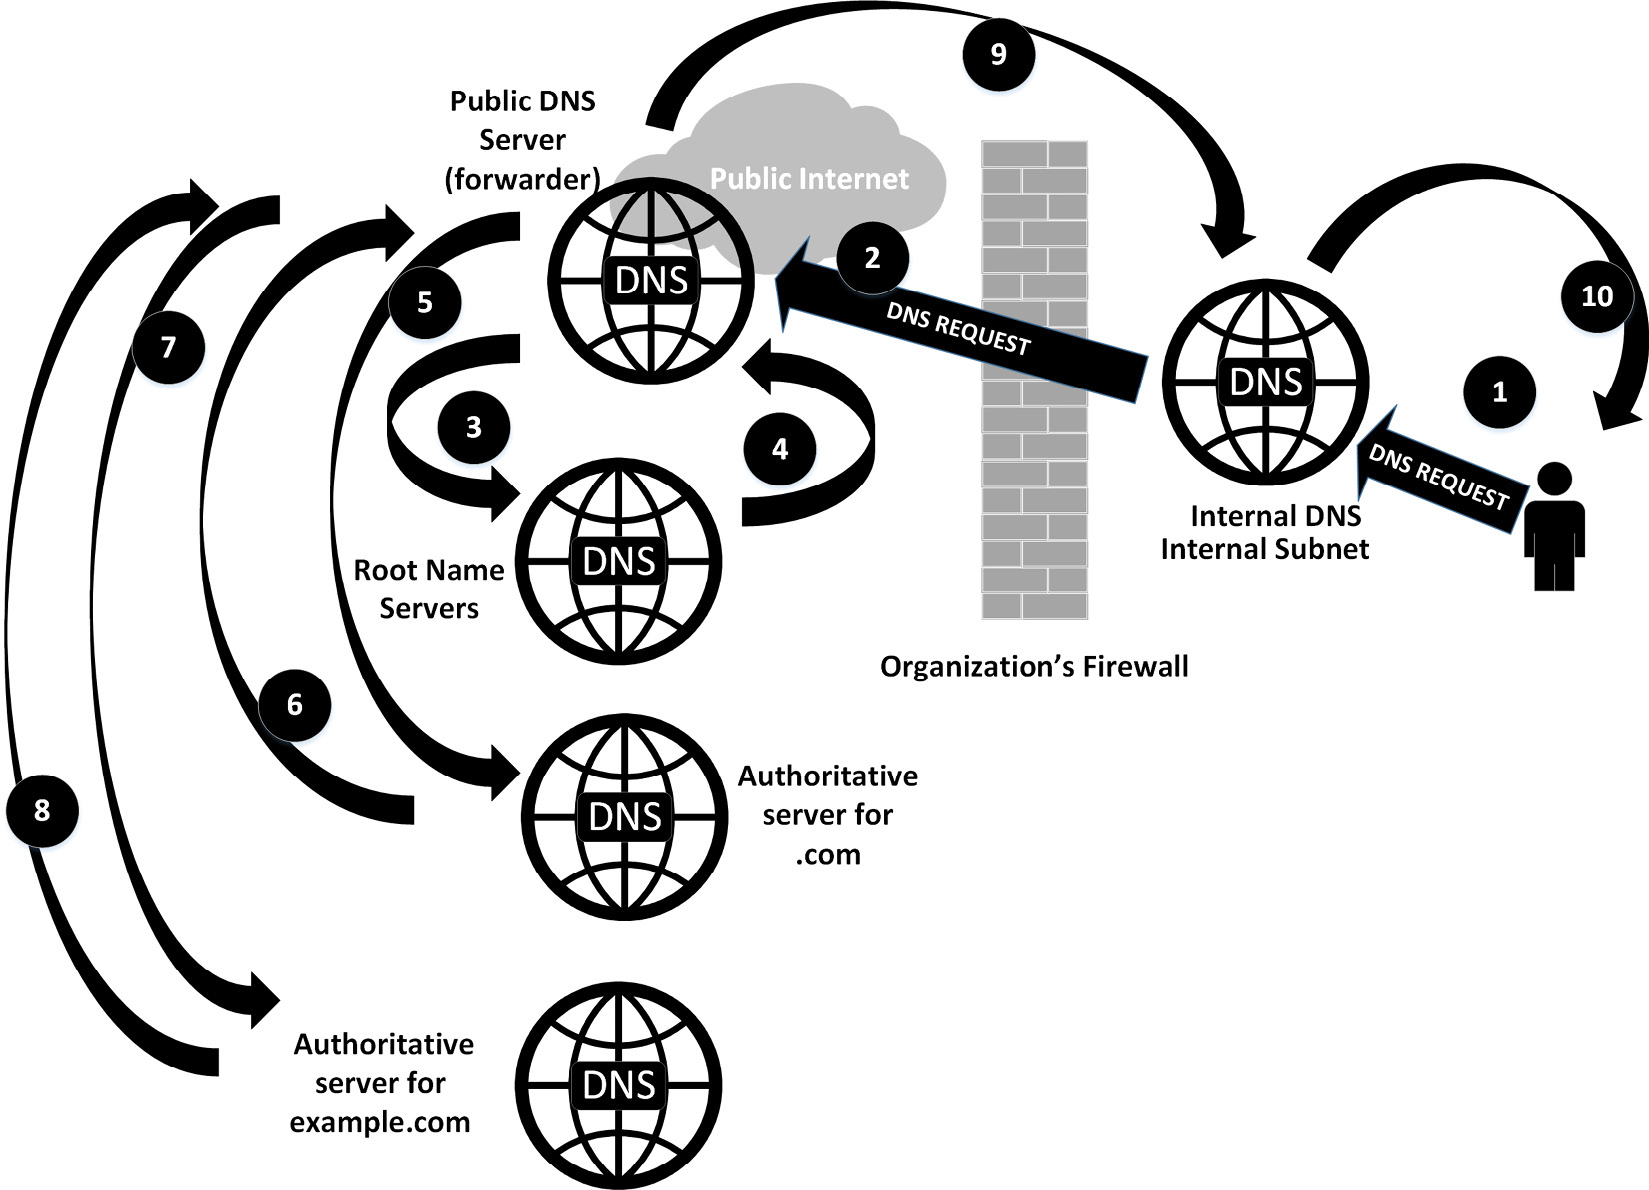
Figure 6.1 – A dizzying overview of how complicated a single DNS request can get
This process looks pretty complicated, but you'll see that it goes by pretty fast, and in fact has a number of escape hatches that let the protocol skip many of these steps in lots of cases. Let's look at the entire worst-case process in detail, as follows:
- If the entry is in the DNS cache of the internal DNS server, and the time to live (TTL) of that entry has not expired, then the response is supplied immediately to the client. Similarly, if the client is requesting an entry that's hosted on the server in a zone file, the answer is supplied immediately to the client.
- If the entry is not in the cache of the internal DNS server, or if it is in the cache but the TTL of that entry has expired, then the internal server forwards the request to its upstream providers (often called forwarders) to refresh the entry.
If the query is in the cache of the forwarder, it will simply return the answer. If this server has the authoritative name server for the domain, it will simply query that host (skipping ahead in the process to Step 5).
- If the forwarder does not have the request in the cache, it will in turn request upstream. In this case, though, it will likely query the root name servers. The goal in this is to find the "authoritative name server" that has the actual entries (in a zone file) for that domain. In this case, the query is made to the root name servers for .com.
- The root name server will not return the actual answer, but will instead return the authoritative name server for the top-level domain (TLD)—in this case, for .com.
- After the forwarder gets this response, it updates its cache with that name server entry, then makes the actual query against that server.
- The authoritative server for .com returns the authoritative DNS server for example.com.
- The forwarder server then makes a request against this final authoritative name server.
- The authoritative name server for example.com returns the actual query "answer" to the forwarder server.
- The forwarder name server caches that answer, then sends a reply back to your internal name server.
- Your internal DNS server also caches that answer, then forwards it back to the client.
The client caches the request in its local cache, then passes the requested information (the DNS response) to the application that requested it (perhaps your web browser).
Again, this process shows the worst-case process to make a simple DNS request and receive an answer. In practice, once the servers have been up for even a short period of time, caching shortens this considerably. Once in a steady state, the internal DNS server for most organizations will have most requests cached, so the process skips right from Step 1 to Step 10. In addition, your forwarding DNS server will cache—in particular, it will almost never query the root name servers; usually, it will have the TLD servers (in this case, the server for .com) cached as well.
In this description, we also brought up the concept of "root name servers". These are the authoritative servers for the root or the . zone. There are 13 root servers for redundancy, each of which in turn is actually a reliable cluster of servers.
Which key features do we need to enable on your internal DNS server to make all this work? We need to enable the following:
- DNS recursion: This model relies on DNS recursion—the ability for each server in turn to make the client's DNS request "up the line". If the DNS entry requested is not defined on the internal server, it needs permission to forward those requests on.
- Forwarder entries: If the requested DNS entry is not hosted on the internal server, internal DNS service (iDNS) requests are forwarded to these configured IP addresses—these should be two or more reliable upstream DNS servers. These upstream servers will in turn cache DNS entries and expire them as their TTL timers expire. In days past, people would use their internet service provider's (ISP's) DNS servers for forwarders. In more modern times, the larger DNS providers are both more reliable and provide more features than your ISP. Some of the common DNS services used as forwarders are listed next (the most commonly used addresses appear in bold):

- Caching: In a large organization, a DNS server's performance can be greatly improved by adding memory—this allows more caching, which means that more requests can be serviced locally, direct from the memory of the server.
- Dynamic registration: While servers usually have static IP addresses and static DNS entries, it's common for workstations to have addresses assigned by DHCP, and having those workstations in DNS is of course desirable as well. DNS is often configured to allow dynamic registration of these hosts, either by populating DNS from DHCP addresses as they are assigned or by permitting the hosts to register themselves in DNS (as described in Request for Comments (RFC) 2136).
Microsoft implements an authentication mechanism into their dynamic update process, and this is where it is most commonly seen. It is, however, an option in Linux DNS (Berkeley Internet Name Domain, or BIND) as well.
- Host redundancy: Almost all core services benefit from redundancy. For DNS, that is usually with a second DNS server. The database is usually replicated in one direction (from the primary to the secondary server) and uses the serial number in the zone file to know when to replicate, using a copy process called a zone transfer. Redundancy is key to account for various systems failures, but it's just as important in allowing system maintenance without a service interruption.
With an internal DNS server in place, what needs to be changed in our configuration to make a DNS server that serves a zone to the public internet?
An internet-facing DNS server
In the case of an internet-facing DNS server, you are most likely implementing an authoritative DNS server for one or more DNS zones. For instance, in our reference diagram (Figure 6.1), the authoritative DNS server for example.com would be a good example.
In this implementation, the focus shifts from the internal server's emphasis on performance and forwarding to restricting access for maximum security. These are the restrictions that we want to implement:
- Restrict recursion: In the DNS model we've outlined, this server is "the end of the line"—it's directly answering DNS requests for the zone(s) it is hosting. This server should never have to look upstream to service a DNS request.
- Cache is less important: If you are an organization and you are hosting your own public DNS zones, then you only need enough memory to cache your own zones.
- Host redundancy: Again, if you are hosting your own zone files, adding a second host is likely more important to you than adding a cache. This gives your DNS service some hardware redundancy so that you can do maintenance on one server without interrupting the service.
- Restricting zone transfers: This is a key restriction that you want to implement—you want to answer individual DNS queries as they arrive. There isn't a good reason for a DNS client on the internet to request all entries for an organization. Zone transfers are meant to maintain your zone between redundant servers so that as a zone is edited, the changes are replicated to the other servers in the cluster.
- Rate limiting: DNS servers have a feature called Response Rate Limiting (RRL) that limits how frequently any one source can query that server. Why would you implement such a feature?
DNS is often used in "spoofing" attacks. Since it is based on the User Datagram Protocol (UDP), there is no "handshake" to establish a session; it's a simple request/response protocol—so, if you want to attack a known address, you can simply make DNS queries with your target as the requester, and the unsolicited answer will go to that IP.
This doesn't seem like an attack, but if you then add a "multiplier" (in other words, if you are making small DNS requests and get larger responses—for instance, text (TXT) records—and you are using multiple DNS servers as "reflectors"), then the bandwidth you are sending to the target can add up pretty quickly.
This makes rate limiting important—you want to restrict any one IP address to make a small number of identical queries per second. This is a reasonable thing to do; given the reliance of DNS caching, any one IP address shouldn't make more than one or two identical requests in any 5-minute period, since 5 minutes is the minimum TTL for any DNS zone.
Another reason to enable rate limiting is to restrict the ability of an attacker to do reconnaissance in DNS—making dozens or hundreds of requests for common DNS names and compiling a list of your valid hosts for subsequent attacks against them.
- Restricting dynamic registration: Dynamic registration is, of course, never recommended on most internet-facing DNS servers. The one exception would be any organization that offers Dynamic DNS (DDNS) registration as a service. Companies of this type include Dynu, DynDNS, FreeDNS, and No-IP, among several others. Given the specialist nature of these companies, they each have their own methods of securing their DDNS updates (often involving a custom-written agent and some form of authentication). The direct use of RFC 2136 is simply not securable for an internet-facing DNS server.
With the basics of implementing both an internal DNS server and starting to secure these for their various use cases, which DNS applications do we have available to work with to build a DNS infrastructure? Let's learn about this in the next section.
Common DNS implementations
BIND, also called named (for name daemon), is the DNS tool most often implemented in Linux, and is arguably both the most flexible and complete, as well as the most difficult to configure and troubleshoot. For better or worse, though, it's the service you are most likely to see and to implement in most organizations. The two main implementation use cases are outlined in the next two sections.
DNS Masquerade (dnsmasq) is a competing DNS server implementation. It's commonly seen on network appliances because of its small footprint, but also makes a fine DNS server for a smaller organization. The key advantages to Dnsmasq would include its built-in graphical user interface (GUI) that can be used for reporting, as well as its integration with DHCP (which we'll discuss in the next chapter), allowing DNS registration directly from the DHCP database. In addition, Dnsmasq implements a friendly way to implement DNS blocklists, which are very nicely packaged up in the Pi-hole application. If your home network has a DNS server on its perimeter firewall or Wireless Access Point (WAP), that DNS server is most likely Dnsmasq.
In this chapter, we'll focus on the commonly used BIND (or named) DNS server. Let's get on with building our internal DNS server using that application.
Basic installation: BIND for internal use
As you would expect, installing bind, the most popular DNS server in Linux, is as simple as this:
$ sudo apt-get install –y bind9
Look at the /etc/bind/named.conf file. In older versions, the application configuration was all in this one monolithic configuration file, but in newer versions it's simply composed of three include lines, as illustrated in the following code snippet:
include "/etc/bind/named.conf.options";
include "/etc/bind/named.conf.local";
include "/etc/bind/named.conf.default-zones";
Edit /etc/bind/named.conf.options, and add the following options—be sure to use sudo as you need admin rights to change any of the configuration files for bind:
- Allow queries from the list of local subnets. In this example, we're allowing all subnets in RFC 1918, but you should restrict this to the subnets you have in your environment. Note that we're using classless subnet masking to minimize the number of entries in this section.
- Define the listening port (this is correct by default).
- Enable recursive queries.
- Define a list of DNS forwarders for recursion to work. In this example, we'll add Google and Cloudflare for DNS forwarding.
Once done, our configuration file should look something like this. Note that it really is an almost "plain language" configuration—there's no mystery about what any of these sections mean:
options {
directory "/var/cache/bind";
listen-on port 53 { localhost; };
allow-query { localhost; 192.168.0.0/16; 10.0.0.0/8; 172.16.0.0/12; };
forwarders { 8.8.8.8; 8.8.4.4; 1.1.1.1; };
recursion yes;
}
Next, edit /etc/bind/named.conf.local, and add the server type, zone, and zone filename. Also, permit workstations on the specified subnets to register their DNS records with the DNS server using the allow-update parameter, as illustrated in the following code snippet:
zone "coherentsecurity.com" IN {
type master;
file "coherentsecurity.com.zone";
allow-update { 192.168.0.0/16; 10.0.0.0/8;172.16.0.0/12 };
};
The zone file itself, where the DNS records are all stored, is not located in the same place as these first two config files. To edit the zone file, edit /var/cache/bind/<zone file name>—so, in this example, it's /var/cache/bind/coherentsecurity.com.zone. You'll again need sudo access to edit this file. Make the following changes:
- Add records as needed.
- Update the SOA line with your zone and name server's FQDN.
- If needed, update the TTL value in the last line in the SOA record—the default is 86400 seconds (24 hours). This is usually a good compromise as it favors caching of records across multiple servers. If you are doing any DNS maintenance, though, you might want to edit the file the day before (that is, 24 hours or more prior to maintenance) and shorten this to 5 or 10 minutes so that your changes aren't delayed due to caching.
- Update the ns record, which identifies the DNS server(s) for your domain.
- Add A record as needed—these identify the IP addresses for each host. Note that for A records, we're only using the common name (CN) for each host, not the FQDN name, which would include the domain.
Once done, our DNS zone file should look something like this:
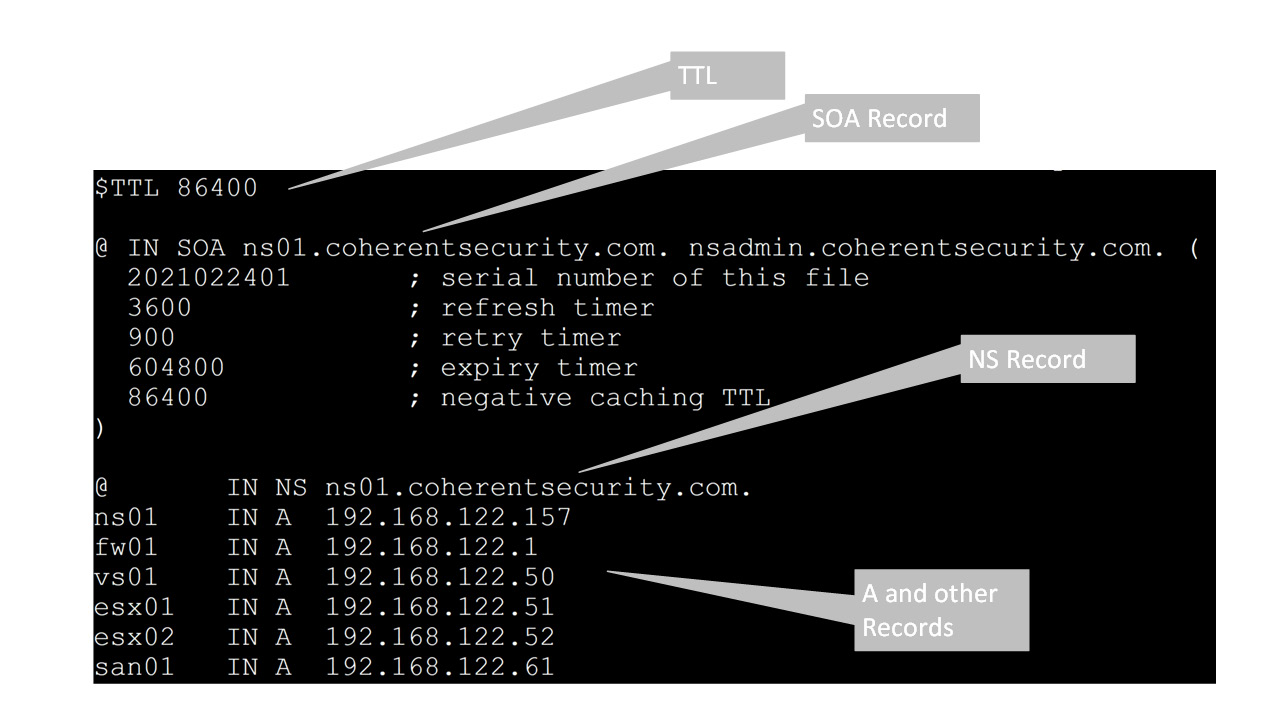
Figure 6.2 – An example DNS zone file
As we discussed earlier, in an internal DNS zone it's often desirable to have clients register themselves in DNS. This allows administrators to reach clients by name rather than having to determine their IP addresses. This is a simple edit to the named.conf file (or, more likely, the applicable included child file). Note that this requires us to add access control lists (ACLs) to permit ranges of IP addresses to update their DNS entries. In this example, we're breaking a subnet up into static IP- and DHCP-assigned clients, but a simple ACL of 192.168.122.0/24 (defining that whole subnet) would likely be more common. A corporate "supernet" that defines the entire company is also commonly seen—for instance, 10.0.0.0/8 or 192.168.0.0/16—but for security reasons this is not usually recommended; you likely don't actually need devices auto-registering in every subnet.
In the applicable zone, add the following lines of code:
acl dhcp-clients { 192.168.122.128/25; };
acl static-clients { 192.168.122.64/26; };
zone "coherentsecurity.com" {
allow-update { dhcp-clients; static-clients; };
};
There are a few scripts that will check your work—one for the basic configuration and included files, and another for the zone. named-checkconf will not return any text if there is no error, and named-checkzone will give you some OK status messages, as shown next. If you run these and don't see errors, you should be at least OK enough to start the service. Note that the named-checkzone command wraps to the next line in the following code example. Errors in the bind configuration files are common—such as missing semicolons, for instance. These scripts will be very specific about issues found, but if they error out and you need more information, the log file for these commands (bind for bind itself) is the standard /var/log/syslog file, so look there next:
$ named-checkconf
$ named-checkzone coherentsecurity.com /var/cache/bind/coherentsecurity.com.zone
zone coherentsecurity.com/IN: loaded serial 2021022401
OK
Finally, enable the bind9 service and start it (or restart it if you are "pushing" an update) by running the following command:
sudo systemctl enable bind9
sudo systemctl start bind9
We're now able to resolve hostnames in our zone, using the DNS server on our local host, as follows:
$ dig @127.0.0.1 +short ns01.coherentsecurity.com A
192.168.122.157
$ dig @127.0.0.1 +short esx01.coherentsecurity.com A
192.168.122.51
Because recursion and forwarders are in place, we can also resolve hosts on the public internet, like this:
$ dig @127.0.0.1 +short isc.sans.edu
45.60.31.34
45.60.103.34
With our internal DNS server completed and working, let's look at our internet-facing DNS, which will allow people to resolve our company's resources from the public internet.
BIND: Internet-facing implementation specifics
Before we start, this configuration is not nearly as common as it once was. Going back to the 1990s or earlier, if you wanted people to get to your web server, the most common approach was to stand up your own DNS server or to use one provided by your ISP. In either case, any DNS changes were manual file edits.
In more recent times, it's much more common to host your DNS services with your DNS registrar. This "cloud" approach leaves the security implementation to that DNS provider and also simplifies maintenance, as the various providers usually give you a web interface to maintain your zone file. The key security consideration in this model is that you will want a provider that gives you the option to enable multi-factor authentication (MFA) (for instance, using Google Authenticator or similar) to guard against credential stuffing attacks against your administrative access. It's also worth researching your registrar's account recovery procedures—what you don't want is to go through all the work of implementing MFA to then have an attacker steal that too with a simple helpdesk call to your DNS registrar!
All that being said, many organizations still do have a good use case for implementing their own DNS servers, so let's get on with modifying the configuration we have from our previous section for use as an internet DNS server, as follows:
- Rate-limiting DNS requests: In etc/bind/named.conf.options, we'll want to add some form of rate limiting—in the case of DNS, this is the RRL algorithm.
- However, keep in mind that this has the possibility to deny service to legitimate queries. Let's add a responses-per-second value of 10 as a preliminary rate limit but set it to a status of log-only. Let it run in log-only mode for some period of time, and adjust the per-second rate up or down until you are comfortable that you have a value that is low enough to prevent aggressive attacks but high enough that you won't deny access during legitimate operations. The log file to monitor during this process is, as mentioned previously, /var/log/syslog. When you are happy with your values, remove the log-only line. Once in operation, be sure to monitor for any situations that trigger this setting—this can be easily done in your logging or Security Information and Event Management (SIEM) solution with simple keyword matching. The code is illustrated in the following snippet:
rate-limit {
responses-per-second 10
log-only yes;
}
- Recursion and forwarding: Because you are only serving DNS services for a limited number of domains, you should disable recursion, also in /etc/bind/named.conf.options. In addition, remove the forwarders line completely. The code is shown here:
recursion no;
- Allow query from any IP: Finally, we are no longer restricting access to our DNS server to internal domains; we're now allowing access to the entire internet, so we'll update the allow-query line to reflect that, as follows:
allow-query { localhost; 0.0.0.0/0 }
Now that we have DNS servers for both our internal users and our internet clients, which tools might we use to troubleshoot this service?
DNS troubleshooting and reconnaissance
The main tool in Linux to troubleshoot DNS services is dig, which comes pre-installed in almost all Linux distributions. If you don't have dig in your distribution, you can install it with apt-get install dnsutils. The use of this tool is pretty simple, as can be seen here:
Dig <request value you are making> <the request type you are making> +<additional request types>
So, to find name server records for a company (we'll check sans.org), we'll make an ns query against sans.org, as follows:
$ dig sans.org ns
; <<>> DiG 9.16.1-Ubuntu <<>> sans.org ns
;; global options: +cmd
;; Got answer:
;; ->>HEADER<<- opcode: QUERY, status: NOERROR, id: 27639
;; flags: qr rd ra; QUERY: 1, ANSWER: 4, AUTHORITY: 0, ADDITIONAL: 1
;; OPT PSEUDOSECTION:
; EDNS: version: 0, flags:; udp: 65494
;; QUESTION SECTION:
;sans.org. IN NS
;; ANSWER SECTION:
sans.org. 86400 IN NS ns-1270.awsdns-30.org.
sans.org. 86400 IN NS ns-1746.awsdns-26.co.uk.
sans.org. 86400 IN NS ns-282.awsdns-35.com.
sans.org. 86400 IN NS ns-749.awsdns-29.net.
;; Query time: 360 msec
;; SERVER: 127.0.0.53#53(127.0.0.53)
;; WHEN: Fri Feb 12 12:02:26 PST 2021
;; MSG SIZE rcvd: 174
This has a lot of commented information—knowing which DNS flags are set, as well as the exact operation of the DNS question and answer, can be very valuable, and that information is all in this default output. However, it's also common to want a "just the facts" output—to get this, we'll add a second parameter, +short, as follows:
$ dig sans.org ns +short
ns-749.awsdns-29.net.
ns-282.awsdns-35.com.
ns-1746.awsdns-26.co.uk.
ns-1270.awsdns-30.org.
The dig command allows us to make any DNS queries we like. You can only query one target with one DNS query at a time, though, so to get NS information (relating to the name server) and mail exchanger (MX) information, you would need two queries. The MX query is shown here:
$ dig sans.org mx +short
0 sans-org.mail.protection.outlook.com.
Which other tools can we use to troubleshoot, and which other DNS implementations might be involved?
DoH
DoH is a newer DNS protocol; as the name implies, it is carried over HTTPS, and in fact, the DNS queries and responses are similar in form to an application programming interface (API). This new protocol was supported first in many browsers rather than natively in mainstream operating systems. It is, however, now available on most mainstream operating systems, just not enabled by default.
In order to verify a DoH server remotely, the curl (a pun on "see url") tool can do the job nicely. In the following example, we're querying against Cloudflare's name server:
$ curl -s -H 'accept: application/dns-json' 'https://1.1.1.1/dns-query?name=www.coherentsecurity.com&type=A'
{"Status":0,"TC":false,"RD":true,"RA":true,"AD":false,"CD":false,"Question":[{"name":"www.coherentsecurity.com","type":1}],"Answer":[{"name":"www.coherentsecurity.com","type":5,"TTL":1693,"data":"robvandenbrink.github.io."},{"name":"robvandenbrink.github.io","type":1,"TTL":3493,"data":"185.199.108.153"},{"name":"robvandenbrink.github.io","type":1,"TTL":3493,"data":"185.199.109.153"},
{"name":"robvandenbrink.github.io","type":1,"TTL":3493,"data":"185.199.110.153"},{"name":"robvandenbrink.github.io","type":1,"TTL":3493,"data":"185.199.111.153"}]}
Note that the query is simply an https request formed as follows:
https://<the dns server ip>/dns-query?name=<the dns query target>&type=<the dns request type>
The HTTP header in the request is accept: application/dns-json. Notice that this query is using standard HTTPS, so it's listening on port tcp/443, not on the regular udp/53 and tcp/53 DNS ports.
We can make the command output much more readable by piping it through jq. This simple query shows the flags—the DNS question, answer, and authority stanzas—in the output. Note in the following code snippet that the RD flag (which stands for Recursion Desired) is set by the client, and the RA flag (which stands for Recursion Available) is set by the server:
curl -s -H 'accept: application/dns-json' 'https://1.1.1.1/dns-query?name=www.coherentsecurity.com&type=A' | jq
{
"Status": 0,
"TC": false,
"RD": true,
"RA": true,
"AD": false,
"CD": false,
"Question": [
{
"name": "www.coherentsecurity.com",
"type": 1
}
],
"Answer": [
{
"name": "www.coherentsecurity.com",
"type": 5,
"TTL": 1792,
"data": "robvandenbrink.github.io."
},
….
{
"name": "robvandenbrink.github.io",
"type": 1,
"TTL": 3592,
"data": "185.199.111.153"
}
]
}
Network Mapper (Nmap) can also be used to verify the certificate on a remote DoH server, as illustrated in the following code snippet:
nmap -p443 1.1.1.1 --script ssl-cert.nse
Starting Nmap 7.80 ( https://nmap.org ) at 2021-02-25 11:28 Eastern Standard Time
Nmap scan report for one.one.one.one (1.1.1.1)
Host is up (0.029s latency).
PORT STATE SERVICE
443/tcp open https
| ssl-cert: Subject: commonName=cloudflare-dns.com/organizationName=Cloudflare, Inc./stateOrProvinceName=California/countryName=US
| Subject Alternative Name: DNS:cloudflare-dns.com, DNS:*.cloudflare-dns.com, DNS:one.one.one.one, IP Address:1.1.1.1, IP Address:1.0.0.1, IP Address:162.159.36.1, IP Address:162.159.46.1, IP Address:2606:4700:4700:0:0:0:0:1111, IP Address:2606:4700:4700:0:0:0:0:1001, IP Address:2606:4700:4700:0:0:0:0:64, IP Address:2606:4700:4700:0:0:0:0:6400
| Issuer: commonName=DigiCert TLS Hybrid ECC SHA384 2020 CA1/organizationName=DigiCert Inc/countryName=US
| Public Key type: unknown
| Public Key bits: 256
| Signature Algorithm: ecdsa-with-SHA384
| Not valid before: 2021-01-11T00:00:00
| Not valid after: 2022-01-18T23:59:59
| MD5: fef6 c18c 02d0 1a14 ab75 1275 dd6a bc29
|_SHA-1: f1b3 8143 b992 6454 97cf 452f 8c1a c842 4979 4282
Nmap done: 1 IP address (1 host up) scanned in 7.41 seconds
However, Nmap does not currently come with a script that will verify DoH itself by making an actual DoH query. To fill that gap, you can download such a script here: https://github.com/robvandenbrink/dns-doh.nse.
This script verifies that the port is servicing HTTP requests using the Lua http.shortport operator, then constructs the query string, and then makes the HTTPS request using the correct header. A full write-up of this tool is available here: https://isc.sans.edu/forums/diary/Fun+with+NMAP+NSE+Scripts+and+DOH+DNS+over+HTTPS/27026/.
With DoH thoroughly explored, which other protocols do we have available to validate and encrypt our DNS requests and responses?
DoT
DoT is the standard DNS protocol, just encapsulated within TLS. DoT by default is implemented on port tcp/853, which means it won't conflict with DNS (udp/53 and tcp/53) or DoH (tcp/443)—all three services can be run on the same host if the DNS server application supports all three.
DoT name resolution is supported on most modern operating systems (as a client). It's not always running by default, but it's available to enable if not.
Verifying a DoT server remotely is as simple as using Nmap to verify that tcp/853 is listening, as illustrated in the following code snippet:
$ nmap -p 853 8.8.8.8
Starting Nmap 7.80 ( https://nmap.org ) at 2021-02-21 13:33 PST
Nmap scan report for dns.google (8.8.8.8)
Host is up (0.023s latency).
PORT STATE SERVICE
853/tcp open domain-s
Doing a version scan gives us more good information, but the fingerprint (at the time of this book being published) is not in nmape:
$ nmap -p 853 -sV 8.8.8.8
Starting Nmap 7.80 ( https://nmap.org ) at 2021-02-21 13:33 PST
Nmap scan report for dns.google (8.8.8.8)
Host is up (0.020s latency).
PORT STATE SERVICE VERSION
853/tcp open ssl/domain (generic dns response: NOTIMP)
1 service unrecognized despite returning data. If you know the service/version, please submit the following fingerprint at https://nmap.org/cgi-bin/submit.cgi?new-service :
SF-Port853-TCP:V=7.80%T=SSL%I=7%D=2/21%Time=6032D1B5%P=x86_64-pc-linux-gnu
SF:%r(DNSVersionBindReqTCP,20,"�x1e�x06x81x82�x01������x07v
SF:ersionx04bind��x10�x03")%r(DNSStatusRequestTCP,E,"�x0c��x90
SF:x04��������");
Service detection performed. Please report any incorrect results at https://nmap.org/submit/ .
Nmap done: 1 IP address (1 host up) scanned in 22.66 seconds
The open port tcp/853 is flagged as domain-s (DNS over Secure Sockets Layer (SSL)), but that just means that the port number matches that entry in the Internet Engineering Task Force's (IETF's) table. The version scan (-sV) shown in the preceding code snippet does show the DNSStatusRequestTCP string in the response, which is a nice clue that this port is in fact running DoT. Since it's DoT, we can also use Nmap to again verify the certificate that's validating the DoT service, as follows:
nmap -p853 --script ssl-cert 8.8.8.8
Starting Nmap 7.80 ( https://nmap.org ) at 2021-02-21 16:35 Eastern Standard Time
Nmap scan report for dns.google (8.8.8.8)
Host is up (0.017s latency).
PORT STATE SERVICE
853/tcp open domain-s
| ssl-cert: Subject: commonName=dns.google/organizationName=Google LLC/stateOrProvinceName=California/countryName=US
| Subject Alternative Name: DNS:dns.google, DNS:*.dns.google.
com, DNS:8888.google, DNS:dns.google.com, DNS:dns64.dns.google, IP Address:2001:4860:4860:0:0:0:0:64, IP Address:2001:4860:4860:0:0:0:0:6464, IP Address:2001:4860:4860:0:0:0:0:8844, IP Address:2001:4860:4860:0:0:0:0:8888, IP Address:8.8.4.4, IP Address:8.8.8.8
| Issuer: commonName=GTS CA 1O1/organizationName=Google Trust Services/countryName=US
| Public Key type: rsa
| Public Key bits: 2048
| Signature Algorithm: sha256WithRSAEncryption
| Not valid before: 2021-01-26T08:54:07
| Not valid after: 2021-04-20T08:54:06
| MD5: 9edd 82e5 5661 89c0 13a5 cced e040 c76d
|_SHA-1: 2e80 c54b 0c55 f8ad 3d61 f9ae af43 e70c 1e67 fafd
Nmap done: 1 IP address (1 host up) scanned in 7.68 seconds
That's about as far as we can go with the tools we've discussed up to now. The dig tool (at this time) does not support making DoT queries. However, the knot-dnsutils package gives us an "almost dig" command-line tool—kdig. Let's use this tool to explore DoT a bit more.
knot-dnsutils
knot-dnsutils is a Linux package that includes the kdig tool. kdig duplicates what the dig tool does but then also adds additional features, which include support for DoT queries. To start using this tool, we'll first have to install the knot-dnsutils package, as follows:
sudo apt-get install knot-dnsutils
Now that the install is completed, the kdig utility is, as mentioned, very much like the dig command, with a few extra command-line parameters—let's make a DoT query to illustrate this, as follows:
kdig -d +short @8.8.8.8 www.cisco.com A +tls-ca +tls-hostname=dns.google # +tls-sni=dns.google
;; DEBUG: Querying for owner(www.cisco.com.), class(1), type(1), server(8.8.8.8), port(853), protocol(TCP)
;; DEBUG: TLS, imported 129 system certificates
;; DEBUG: TLS, received certificate hierarchy:
;; DEBUG: #1, C=US,ST=California,L=Mountain View,O=Google LLC,CN=dns.google
;; DEBUG: SHA-256 PIN: 0r0ZP20iM96B8DOUpVSlh5sYx9GT1NBVp181TmVKQ1Q=
;; DEBUG: #2, C=US,O=Google Trust Services,CN=GTS CA 1O1
;; DEBUG: SHA-256 PIN: YZPgTZ+woNCCCIW3LH2CxQeLzB/1m42QcCTBSdgayjs=
;; DEBUG: TLS, skipping certificate PIN check
;; DEBUG: TLS, The certificate is trusted.
www.cisco.com.akadns.net.
wwwds.cisco.com.edgekey.net.
wwwds.cisco.com.edgekey.net.globalredir.akadns.net.
e2867.dsca.akamaiedge.net.
23.66.161.25
Which new parameters did we use?
The debug parameter (-d) gives us all the preceding lines that include the DEBUG string. Given that most people would be using kdig because of its TLS support, those DEBUG lines give us some excellent information that we might often want while testing a new service. Without the debug parameter, our output would be much more "dig-like", as illustrated in the following code snippet:
kdig +short @8.8.8.8 www.cisco.com A +tls-ca +tls-hostname=dns.google +tls-sni=dns.google
www.cisco.com.akadns.net.
wwwds.cisco.com.edgekey.net.
wwwds.cisco.com.edgekey.net.globalredir.akadns.net.
e2867.dsca.akamaiedge.net.
23.66.161.25
The +short parameter shortens the output to a "just the facts" display, just as in dig. Without this, the output would include all sections (not just the "answer" section), as illustrated in the following code snippet:
kdig @8.8.8.8 www.cisco.com A +tls-ca +tls-hostname=dns.google +tls-sni=dns.google
;; TLS session (TLS1.3)-(ECDHE-X25519)-(RSA-PSS-RSAE-SHA256)-(AES-256-GCM)
;; ->>HEADER<<- opcode: QUERY; status: NOERROR; id: 57771
;; Flags: qr rd ra; QUERY: 1; ANSWER: 5; AUTHORITY: 0; ADDITIONAL: 1
;; EDNS PSEUDOSECTION:
;; Version: 0; flags: ; UDP size: 512 B; ext-rcode: NOERROR
;; PADDING: 240 B
;; QUESTION SECTION:
;; www.cisco.com. IN A
;; ANSWER SECTION:
www.cisco.com. 3571 IN CNAME www.cisco.com.akadns.net.
www.cisco.com.akadns.net. 120 IN CNAME wwwds.cisco.com.edgekey.net.
wwwds.cisco.com.edgekey.net. 13980 IN CNAME wwwds.cisco.com.edgekey.net.globalredir.akadns.net.
wwwds.cisco.com.edgekey.net.globalredir.akadns.net. 2490 IN CNAME e2867.dsca.akamaiedge.net.
e2867.dsca.akamaiedge.net. 19 IN A 23.66.161.25
;; Received 468 B
;; Time 2021-02-21 13:50:33 PST
;; From 8.8.8.8@853(TCP) in 121.4 ms
The new parameters that we used are listed here:
- The +tls-ca parameter enforces TLS validation—in other words, it verifies the certificate. By default, the system certificate authority (CA) list is used for this.
- Adding +tls-hostname allows you to specify the hostname for TLS negotiation. By default, the DNS server name is used, but in our case the server name is 8.8.8.8—and you need a valid hostname that appears in the CN or subject alternative name (SAN) list for TLS to negotiate correctly. So, this parameter allows you to specify that name independent of what is used in the server name field.
- Adding +tls-sni adds the Server Name Indication (SNI) field in the request, which is required by many DoT servers. This may seem odd, as the SNI field is there to allow an HTTPS server to present multiple certificates (each for a different HTTPS site).
What happens if you don't use any of these parameters, and you just use kdig the way you'd use dig? By default, kdig doesn't force the verification of a certificate against the FQDN you specify, so it'll typically just work, as illustrated in the following code snippet:
$ kdig +short @8.8.8.8 www.cisco.com A
www.cisco.com.akadns.net.
wwwds.cisco.com.edgekey.net.
wwwds.cisco.com.edgekey.net.globalredir.akadns.net.
e2867.dsca.akamaiedge.net.
23.4.0.216
However, it's a good idea to use TLS the way it was intended, with verification—after all, the point is to add another layer of trust into your DNS results. If you don't verify the server, all you've done is encrypt the query and response. You can't verify without specifying the correct hostname either in the server name field or in the TLS hostname field (this value needs to match the certificate parameters). Forcing certificate validation is important since this ensures that the DNS server is the one you really want to query (that is, your traffic hasn't been intercepted) and that the response has not been tampered with in its journey back to the client.
Now that we understand how DoT works, how can we troubleshoot it or find out whether a DNS host has DoT implemented?
Implementing DoT in Nmap
Similar to the DoH Nmap example, implementing DoT in Nmap allows you to do DoT discovery and queries at a much larger scale, rather than one at a time. Given the complexities of making HTTPS calls in Nmap, an easy way to accomplish this is to simply call kdig from within the Nmap script, using the os.execute function in Lua.
Another key difference is that instead of testing the target port for the http function (using the shortport.http test), we're using the shortport.ssl test to verify any open port found for SSL/TLS capabilities; since if it isn't servicing valid TLS requests, it can't very well be DoT, can it?
The dns.dot tool is available for download here:
https://github.com/robvandenbrink/dns-dot
You can view a full write-up here:
https://isc.sans.edu/diary/Fun+with+DNS+over+TLS+%28DoT%29/27150
Which other security mechanisms can we implement on the DNS protocol itself? Let's take a look at DNSSEC, the original mechanism to verify DNS responses.
DNSSEC
DNSSEC is a protocol that allows you to validate server responses, using zone certificates rather than server certificates to sign the responses. DNSSEC still operates on udp/53 and tcp/53, as it does not encrypt anything—it just adds fields to validate standard DNS operations using signing.
You can view the public key for any DNS zone by using the DNSKEY parameter in dig. In the following code example, we're adding the short parameter:
$ dig DNSKEY @dns.google example.com +short
256 3 8 AwEAAa79LdJaZfIxVzyjq4H7yB4VqT/rIreB+N0jija+4bWHzNrwhSiu D/SOtgvX+gXEgwAR6tHGn9q9t65o85RfdHJrueORb0usa3x6LHM7qy6A r22P78UUn/rxa9jbi6yS4cVOzLnJ+OKO0w1Scly5XLDmmWPbIM2LvayR 2U4UAqZZ
257 3 8 AwEAAZ0aqu1rJ6orJynrRfNpPmayJZoAx9Ic2/Rl9VQWLMHyjxxem3VU SoNUIFXERQbj0A9Ogp0zDM9YIccKLRd6LmWiDCt7UJQxVdD+heb5Ec4q lqGmyX9MDabkvX2NvMwsUecbYBq8oXeTT9LRmCUt9KUt/WOi6DKECxoG /bWTykrXyBR8elD+SQY43OAVjlWrVltHxgp4/rhBCvRbmdflunaPIgu2 7eE2U4myDSLT8a4A0rB5uHG4PkOa9dIRs9y00M2mWf4lyPee7vi5few2 dbayHXmieGcaAHrx76NGAABeY393xjlmDNcUkF1gpNWUla4fWZbbaYQz A93mLdrng+M=
257 3 8 AwEAAbOFAxl+Lkt0UMglZizKEC1AxUu8zlj65KYatR5wBWMrh18TYzK/ ig6Y1t5YTWCO68bynorpNu9fqNFALX7bVl9/gybA0v0EhF+dgXmoUfRX 7ksMGgBvtfa2/Y9a3klXNLqkTszIQ4PEMVCjtryl19Be9/PkFeC9ITjg MRQsQhmB39eyMYnal+f3bUxKk4fq7cuEU0dbRpue4H/N6jPucXWOwiMA kTJhghqgy+o9FfIp+tR/emKao94/wpVXDcPf5B18j7xz2SvTTxiuqCzC MtsxnikZHcoh1j4g+Y1B8zIMIvrEM+pZGhh/Yuf4RwCBgaYCi9hpiMWV vS4WBzx0/lU=
To view the Delegation of Signing (DS) records, use the DS parameter, as illustrated in the following code snippet:
$ dig +short DS @dns.google example.com
31589 8 1 3490A6806D47F17A34C29E2CE80E8A999FFBE4BE
31589 8 2 CDE0D742D6998AA554A92D890F8184C698CFAC8A26FA59875A990C03
E576343C
43547 8 1 B6225AB2CC613E0DCA7962BDC2342EA4F1B56083
43547 8 2 615A64233543F66F44D68933625B17497C89A70E858ED76A2145997E DF96A918
31406 8 1 189968811E6EBA862DD6C209F75623D8D9ED9142
31406 8 2 F78CF3344F72137235098ECBBD08947C2C9001C7F6A085A17F518B5D 8F6B916D
If we add the -d (debug) parameter and filter to see just the DEBUG data, we'll see the following line in the output, which indicates that we're using the same port and protocol as a regular DNS query:
dig -d DNSKEY @dns.google example.com | grep DEBUG
;; DEBUG: Querying for owner(example.com.), class(1), type(48), server(dns.google), port(53), protocol(UDP)
To make a DNSSEC query, just add +dnssec to the dig command line, as follows:
$ dig +dnssec +short @dns.google www.example.com A
93.184.216.34
A 8 3 86400 20210316085034 20210223165712 45150 example.com. UyyNiGG0WDAsberOUza21vYos8vDc6aLq8FV9lvJT4YRBn6V8CTd3cdo ljXV5uETcD54tuv1kLZWg7YZxSQDGFeNC3luZFkbrWAqPbHXy4D7Tdey LBK0R3xywGxgZIEfp9HMjpZpikFQuKC/iFvd14uJhoquMqFPFvTfJB/s XJ8=
DNSSEC is all about authenticating DNS requests between clients and servers, and between servers as requests are relayed. As we've seen, it's implemented by the owners of any particular zone, to allow requesters to verify that the DNS "answers" they are getting are correct. However, because of its complexity and reliance on certificates, it just hasn't seen the uptake that DoT and DoH have.
As we've seen, DoT and DoH focus on personal privacy, encrypting the individual DNS requests that a person makes as they go about their business. While this encryption makes those DNS requests more difficult to capture as they are made, those requests are still recorded on the DNS servers themselves. Also, if an attacker is in a position to collect a person's DNS requests, they are also in a position to simply record which sites they visit (by IP address).
All that being said, we won't delve into the depths of DNSSEC, mostly because as an industry we've made that same decision and (for the most part) have chosen not to implement it. However, you definitely do see it from time to time, especially when working through a problem involving DNS, so it's important to know what it looks like and why it might be implemented.
Summary
With our discussion on DNS drawing to a close, you should now have the tools available to build a basic internal DNS server and a standard DNS server facing the internet. You should also have the basic tools to start securing these services by editing the various configuration files for the Linux bind or named service.
In addition, you should have some familiarity with troubleshooting various DNS services, using tools such as dig, kdig, curl, and nmap.
In our next chapter, we'll continue on with a discussion on DHCP, which—as we've seen in this chapter—is definitely separate, but still can be related to DNS.
Questions
As we conclude, here is a list of questions for you to test your knowledge regarding this chapter's material. You will find the answers in the Assessments section of the Appendix:
- How does DNSSEC differ from DoT?
- How does DoH differ from "regular" DNS?
- Which features would you implement on an internal DNS server over an external DNS server?
Further reading
To learn more on the subject:
- Definitive DNS references
Basic DNS has literally dozens of RFCs that define the service as well as best practices for implementation. A good list of these RFCs can be found here: https://en.wikipedia.org/wiki/Domain_Name_System#RFC_documents.
However, if you need more detail on DNS and are looking for a more readable guide through the protocol and implementation details than the RFCs (emphasis on "readable"), many consider Cricket Liu's books to be an excellent next step:
DNS and BIND by Cricket Liu and Paul Albitz:
https://www.amazon.ca/DNS-BIND-Help-System-Administrators-ebook/dp/B0026OR2QS/ref=sr_1_1?dchild=1&keywords=dns+and+bind+cricket+liu&qid=1614217706&s=books&sr=1-1
DNS and BIND on IPv6 by Cricket Liu:
https://www.amazon.ca/DNS-BIND-IPv6-Next-Generation-Internet-ebook/dp/B0054RCT4O/ref=sr_1_3?dchild=1&keywords=dns+and+bind+cricket+liu&qid=1614217706&s=books&sr=1-3
- DNS UPDATE (Auto-registration)
RFC 2136: Dynamic Updates in the Domain Name System (DNS UPDATE):
https://tools.ietf.org/html/rfc2136
- Authenticated DNS registration in Active Directory (AD)
RFC 3645: Generic Security Service Algorithm for Secret Key Transaction Authentication for DNS (GSS-TSIG):
https://tools.ietf.org/html/rfc3645
- DoH
Fun with NMAP NSE Scripts and DOH (DNS over HTTPS): https://isc.sans.edu/forums/diary/Fun+with+NMAP+NSE+Scripts+and+DOH+DNS+over+HTTPS/27026/
DoH Nmap script: https://github.com/robvandenbrink/dns-doh.nse
RFC 8484: DNS Queries over HTTPS (DoH): https://tools.ietf.org/html/rfc8484
- DoT
DoT Nmap script: https://github.com/robvandenbrink/dns-dot
Write-up on dns-dot Nmap script: https://isc.sans.edu/diary/Fun+with+DNS+over+TLS+%28DoT%29/27150
RFC 7858: Specification for DNS over Transport Layer Security (TLS): https://tools.ietf.org/html/rfc7858
- DNSSEC
Domain Name System Security Extensions (DNSSEC): https://www.internetsociety.org/issues/dnssec/
RFC 4033: DNS Security Introduction and Requirements: https://tools.ietf.org/html/rfc4033
RFC 4034: Resource Records for the DNS Security Extensions: https://tools.ietf.org/html/rfc4034
RFC 4035: Protocol Modifications for the DNS Security Extensions: https://tools.ietf.org/html/rfc4035
RFC 4470: Minimally Covering NSEC Records and DNSSEC On-line Signing: https://tools.ietf.org/html/rfc4470
RFC 4641: DNSSEC Operational Practices: https://tools.ietf.org/html/rfc4641
RFC 5155: DNS Security (DNSSEC) Hashed Authenticated Denial of Existence: https://tools.ietf.org/html/rfc5155
RFC 6014: Cryptographic Algorithm Identifier Allocation for DNSSEC: https://tools.ietf.org/html/rfc6014
RFC 4398: Storing Certificates in the Domain Name System (DNS): https://tools.ietf.org/html/rfc4398