Chapter 2: Basic Linux Network Configuration and Operations – Working with Local Interfaces
In this chapter, we'll explore how to display and configure local interfaces and routes on your Linux host. As much as possible we'll discuss both the new and legacy commands for performing these operations. This will include displaying and modifying IP addressing, local routes, and other interface parameters. Along the way, we'll discuss how IP addresses and subnet addresses are constructed using a binary approach.
This chapter should give you a solid foundation for topics we cover in the later chapters, troubleshooting networking problems, hardening our host, and installing secure services.
The topics covered in this chapter are as follows:
- Working with your network settings – two sets of commands
- Displaying interface IP information
- IPv4 addresses and subnet masks
- Assigning an IP address to an interface
Technical requirements
In this and every other chapter, as we discuss various commands, you are encouraged to try them on your own computer. The commands in this book are all illustrated on Ubuntu Linux, version 20 (a Long-Term Support version), but should for the most part be identical or very similar on almost any Linux distribution.
Working with your network settings – two sets of commands
For most of the Linux lifespan that people are familiar with, ifconfig (interface config) and related commands have been a mainstay of the Linux operating system, so much so that now that it's deprecated in most distributions, it still rolls off the fingers of many system and network administrators.
Why were these old network commands replaced? There are several reasons. Some new hardware (in particular, InfiniBand network adapters) are not well supported by the old commands. In addition, as the Linux kernel has changed over the years, the operation of the old commands has become less and less consistent over time, but pressure around backward compatibility made resolving this difficult.
The old commands are in the net-tools software package, and the new commands are in the iproute2 software package. New administrators should focus on the new commands, but familiarity with the old commands is still a good thing to maintain. It's still very common to find old computers running Linux, machines that might never be updated that still use the old commands. For this reason, we'll cover both toolsets.
The lesson to be learned from this is that in the Linux world, change is constant. The old commands are still available but are not installed by default.
To install the legacy commands, use this command:
robv@ubuntu:~$ sudo apt install net-tools
[sudo] password for robv:
Reading package lists... Done
Building dependency tree
Reading state information... Done
The following package was automatically installed and is no longer required:
libfprint-2-tod1
Use 'sudo apt autoremove' to remove it.
The following NEW packages will be installed:
net-tools
0 upgraded, 1 newly installed, 0 to remove and 0 not upgraded.
Need to get 0 B/196 kB of archives.
After this operation, 864 kB of additional disk space will be used.
Selecting previously unselected package net-tools.
(Reading database ... 183312 files and directories currently installed.)
Preparing to unpack .../net-tools_1.60+git20180626.aebd88e-1ubuntu1_amd64.deb .. .
Unpacking net-tools (1.60+git20180626.aebd88e-1ubuntu1) ...
Setting up net-tools (1.60+git20180626.aebd88e-1ubuntu1) ...
Processing triggers for man-db (2.9.1-1) ...
You may notice a few things in this install command and its output:
- sudo: The sudo command was used – sudo essentially means do as the super user – so the command executes with root (administrator) privileges. This needs to be paired with the password of the user executing the command. In addition, that user needs to be properly entered in the configuration file /etc/sudoers. By default, in most distributions, the userid defined during the installation of the operating system is automatically included in that file. Additional users or groups can be added using the visudo command.
Why was sudo used? Installing software or changing network parameters and many other system operations require elevated rights – on a multi-user corporate system, you wouldn't want people who weren't administrators to be making these changes.
So, if sudo is so great, why don't we run everything as root? Mainly because this is a security issue. Of course, everything will work if you have root privileges. However, any mistakes and typos can have disastrous results. Also, if you are running with the right privileges and happen to execute some malware, the malware will then have those same privileges, which is certainly less than ideal! If anyone asks, yes, Linux malware definitely exists and has sadly been with the operating system almost from the start.
- apt: The apt command was used – apt stands for Advanced Package Tool, and installs not only the package requested, but also any required packages, libraries, or other dependencies required for that package to run. Not only that, but by default, it collects all of those components from online repositories (or repos). This is a welcome shortcut compared to the old process, where all the dependencies (at the correct versions) had to be collected, then installed in the correct order to make any new features work.
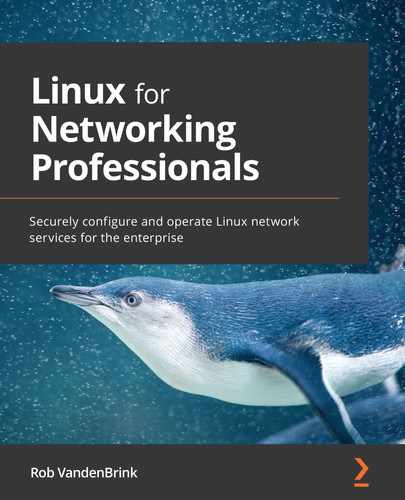
apt is the default installer on Ubuntu, Debian, and related distributions, but the package management application will vary between distributions. In addition to the apt and its equivalents, installing from downloaded files is still supported. Debian, Ubuntu, and related distributions use deb files, while many other distributions use rpm files. This is summarized as follows:
So, now that we have a boatload of new commands to look at, how do we get more information on these? The man (for manual) command has documentation for most commands and operations in Linux. The man command for apt, for instance, can be printed using the man apt command; the output is as follows:

Figure 2.1 – apt man page
As we introduce new commands in this book, take a minute to review them using the man command – this book is meant more to guide you in your journey, not as a replacement for the actual operating system documentation.
Now that we've talked about the modern and legacy tools, and then installed the legacy net-tools commands, what are these commands, and what do they do?
Displaying interface IP information
Displaying interface information is a common task on a Linux workstation. This is especially true if your host adapter is set to be automatically configured, for instance using Dynamic Host Configuration Protocol (DHCP) or IPv6 autoconfiguration.
As we discussed, there are two sets of commands to do this. The ip command allows us to display or configure your host's network parameters on new operating systems. On old versions, you will find that the ifconfig command is used.
The ip command will allow us to display or update IP addresses, routing information, and other networking information. For instance, to display current IP address information, use the following command:
ip address
The ip command supports command completion, so ip addr or even ip a will give you the same results:
robv@ubuntu:~$ ip ad
1: lo: <LOOPBACK,UP,LOWER_UP> mtu 65536 qdisc noqueue state UNKNOWN group default qlen 1000
link/loopback 00:00:00:00:00:00 brd 00:00:00:00:00:00
inet 127.0.0.1/8 scope host lo
valid_lft forever preferred_lft forever
inet6 ::1/128 scope host
valid_lft forever preferred_lft forever
2: ens33: <BROADCAST,MULTICAST,UP,LOWER_UP> mtu 1500 qdisc fq_codel state UP group default qlen 1000
link/ether 00:0c:29:33:2d:05 brd ff:ff:ff:ff:ff:ff
inet 192.168.122.182/24 brd 192.168.122.255 scope global dynamic noprefixroute ens33
valid_lft 6594sec preferred_lft 6594sec
inet6 fe80::1ed6:5b7f:5106:1509/64 scope link noprefixroute
valid_lft forever preferred_lft forever
You'll see that even the simplest of commands will sometimes return much more information that you might want. For instance, you'll see both IP version 4 (IPv4) and IPv6 information returned – we can limit this to only version 4 or 6 by adding -4 or -6 to the command-line options:
robv@ubuntu:~$ ip -4 ad
1: lo: <LOOPBACK,UP,LOWER_UP> mtu 65536 qdisc noqueue state UNKNOWN group default qlen 1000
inet 127.0.0.1/8 scope host lo
valid_lft forever preferred_lft forever
2: ens33: <BROADCAST,MULTICAST,UP,LOWER_UP> mtu 1500 qdisc fq_codel state UP group default qlen 1000
inet 192.168.122.182/24 brd 192.168.122.255 scope global dynamic noprefixroute ens33
valid_lft 6386sec preferred_lft 6386sec
In this output, you'll see that the loopback interface (a logical, internal interface) has an IP address of 127.0.0.1, and the Ethernet interface ens33 has an IP address of 192.168.122.182.
Now would be an excellent time to type man ip and review the various operations that we can do with this command:

Figure 2.2 – ip man page
The ifconfig command has very similar functions to the ip command, but as we noted, it is seen mostly on old versions of Linux. The legacy commands have all grown organically, with features bolted on as needed. This has landed us in a state in which as more complex things are being displayed or configured, the syntax becomes less and less consistent. The more modern commands were designed from the ground up for consistency.
Let's duplicate our efforts using the legacy command; to display the interface IP, just type ifconfig:
robv@ubuntu:~$ ifconfig
ens33: flags=4163<UP,BROADCAST,RUNNING,MULTICAST> mtu 1400
inet 192.168.122.22 netmask 255.255.255.0 broadcast 192.168.122.255
inet6 fe80::1ed6:5b7f:5106:1509 prefixlen 64 scopeid 0x20<link>
ether 00:0c:29:33:2d:05 txqueuelen 1000 (Ethernet)
RX packets 161665 bytes 30697457 (30.6 MB)
RX errors 0 dropped 910 overruns 0 frame 0
TX packets 5807 bytes 596427 (596.4 KB)
TX errors 0 dropped 0 overruns 0 carrier 0 collisions 0
lo: flags=73<UP,LOOPBACK,RUNNING> mtu 65536
inet 127.0.0.1 netmask 255.0.0.0
inet6 ::1 prefixlen 128 scopeid 0x10<host>
loop txqueuelen 1000 (Local Loopback)
RX packets 1030 bytes 91657 (91.6 KB)
RX errors 0 dropped 0 overruns 0 frame 0
TX packets 1030 bytes 91657 (91.6 KB)
TX errors 0 dropped 0 overruns 0 carrier 0 collisions 0
As you can see, mostly the same information is displayed in a slightly different format. If you review the man page for both commands, you'll see that the options are more consistent in the imp command, and there isn't as much IPv6 support – for instance, natively you can't select an IPv4 or IPv6 only display.
Displaying routing information
In the modern network commands, we'll use the exact same ip command to display our routing information. And, as you'd expect, the command is ip route, which can be shortened to anything up to ip r:
robv@ubuntu:~$ ip route
default via 192.168.122.1 dev ens33 proto dhcp metric 100
169.254.0.0/16 dev ens33 scope link metric 1000
192.168.122.0/24 dev ens33 proto kernel scope link src 192.168.122.156 metric 100
robv@ubuntu:~$ ip r
default via 192.168.122.1 dev ens33 proto dhcp metric 100
169.254.0.0/16 dev ens33 scope link metric 1000
192.168.122.0/24 dev ens33 proto kernel scope link src 192.168.122.156 metric 100
From this output, we see that we have a default route pointing to 192.168.122.1. The default route is just that – if a packet is being sent to a destination that isn't in the routing table, the host will send that packet to its default gateway. The routing table will always prefer the "most specific" route – the route that most closely matches the destination IP. If there is no match, then the most specific route goes to the default gateway, which routes to 0.0.0.0 0.0.0.0 (in other words, the "if it doesn't match anything else" route). The host assumes that the default gateway IP belongs to a router, which will (hopefully) then know where to send that packet next.
We also see a route to 169.254.0.0/16. This is called a Link-Local Address as defined in the RFC 3927. RFC stands for Request for Comment, which serves as part of the informal peer review process that internet standards use as they are developed. The list of published RFCs is maintained by the IETF (Internet Engineering Task Force), at https://www.ietf.org/standards/rfcs/.
Link-Local Addresses only operate in the current subnet – if a host does not have a statically configured IP address, and DHCP does not assign and address, it will use the first two octets defined in the RFC (169.254), then compute the last two octets, semi-randomly assigning them. After a Ping/ARP test (we'll discuss ARP in Chapter 3, Using Linux and Linux Tools for Network Diagnostics) to ensure that this computed address is in fact available, the host is ready to communicate. This address is supposed to only communicate with other LLA addresses on the same network segment, typically using broadcast and multicast protocols such as ARP, Alljoyn, and so on to "find" each other. Just for clarity, these addresses are almost never used on real networks, they're the address that gets used if there is absolutely no other alternative. And just for confusion, Microsoft calls these addresses something different – Automatic Private Internet Protocol Addressing (APIPA).
Finally, we see a route to the local subnet, in this case 192.168.122.0/24. This is called a connected route (since it's connected to that interface). This tells the host that no routing is needed to communicate with other hosts in its own subnet.
This set of routes is very common in simple networks – a default gateway, a local segment, and that's it. In many operating systems you won't see the 169.254.0.0 subnet unless the host is actually using a link-local address.
On the legacy side, there are multiple ways to show the current set of routes. The typical command is netstat –rn for network status, show routes, and numeric display. However, route is a command all to itself (we'll see why later on in this chapter):
robv@ubuntu:~$ netstat -rn
Kernel IP routing table
Destination Gateway Genmask Flags MSS Window irtt Iface
0.0.0.0 192.168.122.1 0.0.0.0 UG 0 0 0 ens33
169.254.0.0 0.0.0.0 255.255.0.0 U 0 0 0 ens33
192.168.122.0 0.0.0.0 255.255.255.0 U 0 0 0 ens33
robv@ubuntu:~$ route -n
Kernel IP routing table
Destination Gateway Genmask Flags Metric Ref Use Iface
0.0.0.0 192.168.122.1 0.0.0.0 UG 100 0 0 ens33
169.254.0.0 0.0.0.0 255.255.0.0 U 1000 0 0 ens33
192.168.122.0 0.0.0.0 255.255.255.0 U 100 0 0 ens33
These show the same information, but now we have two additional commands – netstat and route. The legacy set of network tools tends to have a separate, unique command for every purpose, and in this case, we're seeing two of them with quite a bit of overlap. Knowing all of these commands and keeping their differing syntax straight can be a challenge for someone new to Linux. The ip set of commands makes this much simpler!
No matter which set of tools you end up using, you now have the basics to establish and check IP addressing and routing, which, between them, will get you basic connectivity for your host.
IPv4 addresses and subnet masks
In the previous section, we discussed IP addresses briefly, but let's discuss them in a bit more detail. What IPv4 allows you to do is to address each device in a subnet uniquely by assigning each device an address and a subnet mask. For instance, in our example the IPv4 address is 192.168.122.182. Each octet in an IPv4 address can range from 0-255, and the subnet mask is /24, which is also commonly represented as 255.255.255.0. This seems complicated until we break things down to a binary representation. 255 in binary is 11111111 (8 bits), and 3 of those groupings makes 24 bits. So, what our address and mask representation is saying is that, when masked, the network portion of the address is 192.168.122.0, and the host portion of the address is 182 and can range from 1-254.
Breaking this down:

What if we needed a larger subnet? We can simply slide that mask over a few bits to the left. For instance, for a 20 bit subnet mask, we have the following:

This makes the third octet of the mask 0b11110000 (note the shorthand 0b for "binary"), which translates to 240 in decimal. This masks the third octet of the network to 0b01110000 or 112. This increases the range of addresses for our hosts to 0-15 (0 – 0b1111) in the third octet, and 0-255 (0 – 0b11111111) in the fourth, or 3824 (15 x 255 – 1) in total (we'll get to the -1 in the next section).
You can see that keeping a calculator app that does binary to decimal conversions is a handy thing for a networking professional! Be sure it does hexadecimal (base 16) as well; we'll dive into that in a few minutes.
Now that we've got the knack of working with addresses and subnet masks in decimal and especially binary, let's expand on that and explore how it can be used to illustrate other addressing concepts.
Special-purpose addresses
There are a few special purpose addresses that we'll need to cover to further explore how IP addresses work in a local subnet. First of all, if all the host bits in an address are set to 1, that is called the broadcast address. If you send information to the broadcast address, it is sent to and read by all network interfaces in the subnet.
So, in our two examples, the broadcast for the /24 network would be as follows:

In other words, we have a broadcast address of 192.168.122.255.
The broadcast for the /20 network is as follows:

Or, we can convert back to decimal for a broadcast address of 192.168.127.255.
Moving the border between the network and host portions of the IPv4 address brings the concepts of address class to mind. When converted to binary, the first few bytes define what is called the classful subnet mask for that address. In most operating systems, if you set the IP address in a GUI, this classful subnet mask is what is often filled in by default. These binary-to-subnet mask assignments work out to be the following:

What this defines is the default classful subnet masks for networks. We'll dig deeper into this in the next two sections.
From all of this, you can see why most administrators use classful boundaries on subnets inside their organization. By far most internal subnets have masks of 255.255.255.0 or 255.255.0.0. Any other choice turns into confusion each time you add a new member to the team, with the potential for errors in server or workstation configurations. Plus, "doing math" every time you need to set or interpret a network address doesn't appeal to most people.
The second type of special address, which we just touched on, is multicast addresses. A multicast address is used to include several devices in a conversation. For instance, you might use a multicast address to send an identical video stream to a number of network-attached displays, or if you were setting up a conference call or meeting in a voice/video application. Multicast addresses local to a network take the following form:

The last 11 bits (3+8) usually form "well-known addresses" for various multicast protocols. Some commonly seen multicast addresses are as follows:

The full list of well know, registered multicast addresses is maintained by the IANA (Internet Assigned Numbers Authority), at https://www.iana.org/assignments/multicast-addresses/multicast-addresses.xhtml. While this may seem comprehensive, vendors will often create their own multicast addresses in this address space.
This serves as a basic introduction to multicast addressing – it's much more complex than this, to the point where entire books are devoted to the design, implementation, and theory behind it. What we've covered is enough to get the general idea, though enough to get started.
With broadcast and multicast addresses covered, let's discuss the IP address "families" that are most likely used in your environment.
Private addresses – RFC 1918
The other set of special addresses is the RFC 1918 address space. RFC 1918 describes a list of IP subnets that are allocated for internal use within an organization. These addresses are not valid for use on the public internet, so must be translated using Network Address Translation (NAT) before traffic to or from them can be routed over the public internet.
The RFC1918 addresses are as follows:
- 10.0.0.0/8 (Class A)
- 172.16.0.0 to 172.31.0.0 / 16 (Class B) (this can be summarized as 172.16.0.0/12)
- 192.168.0.0/16 (Class C)
These addresses give organizations a large IP space to use internally, all of which are guaranteed to not conflict with anything on the public internet.
For an interesting exercise, you can use these RFC 1918 subnets to verify the default address class, by translating the first octet of each to binary, then comparing them to the table in the last section.
The RFC 1918 specification is fully documented here: https://tools.ietf.org/html/rfc1918.
Now that we've covered off the binary aspects of IP addressing and subnet masks, as well as the various special IP address groups, I'm sure that you're tired of theory and math and want to get back to playing with the command line of your Linux host! Good news, we still need to cover the bits and bytes of addressing for IPv6 (IP version 6). Even better news, it will be in an appendix, so that we can get you to a keyboard that much sooner!
Now that we've got a firm grasp on displaying IP parameters and a good understanding of IP addressing, let's configure an IP interface for use.
Assigning an IP address to an interface
Assigning a permanent IPv4 address is something that you will likely need to do on almost every server that you build. Luckily, it's pretty simple to do. In the new command set, we'll use the nmcli command (Network Manager Command Line). We'll set the IP address, default gateway, and DNS server. Finally, we'll set the addressing mode to manual. We'll display the network connections in nmcli format:
robv@ubuntu:~$ sudo nmcli connection show
NAME UUID TYPE DEVICE
Wired connection 1 02ea4abd-49c9-3291-b028-7dae78b9c968 ethernet ens33
Our connection name is Wired connection 1. We don't need to type this each time, though; we can do tab completion on this by typing Wi then pressing Tab to complete the name. Also, keep in mind that nmcli will allow shortened command clauses, so we can use mod for modify, con for connection, and so on. Let's go forward with our sequence of commands (note how the parameters are shortened in the last command):
$ sudo nmcli connection modify "Wired connection 1" ipv4.addresses 192.168.122.22/24
$
$ sudo nmcli connection modify "Wired connection 1" ipv4.gateway 192.168.122.1
$
$ sudo nmcli connection modify "Wired connection 1" ipv4.dns "8.8.8.8"
$
$ sudo nmcli con mod "Wired connection 1" ipv4.method manual
$
Now, let's save the changes and make them "live":
$ sudo nmcli connection up "Wired connection 1"
Connection successfully activated (D-Bus active path: /org/freedesktop/NetworkManager/ActiveConnection/5)
$
Using the legacy approach, all of our changes are done by editing files. And just for fun, the filenames and locations will change from distribution to distribution. The most common edits and files are shown here.
To change the DNS servers, edit /etc/resolv.conf and change the nameserver line to reflect the desired server IP:
nameserver 8.8.8.8
To change the IP address, subnet mask, and so on, edit the /etc/sysconfig/network-scripts/ifcfg-eth0 file and update the values as follows:
DEVICE=eth0
BOOTPROTO=none
ONBOOT=yes
NETMASK=255.255.255.0
IPADDR=10.0.1.27
If your default gateway is on this interface, you can add this:
GATEWAY=192.168.122.1
Again, note that on different distributions, the files to edit may vary, and note especially that this approach is not backward compatible. On modern Linux systems, this approach of editing the base files for network changes mostly no longer works.
Now that we know how to assign an IP address to an interface, let's learn how to adjust routing on our host.
Adding a route
To add a temporary static route, the ip command is our go-to again. In this example, we tell our host to route to 192.168.122.10 to get to the 10.10.10.0/24 network:
robv@ubuntu:~$ sudo ip route add 10.10.10.0/24 via 192.168.122.10
[sudo] password for robv:
robv@ubuntu:~$ ip route
default via 192.168.122.1 dev ens33 proto dhcp metric 100
10.10.10.0/24 via 192.168.122.10 dev ens33
169.254.0.0/16 dev ens33 scope link metric 1000
192.168.122.0/24 dev ens33 proto kernel scope link src 192.168.122.156 metric 100
You can also add the egress network interface to use for this by tacking dev <devicename> on the end of that ip route add command.
This just adds a temporary route, though, which will not survive if the host is restarted or if the network processes are restarted. You can add a permanent static route by using the nmcli command.
First, we'll display the network connections in nmcli format:
robv@ubuntu:~$ sudo nmcli connection show
NAME UUID TYPE DEVICE
Wired connection 1 02ea4abd-49c9-3291-b028-7dae78b9c968 ethernet ens33
Next, we'll add the route to 10.10.11.0/24 via 192.168.122.11 to the Wired connection 1 connection using nmcli:
robv@ubuntu:~$ sudo nmcli connection modify "Wired connection 1" +ipv4.routes "10.10.11.0/24 192.168.122.11"
Again, let's save our nmcli changes:
$ sudo nmcli connection up "Wired connection 1"
Connection successfully activated (D-Bus active path: /org/freedesktop/NetworkManager/ActiveConnection/5)
$
Now, looking at our routing table, we see both of our static routes:
robv@ubuntu:~$ ip route
default via 192.168.122.1 dev ens33 proto dhcp metric 100
10.10.10.0/24 via 192.168.122.10 dev ens33
10.10.11.0/24 via 192.168.122.11 dev ens33 proto static metric 100
169.254.0.0/16 dev ens33 scope link metric 1000
192.168.122.0/24 dev ens33 proto kernel scope link src 192.168.122.156 metric 100
However, if we reload, we see that our temporary route is now gone, and the permanent one is in place:
robv@ubuntu:~$ ip route
default via 192.168.122.1 dev ens33 proto dhcp metric 100
10.10.11.0/24 via 192.168.122.11 dev ens33 proto static metric 100
169.254.0.0/16 dev ens33 scope link metric 1000
192.168.122.0/24 dev ens33 proto kernel scope link src 192.168.122.156 metric 100
With the basics of adding routes completed, let's take a look at getting that same task done on an older Linux host, using the legacy route commands.
Adding a route using legacy approaches
First, to add a route, use this command:
$ sudo route add –net 10.10.12.0 netmask 255.255.255.0 gw 192.168.122.12
To make this route permanent, things get complicated – permanent routes are stored in files, and the filenames and locations will be different depending on the distribution, which is why the consistency of the iproute2/nmcli commands makes things so much easier on modern systems.
On an older Debian/Ubuntu distribution, a common method is to edit the /etc/network/interfaces file and add the following line:
up route add –net 10.10.12.0 netmask 255.255.255.0 gw 192.168.122.12
Or, on an older Redhat family distribution, edit the /etc/sysconfig/network-scripts/route-<device name> file and add the following line:
10.10.12.0/24 via 192.168.122.12
Or, to just add the routes as commands, edit the /etc/rc.local file – this approach will work on just about any Linux system, but is considered to be less elegant, mainly because it's the last place the next administrator will look for the setting (since it's not a proper network settings file). The rc.local file simply executes on system startup and runs whatever commands are in it. In this case, we'll add our route add command:
/sbin/route add –net 10.10.12.0 netmask 255.255.255.0 gw 192.168.122.12
At this point, we're well on our way to setting up networking on our Linux host. We've set the IP address, subnet mask, and routes. Particularly in troubleshooting or initial setup, though, it's common to have to disable or enable an interface; we'll cover that next.
Disabling and enabling an interface
In the new command "world," we use the – you guessed it – ip command. Here, we'll "bounce" the interface, bringing it down then back up again:
robv@ubuntu:~$ sudo ip link set ens33 down
robv@ubuntu:~$ sudo ip link set ens33 up
In the old command set, use ifconfig to disable or enable an interface:
robv@ubuntu:~$ sudo ifconfig ens33 down
robv@ubuntu:~$ sudo ifconfig ens33 up
When executing interface commands, always keep in mind that you don't want to cut off the branch that you are sitting on. If you are connected remotely (using ssh for instance), if you change ip addressing or routes, or disable an interface, you can easily lose your connection to the host at that point.
At this point, we've got most tasks covered that you'll need to configure your Linux host in a modern network. A big part of network administration though is diagnosing and setting configurations to accommodate special cases, for instance – adjusting settings to optimize traffic, where smaller or larger packet sizes might be needed.
Setting the MTU on an interface
One operation that is more and more common in modern systems is setting the Message Transfer Unit (MTU). This is the size of the largest Protocol Datagram Unit (PDU, also called a frame in most networks) that the interface will send or receive. On Ethernet, the default MTU is 1,500 bytes, which works out to a maximum packet size of 1,500 bytes. The maximum packet size for a media is generally called the Maximum Segment Size (MSS). For Ethernet, the three values are as follows:
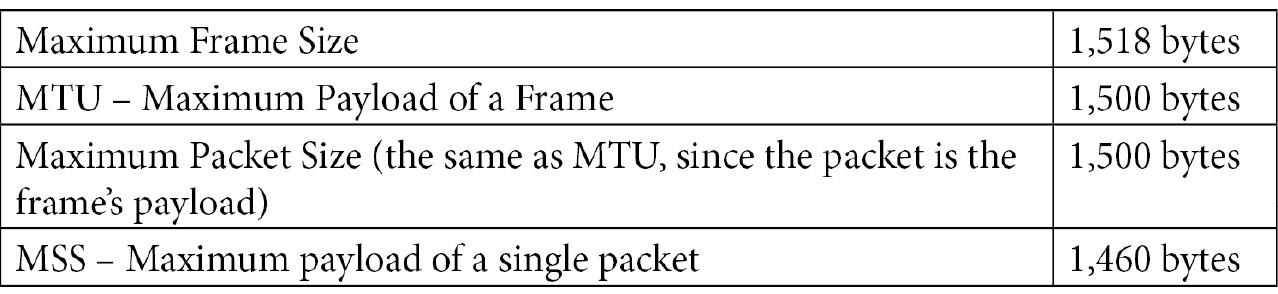
Table 2.1 – Relating frame size, MTU, packet size, and MSS for Ethernet
Why would we need to change this? 1,500 is a nice compromise for packet size in that it's small enough that in the event of an error, that error is quickly detected, and the amount of retransmitted data is relatively small. However, in data centers especially there are a few exceptions.
When dealing with storage traffic, in particular iSCSI, large frame sizes are desired so that the packet size can accommodate more data. In these cases, the MTU is usually set to somewhere in the range of 9,000 (often called a jumbo packet). These networks are most often deployed on 1 Gbps, 10 Gbps, or faster networks. You'll also see larger packets used in traffic to accommodate backups or virtual machine migration (for instance: VMotion in VMware or Live Migration in Hyper-V).
At the other end of the spectrum, you'll also often see situations where smaller packets are needed. This is particularly important as not all hosts will detect this well, and many applications will set the DF (Don't Fragment) bit in their traffic. In that situation, you might see a 1,500-byte packet set with DF on a medium that might only support a 1,380-byte packet – in that case, the application will simply fail, and often the error messages won't be helpful in troubleshooting. Where might you see this? Any link that involves packets being encapsulated will usually involve this – tunnels or VPN solutions, for instance. These will reduce the frame size (and resulting packet size) by the overhead caused by encapsulation, which is usually pretty easy to compute. Satellite links are another common situation. They'll often default to 512-byte frames – in those situations, the sizes will be published by the service provider.
Setting the MTU is as simple as you might think – we'll use nmcli again for this. Note in this example that we're shortening the command-line arguments for nmcli, and we're saving the configuration change at the end – the MTU is changed immediately after the last command. Let's set the MTU to 9000 to optimize iSCSI traffic:
$ sudo nmcli con mod "Wired connection 1" 802-3-ethernet.mtu 9000
$ sudo nmcli connection up "Wired connection 1"
Connection successfully activated (D-Bus active path: /org/freedesktop/NetworkManager/ActiveConnection/5)
$
With our MTU set, what else can we do with the nmcli command?
More on the nmcli command
The nmcli command can also be called interactively, and changes can be made in a real-time interpreter, or shell. To enter this shell for an Ethernet interface, use the nmcli connection edit type ethernet command. In the shell, the print command lists all of the nmcli parameters that can be changed for that interface type. Note that this output is broken up into logical groups – we've edited this (very lengthy) output to show many of the settings you might need to adjust, edit, or troubleshoot in various situations:
nmcli> print
===============================================================================
Connection profile details (ethernet)
===============================================================================
connection.id: ethernet
connection.uuid: e0b59700-8dcb-4801-9557-9dee5ab7164f
connection.stable-id: --
connection.type: 802-3-ethernet
connection.interface-name: --
….
connection.lldp: default
connection.mdns: -1 (default)
connection.llmnr: -1 (default)
-------------------------------------------------------------------------------
These are common Ethernet options:
802-3-ethernet.port: --
802-3-ethernet.speed: 0
802-3-ethernet.duplex: --
802-3-ethernet.auto-negotiate: no
802-3-ethernet.mac-address: --
802-3-ethernet.mtu: auto
….
802-3-ethernet.wake-on-lan: default
802-3-ethernet.wake-on-lan-password: --
-------------------------------------------------------------------------------
These are common IPv4 options:
ipv4.method: auto
ipv4.dns: --
ipv4.dns-search: --
ipv4.dns-options: --
ipv4.dns-priority: 0
ipv4.addresses: --
ipv4.gateway: --
ipv4.routes: --
ipv4.route-metric: -1
ipv4.route-table: 0 (unspec)
ipv4.routing-rules: --
ipv4.ignore-auto-routes: no
ipv4.ignore-auto-dns: no
ipv4.dhcp-client-id: --
ipv4.dhcp-iaid: --
ipv4.dhcp-timeout: 0 (default)
ipv4.dhcp-send-hostname: yes
ipv4.dhcp-hostname: --
ipv4.dhcp-fqdn: --
ipv4.dhcp-hostname-flags: 0x0 (none)
ipv4.never-default: no
ipv4.may-fail: yes
ipv4.dad-timeout: -1 (default)
-------------------------------------------------------------------------------
(IPv6 options would go here, but have been removed to keep this listing readable.)
These are the proxy settings:
-------------------------------------------------------------------------------
proxy.method: none
proxy.browser-only: no
proxy.pac-url: --
proxy.pac-script: --
-------------------------------------------------------------------------------
nmcli>
As noted, the listing is somewhat abbreviated. We've shown the settings that you are most likely going to have to check or adjust in various setup or troubleshooting situations. Run the command on your own station to see the full listing.
As we've illustrated, the nmcli command allows us to adjust several interface parameters either interactively or from the command line. The command-line interface in particular allows us to adjust network settings in scripts, allowing us to scale up, adjusting settings on dozens, hundreds, or thousands of stations at a time.
Summary
With this chapter behind us, you should have a firm understanding of IP addressing from a binary perspective. With this, you should understand subnet addressing and masking, as well as broadcast and multicast addressing. You also have a good grasp of the various IP address classes. With all of this in hand, you should be able to display or set IP addresses and routes on a Linux host using a variety of different commands. Other interface manipulations should also be easily accomplished, such as setting the MTU on an interface.
With these skills in hand, you are well prepared to embark on our next topic: using Linux and Linux tools for network diagnostics.
Questions
As we conclude, here is a list of questions for you to test your knowledge regarding this chapter's material. You will find the answers in the Assessments section of the Appendix:
- What purpose does the default gateway serve?
- For a 192.168.25.0/24 network, what are the subnet mask and broadcast address?
- For this same network, how is the broadcast address used?
- For this same network, what are the possible host addresses?
- If you needed to statically set the speed and duplex of an Ethernet interface, what command would you use?
Further reading
- RFC 1918 – Address Allocation for Private Internets: https://tools.ietf.org/html/rfc1918
- RFC 791 – Internet Protocol: https://tools.ietf.org/html/rfc791