Chapter 5. Automated administration: Configuring automated offsite backups
This chapter covers
- Automating administrative tasks with scripts
- Increasing security and system efficiency
- Backing up local data
- Scheduling automated tasks
If there’s one thing that I’d hope I made sufficiently clear in the previous chapter, it’s that regular and reliable system backups are absolutely critical. But, in many ways, the hard part is the regular. Keeping up with important tasks with immediate consequences is hard enough; remembering to run some dull daily or weekly backup is pretty much a nonstarter.
It’s no secret: the single best solution to the problem is to configure an automated scheduler to perform the task for you and then forget about it. Until recently, the scheduler you’d use on Linux would almost certainly have been some variation of the software utility cron; and, in fact, that’s still a great choice. But the systemd process manager you learned about back in chapter 3 has added systemd timers into the mix.
I’m going to cover both approaches in this chapter, but I’ll also show you how to package backups and any other administration task into scripts, which can themselves be put on an automated schedule. To demonstrate how it all works in the real world, I’ll craft a command to backup some data to an AWS Simple Storage Solution (S3) bucket and then use the command to create schedulers using both cron and systemd timers.
5.1. Scripting with Bash
A Linux script is a plain text file containing one or more commands compliant with Bash (or some other shell interpreter). Being able to string together multiple commands within a single file makes it possible to create executable routines that can rival programming languages in their complexity and versatility.
5.1.1. A sample script for backing up system files
To illustrate what a working script might look like, let me show you a short, nicely written example that’s probably already active on your machine. Once we’ve worked through the script one line at a time, I’ll tell you what it all has to do with this chapter. And don’t forget the other important takeaway from this exercise: if you can read scripts, you can also write them. It’s the exact same skill set.
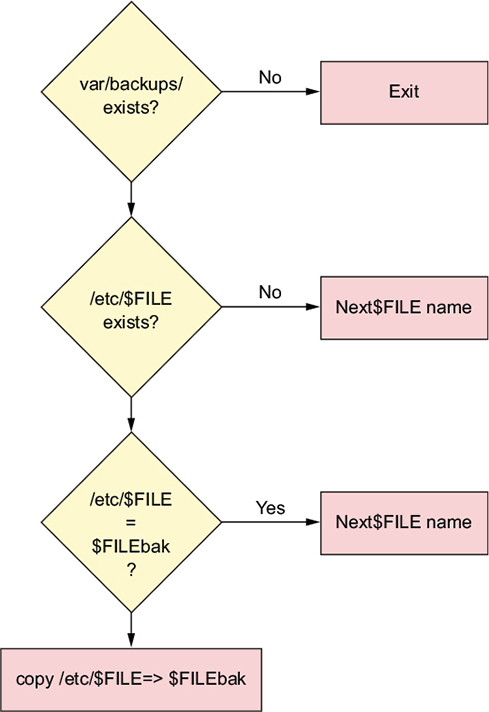
This script uses a series of powerful tools to do something that’s actually quite simple: create secure backups of four important system files to ensure a usable replacement in case the originals are somehow corrupted. Figure 5.1 illustrates the script’s actions as a flow chart. Note that $FILE is a variable used to represent a set of filenames processed by the script.
Figure 5.1. The decision flow traced by the passwd script
Head over to the /etc/cron.daily/ directory and list the contents. You’ll probably see a file called passwd. Display the file using less (or cat or nano or vim). It’s your choice. If it doesn’t happen to be there, this is what it looks like:
#!/bin/sh

cd /var/backups || exit 0

for FILE in passwd group shadow gshadow; do
        test -f /etc/$FILE              || continue
        cmp -s $FILE.bak /etc/$FILE     && continue
        cp -p /etc/$FILE $FILE.bak && chmod 600 $FILE.bak
done
Normally the # character introduces a comment that wouldn’t be read by the interpreter. In this particular case, where both # and ! are used, Linux will read the comment and use its value (/bin/sh) as the active shell. The string is popularly known as the shebang line, though don’t ask me why. Although sh is an alternative to bash, for our purposes right now, there aren’t any practical differences between the two.
The next line in the script changes the directory to /var/backups/. If no such directory exists, it exits the script and issues an exit status code of 0, which signifies the command was successful:
cd /var/backups || exit 0
The || sequence (sometimes known as a double pipe) can be read as though it’s the word or. So this line means: either change directory to /var/backups/ or exit the script. If everything goes according to plan, subsequent script operations will take place in the /var/backups/ directory.
Note
Exit codes are passed when a Linux command completes. A 0 will be passed to indicate success, whereas different numbers can be configured to specify some kind of error.
In the next part of the code, the line starting with for introduces a loop. Those of you with programming experience will have no trouble understanding what’s going on here: the script will assign in turn each of the following four strings (passwd, group, and so forth) as the value of the variable FILE. It then executes the code block between the reserved words do and done:
for FILE in passwd group shadow gshadow; do
Here’s a brief definition of some of those concepts:
- Loop—A sequence of actions delimited by reserved words to be repeated until a specified condition is met
- String—A contiguous sequence of characters
- Variable—A value that can change and can be dynamically incorporated into script actions
- Reserved word—A term interpreted according to a predefined meaning by the shell
Getting back to the script, the first of the following lines will test for the existence of a file in the /etc/ directory whose name matches the current value of the variable $FILE. If there isn’t a file with that name in /etc/, then the script will continue by assigning the next string (the next filename) to the $FILE variable and testing for its existence:
test -f /etc/$FILE || continue
If there is such a file in /etc/, then the script will compare (cmp) the contents of the file with the contents of a file of the exact same name plus the .bak filename extension in the current directory (/var/backups/). If the comparison operation (&&) is successful, the shell will continue the for loop and try the next string. If, on the other hand, the content of the two files isn’t identical, then it will move to the next line:
cmp -s $FILE.bak /etc/$FILE && continue
Then, at last, the script will deliver its payload: it copies the current version in the /etc/ directory to the /var/backups/ directory, adds .bak to its name, and tightens the file’s permissions to prevent unauthorized users from reading it. The operation will overwrite any existing files with that same name. The -p flag in the example preserves the source file’s original ownership attributes and timestamp:
cp -p /etc/$FILE $FILE.bak && chmod 600 $FILE.bak
What does that script do? It’s designed to create copies of specified configuration files that have been updated since their last backup. Here’s how it works: if files with the specified names exist in the active /etc/ directory and their contents are different from similarly named files in the /var/backups/ directory, then those in /etc/ will be copied to /var/backups/ and appropriately renamed and secured.
But what’s the deal with those four files (passwd, group, shadow, and gshadow)? They’re the files whose contents determine how individual users and groups will be able to access particular resources. For instance, if you were to look at the contents of /etc/passwd, you’d see a single line for every account that exists. In the following extract, you can see regular user accounts are assigned user and group IDs (1000, in the case of ubuntu), a home directory (/home/ubuntu/), and a default shell (bash). Some system users like syslog also have a default shell that is, curiously, set to /bin/false. This is a way of preventing a human user from logging in to the system using that account, which would be insecure:
$ cat /etc/passwd
[...]
syslog:x:104:108::/home/syslog:/bin/false
_apt:x:105:65534::/nonexistent:/bin/false
sshd:x:106:65534::/var/run/sshd:/usr/sbin/nologin
ubuntu:x:1000:1000::/home/ubuntu:/bin/bash           1
mysql:x:107:111:MySQL Server,,,:/nonexistent:/
   bin/false                                         2
bind:x:108:112::/var/cache/bind:/bin/false
newuser:x:1002:1002:,,,:/home/newuser:/bin/bash
messagebus:x:109:114::/var/run/dbus:/bin/false
- 1 ubuntu’s user ID (1000), home directory (/home/ubuntu), and default shell (bash)
- 2 Non-user accounts shouldn’t be used for login (/bin/false).
When you add a new user to your system using
# useradd -m alan
new lines will be added to each of the passwd, shadow, and group files. In fact, all related user administration operations can be performed from the command line (or through scripts) without the need to directly edit these files.
Note
Ubuntu prefers you use adduser username over useradd username, although both will work. One advantage of adduser is that a home directory will be automatically created, whereas useradd requires the -m argument. The command adduser will also prompt for a password for your new user. If you use useradd, you’ll need to run sudo passwd new-user-name separately to set up a password.
Once upon a time, an encrypted version of each user’s password would also have been included here. For practical reasons, because the passwd file must remain readable by anyone on the system, it was felt that including even encrypted passwords was unwise. Those passwords were moved to /etc/shadow. Using sudo permissions, you should take a look at that file with its encrypted passwords on your own system. Here’s how:
$ sudo cat /etc/shadow
The /etc/group file contains basic information about all currently existing system and user groups. You can manually edit the group file to manage group membership. You could, for instance, give administrative rights to new users joining your team by adding their names to the sudo group. That line would look like this:
sudo:x:27:steve,newuser,neweruser
Don’t add any spaces between names and commas. Doing so will result in immediate unhappiness.
One last file: The /etc/gshadow file contains encrypted versions of group passwords for use if you sometimes want to allow group resource access to non-group users.
As you might already have guessed, that script was a great example for this chapter because of where it lives: the /etc/cron.daily/ directory. Scripts saved to the /cron.daily/ directory will be executed each day. We’ll get back to all that soon. For now, as another simple example, here’s a script file called upgrade.sh to have apt automate updates to all my installed software:
#!/bin/bash
# Script to automate regular software upgrades

apt update
apt upgrade -y
As you no doubt recall, the apt update command will sync with indexes on the online repositories, ensuring that APT is aware of all the most recent packages and versions available. apt upgrade will download and install any relevant upgrades. -y will automatically answer Yes when asked to confirm the operation.
You’re still not quite ready to run your script. Because you’re going to be running the script as a program, you’ll need to change the file attributes to make it executable. chmod +x followed by the filename will do that:
$ chmod +x upgrade.sh
That’s it. You’re now free to copy the file to the /etc/cron.daily/ directory where it can join passwd and others as they’re run each day:
# cp upgrade.sh /etc/cron.daily/
Because it runs apt, the new script requires administrator permissions, but there’s no need to include sudo in the command itself. Cron, by default, will always run as root. If you did want to run the script directly from the command line, you’d need to add sudo and preface the filename with a dot and forward slash to tell Linux that the command you’re referencing is in the current directory:
$ sudo ./upgrade.sh
5.1.2. A sample script for changing filenames
Let me throw a couple more scripting tools at you. You’ve probably already come face to face with the fact that the Linux shell can sometimes misinterpret filenames that include spaces. Here’s what it’d look like if you tried to cat the contents of a file called big name:
$ cat big name
cat: big: No such file or directory
cat: name: No such file or directory
The simple workaround is to enclose the complete filename in either single or double quotation marks like this:
$ cat 'big name'
Hello world
But that option won’t always be available. In that case, you could automate a process to convert spaces within filenames to, say, underscore characters. Then, in the course of your journeys, when you came across a directory containing lots of offending filenames, you’d be able to execute a script to fix things fast. Well, here it is:
#!/bin/bash
echo "which directory would you like to check?"
read directory
   find $directory -type f | while read file; do
    if [[ "$file" = *[[:space:]]* ]]; then
    mv "$file" `echo $file | tr ' ' '_'`
    fi;
   done
The echo line prints its text to the screen and then waits for user input. The user will type in a valid directory like /home/ubuntu/files/, which will be assigned as the value of the variable directory. The find command will be invoked to return all file objects (-type f) in the specified directory. The set of filenames from find will be read, one at a time in a while loop, with each one tested for the presence of a space. If a space is found, then any spaces (‘ ’) in the filename will be changed (mv) to underscores (‘_’). And fi; stops the loop when there are no more filenames in the directory.
To try this out, create a directory with a few files containing spaces in their filenames, and then run the script for yourself. A directory that did look like this
$ ls
file name  file - name
should now look like this:
$ ls
file_name  file_-_name
Note
Think carefully about each of the steps that make up the script and be sure you understand exactly what’s going on.
Let’s spend a moment reminding ourselves of exactly where we are. It’s always a good idea to make sure you’re not staring at the trees and missing the forest. Here’s what’s happened so far:
- The chapter is about using scripts to create automated backups.
- You explored the script for backing up user admin files from /etc/ to /var/backup/.
- You learned about the care and feeding of those user admin files.
- You wrote your own simple script.
- You’ll back up your own data to an AWS S3 bucket.
- You’ll use cron and anacron to schedule regular backups.
- You’ll learn how that’s also done using systemd timers.
Scripts can be used for much more than backups and filenames. With the ever-increasing demands on servers and network environments, environments that sometimes require hundreds or even thousands of dynamically generated virtual microservices, manual administration is pretty much impossible. Through your career as a system administrator, you’re probably going to need to create scripts to provision and launch individual and swarms of VMs, and to monitor massive and constantly changing environments.
5.2. Backing up data to AWS S3
Here are two reasons that I chose Amazon’s AWS S3 as the target of the backup example I’m going to use:
- It’s crucial to always keep copies of important data off-site.
- Archiving to S3 is something that’s popular right now, and it’s crazy easy.
That’s it. The fact that this would be a great opportunity to shamelessly promote my book Learn Amazon Web Services in a Month of Lunches (Manning, 2017) that’s chock full of everything you could possibly need to know about AWS had absolutely no impact on my choice. None. Well, maybe just a little.
At any rate, if you don’t happen to have an AWS account of your own yet, you can still follow along with the next section and substitute a backup script of your own for the AWS one I’m going to show you. Alternatively, you could also visit https://aws.amazon.com and sign up for a new account. It won’t cost you anything to open the account and, under the Free Tier, many services (including 5 GB of S3 storage) are available at no cost for the first year.
By the way, even after your Free Tier rights on AWS are over, storage still only costs around $0.025 per GB per month. That’s probably cheap enough to make you change the way you think about off-site archives in general.
5.2.1. Installing the AWS command-line interface (CLI)
There’s a lot of AWS administration you can do from your browser in the AWS’s console, but that’s not how real Linux admins get things done. If you’re going to incorporate your backups to S3 into a script, it’s going to have to be something that’ll work on the command line. For that, look no further than Amazon’s own AWS CLI. Because it runs on Python, you’ll need to run at least Python 2 (version 2.6.5) or Python 3 (version 3.3). In addition, you’ll need the pip Python package manager to handle the installation. As of this writing, Ubuntu is pushing to make Python 3 its default version, although other distributions might still favor Python 2.
If the following install command doesn’t work, then you probably need to install pip. (Use either apt install python-pip or apt install python3-pip.) Here’s the ultra-secret, insiders-only, I-can-reveal-it-to-you-but-then-I’ll-have-to-kill-you hidden code that tells you which pip instalation you’ll need. If it works, that’s the right one. If it doesn’t, try the other one:
$ pip3 install --upgrade --user awscli
Collecting awscli
  Downloading awscli-1.11.112-py2.py3-none-any.whl (1.2MB)             1
    100% |################################| 1.2MB 946kB/s
Collecting PyYAML<=3.12,>=3.10 (from awscli)
  Downloading PyYAML-3.12.tar.gz (253kB)
    100% |################################| 256kB 2.2MB/s
[...]
Collecting jmespath<1.0.0,>=0.7.1 (from botocore==1.5.75->awscli)
  Downloading jmespath-0.9.3-py2.py3-none-any.whl
Collecting six>=1.5 (from python-dateutil<3.0.0,>=2.1->
    botocore==1.5.75->awscli)
  Downloading six-1.10.0-py2.py3-none-any.whl
Building wheels for collected packages: PyYAML
  Running setup.py bdist_wheel for PyYAML ... done
  Stored in directory: /home/ubuntu/.cache/pip/wheels
    /2c/f7/79/13f3a12cd723892437c0cfbde1230ab4d82947ff7b3839a4fc
Successfully built PyYAML
Installing collected packages: PyYAML, pyasn1, rsa, colorama, six,
    python-dateutil, docutils, jmespath, botocore, s3transfer, awscli  2
Successfully installed PyYAML awscli botocore colorama docutils
    jmespath pyasn1 python-dateutil rsa s3transfer six
- 1 pip nicely displays real-time progress details.
- 2 A summary of all the packages installed by pip
5.2.2. Configuring your AWS account
You’re now ready to link the local AWS CLI with your AWS account. To do that, you’ll need to retrieve some access keys. From any page in the console, click the drop-down menu header with your account name on it (top right on the page), and then click the My Security Credentials link (figure 5.2).
Figure 5.2. The AWS console with direct links to dozens of AWS services. Here the My Security Credentials link is visible.

Once you’re on the Your Security Credentials page, click to expand the Access Keys (Access Key ID and Secret Access Key) section and note the warning that might appear: Existing Root Keys Cannot Be Retrieved. Then click the Create New Access Key button. You’ll be shown your new access key ID and its accompanying secret access key. The former serves the same function as a login name, and the latter acts like its password. You can either download the access key and save it to a secure location on your computer or select, copy, and paste it somewhere.
To set things up, open a terminal on your local machine and run aws configure from the command line. You’ll be asked for your access key ID, your secret access key, the AWS region you’d like to make default, and the format you’d like to use for output. You can leave those final two values blank if you like. The following example from the AWS documentation uses fake credentials (you should never publicly display a real key set):
$ aws configure
AWS Access Key ID [None]: AKIAIOSFODNN7EXAMPLE
AWS Secret Access Key [None]: wJalrXUtnFEMI/K7MDENG/bPxRfiCYEXAMPLEKEY
Default region name [None]: us-east-1                                   1
Default output format [None]:                                           2
- 1 Determines the AWS geographic center from which resources will be launched
- 2 Choose to have output displayed in text (default), JSON, or table format.
Note
When setting the default region name, bear in mind that local regulatory regimens can restrict the backup of some data to offshore servers.
You should now be all set to get to work. The following command line
$ aws s3 ls
will list all the S3 buckets in your account. Bucket is the term AWS uses for what we would call a directory.
5.2.3. Creating your first bucket
Assuming this is a brand-new account, nothing will be displayed. You should create a new bucket with the make bucket command: mb. One thing to keep in mind when choosing a bucket name is that it must be unique across the entire S3 system. As shown, something like mybucket probably won’t be accepted:
$ aws s3 mb s3://mybucket
make_bucket failed: s3://mybucket/ An error occurred (BucketAlreadyExists)
 when calling the CreateBucket operation: The requested bucket name is not
 available. The bucket namespace is shared by all users of the system.
 Please select a different name and try again.
Instead, using less common words and adding a few numbers will probably work a lot better:
$ aws s3 mb s3://linux-bucket3040
One more step and we’ve got ourselves an off-site backup job. Assuming that the files you need to back up are in a directory called /dir2backup, located in your home directory, here’s how it’ll go:
aws s3 sync /home/username/dir2backup s3://linux-bucket3040
s3 sync works a lot like the rsync tool you met in chapter 4. The first time you run it, everything in the source directory will be uploaded to your S3 bucket; subsequently, only new or changed files will be transferred. Creating a script to run that sync command will be pretty much straightforward. Here’s how it might look:
#!/bin/bash
/usr/local/bin/aws s3 sync
 /home/username/dir2backup s3://linux-bucket3040
Note how I added the full path to the aws command (/usr/local/bin/aws). This is to make sure that Bash knows where on the system to find the command. You can confirm the location of aws using whereis:
$ whereis aws
aws: /usr/local/bin/aws
Having a great backup tool in place doesn’t mean you’ll use it. That requires some kind of task scheduler. You’ll learn about a couple of those schedulers next.
5.3. Scheduling regular backups with cron
Cron comes in a number of flavors. Because that number is greater than one, you can expect that there’s often more than one way to get a particular task done. To get a feel for what’s there, list the objects in the /etc/ directory that include the letters cron:
$ ls /etc | grep cron
anacrontab
cron.d
cron.daily
cron.hourly
cron.monthly
crontab
cron.weekly
Of those, only anacrontab and crontab are files; the rest are directories. Let’s begin by seeing how the directories work.
If you’ve got, say, a file system backup script in an executable file you want run at set intervals, you copy it to the appropriate directory: cron.hourly/ for execution each hour, cron.daily/ to be run daily, and so on. The cron.d/ directory is a bit different. It’s meant for files whose contents precisely time the execution of commands.
Suppose you wanted to run that software upgrade job I scripted earlier once each Monday, but without the script. You could create a file in the /etc/cron.d directory with these contents:
21 5 * * 1 root apt update && apt upgrade
This example will run the upgrade at 5:21 each Monday morning. How does that work? Look at the first characters: 21 5. The first field (21) represents the number of minutes into the hour that you want the command run. In this case, it will run 21 minutes in. The next field is where you can specify which hour of the day (for example, 8 or 23). This one is 5, which means 5:00 a.m. The next two asterisks followed by a 1 indicate that you want the schedule followed on every day of the month, in every month of the year, on each Monday (1 represents Monday). To avoid confusion, either 0 or 7 can be used for Sunday. The root argument means that the command will be run as the root user.
Why so early? Because, presumably, competing demand for network bandwidth will be lower before everyone gets into the office. Why 5:21 rather than 5:00? Because you don’t want to fall into the habit of scheduling all of your scripts for exactly the top of the hour (or any one time), as that might eventually cause a conflict. Better to stagger them.
You could add that line directly into the /etc/crontab file, and it would run the same way but without the need to create a separate file. But I wouldn’t. Doing so might not unleash a zombie apocalypse on the world, but it’s still a bad idea. You see, the crontab file is likely to be overwritten during system upgrades, and your custom commands will be lost.
Then what’s the point of the crontab file? As you should be able to see from the file contents (figure 5.3), this is the scheduler that executes the scripts within the /cron.? directories. Take a minute or two to look through each command for yourself.
Figure 5.3. The well-documented /etc/crontab file showing four jobs, each designed to launch the contents of an /etc/cron.? directory
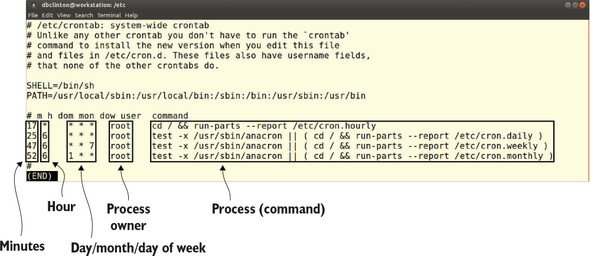
The test -x leading off the final three commands in figure 5.3 confirms that a binary program called anacron exists and is executable. If either of those is not true, then the scripts in the /cron.? directories will be run. The text -x command can be useful for scripting, in general, when you need to confirm to status of an object before launching a related operation.
You’re definitely going to want to leave the /etc/crontab file for the professionals. But because Linux cares about both you and your feelings, they’ve given you your own crontab to play with. That one will run commands as your user rather than as root, with only the permissions available to you—and won’t be overwritten during upgrades.
Care to see what you’ve already got scheduled? Run crontab -l. If you haven’t added any commands yet, you’ll probably get the No Crontab for yourname message shown in the following:
$ crontab -l
no crontab for ubuntu
You can edit your crontab using crontab -e. The first time you edit it, you’ll be asked to choose a text editor. If you’re already comfortable with Nano, go with that, as it’s probably the easiest of the three listed:
$ crontab -e
no crontab for ubuntu - using an empty one            1

Select an editor. To change, run 'select-editor'.     2
  1. /bin/nano                                        3
  2. /usr/bin/vim.basic
  3. /usr/bin/vim.tiny

Choose 1-3 [1]:
- 1 Checks for existing jobs
- 2 Choose a text editor.
- 3 The Nano editor selection
Note
By default, on some systems a user won’t be able to create crontab jobs unless a file called /etc/cron.allow containing their username is created. Debian/Ubuntu, however, allow individual crontab jobs right out of the box.
Those cron-based tools all work well for computers (like production servers) that are likely to be left running all the time. But what about executing important jobs on, say, your laptop, which is often turned off? It’s all very nice telling cron (or cron.daily and so forth) to back up your files at 5:21 on a Monday morning, but how likely is it that you’ll remember to get up to boot your laptop in time? Exactly—not likely at all. It’s time to talk about anacron.
5.4. Scheduling irregular backups with anacron
The one cron file we haven’t yet discussed is anacrontab, which is where you schedule operations to run at a set time after each system boot. If you wanted to back up those files on your laptop but couldn’t guarantee that it would be powered on at any given time during the day, you could add a line to anacrontab.
What should catch your attention in the anacrontab file is that entries have only two columns to control timing, rather than the five used in cron commands. That’s because anacron doesn’t work on absolute time, but relative to the most recent system boot. Here’s the file in all its glory:
# /etc/anacrontab: configuration file for anacron # See anacron(8) and anacrontab(5) for details. SHELL=/bin/sh PATH=/usr/local/sbin:/usr/local/bin:/sbin:/bin:/usr/sbin:/usr/bin 1 HOME=/root LOGNAME=root # These replace cron's entries 1 5 cron.daily run-parts --report /etc/cron.daily 2 7 10 cron.weekly run-parts --report /etc/cron.weekly @monthly 15 cron.monthly run-parts --report /etc/cron.monthly
- 1 The directories within anacrontab’s PATH. Files in these locations can be referenced without a full directory tree.
- 2 This job executes any scripts in the /etc/cron.daily/ directory once a day.
The cron.daily line in the anacrontab file, for instance, runs at one-day intervals, exactly 5 minutes after boot, whenever that happens to take place. The cron.weekly command, on the other hand, runs on seven-day intervals (meaning, when at least seven days have lapsed since the last run), 10 minutes after boot.
You might also be curious about those cron.? commands; weren’t they already run through the /etc/crontab file? Yes, but only if anacron isn’t active on the system. As you can see from the crontab file, anacron is given priority over cron. With all that in mind, here’s how a backup script could be run for your laptop:
1 10 myBackupJob /home/myname/backup.sh
This command runs the backup.sh script no more than once a day, 10 minutes after system boot. The job identifier is myBackupJob, and a log file of that name with job status information will be saved to the /var/spool/anacron/ directory.
5.4.1. Running the S3 sync job
Now, at last, with everything you’ve learned about scripting—AWS S3, cron, and anacron—you’re finally ready to make a smart choice: what’s the best way to schedule your backup? And, as always, the correct answer depends on context.
If you want to make sure the backup will get done even on a machine that’s not always running, you can add a line like this to your anacrontab file (assuming that you’ve already got an executable script file of that name in /etc/):
1 10 myDailyBackup /etc/s3script.sh
This example runs the script each day (1), 10 minutes (10) after the system boots. For your 24/7 servers, syntax-specific directives could be added to your user’s crontab or, within a file, to the /etc/cron.d/ directory (although you’d need to add a username like root to the cron.d version).
The next example runs the script at 5:47 each morning, every day of every month, every day of the week (* * *):
47 5 * * * /home/myusername/s3script.sh 1
- 1 crontab syntax to run a script each day at 5:47 a.m.
In this case, because we’re talking about a simple script, you can also do that just as effectively by inserting the aws command itself into a cron file like anacrontab:
47 5 * * * username /usr/local/bin/aws s3 sync
   /home/username/dir2backup s3://linux-bucket3040
A specific command like this backup operation can be inserted directly into the crontab file. Note the username and the absolute location of aws. This clearly establishes both the ownership of the process you want to run and the file system location of the binary that will run it.
5.5. Scheduling regular backups with systemd timers
If there’s a criticism of the new systemd timer alternative to cron, it’d probably be that it’s noticeably more complicated and involves a few more steps to set up. Instead of simply creating your script and then copying the file into the right cron directory, you’ll need to create and save two separate files to an obscure directory location (that’s not yet standard across all Linux distros) and then run two systemctl commands.
Complicated, perhaps. But definitely not insurmountable. And systemd timers come with some significant advantages, including deeper integration with other system services (including logs) and the ability to execute commands based on changes to system state (for instance, someone connecting a USB device), rather than just set times.
I’ll leave you to explore the specific, in-depth features that interest you on your own time. But I’ll walk you through the steps it’ll take to put together a simple backup. Your mission? Generate a dynamically named tar archive of the Apache-powered website running on your server. For the purposes of this demo, you can choose any directories to back up, and you don’t have to configure and launch a website for this.
First off, take a look at the timers you might already have running. Mine are displayed in figure 5.4 through the systemctl list-timers --all command.
Figure 5.4. The command systemctl list-timers --all provides a rich range of historical data for all existing systemd timer jobs.

Those timers were all created automatically by the system. To create your own, start with a backup script. Digging deeply into my colorful and creative inner personality, I’ll call my script file site-backup.sh. Here’s how it looks:
#!/bin/bash
NOW=$(date +"%m_%d_%Y")                                     1
tar czvf /var/backups/site-backup-$NOW.tar.gz /var/www
- 1 Assigns the system date to an environment variable $NOW
It would make identifying archives a lot easier if my archive filenames always included the date they were created. To do that, I assigned the current system date as the value of the $NOW variable and included it in the filename of the new archive. Here’s how the resulting filename might look:
site-backup-11_28_2017.tar.gz
Don’t forget to make your script file executable (chmod +x site-backup-11_28_2017.tar.gz). In fact, never forget to make your script file executable!
$ chmod +x site-backup.sh
Now you’ll need to create your .service and .timer files. As I wrote previously, there’s no single location where all service files are kept, but /lib/systemd/system/ and /etc/systemd/system/ will both work. Given a choice, I prefer /etc/systemd/ system/ because, for me, it’s an easy-to-remember and logical place. Your mileage may vary.
I’ll begin with the .service file, which I’ll call site-backup.service. Service files are common across systemd operations. They’re meant to describe and define a system service in a uniform, predictable way. The Description value should contain whatever text you feel will accurately describe the service, and the ExecStart line points to the location of an executable resource: the script, in this case. This is all the information systemd needs to figure out what it is you want done:
[Unit]
Description=Backup Apache website

[Service]
Type=simple
ExecStart=/home/username/site-backup.sh         1

[Install]
WantedBy=multi-user.target
- 1 The executable resource to be run by the service
The .timer file, which is specific to systemd timers, tells systemd when you want the associated service to run. The association is set through the Unit line in the [Timer] section, which, in this case, points to my site-backup.service file. Note that, also in this case, the value of OnCalendar is set to execute every day (*-*-*) at 5:51 a.m., and the value of Unit is the site-backup.service file:
[Unit]
Description=Backup Apache website - daily

[Timer]
OnCalendar=*-*-* 5:51:00          1
Unit=site-backup.service          2

[Install]
WantedBy=multi-user.target
- 1 The schedule settings to control the service execution
- 2 The service unit with which to associate this timer
With those files in place, you start the service using systemctl start. Additionally, you set it to load automatically every time the system boots with systemctl enable:
# systemctl start site-backup.timer
# systemctl enable site-backup.timer
Curious about the status of your service? is-enabled and is-active should be good for starters:
# systemctl is-enabled backup.timer
enabled
# systemctl is-active backup.timer
active
Finally, when you edit your .timer file, you’ll need to update the system. In the process of practicing what you’ve learned in this chapter, you’ll probably be doing a lot of editing. Naturally, you’ll want to know how to do that. Well, here you go:
# systemctl daemon-reload
Summary
- Well-written Bash scripts can efficiently and reliably automate both complex and simple administrative tasks.
- Linux keeps user account and authentication information in plain text files (named passwd, group, shadow, and gshadow) in the /etc/ directory.
- You can back up local data to a S3 bucket and manage it through its life cycle directly from the command line.
- Copying an executable script to one of the /etc/cron.? directories causes it to be run at the appropriate interval.
- Adding a directive to the anacrontab file executes commands relative to system boots, rather than at absolute times.
- systemd timers can be set to run based on both absolute time and in reaction to system events, like changes to hardware states.
Key terms
- All Linux commands output exit codes upon completion: 0 represents a successful execution, but all positive integers can be set by a program to represent various failed states.
- Command-line access to AWS resources is secured by the use of access keys (Access Key ID and Secret Access Key).
- A bucket is an AWS object that works much the same way as a directory on an operating system.
Security best practices
- Lock down your system accounts (like syslog and, ideally, even root) to prevent their being used for remote logins.
- Include off-site backups in your security planning, which adds another layer of data reliability.
- Always protect your (AWS) access keys, not to mention passwords and encryption key pairs, from public exposure of any kind.
Command-line review
- #!/bin/bash (the so-called “shebang line”) tells Linux which shell interpreter you’re going to be using for a script.
- || inserts an or condition into a script. Think of this as either “the command to the left is successul” or “execute the command to the right.”
- && - inserts an and condition into a script. Think of this as “if the command to the left is successful” and “execute the command to the right.”
- test -f /etc/filename tests for the existence of the specified file or directory name.
- chmod +x upgrade.sh makes a script file executable.
- pip3 install --upgrade --user awscli installs the AWS command-line interface using Python’s pip package manager.
- aws s3 sync /home/username/dir2backup s3://linux-bucket3040 synchronizes the contents of a local directory with the specified S3 bucket.
- 21 5 * * 1 root apt update && apt upgrade (a cron directive) executes two apt commands at 5:21 each morning.
- NOW=$(date +"%m_%d_%Y") assigns the current date to a script variable.
- systemctl start site-backup.timer activates a systemd system timer.
Test yourself
What is the character used to introduce a comment in a Linux script?
- !
- //
- #
- ^
What is the purpose of || in a Linux script?
- Or
- And
- If
- Comment
What is the data type kept in the /etc/shadow file?
- Account group and shell data
- Group membership data
- Encrypted account passwords
- Encrypted group passwords
Which of the following will create a new bucket on your AWS S3 account?
- s3 mb s3://mybucket
- aws s3 mb s3://mybucket
- aws s3 cb s3://mybucket
- aws s3 sync mb s3://mybucket
Which of the following commands will allow you to enter a cron directive that will be run as your own user?
- nano anacrontab
- crontab -l
- nano /etc/crontab
- crontab -e
Which of the following will run the command each Monday morning?
- 21 * 1 * * root apt update && apt upgrade
- 21 5 * * 1 root apt update && apt upgrade
- 21 1 * * 0 root apt update && apt upgrade
- 21 5 * 4 * root apt update && apt upgrade
Which of the following won’t work well for computers that aren’t always running?
- crontab
- anacron
- systemd timer
- anacrontab
What is the purpose of the systemctl enable site-backup.timer command?
- Loads the site-backup timer manually
- Configures the site-backup timer to load on system boot
- Displays the current status of the site-backup timer
- Forces the site-backup timer to run before the computer can close down
Answer key
c
a
c
b
d
b
a
b