
Chapter 9. Securing your web server
- Securing your infrastructure
- Controlling access to your server using firewalls
- Using encryption to protect your data
- Tightening the authentication process
- Controlling software and processes
The web part of web server is a bit misleading. After all, most of the security tools I’m going to discuss in this chapter are important no matter what kind of server you’re running. In fact, server is also kind of redundant, as all computers need securing. Still, because by definition they’re exposed to significant external traffic, the security of your web servers should be a particularly high priority. So the best way to test the things you’re going to learn about in this chapter is to have an Apache web server running. Consider putting one together right now: apt install apache2.
In an IT context, security is the protection of hardware, software, data, and digital services from unauthorized access and corruption. Given that networked computer resources are designed to be exposed to client users of one sort or another, ensuring that only the right clients are able to perform only the right operations is a challenge.
You can think of security as the fine art of balancing value against risk. When you consider how many kinds of security threats already exist, and how frequently new ones appear, you’ll probably understand that the balance will never be perfect. It will most certainly need to be reassessed often.
There’s no single tool or practice that can cover every aspect of security. Although it’s not a bad idea to build yourself a checklist of key security to-dos, that’s not enough. The most successful administrators I’ve known were all deeply skilled and knowledgeable, and they also seemed to share a particular attitude: no software, vendor, government agency, co-worker, or even close friend can ever be completely trusted. They may mean you no harm, but it’s too easy to make a mistake and leave an important window open to attack. Everything and everyone can use a second pair of eyes and some double checking.
What can you do to secure your servers? It’s really about the small things. Lots and lots of small things. So many, in fact, that a couple of them are going to spill over into the next chapter. In this chapter, however, we’ll begin with some basics before diving into using firewalls to control network access, protecting website data transfers with SSL/TLS encryption, and limiting what can be done with server resources through the strategic use of tools like Security-Enhanced Linux (SELinux) and system groups.
9.1. The obvious stuff
Let’s start by picking some low-hanging fruit. A lot of security is common sense, considering the many security best practices you’ve seen so far in this book. But, simple as it may be, you can’t afford to ignore these basics:
- Back up your data. Today. No matter what the bad guys do to your server, if you can rebuild it from a reliable backup, then you’re still in the game. Take another look at chapters 4 and 5 and then script yourself a regular, automated, comprehensive, and verifiable backup regimen that covers everything of any value that you’ve got. Make sure that there’s more than one archival version available at all times and that at least one archive is stored off site.
- Apply all software updates to your system. No excuse.
Oh, there are always excuses: you’re afraid that updates might break something your application depends on or it might require
a reboot that could end up being disruptive. But do it anyway. Don’t get me wrong. I understand that those are real concerns.
It’s that the alternatives are worse. Here’s your friendly reminder for updating your system:
# yum update
Or (on Ubuntu):# apt update # apt upgrade
Note
Don’t forget that package managers only update packages that were installed through managed repositories. Any applications you added manually will remain unpatched (and potentially unsafe) until you either manually apply patches or disable them.
You could avoid most of the risk of disruption by building test (or staging) environments (figure 9.1) that run mirror images of your applications that are safely protected from public networks. Applying updates and patches to your staging infrastructure should give you an excellent idea of how it’ll work in the real world.
Figure 9.1. You can replicate server infrastructure in a protected staging environment to safely perform maintenance.

Even better, you could use the infrastructure as the code configuration management software you’ll see in chapter 16 to automate your whole deployment process. That way, once you confirm that the staging environment you patched is running properly, it can become your production infrastructure. But that’s a discussion we’ll leave until later.
9.2. Controlling network access
Think of your server’s connection to the network and the big, bad internet beyond as your first line of defense. Networking protocols are designed to be flexible to help you closely control what traffic makes it through. The trick is understanding how the protocols work, and then properly using that knowledge to set things up right.
9.2.1. Configuring a firewall
A firewall is a set of rules. When a data packet moves into or out of a protected network space, its contents (in particular, information about its origin, its target, and the protocol it plans to use) are tested against the firewall rules to see if it should be allowed through. Here’s a simple example as illustrated in figure 9.2.
Figure 9.2. A firewall can filter requests based on protocol or target-based rules.
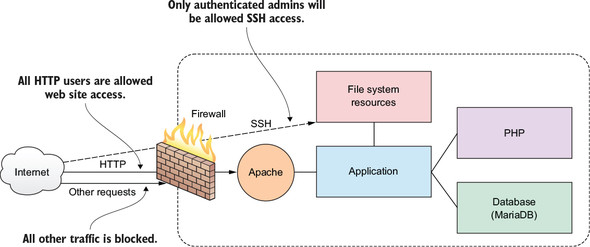
Let’s say that your company’s web server has to be open to incoming web traffic from anywhere on earth using either the insecure HTTP or secure HTTPS protocol. Because your developers and admins will need to get into the backend from time to time to do their work, you’ll also want to allow SSH traffic, but only for those people who’ll need it. Requests for any other services should be automatically refused. Let’s see how that’s done.
A Linux machine can be configured to apply firewall rules at the kernel level through a program called iptables. Creating iptables rules isn’t all that difficult; the syntax can be learned without too much fuss. But, in the interest of simplifying your life, many Linux distributions have added their own higher-level tools for abstracting the job. In this section, you’re going to see CentOS’s firewalld and Ubuntu’s UncomplicatedFirewall (ufw).
Firewall functionality is also available through hardware appliances manufactured by companies like Juniper and Cisco. Those proprietary devices run on their own operating systems with unique syntax and design. For larger enterprise deployments involving hundreds of servers spread across multiple networks, such tools will often make a lot of sense, but there’s a remarkable amount that you can accomplish with any old Linux box for a tiny fraction of the cost. Having said that, this section will introduce you to only a small subset of the full functionality of Linux firewalls. Naturally, if you want to learn more, stick around for a bit more depth in chapter 10 and consult the usual sources of Linux wisdom, like man files and online guides.
firewalld
As you might have guessed from its name, firewalld is part of the systemd family. firewalld can be installed on Debian/Ubuntu machines, but it’s there by default on Red Hat and CentOS. If you’re just too excited by firewalld to even consider trying anything else, here’s how to install it and get it running on Ubuntu:
# apt update
# apt install firewalld
To confirm that the firewall is working, try browsing to your server’s web root. If the site is unreachable, then firewalld is doing its job.
You’ll use the firewall-cmd tool to manage firewalld settings from the command line. Adding the --state argument returns the current firewall status:
# firewall-cmd --state
running
To be sure no one’s left out, let’s define a few important terms. The Hypertext Transfer Protocol (HTTP) coordinates the exchange of resources between web clients and web servers over a network. A browser might, for instance, request a web page written in the Hypertext Markup Language (HTML), to which the server can respond by transferring the page contents. Metadata (contextual information attached to a packet) containing information about session status is generated by each data transfer event and consumed later by admins trying to figure out what went wrong. The HTTPS variation of the protocol ensures that data transfers are securely encrypted using the Transport Layer Security (TLS) protocol.
A packet is a small unit of data that might have been carved out of a larger data file or archive. After transmission, packets can be reassembled into their original form. When the Transmission Control Protocol (TCP) is used for a network data transfer, packets being transferred across a network are checked for errors when received and, if necessary, resent. Transfers using the User Datagram Protocol (UDP) will complete more quickly than TCP but, because they don’t include error correction, they’re only appropriate for operations that are highly tolerant of error.
By default, firewalld will be active and will reject all incoming traffic with a couple of exceptions, like SSH. That means your website won’t be getting too many visitors, which will certainly save you a lot on data transfer costs. As that’s probably not what you had in mind for your web server, you’ll want to open the HTTP and HTTPS ports that, by convention, are designated as 80 and 443, respectively. firewalld offers two ways to do that. One is through the --add-port argument that references the port number directly along with the network protocol it’ll use (TCP in this case). The --permanent argument tells firewalld to load this rule each time the server boots:
# firewall-cmd --permanent --add-port=80/tcp
# firewall-cmd --permanent --add-port=443/tcp
The --reload argument will apply those rules to the current session:
# firewall-cmd --reload
That approach will work for any complicated or customized configuration you can come up with. But if you’ve got simpler needs, you can use one of firewalld’s predefined values for many of the more commonly used services. Those values are drawn from the data kept in the /etc/services file.
The --add-service argument, when it refers to your HTTP and HTTPS services, would open ports 80 and 443. This may not seem like a big deal in this case, but when push comes to shove and time is short, are you sure you’ll remember that the default MySQL port happens to be 3306? Wouldn’t it be easier to just type mysql?
# firewall-cmd --permanent --add-service=http
# firewall-cmd --permanent --add-service=https
Curious as to the current settings on your firewall? Run --list-services:
# firewall-cmd --list-services
dhcpv6-client http https ssh
Assuming you’ve added browser access as described earlier, the HTTP, HTTPS, and SSH ports are all open, along with dhcpv6-client, which allows Linux to request an IPv6 IP address from a local DHCP server. You’ll learn more about that in chapter 14.
You certainly don’t want just anyone getting SSH access to your server, so let’s put firewalld to work securing it. You’ll restrict SSH access so that only sessions originating from a particular IP address will be allowed. To do that, I’m going to show you how to cut off all SSH access and then open it for only a single IP.
Note
I should warn you that playing around with firewalls while logged in to an SSH session is a bit dangerous. You could end up locked out of your own server. If this happens, there are some tricks (coming later in this chapter) for getting back in. In any case, if you’re using a disposable LXC container or VM, you shouldn’t have all that much to worry about one way or the other: if something breaks, destroy it and fire up a clean one.
To shut down the existing SSH access, use --remove-service and then reload firewalld (--remove-port will work the same way if you’re referring to the port number):
# firewall-cmd --permanent --remove-service=ssh
success
# firewall-cmd --reload
Test your new configuration to make sure it worked. Open a new terminal on any other machine with network access, and try to log in to your server using SSH. Your attempt should fail:
$ ssh [email protected]                                          1
ssh: connect to host 192.168.1.22 port 22: No route to host
- 1 Allowing root login via SSH is not a good idea and can be forbidden in the /etc/ssh/sshd.conf file through the PermitRootLogin setting with a value of no.
Now, back on your firewalld machine, add a new rule that will accept TCP traffic on port 22 (the default SSH port), but only from clients using the IP address 192.168.1.5 (or whatever the IP address of your client machine is). The --add-rich-rule argument tells firewall-cmd that this command uses the Rich Language set, a high-level syntax designed to simplify the creation of complex firewall rules (see http://mng.bz/872B for more details):
# firewall-cmd --add-rich-rule='rule family="ipv4"
 source address="192.168.1.5" port protocol="tcp" port="22" accept'
success
Now try logging in once again from a terminal originating in the specified IP address. It should work. Because you didn’t make this rule permanent, everything should go back to normal the next time you boot.
UncomplicatedFirewall (ufw)
Let’s see how you can similarly control SSH access on an Ubuntu machine using ufw. The ufw program might not come installed on new Ubuntu installations and, in any case, will be disabled by default, so you’ll want to get it running:
# apt install ufw
Because ufw starts with all ports closed, enabling it prevents you from opening a new SSH session. Any existing sessions shouldn’t be affected but, still, it’s probably a good idea to add a rule allowing SSH even before enabling ufw:
# ufw allow ssh                                  1
Rules updated
# ufw enable                                     2
Command may disrupt existing ssh connections.    3
Proceed with operation (y|n)?
- 1 Use the ufw deny ssh command to disable SSH.
- 2 Starts the firewall. When necessary, use the ufw disable command to shut down ufw.
- 3 A warning that existing or new remote connections might be affected by this action
If you’re running ufw on an LXC container, those commands probably didn’t work. Instead, this rather frightening error message was probably displayed:
ERROR: initcaps
[Errno 2] modprobe: ERROR: ../libkmod/libkmod.c:586 kmod_search_moddep()
 could not open moddep file '/lib/modules/4.4.0-87-generic/modules.dep.bin'
modprobe: FATAL: Module ip6_tables not found in directory
  /lib/modules/4.4.0-87-generic
ip6tables v1.6.0: can't initialize ip6tables table `filter':
  Table does not exist (do you need to insmod?)
Perhaps ip6tables or your kernel needs to be upgraded.           1
- 1 With IPv6 support disabled on the host system, you may encounter this error message.
This is related to the fact that LXC containers might not have IPv6 support enabled by default. Fixing that might be complicated, given that containers lack full access to their host’s kernel. If you’re not planning to include IPv6 in your network configuration (which, in any case, fits the vast majority of use cases), then it’ll be simplest to disable IPv6 support in your /etc/default/ufw configuration file by editing the IPV6=yes line to read IPV6=no.
Listing 9.1. Part of the /etc/default/ufw configuration file
# /etc/default/ufw
#

# Set to yes to apply rules to support IPv6 (no means only IPv6 on loopback
# accepted). You will need to 'disable' and then 'enable' the firewall for
# the changes to take affect.
IPV6=no                                                                   1

# Set the default input policy to ACCEPT, DROP, or REJECT. Please note that
# if you change this you'll most likely want to adjust your rules.
DEFAULT_INPUT_POLICY="DROP"

# Set the default output policy to ACCEPT, DROP, or REJECT. Please note that
# if you change this you'll most likely want to adjust your rules.
DEFAULT_OUTPUT_POLICY="ACCEPT"
[...]
- 1 Change the value of IPV6 from yes to no to disable IPv6 support and avoid the ufw error.
Enabling ufw, adding a rule for SSH, and running ufw enable should now work:
# ufw enable
Command may disrupt existing ssh connections.
Proceed with operation (y|n)? y
Firewall is active and enabled on system startup
# ufw allow ssh
Rules updated
Like firewalld, ufw lets you create rules using either port numbers or service names (like the ufw allow ssh you just used). The following two commands will open HTTP and HTTPS access for your web server:
# ufw allow 80
# ufw allow 443
The ufw status command shows you that the service is running and that the three rules you need are now active. Go ahead and test this against your web server:
# ufw status
Status: active
To                         Action      From
--                         ------      ----
80                         ALLOW       Anywhere
22                         ALLOW       Anywhere
443                        ALLOW       Anywhere
Note
To properly test web server access through a firewall, don’t forget that your browser caches page data. This means that the browser might be able to load a page it’s previously visited even though there’s now a firewall rule that’s supposed to make that impossible. To make sure you’re testing the current state of your website, flush the browser cache or refresh your browser page.
One more piece of fine-tuning will limit SSH access to your team members sitting behind a specific IP address. If it’s safe (meaning your web server isn’t exposed to internet traffic right now), it’s a good idea to disable ufw before making these changes. Then remove your allow-SSH rule using delete 2 (which refers to the rule as the second in the ufw list) and reopen it only for traffic coming from 10.0.3.1. (In my case, because I was logging in to the LXC container from my LXC host, that happens to be the IP I’ll use; your mileage may vary.) Finally, restart ufw and check its new state:
# ufw disable
Firewall stopped and disabled on system startup
#
# ufw delete 2                                       1
Rules updated
#
# ufw allow from 10.0.3.1 to any port 22             2
Rules updated
#
# ufw enable
Command may disrupt existing ssh connections.
Proceed with operation (y|n)? y
Firewall is active and enabled on system startup
#
# ufw status
Status: active
To                         Action      From
--                         ------      ----
80                         ALLOW       Anywhere
443                        ALLOW       Anywhere
22                         ALLOW       10.0.3.1       3
- 1 Deletes the second firewall rule displayed by ufw status
- 2 Permits SSH traffic from only the specified IP and nowhere else
- 3 A new rule permitting SSH traffic only from the specified IP
You can test your configuration by logging in from both the machine using the permitted IP and from any other machine. The first one should work, but the second one had better not!
With that, you’ve now seen how to use both firewalld and ufw to securely configure access to a simple web server. Even though firewalls can control traffic using any protocol or port, we’ve only covered HTTP, HTTPS, and SSH. It’s worth also mentioning that, as you’ll see a bit later in this chapter, you can use nonstandard network ports for your applications.
Recovering a locked VM
If you do manage to lock yourself out of an LXC container, you can use chroot (as you did back in chapter 6) to disable or even reconfigure your firewall. First of all, stop the container and then run chroot against the rootfs directory that’s within the directory hierarchy used by your LXC container (/var/lib/lxc/your-container-name/). The command prompt you’ll get lets you execute commands as if the container was actually running. Now disable ufw or, if you prefer, run the necessary commands to fix the problem and then exit the chroot shell. When you start the container up again, you should have SSH access:
# lxc-stop -n your-container-name                      1
# chroot /var/lib/lxc/your-container-name/rootfs/      2
# ufw disable
# exit                                                 3
# lxc-start -d -n your-container-name
- 1 Stops a running LXC container
- 2 Mounts your container’s file system as chroot
- 3 Closes the chroot shell session
What if it’s a VirtualBox VM that’s locked you out? That’s an easy one: log in through the original terminal that opened when you launched the VM in the first place. That’s the equivalent of sitting at a keyboard that’s plugged into a physical server and won’t require any network connectivity for access.
9.2.2. Using nonstandard ports
One advantage of being able to set network ports by number is that it lets you configure applications to use nonstandard ports. You could, for instance, set port 53987 for SSH rather than 22. The advantage of nonstandard ports it that they let you implement security through obscurity.
Let me explain. In and of itself, port 53987 isn’t any more secure than port 22: exploiting it is simply a matter of updating the SSH client with the new setting. But it can, nevertheless, add a layer of protection.
Imagine there’s a hacker poking away at your infrastructure, trying to find a way in. Perhaps that person has discovered that one of your admins has a bad habit of reusing the same password for multiple accounts—and one of those accounts has already been compromised. The hacker has quite a lot of valuable information from that breach: your server’s IP address (it’s often the same as the one used by your website) and your admin’s user name and password. Assuming you permit password login to your SSH accounts (which, as you know from chapter 3, is not a good idea), there’s nothing stopping the hacker from logging in and injecting some mayhem into your life. Except no one told the hacker that port 22 is shut tight and SSH access is only available through some obscure high-range port (like 53987). Because you reset the default port, you’ve made it a little bit harder to break through your defenses, and that little bit might one day make a big difference.
How does it work? First, you’ll need to edit the /etc/ssh/sshd_conf configuration file on your server (the computer that will host your SSH sessions). The file will contain a line that, by default, reads Port 22. You’ll want to edit that to use whichever port you plan to use.
Listing 9.2. Port setting line from the ssh_d.conf file on an SSH host
# What ports, IPs, and protocols we listen for
Port 22                                            1
- 1 Change this value to the port number you want to use.
When you’re done, and you’re sure you’ll be able to get back into your server should your current SSH session go down, restart the SSH service. If you’ve got a firewall going, you’ll need to tell it to allow access on your new port...that’s coming soon:
# systemctl restart ssh
Now, when you want to log in from a remote machine, add -p followed by the new port number. Your SSH client will then be able to request a session over the new port:
$ ssh -p53987 username@remote_IP_or_domain
If you’re logging in using a different SSH client (like PuTTY), you’ll need to similarly tell the client about the nonstandard port number. Let’s look at that next.
Configuring a ufw firewall to allow traffic through a nonstandard port
Opening up a port by number is fairly straightforward, but you’ll need to explicitly specify the protocol you’ll be using (TCP or UDP). This example uses the TCP protocol:
# ufw allow 53987/tcp
You can also open a range of ports with a single command using the colon (:) character. This can be useful for infrastructure planning when, say, you know your developers will be pushing out new applications and will need access to multiple ports. Giving them a range to play with now can save time and frustration later. This particular example opens all the ports between 52900 and 53000:
# ufw allow 52900:53000/tcp
The 65,535 available network ports are divided into three categories:
- Ports between 1 and 1023 are designated as well-known and have been set aside for recognized services like SSH (22) and HTTP (80). You should never use a well-known port number for your own applications, as you’re likely to cause a conflict.
- Ports between 1024 and 49151 are registered, meaning companies and organizations have requested that specific ports in this range be set aside for their applications even if they haven’t become universally adopted. Examples of this are port 1812, which is used for the RADIUS authentication protocol, and 3306, MySQL’s dedicated port.
- Ports between 49152 and 65535 are unregistered and are considered dynamic (or private). These ports are available for any temporary or ad hoc use, particularly on private networks. You can be confident that they won’t clash with known applications or services.
Choosing a nonstandard port number
What port number should you choose? Well let’s first of all get one thing clear: you should never let outsiders (like me) influence such decisions! But, to avoid possible conflicts with active network applications, you’ll want to stick to values in the unregistered range between 49152 and 65535. That should give you enough to work with.
Working with nonstandard ports is, of course, not only for SSH. You should consider using this trick for any application that you’ve either written yourself or can control through configuration files. And remember: like most of the tools in this chapter, this won’t be all that effective on its own, but it’s a powerful element when used as part of a larger set of security protocols.
9.3. Encrypting data in transit
For two reasons, website encryption is a really big deal:
- Unencrypted sites dangerously expose their data and place their users at significant risk.
- Unencrypted sites generate significantly less business.
The first problem stems from the fact that unencrypted sites display and handle everything in plain text. That means all transfers involving passwords and personal and financial information (like credit cards) are visible to any curious observer with access to the network. This is obviously a horrible idea.
The second problem is the product of a decision made by Google back in January, 2017. Google decided to penalize unencrypted websites by ranking them lower in internet search results. This made it much harder for users to find content that’s not secure.
Why should Google (along with other powerful internet companies) care? And why should you care? Because the stability of the internet and everything we all do with it can’t survive if we can’t trust its content and the way sites handle our private information. Even if your site doesn’t process credit card purchases, the fact that it’s unencrypted means that it’s much more likely to be compromised, with its resources hijacked for use as part of zombie attacks against other sites. Any single weak site makes the whole internet weaker.
If you want to secure your website (which is what this chapter is about, after all), then encryption is a significant part of the process. Mind you, don’t think that encryption guarantees that your data is safe. It just makes it a great deal more difficult for the wrong people to get at it. To make this work, you’ll need a certificate, which is a file containing information identifying the domain, owner, key, and a reliable digital signature.
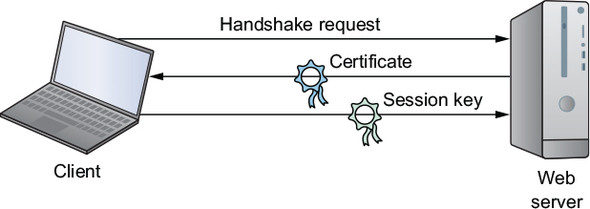
Once you have a certificate, browsers can authenticate the security of your site and exchange only encrypted data throughout a session. All widely used modern browsers come with public root certificates preinstalled, so they can authenticate connections with any site using a private Certificate Authority (CA) certificate. Here’s how it works:
- A client browser requests the server identity so the two can perform a handshake.
- The server responds by sending a copy of the certificate it received from a CA.
- The browser compares the certificate against its list of root certificates and confirms that your certificate hasn’t expired or been revoked.
- If satisfied, the browser encrypts a symmetric session key using the public key your server sent, and transmits the key to the server.
- All transmissions will be encrypted using the session key.
The process is illustrated in figure 9.3.
Figure 9.3. The exchange of identifying data, certificates, and session keys for a TLS encrypted browser session
Until 2016, generating and then installing encryption certificates from trusted CAs using the SSL/TLS standard took time and cost money. On Linux, you would use the OpenSSL command-line interface tool to generate a key pair and then put together a specially formatted Certificate Signing Request (CSR) package containing the public half of the pair along with site profile information.
The CSR would then be sent to a CA. If the request was approved, the CA would send a certificate for you to install in your file system. You would also need to update web server configuration files (/etc/apache2/sites-available/default-ssl.conf, in the case of Apache on Ubuntu) so the software would know where in your file system the certificate was kept. That was then.
Since 2016, Let’s Encrypt has been issuing certificates as a CA for free. Let’s Encrypt (https://letsencrypt.org) is sponsored by the Electronic Frontier Foundation along with a large number of corporate partners including Cisco, Chrome, Shopify, and Digital Ocean. Its mandate is to promote website encryption by making it cheaper and, just as important, simpler.
Forget about configuring files and using OpenSSL to generate CSRs: Let’s Encrypt’s Certbot ACME client will do pretty much the whole thing for you. Let’s Encrypt certificates are valid for 90 days and can be set to automatically renew.
9.3.1. Preparing your website domain
Before you can install a certificate to encrypt your website domain, you’ll need to have a domain. That will involve purchasing a name from a domain registrar like GoDaddy or Amazon’s Route 53. For more on how that works, you can read chapter 5 in my book Learn Amazon Web Services in a Month of Lunches (Manning, 2017).
As you’ll want Apache to handle domain-specific requests from external clients, you’ll also need to add a section to the /etc/apache2/sites-available/000-default.conf file (on a CentOS machine, it’s the settings in the /etc/httpd/conf/httpd.conf file that you’ll edit). Here’s how it might look on my bootstrap-it.com server. Note how, at this point, it’s only configured to accept traffic on the insecure HTTP port 80.
Listing 9.3. Possible domain section from an Apache configuration file
<VirtualHost *:80>                       1
    ServerName bootstrap-it.com          2
    DocumentRoot /var/www/html
    ServerAlias www.bootstrap-it.com     3
</VirtualHost>
- 1 This configuration only listens for traffic on port 80.
- 2 Your domain name is used as the value for ServerName.
- 3 This ServerAlias line adds www as a valid domain prefix.
9.3.2. Generating certificates using Let’s Encrypt
From this point, it’s quite simple. Browse to the Getting Started page of the Electronic Frontier Foundation Certbot website (https://certbot.eff.org) and, as you can see in figure 9.4, specify the web server software and OS you’re using.
Figure 9.4. Once you select your web server software and OS on the Certbot home page, you’ll be shown installation instructions.

From the Certbot home page, you’ll be redirected to a page with some brief instructions. For Apache on Ubuntu 16.04, which includes commands to install the software-properties-common repository management tool, add the Certbot repository to your APT list, and then install the Python-based Certbot software for Apache:
# apt update
# apt install software-properties-common
# add-apt-repository ppa:certbot/certbot
# apt update
# apt install python-certbot-apache
Finally, you’ll launch the Certbot program as admin (using --apache as an argument, in my case). Certbot will read your web server config files to get a feel for the domains you’re likely to want to register:
# certbot --apache
After answering a few questions about contact information and Let’s Encrypt’s terms of services, you’ll be presented with a list of possible domain names that might look like this:
Which names would you like to activate HTTPS for?
--------------------------
1: bootstrap-it.com
2: www.bootstrap-it.com
--------------------------
Select the appropriate numbers separated by commas and/or spaces,
  or leave input blank to select all options shown (Enter 'c' to cancel):
Once you respond, the bot will try to confirm that your selected domains exist and are registered with a publicly accessible DNS server. The certificate server will finally try to connect to your site. If that’s successful, a Let’s Encrypt certificate will be automatically installed and any necessary additional sections will be added to your configuration files.
If something goes wrong with the process, Certbot will display useful error messages that you can use to seed your research for a solution. Plus Let’s Encrypt hosts an active community help forum where users of all skill levels can safely plead for help: https://community.letsencrypt.org.
Up to now in this busy chapter you’ve learned how to enhance website security by keeping your applications patched and updated, use firewall rules to control access to your network, add security through obscurity to your mix, and encrypt data as it moves between your website and its visitors. We’re not done with security.
Still to come: toughening up your login protocols, using the SELinux kernel module and groups to more closely control the trouble your users can get themselves into, and keeping track of your running processes to make sure there’s nothing inappropriate going on in the background when no one’s looking.
9.4. Hardening the authentication process
Using secure connectivity solutions, especially SSH, is great. But it’s also a good idea to give some attention to the way your team members use SSH. Here are a couple of suggestions for improving your remote-access security. It may not be practical to enforce them in every environment (particularly while you’re in the process of setting things up), but they should at least be familiar to you.
Avoid logging in to servers as the root user. It’s always better to use sudo whenever admin privileges are necessary. In fact, you can prevent incoming root logins using SSH altogether by editing the PermitRootLogin line in the /etc/ssh/sshd_conf file:
PermitRootLogin no 1
- 1 The root-login-control line in /etc/ssh/sshd_conf
You can also encourage your admins to use only passwordless SSH access through key pairs (the way you saw back in chapter 3). This, too, can be enforced from the sshd_conf file, this time on the PasswordAuthentication line. With no password authentication, users will be forced to use key pairs:
PasswordAuthentication no 1
- 1 The password-authentication control line in /etc/ssh/sshd_conf
After each of those edits, make sure you reload SSH; otherwise, the new settings won’t take effect until the next boot:
# systemctl restart sshd
Those are important steps in any environment. But if your deployment needs some industrial-strength isolation, consider enabling SELinux.
9.4.1. Controlling file system objects with SELinux
Remember when we discussed object permissions back in chapter 4? The context was the need to make sure users can access and edit their own files. But the flip side of that coin is ensuring that the wrong users can’t get their dirty fingers into other people’s files.
You’ll recall that a common permissions profile for an object might give the owner full read-write-execute powers, but gives the object’s group and others only the permission to read. That would translate as 744 in our numeric notation, or rwx r-- r-- otherwise.
Giving your users full power over their own resources is sometimes described as a discretionary access control (DAC) system. A DAC will make a lot of sense if you want your users to be productive, but it comes with a price: having full control carries the risk that they’ll apply it without being fully aware of the consequences.
Here’s a practical example of what I mean. Suppose a couple of the developers diligently slaving away for your company run into a problem: testing their software locally always fails when trying to write to a data file. Debugging reveals that it’s a permissions issue caused by the fact that the application is being run by one user, but the data file belongs to another.
Because this has happened more than once, and to more than one data file (or SSH key file for that matter), the developers take the quick and lazy route: they open up permissions on the data files and on all the files in those directories to 777—fully accessible to the entire world. Now that’s a significant security problem. There’s also an excellent chance that the application they’re working on will eventually be moved out to production with the same system settings. This is the kind of mistake that lies at the root of a lot of the major data breaches you hear about from time to time.
SELinux is another one of those complex topics that, although critically important for many Linux workloads, doesn’t have to play a major role in this book’s projects. Once again, feel free to skip right past it to our discussion of system groups if you like.
When installed and activated, the SELinux kernel module applies mandatory access control (MAC) to file system objects, regardless of a particular object’s owner. In effect, as illustrated in figure 9.5, it imposes carefully defined, system-wide limits on what a user can do, making it impossible to set inherently dangerous configurations.
Figure 9.5. The process flow following a request for resource access through the filter of SELinux policies

Had SELinux been active, those two developers could have applied 777 permissions to their data files over and over again until their poor little fingers fell off, but it wouldn’t have helped. Instead, they’d have been forced to look for a more appropriate and effective solution. They might, for instance, have considered creating a system group with authority over the data and then adding appropriate user accounts to the group. You’ll learn more about that a bit later in this chapter. Sounds great. What’s not to love about security?
Well, there’s a problem. SELinux has a dark and scary relationship with application compatibility. So dark and so scary that many admins disable it rather than trying to make it work. The problem is that many applications, both off-the-shelf and custom apps you’re building locally, need to access and edit system resources. As a result, running such applications within an unmodified SELinux environment will often fail.
I have it on good authority that there are solutions to all those conflicts and that they’re not impossible to apply. But just as often, the conflicts can be avoided altogether through a better understanding of file system design and security principles. In particular, you should remember the principle of least privilege, which seeks to permit all users and processes only the access they need and nothing more. In any case, you’ll need to know your way around SELinux, so the following sections introduce the basics.
9.4.2. Installing and activating SELinux
Perhaps because SELinux was developed by and for Red Hat Linux (and CentOS), it comes installed and active by default on those systems. Running it on other distros, including Ubuntu, is definitely possible (although AppArmor is a more common choice for Ubuntu), but I can’t guarantee that it will always go smoothly. (Don’t even think about trying it on an LXC container; go with VirtualBox for testing, instead.) On Ubuntu, you’ll need three packages: selinux, setools, and policycoreutils. Here’s how that would look:
# apt install setools policycoreutils selinux
Once they’re nicely tucked in, reboot Ubuntu, and run sestatus for a snapshot of the current SELinux status, including important file system locations and policy. With luck, you should see something like this:
# sestatus
SELinux status:                 enabled              1
SELinuxfs mount:                /sys/fs/selinux
SELinux root directory:         /etc/selinux
Loaded policy name:             targeted             2
Current mode:                   permissive
Mode from config file:          permissive
Policy MLS status:              enabled
Policy deny_unknown status:     allowed
Max kernel policy version:      30
You might sometimes have to run the selinux-activate command to incorporate SELinux settings into the boot process:
# selinux-activate
Activating SE Linux                                            1
Generating grub configuration file ...
Warning: Setting GRUB_TIMEOUT to a non-zero value when GRUB_HIDDEN_TIMEOUT
   is set is no longer supported.
Found linux image: /boot/vmlinuz-4.4.0-89-generic              2
Found initrd image: /boot/initrd.img-4.4.0-89-generic
Found linux image: /boot/vmlinuz-4.4.0-87-generic
Found initrd image: /boot/initrd.img-4.4.0-87-generic
Found linux image: /boot/vmlinuz-4.4.0-83-generic
Found initrd image: /boot/initrd.img-4.4.0-83-generic
Found memtest86+ image: /boot/memtest86+.elf
Found memtest86+ image: /boot/memtest86+.bin
done
SE Linux is activated. You may need to reboot now.             3
- 1 True to its name, selinux-activate sets SELinux as active following the next boot.
- 2 SELinux-friendly flags are added to the launch command for each image controlled by GRUB.
- 3 Because SELinux relies on kernel-level settings, changes often require a reboot.
Like the man says, you may need to reboot for the changes to take effect.
You can control SELinux behavior through the configuration file in /etc/selinux/. The file contains two settings, SELinux state and SELinux type. Table 9.1 gives a brief overview of the possible values.
Table 9.1. The configuration settings for SELinux in /etc/selinux/config
Besides the config file, you can also set the SELinux state from the command line using setenforce, where setenforce 1 enables the enforcing state, and setenforce 0 sets SELinux to the permissive state. When in a permissive state, rule violations are permitted but logged. This is a good way to troubleshoot or test a configuration without turning everything upside down in the process:
# setenforce 1
How about an SELinux example to illustrate how you can control access to an individual file? Consider it done. You should definitely try the example in the next section (or something like it) yourself.
9.4.3. Applying SELinux policies
Say that you’re the sysadmin responsible for those two developers with the lazy streak you met earlier. Based on past experience, you suspect that they might be tempted to open access to a data file a bit too widely. Here’s how you might protect your data no matter what the developers try.
You can use SELinux to control the way any file or process is consumed, but to keep this example simple, let’s work with a machine with Apache (or httpd) installed and an index.html file in the document root at /var/www/html/. The file will, by default, be accessible at least to local requests (via wget localhost from the command line of the server). Here’s how that will normally look:
$ wget locahost
--2017-08-02 10:24:25--  http://localhost/
Resolving localhost (localhost)... ::1, 127.0.0.1
Connecting to localhost (localhost)|::1|:80... connected.
HTTP request sent, awaiting response... 200 OK
Length: 11 [text/html]
Saving to: 'index.html'                                            1

100%[======================================>] 11          --.-K/s   in 0s
- 1 wget successfully saved the index.html file to the local directory.
Now, check out the permissions status of the index.html file using ls -Z (-Z will display the file’s security context):
# ls -Z /var/www/html/
-rw-r--r--. root root unconfined_u:object_r:httpd_sys_content_t:s0 index.html
First, note the regular permissions (-rw-r--r--) that make the file readable (r) by anyone. This is standard for website resources. The SELinux status of the file is displayed as unconfined_u:object_r:httpd_sys_content_t:s0. You can use chcon -t to change the context type of a file. This command replaces the Apache httpd_sys_content_t type with the Samba-related samba_share_t type. I’m not sure you’d ever want to do this in real life, but it should nicely demonstrate one way you can balance the authority you give your users against their potential to mess things up:
# chcon -t samba_share_t /var/www/html/index.html
A second shot of ls -Z shows that the file is now associated with the samba_share_t type:
# ls -Z /var/www/html/ -rw-r--r--. root root unconfined_u:object_r:samba_share_t:s0/var/www/html/index.html
How will another round of wget localhost handle the new SELinux context?
$ wget localhost
--2017-08-02 10:27:30--  http://localhost/
Resolving localhost (localhost)... ::1, 127.0.0.1
Connecting to localhost (localhost)|::1|:80... connected.
HTTP request sent, awaiting response... 403 Forbidden
2017-08-02 10:27:30 ERROR 403: Forbidden.                   1
- 1 Apache responds to the request with a 403: Forbidden fail message.
It’s no go. Apache is forced to disappoint you (or, rather, the developers), as Apache itself has no power over the file in its current context. This is true despite the fact that the file attributes include read permissions for all users. No matter how desperately your developers might want to open access to a protected file, they’ll be spinning their wheels and getting nowhere.
9.4.4. System groups and the principle of least privilege
Those two developers finally got the message. They understand that they’ve been blocked from opening access too widely. But now they’re asking you to help them solve the original problem: how to make files containing sensitive data accessible to multiple accounts without opening those up to everyone.
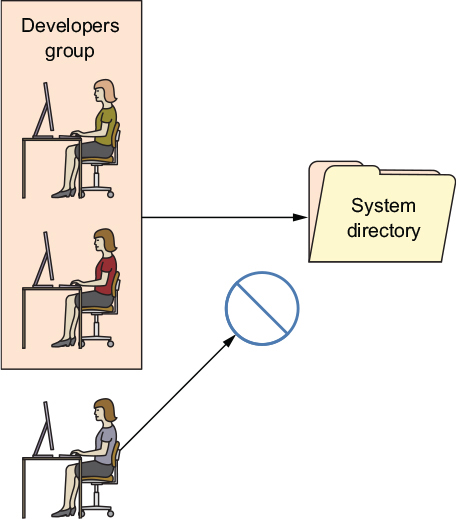
The short answer is groups. (And the long answer is g—r—o—u—p—s.) A group is a system object much the same as a user, except that no one will ever log in to the system as a group. The power of groups is in how they, like users, can be assigned to files or directories, allowing any group members to share the group powers. This is illustrated in figure 9.6.
Figure 9.6. Developers who are members of the Developers group can be given access to a particular directory, as opposed to those individuals who aren’t part of the group.
Try this yourself: use nano to create a new file. Add some Hello World text so you’ll be able to easily tell when you can successfully access it. Now edit its permissions using chmod 770 so that the file’s owner and group have full rights over the file, but others can’t read it:
$ nano datafile.txt
$ chmod 770 datafile.txt
If your system doesn’t already have an extra user besides your account, create one using either adduser (the Debian/Ubuntu way) or useradd (if you’re on CentOS). Note that useradd will also work on Ubuntu:
# useradd otheruser                       1
# passwd otheruser
Enter new UNIX password:
Retype new UNIX password:
passwd: password updated successfully
- 1 The useradd command (as opposed to the Debian adduser command) requires you to generate a user password separately.
Use su to switch to your new user. Once you enter the user’s password, all the commands you execute will be run as that user. You’ll be working with only that user’s authority: no more and no less. If you try reading the datafile.txt file (using cat), you’ll have no luck because, as you remember, others were denied read permission. When you’re done, type exit to leave the new user shell and return to your original shell:
$ su otheruser
Password:
$ cat /home/ubuntu/datafile.txt
cat: /home/ubuntu/datafile.txt: Permission denied
$ exit
All this is expected and easy to understand. And, as you’ve seen, not being able to read the file belonging to a different reader can sometimes be a problem. Let’s see what you can do about that by associating the file with a group and then properly configuring the file’s permissions.
Create a new group you can use to manage your application data, and then edit the properties of your data file using chown. The ubuntu:app-data-group argument leaves the file ownership in the hands of the ubuntu user, but changes its group to your new app-data-group:
# groupadd app-data-group
# chown ubuntu:app-data-group datafile.txt
Run ls with long output (-l) against the file to view its new permissions and status. Note that, as expected, ubuntu is the file’s owner and app-data-group is its group:
$ ls -l | grep datafile.txt
-rwxrwx--- 1 ubuntu app-data-group        6 Aug  9 22:43 datafile.txt
You can use usermod to add your user to app-data-group and then, once again, su to switch to a shell deploying the other user’s account. This time, even though the file’s permissions lock others out, and you’re definitely acting as an “other” right now, you should be able to read it...thanks to your group membership:
# usermod -aG app-data-group otheruser
$ su otheruser                          1
$ cat datafile.txt
Hello World                             2
- 1 Use the su command to switch between user accounts.
- 2 This happened to be the contents of my datafile.txt file.
This kind of organization is the correct and effective way to deal with many of the complicated permissions issues that will arise on a multiuser system. In fact, not only is it used to give individual users the access they need, but many system processes couldn’t do their jobs without special group memberships. Take a quick look through the /etc/group file and note how many system processes have their own groups:
Listing 9.4. Partial listing of the contents of the /etc/group file
$ cat /etc/group
root:x:0:
daemon:x:1:
bin:x:2:
sys:x:3:
adm:x:4:syslog
tty:x:5:
disk:x:6:
lp:x:7:
mail:x:8:
news:x:9:
uucp:x:10:
man:x:12:
proxy:x:13:
[...]
I’ll close out the chapter with a few quick but vital protocols you can incorporate into your security practices.
9.4.5. Isolating processes within containers
Worried that the multiple services you’ve got running on a single server will, should one service be breached, all be at risk? One way to limit the damage that careless or malicious users can cause is by isolating system resources and processes. That way, even if someone might want to expand their reach beyond a set limit, they won’t have physical access.
The old approach to the problem was provisioning a separate physical machine for each service. But virtualization can make it a lot easier, and more affordable, to build a siloed infrastructure. This architecture is often referred to as microservices and would have you launch multiple containers with one, perhaps, running only a database, another Apache, and a third containing media files that might be embedded in your web pages. In addition to the many performance and efficiency benefits associated with microservices architectures, this can greatly reduce each individual component’s risk exposure.
Note
By containers I don’t necessarily mean those of the LXC persuasion. These days, for this kind of deployment, Docker containers are far more popular. If you’re interested in learning more, check out Manning’s Microservices in Action (Morgan Bruce and Paulo A. Pereira, 2018), Microservice Patterns (Chris Richardson, 2018), or Docker in Practice, 2nd ed. (Ian Miell and Aidan Hobson Sayers, 2018).
9.4.6. Scanning for dangerous user ID values
While any admin user will be able to temporarily assume root authority using sudo, only root is actually root. As you’ve seen already, it isn’t safe to perform regular functions as root. But it can happen, whether by innocent accident or malicious tampering, and a regular user can effectively get admin rights full-time.
The good news is that it’s easy to spot imposters: their user and/or group ID numbers will, like root, be zero (0). Take a look at the passwd file in /etc/. This file contains a record for each regular and system user account that currently exists. The first field contains the account name (root and ubuntu, in this case), and the second field might contain an x in place of a password (which, if it exists, will appear encrypted in the /etc/shadow file). But the next two fields contain the user and group IDs. In the case of ubuntu in this example, both IDs are 1000. And, as you can see, root has zeroes:
$ cat /etc/passwd
root:x:0:0:root:/root:/bin/bash
[...]
ubuntu:x:1000:1000::/home/ubuntu:/bin/bash
If you ever see a regular user with a user or group ID of 0, then you know there’s something nasty going on, and you should get to work fixing it. The quick and easy way to spot a problem is to run this awk command against the passwd file, which prints any line whose third field contains only a 0. In this case, to my great relief, the only result was root. You can run it a second time substituting $4 for $3 to pick up the group ID field:
$ awk -F: '($3 == "0") {print}' /etc/passwd              1
root:x:0:0:root:/root:/bin/bash
- 1 The awk command is discussed in greater detail in chapter 11.
9.5. Auditing system resources
The more things you’ve got running, the greater the odds of something breaking, so it makes sense that you’ll want to keep track of what’s running. This applies to network ports (if they’re open, then by definition, there must be a way in), services (if they’re active, then people can run them), and installed software (if it’s installed, it can be executed).
For audits to be useful, you’ll have to remember to run them once in a while. Because you know you’re going to forget, you’ll be much better off incorporating your auditing tools into a script that not only executes regularly but, ideally, also parses the results to make them more readable. In this section, I’ll focus on introducing you to three key audit tools to help you scan for open ports, active services, and unnecessary software packages. Getting it all implemented will be your job.
9.5.1. Scanning for open ports
A port is considered open if there’s some process running on the host that’s listening on that port for requests. Keeping an eye on your open ports can keep you plugged into what’s going on with your server.
You already know that a regular web server is probably going to have HTTP (80) and SSH (22) ports open, so it shouldn’t come as a surprise to find those. But you’ll want to focus on other, unexpected results. The netstat command displays open ports along with a wealth of information about how those ports are being used.
In this example, run against a fairly typical multipurpose server, -n tells netstat to include the numeric ports and addresses, -l includes only listening sockets, and -p adds the process ID of the listening program. Naturally, if you see something, do something:
# netstat -npl
Active Internet connections (only servers)
Proto Local Address     Foreign Address   State       PID/Program name
tcp   127.0.0.1:3306    0.0.0.0:*         LISTEN      403/mysqld        1
tcp   0.0.0.0:139       0.0.0.0:*         LISTEN      270/smbd
tcp   0.0.0.0:22        0.0.0.0:*         LISTEN      333/sshd          2
tcp   0.0.0.0:445       0.0.0.0:*         LISTEN      270/smbd
tcp6  :::80             :::*              LISTEN      417/apache2
[...]
In recent years, ss has begun to replace netstat for many uses. In case you find yourself at a party one day and someone asks you about ss, this example (which lists all established SSH connections) should give you enough information to save you from truly deep embarrassment:
$ ss -o state established
   '( dport = :ssh or sport = :ssh )'                             1
Netid  Recv-Q Send-Q    Local Address:Port   Peer Address:Port
tcp    0      0         10.0.3.1:39874       10.0.3.96:ssh
timer:(keepalive,18min,0)
- 1 Displays all TCP sockets
9.5.2. Scanning for active services
Getting a quick snapshot of the systemd-managed services currently enabled on your machine can also help you spot activity that doesn’t belong. systemctl can list all existing services, which can then be narrowed down to only those results whose descriptions include enabled. This code returns only active services:
# systemctl list-unit-files --type=service --state=enabled
[email protected]                            enabled
bind9.service                              enabled
cron.service                               enabled
dbus-org.freedesktop.thermald.service      enabled
docker.service                             enabled
[email protected]                             enabled
haveged.service                            enabled
mysql.service                              enabled
networking.service                         enabled
resolvconf.service                         enabled
rsyslog.service                            enabled
ssh.service                                enabled
sshd.service                               enabled        1
syslog.service                             enabled
systemd-timesyncd.service                  enabled
thermald.service                           enabled
unattended-upgrades.service                enabled
ureadahead.service                         enabled
- 1 sshd is the SSH server; ssh is the client software.
If you do find something that shouldn’t be there, you can use systemctl to both stop the service and make sure it doesn’t start up again with the next boot:
# systemctl stop haveged
# systemctl disable haveged
There’s actually nothing dark and sinister about the haveged service I’m stopping in this example. It’s a small tool I often install to generate random background system activity when I’m creating encryption keys.
9.5.3. Searching for installed software
Could someone or something have installed software on your system without you knowing? Well, how would you know if you don’t look? To get the whole briefing, use yum list installed or, on Debian/Ubuntu, dpkg --list. To delete any packages that don’t belong, use remove <packagename>:
# yum list installed
# yum remove packageName
Here’s how it goes on Ubuntu:
# dpkg --list                    1
# apt-get remove packageName
- 1 Outputs a long list of packages that you’ll have to visually scan as quickly as you can. I’m not aware of any shortcuts.
It’s also a good idea to be aware of changes to your system configuration files. That’s something you’ll learn about in chapter 11.
Summary
- Using firewalls, you control network traffic by protocol, port, and source or destination.
- Configure applications to listen in on nonstandard network ports to add security through obscurity to your infrastructure.
- Using certificates received from a CA, client-host browser sessions are encrypted, greatly reducing the chances of the transferred data being compromised.
- Global controls are enforced on a multiuser file system using SELinux.
- Access to resources is closely managed using groups to allow users and processes exactly the access they need.
- Regular (scripted) audits of running processes, installed software, and open ports are critical to ongoing server security.
Key terms
- You can administer firewall rules on Linux using iptables or simpler, high-level tools.
- The Hypertext Transfer Protocol (HTTP) manages browser-based data transfers over a network.
- The Transport Layer Security (TLS) protocol enforces data encryption for host-client network data transfers.
- Discretionary access control systems (DACs) allow users control over file system resources.
- Control over resources on mandatory access control systems (MACs) is ultimately managed by system-wide policies.
- Microservices are individual computer services run from individual containers as part of a larger single application infrastructure spanning multiple containers.
Command-line review
- firewall-cmd --permanent --add-port=80/tcp opens port 80 to incoming HTTP traffic and configures it to reload at boot time.
- firewall-cmd --list-services lists the currently active rules on a firewalld system.
- ufw allow ssh opens port 22 for SSH traffic using UncomplicatedFirewall (ufw) on Ubuntu.
- ufw delete 2 removes the second ufw rule as listed by the ufw status command.
- ssh -p53987 username@remote_IP_or_domain logs in to an SSH session using a non-default port.
- certbot --apache configures an Apache web server to use Let’s Encrypt encryption certificates.
- selinux-activate activates SELinux on an Ubuntu machine.
- setenforce 1 toggles enforcing mode in an SELinux configuration.
- ls -Z /var/www/html/ displays the security context of the files in a specified directory.
- usermod -aG app-data-group otheruser adds the otheruser user to the app-data-group system group.
- netstat -npl scans for open (listening) network ports on a server.
Test yourself
You’re concerned that hackers might have gained access to your server, and you want to make sure they aren’t able to escalate their permissions to root powers. Which of the following commands might help?
- firewall-cmd --list-services
- netstat -npl
- certbot --apache
- awk -F: '($3 == "0") {print}' /etc/passwd
You noticed that there are network ports open on your server that you can’t explain. Which of the following tools can be used to close them?
- firewalld
- netstat
- certbot --apache
- awk
What security advantage can there be in splitting a single application’s services among multiple containers?
- A failure in one won’t necessarily affect the performance of the others.
- A vulnerability in one won’t necessarily spread to the others.
- Such a design pushes authentication further away from the servers.
- Such a design increases process visibility.
Which of the following commands will allow SSH access to a server from only a single IP address?
- firewall-cmd allow from 10.0.3.1 to any port 22
- ufw allow from 10.0.3.1 to port 22
- ufw allow from 10.0.3.1 to any port 22
- firewall-cmd --allow from 10.0.3.1 to any port 22
Requesting a TLS certificate from a CA allows you to
- Prevent unauthorized users from accessing your web server’s backend
- Secure data at rest on a web server
- Secure data in transit between a web server and clients
- Permit passwordless SSH access to your web server’s backend
Which of the following settings in the /etc/ssh/sshd_conf file will force SSH clients to use key pairs?
- PermitRootLogin no
- PermitRootLogin yes
- #PasswordAuthentication no
- PasswordAuthentication no
Which of the following commands will set SELinux to permissive mode?
- setenforce 0
- chcon -t samba_share_t /var/www/html/index.html
- setenforce 1
- selinux-activate
Which of the following commands will make the app-data-group the group of the datafile.txt file?
- chown app-data-group,ubuntu datafile.txt
- chown app-data-group datafile.txt
- chown app-data-group:ubuntu datafile.txt
- chown ubuntu:app-data-group datafile.txt
Answer key
d
a
b
c
c
d
a
d