
Chapter 3
Managing Tables and Lists

Tables and lists are great ways to present information in your document in a way that's easy for readers to digest. In this chapter, I start by showing you how to create tables. This includes changing existing text to tables, switching tables to text, and creating a table from scratch.
Next, I talk about how to modify tables after you've created them so that they look the way you want them to appear. You'll learn how to sort table data, manipulate the sizes of cells and tables, split cells and tables, and create a row header at the top of your table so that the header in your table appears on every page where the table resides.
Then I will show you how to create and format text lists. Word allows you to create bulleted and numbered lists easily, and you'll learn how to add and modify them. Finally, you'll learn how to change number values and list levels so that you can manage changes in your lists more easily.
Creating Tables
Word makes it easy for you to create a table. Here's how:
- Place the cursor within the page where you want to add a table.
- Click the Insert menu option.
- Click the Table icon.
- Move your mouse pointer over the grid in the drop‐down menu. Cells in the grid light up as you move the pointer so that you can see the size of the table in terms of rows and columns.
- When the table is the size you want, click the highlighted cell, as shown in Figure 3.1.
Et voilà—the table appears on the page with the number of rows and columns you selected in the grid.
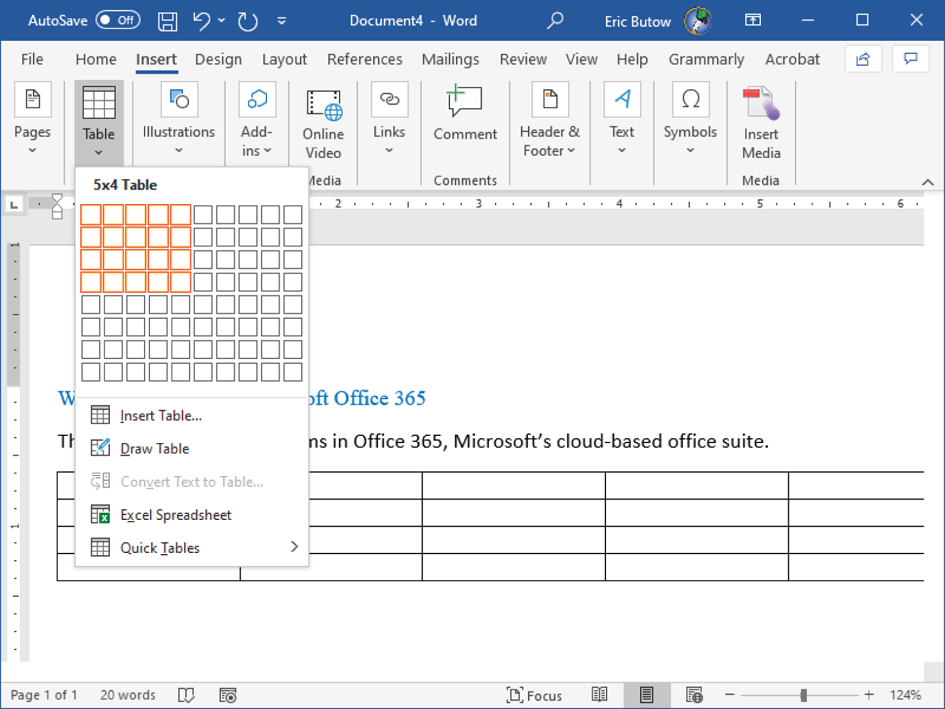
FIGURE 3.1 The selected table cells
Converting Text to Tables
If you decide that some text in your document would be better presented as a table, Word has tools that make it easy to convert that text into a table when you follow these steps:
- Select the text in the document.
- Click the Insert menu option.
- In the Insert ribbon, click the Table icon.
- Click the Convert Cell To Table icon in the drop‐down menu.
- In the Convert Text To Table dialog box, shown in Figure 3.2, select the number of rows and columns that you want in the table in the Table Size section.
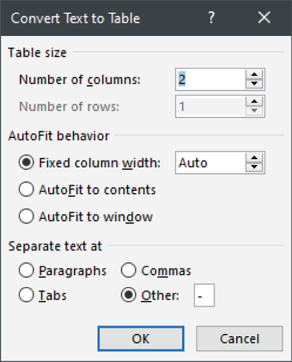
FIGURE 3.2 Convert Text To Table dialog box
- In the AutoFit Behavior section, you can set the specific width of a column or have Word do it by clicking one of the AutoFit options.
- In the Separate Text At section, you can decide how to put each group of text in each table cell.
- When you finish, click OK.
Now your text is in the table, though you may have to do some more tweaking to get it to appear the way you want it to.
Switching Tables to Text
As you work on a table, you may think that what's in a table may read better either in a paragraph of text or in a list. Or the amount of text may be so small that a table simply isn't needed. Whenever you want to change a table into text, start by clicking a cell in your table and then follow these steps:
- Click the Layout menu option to the right of the Table Design option.
- In the Layout ribbon, click the Select icon.
- Click Select Table in the drop‐down menu. Now all cells are gray, which means that Word has selected your entire table.
- Click the Convert To Text icon in the Data section in the ribbon.
- In the Convert Table To Text dialog box, choose if you want to separate text in each cell with paragraph marks, tabs (the default option), commas, or another character.
- When you're done, click OK.
All your table text in the default paragraph style is selected in place of the table.
Creating Tables by Specifying Rows and Columns
The Insert Table grid gives you the ability to create a maximum table size of only 10 columns and 8 rows. If you need more control over the size of your columns when you create a table, follow these steps:
- Place the cursor on the page where you want to insert the table.
- Click the Insert menu option (if you haven't done so already).
- Click the Table icon.
- Click Insert Table in the drop‐down menu, as shown in Figure 3.3.

FIGURE 3.3 Insert Table menu option
- In the Insert Table dialog box (Figure 3.4), specify the number of columns and rows that you want in the Number Of Columns and Number Of Rows boxes, respectively. The default is five columns and two rows.

FIGURE 3.4 Insert Table dialog box
Now you can change the size of the columns in the AutoFit Behavior area. The default fixed column width is Auto, which means that Word takes care of it automatically. Here's what you can do to adjust the column and table widths:
- Click the up and down arrows to the right of the Fixed Column Width box to change the width of the box in tenths of an inch. The minimum width that you can set is 0.3 inches.
- Click AutoFit To Contents to have Word adjust the column width automatically.
- Click AutoFit To Window to have Word adjust the table width automatically.
You can save the settings for the next time you create a table by clicking the Remember Dimensions For New Tables check box. Once you're done, place your new table on the page by clicking OK.
Modifying Tables
Word gives you a lot of power to modify your tables as you see fit. As in Microsoft Excel, you can sort text and/or numbers in a table. You can also take advantage of more tools to change the look of your table cells, rows, columns, and even the entire table.
You can also merge cells in your table. If you already have merged cells, or you have a cell that you think is too big, you can split it into two or more cells. And you can even split the entire table.
If your table is long, then it will likely appear on more than one page. To ensure that your readers know what they're looking at on each page, you can create a header row and tell Word to show that header row on every page in your table.
Sorting Table Data
A common sorting method for a table is to sort text in alphabetical order. Word also gives you the ability to sort by number and date. What is more, you can sort in multiple columns.
For example, you can sort the text in the first column alphabetically. After Word sorts all the text in the first column, it can sort the numbers in the second column.
After you create a table, click the table cell and then click the Layout menu option to the right of the Table Design option. In the Layout ribbon, click the Sort icon in the Data section, as shown in Figure 3.5.
In the Sort dialog box (see Figure 3.6), you can sort by three different columns. If the column has a header, then select the column name by clicking the Sort By box and then selecting the name in the drop‐down list.

FIGURE 3.5 Sort icon
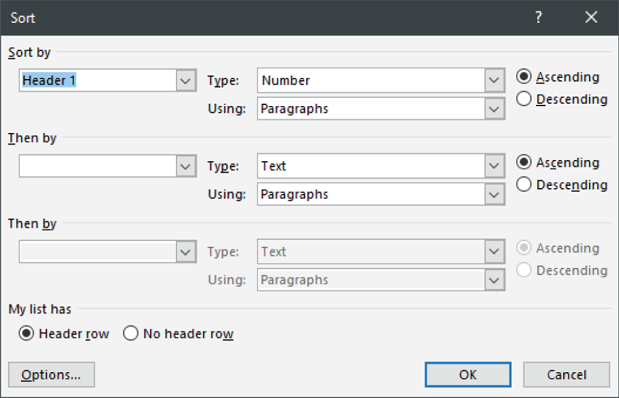
FIGURE 3.6 Sort dialog box
The Sort dialog box is almost a table itself, as it contains three setting columns and four setting rows. The first row allows you to set the basic parameters of your search in each of the three columns as follows:
- Sort By If there are no columns, you see the column numbers starting with Column 1 on the left side of the table and incrementing from left to right.
- Search Parameters Select the type of column for which you want to search in the Type drop‐down list: Text (Default), Number, or Date. Word figures out the type of the first cell in the upper left, and it shows you the two types in the Type box.
In the Using box, sort by paragraphs, headings, or fields in a cell. When you click the box, the column type will determine what cell search types you see in the drop‐down list.
- Sort Order Sorting in Ascending order is the default; that is, letters from A to Z. Click Descending in any of the three sort areas to sort from Z to A. If you sort by number, Word sorts by the first number in the text. For example, if you have the numbers 10 and 5 in a column, Word will list 10 first because 1 comes before 5. You can change this by sorting by number in the Type drop‐down list.
The following two Then By rows allow you to sort by additional columns after Word sorts through the first column. For example, after you sort by name in the first column, you can sort by a number in the second column.
The Header Row button is selected by default at the bottom of the dialog box. If you don't want to use the header row as part of the sort, click the No Header Row button.
Click the Options button to open the Sort Options dialog box and to change other sort settings, such as making the sort text case sensitive.
When you're done, click OK. The table rows are reordered except for the header row, as shown in the example in Figure 3.7.
Configuring Cell Margins and Spacing
It's easy to configure margins and spacing around text in one or more table cells. All you have to do is click a cell and then change the column width either by using your mouse or by setting the height and width with the table's Layout ribbon.

FIGURE 3.7 The reordered table rows
Use Your Mouse
To configure your cell width by clicking and dragging your mouse pointer, move the pointer on the right side of the column boundary you want to move until it becomes a resize pointer, which looks like a double‐headed arrow, as shown in Figure 3.8.
Now drag the boundary until the column is the width you want and then release the mouse button.
If you want to get a precise measurement as you click and drag with your mouse, turn on the Word ruler (if it's not open already) by clicking the View menu option and then clicking the Ruler check box in the Show section in the ribbon.

FIGURE 3.8 Double‐headed arrow icon
Once you see the ruler above your document (and just below the ribbon), click a cell in your table that you want to resize. The ruler shows trapezoid‐shaped markers at the bottom edge of the ruler. These markers tell you where the cell begins and ends.
Move the cell border by clicking and dragging on the marker. When you hold down the Alt key as you click and drag, you see the exact width of the cell in inches, and the width changes as you move the marker to the left and right.
Set to a Specific Width
To change the width to a specific measurement, click a cell in the column that you want to resize. Click the Layout menu option to the right of the Table Design option.
The Cell Size section in the ribbon includes settings for the cell height and width in inches, and you can change the width by clicking in the Width box and typing the width in hundredths of an inch. Click the up or down arrow to the right of the box to increase or decrease, respectively, the width in increments by one‐tenth of an inch.
Add or Change the Space Inside the Table
To add space inside your table, you can adjust cell margins or cell spacing. The difference? Cell margins are inside the table cell, and cell spacing is between cells. Here's how to add or change both cell margins and spacing:
- Click a cell in the table.
- Click the Layout menu option to the right of the Table Design option.
- In the Layout ribbon, click the Cell Margins icon in the Alignment section.
- The Table Options dialog box appears, as shown in Figure 3.9.

FIGURE 3.9 Table Options dialog box
- The Default Cell Margins area contains four boxes so that you can use to adjust the Top, Bottom, Left, and Right margins. Click the up or down arrow to the right of each box to increase or decrease, respectively, the margin by one‐hundredth of an inch.
- In the Default Cell Spacing area, click the Allow Spacing Between Cells check box, and then enter the measurement you want in the box. The default measurement is 0.01 inches.
- Click OK.
Merging and Splitting Cells
There may be times when you need to merge multiple cells into one larger one. You may also find that when you have a cell with a lot of text, it's easier to read when you split that cell into two or more cells. Word makes it easy to do both tasks.
Merge Cells
You can combine two or more table cells located in the same row or column into a single cell. For example, you can merge several cells horizontally to create a heading row that spans several columns at the top of your table. Here's how:
- Select the cells that you want to merge.
- Click the Layout menu option to the right of the Table Design option.
- In the Layout ribbon, click the Merge Cells icon in the Merge section, as shown in Figure 3.10.
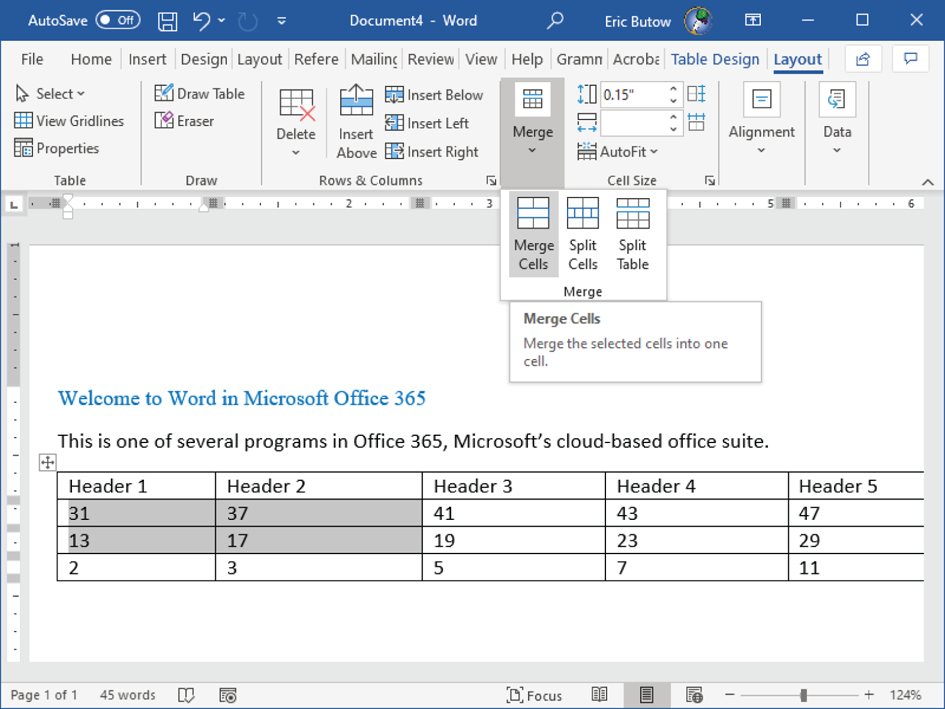
FIGURE 3.10 Merge Cells menu option
If there is text in several cells that you merged, you see several lines of text in the merged cell.
Split Cells
You can split one cell into multiple rows or columns by following these steps:
- Click the cell, or select multiple cells, that you want to split in your table.
- Click the Layout menu option to the right of the Table Design option.
- In the Layout ribbon, click the Split Cells icon.
- In the Split Cells dialog box, shown in Figure 3.11, type the number of columns and/or rows into which you want to split the cell.
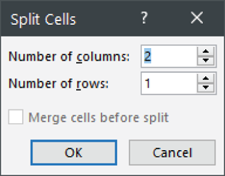
FIGURE 3.11 Split Cells dialog box
- Click OK.
If you specify more rows and cells than there is text in the merged cell, then a lot of split cells won't have text in them.
Resizing Tables, Rows, and Columns
As you create a table, you may find that you want to resize one or more rows or columns. You may also need to resize the entire table.
Change Row Height
Configure the row height by moving your mouse pointer on the right side of the column boundary that you want to move until it becomes a resize pointer, which looks like a double‐headed arrow with the arrows pointing up and down.
If you want to get a precise measurement as you click and drag with your mouse, click a cell in your table that you want to resize. The ruler on the left side of the Word window shows black boxes in the ruler that tell you where the cell begins and ends.
Move the cell border by clicking and dragging on the marker. When you hold down the Alt key as you click and drag, you see the exact width of the cell in inches, and the width changes as you move the marker up and down.
You can also set a specific height for all rows in a table. Here's how to do that:
- Click a cell in the row that you want to change.
- Click the Layout menu option to the right of the Table Design option.
- In the Cell Size section, click the Height box. Word highlights the existing cell height, as shown in Figure 3.12.
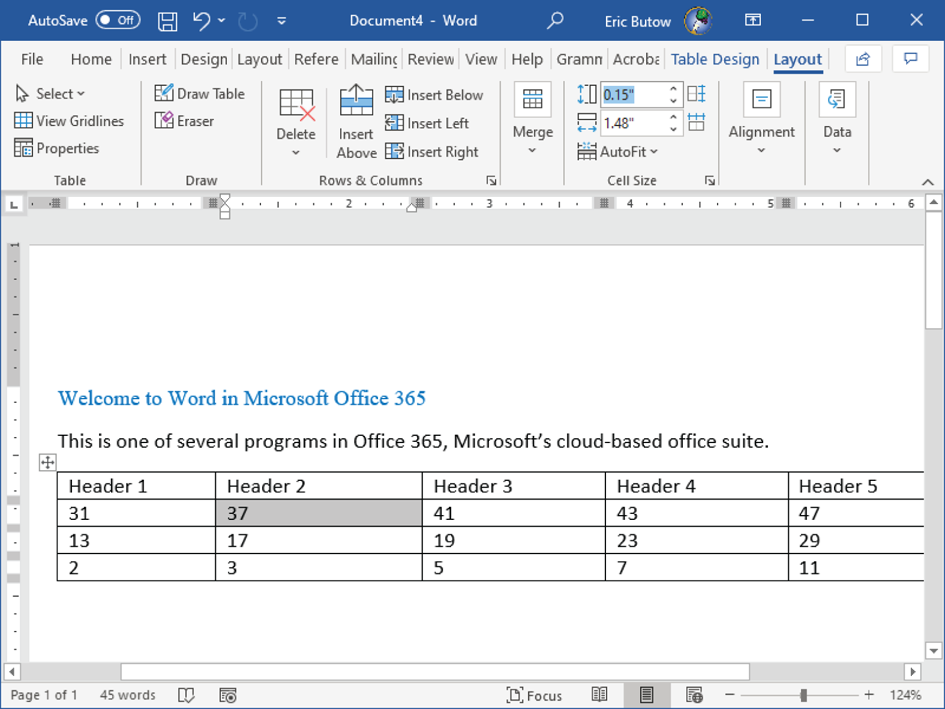
FIGURE 3.12 Table Row Height box
- Type the cell height in the box. You can specify the height in hundredths of an inch if you want.
- Press the Tab key.
The height for all rows in your table changes in your document. You can change the exact height by following the previous steps.
Click the up or down arrow to the right of the box to increase or decrease, respectively, the height in increments of one‐tenth of an inch.
Resize a Column or Table Automatically with AutoFit
If you don't want to bother with resizing a column and/or table so that everything fits just right, let Word do it. Here's how:
- Select a cell in the column you want to resize.
- Click the Layout menu option to the right of the Table Design option.
- In the Layout ribbon, click the AutoFit icon in the Cell Size section.
- Click one of the following three sections, as shown in Figure 3.13:
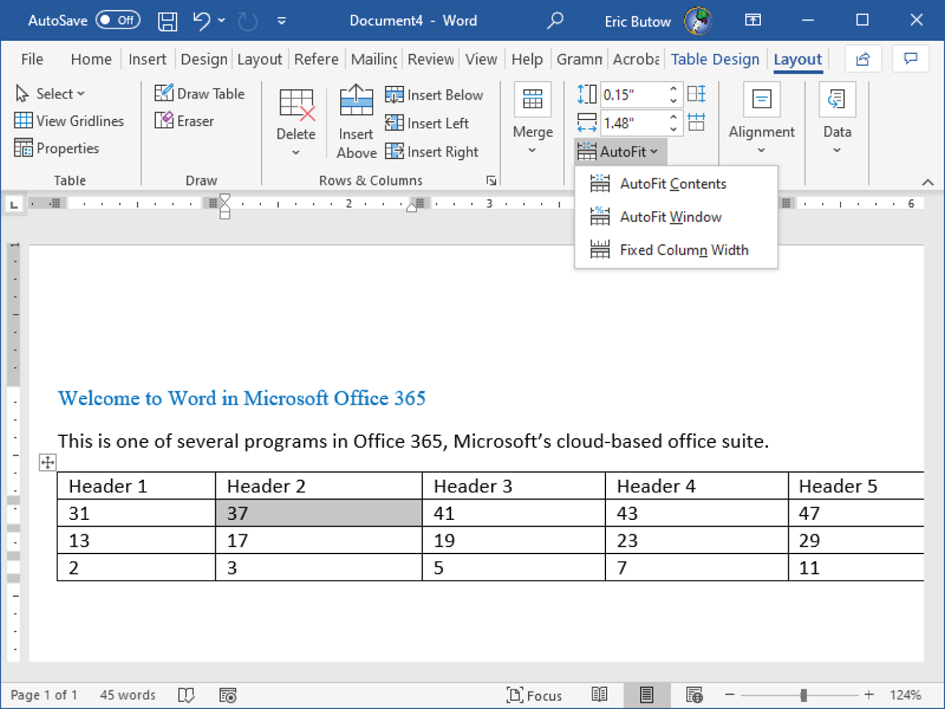
FIGURE 3.13 AutoFit drop‐down list
- Adjust the column width to the widest column by clicking AutoFit Contents.
- Adjust the table width to the full width of the page (minus the margins, of course) by clicking AutoFit Window.
- Keep Word from adjusting the column size as you type text by clicking Fixed Column Width.
Turn Off AutoFit
If you don't want AutoFit to set width in a column to fit the size of the text, here's how to turn it off:
- Select a cell in the column that you want to resize.
- Click the Layout menu option to the right of the Table Design option.
- In the Layout ribbon, click the AutoFit icon in the Cell Size section.
- Click Fixed Column Width in the drop‐down menu.
Resize an Entire Table Manually
Word automatically creates a table so that it fits the entire width of the page. To resize, start by moving the cursor to the lower‐right corner of the table. A white box appears at the lower right of the table.
Place the cursor on the box until it becomes a double‐headed arrow (see Figure 3.14).

FIGURE 3.14 Double‐headed arrow cursor
Now you can click and drag the box and watch the size of the table (and the contents in it) change. If you have text below the table, that text will move down as you stretch the table vertically.
Make Multiple Columns or Rows the Same Size
You may want to make more than one column or row the same size. For example, if you resize one column but you want that column and two columns to the left to be the same size, then you can make all three columns the same size in the space of the total width of those three columns.
Start by selecting the columns or rows that you want to make the same size. Figure 3.15 shows three selected columns. If you want to select noncontiguous rows or columns, hold down the Ctrl key as you select each row or column.
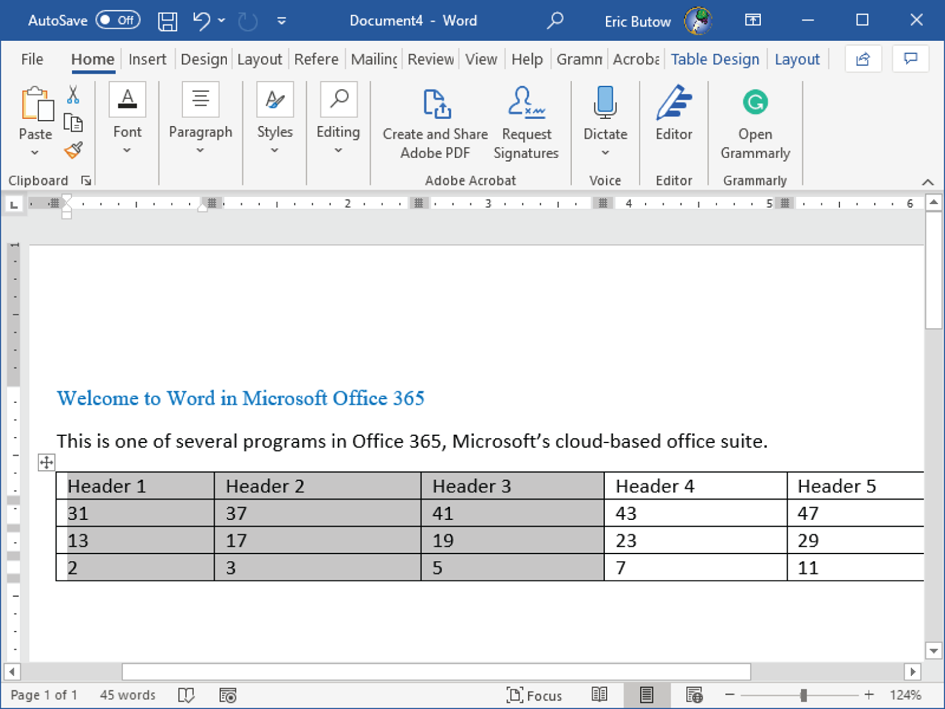
FIGURE 3.15 Selected columns
Next, click the Layout menu option to the right of the Table Design option. In the Layout ribbon in this example, click the Distribute Columns icon in the Cell Size section, as shown in Figure 3.16.

FIGURE 3.16 Distribute Columns icon
The columns change size so that they evenly span the width of all three columns.
Splitting Tables
Once you have a table in Word, you might decide to split that table into two or more tables. This way, you can create smaller tables or add text in between two tables.
Put your cursor on the row that you want as the first row of your second table. In the table shown in Figure 3.17, it's on the third row.
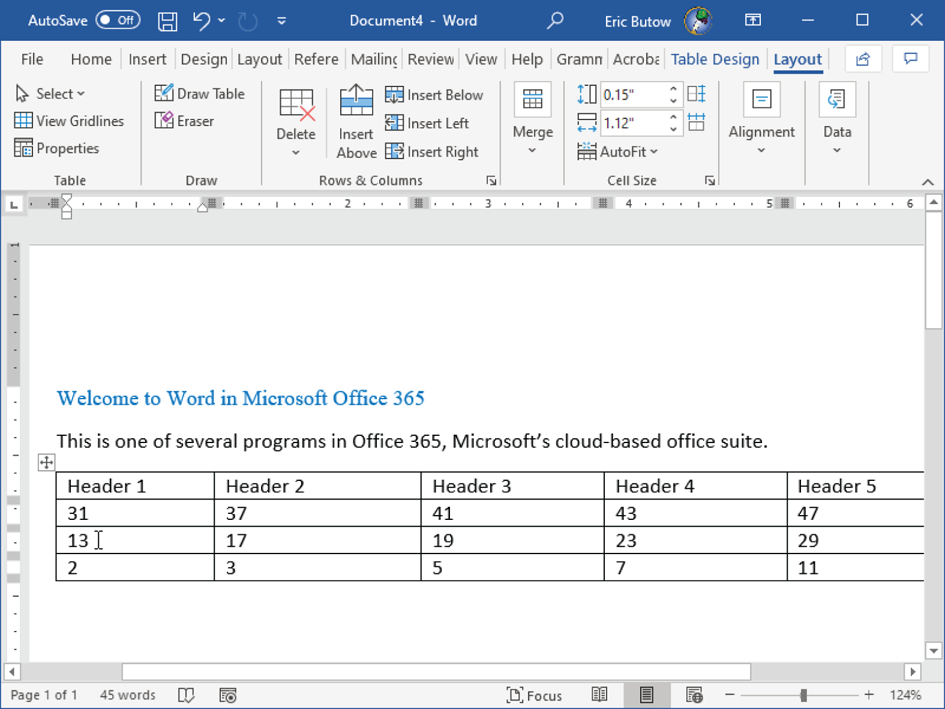
FIGURE 3.17 Cursor on third row
Now click the Layout menu option to the right of the Table Design option. In the Layout ribbon, click the Split Table icon in the Merge section (see Figure 3.18).
The row on which you placed the cursor is now the first row of the new table that appears below the other table. All rows underneath that first row appear underneath that first row.

FIGURE 3.18 Split Table icon
Configuring a Repeating Row Header
When you work with a table that is longer than the height of the page, cells that don't fit on that page appear on subsequent pages. You can set up the table so that the table header row or rows appear on each page automatically.
If your table has a header row, you can set up your table so that the header row appears at the top of each page, making your table easier to read. You can do this in one of two ways.
One way is to place the cursor somewhere in the header row of your table. Next, click the Layout menu option to the right of the Table Design option. In the Layout ribbon, click the Repeat Header Rows icon in the Data section (see Figure 3.19).
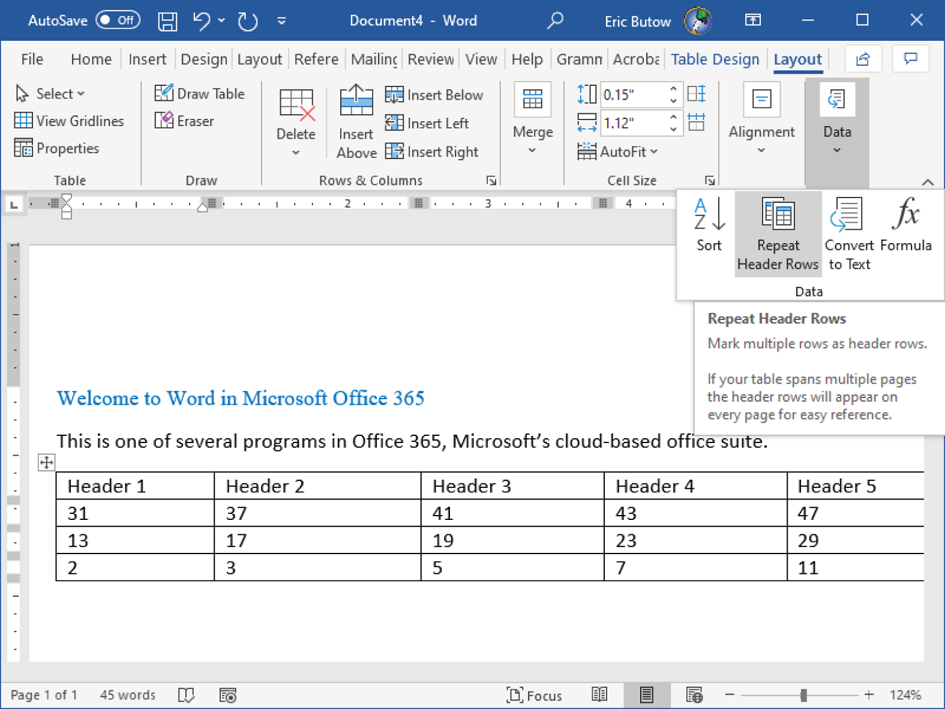
FIGURE 3.19 Repeat Header Rows icon
The other way is to right‐click any cell in the header row of your table. In the context menu, click Table Properties. In the Table Properties dialog box, click the Row tab and then click the Repeat As Header Row At The Top Of Each Page check box, as shown in Figure 3.20.

FIGURE 3.20 Repeat At Header Row
Click OK. No matter what method you choose, the header row will now appear on each page where your table is located.
Creating and Formatting Lists
Lists are an effective way of presenting information that readers can digest easily, as demonstrated in this book. Word includes many powerful tools to create lists easily and then format them so that they look the way you want them to appear.
Word provides two different types of lists. Each entry in a numbered list starts with a number, but you can also change the numbers to appear as letters. In a bulleted list, each entry starts with a special character, which is a black circle by default. You can change the special character to another special character, a symbol, or even a picture.
Structuring Paragraphs as Numbered and Bulleted Lists
An entry in a list, whether it's a few words or a few sentences, is treated as a paragraph. Word makes it easy to change a paragraph to a numbered list or a bulleted list.
Create a List
You don't need to do anything special to create a numbered or bulleted list.
Start a numbered list by typing 1, a period (
.
), a space, and then your text. When you finish typing your text, press Enter. Word formats the first entry in your list and places you on the next line in the numbered list with the number 2.
Create a bulleted list by typing an asterisk (
*
), a space, and then your text. When you're done typing, press Enter. The asterisk changes to a black circle and places you on the next line with another black circle to the left so that you can continue working on your list.
You can also start a numbered or bulleted list from within the Home ribbon. If you don't see it, click the Home menu option. In the ribbon, click the Bullets icon or the Numbered icon in the Paragraph section, as shown in Figure 3.21.

FIGURE 3.21 Bullets and Numbering icons
Now you see the number 1 or a bullet circle to the left of your cursor, and you can start typing your list. When you reach the last item in your list, press Enter twice to switch the bullets or numbering off.
Create a List from Existing Text
Using the Home ribbon, you can easily create a list from text you've already written. Start by selecting the text on the page, and then click the Bullets or Numbering icon in the Paragraph section. Each paragraph in the text appears as a separate number or bullet in the list.
You can continue the list by clicking the last item in the list and then pressing Enter. If the list is fine as is, click outside the selection.
Changing Bullet Characters and Number Formatting
You can change the format of the bullets or the numbers in a list by selecting from several different common bullet characters or numbering systems.
Bullets
Click one entry in your bulleted list. In the Home ribbon, click the down arrow to the right of the Bullets icon. The bullet style tiles appear in the drop‐down list, as shown in Figure 3.22.
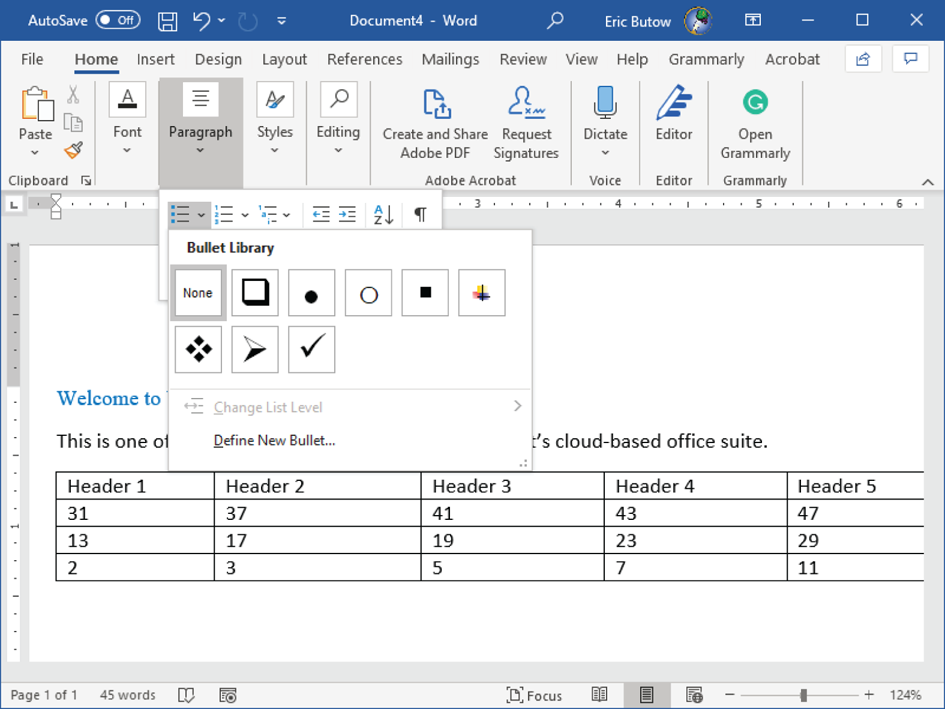
FIGURE 3.22 Bullet style tiles
You can select a style in the Recently Used Bullets, Bullet Library, and Document Bullets sections. As you move the mouse pointer over each tile, all bullets in your list change so that you can see what the bullets look like in your list before you choose one. Once you find a bullet you like, click the tile. Or, if you don't want a bullet character in your list, click None.
Numbering
Click anywhere in your numbered list. In the Home ribbon, click the down arrow to the right of the Numbering icon. The number style tiles appear in the drop‐down list (see Figure 3.23).
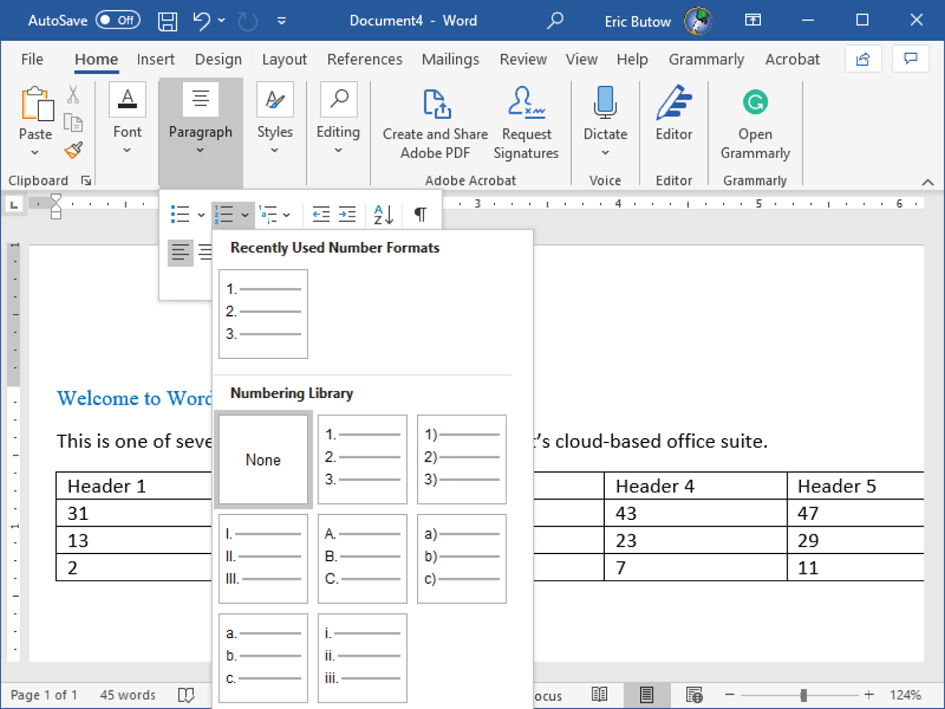
FIGURE 3.23 Number style tiles
You can select a numbering style in the Recently Used Number Formats, Numbering Library, and Document Number Formats sections. As you move the mouse pointer over each tile, the number format in your list changes so that you can see what each format looks like in your list before you choose one. Once you find a format you like, click the tile. If you don't want numbers in your list, click None.
Defining Custom Bullet Characters and Number Formatting
The common bullet characters or number formatting may not be to your liking. No worries; Word has a number (ahem) of other formats from which you may choose.
Bullets
You may need custom bullet characters or symbols to represent what you do better. For example, if your company uses a triangle in its logo, you can change your bullet characters to triangle symbols.
Here's how to create a new bulleted list with a symbol:
- Place the cursor where you want to add the bulleted list in your document.
- Click the Home menu option if you're not there already.
- In the Home ribbon, click the down arrow to the right of the Bullets icon in the Paragraph section.
- Click Define New Bullet in the drop‐down menu.
- In the Define New Bullet dialog box, as shown in Figure 3.24, click Symbol.
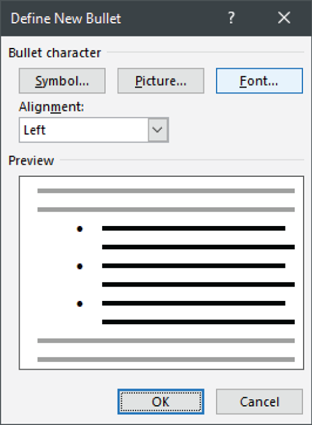
FIGURE 3.24 Define New Bullet dialog box
- In the Symbol dialog box, scan the list of symbols and then click the symbol you want to use.
- Click OK.
- In the Define New Bullet dialog box, click OK.
The first bulleted list entry with your new symbol appears on the screen. The symbol also appears in the Recently Used Bullets and Bullets Library sections in the Bullets drop‐down menu.
Numbering
Here's how to access all the numbering formats in the Define New Number format dialog box:
- Place the cursor where you want to add the numbered list in your document.
- Click the Home menu option if you're not there already.
- In the Home ribbon, click the down arrow to the right of the Numbering icon in the Paragraph section.
- Click Define New Number Format in the drop‐down menu.
- In the Define New Number Format dialog box, as shown in Figure 3.25, change the style by clicking the down arrow next to the Number Style box.

FIGURE 3.25 Define New Number Format dialog box
- Select from one of the numbered styles, text styles, or other chronological format such as 1st, 2nd, and 3rd.
- Click the Font button to change the numbering font, color, and other styles.
- Click OK to close the Font dialog box.
- If desired, add other text after the number, such as parenthetical text, in the Number Format text box.
- Change the number alignment by clicking the Alignment box and then selecting Left, Centered, or Right in the drop‐down list. You can see the results of the alignment change in the Preview box.
- Click OK.
The numbered list in your document now displays its new numbering format. The new format also appears as an icon in the Recently Used Number Formats and Numbering Library sections in the Numbering drop‐down menu.
Increasing and Decreasing List Levels
You can change list levels for both bulleted and numbered lists by indenting an entry in your list. As you change list levels, the bullet or number format changes to match the built‐in level styles for each format.
View the format of each list level and apply a new list level by clicking the list entry to which you want to apply the new level.
Next, click the Home menu option if you haven't already. Depending on the type of list, click the down arrow to the right of the Bullets or Numbering icon in the Home ribbon.
In the drop‐down menu, move the mouse pointer over Change List Level. The submenu appears, as shown in Figure 3.26.
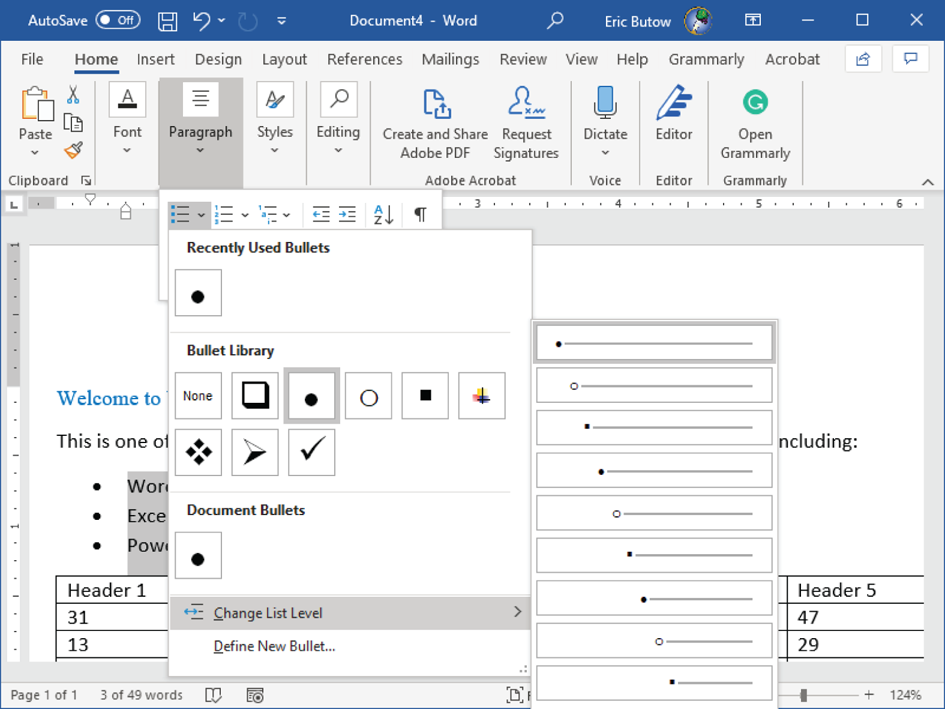
FIGURE 3.26 Change List Level menu
The list shows nine levels, starting with the first level at the top. Each level shows you the bullet character and indent spacing used for that level. Apply a level to your item by clicking the level in the list. If you're changing a list entry with a lower level, click a higher level in the list. Your entry appears with the applied list level. All other entries in the list are unaffected.
When you want to change the list level for multiple entries, or for the entire list, select the entries in the list and then follow the steps in this section.
Restarting and Continuing List Numbering
As you work with numbered lists, you may find that Word can get confused about starting a new list or continuing a previous one. It may be tempting to change numbers in a list manually, but that will only cause more confusion (and headaches) when you work with a list further along in your document.
So, here's how to change numbering values in Word the right way:
- Right‐click the list entry that you want to change.
- Click Set Numbering Value in the context menu, as shown in Figure 3.27.
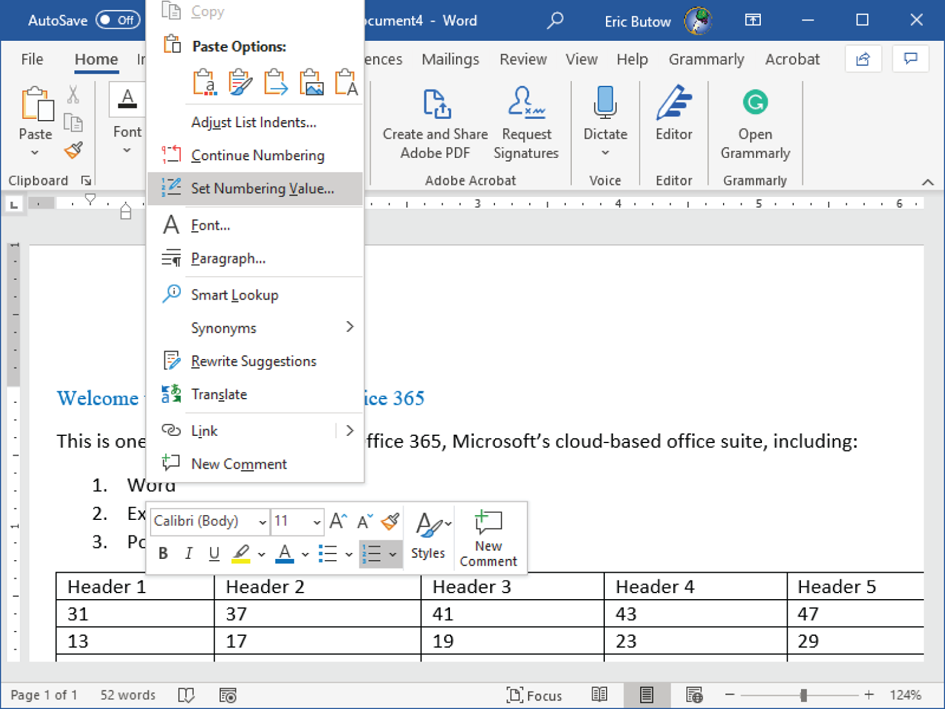
FIGURE 3.27 Set Numbering Value menu option
- In the Set Numbering Value dialog box (see Figure 3.28), type the new value in the Set Value To text box.

FIGURE 3.28 Set Numbering Value dialog box
The list entry shows the new number you gave it. Entries that follow your newly renumbered one will continue from that new number in sequential order.
Changing number values is especially useful when you have two lists (or more) separated by other text with different formats. If you want one list to continue the numbering of the previous list, all you have to do is right‐click the first entry in the numbered list that you want to renumber, and then click Continue Numbering in the context menu, as shown in Figure 3.29.
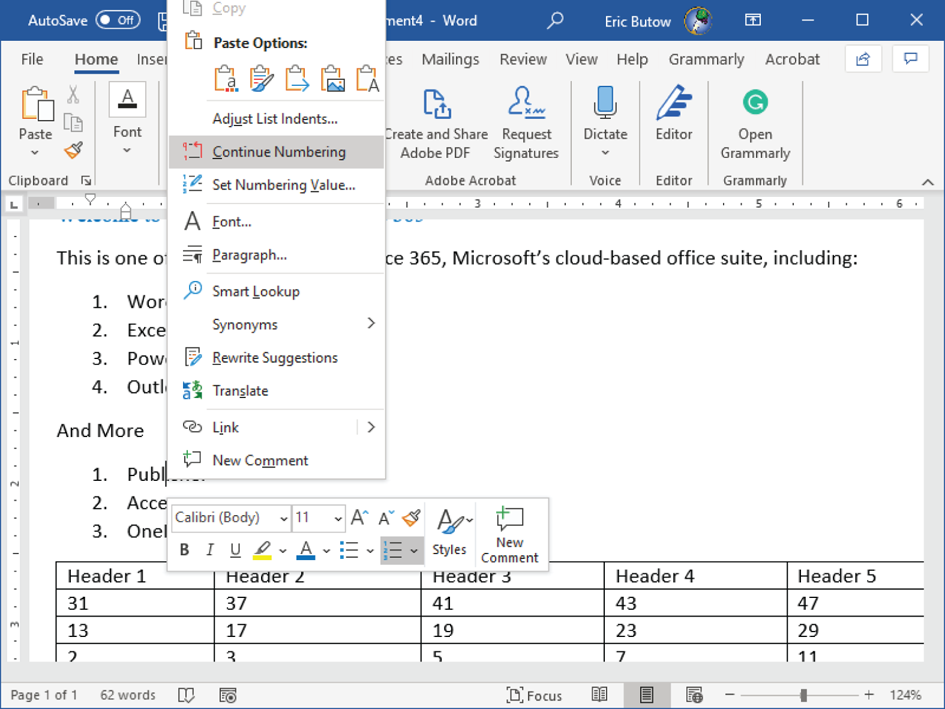
FIGURE 3.29 Continue Numbering option
Your list has the number that follows the last number in the previous number list. Word also renumbers subsequent entries in the list so that they continue in sequential order.
Setting Starting Number Values
If you need to restart one entry in your numbered list with the numbered one, or if you broke up one list into two and the second list continues the numbering from the previous list, you can reset the starting value number in a list entry.
Start by right‐clicking the list entry that you want to change to 1. In the context menu that appears (see Figure 3.30), click the Restart At 1 menu option.

FIGURE 3.30 Restart At 1 menu option
The entry appears with the number 1, and all list entries under that new entry number 1 continue with the numbers 2, 3, and so on.
Summary
This chapter started by showing you how to create a table from selected text. Then you saw how to reverse the process and convert a table into text. You also learned how to use Word table tools to create a table from scratch.
After you created a table, you learned how to modify tables. I discussed how to sort data in a table. Next, you learned how to modify the look and feel of your tables, including changing the cell margins; spacing, merging, and splitting cells; and resizing parts of your table. I discussed when you would need to split a table in two and how to do that. And you learned how to create a repeating row header in case your table is longer than one page and you want the header to appear at the top of each page.
Next I discussed how to create and format text lists, and I started with converting paragraphs into numbered and bulleted lists. You learned how to change and define bullet characters and format numbered lists. After that, I discussed how to increase and decrease list levels in a list.
Finally, you learned several important things about managing numbered lists, including how to restart and continue list numbering properly as well as how to set starting number values.
Key Terms
| bullet characters | number formatting |
| bulleted list | numbering |
| cells | Rows |
| columns | Sorting |
| header row | Split |
| list levels | Tables |
| merge |
Exam Essentials
Understand how to convert text to tables, and vice versa. Know how to use the Table option in the Insert menu to convert text to tables, or to switch tables back to text.
You must understand structuring paragraphs as numbered and bulleted lists; changing bullet characters and number formatting; defining custom bullet characters and number formatting; increasing and decreasing list levels; restarting and continuing list numbering; and setting starting number values.
Know how to specify rows and columns. Understand how to add a specific number of rows and columns in a table.
Understand how to modify a table. Know how to sort data in a table; change margins and spacing in a cell; merge and split cells and tables; and resize elements of a table, including rows, columns, and the entire table. You also need to know how to configure a repeating row header.
Know how to create numbered and bulleted lists. Understand the difference between bulleted lists and numbered lists, and how to create each one.
Understand how to format numbered and bulleted lists. Know how to use formatting tools to change the look and feel of bulleted lists and numbered lists.
Be able to change list levels. Know how to increase and decrease the levels in a bulleted list and a numbered list.
Know how to manage list numbering. Know how to change the numbering in a list to ensure each number in the list continues sequentially. You need to understand how to set values in a new numbered list so that it does not continue numbering from the previous list.
Review Questions
- How do you create a table with built‐in styles?
- Click the Table icon in the Insert ribbon.
- Open the Styles panel.
- Click the Insert ribbon, click Table, and then move the mouse pointer over Quick Tables in the drop‐down menu.
- Click the Columns icon in the Layout menu.
- How do you create a table with three columns and seven rows?
- Click the Table option in the Insert ribbon to open a dialog box.
- Click the Table option in the Insert ribbon and move the mouse pointer over the grid.
- Click the Table option and then click Draw Table.
- Click the Table option in the Insert ribbon and then click Insert Table.
- In what order is a sort from the letters Z to A?
- Ascending
- Alphabetical
- Descending
- Backward
- How do you see the exact measurement of a table row or column when you resize it using the mouse?
- Holding down the Alt key as you drag
- Holding down the Ctrl key as you drag
- Looking at the ruler above the document
- Holding down Ctrl+Shift as you drag
- How do you resize a table or columns to fit the size of your content?
- Quick Tables
- Orientation
- Size
- AutoFit
- What menu options appear when you click inside a table?
- Table Design and Layout
- Shape Layout
- Format and Table Design
- Chart Design
- What types of bullets can you add to a list?
- Symbols and fonts
- Symbols, fonts, and pictures
- Special characters
- Asterisks
- What search parameter types can you use for sorting table contents?
- Text and numbers
- Special characters
- Text, numbers, and dates
- Text and symbols
- How do you create a bulleted list as you type text?
- Press the period (.) key.
- Press the plus (+) key.
- Press the asterisk (*) key.
- Press the caret (^) key.
- Why shouldn't you change the numbers in a list manually?
- Because Word will stop running
- Because Word will convert the numbered list to text
- Because your document will close without saving
- Because Word will lose track of what you've done and get confused