Chapter 5
Adding and Formatting Graphic Elements

Word has taken plenty of features from desktop publishing software, and today you can use Word not only to type text, but to add graphical elements to make a document more engaging for your readers as well.
This chapter starts by showing you how to add shapes using the built‐in Word shape editor. Word also allows you to insert pictures and 3D models, either from your own computer or from stock libraries installed with Word. What's more, you can add screenshots on your computer and place screen clippings, which are a portion of your screen, into your document.
Word also contains its own custom diagrams, called SmartArt, so that you can add things like organizational charts and process charts easily.
If you need to add text in an area outside the main area of text, such as in a sidebar, you can add text boxes and modify how the text appears within the text box.
I also talk about formatting your graphics and text boxes, adding text to graphic elements, and positioning those images so that they look good on the page. Finally, you learn how to add alternative, or Alt, text to illustrations and photos so that people who cannot see them can read a description.
Inserting Illustrations and Text Boxes
Word makes it easy to choose and insert shapes, pictures, 3D models, SmartArt graphics, screenshots, screen clippings, and even text boxes all from one location: the Insert menu ribbon. (If the Word window isn't very wide, you may need to click Illustrations in the Ribbon to view a drop‐down ribbon that contains many of the icons discussed in this section.)
Adding Shapes
Word contains many built‐in shapes that you can add to your document, from lines to callouts like the speech balloons you find in graphic novels and comic strips. When you add a shape, you place the item on the page and then size the shape to your needs.
Add a shape by following these steps:
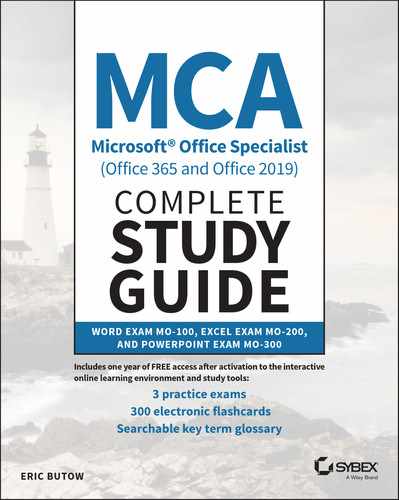
- Click the Insert menu option.
- In the Insert ribbon, click Shapes in the Illustrations section.
- Click a shape icon in the drop‐down list (see Figure 5.1). The mouse pointer changes from an arrow to a cross.
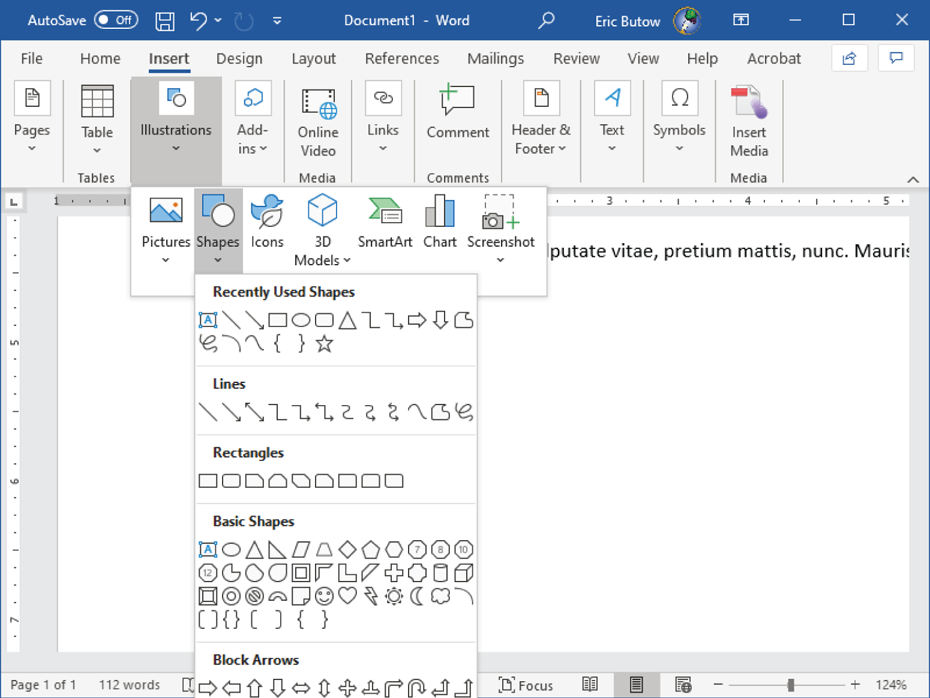
FIGURE 5.1 The shapes drop‐down list
- Move the pointer to the location in your document where you want to add the shape.
- Hold down the mouse button, and then drag the shape to the size you want.
- When you're done, release the mouse button. The shape appears in front of the text in the document.
You'll learn how to wrap text around your image later in this chapter.
Including Pictures
You can add pictures stored on your computer, stock images that were installed with Word, or pictures available on the Office.com website. Here's how to do this:
- Place your cursor where you want to insert the image.
- Click the Insert menu option.
- In the Insert ribbon, click Pictures in the Illustrations section.
- In the drop‐down menu, shown in Figure 5.2, click one of the following options:
- This Device: Click this to browse for and select a photo from your computer.
- Stock Images: Click this to view and open a stock image on your computer.
- Online Pictures: Click this to view and open an image from Office.com. For this example, I'll open a stock image. By default, the Stock Images tab is open in the photos dialog box.

FIGURE 5.2 Pictures drop‐down menu
- Click one of the other tabs to open icons, cut out photos of people, or choose from stickers. I'll keep the default Stock Images.
- Under the Search box, click one of the category tiles, shown in Figure 5.3, to view photos within that category. You can view more categories by clicking the right arrow at the right side of the category tiles row.

FIGURE 5.3 Category tiles
- Scroll up and down in the list of thumbnail images until you find the one that you want, and then click the image.
- Click Insert.
The image appears in the document, and text moves underneath the image. You'll learn how to move the image and change the text wrapping style later in this chapter.
Inserting 3D Models
You can insert 3D models into a document and then change the orientation. Follow these steps:
- Place your cursor where you want to insert the 3D model.
- Click the Insert menu option.
- In the Insert ribbon, click 3D Models in the Illustrations section.
- You can search for 3D models on your computer or stock 3D models that were installed with Word. For this example, I'll click Stock 3D Models.
- In the Online 3D Models dialog box (see Figure 5.4), scroll up and down the list of categories and then click the category tile you want.

FIGURE 5.4 3D model category list
- Click the 3D model you want and then click Insert.
The model appears in the document in front of the rest of the text. You'll learn how to modify the location and position of the 3D model, as well as change the text wrapping style, later in this chapter.
Adding SmartArt Graphics
SmartArt graphics are built‐in art types for conveying specific kinds of information, such as a flow chart to show a process or a decision tree to show a hierarchy. Follow these steps to add a SmartArt graphic:
- Place your cursor where you want to insert your SmartArt graphic.
- Click the Insert menu option.
- In the Insert ribbon, click SmartArt in the Illustrations section.
- In the Choose A SmartArt Graphic dialog box, shown in Figure 5.5, select a category from the list on the left side of the dialog box.
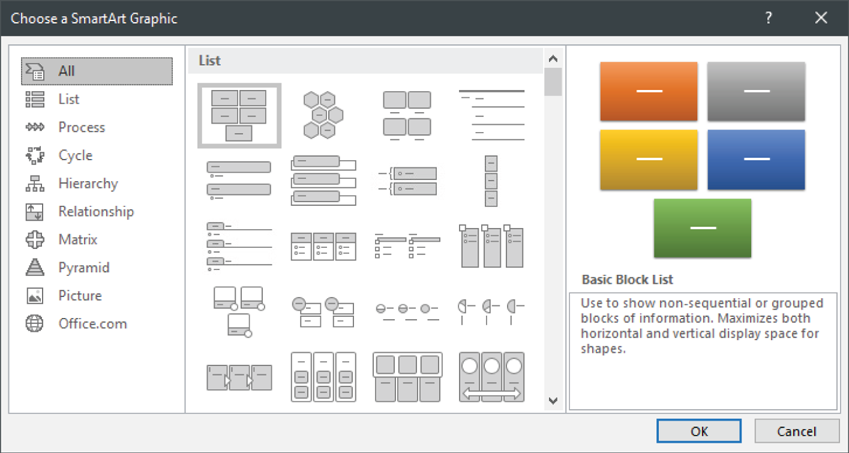
FIGURE 5.5 SmartArt categories
The default is All, which shows all the SmartArt graphics from which you can choose. The list of SmartArt graphic type icons in the center of the dialog box depends on the category you chose. For this example, I chose Hierarchy.
- Click the graphic type that you want to insert. A description of the graphic type appears at the right side of the dialog box.
- Click OK.
The graphic appears in the document, and text moves underneath the image.
You'll learn how to set up a graphic to look the way you want, as well as change the text wrapping style, later in this chapter.
Placing Screenshots and Screen Clippings
You can take a photo of another window and add it directly into your document from within Word. You can also clip a portion of your screen within Word and add it to your document automatically.
Screenshot
Add a screenshot to your document by following these steps:
- Place your cursor where you want to insert the screenshot.
- Click the Insert menu option.
- In the Insert ribbon, click Screenshot in the Illustrations section. If there are any windows open, Word scans your computer and places thumbnail images of the windows within the drop‐down list, as shown in Figure 5.6.

FIGURE 5.6 Screenshots drop‐down list
The currently open Word window is one of the windows that Word finds. When you click the window in the list, Word places the screenshot at the insertion point in your document.
Screen Clipping
Here's how to add a screen clipping, where you can clip the entire screen or a portion of it:
- Click Screen Clipping in the drop‐down list. Word automatically opens the last window that you had open prior to using Word. If you didn't have a window open, you see the desktop. The screen has a transparent white overlay, and the mouse pointer changes to a cross, which means that Word is ready for you to capture the screen.
- Move the cursor to the location where you want to start capturing the screen.
- Hold down the mouse button and drag until you've captured your selection (see Figure 5.7).
- Release the mouse button.

FIGURE 5.7 Capture area
The clipped image appears under the insertion point in your document and shows Alt text—alternative descriptive text that Word thinks is close to what's in the image, intended for people who can't see the image. You'll learn how to change the Alt text and modify the image later in this chapter.
Inserting Text Boxes
If you want to have an area outside of the text of your document with its own formatting, such as a sidebar, Word allows you to create a separate area of text outside the main area in your document. Then you can place text boxes to the side of the text or even over the text. Here's how to add a text box:
- Place your cursor where you want to insert the text box.
- Click the Insert menu option.
- In the Insert ribbon, click Text Box in the Text section. (If the Word window isn't very wide, you may need to click the Text icon in the ribbon to view the Text Box icon in the drop‐down ribbon.)
- In the drop‐down list, scroll up and down to view the different text box styles in each thumbnail‐sized icon (see Figure 5.8).
FIGURE 5.8 Text box styles
The text box appears at a location near the insertion point, depending on the box you selected, and the style name appears underneath the icon.
You can also view more text boxes, if any, on Office.com by moving the mouse pointer over More Text Boxes From Office.com and then clicking a text box style on the side menu.
You'll learn how to format a text box in the next section.
Formatting Illustrations and Text Boxes
After you add an illustration and/or a text box, Word gives you plenty of tools to format them to make them look the way you want and then place them where you want on the page.
Applying Artistic Effects
Word contains 22 artistic effects that you can apply to a photo in your document, from making the photo look as if it was drawn with a marker to applying a glow effect. Apply an artistic effect as follows:
- Click the image.
- Click the Picture Format menu option.
- Click Artistic Effects in the Adjust area.
- Select from the effects by clicking on the effect tile in the drop‐down menu (see Figure 5.9). When you place the mouse pointer over the tile for a couple of seconds, the description of the effect appears in a pop‐up box.
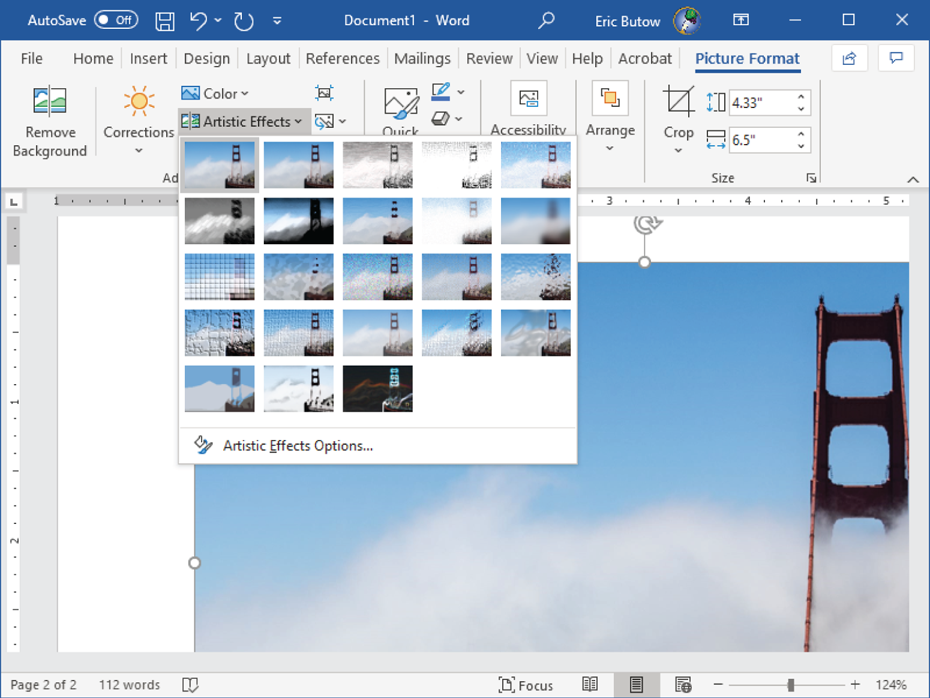
FIGURE 5.9 The effects tiles
- Click the tile you want, and Word will apply the effect to your photo.
Since the effects tiles in the drop‐down menu can be small, applying an effect can show you what it looks like. You can always remove the effect once you've seen it by pressing Ctrl+Z.
Adding Picture Effects and Picture Styles
Word also allows you to set effects from within the Picture Format ribbon. However, if you don't need to have fine‐tuned effects on your picture, Word has prebuilt styles for you that you can apply to the selected picture by clicking the appropriate tile in the ribbon.
Add a Picture Effect
Here's how to choose and add a picture effect:
- Click the picture.
- Click the Picture Format menu option.
- Click Picture Effects in the Picture Styles section.
- In the drop‐down menu, move the mouse pointer to one of the seven effects that you want to add. I selected Shadow in this example.
- In the side menu, move the mouse pointer over the tile that contains the shadow style. The style is applied to the picture in your document so that you can see what it looks like (see Figure 5.10).

FIGURE 5.10 Offset: Center shadow style applied to the picture
- When you find an effect that you like, click the tile in the menu.
If you want to change the effect, click Options at the bottom of the menu. For example, in Shadow, click Shadow Options. The Format Picture pane appears on the right side of the Word window so that you can make more detailed changes, such as the color of the shadow.
Apply a Picture Style
Apply a picture style from the ribbon by following these steps:
- Click the image.
- Click the Picture Format menu option.
- Move the mouse pointer over the style thumbnail icon in the Picture Styles section, as shown in Figure 5.11. (If the Word window isn't very wide, you may need to click Quick Styles in the ribbon to view a drop‐down ribbon with the style icons.)

FIGURE 5.11 Picture Styles section
As you move the pointer over every style icon, the picture in your document changes to reflect the style.
- Apply the style by clicking the icon.
If you don't like any of the styles, move the icon away from the row of styles and the picture reverts to its default state.
Removing Picture Backgrounds
If you want the background of an image to have the background color of the page, here's what to do:
- Click the image.
- Click the Picture Format menu option.
- Click Remove Background at the left side of the ribbon.
The default background area has the color that Word uses to mark it for removal, whereas the foreground retains its natural coloring (see Figure 5.12).

FIGURE 5.12 Removed background
If parts of the picture that you want to keep are magenta (marked for removal), select Mark Areas To Keep and use the free‐form drawing pencil to mark the areas on the picture that you want to keep.
To remove more parts of the picture, select Mark Areas To Remove and use the drawing pencil to draw the boundaries of photo areas that you want to remove.
When you're done, select Keep Changes or Discard All Changes.
Formatting Graphic Elements
How you format graphic elements is different depending on the type of graphic you're editing. This section looks at formatting options that you can use aside from the ones detailed previously. In the case of SmartArt, you'll learn more about that in the next section.
Shapes
After you create a shape, the Shape Format menu ribbon appears (see Figure 5.13) so that you can make a variety of changes to the shape, including the following:
- Editing points in the shape by clicking Edit Shape in the Insert Shapes section
- Changing shape styles, including the shape fill, outline, and effects, in the Shape Style section
- Changing the size of the shape by typing the height and/or width in the Size section
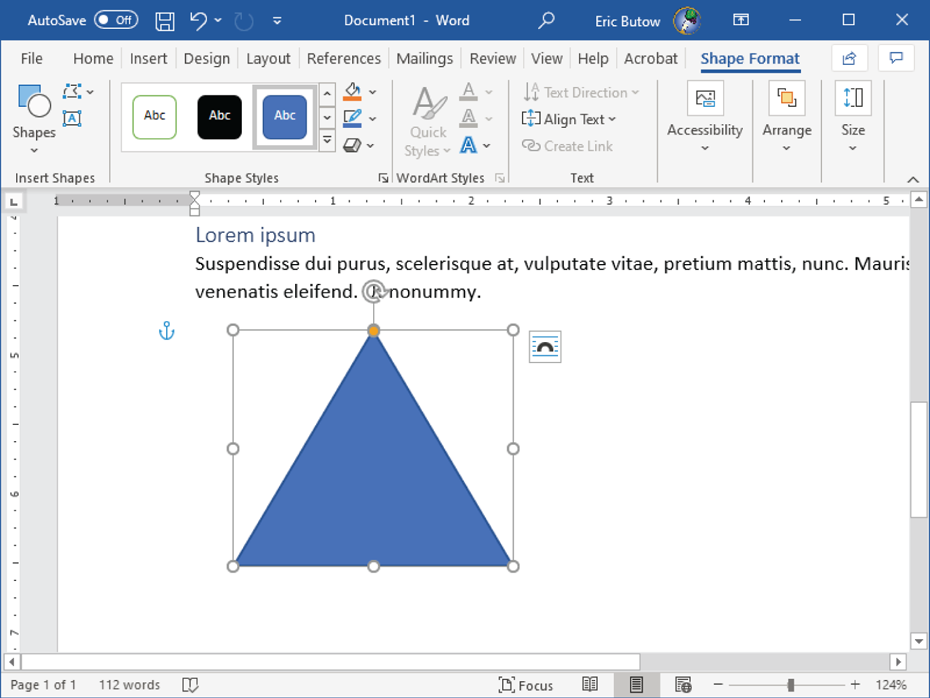
FIGURE 5.13 Shape Format ribbon
Pictures
In addition to removing picture backgrounds, applying styles, and applying effects, you can format the picture by clicking the Picture Format menu option. In the Picture Format ribbon, shown in Figure 5.14, you can format the picture in various ways:
- Setting corrections (such as brightness and contrast), color, and transparency, setting picture file compression to save disk space, and resetting the picture to its original state in the Adjust section
- Changing the picture border, as well as applying a picture layout style, such as formatting the picture with rounded corners and text underneath, in the Picture Styles section
- Changing the size of the picture by typing the height and/or width in the Size section

FIGURE 5.14 Picture Format ribbon
Screenshots and Screen Clippings
When you add a screenshot or a screen clipping, the Picture Format menu ribbon appears (see Figure 5.15) so that you can make a variety of changes to the shape, including the following:
- Editing points in the shape by clicking Edit Shape in the Insert Shapes section
- Setting shape styles, including the shape fill, outline, and effects, in the Shape Style section
- Changing the size of the shape by typing the height and/or width in the Size section

FIGURE 5.15 Picture Format ribbon
Setting Up SmartArt Graphics
After you add SmartArt, the Type Your Text Here box appears to the left of the image. You can type the text that will appear in the image by clicking [Text] in each bullet line and replacing that template text with your own.
Click the SmartArt Design menu option so that you can make any changes you want in the ribbon. The type of SmartArt you added determines the options that appear in the ribbon.
For example, I created an organizational chart, shown in Figure 5.16, and in the ribbon I can change the following:
- The layout of the chart in the Create Graphic section
- The layout type in the Layouts section
- The chart box colors and styles in the SmartArt Styles section

FIGURE 5.16 Designing an organizational chart using SmartArt
Remove all graphic style changes you made and return the graphic to its original style by clicking the Reset Graphic icon.
When you finish making any changes to your SmartArt graphic, click on the page outside the graphic to deselect it.
Working with 3D Models
You can change the size of a 3D model by clicking the model, clicking one of the circular handles on the perimeter of the selection box, holding down the mouse button, and then dragging. When the model is the size you want, release the mouse button.
Rotate the 3D model 360 degrees in any direction by clicking and holding down the Rotate icon in the middle of the model graphic (see Figure 5.17), and then dragging the mouse pointer to see how the model moves. When the model looks the way you want on the page, release the mouse button.

FIGURE 5.17 The Rotate icon
Adding and Organizing Text
Word makes it easy to add text, not only in text boxes, but also to your shapes and SmartArt graphics. What's more, you can format the text to your liking with built‐in text styles and alignment options.
Formatting Text in Text Boxes
You can format text in a text box just as you would in the rest of your document. Just click the Home menu option and change the font, paragraph, and styles as you see fit.
You can also format the text in other ways. Select the text that you want to format. Now you can change the text as follows in the Shape Format ribbon.
Apply WordArt Styles
In the WordArt Styles section, you can click one of the three built‐in text effect icons (see Figure 5.18):
- Click Text Fill (the letter A on top of a black line) to change the text color in the drop‐down menu.
- Click Text Outline (an outlined letter A on top of a black line) to add an outline, including color and outline line width, in the drop‐down menu.
- Click Text Effects (a blue outlined letter A) to view and add other effects to the text. In the drop‐down menu, move the mouse pointer over one of the effects to see how each effect appears in your photo. You can choose from Shadow, Reflection, Glow, Bevel, 3‐D Rotation, or Transform.
FIGURE 5.18 Text effects options in the WordArt Styles section
Change Text Appearance
In the Text section, shown in Figure 5.19, you can do three things:
- Click Text Direction to rotate the text 90 degrees or 270 degrees.
- Click Text Alignment to align the text vertically with the top, middle, or bottom of the shape. The default is Middle.
- Click Create Link to link the text to a second text box. When you type so much text in the shape that the shape can't hold any more, the overflow text appears in the second text box.
FIGURE 5.19 Text appearance options in the Text section
Adding Text in Shapes
When you need to add text in a shape, Word has you covered. Start by right‐clicking anywhere in your shape and then clicking Add Text in the context menu.
The cursor appears in the center of the shape so that you can type your text. If you want to format it, select the text that you want to format. Now you can change the style of the text in two sections in the Shape Format ribbon: the WordArt Styles section and the Text section (see Figure 5.20).

FIGURE 5.20 Shape Format ribbon
Apply WordArt Styles
In the WordArt Styles section, you can click one of three built‐in text effects:
- Click Text Fill to change the text color in the drop‐down menu.
- Click Text Outline to add an outline, including color and outline line width, in the drop‐down menu.
- Click Text Effects to view and add other effects to the text. In the drop‐down menu, move the mouse pointer over one of the effects to see how each effect appears in your photo. You can choose from Shadow, Reflection, Glow, Bevel, 3‐D Rotation, and Transform.
Change Text Appearance
In the Text section, you can change the text appearance in one of three ways:
- Click Text Direction to rotate the text 90 degrees or 270 degrees.
- Click Text Alignment to align the text vertically with the top, middle, or bottom of the shape. The default is Middle.
- Click Create Link to link the text to a second text box. When you type so much text in the shape that the shape can't hold any more, the overflow text appears in the second text box.
Changing SmartArt Graphic Content
SmartArt graphics include text placeholders automatically. For example, when you create an organizational chart, Word puts text placeholders in each box so that you can fill in those boxes with the appropriate person.
All you have to do is click [Text] in one of the boxes (see Figure 5.21) and then enter your text.
The Type Your Text Here box appears to the left of the graphic. As you enter text in the box, the text appears in the outline in the box. You can add more text by clicking [Text] in each box or by clicking [Text] in each bullet in the outline and typing the text to replace the [Text] placeholder.
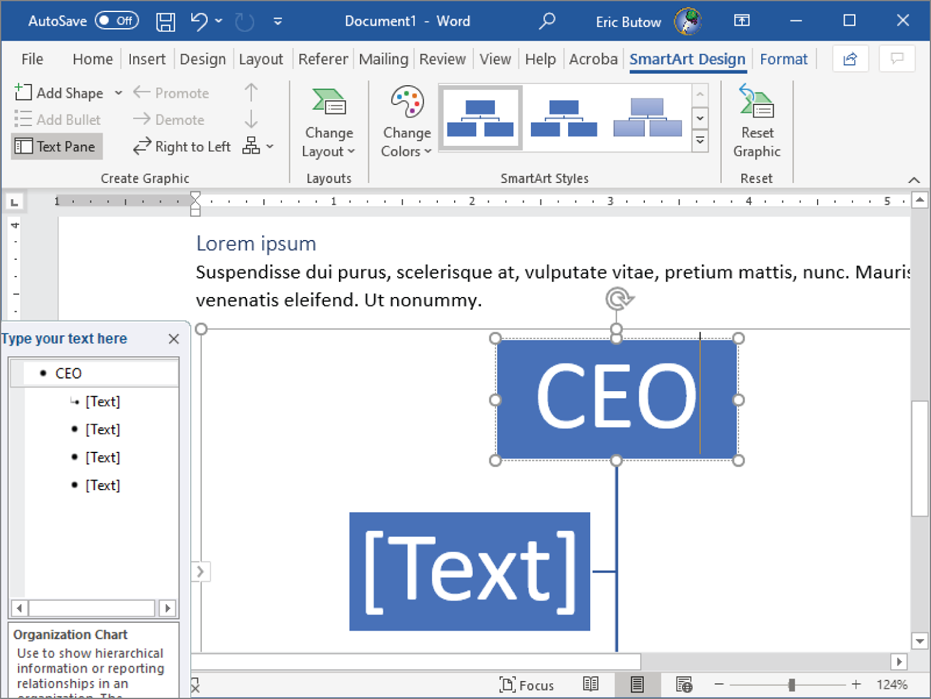
FIGURE 5.21 Text in an organizational chart
Modifying Graphic Elements
Fortunately, Word makes it easy to change where you can put a shape, picture, 3D model, screenshot, or screen clipping (or even all five if you have room) in your document. You can move your objects around on a page and then tell Word how you want the text to move around the image. You can even instruct Word to put text in front of or behind the image.
Positioning Objects
When you add a new shape or image, the image appears in front of the rest of the text on the page, if any. Now you can move the shape or image in your document by moving the mouse pointer over the image, holding down the mouse button, and then moving the image.
If you need to position your shape or image at just the right location, Word gives you three options for moving a shape or image, depending on what you need.
- Small Increments If you only need to move your shape or image in small increments to get the position just right, click the picture. Next, hold down the Ctrl key and then click one of the arrow keys to move the image.
- Move Several Objects You can move several images or shapes by grouping them together. Start by selecting the first object, and then hold down the Ctrl key. Next, select the other images and/or shapes you want to group.
Now right‐click on one of the selected shapes and/or images, move the mouse pointer over Group in the context menu, and then click Group in the side menu. Now you can move all the images and/or shapes around at once.
You can ungroup them by right‐clicking one of the images and/or shapes, moving the mouse pointer over Group in the context menu, and then clicking Ungroup in the side menu.
- Size and Position You can specify exact measurements for the size and position of an image, shape, or group by right‐clicking the object and then clicking Size and Position in the menu. In the Layout dialog box, you can change size, position, and text wrapping options, which you will learn about in the next section.
Wrapping Text Around Objects
If you want to push text around an image or shape, select the object and then click the Layout Options button to the upper right of the shape. (It looks like an upside‐down U.) The Layout Options menu appears and displays icons with the various text wrap options, as shown in Figure 5.22.

FIGURE 5.22 Layout Options menu
However, this menu doesn't give you as much control as you may need. You can view and change more options by clicking the See More link at the bottom of the menu.
The Layout dialog box appears. If the Text Wrapping tab isn't selected, click it to display the text wrapping options, as shown in Figure 5.23.

FIGURE 5.23 Text Wrapping tab in Layout dialog box
Wrapping Text Styles
The current wrapping text style icon is already selected for you. You can click one of the following seven icons to change the text wrapping style:
- In Line With Text This style places the image or shape in a paragraph just as with any line of text. The picture or shape moves with the paragraph when you add or remove text. As with text, you can cut the image or shape and paste it on another line of text.
- Square This style wraps text around the image or shape in a square pattern. If the image or shape tapers, such as a triangle, then you have white text around the tapered parts of the image or shape.
- Tight The text wraps at the same distance between the edge of the image or shape and the text.
- Through This style allows you to customize the areas in which the text wraps around the visible image, but not any space (either white or a solid color) that surrounds the image. Note that this option does not work with vector images.
Through acts much like Tight, except that you can change the wrap points so that text can fill in the spaces between elements in an image. If the image or shape doesn't have any spaces, then text wrapping works just like Tight.
- Top And Bottom The text wraps on the top and bottom of the image or shape and doesn't put any text along the left or right sides of the photo no matter how wide the image or shape is.
- Behind Text Word places the image or shape behind the text and doesn't wrap the text around it. Note that selecting this option means that you must be more precise when selecting the image or shape with your cursor, because otherwise Word will think you're trying to select the text.
- In Front Of Text Word places the picture or shape on top of the text and doesn't wrap the text. Some of your text may be hidden behind the image or shape, which means some of it may be blocked, depending on the transparency of the image.
These options control whether text wraps around an image on both sides, left, right, or wherever the largest distance between the image and the margin.
Specific Wrapping
The Square, Tight, and Through wrapping styles allow you to add specific distance measurements between text and your image or shape. When you click one of these styles, the Wrap Text and Distance From The Text settings become active.
- Both Sides Wraps text around both sides of the image or shape
- Left Wraps text around only the left side of the image or shape and leaves the space to the right of the image or shape blank
- Right Wraps text around only the right side of the image or shape and leaves the space to the left of the image or shape blank
- Largest Only Wraps text on the side of the image or shape that has the larger distance from the margin. For example, if the distance between the left margin and the image is one inch, and the distance between the image and right margin is 3 inches, Word wraps the text around the right side of the image.
- Distance From The Text You can enter the specific distance between the text and the image or shape in inches. You can independently set distances for the top, bottom, left, and right margins. Also, you can specify the distance in hundredths of an inch if you want to be that precise.
Adding Alt Text to Objects
Alt text, or alternative text, tells anyone who views your document in Word what the image, shape, or SmartArt graphic is when the reader moves their mouse pointer over it. If the reader can't see your document, then Word will use text‐to‐speech in Windows to read your Alt text to the reader audibly.
Here's how to add Alt text:
- Click the shape, picture, or SmartArt graphic. If you clicked a SmartArt graphic, skip to step 3.
- In the Shape Format or Picture Format ribbon, click the Alt Text icon. (If your Word window isn't very wide, you may need to click the Accessibility icon and then click Alt Text.)
- In the Alt Text pane on the right side of the Word window (see Figure 5.24), type one or two sentences in the text box to describe the object and its context.
Some images, especially stock images, already have this information in the text box, but you can change it.
- Click the Mark As Decorative check box if your image, shape, or SmartArt graphic adds visual interest but isn't informative, such as a line.
- When you're done, close the pane.

FIGURE 5.24 Alt Text pane
Summary
This chapter started with a discussion about all the ways you can add illustrations to a Word document. You learned how to add pictures, shapes, SmartArt graphics, screenshots, and screen clippings. Then you learned how to add text boxes to have different areas of text in a document.
I followed up with a discussion about how to format illustrations as well as text boxes. Then you learned how to position illustrations and text boxes on a page, including wrapping text around the illustration or text box the way you want.
Finally, you learned how to add Alt text to any type of illustration to ensure that people who can't see the illustration will know what that picture, shape, screenshot, screen clipping, or SmartArt graphic is about.
Key Terms
| 3D models | screenshots |
| Alt text | shapes |
| pictures | text box |
| screen clippings | wrap text |
Exam Essentials
Understand how to add different types of graphics. Word allows you to add a variety of graphics and photos to your document, including shapes, 3D models, and Word SmartArt graphics. You need to know how to add these graphics as well as pictures, screenshots of open windows, and clip portions of your screen to your document.
Know how to add and format text boxes. Understand how to add a text box that is separate from other text on a page, modify a text box, and format text in a text box.
Understand how to position graphics and wrap text around them. Know how to position your graphic on the page and set options for wrapping text around the graphic, moving the text in front of the graphic or moving the graphic in front of the text.
Be able to add Alt text. Understand why Alt text is important for your readers and know how to add Alt text to a graphic or picture.
Review Questions
- How do you add a rectangle?
- Click the Design menu option, and then select a new theme in the Design ribbon.
- Click the Insert menu, and then click SmartArt in the Insert ribbon.
- Click the Insert menu option, and then click Shapes in the Insert ribbon.
- Select the rectangle style from the Home ribbon.
- How do you add an organizational chart to your document using the Insert menu ribbon?
- Click Shapes.
- Click SmartArt.
- Click Chart.
- Click Pictures.
- Why should you add a text box?
- Because it's easier to read
- Because you need to add one before you can start typing text in your document
- You don't need to add one because you can add text directly on a page.
- To have text separate from the rest of the text in your document
- How do you apply a specific picture style in the Picture Format ribbon?
- Click the Corrections icon.
- Click one of the picture styles tiles in the Picture Styles area.
- Click Picture Effects.
- Click Change Picture.
- How do you clear style changes that you made to a SmartArt graphic?
- Use the SmartArt Design menu ribbon.
- Delete the SmartArt graphic.
- Click the Undo icon in the title bar.
- Use the Format menu ribbon.
- How do you rotate a selected 3D model?
- Click one of the icons in the 3D Model Views section in the 3D Model menu ribbon.
- Click and drag the handles on the selection box around the model.
- Click and drag the icon in the middle of the model.
- Click the Position icon in the 3D Model menu ribbon.
- If you have two text boxes in your document, how can you link them together?
- Click the Insert menu option, and then click Link in the ribbon.
- Use the Shape Format menu ribbon.
- Use the Layout ribbon.
- Click the Sort icon on the Home ribbon.
- How do you add text to a shape?
- Use the Shape Format ribbon.
- Click the Layout Option icon next to the selected shape.
- Use the Insert ribbon.
- Right‐click the shape.
- How do you place a graphic so that it remains with the text above and below it when you wrap the text?
- Top and bottom
- Both sides
- In line with text
- Square
- Why should you add Alt text to graphics and pictures?
- Because it's required for all graphics in a Word document
- To help people who can't see the graphic know what the graphic is about
- Because Word won't save your document until you do
- Because you want to be as informative as possible