
This chapter helps you to prepare for the exam by covering the following Microsoft objectives for the Installing and Upgrading Windows Vista section of Exam 70-620: TS: Microsoft Windows Vista, Configuring.
Identify hardware requirements.
<objective>Hardware requirements include a “minimum” level that enables Windows Vista to run in a basic manner and a “preferred” level that enables Windows Vista to perform adequately and use the new Aero graphics interface to its fullest capacity. It is important that you know the hardware requirements so that you can plan the appropriate hardware configurations that support the various editions of Windows Vista and their capabilities.
</objective>Perform a clean installation.
<objective>Microsoft includes this objective to ensure that you know how to manually install Windows Vista. It is important to know how to perform a complete manual installation so that you understand what’s happening behind the scenes when performing automatic, unattended installations.
</objective>Troubleshoot Windows Vista installation issues.
<objective>Troubleshooting various types of installation require you to understand the steps that occur during installation and what can go wrong at each step. Troubleshooting failed installations is an objective referring to the error logs and troubleshooting procedures that are generated when Windows Vista fails during the Setup process. You are required to know which error log applies to which failure, as well as how to follow through in correcting the problem.
</objective>Install and configure Windows Vista drivers.
<objective>Drivers are software interfaces that enable devices such as pointing devices, scanners, printers, keyboards, cameras, modems, network adapters, and so on to perform under the Windows Vista operating system. An administrator must be able to physically connect a device and implement, upgrade, and roll back its device driver.
</objective> </feature>Outline
The Microsoft 70-620 exam assesses your ability to install, configure, and administer Windows Vista and focuses on how to do so in a business environment. Basic to any installation type is the manual, clean installation of Vista on a new computer.
Manual installation of Windows Vista is fine when you have only a few computers that need to be installed, but what would you do if you had several hundred (or thousand!) computers on which you needed to install Windows Vista? This chapter introduces you to automated deployment of Windows Vista using Windows Deployment Services (WDS) and the System Preparation Tool (Sysprep.exe, or Sysprep for short).
As an adjunct to Murphy’s Law, what can go wrong during an operating system installation does go wrong, and then the situation needs troubleshooting. Windows Vista is no exception. Whether the installation is attended or whether the operating system is automatically installed through the use of WDS, Sysprep, or answer files, problems can and do occur. Knowing how to handle the unexpected error makes all the difference to a network administrator or engineer.
When you manually install a Windows Vista system, you may just think it’s a matter of getting your hands on a DVD and popping it into a computer. However, when you deploy Windows Vista throughout an entire organization, even if you decide to do so manually, you can reduce errors and delays by following a carefully planned deployment.
Most projects involve five principal stages—Define, Design, Develop, Test, and Implement. You should follow them when deploying Windows Vista, as well.
There are many different project methodologies, and some are quite complex. If you boil them down to their essential elements, they fall into the following five stages:
Stage 1: Define—. Defining the project scope and objectives. You have to set limits to your project so that you don’t end up with a task that will never end because it has no stopping point. Besides, who wants to be at the mercy of users who ask, “Can’t you just add this one little thing to the project?” You also have to set objectives to ensure that your project actually meets the goals of your organization. It would be senseless to spend hours to test and implement wireless networking within Windows Vista if your network has no wireless access points and has a security policy that objects to wireless networking altogether. However, it would be just as senseless to ignore testing and implementing multimedia support if you are conducting a project for a graphics company. With the scope and objectives of your project in hand, you can then begin planning the project by identifying tasks and phases, specifying the people and groups affected by it, and determining the timeframe for those tasks.
Stage 2: Design—. Designing your Windows Vista configuration. This stage involves creating the ideal desktop to deploy to your end users. (If you are fully networked with Windows 2000/2003/2008 Active Directory, you can also use Group Policy to make user-specific or group-specific configuration specifications rather than incorporating them into the installation itself.) Your design should incorporate the fundamental framework of the preferred Windows Vista configuration for your network. This phase might also involve a lab test of your preferred build to see what the logical design would look like. You can also design the implementation method—whether to implement manually, use WDS, use Sysprep, or refer to third-party implementation tools for unattended installations.
Stage 3: Develop—. Developing the final configuration. During the development phase, you will likely make changes to your original design. Mainly this phase is to gather or create all the resources necessary to conduct your deployment. For example, if you were to design a standard desktop configuration that included most of the Windows Vista features and planned to deploy it through WDS, then the development phase would include creating the unattended installation files for WDS, assembling the WDS server(s) required, along with providing for any network requirements to enable WDS across wide area networks (WANs), if that was a consideration on your network.
Stage 4: Test—. Involves the following components:
Testing the final design of the desktop to ensure that it meets users’ needs
Analyzing hardware compatibility with the devices on your network
Testing application compatibility with the applications that your users must have to be productive
Examining the implementation method to ensure that it will function properly when the project is rolled out
Developing and testing a rollback method so that you can restore the computer to its former state just in case a severe problem takes place
During the testing stage, you should prioritize your tests to ensure that critical applications and uses of the operating system will receive the greatest focus. Giving minor problems a lower priority will help you avoid delays in the project.
In fact, the testing phase is simply the process of trying to break your designed configuration of Windows Vista and then fixing anything that does break during testing before it gets in the hands of end users. This phase should involve a pilot test where you place your final configuration into a production environment with a small control group of users. These users can then conduct business and report back to you any problems that they run into while using your configuration. Users always find something that you might not have thought to test for while in the lab, mainly because they utilize features of applications in different ways than you might try in a lab environment.
Stage 5: Implement—. Deploying the operating system throughout your organization as defined in the scope of the project. This final stage should include
Notifying the affected users and groups of the deployment with some advance notice
Installing any distribution servers if needed
Training the users on the new interface and features of Windows Vista
Backing up data on the users’ computers, if applicable
Upgrading or replacing incompatible hardware
Conducting any additional preparation tasks such as running system checks or defragmenting the hard drives
Installing the operating system itself
Migrating user-specific data back to the newly installed PC
Conducting a quality analysis of the computers to ensure that they will boot up and run critical applications
Objective: Identify hardware requirements.
Microsoft has defined two levels of hardware requirements for computers running Windows Vista. The minimum supported hardware requirements represent the bare minimum required to run the core features of Windows Vista and provide a basic user experience. Computers meeting these requirements are considered to be “Windows Vista-Capable” computers. The premium ready hardware requirements represent the hardware required to run all features of Vista with satisfactory performance.
Table 2.1 lists the base hardware requirements for Windows Vista. Although these are the minimum hardware requirements for supporting the operating system, they are not necessarily adequate to support additional applications or for reasonable performance. When designing the hardware requirements for installation, you should allow for extra RAM and hard disk space and probably a faster processor for applications.
Table 2.1. Hardware Requirements for Windows Vista
Minimum Supported | Premium Ready | |
|---|---|---|
Processor | Intel Pentium/Celeron running at 800MHz or higher | Intel Pentium II/Celeron running at 1GHz or higher, or 64-bit (x64) processor |
RAM | 512MB | 1GB |
Graphics processor | DirectX 9-capable | DirectX 9-capabile with at least 128MB graphics memory |
Hard disk | 20GB with at least 15GB free space | 40GB with at least 15GB free space |
Monitor | SVGA (800×600) | 1024×768 or higher resolution |
Disk drives (for CD installations) | CD-ROM or DVD drive | CD-ROM or DVD drive at 12x or faster speeds |
Other | Standard keyboard and mouse or other pointing device | Standard keyboard and mouse or other pointing device and audio output and Internet access capabilities |
If you want to access a network, you should have a network adapter installed that is compatible with the network infrastructure. For Internet access, at a minimum you need a 14.4-Kbps modem or higher to dial up to an Internet service provider (ISP). Video conferencing, voice, fax, and other multimedia applications generally require 56-Kbps modems, microphone, sound card, and speakers or headset. Video conferencing itself requires a video conferencing camera.
Microsoft makes it easy to check your hardware’s compatibility by providing a list of supported hardware. Microsoft designed the Windows Logo Program for Hardware with the aim of assisting users to identify hardware components that are compatible with Windows Vista and the next Windows Server release. This program replaces the Hardware Compatibility List and Windows Catalog that were previously used with older Windows versions. It consists of two tiers:
A “basic” logo that identifies all compatible products.
A “premium” logo that identifies products that present advanced experiences with Windows Vista. Components that carry the premium logo are certified to perform with the Media Center.
For more information on the Windows Logo program, refer to FAQ for Windows Logo Program in the “Suggested Readings and Resources” section at the end of this chapter.
The Windows Logo program is not comprehensive. You can check hardware compatibility by contacting the manufacturer of the device if you cannot find it on the Microsoft website.
An issue that can interrupt the installation process is the use of incompatible critical device drivers. If a compatible driver is not available, Setup stops until updated drivers are found. Operating system upgrades will not migrate incompatible Windows XP drivers. The only way to ensure a smooth installation is to make certain you have all the drivers available at the start of the installation process. Do not be concerned about unattended installations because there is a folder in which you can place any additional or updated drivers for hardware that is not included in the base Windows Vista files.
Before you deploy Windows Vista on any system, you should ensure that the hardware and BIOS are compatible with the operating system. Older hardware may not have a compatible BIOS even though the devices within the PC itself are all listed in the Windows Logo program. The original equipment manufacturer (OEM) should have an updated BIOS available that can be downloaded from the OEM’s website.
If you have an Internet connection, you can use the Dynamic Update feature to connect to the Windows Update website during setup. Windows Vista automatically downloads and installs updated drivers during the setup process from the Windows Update website.
One of the more difficult parts of the development and testing phase of an operating system deployment project is to handle software compatibility, or rather, software incompatibility. The operating system that you deploy is important because it provides the basic functionality for the computer, but productivity usually depends on business applications that are installed, which makes applications more important to the organization. If an application is not compatible with the operating system, you have the following options:
Upgrade the application to a compatible version.
Replace the application with a similar type of application that is compatible with Windows Vista.
Retire the application.
Before you are faced with these decisions, your first task in determining software compatibility is to identify all the applications that are used and that will be installed in your deployment project. You should develop a matrix of applications that is organized according to priority of business productivity and by number of users that use the application. For example, if you determine that 100% of all your users use APP A, but that it does not directly contribute to business productivity (such as an antivirus application), you would place it in the high use, low productivity quadrant. If you determine that 10% of your users use APP B, and it contributes highly to business productivity, you would place it in the low use, high productivity quadrant. If 5% of users use APP C and it has no impact on business productivity, you would place that in the low use, low productivity quadrant. The applications in that low use, low productivity quadrant are the ones that you should analyze for potentially retiring. If you find that 90% of all users use APP D and it is considered business-critical, you would put APP D in the high use, high productivity quadrant. All applications in this quadrant should receive priority during the project. Figure 2.1 attempts to place these applications into this perspective.

You might decide to include additional criteria to your matrix to better pinpoint the applications that will require more of your time during the project. For example, you could identify which applications are developed for Windows Vista and which are developed specifically for older Windows operating systems, as well as which have been developed in-house. Applications that have been developed for Windows 2000 or Windows XP might not run properly on Windows Vista. Those applications that were developed for older versions of Windows, such as Windows 9x/NT, are more likely to be incompatible with Windows Vista. Antivirus applications are typically incompatible if they were developed for older Windows versions.
After you have an inventory of your current software, you should then build a test lab and test the applications with Windows Vista. With each application that has compatibility problems, you should decide whether the application is important enough to fix. If it is important, you should then determine the fixes you need to undertake to make it compatible. You can then package the fixes using the Microsoft Application Compatibility Toolkit. Finally, you should test the deployment and perform a quality assurance check on the test PCs to see whether the applications install and run properly. For more information on the Microsoft Application Compatibility Toolkit, refer to Inside the New Microsoft Application Compatibility Toolkit in the “Suggested Readings and Resources” section at the end of this chapter.
In a Windows Vista deployment, you must be able to identify which network protocols and network hardware are used on your network. Network protocols affect how you configure the computer, especially if there is some problem with addressing. When you install Windows Vista, it will not connect to the network properly if it does not use a compatible protocol or does not have a correct address.
The network hardware you use on the network affects the options you have available for deployment. For example, if you have no servers on your network and/or no peers with enough hard disk space to hold the installation files, you will be unable to install Windows Vista over the network—attended or unattended. If you have servers, but they do not run Windows 2000 or Windows 2003, you will not be able to use WDS. If you do not have sufficient bandwidth, you will not be able to run the installation across the network either.
To assess your network, collect the following information:
Network protocols
Addressing format and address resolution
Naming conventions and name resolution
Network servers including server operating system, names, IP addresses, domain membership, file and print services, directory services, and authentication
Network sites and available bandwidth between the sites
Routers, hubs, switches, printers, bridges, other peripherals, firewalls, and proxy servers
A thorough network assessment includes physical and logical diagrams of all sites, documenting each physical link, its speed, IP address and available bandwidth, and the location of each piece of equipment. The logical portion should show server roles, Domain Name System (DNS) servers, Windows Internet Naming Service (WINS) servers, Dynamic Host Configuration Protocol (DHCP) servers, trust relationships, and your domain architecture.
When the Windows Vista computer is a network client, you need to determine how to connect that client to the network. Keep in mind that large networks tend to be hybrids, having a mixture of network media. If one client is intended to connect to a token ring network, whereas another is intended to connect to a wireless network, you need to plan for the appropriate network adapter, drivers, and installation method.
The standard network protocol for Windows Vista is Transmission Control Protocol/Internet Protocol (TCP/IP). If you intend to connect to a network that has NetWare servers that do not use TCP/IP, you also need to configure the NWLink protocol, which is Microsoft’s equivalent to the Internetwork Packet eXchange/Sequenced Packet eXchange (IPX/SPX) protocol. On the other hand, you should not install any additional protocols if they are unnecessary because they will generate additional network traffic.
DHCP servers automatically provide IP addresses to each DHCP client on the network from a pool of addresses. When a network device releases its IP address, the address can be reused for another DHCP client. This averts IP address conflicts and helps distribute IP addresses efficiently, along with extended information such as DNS server data. Even if your network uses DHCP services, you should be aware of IP addresses used on each network link. This helps if you have to troubleshoot a problem with connectivity. If your network uses static IP addresses, you need to have an IP address for each network client you install.
Windows Vista computers can participate in an Active Directory domain by becoming members of the domain. Keep in mind that Windows Vista Home Basic or Home Premium cannot participate in a domain as a member but can access data on a domain server. Domain membership in an Active Directory domain requires the TCP/IP protocol and proper DNS server identification.
Challenge
You are a network administrator who is preparing to install Windows Vista on a large number of computers that will be part of a domain. To test whether you can join a domain, you should first be able to communicate with a domain controller. You should be able to perform this process on your own based on what you have learned so far.
If you have trouble with the process, you can determine whether the computer is able to join a domain by performing the following steps:
Click Start, right-click Computer on the Start menu, and select Properties.
On the dialog box that appears, click Change Settings under the Computer name, domain, and workgroup settings section.
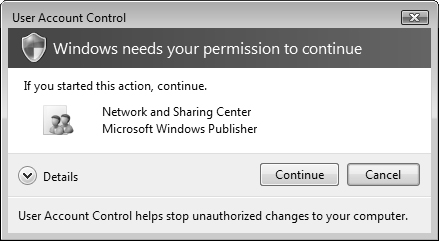
If User Account Control is enabled, the message shown in Figure 2.2 informs you that Windows needs your permission to proceed. Click Continue.
On the System Properties dialog box, click the Computer Name tab.
Ensure that the name of the workgroup is the same as the name of the domain that you intend to join.
Apply the changes and restart the computer when requested.
Click Start and double-click Network.
Locate the domain controller and double-click it.
Make certain that you can browse network resources.
Log off the computer and log on again to disconnect completely from the domain controller.
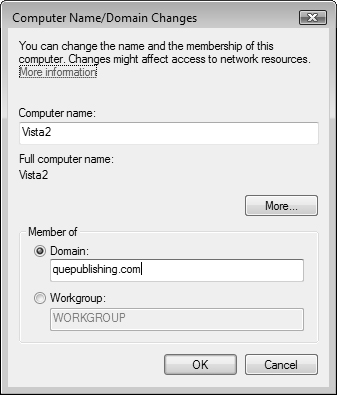
Now you can join the domain. Repeat steps 1 to 4 to access the Computer Name tab of the System Properties dialog box.
Click Change.
On the Computer Name/Domain Changes dialog box that appears, select Domain and type the name of the domain in the text box provided (see Figure 2.3). Then click OK.
Type the user name, password, and domain name. This must be the name of a user who has the authority to join the domain. Click Next.
When you receive the message
Welcome to thedomainnamedomain, you have successfully joined the domain.Exit the Computer properties and you are prompted to restart the computer.
A new logon screen appears, where you need to press Ctrl+Alt+Delete to log on to the domain.
When you install a peer-to-peer network of Windows Vista and other Windows computers, you need to ensure that each computer is connected and that they are all running the same protocol with correct addressing. You also need to ensure that each computer within the peer-to-peer network is a member of the same workgroup.
Because the Windows Vista computer is a peer on the network, it not only needs to access other files and printers, but it needs to share its own files and printers. To do this, you should install File and Printer Sharing if it is not installed already on the computer. To install File and Printer Sharing, follow these steps:
Click Start and double-click Network.
You should see a message bar informing you that file sharing is turned off. Click this message, and then click the Turn on Network Discovery and File Sharing option that appears.
A User Account Control message informs you that Windows needs your permission (refer to Figure 2.2 shown previously). Click Continue to begin sharing files.
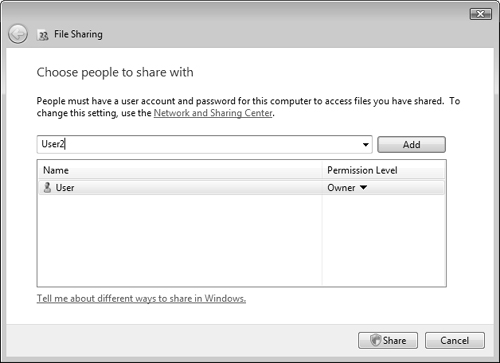
With File and Printer Sharing installed, you still cannot share files and printers until you specify which should be shared. To share a file or printer, follow these steps:
Locate the resource to be shared and right-click it.
Select Share from the shortcut menu.
In the File Sharing dialog box, type the username of a user with whom you want to share the folder (see Figure 2.4), click Add, and then click Share.
In the User Account Control dialog box that appears, click Continue.
The File Sharing dialog box informs you that the folder has been shared and that you may email the links to inform users that the folders are shared or copy the links so that you can paste them into programs or documents. Click Done.
Note: The Public folder
Vista provides a folder located at c:UsersPublic that contains subfolders named Public Documents, Public Download, Public Music, Public Pictures, Public Videos, and Recorded TV. Although this folder is designed for sharing files and folders, it is not shared by default. You will need to share this folder using a procedure similar to that described in the preceding steps.
The file-sharing capabilities in Windows Vista are simplified such that all users have identical rights to files based on how you originally share the resource. This means that either all users can read the files, or all users can change the files. You can control which users are permitted to do by configuring the access control list (ACL) for the appropriate files and folders, provided you are using the New Technology file system (NTFS) for the file system. Right-click the file or folder and choose Properties and then select the Security tab of the dialog box that appears. Users and permissions are discussed further in Chapter 5, “Configuring Windows Security Features.”
Windows Vista supports three file systems:
File Allocation Table 16 (FAT16)
File Allocation Table 32 (FAT32)
NT File System (NTFS)
FAT16 is a 16-bit file system, whereas FAT32 is a 32-bit file system, both of which have grown out of the Windows 95/98/Me family. NTFS is the 32-bit file system that has come from Windows NT. For more information on Vista file systems, refer to “Comparing NTFS and FAT file systems” in Vista Help and Support Center.
In a corporate environment or in any peer-to-peer network, you should consider NTFS to be the optimum file system to use. It has the basic functionality that FAT16 and FAT32 provide, plus it supports improved security, file encryption, file compression, and larger partitions and files. For scalability, NTFS can ensure your file system will support the larger hard disks and will not degrade in performance.
Fault-tolerant features are incorporated in NTFS. The file system automatically repairs disk errors without displaying error messages. When Windows Vista writes files to the NTFS partition, it saves a copy of the file in memory. It then compares the file on the disk to see whether it is the same as the copy in memory. If the two copies aren’t equivalent, Windows Vista marks that section of the disk as bad and rewrites the file to another disk location.
NTFS also allows you to perform several operations related to file and folder security. The security within NTFS allows you to set permissions on folders and individual files. FAT16 and FAT32 do not. Furthermore, to use the Encrypting File System (EFS), you must have NTFS as your file system. EFS allows you to protect your files and folders from unauthorized access on the local hard drive through the use of public key security. In addition, you can set disk quotas. When multiple people use the same computer, you can control the amount of disk space each person can use on that computer. When you have configured disk quotas, a user looking at the available disk space will see only the amount of space available for that user’s disk quota. If users attempt to exceed their allotment, they are given the message that the disk is full.
Native NTFS file compression enables users to select individual files or folders to compress. Because the file system takes care of the compression algorithm, any Windows application can read or write a compressed file without having to manually decompress the file beforehand. File compression is supported only when NTFS has a cluster size of 4KB or smaller.
Note: Upgrading considerations
If you are upgrading an existing Windows system that already uses NTFS, you should keep NTFS. If you are upgrading Windows systems that use FAT16 or FAT32, your partition is automatically converted to NTFS during the setup process.
Dual-boot systems also require you to think through the file system choice. Although you may use both an NTFS and a FAT partition on the same computer, a Windows 9x operating system cannot access files in the NTFS partition. However, Windows Vista (as well as Windows NT, Windows 2000, and Windows XP) can access both partitions.
The highly controversial Windows Product Activation (WPA) was first introduced by Microsoft in Windows XP and Office XP to deter piracy. The premise is that each computer installed should have a unique identifier associated with the software with which it was installed. The WPA addition, however, does cause some planning issues for a large deployment. In a simple installation of a single Windows Vista system, WPA is just a matter of contacting Microsoft via the Internet (the easiest method) or phone and obtaining the unique identifier. In a large deployment, Microsoft has introduced an update to WPA called Volume Activation, which enables straightforward activation of multiple computers.
How WPA works is straightforward: It generates a unique identifier for your computer by combining your hardware ID with the product key. This ID is sent to Microsoft, which then checks to see whether that product key has been used for more than the number of systems that the End User License Agreement (EULA) allows, which is simply one system. If this check passes, your computer receives a confirmation code that activates Windows Vista, and the issue of WPA goes away. If the check fails, your system is not activated and will operate in reduced functionality mode after the 30-day activation period is over.
If you have a computer that is not connected to the Internet and does not have a modem available for connection purposes, you are required to manually activate it. To do so, you run through the WPA process when prompted to activate the computer, and you will obtain an installation ID number. Then you call the Microsoft Activation Call Center to obtain a confirmation ID. Finally, you input the confirmation ID number in WPA.
When you use WPA, regardless of the method, the information in the ID submitted to Microsoft indicates the following:
You can perform Volume Activation by using either of the following two types of licensing keys:
Multiple Activation Keys—. These keys activate computers by either the Internet or telephone in a manner similar to that already described for Product Activation.
Key Management Service—. You can set up this service on a computer running Windows Vista or the new Windows Server operating system to activate Vista computers automatically without the need to contact Microsoft. You must have a minimum of 25 Vista computers to utilize this service.
Objective: Perform a clean installation.
In an attended installation, someone is required to interact with the computer while it executes the installation process. This is a process that IT professionals should be familiar with but one the average user will rarely, if ever, need to perform. With OEMs releasing new computers with the operating system pre-installed, and with organizations ensuring that only IT staff installs and configures computers, it’s likely that the only non-IT professionals who will run fully attended installations are those who purchase Windows Vista off the shelf and install it on their existing home computers.
As an IT professional, you should run through at least one or two attended installations even if you are planning to deploy only unattended installations of Windows Vista throughout your organization. By going through the process, you can see each stage of installation and relate it to sections within the answer files and with the unattended process later on. If you need to troubleshoot an unattended installation, you will be better able to identify the point at which the installation failed if you have already become familiar with the attended installation process.
You can run an attended installation process for either an upgrade or a clean installation of Windows Vista. Upgrading to Windows Vista is covered in Chapter 3, “Upgrading to Windows Vista,” so we will be walking through a clean installation process in this section.
Before you begin, check to make certain that you have gathered all the information you need and are prepared to install. You should have the following:
A computer that meets the minimum hardware requirements listed in the Windows Logo Program for Hardware.
Windows Vista drivers from the manufacturer for any hardware that does not appear in the Windows Logo Program. It’s imperative that you have the hard disk drivers, especially if they are RAID or SCSI devices.
Windows Vista DVD or installation files available across a network.
BIOS that meets the minimum requirements for Windows Vista compatibility.
Product code, which should be listed on the CD package or provided to you from the network administrator.
If across a network, a boot disk that can access network shares and appropriate network adapters.
Internet connection for Automatic Updates and access to updated drivers and WPA.
A backup of all your existing data and the drivers for the backup device so that you can restore the data.
When you have all the preceding items in hand, you’re ready to install Windows Vista. Your first step in the installation is to boot up the computer into the setup process. This means that you will boot to the network and run Setup from a network share, boot from the CD, or create a set of Setup startup disks that will boot the computer and find the CD. If your CD-ROM drive is not bootable, consider that to be a red flag that your system might have compatibility problems. Installing across a network is covered in Exercise 2.1 in the “Apply Your Knowledge” section later in this chapter.
Step by Step 2.1 outlines the process for installing Vista using a bootable DVD-ROM rather than startup disks or a network installation.
Manually Installing Windows Vista Via DVD-ROM
Insert the Windows Vista installation DVD and boot the computer. If you receive a message that the DVD has been auto-detected and a prompt to
Press any key to boot from CD or DVD, press the spacebar or any other key within five seconds or the computer will attempt to boot from the hard disk.A message stating that
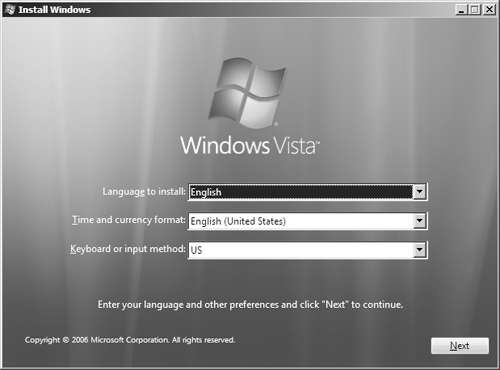
Windows is loading filesappears. After a minute or so, the Install Windows dialog box shown in Figure 2.5 appears. If you need to change the language, time and currency, or keyboard or input method settings, do so. Otherwise, click Next to proceed.Another Install Windows dialog box appears. If you need further information, click the What to Know Before Installing Windows link. Click Install now to install Vista.
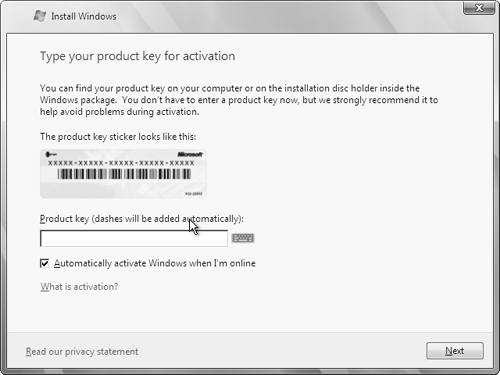
After a few seconds, you receive a Type Your Product Key for Activation dialog box (see Figure 2.6). Type the product key included with the installation DVD and then click Next.
Tip: Installing Vista without a product key
Unlike previous versions of Windows, you can leave the product key blank. If you do so, you will receive a warning message and will be prompted to select the edition of Vista you want to install. You will have 14 days to activate Windows, at which time you must supply a valid product key. You can use this feature to preview any edition of Vista and select the most appropriate edition for your requirements.
The EULA screen appears. You must select the I Accept the License Terms check box to accept the licensing agreement as indicated at the bottom of the screen.
The next screen offers you a choice of upgrade or clean installation. The Upgrade option will be disabled (grayed out) unless you are running the installation on a computer running a compatible copy of Windows XP with sufficient free disk space to accommodate the upgrade. Select the Custom (advanced) option to continue.
The next screen shows the available partitions and unpartitioned disk space where you can install Windows Vista. Make certain you select a partition that has enough available disk space, preferably 40GB but at least 20GB. If unpartitioned space is available, you can select the unpartitioned space and create a new partition for the operating system at this point. Click Next.
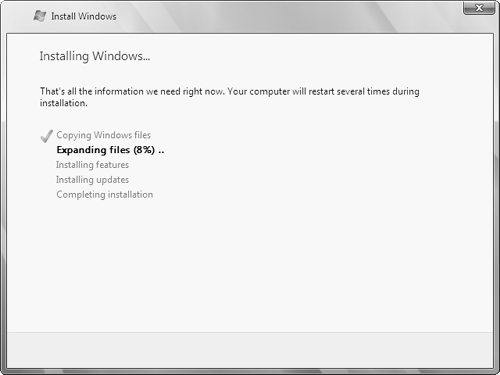
The next window tracks the progress of installing Windows Vista and informs you that your computer will restart several times, as shown in Figure 2.7. Take a coffee break.
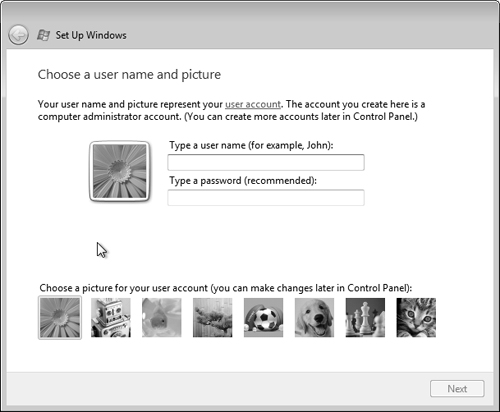
After the final reboot, Setup displays the Choose a User Name and Picture dialog box shown in Figure 2.8. Type a username and password in the text boxes provided. The password you provide is for a local user account on the computer running Windows Vista. You do not need to make this password the same as the one for the domain administrator, and you can leave the password blank. Be careful when assigning different passwords for the Administrator account on different computers during a large deployment because you will have problems if you lose the local Administrator’s password.
On the next screen, accept the computer name provided or type one of your choosing. If you intend to join a domain, enter a computer name that meets your organization’s naming conventions and that has a computer account on the domain. The computer name must be unique on the network for both DNS naming and WINS naming. Also choose a desktop background and then click Next.
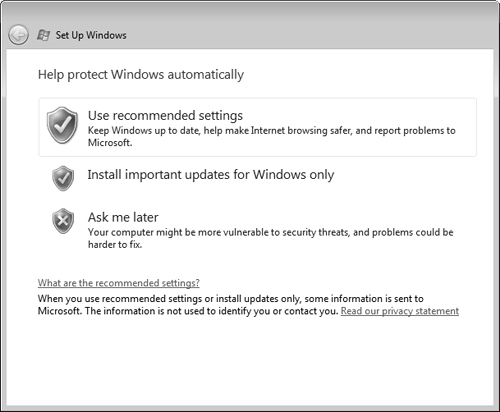
On the next screen, select the Use Recommended Settings option to provide the highest security level (see Figure 2.9).
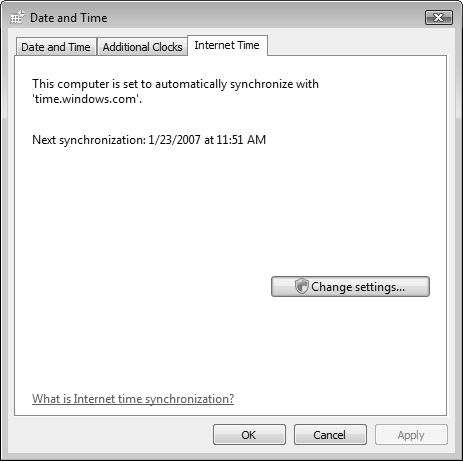
On the next screen, set the current date, time, and time zone. If this computer connects to the Internet, you can simply select the correct time zone and later make certain that Windows Vista automatically synchronizes with an Internet time provider. (If you have a local time provider computer, you can also type in that computer’s address in the appropriate location.) Figure 2.10 shows the dialog box for customizing time synchronization. You can access this dialog box by right-clicking the time on the right end of the Windows Vista taskbar, selecting Adjust Date and Time, and then clicking the Internet Time tab.
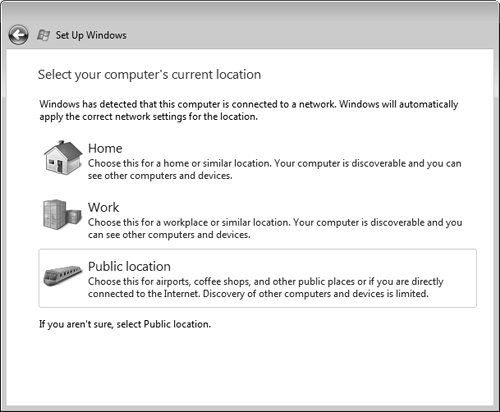
On the next screen, select the location that best describes your computer’s current location (see Figure 2.11).
Setup displays a Thank you message. Click Start to begin working with Vista. At this first logon, Windows informs you that it is checking your computer’s performance. After a minute or two, Vista displays a Welcome screen and a message that it is configuring your desktop.
After another minute or two, the Windows Vista desktop and then the Welcome Center (which was introduced in Chapter 1) appears. The computer attempts to access the Internet to download and install updates from the Microsoft website, and a message at the bottom of the desktop informs you of the update progress. Click any of the options displayed to learn more about Vista.
Caution: Activation period
The period of time before you absolutely have to activate Vista is 30 days. If you do not activate Vista on time, it enters a “reduced functionality mode” in which you can only perform certain actions. Refer to The behavior of reduced functionality mode in Windows Vista in the “Suggested Readings and Resources” section for more information.
You have just completed a full, manual installation of Windows Vista from scratch. In a typical installation, you would next join a workgroup or domain, install additional applications, restore data from backup, and customize the desktop to meet your needs.
The procedure outlined in Step by Step 2.1 is fine when you have only a few computers that need to be installed. But what would you do if you had several hundred (or thousand!) computers on which you needed to install Windows Vista? This section describes several methods of unattended installation (also referred to as automated deployment), which enables you to deploy Windows Vista to a large number of computers with little or no intervention needed from end users.
Unattended installation provides great time savings for administrators who need to install Windows Vista on even a modest number of computers. In addition, it provides a reliable method of creating a series of computers with consistent configurations and reduced chance of error during installation. Original equipment manufacturers (OEMs) use similar methods to install Windows Vista onto large numbers of new computers.
Unattended installation also provides an efficient, rapid means of installing the operating system and core applications should a computer fail and a user needs to be provided with a new computer. Should you need to replace the hard drive containing the operating system files, unattended installation generally provides the fastest means of getting a user productive again.
Several methods of automated deployment of Windows Vista are available. This section discusses the following methods:
Setup Manager—. Enables you to create answer files, which are text files that provide answers to questions asked by the installation program. You can use these answer files to script the installation of Windows Vista.
Sysprep—. Used in conjunction with a third-party replication tool such as Norton Ghost, Sysprep automates the installation of Windows Vista from answer files onto a series of computers.
WDS—. Uses a server configured with image files of Windows Vista to automatically install computers across the network.
Third-party disk duplication programs—. Uses additional tools, such as Microsoft Systems Management Server, to distribute copies of Windows Vista. This method is not covered on the exam and is not discussed in this book.
Microsoft has modified the technology for automated setup in Vista considerably from the technologies previously used in Windows 2000/XP/Server 2003. Table 2.2 introduces the new and modified components and technologies used with Vista.
Table 2.2. Deployment Tools and Technologies
Component | Description |
|---|---|
Answer file | An XML-based file ( |
System Image Manager (SIM) | The application used to automate the process of creating an answer file to your specifications. Replaces the Setup Manager program previously used in Windows XP and Windows Server 2003. |
Catalog | A binary file containing the configuration of settings and packages within a Windows image. |
A minimal 32-bit operating system based on the Vista kernel, used in the preinstallation and deployment of Vista. | |
ImageX | A command-line tool that collects, modifies, and applies Vista installation images. |
Windows Setup | The application that installs the Vista operating system. |
System Preparation Tool (Sysprep) | The application that processes images for deployment to multiple computers. |
Windows image | A compressed file in the new Windows Imaging (.wim) format that contains all the folders and files required to complete a Vista installation, either attended or unattended. |
Using Windows System Image Manager to Create Unattended Answer Files
Windows System Image Manager (SIM) enables you to create answer files from information included in a Windows image (.wim) file and a catalog (.clg) file. You can also include component settings and software packages to be installed on the computers with Windows Vista. The following are several actions you can accomplish using SIM:
You can use SIM to create unattended answer files. You should have two computers, as follows:
A computer from which you install SIM and create the answer files. Microsoft refers to this computer as the “technician computer.”
A computer without an operating system but equipped with a DVD-ROM drive, network card, and a floppy drive, or USB support.
To use SIM to create the files required for performing unattended installations, you first need to download and install the Windows Automated Installation Kit (AIK) from Microsoft and copy the appropriate files from the Windows Vista DVD-ROM. You should perform these steps on a computer running Windows XP Service Pack 2 or later, Windows Server 2003 Service Pack 1 or later, or Windows Vista. Microsoft refers to this computer as the “technician computer.” Follow Step by Step 2.2 to download and install the AIK.
Downloading and Installing the AIK
Open Internet Explorer, navigate to http://www.microsoft.com/downloads/details.aspx?FamilyID=c7d4bc6d-15f3-4284-9123-679830d629f2&DisplayLang=en, and follow the instructions provided to save the Windows AIK image file to an appropriate location on your hard drive. You can also search for “automated installation kit” from Microsoft Live Search.
Use third-party DVD burning software or the native software included with Vista to burn the image file to a blank DVD-ROM disc.
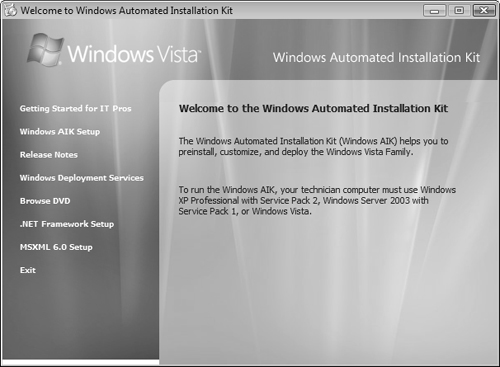
Insert the DVD-ROM disc into the technician computer. The AutoRun program should execute and display a User Account Control dialog box. If not, navigate to the DVD-ROM folder and double-click the
StartCD.exefile.Click Continue to display the Welcome screen shown in Figure 2.12.
Select Windows AIK Setup from the list of options on the left side of this window.
The Windows Automated Installation Kit Setup Wizard starts with a Welcome page. Click Next.
On the License Agreement page, click I Agree and then click Next.
On the Select Installation Folder page, accept the folder provided or type the path to an appropriate folder, and then click Next.
On the Confirm Installation page, click Next and wait while the AIK is installed. This process takes several minutes.
When the completion page appears, click Close.
After you have installed the AIK, a folder is present on your computer, from which you can create answer files. Step by Step 2.3 shows you how.
Creating an Answer File
Insert the Windows Vista DVD-ROM and cancel the Install Windows window that appears.
Open a Computer (or My Computer on a Windows XP or Windows Server 2003 computer) window, navigate to the Vista DVD-ROM, right-click, and select Open.
Open the Sources folder, navigate to the
install.wimfile, right-click, and then choose Copy.In the Computer (or My Computer) window, navigate to a suitable location and create a folder to hold the installation files, for example,
c:Vista_Install.Open this folder and use Ctrl+V to paste the
install.wimfile into it. This will take about one hour.Click Start, All Programs. In the program list that appears, click Microsoft Windows AIK and then click Windows System Image Manager.
In Windows System Image Manager shown in Figure 2.13, select File, Select Windows Image.
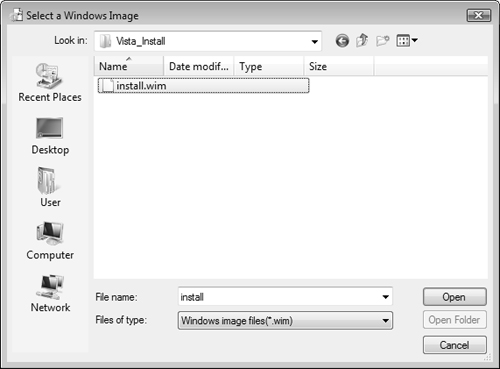
In the Select a Windows Image dialog box shown in Figure 2.14, navigate to the folder you copied the
install.wimfile to, select this file, and then click Open.On the Select an Image dialog box shown in Figure 2.15, select the edition of Windows Vista that you want to create an answer file for.
SIM asks you to create a catalog file. Click Yes and then click Allow in the User Account Control dialog box that appears. A Generating Catalog File message box appears as the files are processed and the catalog file is created. This takes several minutes.
When the process of generating a catalog file is complete, click OK. You are returned to Windows SIM.
In the Windows Image pane, expand the Component node to display the available components.
Right-click each of the following components in turn and add them to the indicated configuration pass:
Microsoft-Windows-SetupDiskConfigurationDiskCreatePartitionsCreate Partition; add to 1 Windows PE configuration pass.Microsoft-Windows-SetupDiskConfigurationDiskModifyPartitionsModify Partition; add to 1 Windows PE configuration pass.Microsoft-Windows-SetupImageInstallOSImageInstallTo; add to 1 Windows PE configuration pass.Microsoft-Windows-SetupUserData; add to 1 Windows PE configuration pass.Microsoft-Windows-Shell-SetupOOBE; add to 7 oobeSystem configuration pass.
The Answer File pane should display all the settings you have added. To complete the creation of an answer file for a basic Vista installation, select and configure the settings contained in Table 2.3.
Table 2.3. Windows Settings for a Basic Answer File
Component
Value
Microsoft-Windows-SetupDiskConfiguration
WillShowUI = OnError
Microsoft-Windows-SetupDiskConfigurationDisk
DiskID = 0
WillWipeDisk = True
Microsoft-Windows-SetupDiskConfigurationDisk
CreatePartitionsCreatePartition
Extend = False
Order = 1
Size = 40,000 (creates a 40GB partition)
Type = Primary
Microsoft-Windows-SetupDiskConfigurationDisk
ModifyPartitionsModifyPartition
Active = True Extend = False Format = NTFS Label = OS_Install Letter = C Order = 1 PartitionID = 1
Microsoft-Windows-SetupImageInstallOSImage
WillShowUI = OnError
Microsoft-Windows-SetupImageInstallOSImageInstallTo
DiskID = 0
PartitionID = 1
Microsoft-Windows-SetupUserData
AcceptEula = True
Microsoft-Windows-SetupUserDataProductKey
Key = <product_key>
WillShowUI = OnError
Microsoft-Windows-Shell-SetupOOBE
HideEULAPage = True
ProtectYourPC = 3
SkipMachineOOBE = True
SkipUserOOBE = True
Validate the settings you have configured by selecting Validate Answer File from the Tools menu.
If you receive an error message, double-click the message in the Messages pane, correct the error, and then repeat step 15.
When all errors have been corrected, click File, Save Answer File. Save the answer file as
Autounattend.xmland then copy this file to a removable flash drive or floppy disk.


Having created the answer files as described in Step by Step 2.3, it is easy to run the automated installation of Windows Vista on a new computer without an operating system. Step by Step 2.4 shows you how.
Installing Windows Vista by Using the System Preparation Tool (Sysprep)
The procedure outlined in Step by Step 2.4 is adequate if you are installing Vista on just a few computers. If you need to install Vista on a large number of computers, you can use the System Preparation Tool (Sysprep) together with a means of disk imaging. Unlike the situation in Windows XP, the Vista DVD already contains an image suitable for deployment to any computer. You can either deploy this image as-is or prepare an image of the computer you installed in Step by Step 2.4 for deployment to the destination computers.
Such a procedure can save considerable time when you are performing a large rollout. In addition, should you encounter problems with a computer at a later time, you can re-image the computer from the disk image that you originally created to return the computer to a baseline configuration.
Unlike the situation in Windows XP, Sysprep is automatically installed into the WindowsSystem32Sysprep folder when you install Vista. To use Sysprep, you begin with a reference computer on which you have installed Windows Vista together with any applications and updates that you want to deploy to the destination computers.
Certain situations are not supported for the use of Sysprep. In these instances, you might be able to use WDS if your network meets the requirements for using WDS:
Upgrades—. You cannot use Sysprep for upgrading computers running older versions of Windows to Windows Vista.
Production environment—. Use of Sysprep for creating an image of a computer that has been used in a production environment is not recommended. In other words, you should use a freshly installed version of Vista when preparing the computer to be imaged.
OEM installation image—. Microsoft does not support the use of Sysprep for imaging a computer that was originally set up from original equipment manufacturer (OEM) installation images or media.
Default user profile has been overwritten—. You should not use Sysprep if you have copied another user profile over the default user profile.
Several optional switches are provided with Sysprep:
/audit—. RunsSysprep.exein audit mode, which verifies hardware and software installation after you have runSysprep.exein factory floor mode. This enables the computer to reboot to verify proper hardware and software installation./quiet—. RunsSysprep.exewithout user interaction./generalize—. Removes system-specific information such as the security identifier (SID) and product activation information so that these items become unique on each newly installed computer./oobe—. Runs Windows Welcome and the oobeSystem configuration pass on the next reboot./reboot—. Forces the computer to reboot after completion of disk imaging./unattend: <file_name>—. Specifies the name of an answer file./shutdown—. Forces a shutdown rather than powering off the computer.
Creation of the image for Sysprep deployment involves preparation of the computer and running the Sysprep.exe utility, followed by shutting down the system and running the disk imaging program. You must be logged on as an administrator to perform these steps. Follow the steps outlined in Step by Step 2.5 to prepare and image the reference computer.
You can store the image created by this procedure on a CD-ROM or a shared folder that is accessible to the target computers. It is also good practice to perform a test deployment and ensure that the operating system and all applications are properly installed and configured before deploying the image to production computers. Should any problems occur, you can reconfigure the source computer and re-create the image.
Microsoft includes Windows PE, which is a minimal version of a 32-bit operating system designed to facilitate the deployment of a Windows Vista image to multiple computers. To use Windows PE, you first need to create a CD that enables you to capture an image of the master computer to be stored on a shared folder accessible to the target computers. The process involves creating a CD from which you can start Windows PE, using this CD to start Windows PE, using ImageX to capture the installation image, and copying this image to a network share. Follow Step by Step 2.6 to complete these tasks.
Creating a Windows Vista Image
At the technician computer, run the following commands to create a local Windows PE build directory:
cd Program FilesWindows AIKToolsPETools
Copype.cmd <arch> <destination>
Where
<arch>refers to x86, amd64, or ia64, and<destination>is the path to a local folder; for example:Copype.cmd x86 c:WinPE_x86
Copy additional tools as required to the local folder, for example:
Copy "C:Program filesWindows AIKToolsx86imagex.exe " C:
WinPE_x86iso<subfolder>
Where
<subfolder>refers to whatever subfolder structure is required for supporting the tools.Use Notepad or another text editor to create a configuration file named
wimscript.ini, which instructs ImageX to exclude specific files during the capture procedure. This file contains the following statements:[ExclusionList] ntfs.log hiberfil.sys pagefile.sys "System Volume Information" RECYCLER WindowsCSC [CompressionExclusionList] *.mp3 *.zip *.cab WINDOWSinf*.pnf
Save this file to the same location specified in step 2. This enables ImageX to detect this file automatically.
Use the
Oscdimg.exetool to create an ISO image file, for example:cd Program FilesWindows AIKToolsPETools Oscdimg –n –bc:winpe_x86etfsboot.com c:winpe_x86ISO c:
winpe_x86winpex86.isoUse the Windows CD-writing wizard or a third-party CD burning application to burn the ISO image file to a blank CD-ROM.
Having created the Windows PE CD-ROM, you can now start the master computer and copy its image to a network share for deployment. Step by Step 2.7 shows you how.
Capturing the Vista Installation
At the master computer, insert the Windows PE CD-ROM and restart the computer.
Windows PE opens a command prompt. To capture an image of the master installation, type the following:
D:ToolsImagex.exe /compress fast /capture C: C:Myimage.wim "my
 Vista Install" /verify
On the network server, create and share a folder to hold the image, for example
\Server1Vista_installationImages.At the master computer, type the following to copy the image to the share:
net use z: \Server1Vista_installationImages
copy c:Myimage.wim z:
The image is now ready to deploy to any number of destination computers. Follow Step by Step 2.8 to deploy the image.
Installing Windows Vista by Using Windows Deployment Services (WDS)
WDS is the replacement for Remote Installation Services (RIS), which was first introduced with Windows 2000 to provide a means of performing on-demand, image-based installation of operating systems across a network connection from a server running RIS to the computer on which the operating system is to be installed. You can install WDS on a server running either Windows Server 2003 or Windows Server 2008 and use it to install Windows Vista or Windows Server 2008 on destination computers.
WDS provides several advantages to the administrator who needs to install Windows Vista/2008 on a large number of computers, including the following:
WDS enables you to install Windows Vista on computers at a remote location across a wide area network (WAN).
WDS provides native support for Windows PE and the WIM file format.
WDS reduces the complexity associated with large deployments, thereby reducing total cost of ownership (TCO).
WDS simplifies the duties associated with management of an installation server.
WDS simplifies the procedures required to recover an installation from system failures that occur during installation.
WDS provides backwards compatibility with RIS by enabling the following operational modes:
Legacy mode—. Functionally equivalent to RIS, this mode enables the installation of Windows 2000/XP/Server 2003 computers only.
Mixed mode—. Enables the actions of both RIS and WDS to deploy any Windows 2000/XP/Server 2003/Vista/Server 2008 computers.
Native mode—. Deploys only Windows PE boot images to install remote copies of Windows Vista and Windows Server 2008.
You can create installation images of Windows Vista or Windows Server 2008 that include complete computer configurations, including such items as applications and desktop settings, and use WDS to push these images out to client computers on the network. The capabilities of WDS include the following:
Enable users to install an operating system on demand. On starting a client computer that is equipped with the PreBoot eXecution Environment (PXE), the computer connects to a WDS server, which then installs the operating system across the network without the need for a CD.
Provide images of the operating system that are complete with specific settings and applications such as those required by a corporate workstation policy. You can designate the group of users that is provided with a certain image or series of images.
Create images that enable the automated installation of Windows Vista or Windows Server 2008.
You can install WDS on a server running Windows Server 2003 or Windows Server 2008 from the Windows AIK by using the Windows_deployment_services_update.exe program included in the AIK. In addition, the following server components must be available on the WDS server or on another server available to the WDS server:
Dynamic Host Configuration Protocol (DHCP)—. Provides TCP/IP configuration parameters that enable the client computer to create its own network connection.
Domain Name System (DNS)—. Provides name resolution services so that the client computer can locate the WDS server by name.
Active Directory—. WDS operates only in an Active Directory–enabled domain environment. You cannot use WDS in a workgroup environment.
In addition, you must have the Windows AIK media available either on the WDS server or at an accessible location, as well as a separate partition on the WDS server that is formatted with the NTFS file system. You must be using a domain account with membership in the local Administrators group on the WDS server.
Exam Alert: Be sure you know these requirements for using WDS
You might encounter a question on the exam where you are asked to troubleshoot why WDS isn’t working, when the reason is that one of these services is missing. Also remember that DNS is required for Active Directory.
Client computers must meet the proper design specification to be installed with RIS. This includes the capability for remote booting, which is usually accomplished by adding a network interface card (NIC) that is equipped with a PXE ROM-enabled chip, along with support in the BIOS for booting the computer from this NIC. In addition, the client computer can have only a single disk partition. (Any additional partitions are destroyed when the operating system is installed, and the entire disk is formatted as a single NTFS partition.)
Use of WDS to deploy multiple images of Vista is beyond the scope of the 70-620 exam and will not be discussed further. For additional details, refer to Windows Deployment Services Update Step-by-Step Guide in the “Suggested Readings and Resources” section.
Objective: Troubleshoot Windows Vista installation issues.
At some point, before a computer can be used, an operating system must be installed. Problems often occur during an operating system installation, which requires troubleshooting. Windows Vista is no exception. Whether the installation is attended or the operating system is automatically installed through the use of answer files, Sysprep, or WDS, problems can occur. Network administrators and engineers need to know how to handle unexpected errors.
In this section you review the common problems that can occur during attended installations. You also discover how to troubleshoot problems with the various types of unattended installations and the troubleshooting methods to follow when faced with a failed installation of Windows Vista.
When you troubleshoot any problem, whether it is during installation or otherwise, there is a simple cyclical methodology that can help you achieve a solution. This is shown in Figure 2.16. As you can see, it consists of five phases:
Identify the point of failure.
Discover the cause of the failure.
Define a solution.
Test and implement the solution.
Document the results.

This is not a straightforward linear process because all troubleshooting is based on theory. Your job is to come up with a theory about why the computer is failing and then test your theory. If your test proves the theory to be wrong, you need to return to the original phase—identifying the point of failure.
The first phase of troubleshooting is determining what the problem is. Given that some symptoms can be caused by a variety of different failures, you need to remain open to any possibility.
Let’s take for example that Windows Vista Setup does not boot from the DVD-ROM. The point of failure is limited to
DVD-ROM drive
DVD-ROM device drivers
BIOS
Installation media
Lack of power (computer is not plugged in)
Given that any one of these items could be the failure, you should look closely at the clues that your computer has given you. If, for example, you can see that the BIOS has started, the light on your keyboard is on, and the monitor is displaying data, you can discard the last item as a point of failure. You should select one of the most likely points of failure and then move on to the next phase.
The difference between the point of failure and the cause of failure is the same as the what and why. A point of failure can be the DVD-ROM. The cause of the failure could be that the DVD-ROM drive is not plugged into the power cable, the DVD-ROM drive is not a bootable drive, or the DVD-ROM drive electronics failed.
During this second phase, you should select the most probable cause of failure. Ask yourself, “If the problem is the what, then why did it fail?” and consider your answer to be the next part of your theory that you need to test.
The third troubleshooting phase is to define a solution. This is the answer to the question “How do you fix it?”
For example, if you have decided that the DVD-ROM drive is the problem and that it failed because it is not a bootable drive, your solution might be to install the operating system over the network from another computer’s shared DVD-ROM drive.
Testing and implementation are often the same phase when it comes to troubleshooting because your test is usually to carry out the solution you just defined. If the solution worked, it was implemented. Otherwise, you simply tested a possible solution with negative results.
If your test produces a negative result, you should return to the first phase—identifying the point of failure. For example, if you test the solution by trying to install Windows Vista from another computer’s shared DVD-ROM drive and you are unable to gain access to the media, you can theorize that the installation media is the point of failure. From there, you can theorize that the DVD is damaged. Your solution might be to replace the DVD. You can then test again and move through the cycle as needed until you succeed.
When you are sitting in front of a computer, watching it go through the various installation phases, it’s easier to troubleshoot a problem as it occurs than to resolve a failed installation after the event. The Vista Setup process is so streamlined that you usually do not encounter problems during installation. However, when a problem does occur, it’s frequently related to lack of preparation. This basic problem manifests itself in the following symptoms:
The Basic Input/Output System (BIOS) is not compatible with Windows Vista.
The hardware is not compatible with Windows Vista.
There is not enough space on the hard drive to install the operating system.
The drivers for the hard disk, network adapter, or other devices are incorrect or incompatible.
The computer cannot connect to the network because the name or IP address conflicts with another computer on the network.
Typically, fixing a problem or running the installation again takes much longer than gathering the tools and information you need before you start the installation. As it happens, an ounce of preparation is equal to a pound of troubleshooting.
Exam Alert: Have the latest BIOS
One or two exam questions look for a combination of answers, with one being the need for the latest BIOS. Compatibility with Windows Vista is not just related to hardware or software; it includes firmware.
This section reviews specific problems that you might encounter during installation. These consist of media errors, insufficient hard disk space, unrecognized CD-ROM, a network that can’t be accessed, and problems that require an advanced startup.
Exam Alert: Be prepared to draw conclusions from stated symptoms
Often, exam questions simply describe the symptoms of a problem. You need to draw conclusions from the exam question and then create a solution. To succeed on these questions, you should be thoroughly familiar with the most common problems that can occur during installation.
Windows Vista can be installed directly from a bootable DVD-ROM drive. If the disc does not boot, check to see whether the drive can be configured as a boot drive and whether this is set in the computer’s BIOS. If you are installing from a bootable DVD-ROM and your computer has difficulty reading from the disc, the quickest way to resolve the problem may be to simply use a different Windows Vista Setup DVD-ROM. Even though a DVD-ROM has worked in the past for other installations, it might have become scratched or otherwise damaged. If you inspect the data side of the disc and discover fingerprints, a simple cleaning may fix the problem. To determine whether the problem is with the DVD-ROM or with the DVD-ROM drive, test the disc on another computer. If you have the same or similar errors reading the disc, you should contact Microsoft for a replacement.
If you boot from a DVD-ROM and the Setup process begins but is unable to copy files to the computer, you might have an unsupported DVD-ROM drive. In addition, make sure you have a DVD-ROM drive and not a CD-ROM drive; the latter cannot read the Vista DVD-ROM disc. Try to install Windows Vista from another location—either from another DVD-ROM drive or across the network. Another option is to copy the Setup files to a local hard drive before beginning Setup.
For network installations, you can boot to the network from either the computer’s existing operating system or a Setup floppy boot disk. If you have problems with the boot disk, test it on an alternate computer to see whether the disk needs to be re-created.
The minimum hardware requirements for installing Windows Vista state that you should have 15GB of available drive space for the operating system on a drive of at least 20GB. If your hard drive is smaller than 20GB, you should add a new hard drive or replace the drive.
Exam Alert: Reality bytes
Although theoretically (and on the exam) you can install Windows Vista with only 15GB of free space, the reality is you need well over 20GB. On an exam question that suggests installing Windows Vista on a disk with less than 20GB total of space, select the answer to add another disk or replace the disk.
If the Setup program doesn’t recognize the DVD-ROM drive, check whether the DVD-ROM drive is compatible with Windows Vista. If it is, you might be able to load updated drivers from the manufacturer. A much easier solution is to install across a network or to copy the files to a local drive before running Setup.
Network connectivity can be a problem caused by simple errors, such as the following:
The password is incorrectly typed. Check to make sure that the Caps Lock key isn’t on.
The wrong domain name is used. Check to make sure that the domain name has been entered correctly.
The network cable is not connected.
The IP address is incorrect.
A name conflict exists, the name is too long, or the name contains illegal characters.
The computer was unable to obtain an IP address from the DHCP server.
The network adapter drivers are incorrect or malfunctioning.
The DNS server or domain controller is not online.
There is no computer account created in the domain.
The IP address of the default gateway is incorrect.
For each of these problems, there is generally an easy solution. To determine which of the errors specifically applies to you or if there is another error preventing network connectivity, you can use the IP utilities listed in Table 2.4.
Table 2.4. IP Utilities
Utility | Command | Usage |
|---|---|---|
Packet InterNet Groper (Ping) |
| Uses an |
File Transfer Protocol |
| Uploads/downloads files on a network. The |
Telnet |
| Establishes a character-based session with a Telnet server across a network. The |
Line printer daemon |
| Executes a print job on a network printer. |
Ipconfig |
| Shows the IP configuration of network adapters installed in a computer. From the results of this command, you can determine whether you have incorrectly addressed the adapter or the default gateway or whether the adapter was unable to obtain an address from the DHCP server. |
Name Server Lookup |
| Checks DNS entries. |
Netstat |
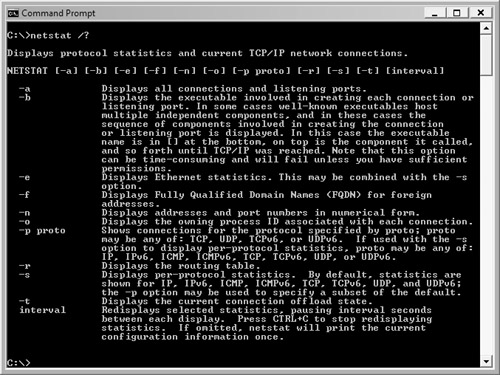
| Displays Transmission Control Protocol/Internet Protocol (TCP/IP) connections and protocol statistics. To find all the applicable switches, type |
Nbtstat |
| Similar to netstat, except that it resolves NetBIOS names to IP addresses. To find all applicable command switches, type |
Trace Route |
| Shows all the routing hops that a packet takes to reach a destination on a network. |
If everything physically checks out with your computer and you are able to install and boot the computer but cannot connect to the network, you should determine whether the adapter is working and then review your network adapter configuration settings. Step by Step 2.9 shows you how to determine whether the adapter is functioning.
Checking Network Adapter Settings
Click Start, right-click Computer, and select Properties.
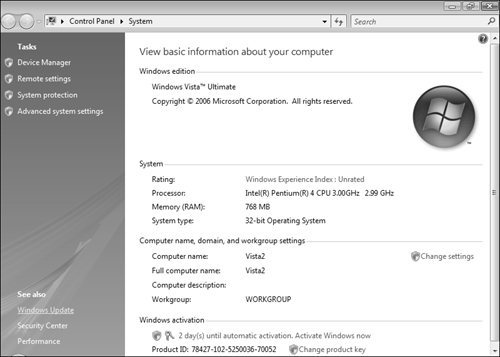
On the Computer Name, Domain, and Workgroup Settings section of the System applet shown in Figure 2.18, make certain that the name is unique for the network and that the workgroup or domain name is spelled correctly.
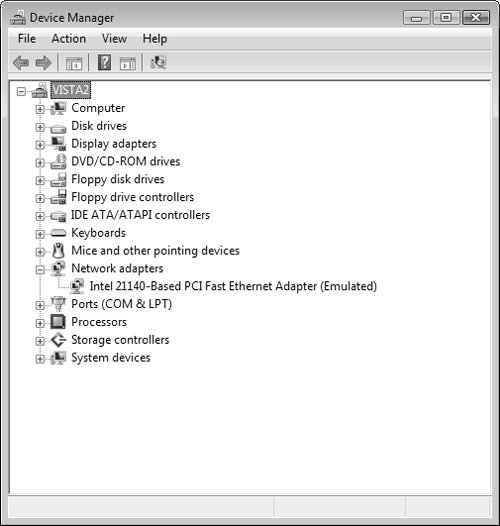
On the left side of the applet under Tasks, select Device Manager.
On the User Account Control message box that appears, click Continue.
Expand the Network Adapters section, as shown in Figure 2.19.
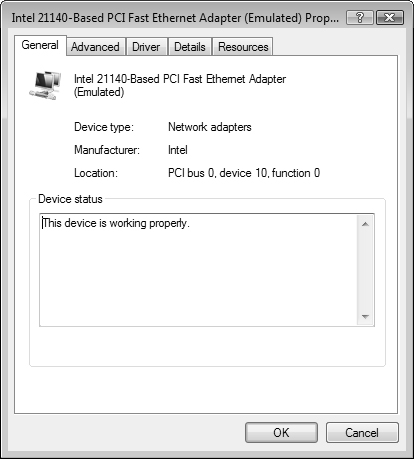
Right-click the network adapter and select Properties. The Properties dialog box is shown in Figure 2.20.
Ensure that the General tab states that This Device Is Working Properly.
Click the Advanced tab to check the adapter’s configuration.
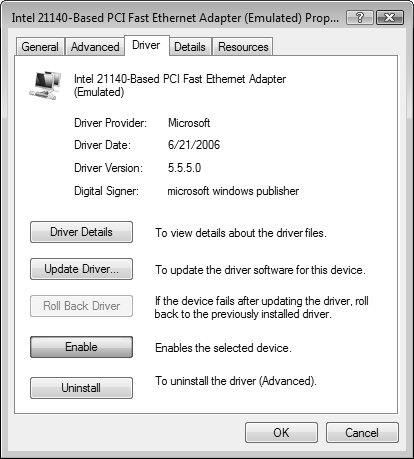
Click the Driver tab to determine whether you are using the current/latest driver for the adapter. You can also use the Update Driver button to install a newer driver or the Roll Back Driver button to revert to an older driver version.
On the Driver tab, ensure that the second command button from the bottom reads Disable. If it reads Enable, as shown in Figure 2.21, the adapter is disabled; click this button to enable it.
Click the Resources tab to see whether there are any hardware conflicts to resolve.
Click the Power Management tab, if available, to see whether Power Management has been configured to turn the device off.
Close the Properties dialog box and Device Manager.
Click Start, right-click Network, and select Properties to display the Network and Sharing Center. If the network adapter is not functioning, the diagram at the top of this page displays a disconnected symbol in the form of a red “X”.
On the left side of the Network and Sharing Center, click Manage Network Connections. This brings up the Network Connections dialog box showing your local area connection.
Right-click the connection and select Properties and then click Continue in the User Account Control message box that appears. You should see a driver in the Connect Using text box. You should also see the following protocols listed in the This Connection Uses the Following Items list:
Client for Microsoft Networks or alternate client if connecting to a different type of network
Internet Protocol Version 4 (TCP/IP)
Internet Protocol Version 6 (TCP/IP)
Other network protocols
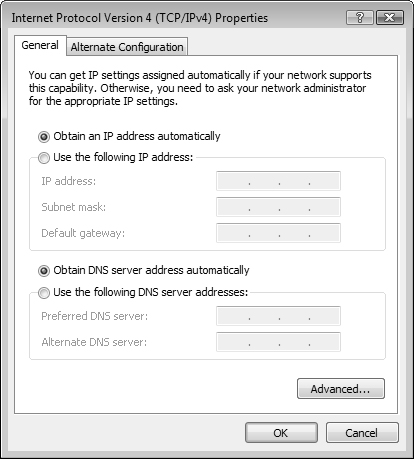
If you have determined that there is a TCP/IP problem from the results of running an
ipconfigcommand, select the Internet Protocol Version 4 (TCP/IP) option and then click the Properties button. The Internet Protocol Version 4 (TCP/IPv4) Properties dialog box opens, as shown in Figure 2.22. You can configure the IP address, subnet mask, and default gateway.
Sometimes you can install the Windows Vista operating system but cannot get the computer to boot normally. You can use options in the Advanced Boot Options Menu by pressing F8 during the initial boot sequence. Use the Safe Mode option to load the minimum necessary operating system drivers and then continue to troubleshoot the problem by making configuration changes as appropriate. You can also select Safe Mode with Networking to access network or Internet resources.
Another useful option is Enable Boot Logging. Boot logging stores information about drivers that initialize upon startup in the %systemroot% directory in a file named Ntbtlog.txt. You can identify incorrect, missing, or possibly corrupted drivers and replace them as necessary. Chapter 4, “Configuring and Troubleshooting Post-Installation System Settings,” discusses advanced startup and recovery options in more detail.
The previous sections referred several times to checking the compatibility of your hardware, BIOS, and drivers. This is probably the main issue that affects a new installation of Windows Vista. Compatibility with Windows Vista means that Microsoft supports the driver or the device. If you have hardware that is not listed in the Windows Logo Program for Hardware, even if Windows Vista installs and appears to work correctly, Microsoft will not provide any technical support in the event of an error.
Tip: Check your hardware first
When you have an installation failure, check hardware compatibility first.
Application compatibility is another significant concern. Because many unattended installations of Windows Vista automatically incorporate applications, you can encounter errors that are caused by the applications rather than the operating system. To reduce application errors significantly, you should prepare in advance as follows:
Inventory the applications on the network.
Investigate the compatibility of the applications with Microsoft and the manufacturers.
Test the applications.
Resolve application compatibility issues and incorporate the resolutions in the installation process.
Test hotfixes, service packs, and application updates.
Incorporate hotfixes, service packs, and application updates into the installation process.
Create standard software images so that all users have identical application installations.
An unattended installation is one in which a computer installs Windows Vista without a person sitting at the console watching the progress, as covered earlier in this chapter. As already discussed, this process uses an answer file and can be automated to large numbers of computers using Sysprep, WDS, or third-party imaging solutions.
A standard image of Windows Vista reduces implementation and maintenance costs. The implementation savings are obvious because you do not need to have a network administrator watch each installation and input information, which takes a lot of time. Ongoing maintenance costs of a standard configuration are less expensive because network administrators are thoroughly familiar with the configuration of the computer they are helping an end-user troubleshoot, saving time and effort.
Because the method of setup for an unattended installation is different from an attended installation, you can expect that some of the problems you encounter are also different. You can encounter many of the same problems that you may have had in an attended installation, but you will also have unique problems associated with an unattended method of installation.
You can use answer files to automate a Windows Vista installation, whether the computer is installed from a DVD or across a network. Nearly always, answer files are used with network installations. The fact that you can use an answer file with a DVD installation can help you troubleshoot a computer that has difficulty connecting to the network.
Exam Alert: Answer files
The exam might refer to answer files as a script, a text file, an answer file, or simply unattend.xml. Read the question and understand the context to be sure that the file being described is the same as you expected.
Because answer files are mainly used with network installations, the first dilemma usually stumbled into is booting to the network and accessing the distribution server files. You can use floppy boot disks, or you can execute the installation from a command line on a computer while it is running a different operating system. The only requirement you have of any existing operating system is that it has access to the network and that you are logged in with a user ID that has permissions to read the i386 folder structure on the distribution server. If you use a boot disk to access the network, you need to have the correct network interface card (NIC) driver for the computer already installed on the floppy disk. When you try to boot a computer with a boot disk that has drivers for one type of NIC while the computer has a different NIC, you will not be able to access the network. Depending on the computer’s configuration, you might not even see an error on the screen.
When you are conducting a clean installation of Windows Vista, you are likely to have better results if you use a boot disk because you can automate preparation tasks such as creating a disk partition and formatting it. If you are upgrading a computer, you should execute the installation only from within the existing operating system. Chapter 3 discusses upgrades.
The Setup.exe program used for installing Vista utilizes a variety of switches to control how the Setup program runs. Table 2.5 displays the syntax used for Setup.exe switches. An incorrectly used switch can cause some of the errors you can encounter during an unattended installation. For example, you might need to specify an answer file for unattended installation. If you do not supply the proper path to the answer file, Setup will be unable to locate it and will ask for information otherwise included in the answer file.
Table 2.5. Syntax for Setup.exe
Switch | Results |
|---|---|
| Enables kernel debugging across an IEEE 1394 port. |
| Enables kernel debugging across a COM port. |
| Enables or disables Emergency Management Services (EMS) and specifies the baud rate to use while transferring data. Used for x86 systems only. |
| Tells |
| Tells |
| Tells |
| Specifies the answer file for the unattended installation. |
| Enables kernel debugging across a USB 2.0 port. |
The answer file that you use is an XML file that’s structured considerably differently from those used with previous Windows installations. Like its predecessors, it contains headings, parameters, and values. If you don’t include a heading, a parameter, and a value for a specific item that you want to install a certain way, Windows Vista uses the default installation values for that item. While the SIM program creates valid XML coding, it is possible to edit the answer file using a text editor such as Notepad. Typos, incorrect headings, incorrect parameter names, or incorrect values cause errors or unexpected results during installation. Spelling counts!
A spelling error in an answer file usually does not cause a Windows Vista installation to fail unless the error is specifically related to a driver. Most people use SIM to create an answer file. When SIM creates the file, it does not always customize the features that you want to customize. Therefore, you likely must edit the file directly. The best way to troubleshoot your answer file is to make certain that you save your original answer file created by SIM and save each subsequent version of the answer file. By doing this and by testing the answer file with each individual customization as you make them, you will be able to pinpoint the specific problem with the file.
The System Preparation Tool, or Sysprep, creates a snapshot of a Windows Vista workstation and strips out the unique information for that workstation so that the image can be stamped on another. Sysprep not only can prepare an image of Windows Vista, but it can include unusual settings, applications, special application configurations, and even additional files. After preparing the image with Sysprep, you can then use a third-party utility to transfer the image to a target computer. The process is quick and easy to repeat. This is called cloning and can be either the best thing since sliced bread to your company or its worst nightmare.
The problem with cloning is that software image information is often intertwined with hardware information in odd places. When you attempt to clone a source computer onto a target computer that is not identical to the source, the image might function perfectly well, but it also might have results in a few configuration errors or even fail to start. It depends on what is different between the source and target computers and whether Sysprep strips out that particular information or the target computer has true Plug and Play devices.
Exam Alert: Cloning
The exam includes some questions about cloning to point out the need to generate cloned images for each different type of computer on the network.
Another issue you might experience with Sysprep is the version of the tool that you are using. Microsoft has been known in the past to include updated deployment tools with service packs and will likely continue to do so with Windows Vista and Windows Server 2008. When you create a source location that incorporates a service pack, you should also use the version of Sysprep that comes with that same service pack.
Note: Sysprep and domains
Sysprep does not work on a computer that is a member of a domain. It works only on a computer that is a member of a workgroup. If you run Sysprep on a computer that has already joined a domain, Sysprep removes it from the domain before preparing the image.
If you try to copy encrypted files using the Encrypting File System (EFS) on an NTFS-formatted partition as part of your Sysprep image, you will fail because the Sysprep process makes encrypted files unreadable. The only way to encrypt the files is to execute the encrypting command after the image has been transferred to the target computer.
Whenever you use Sysprep, you should ensure that the computer functions properly. Step by Step 2.10 leads you through some basic computer functions.
Use cloning when you have hundreds of computers that have identical hardware and need identical software and operating system configurations. If you have a large number of different hardware configurations and/or software and operating system configurations, you should consider using answer files instead.
A network administrator’s best friend in a crisis is an error log file. This is also true for Windows Vista installation failures. While installing, Windows Vista Setup generates log files that point you in the right direction when you need to troubleshoot.
The Action log (Setupact.log) reports which actions Setup performed in chronological order. This log indicates which files were copied and which were deleted. It records whether any external programs are run and shows where errors have occurred.
Setup creates an Error log (Setuperr.log) to record only the errors. Given that the Action log is extremely large, this log makes it easier to review errors and their severity levels. Although you might see some errors in the Action log, you probably won’t see them in the Error log unless they are fairly severe. For example, the Action log reports an error if Setup cannot delete a file because the file was already moved or deleted, but that error does not appear in the Error log.
Other logs created during Setup include
%systemroot%DtcInstall.log—. Records errors generated by the Microsoft Distributed Transaction Coordinator (MSDTC).%systemroot%setupact.log—. Records modifications performed on the system during Setup.%systemroot%setupapi.log—. Records data for each time an INF file is called and implemented. Check this file for device driver installation information.%systemroot%setuperr.log—. Records errors generated by hardware or driver issues during Windows installation.%systemroot%WindowsUpdate.log—. Records information about transactions performed by Windows Update, including updates downloaded during installation.%systemroot%debug etsetup.log—. Reports the results of a computer attempting to join a workgroup or domain. Check this file if you have trouble joining a domain.%systemroot%securitylogsscesetup.log—. Logs the security settings for the computer.
Stop Errors or Blue Screen of Death (BSOD)
If you receive a Stop error that appears on the Microsoft blue screen (commonly known as the Blue Screen of Death), you have encountered a serious error with the installation. Stop errors have some instructions to follow on the screen. Not only should you follow the instructions, but also you should check the compatibility of the hardware before attempting to install again. Step by Step 2.11 shows you how to resolve a Stop error.
Tip: Stop codes
The code and text associated with a Stop error are a great help in troubleshooting. For example, an error could be STOP 0X00000D1 (DRIVER IRQL NOT LESS OR EQUAL). You can search for this code number and text on Microsoft’s website for an explanation of the cause and possible ways to fix the problem.
If Vista fails to start and either hangs or displays the BSOD, the Vista installation DVD-ROM provides a Startup Repair option that can assist you in repairing the problem. This tool is a diagnostics-based troubleshooting utility that walks you through recovery options when your computer cannot boot normally. It performs several diagnostics tests, including looking at the log files, to determine the cause of the startup failure, and it then attempts to repair the problem.
The following are several types of problems Startup Repair can attempt to correct:
Incompatible drivers—. Startup Repair can use Device Driver Rollback or System Restore to restore the drivers to a previous condition.
Missing or corrupted boot configuration—. Startup Repair can rebuild the computer’s boot configuration including all operating systems it finds on the machine. It then prompts the user to select the operating system he wants to start.
Corrupted disk metadata—. Startup Repair can repair problems such as a corrupted master boot record (MBR), problems in the boot sector, or a corrupted partition table.
Manual repair tools—. Tools are available to assist the user in manually troubleshooting startup problems.
After Startup Repair has corrected the problem, it reboots the computer normally and notifies the user of the problem it has repaired. It includes an event in the event log that describes the repairs it has performed.
In addition, you can install repair tools on your computer so that the computer will automatically fail over into Startup Repair should it become unbootable at a later date. For additional information on Startup Repair, refer to the Vista Help and Support Center.
Windows Vista might stop in the middle of an installation. This can happen because of a hardware conflict, incompatibility, or unsuitable configuration. To resolve the conflict, you should follow the usual procedure of removing all unnecessary devices from the computer and attempting installation again. After Windows Vista is installed, you can add one device at a time back to the computer, load the latest manufacturer’s drivers, and boot to see whether the computer functions properly. It is important that you add only one device at a time so that you can discover which device (or devices) might have been the cause of the problem.
Objective: Install and configure Windows Vista drivers.
Drivers are software utilities that enable hardware components to communicate with the operating system. All components that you see in Device Manager, including disk drives, display adapters, network interface cards, removable media (floppy, CD-ROM, DVD-ROM, and so on) drives, keyboards, mice, sound cards, USB controllers, and so on, utilize drivers for this purpose. External components such as printers, scanners, and so on, also utilize drivers. With each new version of the operating system, it becomes necessary for hardware manufacturers to produce new drivers. Drivers written for older operating systems such as Windows 2000 and Windows XP might work with Vista but can result in reduced device functionality; or they might not work at all. You need to be able to install, configure, and troubleshoot drivers for various components for the 70-620 exam and for real-world computer support tasks.
Managing and Troubleshooting Drivers and Driver Signing
Driver signing is a process that Microsoft follows to validate files that a third-party manufacturer creates for use in a Windows Vista computer. A manufacturer submits its drivers to Microsoft, and after Microsoft completes a thorough quality assurance testing process, Microsoft signs the files digitally. Driver signing is an extra assurance of the quality of the software installed on the PC.
Microsoft has initiated the following new driver signing requirements for Windows Vista:
Standard (non-administrative) users can install only drivers that have been signed by either a Windows publisher or trusted publisher.
Standard users cannot install unsigned drivers or drivers that have been signed by an untrusted publisher; you cannot modify this policy in Vista.
Administrative users can install drivers that have been signed by an untrusted publisher, and they can also add the publisher’s certificate to the trusted certificates store, thereby enabling standard users to install drivers signed by this publisher.
If drivers are unsigned or have been altered, administrators are warned. They can proceed in a manner similar to how they would if the drivers were from an untrusted publisher.
If you install a device, Windows Vista looks for the driver signature as a part of System File Protection. When it fails to find one, Vista notifies you that the drivers are not signed and prompts you to continue or stop the installation, provided you have administrative privileges. Otherwise, the installation attempt fails. If you continue with the installation, Vista automatically creates a restore point, which facilitates returning to the previous configuration. Restore points are discussed in more depth in Chapter 8, “Maintaining and Optimizing Systems That Run Windows Vista.”
Dynamic-link libraries (DLLs) and other files are often shared by programs. Sometimes a program overwrites files that were originally installed by a digitally signed driver. If a device behaves oddly, you might want to verify that its driver still has the signature. You can check to validate the driver by looking in Device Manager. Double-click the device and click the Driver tab. You should see the statement: Digital Signer: Microsoft Windows Publisher.
You can check individual files further by clicking the Driver Details button. Files that are signed have an icon of a box with a green check mark, which appears to the left of the name (see Figure 2.23). Files that have not been digitally signed do not have a green check mark icon next to the filename.
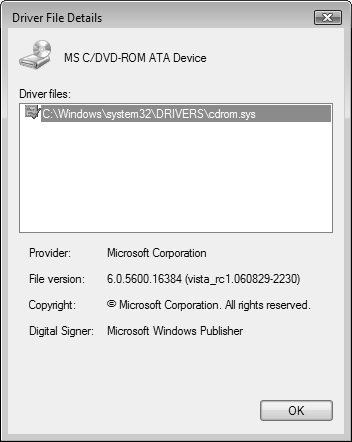
If you want to verify device drivers throughout the system, you can run the sigverif application. To do so, click Start, Run. Type sigverif in the Open text box and press Enter. The File Signature Verification program starts. Click the Advanced button and verify that sigverif will log the results and save them to a file. Click OK and then click Start. After the program has completed its check, the program displays any files that were not signed in a window, plus you can see the results in the Sigverif.txt file. If the program does not detect any unsigned files, it displays a message box with the message, “Your files have been scanned and verified as digitally signed.”
Tip: Enabling the Run command
In Vista, the Run command does not appear on the Start menu by default. To enable this command, right-click the Start button and choose Properties. On the Taskbar and Start Menu Properties dialog box that appears, ensure that Start menu is selected and click Customize. On the Customize Start Menu dialog box, scroll down and select the Run command check box. Then click OK twice to close the dialog boxes.
Another method of viewing which drivers are signed is to open the System Information utility by clicking Start, Run, typing msinfo32, and pressing Enter. On the left side of the System Information dialog box, expand the Software Environment node. Click to select Signed Drivers. This displays a comprehensive list of all drivers, their signed status, date, manufacturer, and more.
Unsigned drivers might not cause a problem. If you are having problems with a device that has an unsigned driver, you should disable the driver. If you are having unspecified problems, such as the computer does not go into Sleep mode, you should determine which devices have unsigned drivers, disable them one at a time, and test to see whether the problem is resolved. To disable an unsigned driver that has already been installed, you should disable the device that uses the driver, uninstall the driver, or rename the driver files.
Tip: When in doubt, check the system files
The System File Checker, which is executed from the command line with sfc.exe, can check the digital signature of system protected files. With other uses, such as repopulating the DLLCACHE folder and replacing system files that are missing or incorrect, sfc.exe can be executed from a batch program or script. This program has several options; run sfc.exe /? to view information on them. Note that in Vista, you must run this command as an administrator; right-click the Command Prompt option, select Run as administrator, and then click Continue in the User Account Control dialog box.
If you update an existing driver to a new version and then you experience system problems, you should roll back the driver to the previous version. In versions of Windows prior to Windows XP, this was almost impossible to do. As was the case in Windows XP, Windows Vista maintains a copy of the previous driver each time a new one is updated. If, at any time, you want to restore the previous version, you simply need to roll back the driver. To do this, open Device Manager and double-click the device to open its Properties dialog box. Click the Driver tab and then click the Rollback Driver button. When prompted with the question Are You Sure You Would Like to Roll Back to the Previous Driver?, click Yes. After the previous version is restored, click the Close button.
You can roll back all device drivers except for printers. You will receive a User Account Control dialog box before either updating a driver or rolling it back to a previous version.
Microsoft has published two levels of hardware requirements that determine whether an existing computer can run Vista: minimum supported requirements that determine whether the computer can run Vista at all and premium-ready requirements that determine whether the computer is able to run Vista with a complete user experience. You took a look at software, network, and domain considerations that come into play before you install Windows Vista.
In this chapter, you proceeded through a clean, manual installation of Windows Vista on a computer without a previous operating system. You then took a look at the use of Windows SIM to create an answer file, which supplies answers to the questions asked during a manual installation so that the installation can proceed in an unattended fashion.
Sysprep allows you to prepare an image of a Windows Vista computer that is configured with applications, service packs, and settings. You can use a third-party imaging application to clone the image to new computers. You can also use WDS to deploy images of Windows Vista to multiple computers in a domain environment.
After you completed installations of Windows Vista, you looked at some procedures you can utilize to troubleshoot installation problems. Troubleshooting a Windows Vista installation requires you to understand the process that installation follows. By pinpointing the failure’s cause, you can then define a solution and carry it out. The common problems that take place include
Media errors
Insufficient hard disk space
An unrecognized or failed DVD-ROM drive
Network access errors
Hardware incompatibility
Unattended installations can fail because of problems with the switches used with Setup.exe, as well as issues within answer files. Sysprep can experience problems if source and target computers vary significantly.
Microsoft applies a digital signature to third-party manufacturers’ drivers when those manufacturers submit drivers that pass a rigorous quality assurance testing process. Standard users can install only those drivers that have been signed by either Microsoft or a trusted publisher; administrators are warned if they attempt to install an unsigned driver. Administrators can roll back a driver to a previous version in the device’s Properties dialog box Driver tab.
You have seen several methods you can use to install Windows Vista on a computer with no previous operating system. You need to be familiar with different types of installation so that you can select the most appropriate method. In addition, you need to be familiar with the installation process so that you can troubleshoot installation problems. You can be better prepared to handle errors when they occur by installing the operating system on as many different hardware combinations as you can find. You can practice unattended installations with just a single server and a single computer client.
To perform these exercises, you should have two or three computers available. You should not have any valuable data stored on any of these computers.
This exercise is intended to familiarize you with the process of installing Windows Vista. Because unattended installations are typically installed across a network, this will familiarize you with the processes you may need to use if you must manually troubleshoot a failed installation. Estimated time: 90 minutes, depending on the speed and capabilities of your computer’s hardware
The challenge with many networks is the centralization of servers and the increasingly lengthy distances between clients and their servers. What would happen if you were limited in bandwidth between your client computer and the server that contained the Vista Setup files? What installation process would you recommend for a site that connected to the rest of the corporate network through a virtual private network (VPN) connection across the Internet? |
Answers:
B. Windows Vista Business is the only version that can authenticate to Active Directory and join a domain. Given the information supplied in this question, you cannot proceed as your boss has asked, and you should inform her that you need to install Windows Vista Business. Even though this is a manual installation, it is the only one that will meet the organization’s security policy. Answers A, C, and D are incorrect because Windows Vista Home Basic cannot join a domain. Also Windows Vista Home Basic or Vista Home Premium cannot be installed with either WDS or Sysprep. For more information, see the section, “Domain Membership.” | |
The installation steps should be taken in the following order:
| |
C. You will call the Microsoft Product Activation Center and manually enter the product ID code given to you by the center. Answers A, B, and D are incorrect because all off-the-shelf media require WPA, but you can activate the product by calling the product activation center and typing in the correct ID. For more information, see the section, “Product Activation.” | |
B. When you create an answer file that will be included on a floppy disk for users that are installing Windows Vista from a DVD-ROM, you should name the file | |
D. Harry needs to manually reconfigure each computer to join the workgroup. He can do this from the Computer Name tab of the System Properties dialog box. It is not possible to configure a GPO, local or otherwise, that removes computers from a domain and joins them to a workgroup, so answers A and B are incorrect. He could correct the error in the answer file and reinstall Windows Vista Business on each computer. However, this takes far more administrative effort, so answer C is incorrect. For more information, see the section, “Performing an Unattended Installation.” | |
C. You should review the hardware compatibility of your PCs with Windows Vista. Stop errors are usually caused by a device or device driver problem. Answer A is incorrect because there is no need for a Sysprep server. Answer B is incorrect because editing the | |
E. You would use the | |
C and D. The problem exhibited by the one computer indicates a networking problem. You should check the physical network adapter and the TCP/IP configuration. Answers A and B are incorrect because the device settings are not the problem, and the | |
D. Nancy should reboot her computer using the Vista DVD-ROM and select the Startup Repair tool. She can reach this option by selecting Install Windows Now, entering the product code (or bypassing it), accepting the license terms, selecting the Custom (Advanced) option, selecting the partition on which she installed Vista, and then selecting Startup Repair. She cannot use | |
C, E, and F. You can find whether the pen tablet device driver is signed by looking at the pen tablet’s Properties dialog box from within Device Manager. Click the Driver tab to view the current version. You can access Device Manager from the System applet in the System and Maintenance category in Control Panel, or you can also access Device Manager directly from the System and Maintenance category. You can also find whether a particular driver is signed by viewing the System Information utility, which you can start in the Run box by typing | |
B. If you are using an unsigned driver and experience problems, you can update the driver with a new one from the manufacturer. This is done by opening Device Manager, double-clicking the device icon to open its Properties dialog box, selecting the Driver tab, and then clicking the Update Driver button. When prompted for a location for the new driver, you should click Have Disk. Answer A is incorrect because it does not install the new driver. Answer C is incorrect because it rolls the current driver back to a previous version, if any. Answer D is incorrect because it removes the current driver version rather than install the new one. For more information, see the section, “Managing and Troubleshooting Drivers and Driver Signing.” |
The following are some recommended readings on the subject of Windows Vista installation:
Books
McLean, Ian and Orin Thomas. MCTS Self-Paced Training Kit (Exam 70-620): Configuring Windows Vista Client. Redmond, WA: Microsoft Press. 2007.
Course
Microsoft Official Curriculum course 5115, Installing and Configuring the Windows Vista Operating System. Module 1, Installing Windows Vista. Information available at http://www.microsoft.com/learning/syllabi/en-us/5115aprelim.mspx.
Websites
Microsoft. FAQ for Windows Logo Program V. 3.0. http://www.microsoft.com/whdc/winlogo/VistaLogoFAQ.mspx.
Microsoft. Windows Deployment Services Update Step-by-Step Guide for Windows Server 2003. http://technet2.microsoft.com/WindowsVista/en/library/9e197135-6711-4c20-bfad-fc80fc2151301033.mspx?mfr=true
Microsoft TechNet. Windows Vista Deployment Step-by-Step Guide. http://technet2.microsoft.com/WindowsVista/en/library/88f80cb7-d44f-47f7-a10d-e23dd53bc3fa1033.mspx?mfr=true.
Microsoft. Windows Preinstallation Environment Overview. http://www.microsoft.com/whdc/system/winpreinst/WindowsPE_over.mspx.
Microsoft TechNet. Comparing Windows XP and Windows Vista Deployment Technologies. http://technet2.microsoft.com/WindowsVista/en/library/2957d7c4-02c7-4205-afb5-f03434d8f37d1033.mspx.
Microsoft TechNet. Deploying Windows Vista. http://technet.microsoft.com/en-us/windowsvista/aa905061.aspx.
Microsoft. Driver Signing Requirements for Windows. http://www.microsoft.com/taiwan/whdc/winlogo/drvsign/drvsign.mspx.
Microsoft. How to install Windows Vista. http://support.microsoft.com/kb/918884.
Microsoft. A Stop error occurs, or the computer stops responding when you try to start Windows Vista. http://support.microsoft.com/?kbid=925810.
Microsoft. System Requirements for Windows Vista. http://support.microsoft.com/?kbid=919183.
Microsoft TechNet. Windows Vista Enterprise Hardware Planning Guidance. http://technet.microsoft.com/en-us/windowsvista/aa905075.aspx.
Microsoft. Using System Configuration. http://windowshelp.microsoft.com/Windows/en-US/Help/bd9e1cb6-a66a-47a8-a4b6-ef7ea672ae4b1033.mspx.
Microsoft. The behavior of reduced functionality mode in Windows Vista. http://support.microsoft.com/kb/925582
Microsoft TechNet. Windows Vista Reliability and Performance Features and Improvements. http://technet.microsoft.com/en-us/windowsvista/aa905071.aspx.
Microsoft TechNet. Inside the New Microsoft Application Compatibility Toolkit. http://www.microsoft.com/technet/technetmag/issues/2006/11/ApplicationCompatibility/default.aspx.