
This chapter helps you to prepare for the exam by covering the following Microsoft-specified objectives for the Installing and Upgrading Windows Vista section of the TS: Microsoft Windows Vista, Configuring exam:
Troubleshoot post-installation configuration issues.
<objective>After you have installed Vista, you might encounter configuration problems that lead to startup problems. You must know how to perform startup repair and to start your computer in alternate modes. Furthermore, you can encounter various hardware difficulties. This objective ensures that you are able to troubleshoot startup and hardware configuration problems.
</objective>Configure and troubleshoot Windows Aero.
<objective>Windows Vista presents a new Aero desktop interface, which can operate at several levels of functionality depending on the edition of Vista you are running as well as the computer’s hardware configuration. You can modify the default configuration to optimize the user’s experience or improve overall computer performance. This objective ensures that you can configure these options and troubleshoot them when problems occur.
</objective>Configure and troubleshoot Parental Controls.
<objective>Vista contains several options that are designed to limit a child’s exposure to questionable content on the local computer, network, and the Internet. A technician who services home-based computers needs to be familiar with these options and capable of instructing parents in their proper operation.
</objective>Configure Windows Internet Explorer.
<objective>Users are likely to rely on Internet Explorer for their Internet experience. However, users might also need to connect to other resources and prefer using Internet Explorer as a common interface. You therefore are expected to also know how to connect to files, shared folders, Web folders, and other network elements.
</objective> </feature>Outline
Now that you have installed Windows Vista, you have a basic system that is reasonably well configured. You also have a large range of configuration options available to you, many of which are new or changed since the days of Windows XP. This chapter looks at several of these configurations and their problems, including startup issues, hardware devices, Windows Easy Transfer, the new Aero desktop interface, Parental Controls, and the updated Internet Explorer 7.
Objective: Troubleshoot post-installation configuration issues.
When users receive new Windows Vista computers, support technicians must confront a myriad of issues ranging from what to do if a user’s computer doesn’t start to how to get documents, applications, and settings from the old Windows XP computer to the new computer. Several of the issues this section explores include the following:
Startup issues—. You need to know how to assist a user whose Windows Vista computer does not start up properly or won’t let him log on to the network.
Hardware issues—. Vista supports all the hardware types previously supported by Windows XP and adds support for the latest high-tech gadgets.
Transferring documents and settings—. Windows Vista provides the Easy Transfer Wizard, which improves on Windows XP’s Files and Settings Transfer Wizard.
Microsoft has improved the robustness of Vista beyond the capabilities present in previous versions of Windows. For example, if you attempt to rename or delete a vital driver from the WindowsSystem32Drivers folder, you receive an administrative prompt asking for permissions beyond the capabilities of a normal administrative account. Just the same, startup problems can occur. When your computer is unable to boot properly or won’t let you log on, it can be very frustrating when you have pressing work deadlines. In a corporate environment, startup problems can result in many calls to the help desk. Microsoft has designed Vista to reduce the number of startup problems and automate their recovery as much as possible.
New to Vista is the Startup Repair Tool (SRT), which attempts to automatically recover a computer that will not start normally. The following are some of the problems that the SRT can attempt to repair:
Missing, corrupted, or incompatible device drivers
Missing or corrupted system files or boot configuration settings
Improper or corrupted Registry keys or data
Corrupted disk metadata, such as the master boot table, boot sector, or partition table
SRT provides a diagnostics-based, step-by-step troubleshooting tool that enables end users and tech support personnel to rapidly diagnose and repair problems that are preventing a computer from starting normally. When SRT determines the problem that is preventing normal startup, it attempts to repair this problem automatically. If it is unable to do so, it provides support personnel with diagnostic information and suggests additional recovery options.
Step by Step 4.1 demonstrates the action of SRT.
Using the Startup Repair Tool
Start your computer with the Vista DVD-ROM in the drive.
Press the spacebar when instructed to press any key to boot from the CD or DVD.
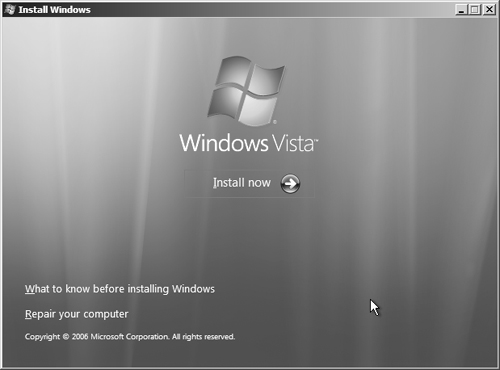
When the Install Windows screen appears, confirm the settings displayed and then click Next.
On the Install Windows screen shown in Figure 4.1, select Repair Your Computer.
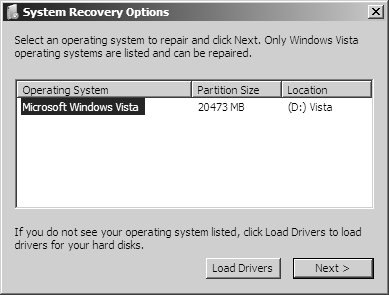
On the System Recovery Options dialog box, you should see Microsoft Windows Vista, as shown in Figure 4.2. Ensure that it is highlighted, and then click Next.
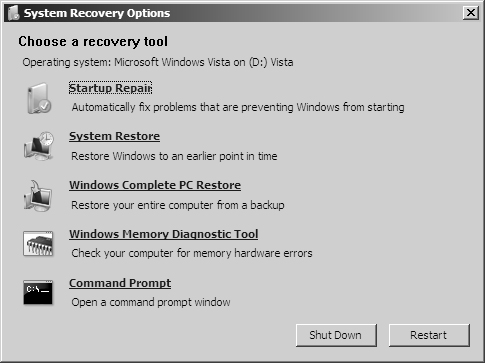
On the System Recovery Options dialog box shown in Figure 4.3, click Startup Repair.
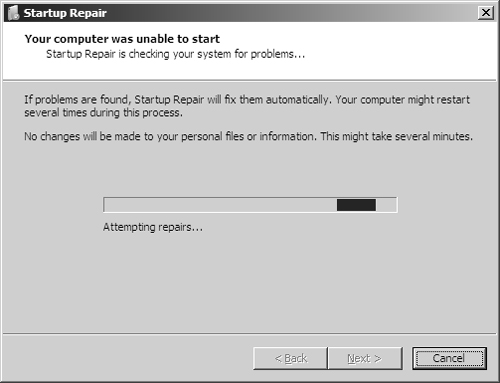
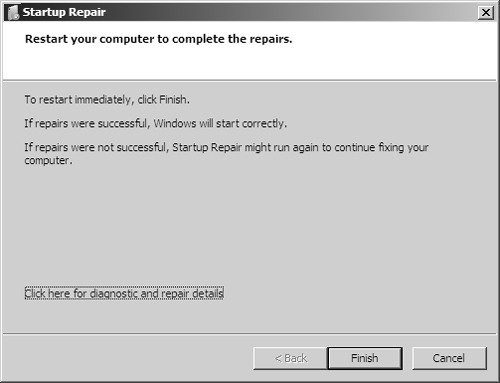
Startup Repair runs and displays the message shown in Figure 4.4.
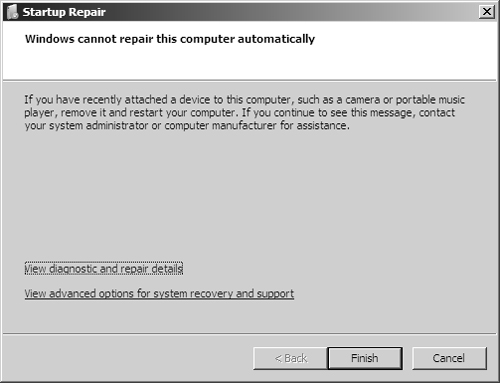
If SRT detects and repairs a problem, it displays a message such as the one in Figure 4.5, informing you that it repaired the problem successfully. To see details of its actions, click the link provided. If it is unable to repair the problem, it offers additional information and links (see Figure 4.6).
When you are finished, click Finish, and then click Restart to restart your computer normally.
Windows Vista provides several tools that help you recover from computer failures that prevent you from starting Windows normally. This section looks at several of these tools, including the Last Known Good Configuration, Safe mode, and System Restore.
Note: Recovery Console
The Recovery Console, which was used in Windows 2000/XP/Server 2003 to perform command line–based recovery procedures, has been replaced by the command prompt option in Startup Repair (refer to Figure 4.3 shown previously). For additional information on the actions you can perform using this option, refer to “Command-line reference for IT Pros” in the Windows Vista Help and Support Center.
Every time a user logs on successfully, Windows Vista makes a recording of the current Registry settings known as a control set. These settings are stored under HKEY_LOCAL_MACHINESYSTEMCurrentControlSet and are made available so that they can be used if the computer is unable to boot because of configuration changes such as installation of new device drivers or inappropriate modification of settings. For example, if configuration changes result in a computer displaying the Blue Screen of Death (BSOD) or modified display settings render the screen unreadable, you can revert to the previous settings by using the Last Known Good Configuration. Follow Step by Step 4.2 to use this configuration.
Using the Last Known Good Configuration
Restart the computer (use the reset button if necessary).
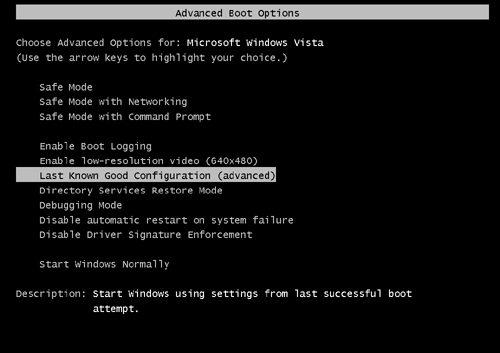
Press F8 as the boot sequence begins to display the Windows Advanced Options menu, as shown in Figure 4.7.
Use the arrow keys to select Last Known Good Configuration and then press Enter. The computer proceeds to start from this configuration.
When the logon screen appears, log on as usual.
Exam Alert: Know when you can and cannot use the Last Known Good Configuration
Using the Last Known Good Configuration is the easiest way to correct changes when you are unable to log on as a result of various problems. If you have logged on successfully and then encounter a problem caused by a previous configuration change, you are unable to use the Last Known Good Configuration because this configuration is overwritten at the successful logon. Under these circumstances you must select a different startup option.
Safe mode starts your computer with a minimal set of drivers (mouse, VGA, and keyboard) so that you can start your computer when problems with drivers or other software are preventing normal startup. The following are several problems with which you can use Safe mode for recovering your computer:
The computer stops responding or runs very slowly—. You can start in Safe mode and use various tools for diagnosing and correcting the problem. You can also uninstall software, roll back device drivers, or use System Restore to roll back the computer to an earlier point in time.
The computer display is blank or distorted—. After starting in Safe mode, you can use the Control Panel Display applet to select appropriate display settings.
The computer fails to respond after new hardware or software is installed—. Use Safe mode to uninstall software, disable hardware devices in Device Manager, roll back drivers, or restore the computer using System Restore.
To enter Safe mode, follow the procedure outlined in Step by Step 4.2 and select Safe mode from the options displayed previously in Figure 4.7. You can also select either of the following options:
Safe mode with Command Prompt—. Starts the computer to a command prompt. This can be useful if you cannot obtain a normal GUI.
Safe mode with Networking—. Starts network drivers as well as the other basic drivers. This is useful if you need to copy files from a network location.
First introduced with Windows XP, System Restore enables you to recover from system problems such as those caused by improper system settings, faulty drivers, and incompatible applications. It restores your computer to a previous condition without damaging any data files such as documents and email. System Restore is useful when problems persist after you have uninstalled incompatible software or device drivers, after downloading problematic content from a website, or when you are having problems that you cannot diagnose but that have started recently.
During normal operation, System Restore creates snapshots of the system at each startup and before major configuration changes are started. It stores these snapshots and manages them in a special location on your hard drive. It also copies monitored files to this location before any installation program or Windows itself overwrites these files during application or device installation.
You can run System Restore from the System and Maintenance category of Control Panel. Step by Step 4.3 shows you how.
Using System Restore to Restore Your Computer
Click Start, Control Panel, System and Maintenance, System (or right-click Computer and choose Properties).
On the left pane of the System applet, select System Protection.
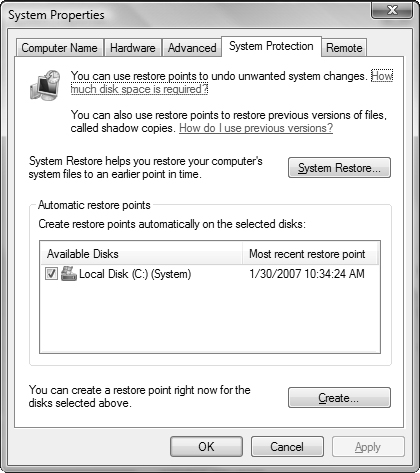
In the User Account Control message box that appears, click Continue. This opens the System Protection tab of the System Properties dialog box, as shown in Figure 4.8.
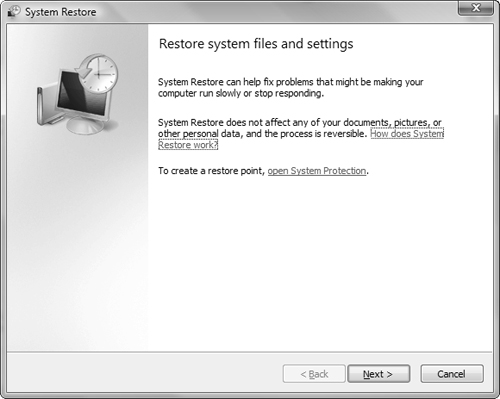
Click System Restore to open the System Restore dialog box, as shown in Figure 4.9.
Click Next to display the Choose a Restore Point page.
Select a date and time to which you want to restore your computer, and then click Next.
In the Confirm Your Restore Point dialog box, note the warning to save open files and then click Finish to perform the restore.
You receive a message box informing you that System Restore might not be interrupted and cannot be undone. Click Yes to proceed. The computer performs the restore, and then shuts down and restarts.
Log back on as an administrator. You receive a System Restore message box informing you that the restore completed successfully. Click Close.
Tip: System Restore also enables you to create restore points
If you are planning to install or download applications or other material that could be problematic, you can manually create a restore point first. Simply select the Create option shown in Figure 4.8 and follow the instructions provided.
The boot logging option, selected from the options displayed previously in Figure 4.7, starts Vista normally while creating the windows
tbtlog.txt file, which lists all drivers that load or fail to load during startup. From the contents of this file, you can look for drivers and services that are conflicting or otherwise not functioning. After using this mode, reboot to Safe mode to read the ntbtlog.txt file and identify the problematic driver.
The low-resolution video option starts Vista at the lowest video resolution with 16 colors. This is useful if you have selected a display resolution and refresh rate that is not supported by your monitor and video card or if you have installed a driver that is incompatible with your video card. You can go to the Display Properties dialog box, select an appropriate video option, and then reboot to Normal mode.
Debugging mode provides advanced troubleshooting options for experienced developers and administrators. It sends kernel debug information to another computer via a serial cable.
Microsoft has improved the technologies for implementing, configuring, and troubleshooting hardware devices with every upgrade of Windows. Windows Vista is no exception, and support for a large range of devices is present in Vista.
You can manage many types of hardware devices in Windows Vista using the Computer Management tool, shown in Figure 4.10. You can open Computer Management by using any of the following procedures:
Click Start, right-click Computer, and select Manage.
Click Start and type
Computer Managementinto the Search pane. After a few seconds, Computer Management appears at the top of the Programs list. Select this entry.Click Start, Control Panel, System and Maintenance, Administrative Tools. Select Computer Management from the top of the list that appears. You can also select individual activities from the Administrative Tools entry under System and Maintenance.
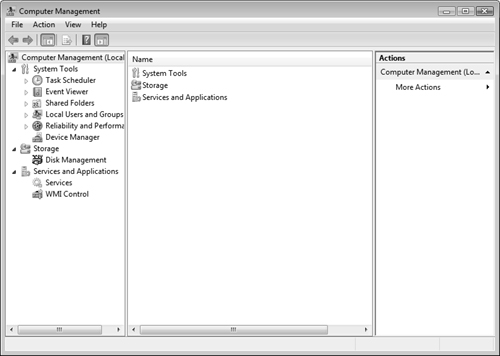
Computer Management offers the following tools and utilities:
Task Scheduler—. Used for scheduling programs or actions to run at predetermined times in the future
Event Viewer—. Used for troubleshooting errors
Shared Folders—. Used for creating and managing shares that are visible to users across the network
Reliability and Performance—. Used for troubleshooting errors as well as optimizing performance
Device Manager—. Used for configuring devices, updating or uninstalling device drivers, rolling back device drivers, enabling and disabling devices, scanning for hardware changes, and troubleshooting
Disk Management—. Used for viewing and managing volume and disk configuration as well as defragmenting hard disks
Services—. Used for starting and stopping services related to a device
WMI Control—. Used for turning error logging on or off or backing up the Windows Management Instrumentation (WMI) repository (in most cases, you will not use this tool)
Another place to check devices is in the System Information console. You can open it by clicking Start, Run, typing msinfo32, and then pressing Enter. Expand the Hardware Resources category to obtain information.
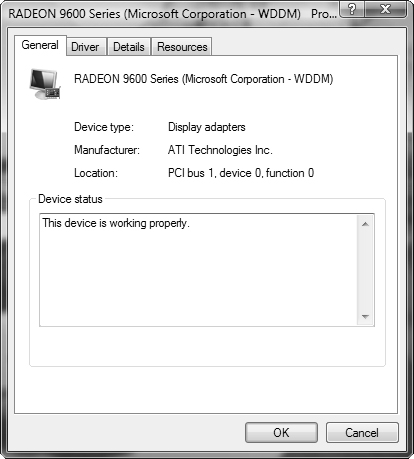
The majority of the work involving device implementation, management, and troubleshooting for many types of hardware devices is found in the Device Manager utility. Every device has its own Properties dialog box, specific to its device type and sometimes specific to the manufacturer and model, depending on the installed driver. The following standard tabs are found in any device Properties dialog box:
General—. Displays the device’s description and status.
Driver—. Displays the current device driver’s information. Includes buttons to display the files that make up the driver (Device Details), to install a new device driver (Update Driver), to roll back the driver to an older version (Roll Back Driver), to enable or disable the device (Disable), and to uninstall the driver (Uninstall).
Details—. Displays the device’s specifications. You can choose from a long list of device properties.
Resources—. Displays the system resources being consumed, including interrupt requests (IRQs), direct memory access (DMA) channels, and the I/O memory range. Displays whether these resources are in conflict with any others being used in the system.
You can access Device Manager from the Computer Management console. You can also access it by right-clicking Computer, selecting Properties, and selecting the Device Manager link or from the Hardware and Sound category in Control Panel.
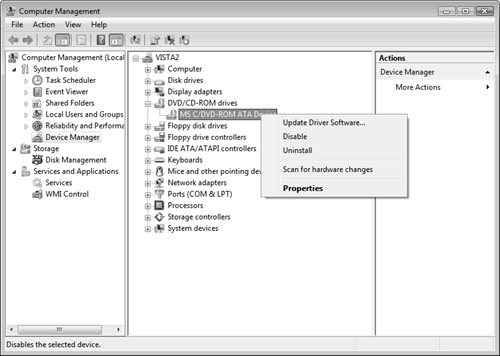
After you determine that a hardware device is installed correctly and is listed in the Windows Logo Program for Hardware, you should check to see whether the device is detected by Windows Vista and is functioning by checking Device Manager for its listing. If a device is not functioning, an icon with a red “X” appears over the device icon. If a device is functioning but experiencing problems, a yellow question mark icon appears next to the device icon. When you right-click a device, a shortcut menu similar to the one displayed in Figure 4.11 appears. You can select to update the driver or uninstall or disable the device. You can also scan the device for hardware changes or access the device’s properties. When you open the device’s Properties dialog box, you can put a variety of configurations into effect, as well as disable or enable the device.
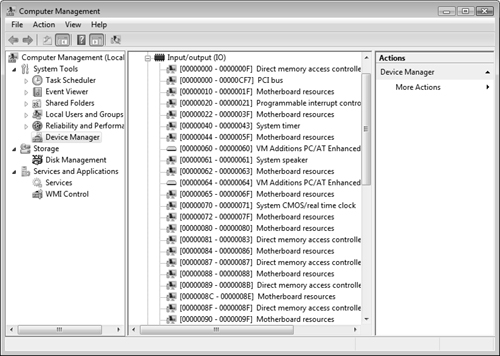
You can use Device Manager to determine whether an I/O conflict exists by changing the view. In Computer Management, right-click Device Manager in the left pane, select View, and then select Resources by Type. In the right pane, click the plus (+) sign next to Input/Output (IO). Each device is listed in the order of the I/O resources it uses, as shown in Figure 4.12.
Device Manager offers other views that assist in monitoring. When you select Devices by Type, you see the devices organized by the kind of hardware each device is. If you have multiple monitors, for example, you see each of the monitors displayed below the Monitor node. This is the default view. The Devices by Connection view groups each device by the way it is connected in the computer. For example, all the disk drives and CD or DVD drives connected to the IDE controller are displayed under the IDE connection node. The Resources by Connection view shows the status of the I/O ports, as well as DMA channels, IRQs, and memory addresses, listed by the connection type. To expand the views to show non–Plug and Play devices, select Show Hidden Devices from the View menu.
Tip: The Problem Reports and Solutions applet
Another place to look when you are experiencing hardware or software problems with your Vista computer is the new Problem Reports and Solutions Control Panel applet, found in the System and Maintenance category. Vista identifies problems that have occurred on your computer and automatically checks online for solutions to these problems. Click the problems displayed to obtain additional information.
Virtually all computers sold nowadays come with DVD+RW or DVD-RW drives, which allow you to burn all types of information to 4.7GB DVD discs, while maintaining backwards compatibility with CDs. Considering that some drives are not included within the Windows Logo Program for Hardware, there are bound to be some problems. To troubleshoot a problem with your CD or DVD device, you can use the following process:
If the CD/DVD or the IDE/SCSI controller is not listed in the Windows Logo Program for Hardware, the next course of action is to contact the original equipment manufacturer (OEM) for a compatible device driver.
If the Windows Logo Program for Hardware shows that both the CD/DVD and the IDE/SCSI controller are listed, you need to physically inspect the devices to ensure that they have been installed correctly. If using SCSI, also ensure that the SCSI ID of the device does not conflict with any other SCSI IDs, the SCSI ID of the controller is set to 7, and the SCSI bus has been terminated correctly. If using IDE, ensure that you are using the correct IDE controller.
If you suspect the problem is confined to the CD or DVD media that you are currently using, you can check the volume for the disc by selecting the Volumes tab in the device’s Properties dialog box while the CD or DVD is in the drive. If the CD or DVD were able to mount, you see a description of the volumes contained on the disk.
To investigate the configuration, you can click the Details tab in the Properties dialog box. Click the arrow on the drop-down box and select the various items from the list. Although this dialog box does not allow you to make configuration changes, it displays whether power is being provided to the device, the hardware ID, and more.
For DVD drives, an additional configuration tab is available in the Properties dialog box—the DVD Region tab. DVD discs are encoded for a specific geographical location, called a region, in which they are intended to be used. A DVD drive reads only the DVDs that match the region for which it has been configured. A problem presents itself when a user travels internationally or for some other reason requires access to DVDs from more than one region. You are allowed to change regions a limited number of times. If a user needs to read DVDs from two different regions on a frequent basis, you should purchase a second DVD drive for that user. For a short-term change to another region, you can configure the new region in the DVD Region tab. Simply select the country where the DVD originated or a country whose region matches the region indicated by the error message that was received when the DVD was inserted and click OK to change the region.
The Driver tab in the device’s Properties dialog box allows you to uninstall or update the device driver, roll the driver back to an older version, or simply view the driver details. Drivers are often the source of problems with all types of devices.
You can use the Properties tab to troubleshoot an array of challenging problems. Table 4.1 displays common problems and the responses that you can use to troubleshoot them.
Table 4.1. Troubleshooting CD or DVD Errors
Device | Problem or Process | Utility/Solution | Response |
|---|---|---|---|
CD-ROM drive | Can’t play audio CD, can read data CD | Control Panel, Hardware and Sound utility, Sound tab | Verify CD drive is listed. Verify audio codecs. |
CD or DVD drive | Disc reading problem | Physically inspect the disc | Verify that CD has no defects or scratches. Clean CD. |
CD or DVD drive | Can’t play DVD | Device Manager, device Properties, General tab | Verify device type is DVD drive, not CD-ROM drive. |
CD or DVD drive | Disc reading problem | Alternate CD or DVD drive | Test disc in alternative drive. |
CD or DVD drive | Error reading multiple discs | Special CD or DVD drive cleaning disc | Clean drive. |
CD or DVD drive | Computer stops responding while reading disc | Task Manager (press Ctrl+Shift+Esc), Performance tab | View performance. Exit unnecessary applications. |
CD or DVD drive | Computer stops responding while reading disc | Perform a clean boot | Ensure that no unnecessary applications are running. Test the disc in the drive again. |
DVD drive | Cannot play a DVD movie disc | Device Manager, display adapter Properties, Driver tab, Update Driver button | Update the video driver. |
DVD drive | Analog copy protection error | Physical presence of video output cables or older device driver does not support copyright protection on disc. Device Manager, display adapter Properties, Driver tab, Update Driver button | Remove video output cables from video adapter or DVD drive. Update video adapter driver. |
DVD drive | Low video memory | Device Manager, display adapter Properties, Driver tab, Update Driver button | Update the video driver. |
DVD drive | Low video memory/poor resolution | Control Panel, Display utility, Settings tab, Advanced button, Monitor tab | Lower the refresh rate. |
DVD drive | Does not play DVD discs | Firmware version and DVD decoder software version—validate compatibility | Update the firmware version; uninstall the DVD decoder software. Install a version that is compatible with Windows Vista. This can happen when a computer was upgraded from an older version of Windows. |
The computer might also stop responding and does not eject the CD when there is an error reading the disc in the CD drive. Such a problem generally requires you to reboot your computer to eject the CD. Other types of audio problems can also occur when attempting to read a CD or DVD. For further information, refer to Troubleshoot Audio Problems in Windows Media Center in the “Suggested Readings and Resources” section at the end of this chapter.
Tip: Know how to perform a clean boot
Know when to perform a clean boot and understand the process to do so. You can customize how Windows Vista starts up by clicking Start, Run, typing msconfig in the Open text box, and pressing Enter. Select Diagnostic Startup, and then reboot. You might want to simply disable a selection of applications and services, in which case you can use the Selective Startup option and disable the items you want in the resulting dialog box. You can keep this configuration for several reboots if you need to. After your final reboot, you can restart Windows Vista normally by returning to the System Configuration utility (Msconfig.exe), selecting the Normal Startup option, and then rebooting a final time.
Disk Management, which can be found in Computer Management as shown in Figure 4.13, displays the disks installed on your computer as well as the volumes configured for the disks.
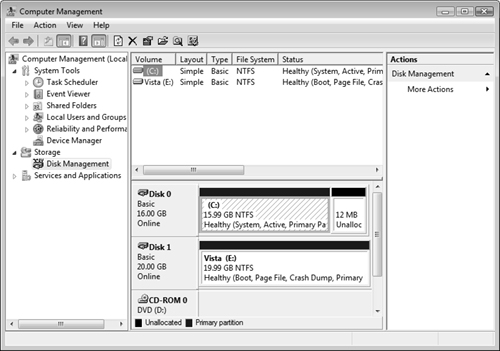
The following list summarizes the major actions you can perform from the Disk Management snap-in:
Create dynamic disks—. Disks can be either basic (the default) or dynamic. You can convert a basic disk to a dynamic disk but you cannot change back. Your only avenue to reverting to a basic disk is by deleting the dynamic disk, losing the data, creating a new basic volume, and restoring the data from a backup.
Create volumes—. You can create several types of volumes on a dynamic disk. Microsoft provides a wizard to assist you in creating these volumes:
Simple volumes—. A single region of free space on a single disk. You can create simple volumes on either basic or dynamic disks.
Spanned volumes—. Two or more regions of free space on 2 to 32 disks linked into a single volume on a dynamic disk.
Striped volumes—. Multiple regions of free space from two or more disks. Data is evenly interleaved across the disks, in stripes. Can be created on dynamic disks only.
Extend volumes—. You can add additional unallocated space on a disk to an existing volume. Vista provides the Extend Volume Wizard to assist you in this action.
Shrink volumes—. You can reduce the size of a volume to generate unallocated space for creating or extending a different volume.
Display properties of disks and volumes—. For disks, you can obtain the same information as provided by Device Manager. For volumes, you can obtain information about free space and device properties. This feature also lets you defragment the volume, share the volume, configure an access control list (ACL), back up all files on the volume, and create shadow copies of files and folders within the volume.
Note: Shadow copies
The shadow copy feature, first introduced with Windows XP and Windows Server 2003, is available in the Business, Enterprise, and Ultimate editions of Windows Vista. This feature creates copies of files in real time as you work on them. It enables you to revert to a previous version of a file should you accidentally delete a file or save unsuitable modifications. In addition, this feature works with Windows Backup to enable the back up of all files, including those that an application might have open currently. Versions of Windows prior to Windows XP skipped any open files, thereby risking incomplete backups.
The Disk Management utility is fairly comprehensive, but it is not the only tool available in Windows Vista to configure or manage disks. Some of these tools hearken back to the days of DOS and Windows 3.x, yet they are still very useful, especially if there is a problem accessing the graphical user interface (GUI):
Chkdsk.exe—. A command-line utility that verifies and repairs FAT- or NTFS-formatted volumes. (For NTFS drives, use theCHKDSK C: /Rcommand to automatically check and repair disk problems.)Cleanmgr.exe—. Also known as Disk Cleanup, a GUI utility that deletes unused files.Defrag.exe—. Also known as Disk Defragmenter, a command-line utility that rearranges files contiguously, recapturing and reorganizing free space in the volume. Optimizes performance.Diskpart.exe—. A command-line utility that can run a script to perform disk-related functions. Diskpart’s nearest GUI counterpart is the Disk Management utility.Fsutil.exe—. A command-line utility that displays information about the file system and can perform disk-related functions.
An administrator should understand how to handle the errors that can plague a hard disk. Common problems are listed in Table 4.2.
Table 4.2. Troubleshooting Disk Errors
Problem or Process | Possible Repairs | |
|---|---|---|
Non-system disk | Computer is trying to boot from a disk without a boot volume. | Remove any non-system disks from the floppy or CD-ROM drives. Repair the boot volume using Windows Recovery Console. |
There is not enough memory or disk space to complete the operation. | Disk is full. | Free up space on the hard disk by deleting files, removing applications, or compressing files. Add another disk and extend the volume to span both disks. |
Missing Operating System | No active partition is defined. | Check the BIOS settings and configure if they incorrectly identify the boot disk. Boot up with a floppy. Use |
Non-System Disk or Disk Error | Basic Input Output System (BIOS) generates this error when the master boot record (MBR) or boot sector is damaged or when a different device is configured as the boot device in the BIOS. | Check the BIOS and reconfigure if necessary. Remove any non-bootable floppy disks from the PC. Repair the boot volume with the Windows Vista Startup Repair Tool. Reinstall Windows Vista. Replace the hard disk. |
Invalid Media Type | Boot sector is damaged. | Repair the boot volume with Windows Vista Startup Repair Tool. Reinstall Windows Vista. Replace the hard disk. |
Hard disk controller failure | BIOS’s disk controller configuration is invalid, or the hard disk controller has failed. | Check the BIOS and reconfigure controller. Replace the hard disk controller. |
The volume properties of a disk in the Disk Management snap-in provides you with a status display, which can help you in troubleshooting disk problems. The following statuses can appear:
Healthy—. This status is normal and means that the volume is accessible and operating properly.
Failed—. This status means that the operating system could not start the volume normally. Failed usually means that the data is lost because the disk is damaged or the file system is corrupted. To repair a failed volume, physically inspect the computer to see whether the physical disk is operating. Ensure that the underlying disk(s) has an Online status in Disk Management.
Formatting—. This status is temporary, appearing only while the volume is being formatted.
Unknown—. This status means that you’ve installed a new disk and have not created a disk signature or that the boot sector for the volume is corrupt, possibly because of a virus. You can attempt to repair this error by initializing the underlying disk by right-clicking the disk and selecting Initialize from the shortcut menu.
Data Incomplete—. This status appears when a disk has been moved into or out of a multi-disk volume. Data is destroyed unless all the disks are moved and imported on the new computer.
Healthy (At Risk)—. This status indicates I/O errors have been detected on an underlying disk of the volume but that data can still be accessed. The underlying disk probably shows a status of Online (Errors) and must be brought back online for the volume to be corrected.
When you see a status other than Healthy for your volumes or other than Online for your disks, you can attempt to repair by selecting the Rescan Disks option from the Action menu in Disk Management.
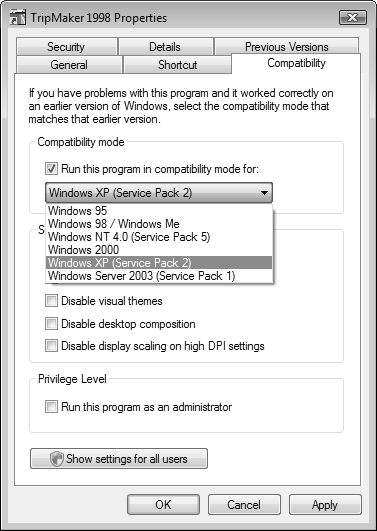
Programs written for earlier versions of Windows might not work properly or stop responding (hang). At times, such programs might exhibit a compatibility issue with Windows Vista. Windows Vista provides a Compatibility mode that emulates the environment found on several previous versions of Windows. Follow Step by Step 4.4 to run an application in Compatibility mode.
Running an Application in Compatibility Mode
Right-click the executable or its shortcut and choose Properties.
On the Compatibility tab of the Properties dialog box, select Run This Program in Compatibility Mode For and choose one of the options shown in Figure 4.14.
Select additional options under Display Settings and Input Settings as required, and then click OK.
Tip: You can also use the Program Compatibility Wizard to run a program in Compatibility mode
The Program Compatibility Wizard provides the same options available from the Compatibility tab described in Step by Step 4.4. Click Start, Control Panel, Programs and Features. In this category of Control Panel, select the Use an Older Program with this Version of Windows. Follow the instructions provided in the Program Compatibility Wizard.
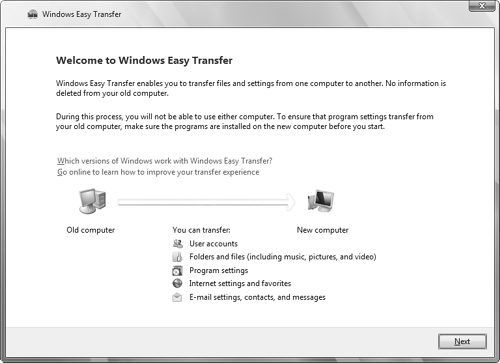
When a user moves to a new computer, one of the most challenging activities that she faces is the migration of files and settings from the old computer to the new one. Microsoft provides the Windows Easy Transfer tool to assist users in this daunting task. An update to the Windows XP Files and Settings Transfer Wizard, the Windows Easy Transfer tool enables you to transfer files, folders, and settings belonging to a user from an old computer running Windows 2000 or later to a new computer or an existing computer on which a clean installation of Windows Vista exists. It is a simple means of transferring these settings when only a few computers are involved or when users are individually responsible for migrating information to a new computer. It is automatically installed on Windows Vista computers during operating system installation.
Windows Easy Transfer migrates the following components to the new computer:
User accounts
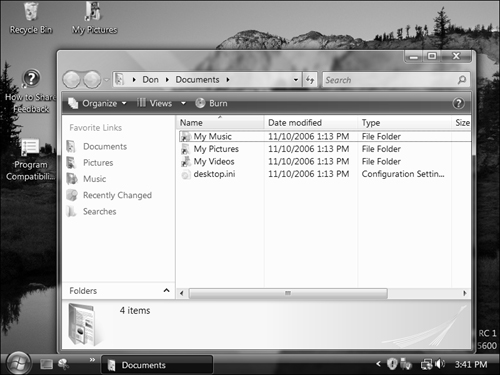
Folders and their files, including pictures, music, and videos
Application data and settings (but not the applications themselves)
Email data, including messages, settings, and contacts
Windows and Internet settings
This wizard operates by creating a shared folder on the new computer, using this share to prepare data on the old computer for transfer, and then transferring it to the new computer. To perform this procedure, the following items must be available:
Removable media such as CD-R disks, a flash drive, or a removable hard drive to store the migrated information. You can also use a shared folder on a server or a USB Easy Transfer cable to connect the two computers directly.
The username and password of the user whose information is being migrated.
To use Windows Easy Transfer, start the wizard on the new computer and create the shared folder, which contains a copy of the Easy Transfer application. Then go to the old computer, connect to the shared folder, and migrate the data to removable media or a shared folder. Finally, return to the new computer and import the migrated data. Step by Step 4.5 provides a detailed procedure.
Using Windows Easy Transfer and a Shared Folder to Transfer Data to a New Computer
Create and share a folder on the new computer, for example,
C:EasyTransfer.At this computer, click Start, All Programs, Accessories, System Tools, Windows Easy Transfer.
Click Continue on the User Account Control message box that appears.
The Windows Easy Transfer Wizard displays the welcome screen shown in Figure 4.15 that describes its actions. Click Next.
The wizard asks whether you want to start a new transfer or continue one in progress. Click Start a New Transfer.
The wizard asks whether you are at the new computer or the old one. Ensure that the My New Computer option is selected, and then click Next.
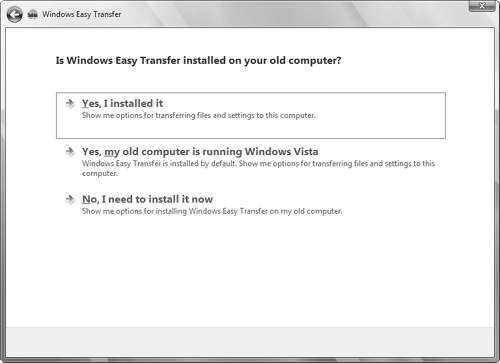
The wizard asks whether you have an Easy Transfer Cable. Select the No option to display the options shown in Figure 4.16 for accessing the old computer.
To install Windows Easy Transfer on the old computer, select the No, I Need to Install It Now option.
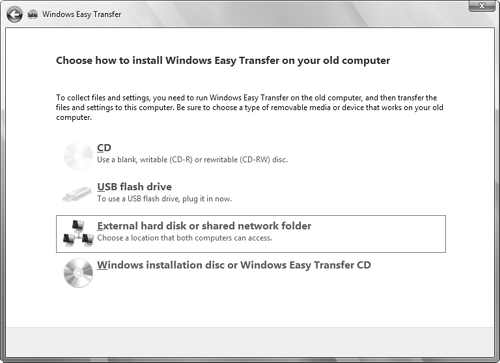
The wizard presents the options shown in Figure 4.17 for installing Windows Easy Transfer on the old computer. Select the External Hard Disk or Shared Network Folder option.
Type the path to the shared folder that you created in step 1, and then click Next. The wizard copies the Windows Easy Transfer software to a subfolder named MigWiz in the shared folder and then asks whether the computers are connected to a network.
To transfer files and settings across the network, select the Yes option.
The wizard asks whether you have a Windows Easy Transfer key, which acts like a password for security purposes. Select No, I Need a Key, and write down the alphanumeric key that appears. Then click Next.
Go to the old computer, click Start, Run, and type the path to the shared folder. If you are asked to provide credentials, type the username and password of the user on the new computer.
When the shared folder opens, select the MigWiz subfolder, open it, and then double-click
MigWiz.exe.Windows Easy Transfer opens and asks you how you want to transfer files and settings to the new computer. To use the shared folder, select the Transfer Directly, Using a Network Connection option.
To transfer files directly from the old computer to the new one, select the Use a Network Connection option.
Click Yes, I Have a Key, type the Windows Easy Transfer key that you received in step 12, and then click Next.
The wizard displays a Connecting to the Network message as it connects to the other computer and then asks what you want to transfer to the new computer. Select either All User Accounts, Files, and Settings or My User Account, Files, and Settings Only as Required. If you need to choose only selected users or settings, select the Advanced Options option.
As shown in Figure 4.18, the wizard displays a list of files and settings to be transferred. If you need to modify this list, click Customize and follow the instructions provided. Otherwise, click Transfer.
Select a user account on the new computer or type a username to create a new user account. Then click Next.
The wizard collects the information to be transferred. This can take several minutes. When data collection is complete, it asks you to go back to the new computer.
At the new computer, select a user account and then click Next.
Review the list of selected files and settings, and then click Transfer to begin the transfer.
The wizard displays a progress bar as the transfer takes place. You are informed when the transfer is complete.
Click Close, and then click Yes to log off and apply the settings.

Note: User State Migration Tool
Microsoft also provides the User State Migration Tool (USMT), which is useful if you need to migrate large numbers of users to new computers running Windows Vista. USMT is a command line-based tool that is easily scripted and provides comprehensive migration capabilities for enterprise deployments. Refer to Migrating to Windows Vista Through the User State Migration Tool in the “Suggested Readings and Resources” section for further information.
Objective: Configure and Troubleshoot Windows Aero.
With Windows Vista, Microsoft introduces a new desktop scheme known as Aero. Any computer with a high-quality display adapter card can utilize all the power inherent in the display card to produce the top-level Aero Glass display appearance. Available on all editions except Home Basic, Aero Glass enables enhanced display features such as the following:
Translucent title bars—. As shown in Figure 4.19, window title bars and other interface elements show a view of any windows or the desktop hidden beneath them. This feature can assist you in tracking actions taking place in the background or locating hidden items. You can customize the color and transparency from the Control Panel Display applet.
Windows Flip—. In Windows Vista, the familiar Alt+Tab brings up live thumbnail views of each task running on the computer rather than generic icons, assisting you in locating the correct folder, Word document, and so on.
Windows Flip 3D—. Pressing the Windows key+Tab brings up a stacked view of each task window, showing live actions currently taking place and simplifying the task of choosing the application you want. You can even see live action of a task such as a movie playing in Windows Media Player. You can also scroll through the tasks by using the scroll wheel on your mouse.
Improved taskbar—. You can obtain thumbnail views of tasks running on the computer by hovering your mouse over a taskbar button.
More smoothly performing desktop—. Aero has done away with previous redraw artifacts such as “tearing” that frequently were observed in older Windows versions. Graphics driver-related lockups and crashes have also been reduced.
Known as Avalon during the beta phase of Vista, the Windows Presentation Foundation (WPF) presents an enhanced platform that supports media-rich applications that provide complete fidelity to systems such as the Xbox 360 Media Center Extender. Microsoft has back-ported WPF to Windows XP to provide support for these applications; however, this does not include the Aero interface.
WPF provides the following improvements to graphics in Windows Vista:
Window “tearing” is eliminated—. Under previous graphics subsystems, windows that were dragged rapidly across the desktop appeared to tear. WPF routes graphics through the hardware-accelerated graphics processor, enabling smooth graphics movements under all conditions.
Improved animations—. Animation effects such as blurred motion are possible. Developers can create effects such as fade-ins and fade-outs, enhanced user interface elements, and impressive screen transitions.
Vector-based scaling—. This improvement allows you to rescale images to larger size without their appearing blurred or pixilated—in other words, no more jagged edges when you upscale an item such as an icon.
Transparency—. WPF enables transparency without a high level of overhead because everything is rendered in the hardware-accelerated graphics processor.
Enhanced video capabilities—. WPF treats video in much the same manner as any other graphical object. The hardware-accelerated graphics processor handles video without dropping frames (as happened in older Windows systems) or taxing the CPU. These capabilities also enable the Flip and Flip 3D actions already introduced.
A computer that runs Aero properly should meet the Premium Ready hardware requirements already introduced in Chapter 1, “Introducing Windows Vista.” Being a processor- and memory-intensive subsystem, Aero Glass imposes additional graphics card requirements on computers capable of running it:
Video memory—. You must have a high-performance video card with at least 128MB of memory on the card to use Aero Glass. If using a resolution higher than 1920×1200 or a dual-monitor setup above 1280×1024, you need at least 256MB graphics memory.
Graphics processor—. Aero requires a DirectX 9 graphics processor with Pixel Shader 2, 32 bits per pixel, and Windows Display Driver Model (WDDM) support. A further advantage of WDDM is that it provides a high level of graphics stability, thereby reducing crashes resulting from graphics driver problems.
Graphics memory bandwidth—. You must have a bandwidth of at least 1800MB for a desktop computer running at a 1280×1024 pixel resolution.
Computers whose graphics hardware do not meet Aero Glass requirements may still be able to function in the standard Aero capability. A computer that is not Aero-capable will provide a desktop graphics experience similar to that of Windows XP.
If the hardware requirements for Aero or Aero Glass are met, Vista automatically enables the highest display capabilities. You can enable or disable Aero or choose from other available schemes from the Appearance Settings dialog box. Step by Step 4.6 shows you how.
Enabling or Disabling Windows Aero
Click Start, Control Panel, Appearance and Personalization, Personalization. You can also right-click a blank area of the display and choose Personalize.
Select Windows Color and Appearance.
On the Window Color and Appearance dialog box, click Open Classic Appearance Properties for More Color Options.
On the Appearance Settings dialog box shown in Figure 4.20, open the Color Scheme drop-down list and select Windows Aero. Then click OK or Apply.
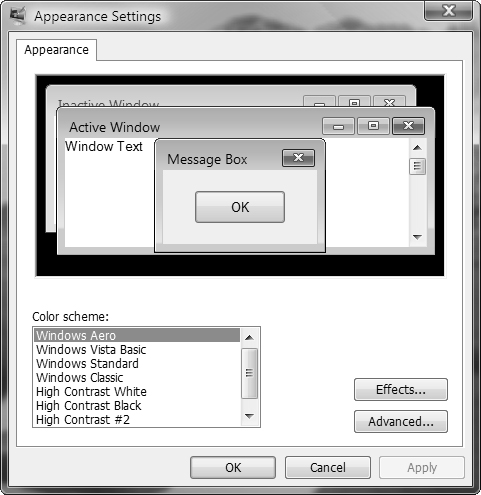
From this dialog box, you can also choose Windows Standard, which is similar to the display properties of Windows 2000, or Windows Classic, which is similar to Windows 98. Several high contrast schemes, which enhance visibility for vision-challenged users, are also available from this location.
This section describes some of the more common problems you might encounter with Aero and how you might solve those problems, either on the 70-620 exam or in the real world.
Your computer can be running Aero Glass but might not be set for translucent window borders. To test whether your computer is running Aero Glass, press Windows+Tab. If you observe the Flip 3D task view, your computer is running Aero Glass. If so, follow Step by Step 4.7 to configure translucency.
Configuring Translucency
Click Start, Control Panel, Appearance and Personalization, Personalization. You can also right-click a blank area of the display and choose Personalize.
Select Window Color and Appearance.
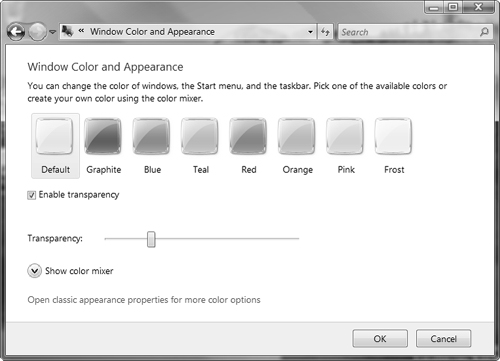
As shown in Figure 4.21, select the Enable Transparency check box. You can also choose a color and a level of transparency from the options and sliders available on this dialog box.
When finished, click OK.
If pressing Windows+Tab does not reveal Flip 3D actions, your computer is running the Vista Basic desktop scheme. Follow the procedure of Step by Step 4.6 to enable Aero Glass. If Aero Glass is not available from the Color Scheme drop-down list, your computer is not capable of running Aero Glass. Even if your video card is Aero Glass–capable, it might not have the appropriate drivers. Follow Step by Step 4.8 to check your video drivers.
Checking Video Drivers
Click Start, right-click Computer, and click Properties.
Select Device Manager from the list on the left side of the System Properties applet.
Double-click Display Adapters, and then double-click your display adapter.
The Adapter Type string should contain a WDDM entry (see Figure 4.22). If it doesn’t, visit the display adapter manufacturer’s website to see whether they have a newer WDDM-compliant driver.
If you can obtain a WDDM-compliant driver, select the Update Driver command button to install it and reboot your computer.
Additional features may inhibit the appearance of Aero Glass visual elements, as follows:
Glass or transparency might have been disabled in the Performance Options dialog box—. In Control Panel, open System and Maintenance, select Performance Information and Tools, and then select Adjust Visual Effects. From the Visual Effects tab of the Performance Options dialog box, ensure that the Adjust for Best Appearance radio button is selected. If the Adjust for Best Performance radio button is selected, Glass effects are automatically disabled. You can also select Custom, and then select the check boxes labeled Enable Desktop Composition and Enable Transparent Glass.
Incorrect theme setting—. Ensure that Windows Vista is selected in the Theme Setting dialog box. See Step by Step 4.6 discussed previously.
Color depth may be insufficient—. You cannot run Aero Glass if the color depth is set to less than 32 bits per pixel. Access the Display Settings dialog box and ensure that Color quality is set to Highest (32-bit). If this setting is not available, your display adapter is incapable of running Aero.
An application may be disabling Glass—. Application compatibility settings for older applications may disable the Aero Glass desktop. You looked at application compatibility earlier in this chapter.
For additional troubleshooting hints, refer to Windows Vista Rules for Enabling Windows Aero in the “Suggested Readings and Resources” section at the end of this chapter.
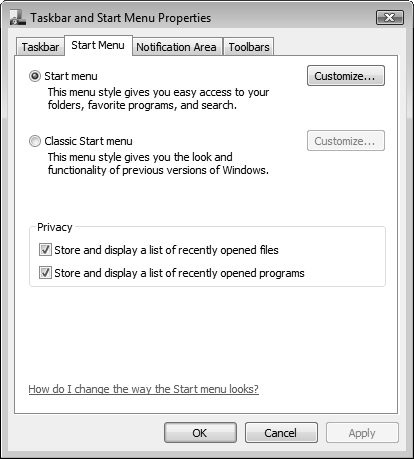
Vista provides several options for configuring the properties of the Start menu and the Taskbar. Right-click Start and choose Properties to bring up the Taskbar and Start Menu Properties dialog box, which enables you to configure properties related to the taskbar, Start menu, notification area, and toolbars.
As shown in Figure 4.23, you can configure the following properties of the Start menu:
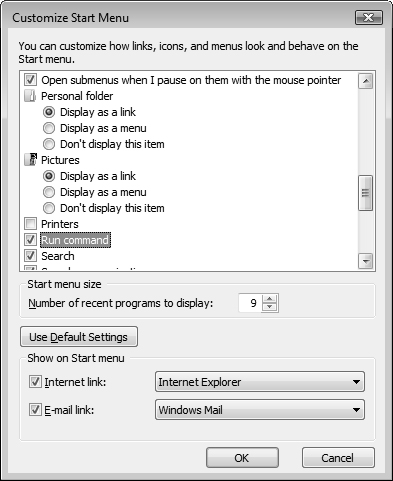
Start Menu Customize button—. Select this button to ring up the Customize Start Menu dialog box (see Figure 4.24). You can choose which options appear on the Start menu. In particular, you can enable the Run dialog box, which is not enabled by default in Windows Vista.
Classic Start Menu—. Select this option to use a Start menu similar in appearance to that of Windows 2000 and older operating systems. Click Customize to specify which items appear on this Start menu.
Privacy—. If additional users are accessing your computer and you do not want them to know which files and programs you have recently accessed, clear either or both of the check boxes in this section.
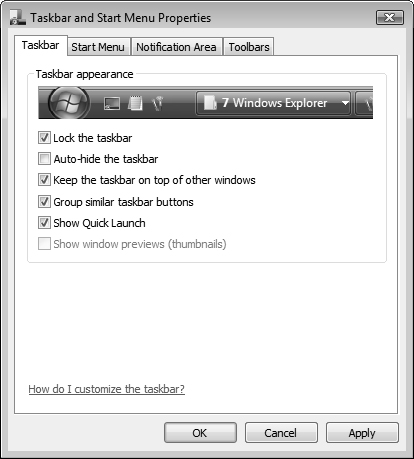
Selecting the Taskbar tab of the Taskbar and Start Menu Properties enables you to configure the following items shown in Figure 4.25. Except for the Show Window Previews option, these properties function as they did in Windows XP:
Lock the taskbar—. Determines whether the taskbar is always visible at the bottom of the display.
Auto-hide the taskbar—. Determines whether the taskbar disappears automatically after a program is started.
Keep the taskbar on top of other windows—. Prevents windows from hiding the taskbar.
Group similar taskbar buttons—. When selected, taskbar buttons for similar functions (such as multiple Word documents or multiple Explorer windows) are grouped into single buttons to prevent taskbar buttons from shrinking to a very small size.
Show Quick Launch—. Enables the quick launch section of the taskbar, from which you can start frequently used programs with a single mouse click.
Show window previews (thumbnails)—. Enables the display of Flip view thumbnails.
Select the Notification Area tab to configure the items that appear in the notification area (formerly known as the System Tray), as shown in Figure 4.26.
Hide inactive icons—. Clears the notification area of icons for programs that have not recently been used. Click Customize to change the behavior of certain icon types.
System icons—. Enables the display of the clock, as well as icons for speaker volume, network connection, and on portable computers, the power setting.

Objective: Configure and Troubleshoot Parental Controls.
A common problem in home-based computers is that children have free access to the computer at times when their parents are busy doing other tasks or are not at home. This allows access to questionable websites that include topics such as violence, pornography, drug making, and so on. Furthermore, children may be accessing games or other content at times when they should be using the computer for homework projects. Microsoft has incorporated the new Parental Controls feature into Windows Vista Home Basic, Home Premium, and Ultimate to enable parents to limit children’s computer usage and provide reports on what children actually are doing.
The Parental Controls feature enables parents to specify the following types of restrictions:
Website restrictions—. The Web Content Filter included with Windows Vista examines the content of web pages and enables parents to configure restrictions on the type of content accessed by children. Parents can choose from several preconfigured restriction levels or modify them as needed. Besides Internet Explorer, this filter works with other major browsers such as Firefox.
Usage time limits—. Parents might want to prevent children from using the computer for hours on end. They can select the times of day and days of the week during which a child can use the computer. The child is logged off at the end of his allowed time, but his session remains active in the background so he can resume it during the next allowed time interval.
Application limits—. Parents can choose which applications their child is permitted to access, thereby preventing him from running programs such as the parents’ financial planner. The child can ask a parent for approval to run a specific application if required, for example, to complete a school assignment, and the parent can enter her user credentials to approve the application.
Game limits—. Parents can choose which types of games children are permitted to play according to age limits set by major game rating boards. They can also choose to permit or block specific games.
Every user of your computer (yourself included) should have his or her own user account, and these accounts should have passwords to help protect them from unauthorized use. Follow Step by Step 4.9 to create a user account.
Creating User Accounts
Click Start, Control Panel, User Accounts and Family Safety, Add or Remove User Accounts.
Click Continue in the User Account Control message box that appears.
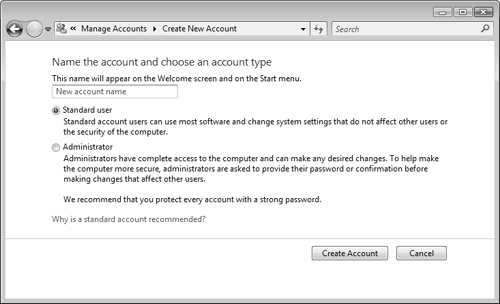
Click Create a New Account to display the dialog box shown in Figure 4.27.
Type a name for the user account. Choose an option as explained on the dialog box (you would normally choose the Standard User option) and then click Create Account.
To create a password, select Create a Password. Type a password in the Password and Confirm Password text boxes, and then click Create Password. You might also want to type a hint in the Type a Password Hint text box in case the user forgets the password.
After you have created user accounts for each child, it is simple to set up Parental Controls. Step by Step 4.10 shows you how.
Configuring Parental Controls
Click Start, Control Panel, User Accounts and Family Safety, Set Up Parental Controls for Any User. Or simply type
parentalin the Search box in the Start menu and press Enter.Note: Another way to access Parental Controls
You can also access Parental Controls from the Content tab of the Internet Properties dialog box. Click Start, right-click Internet, and choose Internet Properties. Or choose Tools, Internet Options from the command bar in Internet Explorer. Internet Explorer is discussed later in this chapter.
Click Continue in the User Account Control message box that appears.
Choose the user for which you want to configure Parental Controls.
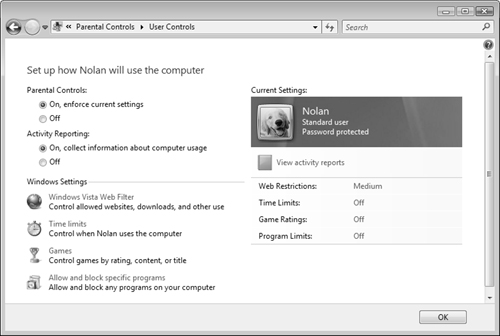
On the Parental Controls dialog box shown in Figure 4.28, click On, Enforce Current Settings under the Parental Controls heading.
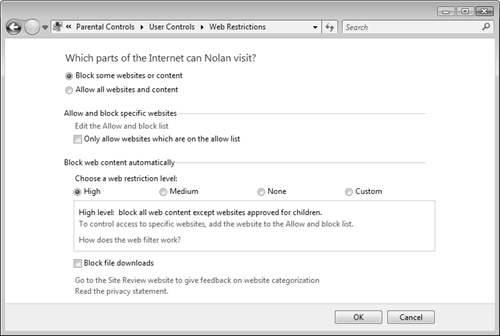
To configure website restrictions, click Windows Vista Web Filter. This brings up the screen shown in Figure 4.29, which enables you to configure the following items:
Block Some Websites or Content—Enables Web restrictions. Select this option to enable the remaining options.
Allow and Block Specific Websites—Brings up a dialog box in which you can enter specific websites that you want to either allow or block.
Block Web Content Automatically—Enables you to select a restriction level from High (blocks all sites except those approved for children), Medium (blocks unratable sites and those containing pornography, drugs, hate speech, and weapons), None (does not automatically block sites), or Custom (enables you to select categories to be blocked; you receive a list of 11 categories that you can selectively block).
Block File Downloads—Prevents the child from downloading potentially harmful material.
Choose the options you want from this list, and then click OK.
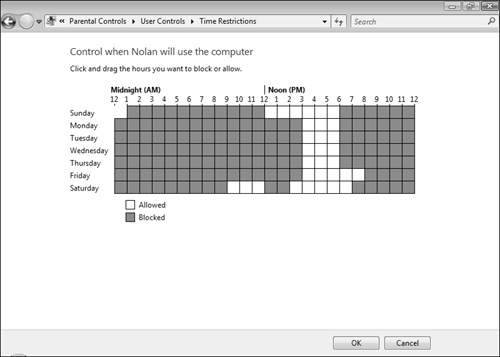
To specify time limits, click Time Limits to display the window shown in Figure 4.30. Click and drag to outline the blocked times in blue, and then click OK.
To specify game limits, click Games. From the Game Controls dialog box you can block or allow specific games on your computer or prevent the child from playing any games. Click Set Game Ratings to select a maximum allowed rating as shown in Figure 4.31. You can also choose to block specific content types even if a game has an allowed rating. Click OK twice.
To specify program limits, click Allow and Block Specific Programs. Select the (Username) Can Only Use the Programs I Allow option and select the programs to be permitted. Then click OK.
When you are finished, click OK to confirm your settings and return to the User Controls dialog box.
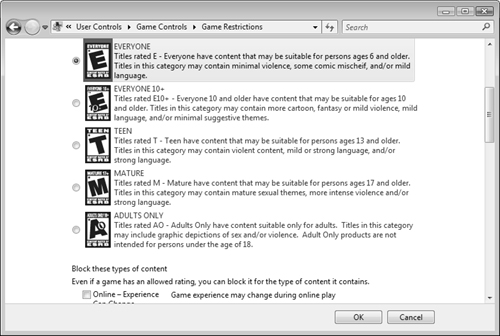
Tip: Other game rating systems are available
You can select other game rating systems from the initial parental control window where you select the user you want to control. A series of rating systems including several Pan European Game Information systems is available, together with links to their websites. You must use the same ratings system for all users.
The Parental Controls feature enables you to view a report of what your child has done at the computer. This report is useful in case you need to modify the parental control settings. The report includes the following items:
Web Browsing—. Shows the top 10 websites visited and the 10 most recent websites that the child attempted to visit but was blocked by the filter. This also shows any Web overrides, files successfully downloaded, and files blocked from downloading.
System—. Shows the recent times the child was logged on and the times he was blocked from logging on.
Applications—. Shows the programs the child ran or was prevented from running.
Gaming—. Shows the games the child played or was prevented from playing.
Email and Instant Messaging—. Summarizes the email and instant messages that the child sent or received.
Media—. Summarizes media player (songs, videos played, and so on) activity.
To enable activity reporting, select the radio button labeled On, Collect Information About Computer Usage in the main Parental Controls window shown previously in Figure 4.28. There are no other configurable options for activity reporting.
Objective: Configure Windows Internet Explorer.
Browsers are fast becoming a ubiquitous interface to every type of resource—from Hypertext Markup Language (HTML) files, eXtensible Markup Language (XML) data, and FTP files, to network shares, network and local printers, local files and folders, and more. For the 70-620 exam, you are expected to have the skills to configure and troubleshoot various aspects of Internet Explorer 7, including tabbed browsing, pop-ups, add-ons, and Really Simple Syndication (RSS) feeds, and access a variety of network resources using Internet Explorer. Table 4.3 lists the methods you should know.
Table 4.3. Accessing Resources Via a Browser
Sample URL | Usage | |
|---|---|---|
| Downloads HTML files from Internet Web servers and displays the file within the browser. | |
| Downloads HTML files using Secure Socket Layer (SSL) so that the information exchanged is secured. | |
| Downloads a file from an FTP server. | |
| Opens the file specified from a network server. | |
| Displays a list of the printers that are being shared by a computer configured with IIS for sharing printers. | |
| Opens the printer page for the printer. |
Exam Alert: Handling passwords with a URL
How to type a URL correctly is a favorite exam question. When you open a file using FTP, for example, you might need a password. Because Internet Explorer doesn’t support password prompting, you must supply that password within your URL. In this example, the correct syntax is ftp://user:password@ftpserver/url-path.
Internet Explorer 7 improves upon its predecessor, Internet Explorer 6, in many ways. You can keep a series of websites open using tabbed browsing, search for information directly from the address bar, disable use of pop-up windows, use RSS feeds, modify the appearance of the browser window to suit your own preferences, and so on. You can type search phrases into the Search text box to the right of the main address bar (note “Live Search” in Figure 4.32 referenced in the following section). Internet Explorer 7 also improves browsing security greatly over the problem-plagued Internet Explorer 6. Chapter 5, “Configuring Windows Security Features,” discusses configuring Internet Explorer 7’s security settings.
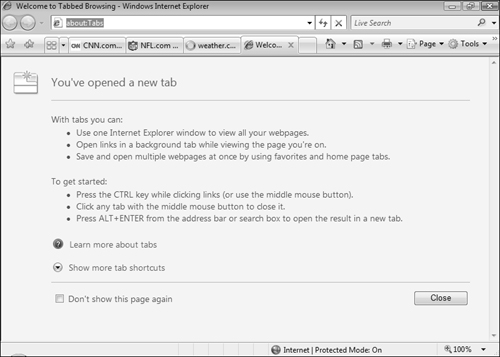
Users familiar with tabbed browsing in other browsers such as Firefox have come to realize the convenience of having multiple browser sessions open in the same window. To open a new tab in Internet Explorer, just click the small blank tab visible to the right of the active tabs. As shown in Figure 4.32, a new tab initially displays a page that summarizes the advantages of tabbed browsing.
The following sections outline several activities you can perform using tabbed browsing:
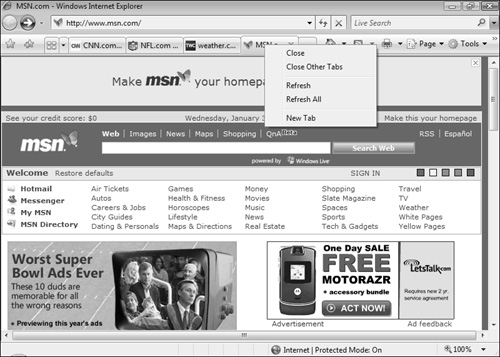
Open, close, and refresh tabs—. Right-clicking an active tab enables you to perform the activities shown in Figure 4.33. You can close the current tab, close all tabs except the current tab, refresh the current tab or all tabs, or create a new tab.
View thumbnails of tabs—. Click the small tab at the left end of the tabs (circled in Figure 4.34) to display all open tabs as thumbnail images. This feature is known as Quick Tabs. To view any of the tabs in full-screen view, simply click its thumbnail.
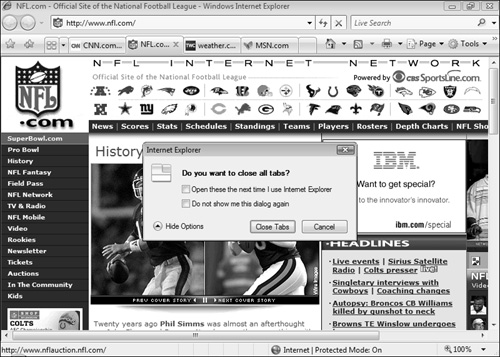
Save a set of tabs to reopen later—. When you close Internet Explorer with more than one tab open, a dialog box appears, asking you if you want to close all tabs. Click Show Options to display the options shown in Figure 4.35. To open the same tabs later, select the Open These the Next Time I Use Internet Explorer check box.
Save a group of tabs as a favorite—. Access the Favorites Center by clicking the yellow star with the green “+” (circled in Figure 4.36). On the pop-up menu that appears, select Add Tab Group to Favorites. Type a name for the tab group, select a subfolder within Favorites if desired, and then click Add. You can access this group later simply by selecting the group name from the Favorites list, accessed from the yellow star at the far left end of the tabs bar.
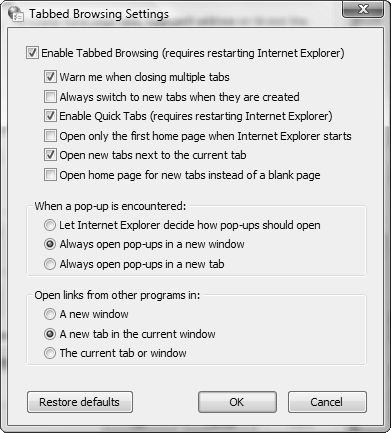
Disable tabbed browsing completely—. From the Tools menu, select Internet Options. On the General tab, in the Tabs section, click Settings and then clear the check box labeled Enable Tabbed Browsing (see Figure 4.37). Then close and restart Internet Explorer.
Initially included with Internet Explorer 6 on Windows XP with SP2, the Pop-up Blocker eases the frustrations of many Internet users. You can configure how the Pop-up Blocker feature functions by opening the Tools menu, selecting the Pop-up Blocker submenu, and then clicking Pop-up Blocker Settings. The Pop-up Blocker Settings dialog box opens, as shown in Figure 4.38. (This option is not available if the Pop-up Blocker is off.) The other option in this submenu is to Turn Off the Pop-up Blocker (if it is turned on) or Turn On the Pop-up Blocker (if it is turned off).
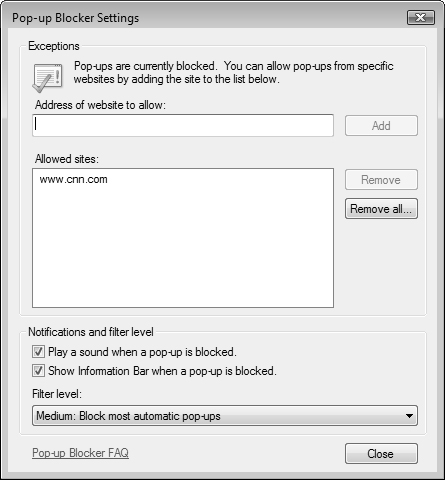
To allow pop-ups from a certain website, type the URL in the Address of Website to Allow text box, and then click the Add button. You can select whether to display the information bar and play a sound when a website’s pop-up is blocked. The Filter Level list box enables you to select whether to block all pop-ups (High), most pop-ups (Medium), or just the pop-ups that are from non-secure sites (Low).
When Internet Explorer blocks a pop-up, it displays an information message bar beneath the line of tabs. You can click this bar to temporarily allow pop-ups, always allow pop-ups from this site, or configure additional pop-up settings including suppressing the information bar.
Internet Explorer contains a large range of features that you can configure to customize your browsing experience. We look at customizing search providers, managing add-ons, and configuring RSS feeds in this section.
By default, Internet Explorer uses Microsoft Live Search as its search provider when you first open it (note “Live Search” in Figures 4.32 to 4.33). You can change the default search provider or add additional search providers to this box. Step by Step 4.11 shows you how.
Configuring Search Providers
In Internet Explorer 7, click the small drop-down triangle immediately to the right of the Search field. From the pop-up menu that appears, select Find More Providers.
Internet Explorer opens a new tab displaying the Add Search Providers to Internet Explorer 7 web page. Click the desired search provider.
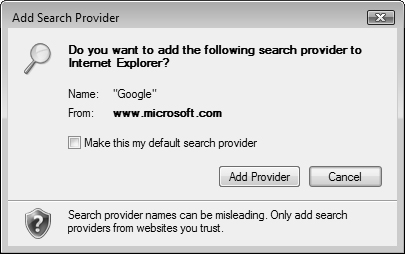
The Add Search Provider dialog box shown in Figure 4.39 appears. If you want to use this provider as your default, select the check box provided. Then click Add Provider.
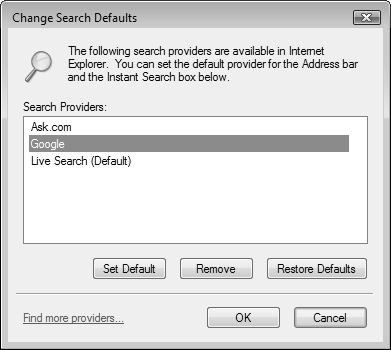
To change or remove search providers, select Change Search Defaults from the pop-up menu. In the Change Search Defaults dialog box shown in Figure 4.40, select the desired search provider and click Set Default to make it the default search provider. Click Remove to remove this provider from the list.
After you have added search providers, it is simple to perform a search with an alternate provider. Simply click the same small drop-down triangle and select the desired search provider. This procedure enables you to change the search provider temporarily without changing the default provider.
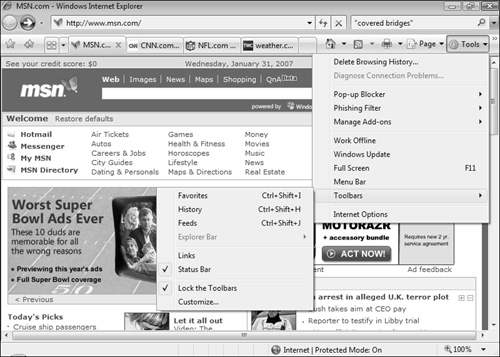
Microsoft has changed the default appearance of the toolbars at the top of the Internet Explorer window. However, you can customize Internet Explorer by selecting options from the Tools menu, as shown in Figure 4.41:
Delete Browsing History—. Opens the Delete Browsing History dialog box, which enables you to delete temporary Internet files, cookies, history, form data, or passwords that are stored on your computer. Click Delete All to delete all these items from your computer.
Pop-up Blocker—. Enables you to manage the pop-up blocking feature, as already discussed.
Phishing Filter—. Warns you about fake websites that attempt to hijack your personal information such as credit card numbers, social security numbers, and so on, which is a practice known as phishing. You can check the current website, report it if it appears to be suspicious, modify filter settings, or turn off the filter completely.
Manage Add-ons—. Enables you to manage additional components added to Internet Explorer. This feature is discussed in the section, “Managing Add-Ons.”
Work Offline—. Saves copies of websites so that you can access information when offline. This feature helps to save costs when you are using a provider that charges according to connect time.
Windows Update—. Connects to the Microsoft Windows Update website. This was discussed in Chapter 3, “Upgrading to Windows Vista.”
Menu Bar—. Displays the menu bar, which is hidden by default.
Toolbars—. Enables you to display additional toolbars, including favorites, history, feeds, links, and status bar. Only the status bar is displayed by default.
Internet Options—. Brings up the Internet Properties dialog box, components of which are discussed elsewhere in this chapter and Chapter 5.
Tip: Another way to access these options
You can also access several of the options discussed here by right-clicking a blank area on the toolbar. The pop-up menu displayed also enables you to customize the icons appearing on the command bar by displaying all text labels selective text (the default) or icons only. You can also add or remove commands from this area.
One of the most annoying features in previous versions of Internet Explorer was the fact that some web pages printed incompletely, with text on the right side of the page being clipped off. Internet Explorer has improved printing by introducing several new items, accessible from the Print icon and the Page icon on the command bar.
Click the small triangle to the right of the printer icon to access a pop-up menu that enables you to preview the printed page or modify page setup options. You can specify the paper size, source, orientation (portrait or landscape), and margin size. You can suppress display of the headers and/or footers by clearing the text in the respective text boxes. You also can access printer properties by clicking the Printer button.
New to Internet Explorer 7 in Vista is the XPS Document Writer. This appears as a printer option on the Print dialog box and enables you to create an XML Paper Specification (XPS) document, which is a portable file type that you can view on any computer with an XPS viewer installed. This feature enables you to display a web page or other document online exactly as it appears on your monitor. Such documents can be shared, sent to others, or published so that they do not display differently when printed or on computers with different monitors. When you select this printing option, you receive a Save As dialog box that enables you to save the web page to a folder of your choice.
Add-ons are optional additional features that you can install in Internet Explorer to provide additional functionality. They generally come from sources on the Internet and are sometimes installed without your knowledge. At other times, the Internet source will ask you for permission to install an add-on before proceeding. However, if you deny this permission, the web page may not display as intended by their creators.
Tip: Running Internet Explorer without any add-ons
You can run Internet Explorer without any add-ons by clicking Start, All Programs, Accessories, System Tools, Internet Explorer (No Add-ons). Internet Explorer opens and displays a page that informs you that all add-ons are turned off.
Internet Explorer enables you to manage add-ons in several ways. Follow Step by Step 4.12 to manage add-ons.
Managing Internet Explorer Add-Ons
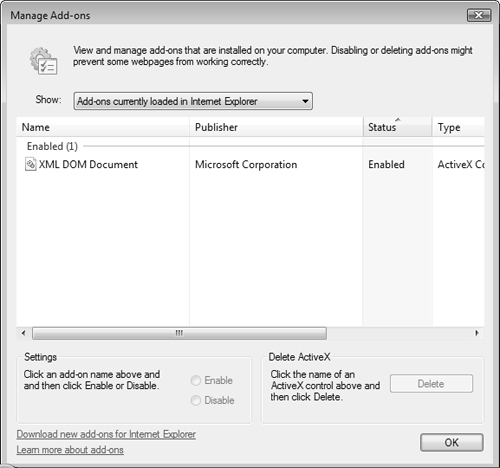
In Internet Explorer 7, click Tools, Manage Add-ons, Enable or Disable Add-ons. The Manage Add-Ons dialog box shown in Figure 4.42 opens.
Select one of the following options from the Show drop-down list:
Add-ons that have been used by Internet Explorer—Lists all add-ons that have been downloaded to Internet Explorer at any time since you installed Windows plus those that were pre-approved by Microsoft or your computer manufacturer.
Add-ons currently loaded in Internet Explorer—Displays only those add-ons used by a currently or recently viewed web page. This list appears by default when you first open the Manage Add-ons dialog box.
Add-ons that run without requiring permission—Displays all add-ons that were pre-approved by Microsoft, your computer manufacturer, or your Internet service provider (ISP). These add-ons have generally been digitally signed and run without displaying any permissions message box. Any unsigned add-ons carry the message
(Not verified)in the Publisher column.Downloaded ActiveX Controls (32-bit)—Displays 32-bit ActiveX controls only. While these controls add functionality to Internet Explorer, malicious software writers often use them for undesirable purposes.
If an add-on appears to be causing problems or preventing a web page from displaying properly, select it and click Disable.
To delete an ActiveX control, select it and click Delete. Note that you cannot delete pre-installed ActiveX controls or other types of add-ons; you can only disable them.
To locate additional add-ons for Internet Explorer, click Tools, Manage Add-ons, Find More Add-Ons. Follow the instructions and links on the Add-Ons for Internet Explorer web page that appears.
RSS presents a simple means in which you can receive up-to-date information on the Internet at times that are convenient to you. Internet Explorer 7 automatically detects when websites are offering RSS feeds and displays a toolbar icon. Click this icon to view the feed and obtain information about subscribing to it. You can subscribe to feeds from various websites and bring headlines from different sources together in one common list from which you can browse content without the need to access each site. When the Feeds toolbar icon turns orange, you are on a site that offers RSS feeds. Click this icon to view current headlines and subscribe to the feed. You can also specify that a sound be played when a feed is received.
When you subscribe to feeds, Internet Explorer adds them to the Feeds section of the Favorites list. To review the feeds to which you are subscribed, click the star icon at the top-left corner of Internet Explorer and then click Feeds.
Follow Step by Step 4.13 to configure how RSS feeds are downloaded and displayed.
Managing RSS Feeds
In Internet Explorer 7, click Tools, Internet Options.
Select the Content tab, and then click Settings under Feeds at the bottom of the dialog box. The Feed Settings dialog box shown in Figure 4.43 opens.
Configure the following items as required:
Automatically Check Feeds for Updates—. You can enable Internet Explorer to download feeds automatically at the interval selected from the drop-down list. Available intervals range from 15 minutes to one week.
Advanced options—. You can choose to automatically mark feeds as read, play a sound when feeds arrive, or modify the view in which a feed is displayed.
Click OK when you are finished, and then click OK to close the Internet Properties dialog box (or click Apply to apply the settings and keep the Internet Properties dialog box open).
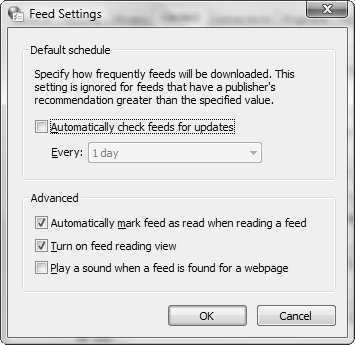
Tip: Viewing feeds in HTML format
The Turn On Feed Reading View option shown in Figure 4.43 controls whether feeds display in XML or HTML format. By default, Internet Explorer displays these feeds in XML. By clearing this check box, you can configure Internet Explorer to display feeds in HTML format.
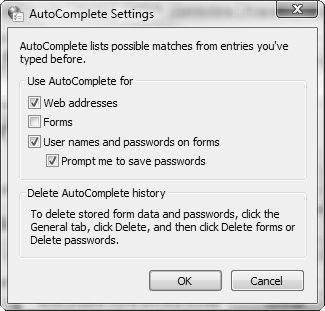
The Content tab of the Internet Properties dialog box also enables you to configure properties related to the AutoComplete feature. This feature remembers entries you have typed before on web page addresses, forms, usernames, and passwords. To configure the types of settings that are remembered, click Settings in the AutoComplete section. The AutoComplete Settings dialog box shown in Figure 4.44 opens. Simply select the types of items for which you want to use AutoComplete, and clear the settings to prevent new items from being stored.
After you have installed Windows Vista, you can configure many settings to improve the functionality of the operating system and troubleshoot issues that might arise. Various problems can cause Vista to fail to start or to display a Blue Screen of Death (BSOD) on startup. Vista provides the Startup Repair Tool (SRT) that helps you diagnose and correct startup problems automatically. You can also start Vista in several advanced options including the Last Known Good Configuration and Safe mode. You can invoke the System Restore feature to take your system back to a previous stable configuration and undo a harmful setup.
Microsoft has provided the new Aero and Aero Glass interface with Vista to enable an enhanced desktop experience. The Aero Glass interface possesses enhanced hardware requirements, and is not available with Vista Home Basic. You saw how to enable Aero and Aero Glass, as well as to revert to a desktop similar to that of previous Windows operating systems, and we discussed several options that you can follow when a user’s desktop does not display as expected.
The new Parental Controls feature enables parents to control a child’s computer capabilities to protect the child from undesirable actions. You can control the types of websites visited, limit logon hours, restrict the types of games that can be played, and limit the applications that will run. You can also view a report on the child’s computer activities.
Internet Explorer 7 introduces new browsing capabilities. You saw how to configure tabbed browsing, control the appearance of pop-up windows, customize search providers and toolbars, manage add-ons, and control Really Simple Syndication (RSS) feeds.
The 70-620 exam expects you to be able to troubleshoot startup and hardware configuration problems, configure and troubleshoot the Aero and Aero Glass interfaces, configure Parental Controls, and customize Internet Explorer. You can supplement the exercises and questions with hands-on practice of configuring the various options for connecting to the Internet and displaying Web content and RSS feeds. You need at least two computers, together with an Internet connection, to perform these exercises.
In this exercise, you create a restore point that is needed by the SRT to perform a successful driver restore. You should have a dual-boot computer that can be running two instances of Windows Vista or one of Vista and one of either Windows 2000 or Windows XP to perform Exercises 4.1 and 4.2. Estimated time: 15 minutes (not including operating system installations).
|
In this exercise, you work with the SRT by setting up a dual-boot system and renaming an essential driver to observe the functioning of the SRT. You need to first modify the permissions on the Vista Windows folder so that the exercise runs properly, because Microsoft has created a new account identified only by its security identifier (SID) of S-1-5-80-956008885-3418522649-1831038044-1853292631-2271478464. This involves changing the owner of the Estimated time: 30 minutes.
|
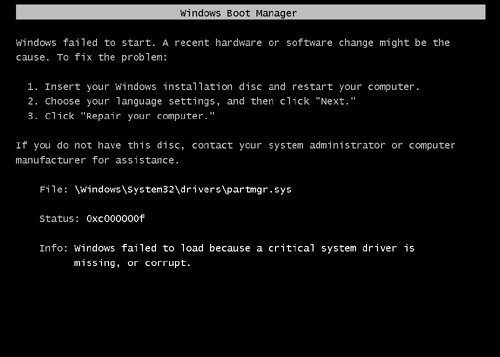
B. Because you never actually logged on to the computer, you could restart the computer and use the Last Known Good Configuration. If you were able to log on and then received a stop error, you would probably need to use the Device Driver Rollback feature, but it isn’t necessary in this case. Answers A, C, and D are incorrect because they are measures you might take if you were unable to use the Last Known Good Configuration method, for whatever reason. For more information, see the section, “Using Alternative Startup Strategies.” | |
B and C. You can right-click the program and choose Properties. On the dialog box that appears, select the Compatibility tab and select the option to run this program in Compatibility mode for Microsoft Windows 98/Windows Me. Alternately, you can run the Program Compatibility Wizard and select the same option from this location. An application’s Properties dialog box does not have a Previous Versions tab; this tab is found on files and folders that have been modified. This feature enables you to go back to an older version of a file. It does not enable you to run a program in compatibility mode, so answer A is incorrect. Enabling the Windows Classic theme emulates the desktop appearance of older Windows versions but does not enable a program to run in Compatibility mode; therefore, answer D is incorrect. For more information, see the section, “Configuring Application Compatibility.” | |
A. Peter should right-click the network adapter and select Update Driver Software. The yellow exclamation point indicates that the network adapter does not have drivers installed. Selecting Update Driver Software starts the Hardware Update Wizard and initiates a search for the appropriate driver. He might need to reboot to Windows 2000 to access the network adapter manufacturer’s website to download a suitable driver before he runs this wizard. Peter would receive the Enable option only if the network adapter were disabled; in this case it would be displayed with a red “X” icon, so answer B is incorrect. The Scan for Hardware Changes option does not install new drivers, so answer C is incorrect. Windows Update provides updates for Windows Vista and other Microsoft software products. It does not provide Windows Vista-compliant drivers, so answer D is incorrect. For more information, see the section, “Troubleshooting Hardware Devices.” | |
C. Diane needs to replace the video card with a new one that has 128MB video RAM. To run the Aero Glass theme, which includes the Flip 3D feature, she needs to have a video card that has at least this amount of memory. She cannot simply go to the display properties and select Aero Glass; this theme is not present in the available options unless her computer has the proper video card, so answer A is incorrect. Installing an updated driver for the video card will not help because the video card has insufficient RAM, so answer B is incorrect. The Alt+Tab key combination does not invoke Flip 3D, so answer D is incorrect. Diane does not need Vista Ultimate to use Aero Glass; Vista Business is adequate, so answer E is incorrect. For more information, see the section, “Understanding Hardware Requirements for Running Aero.” | |
B, C, and D. The process you need to go through is to first get to a point where you can see the screen. You can do this by rebooting the computer and selecting the Enable Low-Resolution Video (640×480) option. This uses a basic video driver to operate the display adapter. After you can see what you are doing, you then need to uninstall the video adapter driver that George replaced in the Device Manager. After the video adapter driver has been uninstalled, you can scan for new hardware changes, which will begin the installation of the video adapter driver. The only incorrect answer was A, which was to use the Last Known Good Configuration. However, you cannot use the Last Known Good Configuration because George had already successfully logged on to the computer. For more information, see the sections, “Using Alternative Startup Strategies,” and, “Using Device Manager to Troubleshoot Hardware Devices.” | |
D. You should install the program, and then select it in the program list that appears on the Application Restrictions page. This list specifies all programs installed on the computer and enables you to select which ones your child is permitted to run. If she attempts to run a program that is not approved, she receives an error message. While this error message contains text boxes that permit you to enter your credentials, you would need to do this each time she needs to run the program. Therefore, this method takes more administrative effort, and answer A is incorrect. Likewise, using the Run As option takes more administrative effort, so answer B is incorrect. Enabling the Erin Can Use All Programs option would permit her to run other programs that you do not want her to access, so answer C is incorrect. For more information, see the section, “Configuring Parental Restrictions.” | |
A. You should delete the information that appears in the header and footer text boxes in the Page Setup dialog box. This prevents these items from being printed. The Microsoft XPS Document Writer produces an exact copy of the document and facilitates its printing in the exact form it appears in on the web page. This option would include the header and footer information, so answer B is incorrect. Unlike Microsoft Office products, the View menu does not include options for turning off headers and footers, so answer C is incorrect. Copying the page to a Microsoft Word document would allow you to delete the header and footer. However, doing this might render the information in a different format than desired and present problems for reformatting it; therefore, answer D is incorrect. For more information, see the section, “Printing Web Pages.” | |
A. You should reconfigure the application compatibility settings. Application compatibility settings for older applications may disable the Aero Glass desktop. If this step does not work, you might need to contact the application’s vendor for an upgrade. The Windows Vista theme setting must already have been selected, or you would not have seen the Flip 3D feature before opening the application, so answer B is incorrect. The current video drivers and RAM on your computer must be adequate for enabling Flip 3D because you have been able to use this feature, so answers C and D are incorrect. For more information, see the section, “Aero Glass Is Not Running.” | |
D. You should uninstall the add-on from Control Panel Programs and Features. While you cannot uninstall add-ons that were pre-installed on your computer, you can uninstall add-ons that you have downloaded. Click Start, Control Panel, and in the Programs category, select the Uninstall a Program option. This starts the Programs and Features applet with a page labeled Uninstall or Change a Program. Resetting Internet Explorer to default settings will not undo the effect of the problematic add-on, so answer A is incorrect. While you could run Internet Explorer with the No Add-ons option by selecting this option from the Start, All Programs, Accessories menu, many websites would be unable to display properly; therefore, answer B is incorrect. It is not possible to uninstall an add-on from the Manage Add-Ons dialog box; you can uninstall ActiveX controls only from this location. Therefore, answer C is incorrect. For more information, see the section, “Managing Add-Ons.” | |
A. To ensure that RSS feeds always appear in the HTML format, you should disable the Turn On Feed Reading View option. This option is found on the Feed Settings dialog box, which is accessed from the Feeds section of the Internet Properties dialog box, Content tab. The default settings are to view feeds in the XML format, so resetting Internet Explorer to default settings does not work; therefore, answer B is incorrect. Disabling the XML DOM Document add-on does not change the format of RSS feeds, so answer C is incorrect. You do not need to search for an additional add-on, so answer D is incorrect. Clicking the title of the feed only changes the feed to HTML format on a temporary basis, so answer E is incorrect. For more information, see the section, “Configuring Really Simple Syndication (RSS) Feeds.” |
The following are some recommended readings on the subject of post-installation configuring and troubleshooting of desktop settings, Parental Controls, and Internet Explorer in Microsoft Windows Vista:
Course
Microsoft Official Curriculum course 5115, Installing and Configuring the Windows Vista Operating System. Module 3, Configuring Post-Installation System Settings and Module 8, Configuring Internet Explorer 7.0. Information available at http://www.microsoft.com/learning/syllabi/en-us/5115aprelim.mspx
Websites
Microsoft. System requirements for Windows Vista. http://support.microsoft.com/kb/919183
Microsoft. Windows Vista Rules for Enabling Windows Aero. http://www.microsoft.com/whdc/device/display/aero_rules.mspx
Microsoft. Troubleshoot audio problems in Windows Media Center. http://windowshelp.microsoft.com/Windows/en-US/Help/e7b016f9-915c-47e6-b101-c4c6deb4b7af1033.mspx
Microsoft. Stay up to date with Microsoft RSS feeds. http://www.microsoft.com/windows/rss/default.mspx
Hardmeier, S. RSS—A Whole New Way to Communicate. http://www.microsoft.com/windows/ie/community/columns/rss_communicate.mspx
Microsoft. Migrating to Windows Vista Through the User State Migration Tool. http://technet.microsoft.com/en-us/windowsvista/aa905115.aspx
Microsoft. Learn About the Features. http://www.microsoft.com/windows/products/windowsvista/features/safer.mspx. (includes Parental Controls and Internet Explorer 7)