
This chapter helps you to prepare for the exam by covering the following Microsoft-specified objectives for the Configuring and Troubleshooting Mobile Computing section of the TS: Microsoft Windows Vista, Configuring exam:
Configure Mobile Display Settings.
<objective>Windows Vista provides a series of display settings that are more pertinent to users of mobile computers as opposed to desktop computers. With the increasing use of mobile computers in today’s workforce, Microsoft added this objective to ensure that you are familiar with settings for purposes such as attaching external monitors, using an auxiliary display, and so on.
</objective>Configure Mobile Devices.
<objective>Windows Vista provides a feature-complete environment for all types of mobile computers, including laptops, notebooks, and Tablet PC devices. Microsoft expects you to be able to perform basic configuration and troubleshooting tasks on these types of devices for the 70-620 exam.
</objective>Configure Tablet PC software.
<objective>The Tablet PC is a new type of computer that is gaining use by people who require enhanced note- and order-taking capabilities. Microsoft has developed new software that facilitates the use of the Tablet PC for these purposes and wants you to be familiar with its capabilities.
</objective>Configure Power Options.
<objective>Mobile computers need to rely on battery power when used away from locations where AC power is available. Microsoft expects you to be able to configure mobile computers for optimizing power use according to different requirements and to configure the appropriate options for scenarios such as offices, client locations, and in the field.
</objective> </feature>Outline
Mobile computing has entered the mainstream of everyday business activity, with modern notebook or laptop computers presenting an unprecedented level of computing power. You can do almost as much on a notebook or laptop computer as on a desktop with the added convenience of portability to any workplace, client, hotel, or home as the demand requires.
Microsoft has designed Windows Vista to accommodate a large range of mobile features such as the Windows Mobility Center, improved power management, presentation settings, and Windows SideShow. Furthermore, tablet computers are supported in a highly improved fashion with additional options and settings such as an enhanced input panel and improved handwriting recognition software. This chapter introduces you to these portable computer features.
Objective: Configure Mobile Devices.
Windows Vista provides a feature-complete environment for all types of mobile computers, including laptops, notebooks, and Tablet PC devices. Included are features for connecting your portable computer with wired and wireless networks and sharing data with these networks in a secure fashion.
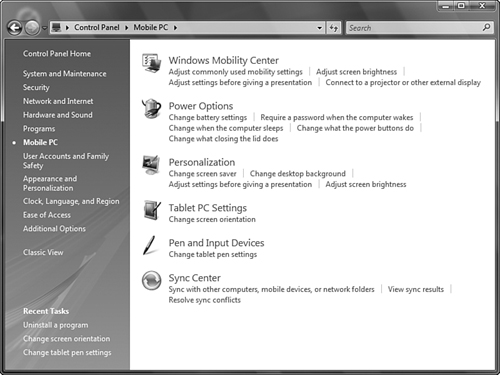
New to Windows Vista is the Mobile PC Control Panel, which provides a centralized location for performing many of the configuration activities associated with portable computing. This Control Panel component appears only on mobile computers, including Tablet PC devices. Open the Control Panel and select Mobile PC to display the window shown in Figure 9.1, which features the following applets:
Windows Mobility Center—. Enables you to configure common mobile computer settings such as display settings, speaker volume, and battery status
Power Options—. Enables you to configure power use for specific conditions including connecting your computer to an AC outlet or running it on battery power
Personalization—. Similar to the Personalization applet found in the display settings of other Windows Vista computers
Tablet PC Settings and Pen and Input Devices—. Enable you to configure properties specific to tablet computers
Sync Center—. Synchronizes data on your mobile computer with other network devices including servers, desktop computers, and other portable computers
Previous Windows versions required you to navigate to different locations to perform actions specific to portable computers such as adjusting the display properties, power conservation, wireless networking, and so on. Windows Vista centralizes these features in a new component called the Windows Mobility Center. This application enables you to configure a large range of features specific to notebook computers. Follow Step by Step 9.1 to access the Windows Mobility Center.
Configuring the Windows Mobility Center
Click Start and type
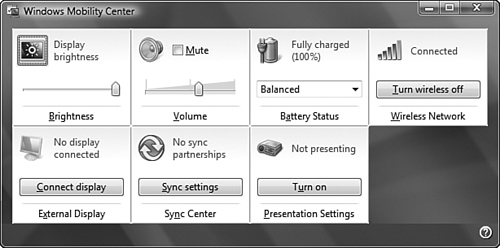
mobilityin the Start Search text box. You can also click Start, Control Panel, Mobile PC, Windows Mobility Center. The Windows Mobility Center opens, as shown in Figure 9.2.Select the control provided by the appropriate applet. The following might be available, depending on the edition of Vista and the capabilities of your computer:
Brightness—. Adjust the slider provided to control the brightness of your portable computer display.
Volume—. Adjust the slider to control your computer’s speaker volume or select the Mute check box to turn it off.
Battery Status—. Displays the current charge level of your computer’s battery. You can also select a power scheme from the drop-down list provided, which might include custom settings set up by the computer manufacturer if available. Power options are discussed later in this chapter.
Wireless Network—. Provides the current connection status and signal strength. Select the command button provided to toggle the wireless network on or off. You learned about configuring wireless network settings in Chapter 6, “Configuring Network Connectivity.”
Screen Orientation—. Available on Tablet PC devices only, enables you to toggle the display orientation between horizontal (landscape) and vertical (portrait) modes.
External Display—. Enables you to connect an external monitor to your mobile computer or its docking station and configure its properties.
Sync Center—. Displays your current synchronization settings. Select the command button provided to view synchronization activities or modify the settings.
Presentation Settings—. Select the command button provided to turn on and modify settings for giving presentations.
Note: Mobility Center controls depend on your computer’s features
Vista does not display modules associated with features not supported by your mobile computer. In addition, certain editions of Vista do not support and therefore do not display certain portability features. Furthermore, computer manufacturers might add additional modules to the Mobility Center.
Exam Alert: Windows Mobility Center settings
Some of the settings available from Windows Mobility Center are also available from other Control Panel applets. The exam might ask you for more than one way to perform an action using a phrase such as, “Each correct answer represents a complete solution. Choose two.”
The mobile nature of these computers presents unique situations—for example, you might be connected to your office network in the morning; travel to a client or conference location in the afternoon and access a different network; and then at home in the evening, connect to your home desktop computer or even back to the office via a virtual private network (VPN) connection. This section expands upon networking situations introduced in Chapter 6 to include items of primary concern to mobile computer users.
Chapter 6 introduced you to VPN connections and showed you how to set up a connection using either the Point-to-Point Tunneling Protocol (PPTP) or Layer 2 Tunneling Protocol (L2TP). Either of these protocols enables you to set up a tunneled connection from a remote location across the Internet to servers in your office network and access shared resources as though you were located on the network itself. Recall that PPTP includes built-in security for encryption and authentication, whereas L2TP does not. You must use IP Security (IPSec) to secure data being sent across an L2TP connection.
An issue that you should be aware of concerns the encryption levels used by client and server computers when establishing a VPN connection. If these encryption levels fail to match, you might receive an error code 741 accompanied by the message stating that The local computer does not support encryption or an error code 742 with the message The remote server does not support encryption. This problem occurs if the server is using an encryption level different from that of your mobile computer. Servers running Windows 2000 Server or Windows Server 2003 use Rivest Cipher 4 (RC4) encryption at a level of either 40-bits or 56-bits. By default, Vista uses 128-bit encryption. Follow Step by Step 9.2 to modify the encryption level.
Configuring VPN Encryption Levels
Click Start and click Connect To.
Right-click the desired VPN connection and select Properties.
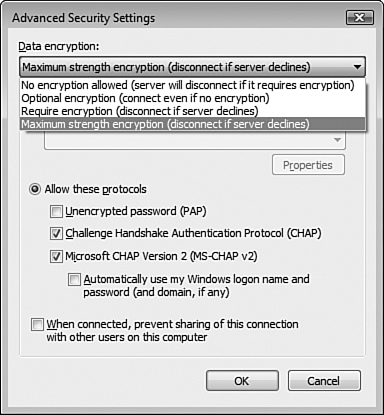
On the VPN Connection Properties dialog box, select the Security tab, select Advanced (Custom Settings), and then click Settings.
On the Advanced Security Settings dialog box shown in Figure 9.3, select Maximum Strength Encryption (Disconnect If Server Declines), and then click OK.
Click OK to close the VPN Connection Properties dialog box.
The Offline Files feature in Windows Vista originated with Windows 2000 and XP. It replaces the My Briefcase feature included with Windows 9x/NT and works only on Microsoft-based networks. The Offline Files feature enables a user to access and work with files and folders stored on a network share when the user is disconnected from that share. For example, such a situation could occur when the user is working from a laptop on the road or at home. This feature ensures that users are always working with the most recent version of their files.
When you enable Offline Files, the feature makes anything you have cached from the network available to you. It also preserves the normal view of network drives, shared folder and NTFS permissions, and so on. When you reconnect to the network, the feature automatically synchronizes any changes with the versions on the network. In addition, changes made to your files while online are saved to both the network share and your local cache.
Offline files are stored on the local computer in a special area of the hard drive called a cache. More specifically this is located at %systemroot%CSC, where CSC stands for client-side caching. By default, this cache takes up 10% of the disk volume space.
You need to configure both the client computer and the server to use the Offline Files feature. Keep in mind that the “server” in this sense refers to any computer that holds a shared folder available to users of other computers. This might be a computer running Windows 2000 or XP Professional, Vista Business, Enterprise, or Ultimate, as well as a server running Windows 2000 Server, Windows Server 2003, or Windows Server 2008.
By default, the Offline Files feature is enabled on the client computer. Step by Step 9.3 shows you how to configure the available client options.
Configuring Offline Files at the Client Computer
Click Start, Control Panel, Network and Internet, Offline Files.
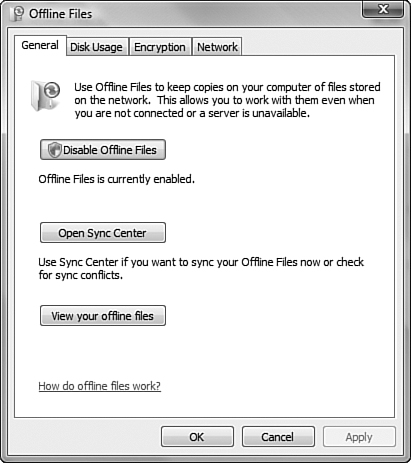
From the General tab of the Offline Files dialog box shown in Figure 9.4, select the following options as required:
Disable Offline Files—. Select this command button if you do not want to use Offline Files. You must accept a User Account Control (UAC) prompt and then restart your computer to disable offline files. If Offline Files are disabled, this command button enables you to enable Offline Files.
Open Sync Center—. Opens the Sync Center.
View Your Offline Files—. Opens a Windows Explorer window displaying the contents of the Offline Files folder.
Select the Disk Usage tab to configure the amount of disk space currently used for storing offline files. By default this is 10% of the drive space. Click Change Limits and click Continue on the UAC prompt that appears to modify this setting. Click Delete Temporary files to delete locally stored files. You receive a Confirm File Delete dialog box displaying the shared folders from which you have cached files and an option to delete only the temporary files or both the temporary files and those that are always available offline.
Select the Encryption tab and then click Encrypt to encrypt offline files. This feature uses the Encrypting File System (EFS) to encrypt offline files, keeping them secure from unauthorized users. By default, offline files are not encrypted.
Select the Network tab to check for slow network connections. You can specify the number of minutes (five by default) at which Vista checks for a slow connection.
When finished, click OK or Apply.
When you have enabled your computer for Offline Files, copies of files and folders you access across the network are stored automatically in your cache area according to the server configuration parameters in effect. These parameters are discussed in the next section.
You can also automatically cache all available files from a network share to which you have connected. Right-click the shared folder icon and choose Make Available Offline. This automatically caches all available files without your having to open them first. You can also synchronize your cached files manually when you are connected to the network share. To do so, right-click the shared folder icon and choose Synchronize.
To enable the caching of files stored on a shared folder, you need to configure the shared folder on the server and specify the type of caching available. Step by Step 9.4 shows you how to perform these tasks on a Windows Vista computer.
Configuring a Shared Folder for Offline Use
Right-click the shared folder and choose Properties.
On the Sharing tab of the folder’s Properties dialog box, click Advanced Sharing and then click Continue in the UAC prompt that appears.
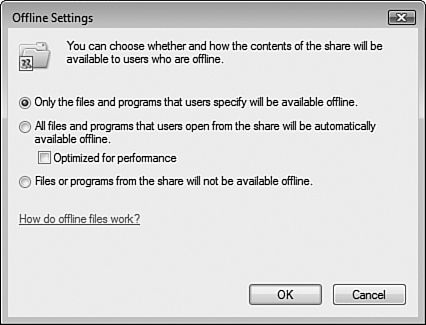
On the Advanced Sharing dialog box, click Caching to open the Offline Settings dialog box shown in Figure 9.5.
Select from the following options, and then click OK:
Only the Files and Programs that Users Specify Will Be Available Offline—. Requires that a user connecting to the share specifically indicate the files to be made available for caching. This is the default setting.
All Files and Programs that Users Open from the Share Will Be Automatically Available Offline—. Makes every file in the share available for caching by a remote user. When a user opens a file from the share, the file is downloaded to the client’s cache and replaces any older versions of the file.
Optimized for Performance—. Enables expanded caching of shared programs so that users can run them locally, thereby improving performance.
Files or Programs from the Share Will Not Be Available Offline—. Effectively disables the Offline Files feature.
Click OK to close the Advanced Sharing dialog box, and then click Close to close the Properties dialog box for the shared folder.
New to Windows Vista is the Sync Center, which enables you to manage cached offline files and folders once you have configured them as described in the previous sections. Shown in Figure 9.6, Sync Center enables you to perform the following actions:
Synchronization with different device types—. Sync Center enables you to synchronize data with other computers and with devices such as smart phones, digital media devices, personal data assistants (PDAs), and so on.
Multiple synchronization—. You can synchronize files and folders with a single device or all available devices.
Manage synchronization activities—. You can initiate manual synchronization, stop actions in progress, check device connectivity status, view the status of activities, and be notified about possible conflicts.
Conflict resolution—. If different users have performed conflicting edits on a file such as a Word document, Sync Center informs you and enables you to save multiple copies of the edited file for later analysis.
Sync partnerships—. Sync Center establishes sync partnerships for all shared folders that you have cached locally. You can configure these partnerships to specify how and when the folders are synced.

Follow Step by Step 9.5 to view sync partnerships and synchronize files.
Sync Center also enables you to schedule synchronization activities to take place at any of the following actions:
At a specified time and synchronization interval
When you log on to your computer
When your computer has been idle for a specified number of minutes (15 minutes by default)
When you lock or unlock Windows
Follow Step by Step 9.6 to create a schedule.
Using the Sync Center to Schedule Synchronization
In Sync Center, select the required synchronization partnership, and then click Schedule.
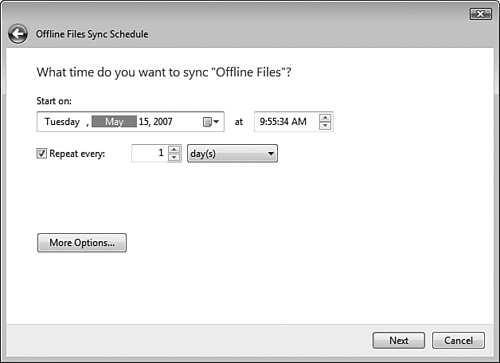
On the Offline Files Sync Schedule dialog box that appears, select the items to be synced on this schedule, and then click Next.
To specify a time for the sync to begin, select At a Scheduled Time. To initiate synchronization when an event such as logging on to the computer occurs, select On an Event or Action and then select the desired action or actions.
If you select At a Scheduled Time, Sync Center automatically provides the current date and time as a start time and a one-day repeat interval (see Figure 9.7). Accept these or specify a different date, time, and interval as required, and then click Next.
Specify a descriptive name for the scheduled synchronization and then click Save Schedule.
After you have created a synchronization schedule, the Offline Files Sync Schedule dialog box provides additional options for viewing or editing an existing sync schedule or deleting the schedule.
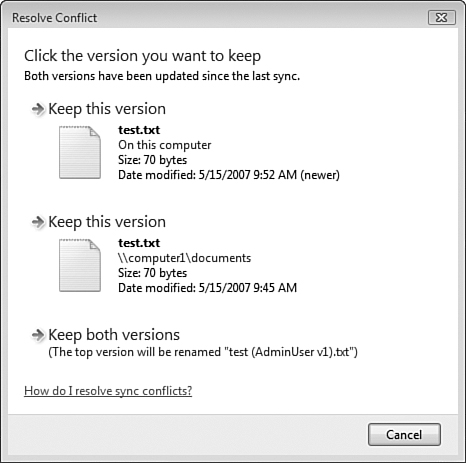
If different users modify a synchronized file while working on different computers, a synchronization conflict occurs. Sync Center informs you when conflicts have occurred. To view information about sync conflicts, click View Sync Conflicts in the Tasks pane. As shown in Figure 9.8, Sync Center informs you about the file or files that are in conflict.

To resolve a conflict, select it and click Resolve. As shown in Figure 9.9, Sync Center enables you to keep either or both versions by using an altered filename, thereby allowing you to compare them and resolve differences at a later time.
Many laptops are equipped with Infrared Data Association (IrDA) ports and can create ad hoc peer-to-peer network connections. An ad hoc network is one that does not need a central access point to direct traffic. Instead, each computer creates a mesh network of links to all other computers. Performance is typically lower in ad hoc networks than in those using access points.
Not only can two IrDA computers create a network link, but a computer can connect to peripheral devices, such as digital cameras and printers, through the same IrDA port. Using IrDA to link up to peripheral devices eliminates the need for cables, so it is very convenient.
Windows Vista should automatically detect and install IrDA devices. However, if the device is not detected, you can install it manually using the procedure in Step by Step 9.7.
To connect an IrDA device after it has been installed, you need to be within a fairly close range of the device—typically about three to four feet—with the infrared transceivers pointing toward each other. After the two devices are aligned, Vista alerts you to an IrDA link, by means such as providing an icon on the taskbar. You can also synchronize an infrared device by using the Sync Center.
You can monitor IrDA devices in Control Panel in the Wireless Link utility, which appears only after an IrDA device is installed. The Hardware tab of the Wireless Link dialog box shows the IrDA devices installed. Right-click the device and select Properties to view the device’s current status.
If your IrDA device does not appear to be working, it might be disabled. You can use the Device Manager to check its status. Open the Infrared Devices node to locate the device, right-click it, and select Enable.
Objective: Configure Mobile Display Settings.
Windows Vista enables you to configure the display on your mobile computer for various circumstances. You can set up presentation settings, attach a projector to your computer, use an external monitor as either a primary or secondary display, or use the Windows SideShow feature on a computer equipped with an auxiliary display on the lid. You look at configuring and troubleshooting these settings in this section.
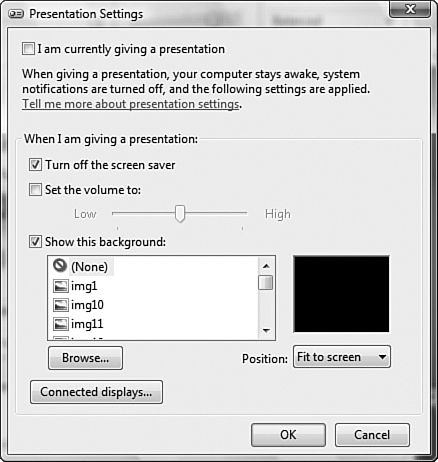
The Windows Vista Mobility Center enables you to configure your mobile computer for presentation settings, which enables you to set up your computer rapidly for giving presentations. Gone are the days when your computer would display system notifications or even go to sleep while you were presenting an important event. The Presentation Settings feature looks after actions such as the following:
Disabling Sleep mode—. Prevents the computer from entering Sleep mode.
Disabling the screen saver—. Prevents the screen saver from appearing while you are explaining an elaborate point.
Disabling system notifications—. Prevents the audience from being distracted by alerts for items such as incoming email messages or available updates.
Speaker volume—. Adjusts your computer’s speaker volume so that the audience can hear recorded items clearly.
Modifies the desktop appearance—. Enables you to select an appropriate nondistracting desktop such as a professional logo or even a blank wallpaper.
Follow Step by Step 9.8 to configure presentation settings.
Configuring Presentation Settings
In the Presentation Settings pane of the Windows Mobility Center, click Turn On.
Click the Presentation Settings icon (the projector icon) to display the Presentation Settings dialog box shown in Figure 9.10.
Configure the settings provided according to your preferences.
If you are using an attached monitor, click Connected Displays to modify the display configuration as required. You learn about the use of external monitors later in this chapter.
Click OK. The presentation settings you have specified will take effect whenever you turn them on from the Mobility Center.
When you are finished presenting, simply return to the Mobility Center and click Turn Off in the Presentation Settings panel.
Many conference rooms and boardrooms nowadays are equipped with a networked digital projector, which you can access in a manner similar to any other networked resource. This facilitates the giving of presentations by a user with a mobile computer, no matter where the presenter, her computer, or the projector are located.
Windows Vista provides the Connect to a Networked Projector Wizard to simplify the action of using a networked projector, as Step by Step 9.9 illustrates.
Using a Networked Projector
Click Start, All Programs, Accessories, Connect to a Network Projector. Alternately, you can simply type
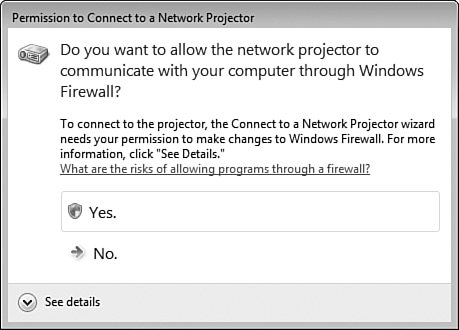
projectorin the Start menu Search box and select Connect to a Network Projector.If you have not previously connected to a networked projector, you receive the Permission to Connect to a Network Projector dialog box shown in Figure 9.11. Click Yes to modify Windows Firewall settings to allow communication to the projector.
Click Continue to accept the UAC prompt.
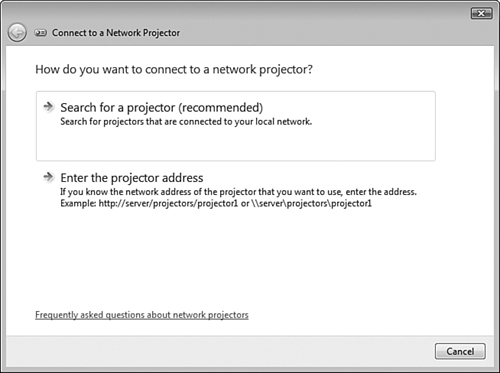
The How Do You Want to Connect to a Network Projector page shown in Figure 9.12 provides two options for locating the projector. If you know the network address (UNC path or URL) of the projector, select Enter the Projector Address; otherwise select Search for a Projector (Recommended).
If you select Search for a Projector, the wizard searches the network and displays the addresses of available projectors on the next page. Security-enabled projectors require a password and are represented by an icon that includes a lock. Select the desired projector and click Next.
If you select a security-enabled projector, enter its password when requested. Then click Connect.
After you have connected to the projector, the wizard provides the Network Presentation dialog box, from which you can control your presentation. This dialog box enables you to pause or resume your presentation as required and to disconnect from the projector when you are finished. You can also choose to mirror or extend your display on the projector, in a fashion similar to that described in the next section for an external monitor.
Note: Networked projectors and Windows Meeting Space
The presentation feature and use of network projectors described in these sections integrate seamlessly with Windows Meeting Space. For more information on Windows Meeting Space, refer to Chapter 7, “Configuring Applications Included with Windows Vista.”
If your notebook computer or its docking station is equipped with a VGA monitor port, you can attach an external monitor and configure it in either of the following ways:
Mirror your notebook display—. Provides a copy of the laptop display that others can view as you perform tasks or enables you to use a higher-quality display for precise work.
Extend your notebook display—. Enables you to work as you would on a desktop computer equipped with multiple monitors.
After you have attached the external monitor, you can either mirror your notebook’s display or extend it onto the attached monitor. Step by Step 9.10 shows you how.
Using an External Monitor
Connect the monitor to your VGA port.
In the Windows Mobility Center (refer back to Figure 9.2), click Connect Display.
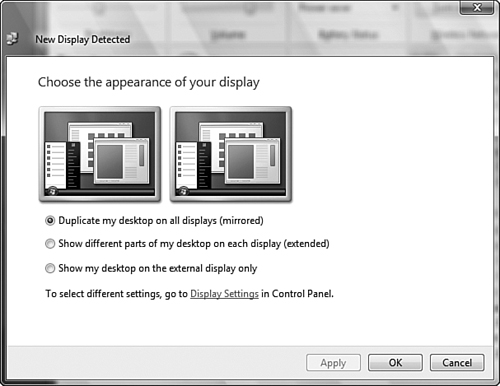
Windows detects the monitor and displays the New Display Detected dialog box, as shown in Figure 9.13.
Configure the following settings as required:
Duplicate My Desktop On All Displays (Mirrored)—. Copies the desktop to the external monitor so that others can view it or you can take advantage of a higher-quality monitor.
Show Different Parts of My Desktop on Each Display (Extended)—. Extends your desktop to the external monitor.
Show My Desktop on the External Display Only—. Blanks out the notebook display and transfers the desktop to the external display. Useful for working from a higher-quality monitor and for conserving battery life by turning off your notebook display.
Display Settings link—. Enables you to modify the properties of the external display from the Control Panel Display applet.
When you are finished, click OK or Apply.
To disconnect the external display, simply remove its cable. Windows Mobility Center automatically detects the removal and reports it in the External Display module.
Many new mobile computers manufactured nowadays incorporate a small auxiliary display into the notebook lid. Such a display can alert you to events such as incoming email, actions scheduled in Windows Calendar, invitations to meetings run on Windows Meeting Space, and so on. You can even receive alerts when your computer is in Sleep mode or turned off. The auxiliary display functions independently of the main computer actions by means of an embedded memory cache, which saves copies of pertinent information such as email messages.
Windows SideShow is a new application in Windows Vista that enables the auxiliary display to perform all these functions and others. It is available in all editions of Vista except Home Basic and operates by means of a series of gadgets that are not unlike the gadgets included in the Windows Sidebar.
Windows SideShow can work with the following two types of devices:
Integrated devices—. These include small displays on the mobile computer’s lid or monochrome displays embedded in the keyboard of a desktop computer.
External devices—. External wireless LCD displays, mobile phones, and even TVs that have Windows SideShow capabilities can interact with your mobile computer to display SideShow gadgets. You need a device that is compatible with Windows SideShow and then install this device to use it. For more information on compatible devices and how to install them, refer to the Windows SideShow website and the device manufacturer’s website.
Step by Step 9.11 shows you how to work with Windows SideShow.
Using Windows SideShow
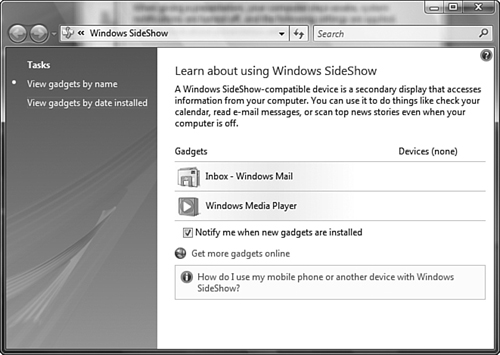
Click Start, Control Panel, Hardware and Sound, Windows SideShow. Alternately, you can type
sideshowin the Start Menu Search box, and then select Windows SideShow from the program list. Either of these actions opens the applet shown in Figure 9.14.By default, Windows SideShow includes gadgets for Windows Mail and Windows Media Player. You can add certain sidebar gadgets as well as download additional gadgets from the Internet.
To add a sidebar gadget, it must be currently running on Windows Sidebar. Select the gadget and drag it to the Windows SideShow applet.
To turn on a new gadget after adding it, select its check box. To turn it off, clear the check box.
To remove a gadget from Windows SideShow, select it and press the Delete key, and then confirm the deletion when requested.
To add gadgets from remote locations, select the Get More Gadgets Online link. This connects you to a web page at Microsoft that displays links to available Windows SideShow gadgets. Follow the instructions provided.
To keep information on compatible devices up-to-date when your computer is in Sleep mode, select Set My Computer to Wake Automatically. Then select Automatically Wake My Computer, specify when this action should occur, and then click OK.
Exam Alert: Updating Windows SideShow Data
You can view data from Windows SideShow on your laptop’s auxiliary display at any time because this data is stored in the display’s cache and the cache is powered separately from the computer. However, you cannot update Windows SideShow data if your laptop is powered off or in Sleep mode or if you are not logged on to the computer. If you encounter a problem where data is not being updated, any of these reasons might be the problem. An exam question might test you on this fact.
On a portable computer that could be lost or stolen, security of information on a Windows SideShow device, including an auxiliary display, is of importance. Security functions such as BitLocker do not protect information stored in the device’s cache. You can protect information on your device by locking it, as described in Step by Step 9.12, or delete information from it, as described in Step by Step 9.13.
Objective: Configure Tablet PC software.
A Tablet PC is essentially a small notebook computer equipped with a pressure-sensitive touch screen and a digital pen. In addition, you can physically reorient the screen so that it lies on top of the machine and acts like a pad of paper (hence the term “Tablet PC”). Many Tablet PCs do not even have a keyboard; rather, you enter data by writing on the screen with the digital pen, and handwriting recognition software assumes the job of creating text. If you’ve ever signed your credit card bill on a screen with an attached input pen, you’ve used a Tablet PC device. The digital pen also assumes the role of the mouse; hence, you see the wording “tap” for “click” used throughout this section.
Windows Vista has improved greatly on the technology that enables a Tablet PC to function. All editions except Vista Home Basic support Tablet PC. The following are several of the more important features that Vista provides to Tablet PC:
Personalized handwriting recognition—. You can customize the handwriting recognition software to fit your personal writing style. You can also turn on automatic learning so that this tool collects information about your writing habits and vocabulary.
AutoComplete—. When Tablet PC recognizes your handwriting, it can display lists of possible completions for items such as email addresses, filenames, and URLs.
Handedness—. You can configure Tablet PC to work properly with either left- or right-handed users.
Touch screen support—. You can easily access small interface elements such as check boxes, radio buttons, and drop-down lists at a tap of the digital pen.
Visual pen feedback—. Tablet PC provides distinct icons for single-tap, double-tap, and right-click actions.
Pen flicks—. You can use the digital pen to rapidly navigate menus and shortcuts. These include scroll up, scroll down, page forward, and page back. You can also perform editing actions such as cut, copy, paste, and delete, as well as other customized activities.
Snipping Tool—. You can capture a snip, or screen shot, of any screen object that you can save, paste into documents, or perform other actions with the image.
The following sections provide additional details on configuring Tablet PC settings, working with the Tablet PC Input Panel, the Snipping Tool, and touch screen support.
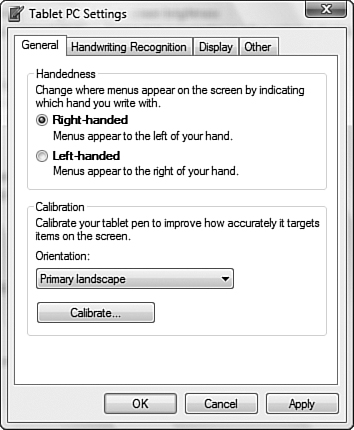
Tap Start, Control Panel, Mobile PC, Tablet PC Settings to access the Tablet PC Settings dialog box shown in Figure 9.15. Settings available from this dialog box enable you to control the following basic behavior of Tablet PC:
Handedness—. Enables you to locate the screen menus so that your writing hand does not obscure them. Select Right-handed to make the menus appear to the left and Left-handed to make them appear to the right.
Calibration—. Enables you to improve the accuracy of the digital pen tracking items on the screen. Tap Calibrate and follow the instructions provided.
Handwriting recognition—. Improves the accuracy with which your computer recognizes your personal writing style. Handwriting recognition is discussed in more detail later in this section.
Display—. Enables you to change the orientation of the screen. You have the following four choices:
Primary Landscape—. The default orientation places the taskbar at the bottom of the display when oriented with the long side horizontal.
Primary Portrait—. Places the taskbar at the bottom of the display when oriented with the long side vertical.
Secondary Landscape—. Places the taskbar at the top of the display when oriented with the long side horizontal.
Secondary Portrait—. Places the taskbar at the top of the display when oriented with the long side vertical.
Other—. Provides a link to the Pen and Input Devices applet, which enables you to configure pen and input device settings.
You can also select any of the four display orientations from the Windows Mobility Center, which includes a Screen Orientation panel on a Tablet PC. Tap Rotate Screen and then choose the desired option.
The Tablet PC Input Panel enables you to use the digital pen rather than the keyboard to enter handwritten text. It consists of a writing pad and a character pad that converts handwriting into typed text. An on-screen keyboard enables you to type individual characters with the pen.
You can display the Tablet PC Input Panel as shown in Figure 9.16 in any of the following ways:
Tablet PC provides an Input Panel icon in a small tab docked to the left edge of the screen. Hover the pointer over this tab to display the icon, and then tap it to display the Input Panel.
Move the pen to any area where you can enter text, such as a text box or a Microsoft Word document. Tap the icon that appears.
Tap Start and type
tabletin the Search box and then select Tablet PC Input Panel from the Programs list.

Tip: You can add a Tablet PC Input Panel icon to the taskbar
Right-tap the taskbar and select Toolbars, Tablet PC Input Panel. This places an icon on the taskbar, which you can tap to display the Input Panel quickly.
Besides a Tools menu and a Help menu, the title bar of the Tablet PC Input Panel contains three icons that control what is displayed by the Input Panel. The first one, which is selected by default, displays the writing pad, in which you can write words that Tablet PC translates into text for you. The second icon displays the Character Pad, in which you can write individual letters, numbers, or special characters. Tablet PC translates each character as you write it. The third icon displays the on-screen keyboard, enabling you to type by tapping the desired key with your pen.
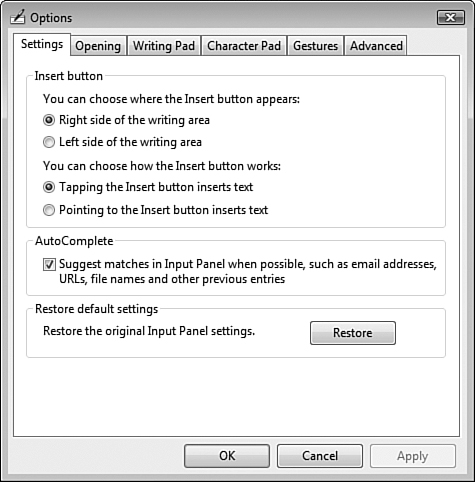
Tap Options from the Tools menu in the Input Panel to display the Options dialog box shown in Figure 9.17, which provides the following settings for controlling the Input Panel:
Settings tab—. Enables you to choose the location and action of the Insert button for inserting text. You can also turn on AutoComplete and reset the Input Panel to its default settings.
Opening tab—. Enables you to determine how the Input Panel is opened. It contains the following items:
Actions that open Input Panel—. You can choose to open the Input Panel by either pointing to the Input Panel icon or tapping it.
Displaying the Input Panel icon—. Positions the Input Panel icon as close as possible to the text entry area. You also have the option to display an Input Panel icon on the taskbar.
Displaying the Input Panel tab—. You can choose to display the Input Panel tab and specify its default location.
Writing Pad tab—. Controls the pen action when writing text into the Input Panel. You can select your ink thickness, automatically insert text characters after a pause, and control how close to the end of the writing line you want to write before a new line is started.
Character Pad tab—. Controls the ink thickness when inserting characters and converts characters to text after a pause.
Gestures tab—. Enables you to choose the desired gesture for scratching out written text. You can choose a horizontal straight or wavy line, an M- or W-shaped gesture, circular gestures, or angled straight or wavy lines. You can also restrict the scratch-out gesture to the Z-shaped gesture that was available in the Windows XP Tablet PC Edition.
Advanced tab—. Enables you to control the password security level used by Vista when you use the pen to enter a password into a password text box. This helps to prevent others from viewing your passwords.
Pen flicks are actions that you can use with the pen to navigate a document or perform editorial actions. Click Start, Control Panel, Mobile PC, Pen and Input Devices (or type pen in the Start Menu search field) to bring up the Pen and Input Devices dialog box. Click the Flicks tab to display the dialog box shown in Figure 9.18.
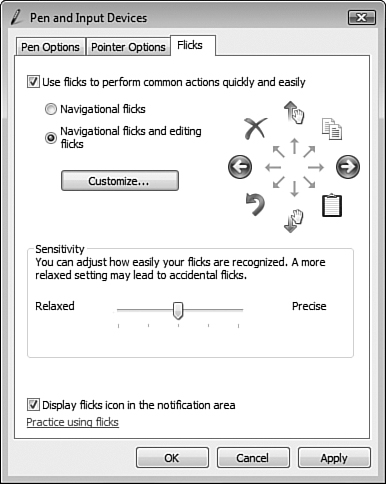
You have the following default navigational actions:
Scroll up—. Move the pen upward in a straight line.
Scroll down—. Move the pen downward in a straight line.
Navigate forward—. Move the pen to the right in a straight line to navigate forward in Windows Explorer or Internet Explorer.
Navigate back—. Move the pen to the left in a straight line to navigate back in Windows Explorer or Internet Explorer.
In addition, if you select the Navigational Flicks and Editing Flicks option, you have the following default editing actions:
Copy—. Move the pen up and to the left in a straight line.
Paste—. Move the pen up and to the right in a straight line.
Delete—. Move the pen down and to the right in a straight line.
Undo—. Move the pen down and to the left in a straight line.
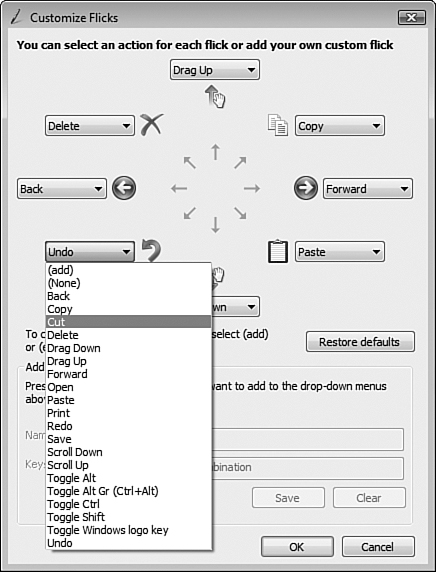
If you want to substitute other editing or navigational actions for these defaults, tap Customize to display the dialog box shown in Figure 9.19. Tap the drop-down list corresponding to the action you want to modify (for example, to substitute Cut for Undo, select it as shown in Figure 9.19). Tap OK to apply your change, which brings up the Pen and Input Devices dialog box, or tap Restore Defaults to return the flick actions to their defaults.
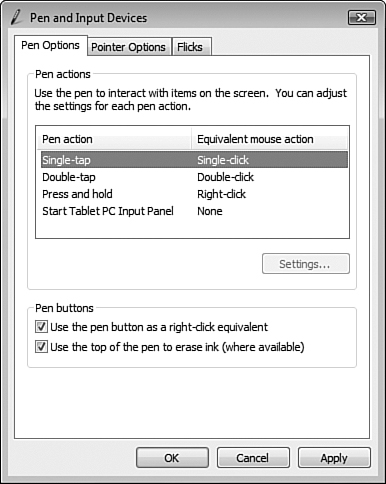
The Pen Options tab of the Pen and Input Devices dialog box enables you to define pen actions that correspond to mouse actions. As shown in Figure 9.20, single and double taps of the pen correspond to single and double clicks, while pressing and holding the pen corresponds to a right-click. You can also control actions initiated by use of the pen button or the top of the pen, where available.
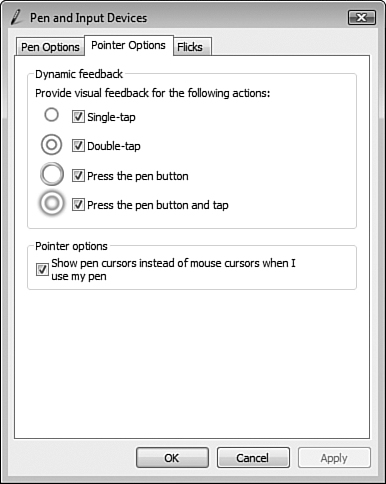
In addition, Tablet PC provides feedback on tapping the pen and use of the pen button. These appear as visual icons on the screen as defined in the Pointer Options tab of the Pen and Input Devices dialog box. If you do not want these feedback actions to appear, clear the corresponding check boxes in Figure 9.21.
Tablet PC includes a handwriting recognition software package that you can train to translate your handwritten words accurately into typed text. This facilitates the use of your Tablet PC computer in situations where it is more convenient to write notes into your computer rather than typing, such as during a meeting or interview. Individual differences in handwriting style can result in improper translation of often-confused characters such as the capital “I”, lowercase “l” and number “1”, the uppercase “O” and number “0”, and so on.
Follow Step by Step 9.14 to train the handwriting recognizer.
Training the Handwriting Recognizer
From the Tools menu of the Tablet PC Input Panel, select Personalize Handwriting Recognition to open the Handwriting Personalization dialog box shown in Figure 9.22.
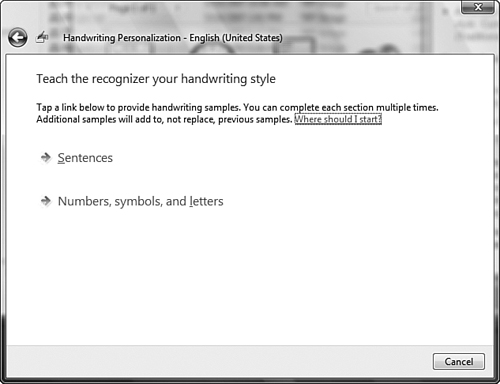
The best way to start training the handwriting recognizer is to select the Teach the Recognizer Your Handwriting Style option, which brings up the dialog box shown in Figure 9.23.
Select Sentences and use the tablet pen to write the sentence supplied in your natural handwriting style. When finished, tap Next and repeat as many times (up to 50) as desired.
To train the recognizer specifically on individual numerals and letters, return to the dialog box shown in Figure 9.23 and select Numbers, symbols, and letters. Use the tablet pen to write the characters supplied in your natural handwriting style.
Repeat these steps as often as desired. Repetition improves the accuracy of the recognition process by providing additional samples that demonstrate the variability inherent in your writing style.
When finished, tap Update and then tap Exit to add your handwriting samples to the recognition library.
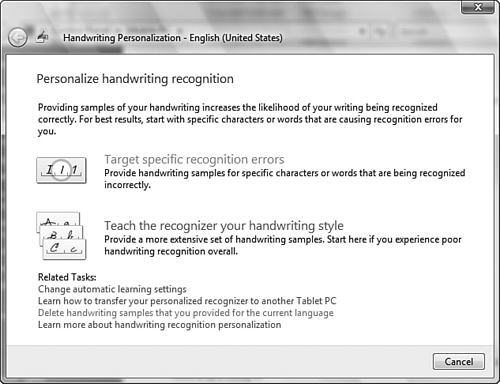
After you have used the Tablet PC Input Panel several times and noted that it fails to recognize certain characters properly, you can improve the training by returning to the Handwriting Personalization dialog box shown in Figure 9.22 and selecting Target Specific Recognition Errors. This brings up the dialog box shown in Figure 9.24. Select the option that is most appropriate for the problem you are encountering and then follow the instructions provided.

The Handwriting Recognition tab of the Tablet PC Settings dialog box previously mentioned has several additional controls that determine how the handwriting recognizer operates. You can configure the following options:
Use the Personalized Recognizer (Recommended)—. Enables the handwriting recognizer to collect samples of your personal handwriting as already described and store this data in your user profile. Clear this check box to suspend the use of the recognizer temporarily without deleting previously collected data.
Use Automatic Learning (Recommended)—. Ensure that this radio button remains selected to continue using the handwriting recognizer.
Don’t Use Automatic Learning and Delete Any Previously Collected Data—. Select this radio button and tap Apply to clear previous data from the handwriting recognizer. Use this option only if you need to start over again in training the handwriting recognizer for any reason.
For more information on the handwriting recognizer and additional hints in its use, consult the Windows Vista Help and Support Center.
Tip: Time is of the essence
When training the handwriting recognizer, each exercise you complete improves the capability of the recognizer to provide accurate results. Keep working on this activity. Samples you provide are never thrown out unless you click or tap Cancel. Do this task when you do not have any other pressing activities at hand.
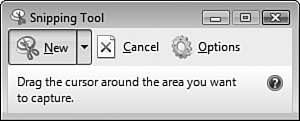
The snipping tool enables you to capture an object from any application active on your screen. You can add a handwritten comment if desired and save it as an image file or paste it into a document such as a Microsoft Word file. Follow Step by Step 9.15 to use the snipping tool.
Using the Snipping Tool
Tap Start, All Programs, Accessories, Snipping Tool. Alternately, you can type
snipin the Start menu Search field, and then select the Snipping Tool from the Programs list to open the tool, as shown in Figure 9.25.Tap New and select one of the following options:
Free-form Snip—. Captures the area within any freehand-drawn area.
Rectangular Snip—. Captures a rectangular area.
Window Snip—. Captures a dialog box or other window.
Full-screen Snip—. Captures everything on the screen.
Tap and drag to select the desired item. The Snipping Tool displays a preview of the captured area and provides several options.
To save the captured area as a graphics file, tap File, Save As, and provide an appropriate path, filename, and file type (you can choose a .jpg, .gif, .png, or .mht file). To insert the capture into a document, select Edit, Copy (or press Ctrl+C). To add a handwritten note, tap Tools, Pen, select a color, and write the note. To highlight a part of the capture, tap Tools, Highlighter.
Some Tablet PC models possess touch screen capabilities, in which the screen responds to finger touches. You can use your finger to perform actions such as configuring screen items, navigating web pages, or even writing and using touch flicks in the same manner as pen flicks already described. Vista includes a new feature called the touch pointer, which is a mouse-like icon that floats on the screen below your finger when in use. It includes a drag area, a pointer area, and buttons for left- and right-clicking.
Tablet PC in Windows Vista includes a Tablet PC Touch Training module, which assists you in working with the touch pointer. For more information, consult Vista Help and Support.
Objective: Configure Power Options.
The chief issue with system performance for mobile users is that of managing power consumption on laptop computers when running on battery power. Microsoft provides the Control Panel Power Options applet for configuring several power management options that enable you to configure energy-saving schemes appropriate to your hardware.
Windows Vista replaces the Standby mode used in previous Windows versions with a new Sleep mode, which offers the following advantages compared to shutting down your computer:
Vista automatically saves your work and configuration information in RAM and turns off the computer’s monitor, hard disk, and other system components. Should your battery be running low, Vista saves your work to the hard disk and turns off your mobile computer.
Entering the sleep state is rapid—it takes only a few seconds.
When you wake your computer, Vista restores your work session rapidly. You don’t need to wait for your computer to boot up and restore your desktop after logging on.
Note: Hibernation is still supported in Vista
Hibernation is available in Windows Vista as an advanced power management setting. This option saves configuration information and data to the hard disk and turns off all computer components. You need an amount of free hard disk space equal to the amount of RAM on the computer to save the entire contents of the RAM. Waking from hibernation takes more time than waking from Sleep mode. You learn about advanced power management settings later in this section.
You can access the Power Options applet from the Hardware and Sound section of Control Panel. On a mobile computer, you can access the same applet from the Mobile PC section. This opens the dialog box shown in Figure 9.26, from which you can configure the options described in the following section.
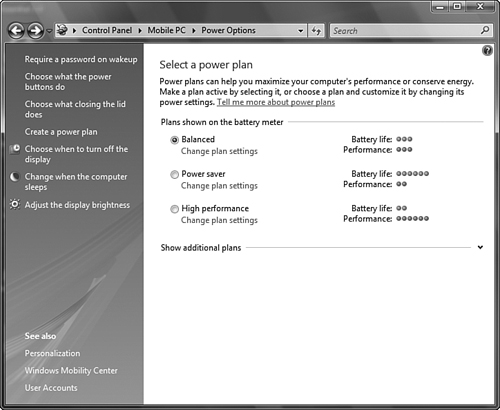
Microsoft has supplied three preconfigured power plans that help to strike a balance between usability and power conservation. The high performance power plan optimizes the computer for performance at the expense of battery life and is suitable for individuals who run graphics-intensive or multimedia applications frequently. The power saver plan optimizes battery life by slowing the processor down and is suitable for those who use the computer primarily for purposes such as email, Web browsing, and word processing. The balanced plan strikes a balance between these extremes. You can edit one of these power schemes or create a new one if the preconfigured power schemes do not fulfill your needs. Table 9.1 compares the three preconfigured power plans.
Table 9.1. Windows Vista Power Plans
Power Plan | When on Battery Power | When Plugged into AC Outlet |
|---|---|---|
Balanced | Turns off display after 5 minutes | Turns off display after 20 minutes |
Sleep after 15 minutes | Sleep after 1 hour | |
Display dimmed slightly | Display at full brightness | |
Power Saver | Turns off display after 3 minutes | Turns off display after 20 minutes |
Sleep after 15 minutes | Sleep after 1 hour | |
Display dimmed slightly | Display at full brightness | |
High Performance | Turns off display after 20 minutes | Turns off display after 20 minutes |
Sleep after 1 hour | Does not sleep | |
Display at full brightness | Display at full brightness |
Caution: Do not use Sleep mode when on a commercial airplane
Airline regulations forbid the use of electronic devices during takeoff and landing. Because a computer can wake to perform a scheduled task or other action, you should turn off your computer completely at these times.
Vista enables you to perform additional power management actions that you can use to tailor your computer’s power scheme to your needs.
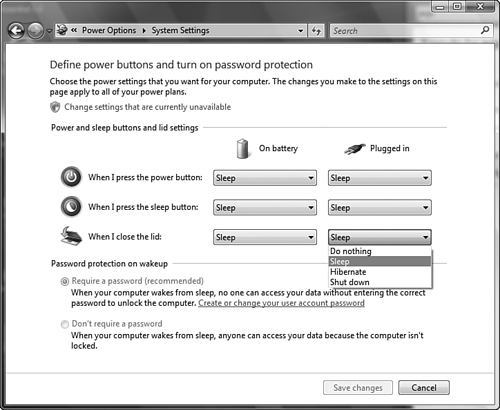
Selecting any of the top three options in the Power Options window previously shown in Figure 9.26 brings up the screen shown in Figure 9.27, which enables you to perform the following actions:
Power and sleep buttons and notebook lid—. You can choose from Do Nothing, Sleep Mode, Hibernation, and Shut Down for each of these actions on battery or AC power. The Shut Down option is not available for the sleep button.
Password protection on wakeup—. You can choose whether or not to require a password when the computer wakes from Sleep mode. To change this setting, you need to select the link provided and respond to a UAC prompt.
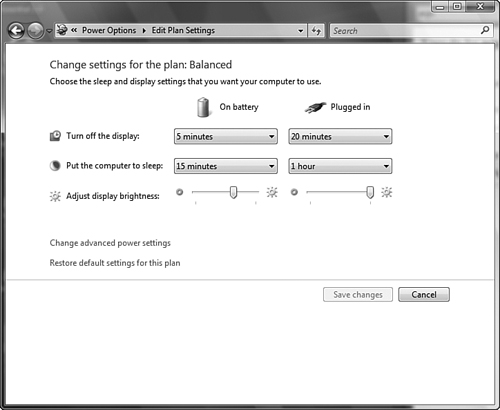
You can also modify any of the existing power plans or create your own custom power plan. To do so, select the Change Plan Settings link under the desired power plan or any of the last three links on the left side of the Power Options window previously shown in Figure 9.26. You receive the window shown in Figure 9.28, focused on the power plan currently in use or the plan whose link you selected.
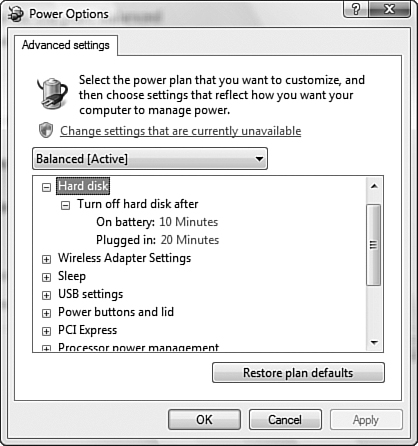
Click Change Advanced Power Settings to bring up the dialog box shown in Figure 9.29 for the following additional options, each of which you can define separately for operation on battery power or plugged in:
Hard disk—. You can specify the number of minutes of inactivity after which the hard disk is turned off.
Wireless adapter settings—. You can specify a maximum performance, or low, medium, or maximum power saving for the adapter. The more power saving you specify, the poorer the signal throughput might become.
Sleep—. You can specify the number of minutes after which your computer enters Sleep mode or hibernation. You can also turn on hybrid sleep, which saves all open documents to both memory and the hard disk. Should a power failure occur when in hybrid sleep, Windows can restore your data from the hard disk. If hybrid sleep is not enabled and a power failure occurs, your data is lost.
USB Settings—. You can enable the USB Selective Suspend setting, which enables Vista to turn off the USB root hub when not in use.
Power buttons and lid—. You can define the action that occurs when you close the lid or press the power or sleep buttons, in a manner similar to that described previously. You can also define the action (sleep, hibernate, or shut down) that occurs when you select the power off button from the Start menu.
PCI Express—. You can define the level of power savings for link state power management, which controls the power management state for devices connected to the PCI Express bus if present in the computer.
Processor power management—. You can control the minimum and maximum power status of the processor, also known as throttling the processor. Reducing the processor power levels saves battery power at the expense of lengthening the time required to respond to keyboard and mouse actions.
Search and indexing—. You can balance how actively indexing operations are performed, and save power by allowing the index to be less up to date.
Display—. You can control the display brightness and the length of time before it is turned off. You can also enable Adaptive Display, which increases the waiting time before turning off the display if you wake the computer frequently.
Multimedia settings—. You can control whether the computer enters Sleep mode when sharing multimedia with other users. By setting this option to Prevent My Computer from Sleeping after a Period of Inactivity, the computer will not go to sleep if media is being shared with other computers or devices.
Battery—. You can specify actions to take place when the battery power reaches a low or critical level, as well as the battery level at which these events occur. By default, low battery level is at 10% and produces a notification but takes no action. The critical level is at 5%; you are notified and the computer is put into hibernation when running on battery power.
Exam Alert: Configure power plans to turn off components after a period of inactivity
If you set up a power plan to turn off components separately after an interval of nonuse, the computer progressively moves toward Sleep mode. This should happen if a user is away from his laptop for 20 or 30 minutes. At the same time, a user doing presentations should not have her computer go into Sleep mode. Remember that the user can enable presentation settings so that this and other actions do not occur. An exam question might ask you what to do if a user’s computer goes to sleep during a presentation.
You can customize a power plan to suit your needs if required. Follow Step by Step 9.16 to create a custom power plan.
Vista uses the battery meter to help you keep track of remaining battery life. This is represented by a battery icon in the notification area, which also contains a plug icon when the notebook is plugged in to AC power. Hover your mouse over this icon to view the percent battery power left and the power plan in use. To view the battery meter in full as shown in Figure 9.30, click the battery icon.
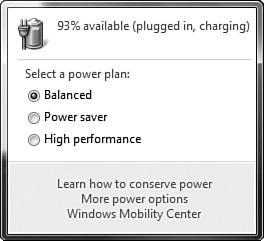
From the battery meter, you can also perform the following tasks:
Select a power plan—. Enables you to choose any of the default or custom power plans configured on your computer.
Learn how to conserve power—. Opens the Help and Support Center to a page with additional information on power conservation.
More power options—. Opens the Power Options dialog box as previously described and shown in Figure 9.26.
Windows Mobility Center—. Opens the Windows Mobility Center as previously described and shown in Figure 9.2. Note that this location also enables you to select a power plan.
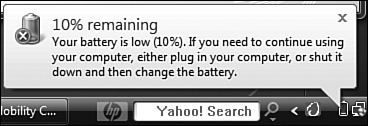
When the battery power drops below 25%, the notification area icon and the full battery meter display a yellow exclamation point triangle. When the power drops below 10% (or any other value configured in the Power Options dialog box), you receive the warning message shown in Figure 9.31, and the battery meter and icon display a red “X” icon. Some computers can sound an audible notification. You should plug your computer into AC power when this message appears.
New to Vista is the capability for configuring power management settings in Group Policy. When you configure policies for power management, a non-administrative user cannot modify the power settings. It is expected that Group Policy in Windows Server 2008 will include the capability of configuring domain- or organizational unit (OU)-wide policy settings that will improve power management in companies that possess a large number of mobile computers.
Step by Step 9.17 shows you how to use Group Policy to configure power management settings.
Using Group Policy to Configure Power Settings
Click Start, Run, type
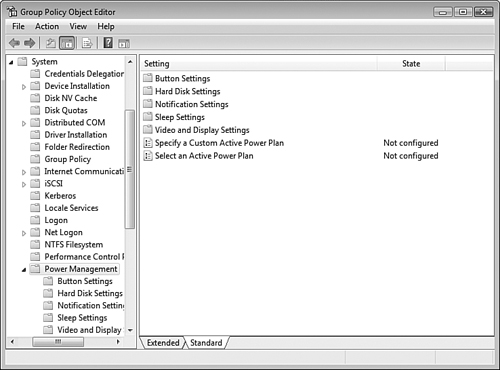
gpedit.msc, and press Enter.Navigate to the Computer ConfigurationAdministrative TemplatesSystemPower Management node. You receive the policy groups shown in Figure 9.32.
Configure the following groups of settings as required:
Button Settings—. Enables you to define the actions that occur when the power button, sleep button, or Start menu power button is pressed or the lid closed. You can define these separately for battery and AC power conditions.
Hard Disk Settings—. Enables you to specify when the hard disk is turned off when plugged in or running on battery.
Notification Settings—. Enables you to define the battery levels at which low and critical alarm notifications take place and the actions that will occur.
Sleep Settings—. Includes settings for controlling when and how the computer enters sleep mode or reawakens.
Video and Display Settings—. Enables you to specify how long the computer must be inactive before the display is turned off and whether the time interval is adjusted according to the user’s keyboard and mouse usage.
Power Plans—. Enables you to select either an active power plan or specify a custom power plan to be active on all computers controlled by the Group Policy object.
When finished, close the Group Policy Object Editor.
In this chapter, you learned about the new and improved features of Vista related to mobile computing. Microsoft has enhanced Vista to meet the needs of the increasing segment of the workforce that rely on laptop and notebook computers, as well as Tablet PC machines, for their everyday activities.
Mobile computers feature the Mobile PC Control Panel, which provides a centralized location for performing many of the actions associated with mobile computing. Also included is the Windows Mobility Center, which provides a series of panels that enable you to perform several simple tasks such as adjusting your brightness and volume, checking your battery status and wireless network signal strength, setting your computer up for giving presentations, and so on.
You can synchronize your mobile computer with network folders stored on a server or client computer and configure shared folders for use when offline. The Sync Center manages all aspects of synchronizing offline files and folders and warns you when version conflicts exist.
By configuring your computer for presentation, you can disable system notifications, the screen saver, and Sleep mode, adjust the speaker volume, and modify the desktop appearance for giving presentations. You can also connect to a networked projector and use an external monitor.
Windows SideShow enables you to view information such as incoming email messages, scheduled actions, meeting invitations, and so on, on an auxiliary display or an external device. Windows SideShow employs gadgets similar to those used with the Sidebar.
Vista provides a comprehensive set of actions for use on a Tablet PC computer. You can use the digital pen to write text or as a mouse to tap actions normally associated with mouse clicks. The Tablet PC Input Panel facilitates the use of the pen as a writing tool, and the Handwriting Recognizer translates written input into text. You can train the Handwriting Recognizer to your individual writing style. The Snipping Tool enables you to capture items from the screen and save these as image files or paste them into documents.
Vista provides power options that enable you to configure your computer for power saving or enhanced performance as the task at hand dictates. You can choose from three preconfigured power plans, edit these power plans, or design your own custom power plan. The battery meter informs you of the current battery level and warns you when this level drops below warning and critical power levels so that you can save your work and connect to an AC outlet.
Windows Vista provides tools and options designed to accommodate the needs of mobile computer users who must rely on their computers in a large range of situations. The following exercises are designed to reinforce your knowledge of Vista features specifically designed for mobile computing.
A. The error message | |
D. You should use the Sync Center to synchronize the document. The Sync Center will report that a conflict exists and offer options to save either or both versions of the document. Choose the option to save both versions, and then edit the newly saved document to incorporate your changes. The Sync Center makes it simple to incorporate edits from different locations by recognizing conflicts and providing this option. You do not need to download the client’s version of the document separately and then copy the changes from your version because the Sync Center facilitates the download process, so answer A is incorrect. You do not need to manually type in your corrections because the Sync Center can save both versions, so answers B and C are incorrect. You do not need to rename your version of the document because the Sync Center recognizes the conflicting changes, so answer E is incorrect. For more information, see the section, “Use of the Sync Center.” | |
C. Brian needs to ensure that synchronization takes place at a time and interval that allows for frequent synchronization of offline documents. This increases the probability that the sales associates will always have the most up-to-date versions of the files that they require when offline. Changing the caching options on the shared folders to All Files and Programs That Users Open from the Share Will Be Automatically Available Offline makes both files and applications always available; however, this action does not solve the current problem, so answer A is incorrect. If the disk space available were too low, the sales associates would observe that some files were available offline while others were not. However they did not receive any files, so answer B is incorrect. Scheduling synchronization to take place when users log on would update the files at logon time but would not continue to update the files for any changes that subsequently take place before logging off, so answer D is incorrect. For more information, see the section, “Use of the Sync Center.” | |
B. Before the time of her presentation, Nancy should open the Windows Mobility Center and ensure that the Presentation Settings are set to Not Presenting. When she is ready to begin her presentation, she should click Turn On. Presentation Settings ensures that her computer does not enter Sleep mode during her presentation. It also can be set so that other actions such as displaying alerts and opening the screen saver do not occur. Nancy does not need to modify power settings before and after her presentation because the Presentation Settings option solves the problem for her, so answers A and C are incorrect. Nancy does not need to use an extra battery; furthermore, this action in itself would not prevent Sleep mode from kicking in, so answer D is incorrect. For more information, see the section, “Presentation Settings.” | |
A. You should turn the computer on and log on to your user account. Windows SideShow works by means of a separate cache that holds information when the computer is turned off or placed into Sleep or Hibernation mode. Vista can update the contents of this cache only when the computer is on and you are logged onto your user account. Vista cannot update the contents of the cache when the computer is in Sleep or Hibernation modes, so answers B and C are incorrect. Because the computer needs to be on and logged on to the user account to update the cache, you should not phone your client until after you have performed these tasks; therefore answer D is incorrect. For more information, see the section, “Using Windows SideShow.” | |
B and D. Norman can use either the Tablet PC Input Panel or pen flicks to scroll his documents. On the Input Panel he can select the on-screen keyboard and use his pen to tap the Home, End, PgUp, PgDn, or arrow keys to scroll his document. Pen flicks are actions that he can use with the pen to navigate a document or perform editorial actions. He can set up and customize pen flicks from the Flicks tab of the Pen and Input Devices dialog box. The handwriting recognizer enables him to translate handwriting into typed text accurately. It does not enable him to scroll his document, so answer A is incorrect. The Snipping Tool enables him to capture items from the display and save these as image files or copy them to documents. It does not enable him to scroll his document, so answer C is incorrect. For more information, see the sections “Tablet PC Input Panel” and “Pen Flicks.” | |
A. Laurie should access the Handwriting Recognition tab of the Tablet PC Settings dialog box and clear the Use the Personalized Recognizer (Recommended) check box. Doing this suspends the action of the personalized recognizer without loss of any data that she has collected. She can later return to this dialog box and select this check box to resume using the collected data. If she were to select the Don’t Use Automatic Learning, and Delete Any Previously Collected Data option from the Handwriting Recognition tab or the Delete Handwriting Samples that You Provided for the Current Language option from the Personalize Handwriting Recognition dialog box, she would lose all personalized handwriting data she has collected, so answers B and D are incorrect. If she were to select Restore from the Settings tab of the Options dialog box, default Handwriting Recognizer settings would be restored. This would continue to use the collected handwriting data, so answer C is incorrect. For more information, see the section, “Handwriting Recognizer.” | |
D. By configuring the portable computers to enter Sleep mode when the lid is closed, you can enable the users to rapidly and manually place their computers in a low-power state from which the computers can resume normal operation rapidly. While the Power Saver and Balanced power plans enable Sleep mode after a preconfigured time interval, they do not enable the users to manually place their computers into Sleep mode, so answers A and B are incorrect. The Critical Battery Alarm also does not enable the users to manually place their computers in Sleep mode, so answer C is incorrect. The computers do not resume normal operating condition as rapidly from hibernation as they do from Sleep mode, so answer E is incorrect. For more information, see the section, “Power Plans.” | |
E. In this scenario, the computer is not actually turning itself off; it is going to sleep after an hour. To prevent this when running on AC power while optimizing battery life when running on battery power, Peter should access the Power Options dialog box. He should select the Power Saver plan and click Change Plan Settings. On the Change Settings for the Plan dialog box, he should select Never under the Put the Computer to Sleep drop-down list for the Plugged In situation. Selecting Never under the When I Press the Power Button drop-down list does not affect what the computer does when idle, so answers A and B are incorrect. Answer C is incorrect because this would prevent the computer from going to sleep when on battery and not when plugged in. Answer D is incorrect because this would shut down the display only and not prevent the computer from going to sleep. Answer F is incorrect because this would not optimize battery life when running on battery power. For more information, see the section, “Power Plans.” | |
C. You should access the Battery section of the Power Options dialog box and increase the Low Battery Level setting. You can reach this dialog box by selecting the Change Plan Settings link for the power plan in use and then selecting Change Advanced Power Settings. Increasing this setting enables you to receive a warning sooner and gives you more time to save your work. Setting the Put the Computer to Sleep setting to a higher value would cause the computer to remain active for a longer time, thereby actually increasing the chance of data loss from a sudden shutdown, so answer A is incorrect. Selecting the Power Saver power plan would allow the computer to run longer on battery power but in itself would not provide more warning of low battery levels, so answer B is incorrect. Increasing the Low Battery Notification setting is not possible. This is an on/off switch and is normally set to on. Turning it off would result in no warning at all, and the computer would shut down without warning; therefore answer D is incorrect. For more information, see the section, “Advanced Power Settings.” |
The following are some recommended readings on the subject of configuring and troubleshooting mobile computing in Windows Vista:
Book
Stanek, William R. Windows Vista Administrator’s Pocket Consultant. Chapter 7, Managing Laptops and Traveling Users. Redmond, WA: Microsoft Press. 2007
Course
Microsoft Official Curriculum course 5116. Configuring Windows Vista Mobile Computing and Applications. Module 4, Configuring Mobile Computers, Module 5, Configuring Tablet PC Settings, and Module 6, Networking Mobile Computers. Information available at http://www.microsoft.com/learning/syllabi/en-us/5116afinal.mspx
Websites
Microsoft. Windows Mobility Center. http://www.microsoft.com/windows/products/windowsvista/features/details/mobilitycenter.mspx
Microsoft. Windows Vista: 6 Hot New Features. http://www.microsoft.com/australia/smallbusiness/issues/technology/vistamobility.mspx
Microsoft. Tablet PC Support. http://www.microsoft.com/windows/products/windowsvista/features/details/tabletPC.mspx
MSDN. Mobile PCs. http://msdn2.microsoft.com/en-us/windowsvista/aa905027.aspx
Microsoft. Power Policy Configuration and Deployment in Windows Vista. http://download.microsoft.com/download/9/c/5/9c5b2167-8017-4bae-9fde-d599bac8184a/PMPolicy_Vista.doc