
This chapter helps you to prepare for the exam by covering the following Microsoft-specified objectives for the Maintaining and Optimizing Systems That Run Windows Vista section of the TS: Microsoft Windows Vista, Configuring exam:
Troubleshoot performance issues.
<objective>The performance of a computer is dependent on several factors, any of which can cause a slowdown. Microsoft includes this objective to measure your understanding of the factors that affect a computer’s performance over time and how they interact with one another. You also need to know how to optimize the computer’s performance and troubleshoot problems and bottlenecks that can occur from time to time.
</objective>Troubleshoot reliability issues by using built-in diagnostic tools.
<objective>Windows Vista provides the System Configuration tool, Task Manager, and Event Viewer for diagnosing and troubleshooting problems that you might encounter. You should know what each of these tools can accomplish and when to utilize them.
</objective>Configure Windows Update.
<objective>The Microsoft Windows Update website enables you to keep your computer up-to-date with the latest security patches and productivity enhancements. Know how to configure the options available that govern how Windows Update functions on your computer and across a network.
</objective>Configure data protection.
<objective>Data protection is an important concern that Microsoft expects you to understand. Know how to back up and restore files and folders or your entire computer. Also know when and how to encrypt your data.
</objective> </feature>Outline
When you set up a brand new Windows Vista computer with a baseline set of applications, you will generally find that it performs very capably. As you install additional applications, store data, and work with the computer, its performance can slow down. Factors that affect a computer’s performance include memory, processor, disks, and applications. Windows Vista provides tools such as the Performance Console, Reliability Monitor, and Task Manager to monitor and troubleshoot computer performance. This chapter looks at monitoring the computer’s performance with these tools and keeping it working at a level close to that observed when you first set it up.
Microsoft is continually releasing new updates for its operating systems, mainly as vulnerabilities are discovered. This chapter looks at the configuration and use of the Windows Update feature including the use of a server running Microsoft Windows Server Update Services (WSUS) for updating computers on a network.
In this day and age of highly mobile workforces and risk for data theft and its often dire consequences, protection of data is of utmost importance. This chapter looks at new protection technologies introduced by Microsoft including the BitLocker drive encryption tool. Another technique that is vital for protection of data is the backup. If you do not have backup copies of data stored on a computer, valuable data can be lost forever. Windows Vista provides a Backup tool that you can use to create backup copies of data on a variety of media including disk, CD-ROM, DVD, and shared network drives.
Objective: Troubleshoot performance issues.
Windows Vista includes several tools that are used for monitoring, optimizing, and troubleshooting performance. These include the revamped Reliability and Performance Monitor and the new optimization tools introduced with Vista.
The Windows Vista Reliability and Performance Monitor console replaces and updates the Performance Console tool found in Windows 2000 and XP. As shown in Figure 8.1, it includes the following monitoring tools:
Performance Monitor—. Provides a real-time graph of computer performance, either in the current time or as logged historical data.
Reliability Monitor—. Performs an overall reliability analysis of computer stability over time.
Data Collector Sets—. Known as Performance Logs and Alerts in Windows 2000/XP, this component records computer performance information into log files. Data collectors are grouped into groups that you can use for monitoring performance under different conditions.
Reports—. Included as the Report function of the System Monitor console in Windows 2000/XP, this component creates performance report data.
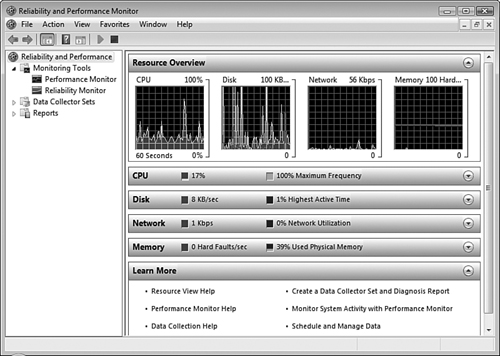
This section introduces the Resource Overview pane that appears as part of the Reliability and Performance Monitor console before describing each of the monitoring tools in more detail.
When you first start the Reliability and Performance Monitor, it displays the Resource Overview panel previously shown in Figure 8.1. This overview provides a summary of CPU, disk, network, and memory performance statistics including mini-graphs of recent performance of these four components. Click the downward-pointing arrow to display additional information about a component similar to that shown for CPU in Figure 8.2.
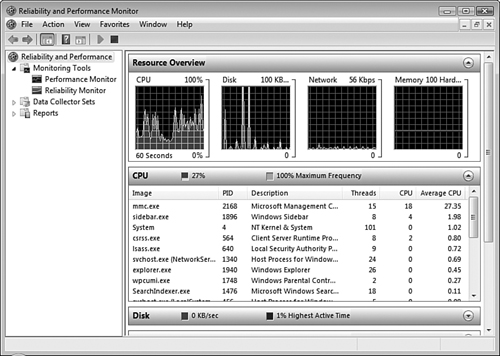
For each of the four components, the information provided includes the application whose resource usage is being monitored (known as the image) and the process identifier number (PID) of the application instance. The following additional information is provided for each of the four components:
CPU—. A brief description of the monitored application, the number of threads per application, the CPU cycles currently used by each application instance, and the average CPU resulting from each instance as a percentage of total CPU usage.
Disk—. The file being read or written by each application instance, the current read and write speeds in bytes/minute, and the total disk input/output (I/O) in bytes/minute.
Network—. The IP address of the network component with which the computer is exchanging data, the amount of data (bandwidth) in Kbps (sent, received, and total) by each instance.
Memory—. Current hard faults per second and memory usage information in kilobytes for committed, working set, sharable, and private memory components.
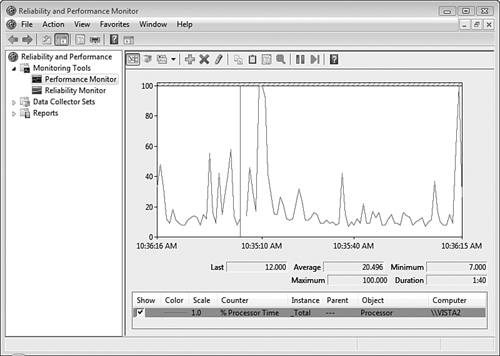
Performance Monitor, which is shown in Figure 8.3, provides a real-time graph of computer performance and enables you to perform tasks such as the following:
Identify performance problems such as bottlenecks
Monitor resource usage
Track trends over time
Measure the effects of changes in system configuration
Generate alerts when unusual conditions occur
Before you learn more about the Performance Monitor tool, you need to be familiar with the following terms, which are used in a specific manner when referring to performance metrics:
Object—. A specific hardware or software component that the Performance Console is capable of monitoring. It can be any component that possesses a series of measurable properties. Windows Vista comes with a defined set of objects; applications such as Internet Information Services (IIS) installed on Windows Vista might add more objects to the available set.
Counter—. One of a series of statistical measurements associated with each object.
Instance—. Refers to multiple occurrences of a given object. For example, if your computer has two hard disks, two instances of the PhysicalDisk object will be present. These instances are numbered sequentially, starting with 0 for the first occurrence. An instance labeled “_Total” is also present, yielding the sum of performance data for each counter. Note that not all objects have multiple instances.
Information on objects and counters is displayed in the following format: Object (_instance)Counter. For example, Processor (_0)\%Processor Time measures the %Processor time on the first processor. The instance does not appear if only a single instance is present.
Performance Monitor enables you to obtain a real-time graph of computer performance statistics. Step by Step 8.1 shows you how.
Configuring Performance Monitor
Click Start and type
performancein the Start Search text box. You can also start the Reliability and Performance console from the Computer Management console, accessed by right-clicking Computer and choosing Manage.Click Continue on the User Account Control (UAC) prompt.
In the Reliability and Performance console, click Performance Monitor. As previously shown in Figure 8.3, Performance Monitor displays the Processor\%Processor Time counter.
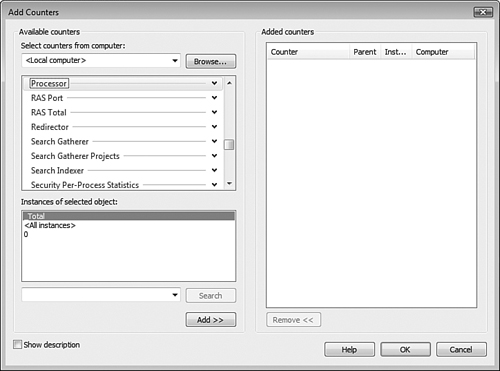
To add objects and counters, click the “+” icon on the toolbar.
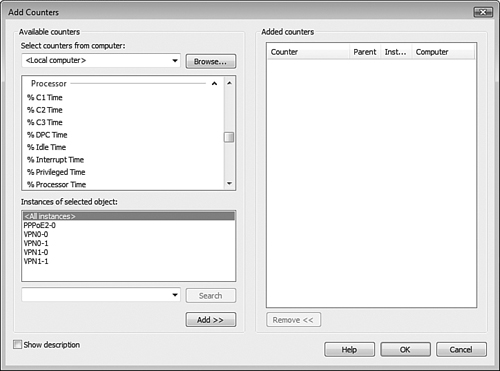
In the Add Counters dialog box that appears (see Figure 8.4), ensure that the Select Counters from Computer drop-down list reads
<Local Computer>for monitoring the local computer performance. Then select the desired object and instance from the lists directly below the Select Counters list.Expand the desired object to display a list of available counters from which you can select one or more counters, as shown in Figure 8.5. To add counters to the graph, select the counter and click Add.
Repeat steps 5 and 6 to add more counters. You learn about suitable counters in the following sections.
When you are finished, click OK.
Tip: You can highlight individual counters in System Monitor
To highlight an individual counter in the System Monitor display, select it from the list at the bottom of the details pane and click the highlight icon (looks like a highlighter pen) in the taskbar. You can also press the Backspace key to highlight the counter. The highlighted counter appears in a heavy line. You can use the up or down arrow keys to toggle through the list of counters and highlight each one in turn. This feature helps you to find the desired counter from a graph that includes a large number of counters.
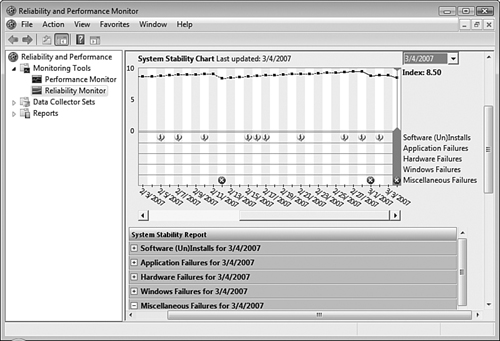
Reliability Monitor is a new component in Windows Vista that utilizes the built-in Reliability Analysis Component (RAC) to provide a trend analysis of your computer’s system stability over time. As shown in Figure 8.6, Reliability Monitor provides the System Stability Chart, which correlates the trend of your computer’s stability against events that might destabilize the computer. Events tracked include Windows updates; software installations and removals; device driver installations, updates, rollbacks, and removals, as well as driver failure to load or unload; application hangs and crashes; disk and memory failures; and Windows failures such as boot failures, crashes, and sleep failures. This chart enables you to track a reliability change directly to a given event.
Note: Reliability Monitor limitations
To display data in the System Stability Chart, you must run your computer for at least 24 hours after the first installation of Windows Vista. For the first 28 days, Reliability Monitor uses a dotted line on the Stability Chart graph, indicating that the data is insufficient to establish a valid baseline for this index.
Follow Step by Step 8.2 to use Reliability Monitor.
A data collector set is a set of performance objects and counters that enables you to log computer performance over time while you are performing other tasks. Such logging is important because changes in computer performance often occur only after an extended period of time. Best practices state that you should create a performance baseline, which is a log of computer performance that you can save for comparing with future performance and tracking any changes that might have occurred over time. In this way you can identify potential bottlenecks in computer performance and take any required corrective measures. You can also monitor the effectiveness of any changes you make to a computer’s configuration.
The Data Collector Sets feature was known as Performance Logs and Alerts in previous Windows versions.
Data collector sets are binary files that save performance statistics for later viewing and analysis in the Performance Monitor snap-in; you might also export them to spreadsheet or database programs for later analysis. Vista creates a series of data collector sets by default. The default data collector sets enable you to log default sets of performance counters for various purposes, including system diagnostics, LAN diagnostics, system performance, wireless diagnostics, event trace sessions, and startup event trace sessions. To view these sets, expand the branches under the Data Collector Sets node of the Reliability and Performance Monitor. Right-click any available data collector set and choose Properties to view information on the selected data collector set.
You might also create your own user-defined data collector set. Follow Step by Step 8.3 to create a data collector set.
Creating a Data Collector Set
In the console tree of the Reliability and Performance Monitor snap-in, select and expand Data Collector Sets.
Select User Defined.
To create a new data collector set, right-click a blank area of the details pane and select New, Data Collector Set. The Create New Data Collector Set Wizard starts.
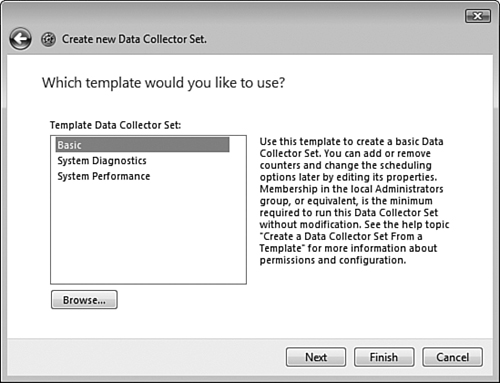
In the New Log Settings dialog box, provide a name for the new log. Select either Create from a Template (Recommended) or Create Manually (Advanced) and then click Next. If you select the Create Manually (Advanced) option, refer to Step by Step 8.4 for the remainder of this procedure.
If you select the Create from a Template option, you receive the dialog box shown in Figure 8.7, which enables you to use one of the following templates:
Basic—. Enables you to use performance counters to create a basic data collector set, which you can edit later if necessary.
System Diagnostics—. Enables you to create a report that contains details of local hardware resources, system response times, and local computer processes. System information and configuration data are also included.
System Performance—. Enables you to create a report that provides details on local hardware resources, system response times, and local computer processes.
Select the desired template and click Browse to locate a template file (XML format) if one exists. Then click Next.
Select a location to which you would like the data to be saved (or accept the default location provided), and then click Next.
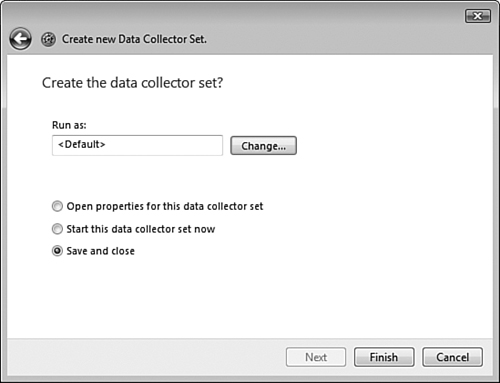
You receive the Create the Data Collector Set page shown in Figure 8.8. To run the set as a different user, click Change and select the desired user. To start logging now or configure additional properties, select the option provided. Then click Finish.
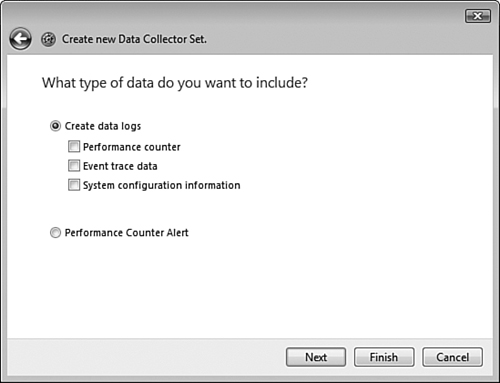
To create a custom data collector set, use the Create Manually (Advanced) option in step 4 of Step by Step 8.3, and then follow Step by Step 8.4 to complete the procedure.
Creating a Manually Configured Data Collector Set
After selecting the Create Manually (Advanced) option and clicking Next, you receive the screen shown in Figure 8.9, which enables you to specify the following options:
Performance Counter—. Enables you to select performance objects and counters to be logged over time. Click Next to specify the performance counters to be logged and the desired sampling interval.
Event Trace Data—. Enables you to create trace logs, which are similar to counter logs, but they log data only when a specific activity takes place. Counter logs track data continuously for a specified interval.
System Configuration Information—. Enables you to track changes in Registry keys. Click Next to specify the desired keys.
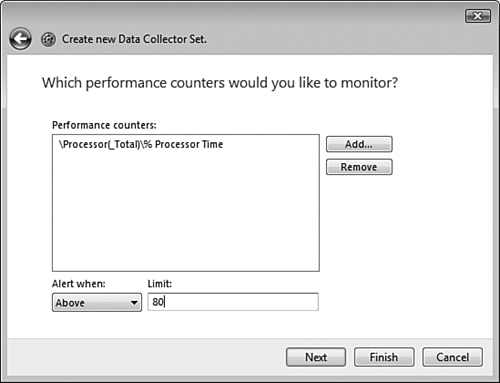
Performance Counter Alert—. Enables you to display an alert when a selected counter exceeds or drops beneath a specified value. Click Next to specify the counters you would like to alert and the limiting value (see Figure 8.10 for an example).
After clicking Next, you receive the same dialog box shown previously in Figure 8.8. Make any changes needed, and then click Finish.
Perhaps the simplest method to create a data collector set is to use a set of counters you have already configured in Performance Monitor. Step by Step 8.5 shows you how.
The data collector set is created and placed in the User Defined section. If you select the option to start the data collector set now, logging begins immediately and continues until you right-click the data collector set and choose Stop.
The Memory object includes counters that monitor the computer’s physical and virtual memory. Table 8.1 discusses the most important counters for this object.
Table 8.1. Important Counters for the Memory Object
Counter | What It Measures | Interpretation and Remedial Tips |
|---|---|---|
Pages/sec | The rate at which data is read to or written from the paging file | A value of 20 or more indicates a shortage of RAM and a possible memory bottleneck. To view the effect of paging file performance on the system, watch this counter together with LogicalDisk\% Disk Time. Add RAM to clear the problem. |
Available Bytes | The amount of physical memory available | A value consistently below 4MB indicates a shortage of available memory. This might be due to memory leaks in one or more applications. Check your programs for memory leaks. You might need to add more RAM. |
Committed Bytes | The amount of virtual memory that has been committed to either physical RAM or running processes | Committed memory is in use and not available to other processes. If the amount of committed bytes exceeds the amount of RAM on the computer, you might need to add RAM. |
Pool Nonpaged Bytes | The amount of RAM in the nonpaged pool system memory (an area holding objects that cannot be written to disk) | If this value exhibits a steady increase without a corresponding increase in computer activity, check for an application with a memory leak. |
Page Faults/sec | The number of data pages that must be read from or written to the page file per second | A high value indicates a lot of paging activity. Add RAM to alleviate this problem. |
In addition to these counters, the Paging File\% Usage counter is of use when troubleshooting memory problems. This counter measures the percentage of the paging file currently in use. If it approaches 100%, you should either increase the size of the paging file or add more RAM.
Lack of adequate memory might also have an impact on the performance of other subsystems in the computer. In particular, a large amount of paging, or reading/writing data from/to the paging file on the hard disk results in increased activity in both the processor and disk subsystems. You should monitor counters in these subsystems at the same time if you suspect memory-related performance problems. You learn more about monitoring counters later in the section “Optimizing and Troubleshooting Processor Utilization.”
The paging file is an area on the hard disk that is used as an additional memory location for programs and data that cannot fit into RAM (in other words, virtual memory). By default, the paging file is located at %systemdrive%pagefile.sys and has a default initial size of the amount of RAM in the computer plus 300MB and a default maximum size of three times the amount of RAM in the computer.
To improve performance on a computer equipped with more than one physical hard disk, you should locate the paging file on a different hard disk than that occupied by the operating system. You can also increase the size of the paging file or configure multiple paging files on different hard disks. Any of these configurations help to optimize performance by spreading out the activity of reading/writing data from/to the paging files. Note that you should retain a paging file on the system/boot drive to create a memory dump in case of a crash. This memory dump is useful for debugging purposes.
Follow Step by Step 8.6 to modify the configuration of the paging file.
Configuring the Paging File
Right-click Computer, choose Properties, and then select Advanced System Settings from the Tasks list in the System applet. Click Continue in the UAC prompt that appears.
On the Advanced tab of the System Properties dialog box, select Settings under Performance.
Select the Advanced tab of the Performance Options dialog box.
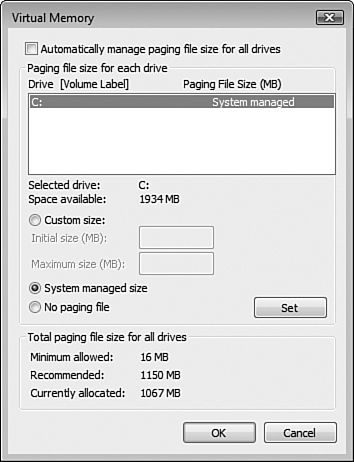
In the Virtual memory section of this tab, click Change.
As shown in Figure 8.11, the Virtual Memory dialog box displays the disk partitions available on the computer and the size of the paging file on each. To add a paging file to a drive, first clear the Automatically Manage Paging File Size for All Drives dialog box. Select the drive and choose Custom Size to specify an initial and maximum size in megabytes or System Managed Size to obtain a default size. To remove a paging file, select the drive holding the file and click No Paging File. Note that some programs might not work properly if you choose the No Paging File option. Then click Set.
Click OK three times to apply your changes and to close the Performance Options and System Properties dialog boxes.
Click Restart Now to restart your computer if so prompted.
The processor is the “heart” of the system because it executes all program instructions, whether internal to the operating system or in user-executed applications. The Processor object contains counters that monitor processor performance. Table 8.2 discusses the most important counters for this object.
Table 8.2. Important Counters for the Processor Object
What It Measures | Interpretation and Remedial Tips | |
|---|---|---|
% Processor Time | The percentage of time the processor is executing meaningful actions (excludes the Idle process) | If this value is consistently greater than 85%, the processor could be causing a bottleneck. You should check the memory counters discussed previously; if these are high, consider adding more RAM. Otherwise, you should consider adding a faster processor (or an additional one if supported by your motherboard). |
Interrupts/sec | The rate of service requests from I/O devices that interrupt other processor activities | A significant increase in the number of interrupts, without a corresponding increase in system activity, might indicate some type of hardware failure. Brief spikes are acceptable. |
You should also look at the SystemProcessor Queue Length counter. If the value of this counter exceeds 2, a processor bottleneck might exist, with several programs contending for the processor’s time.
As mentioned in Table 8.2, memory shortages might frequently manifest themselves in high processor activity. It is usually much cheaper and easier to add RAM to a computer than to add a faster or additional processor. Consequently, you might want to consider this step first when you are experiencing frequent high processor activity.
Disk performance is measured by two processor objects: The PhysicalDisk counters measure the overall performance of a single physical hard disk rather than individual partitions. LogicalDisk counters measure the performance of a single partition or volume on a disk. These counters include the performance of spanned or striped volumes that cross physical disks.
PhysicalDisk counters are best suited for hardware troubleshooting. Table 8.3 describes the most important counters for this object.
Table 8.3. Important Counters for the PhysicalDisk Object
What It Measures | Interpretation and Remedial Tips | |
|---|---|---|
% Disk Time | The percentage of time that the disk was busy reading or writing to any partition | A value of more than 50% suggests a disk bottleneck. Consider upgrading to a faster disk or controller. Also check the memory counters to see whether more RAM is needed. |
Avg. Disk Queue Length | The average number of disk read and write requests waiting to be performed | If this value is greater than 2, follow the same suggestions as for % Disk Time. |
Average Disk Sec/Transfer | The length of time a disk takes to fulfill requests | A value greater than 0.3 might indicate that the disk controller is retrying the disk continually because of write failures. |
LogicalDisk counters are best suited for investigating the read/write performance of a single partition. Table 8.4 describes the most important counters for this object.
Table 8.4. Important Counters for the LogicalDisk Object
Counter | What It Measures | Interpretation and Remedial Tips |
|---|---|---|
% Disk Time | The percentage of time that the disk is busy servicing disk requests | A value greater than 90% might indicate a performance problem except when using a RAID device. Compare to Processor\% Processor Time to determine whether disk requests are using too much processor time. |
Average Disk Bytes/Transfer | The amount of data transferred in each I/O operation | Low values (below about 20KB) indicate that an application might be accessing a disk inefficiently. Watch this counter as you close applications to locate an offending application. |
Current Disk Queue Length | The amount of data waiting to be transferred to the disk | A value greater than 2 indicates a possible disk bottleneck, with processes being delayed because of slow disk speed. Consider adding another faster disk. |
Disk Transfers/ sec | The rate at which read or write operations are performed by the disk | A value greater than 50 might indicate a disk bottleneck. Consider adding another faster disk. |
% Free Space | Percentage of unused disk space | A value less than about 15% indicates that insufficient disk space is available. Consider moving files, repartitioning the disk, or adding another disk. |
You can perform several tasks associated with performance monitoring and optimization from the command line. The following are several available tools:
Logman—. Manages data collector logs. You can start, stop, and schedule the collection of performance and trace data.Relog—. Creates new performance logs from data in existing logs by modify the sampling rate and/or converting the file format.Typeperf—. Displays performance data to the command prompt window or to a log file.
You can also use the Perfmon command to start the Reliability and Performance Monitor from a command line. For information on running these tools, type the command name followed by /? at a command prompt.
New to Windows Vista are three technologies for enhancing system performance: Windows ReadyBoost, Windows SuperFetch, and Windows ReadyDrive. These three technologies are collectively known as Windows PC Accelerators. You learn about these technologies in this section.
Included with all editions of Vista, Windows SuperFetch optimizes memory performance based on trends of most-used programs and data on the computer, enabling Vista to decide which content should be loaded into RAM at a particular time. SuperFetch also enables Vista to detect and avoid problematic memory usage scenarios that would otherwise remove content of higher priority from memory.
Included with all editions of Windows Vista, Windows ReadyBoost enhances your computer’s performance without adding additional RAM. ReadyBoost enables you to use a USB flash drive or a Compact Flash or Secure Digital (SD) memory card as an additional source of memory (also known as a cache) to improve your computer’s performance. The computer can access this cache more rapidly than it can access the paging file or other data on the hard drive. ReadyBoost can work with SuperFetch to dramatically enhance your computer’s performance. You can even use a portion of the flash drive for Windows ReadyBoost and the remainder for data storage. Microsoft recommends that you use one to three times the amount of RAM in your computer for optimum performance of Windows ReadyBoost.
Devices used by Windows ReadyBoost must be USB 2.0-capable and be of at least 256MB capacity. The device must support a minimum read speed of 2.5 MB/s and a write speed of 1.75 MB/s. In addition, the USB host controller on the computer must accept the USB 2.0 standard. Windows ReadyBoost can use a cache of up to 4GB in size.
Using Windows ReadyBoost is easy, as Step by Step 8.7 shows.
Using Windows ReadyBoost
Insert the USB flash drive into an available port. Windows displays an AutoPlay message box with an option to use Windows ReadyBoost.
To use Windows ReadyBoost, select the Speed Up My System option. Windows tests the device to determine whether it can be used with ReadyBoost.
If you do not receive a prompt, or if you want to use a portion of the drive for data storage, open Computer. Right-click the USB drive and choose Properties.
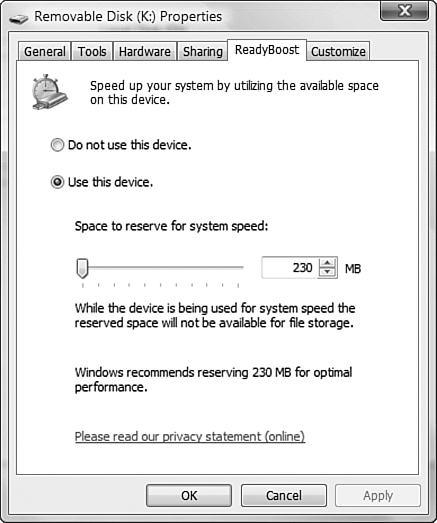
On the ReadyBoost tab of the device’s Properties dialog box shown in Figure 8.12, ensure that the Use This Device option is selected, and then drag the slider to select the amount of space to be used for ReadyBoost. Then click OK.
Exam Alert: Fast and slow memory
Most USB flash drives contain both fast and slow flash memory. ReadyBoost can use only the fast memory on a flash drive, so the maximum amount of memory displayed on the ReadyBoost tab is often less than the total capacity of the drive. You might receive an exam question that asks why ReadyBoost is unable to use the total amount of memory provided by the flash drive.
Windows ReadyDrive enables mobile computers equipped with a hybrid hard disk to achieve enhanced performance and improved battery life. A hybrid hard disk includes nonvolatile flash memory as a component in the hard disk; data is written to this cache where it can be accessed more rapidly and with less use of battery power (because the need for spinning the hard drive is dramatically reduced). Computers boot, hibernate, and resume from hibernation faster with Windows ReadyDrive. ReadyDrive can also work with SuperFetch for the best possible performance. To be used by ReadyDrive, the disk must have at least 50MB of nonvolatile cache that performs at a minimum speed of 4MB/s.
The hybrid hard drive technology is just being perfected at the time of writing and is expected to be available in the near future.
For more information on SuperFetch, ReadyBoost, and ReadyDrive, consult Windows PC Accelerators: Performance Technology for Windows Vista and references cited therein, included in the “Suggested Readings and Resources” section at the end of this chapter.
Objective: Troubleshoot reliability issues by using built-in diagnostic tools.
Windows Vista contains several built-in tools that enable you to monitor, diagnose, and troubleshoot system reliability. You have already learned about the Reliability and Performance Monitor console and its components. In this section you look at the System Configuration Utility, Task Manager, and Event Viewer.
Microsoft has enhanced the System Configuration Utility to improve its capabilities for identifying problems that can prevent Windows from starting properly. System Configuration Utility enables you to disable common services and startup programs to selectively troubleshoot which items are preventing a normal startup.
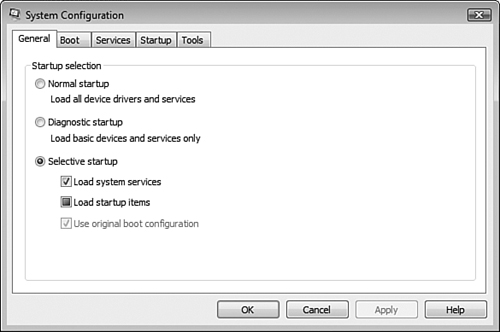
To start the System Configuration Utility, click Start, Run, type msconfig, and press Enter. Then click Continue on the UAC prompt that appears. You receive the dialog box shown in Figure 8.13.
The following sections describe the functions available on each tab.
Similar to the General tab on the Windows XP System Configuration tool, you can choose Normal Startup, which loads all drivers and services configured to start automatically; Diagnostic Startup, which loads basic drivers and services; or Selective Startup, which enables you to select the following options:
Load System Services—. Starts all services that are configured for automatic startup.
Load Startup Items—. Starts applications that have been configured to start at boot or logon time.
Use Original Boot Configuration—. Remains selected unless you modify default settings on the Boot tab.
Shown in Figure 8.14, the Boot tab has been completely modified in Windows Vista. On a multi-boot computer, the display window contains entries for the different operating systems present. To choose which operating system boots by default, select the desired entry and click Set as Default. You have the following boot options available:
Safe Boot—. Provides four options for booting your computer into Safe mode. The Minimal option brings up the Windows GUI with only critical system services loaded and networking disabled. The Alternate Shell option boots to the command prompt and disables both the GUI and networking. The Active Directory repair option boots to the GUI and runs Active Directory as well as critical system services. The Network option boots to the Windows GUI with only critical services loaded and enables networking.
No GUI Boot—. Starts Windows without displaying the Windows splash screen.
Boot Log—. Boots according to the other options selected and logs information from the boot procedure to
%systemroot%Ntbtlog.txt.Base Video—. Uses standard VGA drivers to load the Windows GUI in minimal VGA mode.
OS Boot Information—. Displays driver names as the boot process loads them.
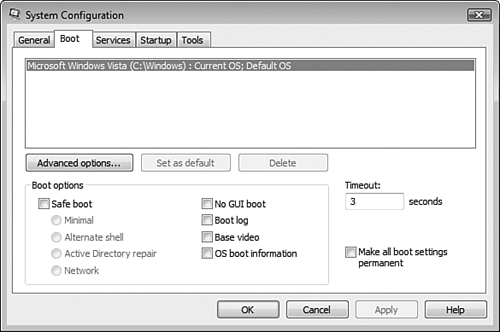
In addition, the Timeout setting determines the number of seconds that the boot menu is displayed on a multi-boot computer, and the Make All Boot Settings Permanent option disables tracking of changes made in the System Configuration Utility. This option disables the ability to roll back changes by selecting the Normal Startup option from the General tab.
The Services tab lists all Windows services available on the computer, including those installed by other applications running on the computer. You can enable or disable individual services at boot time when you think that running services might be causing boot problems. Clear the check box for those services you want to disable for the next boot, or click the Disable All command button to disable all nonessential services.
To show only services installed by non-Microsoft programs, select the Hide All Microsoft Services check box. This enables you to more rapidly locate non-Microsoft services that might be contributing to boot problems.
Caution: Ensure that you do not disable essential services
You might encounter system stability problems or other malfunctions if you disable too many services. Ensure that services you disable are not essential to your computer’s operation. The Disable All option does not disable secure Microsoft services required at boot time.
The Startup tab lists all applications that are configured to start automatically when the computer starts up. Information provided includes the manufacturer name, the path to the file that starts the application, and the Registry key or shortcut that starts the application.
To prevent an application from starting on the next boot, clear its check box. To enable it to start on subsequent boots, select its check box or select the Normal Startup option from the General tab.
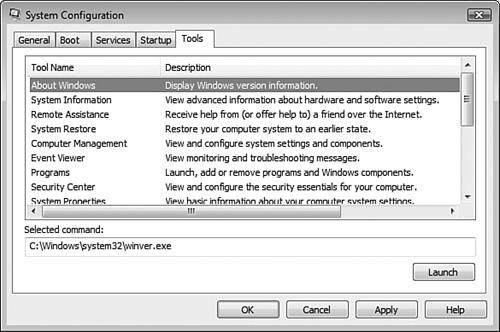
Shown in Figure 8.15, the Tools tab enumerates all diagnostic applications and other available tools. It provides a convenient location from which you can start a program; to do so, select the desired program and click Launch.
Task Manager provides data about currently running processes, including their CPU and memory usage, and enables you to modify their priority or shut down misbehaving applications.
You can use any of the following methods to start Task Manager:
Click Start, type
taskmgrin the Search box, and select Task Manager from the programs list.Press Ctrl+Shift+Esc.
Press Ctrl+Alt+Delete and select Task Manager from the Windows Security dialog box.
Right-click a blank area on the taskbar and then select Task Manager.
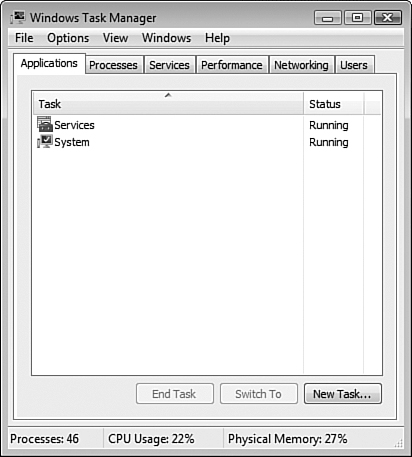
As shown in Figure 8.16, Task Manager has six tabs that perform the following tasks:
Applications—. Displays all applications running on the computer. You can terminate an ill-behaved program by selecting it and clicking End Task.
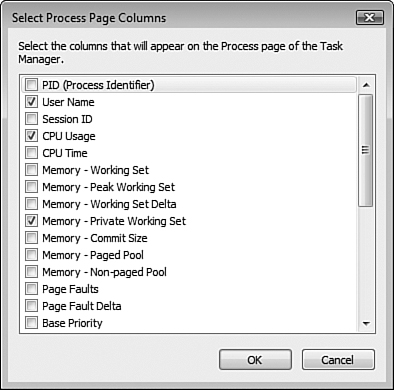
Processes—. Provides information on resources consumed by processes running on the computer. New to Windows Vista is the Description column, which provides a detailed description of each process running on your computer. You can modify the property of a running application or terminate an ill-behaved process or one that is consuming a large amount of processor time. To obtain additional information, select the Select Columns option from the View menu. This displays the Select Process Page Columns dialog box shown in Figure 8.17, from which you can choose to display a large number of variables associated with each process.
Services—. New to Vista, provides information on services installed on the computer. You can view which services are running or stopped, the service group to which they belong, and descriptive information about each service. Click the Services command button and provide UAC credentials to access the Services snap-in, which enables you to configure service startup type and properties. You can also determine whether a service is associated with a particular process by right-clicking the service name and selecting Go To Process. This opens the Processes tab and highlights the appropriate process.
Performance—. Provides a limited performance monitoring function, showing processor and physical memory usage statistics. This tab is ideal for providing a quick snapshot of computer performance. The memory graph now displays actual memory usage instead of the page file usage displayed in Windows XP. If your computer is equipped with dual processors or a dual-core processor, the CPU usage history graph is split to show the activity of both cores or processors. You can also access the Resource Monitor application described earlier in this chapter.
Networking—. Provides information on network utilization across the local area interface.
Users—. Displays the users that have sessions, active or disconnected, running on the local computer.
You can access additional options from the menu bar of Task Manager. In particular, you can start a new process from the File menu. Doing so is equivalent to using the Run dialog box and is useful if the Explorer process has terminated or is misbehaving. The Options menu allows you to keep the Task Manager window always visible on the desktop. The View menu allows you to adjust the refresh rate of the graphs on the Performance and Networking tabs. It also allows you to modify what data is displayed on the Processes, Networking, and Users tabs.
You can modify application behavior by adjusting its priority in Task Manager or by starting the application at a different priority. Windows Vista offers the following application priorities, arranged in decreasing order:
Realtime—. The highest priority level. Use extreme caution when selecting this priority because it can hang the computer.
High—. The highest useful priority level. Devotes a high level of priority to the application without disrupting essential services.
AboveNormal—. Runs the application at a priority slightly higher than default.
Normal—. The default priority. All processes run at this priority unless configured otherwise.
BelowNormal—. Runs the application at a priority slightly lower than default.
Low—. The lowest priority.
You can modify an application’s priority in either of the following ways:
From Task Manager—. From the Processes tab, right-click the required process and choose Set Priority. Then select one of the priorities shown. If you are unsure of the process associated with a given application, right-click the application in the Applications tab and select Go to Process. This switches you to the Processes tab, with the required process selected.
From a command prompt—. Type
Start /option executable_name, whereoptionrefers to one of the priorities shown in the preceding list, and executable_name refers to the program’s name.
Depending on your computer’s usage, you might be able to improve computer performance by changing the relative priority of foreground and background applications. As Step by Step 8.8 describes, you can accomplish this action from the Advanced tab of the Performance Options dialog box.
Windows Vista includes built-in capability for computers with two processors. Under most conditions, dual-processor computers provide enhanced computing power; however, you should be aware of several considerations that exist with regard to dual-processor computers:
Use of Task Manager—. As already mentioned, the Performance tab of Task Manager shows processor usage information for both processors by splitting the graph of CPU Usage History into two portions.
Running 16-bit legacy applications—. Windows Vista uses a special 32-bit application called a Windows NT Virtual DOS Machine (
Ntvdm.exe) to emulate the older 16-bit environment. You can have multiple instances of theNtvdm.exeprocess on a single computer; however, by default Windows Vista runs all 16-bit applications in a single instance ofNtvdm.exe(also called a single memory space). This can cause two problems: First, if one application crashes or becomes unresponsive, all 16-bit applications are halted. Second, on a dual-processor computer, all 16-bit applications run on the same processor, thereby resulting in the possibility of this processor being overloaded while the other processor is underutilized. To run 16-bit applications in separate memory spaces, click Start, Run, and typestart /separateapplication.exe, whereapplication.exeis the name of the 16-bit application.Configuring processor affinity for each application—. This capability enables you to specify on which processor a given process will execute and can be utilized to distribute activity evenly across more than one processor. You can set processor affinity from Task Manager. Simply right-click the process from the Processes tab and choose Set Affinity. Then select the appropriate processor.
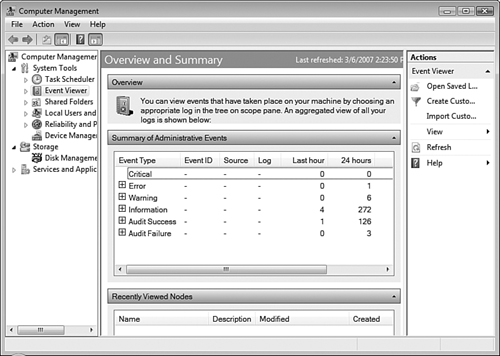
One of Windows Vista’s standard troubleshooting tools is Event Viewer, which is incorporated into the Computer Management console. You can rely on this utility to be able to see errors and system messages. This tool enables you to view events from multiple event logs on the local computer or another computer to which you can connect, save event filters as custom views for future usage, schedule tasks to run in response to events, and create and manage event subscriptions.
You can open Event Viewer by using any of the following methods:
Click Start, right-click Computer, and select Manage.
Click Start, Control Panel, System and Maintenance, View Event Logs.
Click Start and type
event viewerin the Search box. Then select Event Viewer from the Programs list.
In each case, you must click Continue or supply an administrative username and password on the UAC prompt that appears. The Event Viewer snap-in opens and displays a summary of recent administrative events in the details pane, as shown in Figure 8.18.
The following sections provide more detail with regard to several aspects of working with Event Viewer.
To view the actual event logs, expand the Event Viewer node in the console tree and then expand the Windows Logs subnode. Windows Vista records events in the following five types of logs:
Application—. Logs events related to applications running on the computer, including alerts generated by data collector sets.
Security—. Logs events related to security-related actions performed on the computer. To enable security event logging, you must configure auditing of the types of actions to be recorded.
Setup—. Logs events related to setup of applications.
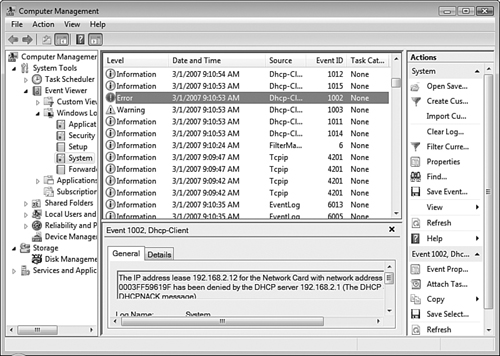
System—. Contains events related to actions taking place on the computer in general, including hardware-related events. See Figure 8.19.
Forwarded events—. Contains events logged from remote computers. To enable this log, you must create an event subscription.
Applications and Services logs—. Contained in its own subnode, these logs store events from single applications or components, as opposed to events with potential systemwide impact. Logs might include categories such as Distributed File Service (DFS) replication, hardware events, Internet Explorer events, Key Management service events, and Media Center events.
Note: Additional event logs
If you are looking at Event Viewer on a server, you might observe additional event logs added by applications such as Active Directory and DNS. Installed applications on servers and even on Windows Vista might add additional event logs to Event Viewer.
Most logs in Event Viewer record the three types of events—errors, warnings, and informational events—as previously shown in Figure 8.19. As you can see, error messages are represented by a red circle with a white exclamation mark in the center. Information messages are represented by a balloon with a blue “I” in the center, and warning messages are represented by a yellow triangle with an exclamation mark in the center. Although not always true, an error is often preceded by one or more warning messages. A series of warning and error messages can describe the exact source of the problem, or at least point you in the right direction. To obtain additional information about an event, select it. The bottom of the central pane displays information related to the selected event. You can also right-click an event and select Event Properties to display information about the event in its own dialog box that can be viewed without scrolling.
If you have selected a large number of auditable events, the Event Viewer logs can rapidly accumulate a large variety of events. Windows Vista provides capabilities for customizing what appears in the Event Viewer window. To customize the information displayed, right-click Event Viewer in the console tree and choose Create Custom View. This displays the Create Custom View dialog box shown in Figure 8.20.

Options available from this dialog box include the following:
Logged—Select the time interval that you want to examine.
Event Level—Choose the type(s) of events you want to view. Select Verbose to view extra details related to the viewed events.
By Log—Select the Windows logs or Applications and Services logs you want to include.
By Source—Select from an extensive range of Windows services, utilities, and components whose logs you want to include.
Task Category—Expand the drop-down list and select the categories you want to view.
Keywords—Select the keywords you want to include in the customized view.
User and Computer(s)—Select the usernames of the accounts to be displayed and the names of the computers to be displayed. Separate the names in each list by commas.
XML tab—Enables you to specify an event filter as an XML query.
When you have made your selections, click OK and type a name for the custom view in the Save Filter to Custom View dialog box that appears. After you have saved the custom view, you can use this view at a future time by right-clicking Event Viewer in the console tree and choosing Import Custom View.
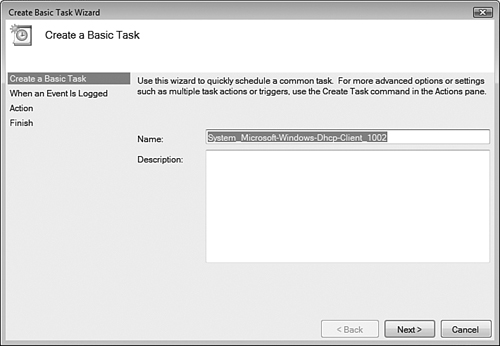
Another new feature in Event Viewer for Windows Vista is the ability to associate tasks with events. Event Viewer integrates with Task Scheduler to make this action possible. To do so, right-click the desired event and choose Attach Task to This Event. Follow the instructions in the Create a Basic Task Wizard that opens, as shown in Figure 8.21. Actions that you can take include starting a specified program, sending an email, and displaying a message.
For more information on Event Viewer, refer to Event Viewer Overview and links contained therein in the “Suggested Readings and Resources” section.
Configuring Windows Update
Objective: Configure Windows Update.
Chapter 3, “Upgrading to Windows Vista,” introduced the concept of automatically receiving updates from the Windows Update website. This section takes a closer look at the options available in Windows Update and using a server running Windows Server Update Services (WSUS) to receive and distribute updates to Windows Vista computers on a network.
Windows Update enables you to maintain your computer in an up-to-date condition by automatically downloading and installing critical updates as Microsoft publishes them. By default, your computer automatically checks for updates at the Windows Update website. Critical updates are automatically installed on a daily basis, and you are informed about optional updates that might be available. The following are several key features of Windows Update:
Windows Update scans your computer and determines which updates are applicable to your computer. These updates include the latest security patches and usability enhancements that ensure your computer is kept as secure and functional as possible.
Updates classified by Microsoft as High Priority and Recommended can be downloaded and installed automatically in the background without interfering with your work. At the same time, Windows Update can inform you about optional updates and Windows Ultimate Extras.
Windows Update informs you if a restart is required to apply an update. You can postpone the restart so that it does not interfere with activities in progress. Should an update apply to a software program with files in use, Vista can save the files and close and restart the program.
For additional information about Windows Update, refer to Windows Update and Resulting Internet Communication in Windows Vista in the “Suggested Readings and Resources” section.
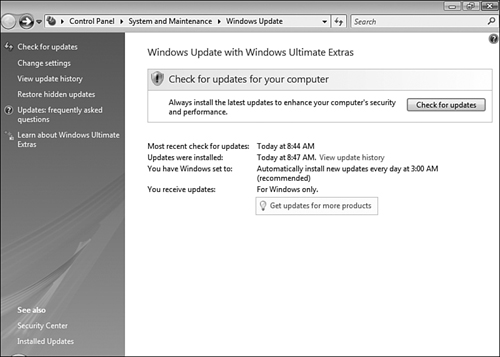
The System and Maintenance category in Control Panel includes the Windows Update applet, which enables you to configure and work with the various options that are offered. Follow Step by Step 8.9 to work with Windows Update.
Using Windows Update
Click Start, Control Panel, System and Maintenance, Windows Update. You can also click Start and type
updatein the Search box and then click Windows Update in the Programs list. Either method opens the applet shown in Figure 8.22.To perform a manual check for updates, click Check for Updates. Windows Update checks on the Microsoft website. After a minute or two, it informs you of any available updates and offers to install them.
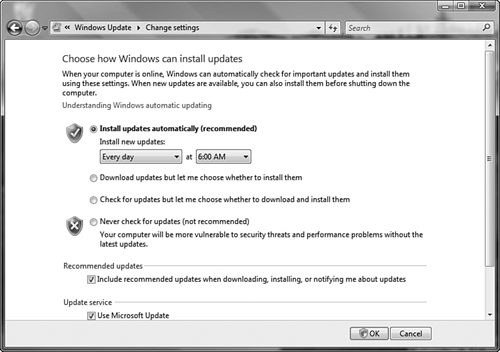
To modify the way Windows Update performs automatic checking and installation of updates, click Change Settings. From the Choose How Windows Can Install Updates page shown in Figure 8.23, select one of the following options:
Install Updates Automatically (Recommended)—. Automatically downloads and installs updates at the day and time specified in the drop-down list boxes provided. You should ensure that your computer is on and connected to the Internet at the time you specify. This is the default setting.
Download Updates but Let Me Choose Whether to Install Them—. Downloads updates when they are available and informs you by means of an icon in the notification area. You can select which updates should be installed by clicking this icon and choosing Install.
Check for Updates but Let Me Choose Whether to Download and Install Them—. Provides an icon in the notification area to inform you that updates are available from the Windows Update website. You can download these updates by clicking this icon and choosing Start Download. After the updates are installed, you can select Install to install them.
Never Check for Updates (Not Recommended)—. You are not informed of any available updates and need to access the Windows Update website regularly to check for updates. You can do this by means of the link provided.
By default, Windows Update checks for both critical and recommended updates including updated definition files for Windows Defender. To limit the check to critical updates only, clear the check box labeled Include Recommended Updates When Downloading, Installing, or Notifying Me About Updates.
To review the history of updates installed on your computer, return to the main Windows Update applet and select View Update History. You receive a list of the updates installed on your computer including definition updates for Windows Defender.
If an update is causing problems and you want to remove it, click the Installed Updates link. On the Uninstall an Update page that appears, select the update you want to uninstall and then click Uninstall. Follow the instructions provided to complete this task.
Updates might become hidden if you have asked Windows not to notify you or install updates automatically. To view and restore any hidden updates that might be available, select Restore Hidden Updates. On the page that appears, select the updates to be installed and then click Restore.
If you are running Windows Vista Ultimate, click Learn about Windows Ultimate Extras to view information about additional programs, services, and premium content available to users of this edition of Vista.
WSUS is a server-based component that enables you to provide update services to computers on a corporate network without the need for individual computers to go online to the Microsoft Windows Update website to check for updates. It saves valuable bandwidth because only the WSUS server actually connects to the Windows Update website to receive updates, while all other computers on the network receive their updates from the WSUS server. Furthermore, WSUS provides network administrators with the ability to test updates for compatibility before enabling computers on the network to receive the updates, thereby reducing the chance of an update disrupting computer or application functionality across the network.
You can download version 3.0 of WSUS from Microsoft and install it on a computer running Windows Server 2003 or Windows Server 2008. Configuration of the WSUS server is beyond the scope of the Windows Vista exams and is not discussed here.
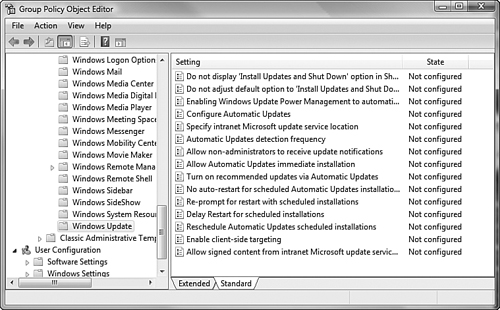
Group Policy in Windows Vista provides a series of policies that govern the actions performed by Windows Update. To view and configure these policies, open the Group Policy Object Editor by typing gpedit.msc in the Run dialog box and accepting the UAC prompt that appears. Navigate to the Computer ConfigurationAdministrative TemplatesWindows ComponentsWindows Update node to obtain the policy settings shown in Figure 8.24.
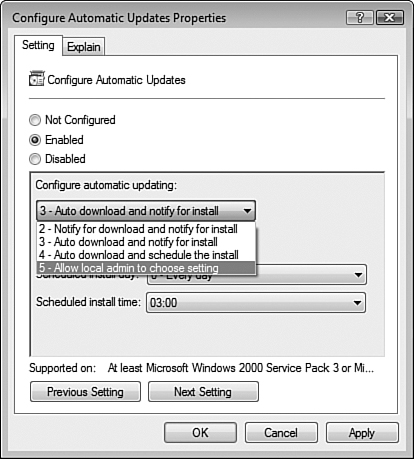
To use Group Policy to specify the behavior of automatic updates, double-click the Configure Automatic Updates policy setting to receive the Properties dialog box shown in Figure 8.25. Select Enabled and then choose one of the following settings from the Configure Automatic Updating drop-down list:
2 - Notify for Download and Notify for Install—. Windows Update notifies you when updates are available by displaying an icon in the notification area and a message stating that updates are available for download. The user can download the updates by clicking either the icon or the message. When the download is complete, the user is informed again with another icon and message; clicking one of them starts the installation.
3 - Auto Download and Notify for Install—. Windows Update downloads updates in the background without informing the user. After the updates have been downloaded, the user is informed with an icon in the notification area, and a message stating that the updates are ready for installation. Clicking one of them starts the installation. This is the default option.
4 - Auto Download and Schedule the Install—. Windows Update downloads updates automatically when the scheduled install day and time arrive. You can use the drop-down lists in the Configure Automatic Updates Properties dialog box to specify the desired days and times, which, by default, are daily at 3:00 a.m.
5 - Allow Local Admin to Choose Setting—. Enables local administrators to select a configuration option of their choice from the Automatic Updates control panel, such as their own scheduled time for installations.
The following describes several of the other more important available policy settings shown in Figure 8.24:
Enabling Windows Update Power Management to automatically wake up the system to install scheduled updates—. Uses features of Windows Power Management to wake computers up from hibernation to install available updates.
Specify intranet Microsoft update service location—. Enables you to specify a WSUS server for hosting updates from the Microsoft Windows Update site, as described in the previous section.
Automatic Updates detection frequency—. Specifies the length of time in hours used to determine the waiting interval before checking for updates at an intranet update server. You need to enable the Specify Intranet Microsoft Update Service Location policy to have this policy work.
Allow non-administrators to receive update notifications—. Enables users who are not administrators to receive update notifications according to other Automatic Updates configuration settings.
Allow Automatic Updates immediate installation—. Enables Automatic Updates to immediately install updates that neither interrupt Windows services nor restart Windows.
Turn on recommended updates via Automatic Updates—. Enables Automatic Updates to include both important and recommended updates.
No auto-restart for scheduled Automatic Updates installations—. Prevents Automatic Updates from restarting a client computer after updates have been installed. Otherwise, Automatic Updates notifies the logged-on user that the computer will automatically restart in five minutes to complete the installation.
Reprompt for restart with scheduled installations—. Specifies the number of minutes from the previous prompt to wait before displaying a second prompt for restarting the computer.
Delay Restart for scheduled installations—. Specifies the number of minutes to wait before a scheduled restart takes place.
Reschedule Automatic Updates scheduled installations—. Specifies the length of time in minutes that Automatic Updates waits after system startup before proceeding with a scheduled installation that was missed because a client computer was not turned on and connected to the network at the time of a scheduled installation, as previously specified by option 4 of the Configure Automatic Updates policy (Auto download and schedule the install).
Enable client-side targeting—. Enables you to specify a target group name to be used for receiving updates from an intranet server such as a WSUS server. The group name you specify is used by the server to determine which updates are to be deployed.
Do not display “Install Updates and Shut Down” option in Shut Down Windows dialog box—. Prevents the appearance of this option in the Shut Down Windows dialog box, even if updates are available when the user shuts down his computer.
Do not adjust default options to “Install Updates and Shut Down” option in Shut Down Windows dialog box—. When enabled, changes the default shut down option from Install Updates and Shut Down to the last shut down option selected by the user.
For more information on these policies, consult the Explain tab of each policy’s Properties dialog box.
Objective: Configure Data Protection.
Windows Vista provides enhanced backup tools that are designed to help protect data from accidental loss due to hardware failure or other disaster. In addition, Vista includes encryption tools that protect data on computers against unauthorized access. This is especially important for portable computers that could be lost or stolen, resulting in data falling into the wrong hands. In this section, you first look at backup and restore solutions and then at data encryption.
Microsoft has rewritten the backup program completely in Windows Vista, introducing the Backup and Restore Center and the Backup Status and Configuration utility to facilitate backup and restoration of data. You can back up all data on a disk or a portion thereof to a variety of media, including tapes, shared network drives, CD-ROM drives, and so on.
First introduced with Windows XP Professional and continued in Windows Vista is the concept of volume shadow copies, which create a shadow copy of the original volume at the instant the backup starts. This enables you to back up all files, including those an application might have open currently. Previous versions of Windows skipped any open files, thereby risking incomplete backups.
Follow Step by Step 8.10 to perform a backup of selected files.
Backing Up Selected Files in Windows Vista
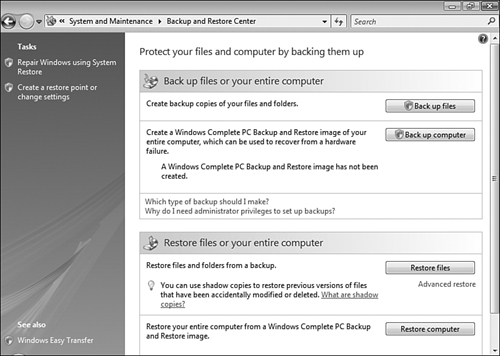
Click Start, Control Panel, Back Up Your Computer. As shown in Figure 8.26, the Backup and Restore Center opens and offers you options to back up files or create a Windows Complete PC Backup and Restore image.
Click Back Up Files, and then click Continue in the UAC prompt that appears.
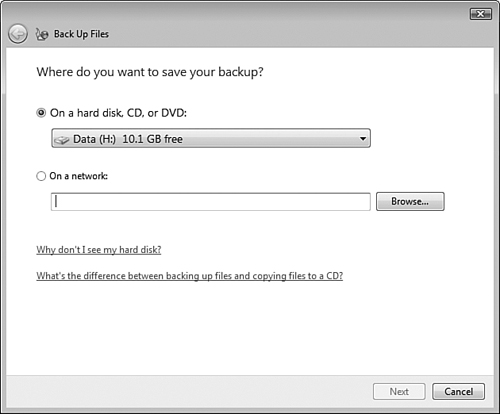
On the Back Up Files screen shown in Figure 8.27, select a location to save your backup and then click Next. If you choose a network location, you will need to provide the appropriate administrative credentials valid on the computer selected.
If your computer contains more than one partition, you receive the Which Disks Do You Want to Include in the Backup screen. Select the disks that you want to back up, and then click Next.
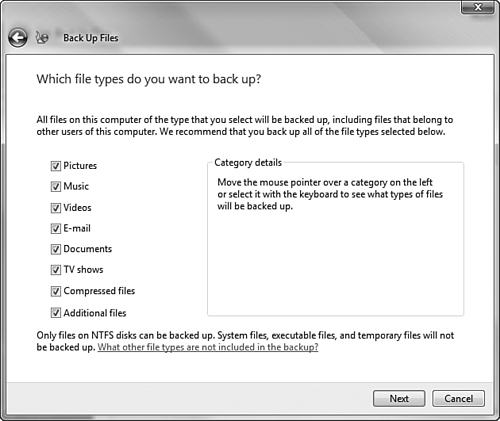
The Which File Types Do You Want to Back Up screen shown in Figure 8.28 enables you to select the types of files to be backed up. Clear the check boxes next to any file types you do not want to back up, and then click Next.
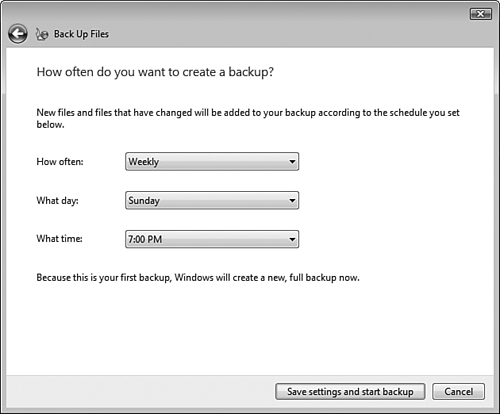
The How Often Do You Want to Create a Backup screen shown in Figure 8.29 enables you to specify how frequently files will be backed up. You can choose daily, weekly, or monthly and specify the day and time the backup should run. Make a selection and then click Save Settings and Start Backup to perform the first backup.
Backup displays a message box containing a progress chart as files are backed up to the location you selected. If you choose to save the backup to a CD or DVD, you are prompted for additional discs as required.
You are informed when the backup is completed. Click Finish to return to the Backup and Restore Center, which now displays details of the completed backup.
Performing a Windows Complete PC Backup and Restore image enables you to fully restore your computer in the event of a hardware failure. This procedure replaces the System State backup used in Windows 2000/XP and backs up your data at the same time. The procedure to do this is similar to that of backing up selected files, as Step by Step 8.11 shows.
The following sections discuss the use of the Backup and Restore Center to restore files and folders or your entire computer, as well as the use of the Backup Status and Configuration Utility for configuring and performing backups.
After you have performed a backup, the Backup and Restore Center makes it simple to restore data in the event of a hardware or software failure of some kind. Follow Step by Step 8.12 to restore data.
Restoring Files and Folders
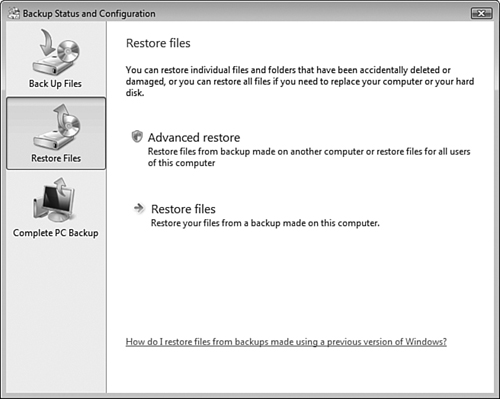
In the Backup and Restore Center previously shown in Figure 8.26, click Restore Files.
On the Restore Files screen, select the option to restore from the latest backup or an older backup as required and then click Next.
If you select the option to restore from an older backup, the Select the Data to Restore From screen appears. Select a date and time, and then click Next.
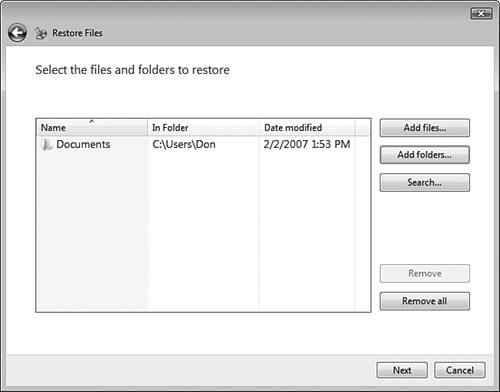
From the Select the Files and Folders to Restore screen shown in Figure 8.30, select the appropriate command button to locate the files or folders to be restored. The selected folders are added to the list. When finished, click Next.
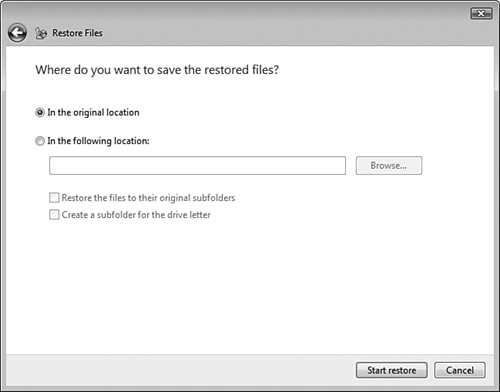
The Where Do You Want to Save the Restored Files screen shown in Figure 8.31 enables you to select a location to save the restored files. Make an appropriate selection and then click Start Restore to restore the files.
Windows displays a message box that charts the progress of file restoration. When completed, it informs you. Click Finish.
The Backup and Restore Center also enables you to restore all files and settings on your computer from a Windows Complete PC Backup and Restore image. This procedure replaces the System State restore used with Windows 2000/XP and also restores data files. Follow Step by Step 8.13 to do so.
Restoring Your Entire Computer
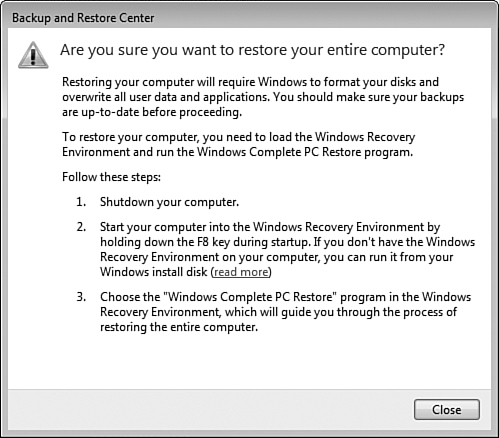
In the Backup and Restore Center, select Restore Computer from the options previously shown in Figure 8.26.
You receive the message box shown in Figure 8.32, outlining the steps to be performed. Follow these steps to load the Windows Recovery Environment.
The Backup and Restore Center also enables you to perform the following restoration tasks. You will need to supply UAC credentials to perform any of these operations:
Perform an advanced restore—Click Advanced Restore to restore files from a backup performed on a different computer or to restore files for all users of this computer.
Use System Restore to fix problems and undo changes to Windows—Click the link provided in the Tasks menu or at the bottom of the Backup and Restore Center to restore system files and settings to an earlier point in time. Follow the instructions provided to perform this restore.
Create a restore point or change settings—Create a restore point that System Restore can use. Select this option from the Tasks menu to open the System Properties dialog box to the System Protection tab. Click Create, type a descriptive name to identify the restore point, and then click Create again.
Note: Vista and the Ntbackup utility
The restore tool in Vista’s Backup and Restore Center is not compatible with the .bkf files created using Windows NT/2000/XP/Server 2003 Ntbackup program. However, Microsoft makes a version of this utility available for download, should you need to restore backups created on an older Windows computer. You can download this utility from http://www.microsoft.com/downloads/details.aspx?FamilyID=7da725e2-8b69-4c65-afa3-2a53107d54a7&DisplayLang=en. You can navigate to this page by searching for “Windows NT Backup—Restore Utility” at Microsoft.com.
You can also configure and perform backups from the Backup Status and Configuration Utility. From the Backup and Restore Center, click Change Settings in the Back Up Files or Your Entire Computer section to reveal the dialog box shown in Figure 8.33. You can also access this tool by clicking Start, All Programs, Accessories, System Tools, Backup Status and Configuration.
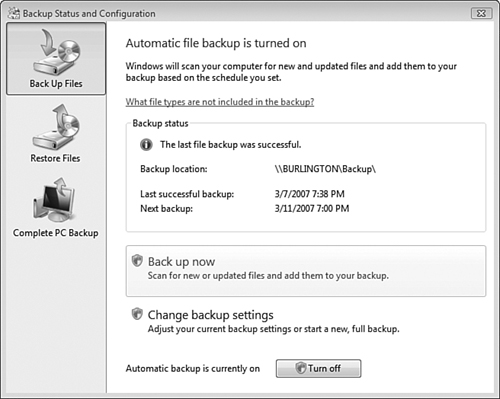
You can perform the following actions from the Backup Status and Configuration dialog box:
Back Up Now—Performs an incremental backup of files and folders according to settings you have configured in the Back Up Files and Folders section of the Backup and Restore Center. An incremental backup procedure backs up only those files and folders that have changed since the previous backup. This procedure also marks these files as having been backed up.
Change Backup Settings—Starts the wizard previously described in Step by Step 8.10, enabling you to modify the settings for backing up files and folders.
Restore Files—Click the link on the left side of the dialog box to reveal the options shown in Figure 8.34, which enable you to perform the same restore procedure previously described in Step by Step 8.12 or perform an advanced restore of backup files from another computer or files for all users of the local computer.
Complete PC Backup—Creates a Windows Complete PC Backup and Restore image according to the procedure previously described in Step by Step 8.11.
Caution: Make a habit of testing your backups and restores
You should ensure that you are creating valid backups by performing test restores on a regular basis. Use the In the Following Location option referred to in Step by Step 8.12 and shown in Figure 8.31 to restore data to a different folder and verify that the restored data is present. Otherwise you might not realize something is wrong with your backups until it is too late.
You often hear news reports that mention thefts of laptop computers containing valuable data. In one such case, a computer stolen from a doctor’s car in Toronto contained the records of thousands of patients, exposing them to misuse and potential identity theft. The computer was protected with a password, but the data was not encrypted. Besides the Encrypting File System (EFS) introduced with Windows 2000 and continued with Windows XP, Windows Vista includes a new technology called BitLocker Drive Encryption, which encrypts a computer’s entire system partition. This section takes a look at these technologies.
For further information on both of these technologies, consult Microsoft Windows Vista Security Enhancements in the “Suggested Reading and Resources” section.
EFS enables users to encrypt files and folders on any partition that is formatted with the NTFS file system. The encryption attribute on a file or folder can be toggled the same as any other file attribute. When you set the encryption attribute on a folder, all its contents, whether subfolders or files, are also encrypted.
The encryption attribute, when assigned to a folder, affects files the same way that the compression attribute does when a file is moved or copied. Files that are copied into the encrypted folder become encrypted. Files that are moved into the encrypted folder retain their former encryption attribute, whether or not they were encrypted. When you move or copy a file to a file system that does not support EFS, such as FAT16 or FAT32, the file is automatically decrypted.
Exam Alert: EFS requirements
The file system must be set to NTFS if you want to use EFS, and no file can be both encrypted and compressed at the same time. You might be presented with a scenario where a user is unable to use EFS or file compression on a FAT32 volume; the correct answer to such a problem is to convert the file system to NTFS, as described in the section “Preparing a Disk for EFS.”
Windows Vista has the capability to encrypt files directly on any NTFS volume. This ensures that no other user can use the encrypted data. Encryption and decryption of a file or folder is performed in the object’s Properties dialog box. Administrators should be aware of the rules to put into practice to manage EFS on a network:
Only use NTFS as the file system for all workstation and server volumes.
Keep a copy of each user’s certificate and private key on a floppy disk or other removable media.
Remove the user’s private key from the computer except when the user is actually using it.
When users routinely save documents only to their Documents folder, make certain their documents are encrypted by having each user encrypt his or her own Documents folder.
Use two recovery agent user accounts that are reserved solely for that purpose for each Active Directory organizational unit (OU) if computers participate in a domain. Assign the recovery agent certificates to these accounts.
Archive all recovery agent user account information, recovery certificates, and private keys, even if obsolete.
When planning a network installation, keep in mind that EFS does take up additional processing overhead and plan to incorporate additional CPU processing power in your plans.
EFS uses certificates to manage the encryption. When a file is encrypted, the user’s encryption certificate is assigned to the file. When the user opens the file, the encryption certificate is checked, and the user is allowed to open and work with the file. When another user attempts to open the file, the user is unable to do so. Therefore, EFS is suitable for data that a user wants to keep private but not for files that are shared.
A unique encryption key is assigned to each encrypted file. You can share an encrypted file with other users in Windows Vista, but you are restricted from sharing an entire encrypted folder with multiple users or sharing a single file with a security group. This is related to the way that EFS uses certificates, which are applicable individually to users, and how EFS uses encryption keys, which are applicable individually to files. New to Windows Vista is the ability to store keys on smart cards. If you are using smart cards for user logon, EFS automatically locates the encryption key without issuing further prompts. EFS also provides wizards that assist users in creating and selecting smart card keys.
You can use different types of certificates with EFS: third party–issued certificates, certificates issued by certification authorities (CAs) including those on your own network, and self-signed certificates. If you have developed a security system on your network that utilizes mutual authentication based on certificates issued by your own CA, you can extend the system to EFS to further secure encrypted files. For more information on using certificates with EFS, refer to the Windows Vista Help and Support Center.
Unlike previous versions of Windows, the system and boot partition in Windows Vista must be formatted with NTFS before you can install Vista, as you learned in Chapter 2, “Installing Windows Vista.” However, a data partition can be formatted with the FAT or FAT32 file systems. But you must ensure that such a partition is formatted with NTFS before you can encrypt data using EFS. If it is not, you can convert the hard disk format from FAT to NTFS or format the partition as NTFS. There are two ways to go about this:
Use the command-line
Convert.exeutility to change an existing FAT16 or FAT32 partition that contains data to NTFS without losing the data.Use the graphical Disk Management utility to format a new partition, or an empty FAT partition, to NTFS. If the volume contains data, you will lose it. (You can also use the command-line
Format.exeutility to format a partition as NTFS.)
The Convert.exe utility is simple to use and typically problem-free, although you should make certain to back up the data on the partition before you convert it as a precaution. Follow Step by Step 8.14 to use this utility.
You can use either the cipher command line utility or the advanced attributes of the file or folder to encrypt a file. To use the cipher utility for encrypting a file named Myfile.txt located in the C:MYDIR folder, the full command to use is
cipher /e /s:c:mydirmyfile.txt
To change the Advanced encryption attribute of a file, open Computer and navigate to the file. Right-click the file and select Properties. On the General tab, click the Advanced button in the Attributes section. The Advanced Attributes dialog box opens, as shown in Figure 8.35.
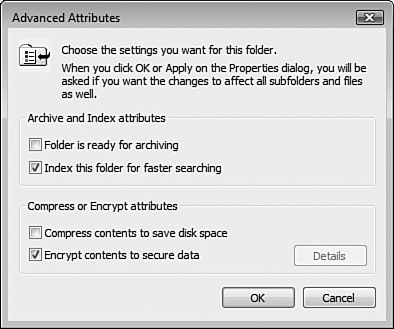
Check the box next to Encrypt Contents to Secure Data and click OK. Then click OK again to close the file’s Properties sheet. You are given a warning dialog that lets you choose between encrypting just the file that you had selected or both the file and its parent folder. Select one of the options and click OK.
Note: Mutually exclusive advanced attributes
In the Advanced Attributes dialog box, if you select the Compress Contents to Save Disk Space check box, the check mark disappears from the Encrypt Contents to Secure Data check box. These two attributes are mutually exclusive—you can select only one.
After a file has been encrypted, you can view its encryption attribute details by again right-clicking the file, selecting Properties, and clicking the Advanced button on the General tab. In the Advanced Attributes dialog box, click the Details button. The User Access To dialog box opens, as shown in Figure 8.36.
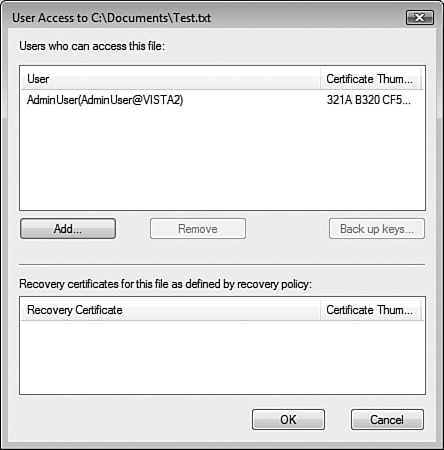
You can see who is able to open the encrypted file, and you can add other user accounts to share the encrypted file and view the designated data recovery agent, if any. Click the Add button to share the encrypted file. A dialog box listing all the EFS-capable certificates for users opens. If a user has never been issued a certificate, the user’s account does not appear in this dialog box.
After a file is encrypted, an unauthorized user attempting to open the file is given an error message that says the user does not have access privileges. If an unauthorized user tries to move or copy an encrypted file, the user receives an Access is denied error message.
The process of decryption is the opposite of encryption. You can either use the cipher command or change the Advanced attribute for encryption on the file.
To use the cipher command to decrypt the file, click Start, Run, type cmd in the Open text box, and press Enter. At the command prompt, type cipher /d /s:c:myfoldermyfile.txt and press Enter. The file will be decrypted.
To use the Advanced Attributes method, open Computer and navigate to the file. Right-click the file and select Properties. On the General tab, click the Advanced button. In the ensuing Advanced Attributes dialog box, clear the Encrypt the Contents to Secure Data check box. Click OK and then click OK again.
If you are not the person who originally encrypted the file, or if you are not the designated recovery agent, then you will receive an error for applying attributes that says the access is denied.
Windows Vista introduces a hardware-enabled data encryption feature named BitLocker that serves to protect data on a computer that is exposed to unauthorized access. Available on the Enterprise and Ultimate editions of Vista, BitLocker encrypts the entire Windows volume, thereby preventing unauthorized users from circumventing file and system permissions in Windows or attempting to access information on the protected partition from another computer or operating system. BitLocker even protects the data should an unauthorized user physically remove the hard drive from the computer and use other means to attempt access to the data.
BitLocker utilizes the Trusted Platform Module (TPM) version 1.2 to provide secure protection of encryption keys and checking of key components when Windows is booting. You can store keys and password on a USB flash drive that the user must insert to boot the computer. You can also employ an option that requires the user to supply a PIN code, thereby requiring multifactor authentication before the data becomes available for use. If an unauthorized individual has tampered with or modified system files or data in any way, the computer will not boot up.
Note: Trusted Platform Modules
At the time of writing, very few computers on the market are equipped with a TPM. While most computer manufacturers can include a TPM in new computers, you cannot retrofit existing computers with TPMs. For this reason, this section emphasizes the procedure for employing BitLocker on computers that are not equipped with TPMs.
You can store encryption keys and restoration password on a USB flash drive or a separate file for additional data security and recovery capability. Should a user need to recover data using BitLocker’s recovery mode, she merely needs to enter a recovery password to access data and the Windows operating system.
To use BitLocker your computer must have at least two partitions: a system partition or volume of at least 1.5GB size and a boot (Windows) partition or volume. The BitLocker procedure will encrypt the Windows partition.
You can use a computer that does not have a TPM module if you have a USB flash drive to store the encryption keys and password. Step by Step 8.15 outlines the procedure for setting up a new computer for BitLocker and installing Vista on this computer.
Caution: Do not use a computer containing important data
If your computer contains any data you want to retain, back this data up before performing Step by Step 8.15. Note that if your computer already has two valid partitions as described in this section, you do not have to perform Step by Step 8.15.
Tip: BitLocker Drive Preparation Tool
Microsoft makes available the BitLocker Drive Preparation Tool, which can be downloaded from the Windows Update website as an available extra. At this location, select BitLocker and EFS Enhancements and then click Install. This tool repartitions your Windows partition to add the required 1.5GB system partition. For more information, refer to Description of the BitLocker Drive Preparation Tool in the “Suggested Readings and Resources” section.
Because most computers that are currently available on the market or already in users’ hands do not contain a TPM module, this section covers the procedure for enabling BitLocker on such a computer. Step by Step 8.16 outlines the procedure for doing so.
Enabling BitLocker on a Computer Without a TPM
Click Start, Run, type
gpedit.msc, and then press Enter.Click Continue on the UAC prompt that appears.
In the Group Policy Object Editor, navigate to Computer ConfigurationAdministrative TemplatesWindows ComponentsBitLocker Drive Encryption.
Double-click Control Panel Setup: Enable Advanced Startup Options, enable this policy, select the Allow BitLocker Without a Compatible TPM option, and then click OK.
Close the Group Policy Object Editor.
Click Start, Run, type
Gpupdate /force, and then press Enter. This forces Group Policy to apply immediately.Click Start, Control Panel, Security, BitLocker Drive Encryption, and then click Continue on the UAC prompt that appears.
On the BitLocker Drive Encryption applet shown in Figure 8.37, click Turn On BitLocker. You receive the Set BitLocker Startup Preferences dialog box shown in Figure 8.38.
Ensure that your USB flash drive is inserted, and then select Require Startup USB Key at Every Startup.
You receive the Save the Recovery Password dialog box, which provides the three options shown in Figure 8.39 for saving your recovery password. Use one or more of these options to save the recovery password. If you print it, ensure that you save the printed document in a secure location. If you save it to a USB flash drive, you will see the dialog box shown in Figure 8.40. Click Save.
You receive the Encrypt the Volume dialog box shown in Figure 8.41. Ensure that the check box labeled Run BitLocker System Check is selected and then click Continue to proceed.
You will need to restart your computer to proceed. Click Restart Now.
On restarting your computer, you will receive a message to remove the USB flash drive storage media. Remove the USB drive and allow Vista to boot.
Encryption takes place, and Vista displays an icon in the notification area. You can track the progress of encryption by hovering your mouse pointer over this icon. This icon disappears when encryption is complete.

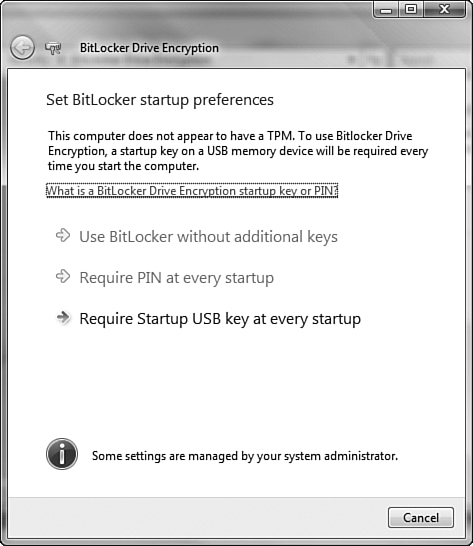
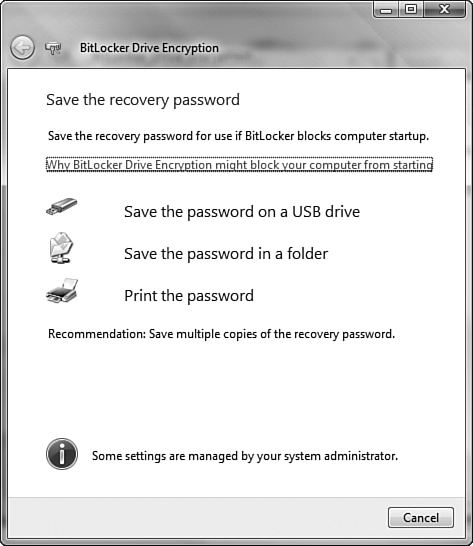
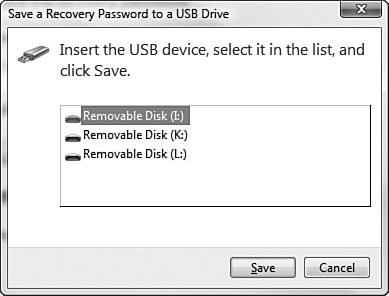
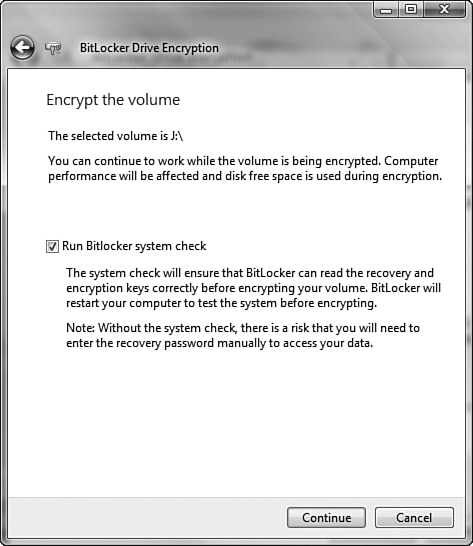
After you have completed this procedure, you must have the USB drive to start your computer. Alternately, you can use the recovery mode and type the recovery password that was automatically created while enabling BitLocker. BitLocker provides the BitLocker Drive Encryption Recovery Console to enable you to insert the USB drive that contains the recovery password or press Enter, type the recovery password, and press Enter again.
Caution: Ensure that you do not lose the recovery password
If you lose the recovery password, your Windows installation and all data stored on its partition will be permanently lost. You will need to repartition your hard drive and reinstall Windows. Consequently, you should create at least two copies of the password as described in Step by Step 8.16 and store these in a secure location. Do not leave the USB flash drive in your laptop bag; attach it to your key chain or store it elsewhere on your person.
Should you need to turn BitLocker off for any reason, the BitLocker Drive Encryption applet in Control Panel enables you to do so. This procedure decrypts your volume and discards all encryption keys. To do so, access the BitLocker Drive Encryption applet (you will need to accept a UAC prompt) and select Turn Off BitLocker. On the BitLocker Drive Encryption dialog box, select Disable BitLocker Drive Encryption or Decrypt the Volume as required. This action begins immediately without further prompts. You will be able to monitor the decryption action from an icon in the notification area.
In this chapter, you learned about performance monitoring and optimization, using the built-in diagnostic tools to troubleshoot reliability problems, configuring Windows Update, backup and restore, and file encryption.
Windows Vista provides the Reliability and Performance Monitor console for monitoring, optimizing, and troubleshooting desktop performance. You can use Performance Monitor to monitor counters related to performance objects associated with different hardware and software components of the system. Reliability Monitor provides a trend analysis of events that can potentially destabilize your computer. You can create data collector sets to log performance counters over a period of time for a permanent record of computer performance.
Vista provides three new technologies that enhance system performance. Windows SuperFetch optimizes memory performance based on trends of most-used programs and data. Windows ReadyBoost enables you to use a USB flash drive or memory card as an additional source of memory. Windows ReadyDrive enables mobile computers equipped with a hybrid hard drive to improve their performance and battery life.
Vista provides several tools for troubleshooting reliability issues. System Configuration Utility enables you to start your computer with a reduced set of services and startup programs to troubleshoot problematic startups. You can use Task Manager to provide a quick view of computer performance. Task Manager enables you to shut down misbehaving applications and processes and start applications at different priority levels. Event Viewer logs errors, warning, and informational events that take place on the computer. You can also schedule actions to take place should a given event be logged.
Windows Update enables you to keep your computer up-to-date with security patches, Windows Defender definition updates, and other enhancements available from the Microsoft Windows Update website. On a network you can configure a WSUS server to download updates and make them available to network computers and configure policies that govern the behavior of computers obtaining updates.
Vista provides enhanced backup and restore tools in the Backup and Restore Center that help to prevent data loss resulting from hardware failure and other disasters. You can back up selected files and folders or your entire computer and schedule backups to take place at preconfigured intervals.
Vista provides two solutions for protecting data against unauthorized access by means of encryption. EFS encrypts files and folders on any NTFS volume of your computer, and BitLocker encrypts the entire system volume.
Compatibility mode
Backing up and restoring crucial data is one of the most important responsibilities for anyone using modern computers. Windows Vista’s backup tools simplify the task of backing up files, folders, or the entire computer to hard disks, CD-ROMs, DVD-ROMs, and network locations.
Windows Vista provides the Documents folder as a default location used by many applications to store data. In this exercise you back up this folder to a network location and then delete its contents. You need two computers running Windows Vista for this exercise. Estimated Time: 15 minutes.
|
B and D. To have the computer generate an alert when a certain condition occurs (for example, when the Processor\%Processor time counter exceeds 85%), you need to create a manually configured data collector set and access the Performance Counter Alert option. Doing so enables alerts to be recorded in the Application log, which you can view from Event Viewer. You can watch the counter values in real time from System Monitor, but this application does not generate an alert, so answer A is incorrect. Reliability Monitor displays a computer reliability graph but does not generate any alerts, so answer C is incorrect. You need to look in the Application log and not the System log to find alerts, so answer E is incorrect. You cannot configure the Alerter service to display alerts to your desktop, so answer F is incorrect. For more information, see the section, “Data Collector Sets.” | |
C. Ryan should add more RAM. A value of MemoryPages/sec that is consistently greater than 20 indicates a shortage of RAM and a potential bottleneck. LogicalDisk\% Disk Time and PhysicalDisk\% Disk time report the percentage of time that the disk was busy servicing disk requests; in this situation, the high amount of paging results in a busy disk. When PhysicalDisk\% Disk time is above 50%, it is sometimes necessary to upgrade to a faster hard disk; however, if memory counters are also high, you should add RAM first to improve computer performance. Therefore answers A and B are incorrect. Paging activity and disk requests might cause an increase in the Processor\% Processor time; however, the value of 71 for this counter is within acceptable limits. Therefore answers D and E are incorrect. For more information, see the section, “Optimizing and Troubleshooting Memory Performance.” | |
B. Kristin can use Windows ReadyBoost to improve the performance of her computer. ReadyBoost enables her to use a USB flash drive or memory card with at least 256MB free space as an additional memory source that responds much faster than the paging file on her hard disk. Windows SuperFetch optimizes memory performance based on recent data and program usage. It works automatically and does not use a USB flash drive, so answer A is incorrect. Windows ReadyDrive enables mobile computers equipped with a hybrid hard drive to achieve enhanced performance. It also does not use a USB flash drive, so answer C is incorrect. Because Kristin can use her USB flash drive with Windows ReadyBoost, she does not need to add RAM, so answer D is incorrect. For more information, see the section, “Windows ReadyBoost.” | |
D. Brent should access the General tab of the System Configuration utility, select the Selective Startup option, and clear the Load Startup Items check box. Doing so prevents all applications configured to load at startup from running. He can then check the performance of the computer at startup, after which he can selectively start programs from the Startup tab. The Advanced Options dialog box accessed from the Boot tab does not contain options for starting programs automatically, so answer A is incorrect. The Diagnostic Startup option loads basic devices and services only but does not modify application startup, so answer B is incorrect. Clearing the Load System Services check box prevents nonessential services from starting but does not prevent programs from starting automatically, so answer C is incorrect. For more information, see the section, “System Configuration Utility.” | |
A. Debbie can resolve this problem by configuring the simulation program to run at a lower priority (either Low or BelowNormal). Doing so causes more computer resources to be allocated to other engineering applications, thereby improving their performance while still allowing the simulation program to run. Configuring the simulation program to run at a higher priority would take resources away from the other programs, so answer B is incorrect. Configuring all other programs to run at High priority might help to solve the problem but requires more effort than changing the priority of a single program, so answer C is incorrect. Configuring programs for RealTime priority can cause the computer to become unstable, so answer D is incorrect. For more information, see the section, “Configuring Application Priority.” | |
D. Connie should access the Windows Update applet in Control Panel. She should click Restore Hidden Updates, select the update, and then click Restore. Updates might become hidden if she has asked Windows not to notify her or install updates automatically. Selecting the check box labeled Include Recommended Updates When Downloading, Installing, or Notifying Me About Updates enables her to include updated definition files for Windows Defender in the updates downloaded from the Microsoft Windows Update website. This option (which is selected by default) does not enable her to restore a hidden update, so answer A is incorrect. Connie should not select the Install Updates Automatically (Recommended) option because she wants to retain the option to let her choose whether to download and install future updates, so answer B is incorrect. The View Update History option enables her to view installed updates but not access hidden updates, so answer C is incorrect. For more information, see the section, “Working with Windows Update.” | |
C. You should select the Back Up Computer option. This option enables you to create a Windows Complete PC Backup and Restore image of your entire computer. This image contains your Windows files and Registry, and you can use it to recover from a hardware failure. The Back Up Files option enables you to back up selected files and folders but not the Windows files or Registry, so answer A is incorrect. The Back Up System State option existed in Windows 2000/XP for backing up items such as the Registry, system files, and boot files. It has been replaced by the Complete PC Backup and Restore option in Vista, so answer B is incorrect. The Create a Restore Point or Change Settings option enables you to create a point that can be used for rolling back your computer settings to a previous point in time. It does not create a backup of any type, so answer D is incorrect. For more information, see the section, “Using Windows Backup to Protect Your Data.” | |
B. You should select the option to perform an advanced restore. In the Backup and Restore Center, click Advanced Restore and select the option to restore a backup that was created on a different computer. The option to save the restored files in a specified location enables you to create a new copy of files or folders backed up on the same computer, so answer A is incorrect. The option to create a restore point or change settings enables you to create a point that can be used for rolling back your computer settings to a previous point in time. It does not restore files from either the same computer or a different one, so answer C is incorrect. The option to load the Windows Recovery Environment is used to restore your entire computer from a Windows Complete PC Backup and Restore image. This does not restore files from another computer, so answer D is incorrect. For more information, see the section, “Using Windows Backup to Restore Your Computer.” | |
C. Lance should access the User Access to Effluents dialog box, click Add and add the other researchers individually to the list of users that can transparently access the file. Windows Vista enables you to enable additional users to access files and folders that are encrypted with EFS. Lance can authorize the users in his group to access the data files in this folder by following the procedure in this option for each of the files in turn. The Encryption Details dialog box does not contain an option for enabling additional users to access the encrypted files, so answers A and B are incorrect. Lance cannot add a group to the list of users who can access the file on the User Access dialog box, so answer D is incorrect. For more information, see the section, “Encrypting Files.” | |
D and E. Nancy should use the BitLocker Drive Preparation Tool to repartition the hard drive in the notebook to hold a 1.5GB system partition and a single partition that holds both operating system files and the data files. She should then use a USB flash drive to hold the encryption keys and access password while she enables BitLocker from the BitLocker Drive Encryption applet in Control Panel. If Nancy were to repartition the hard drive by using the command prompt available from the System Recovery Options dialog box, her data would be lost. Therefore answers A and B are incorrect. If she were to repartition the hard drive to hold a 40GB Windows partition and the remainder of the drive as a data partition, her data would not be protected. Therefore answer C is incorrect. It is not possible to store the encryption keys and access password on a floppy disk, so answer F is incorrect. For more information, see the section, “BitLocker Drive Encryption.” |
The following are some recommended readings on the subject of monitoring and optimizing computer performance and reliability, and configuring Windows Update and data protection:
Course
Microsoft Official Curriculum course 5116, Configuring Windows Vista Application and Tools. Module 1, Maintaining and Optimizing Windows Vista Systems. Information available at http://www.microsoft.com/learning/syllabi/en-us/5116aprelim.mspx
Websites
Microsoft Technet. Overview of Windows Reliability and Performance Monitor. http://technet2.microsoft.com/WindowsVista/en/library/44daefa4-407d-4763-b42f-b613a261da541033.mspx
Microsoft. Windows PC Accelerators: Performance Technology for Windows Vista. http://www.microsoft.com/whdc/system/sysperf/accelerator.mspx
Microsoft Technet. Event Viewer Overview. http://technet2.microsoft.com/WindowsVista/en/library/4229f239-16a6-4ecd-b3cf-aec03dc08cd51033.mspx
Microsoft Technet. Windows Update and Resulting Internet Communication in Windows Vista. http://technet2.microsoft.com/WindowsVista/en/library/2acc5240-6223-453f-8409-4c020311a1ae1033.mspx
Microsoft. Security Enhancements in Windows Vista. http://www.microsoft.com/downloads/details.aspx?FamilyID=6fb28358-68d9-43e9-b574-6a0d377bba34&DisplayLang=en
Microsoft. Description of the BitLocker Drive Preparation Tool. http://support.microsoft.com/kb/930063
Microsoft Technet. Windows BitLocker Drive Encryption Step-by-Step Guide. http://technet2.microsoft.com/WindowsVista/en/library/c61f2a12-8ae6-4957-b031-97b4d762cf311033.mspx