This chapter helps you to prepare for the exam by covering the following Microsoft-specified objectives for the Installing and Upgrading Windows Vista section of exam 70-620, TS: Microsoft Windows Vista, Configuring:
Configuring networking by using the Network and Sharing Center.
<objective>Windows Vista introduces the Network and Sharing Center, which provides a central point for all types of network configuration. You should know how to perform the various network configuration activities that you can perform from this location.
</objective>Troubleshoot connectivity issues.
<objective>You should understand how a Windows Vista computer interacts on the network via TCP/IP to be able to troubleshoot it if there are connectivity problems.
</objective>Configure Remote Access.
<objective>Dial-up networking (DUN) enables a Windows Vista computer to connect to another single computer, a private network, or to the Internet through a modem or other adapter. This same connection can then be shared with other computers on the network. You are expected to know how to configure and troubleshoot all types of connections. You should also understand the Remote Assistance and Remote Desktop applications, the difference between the two applications, their situational usage, and management.
</objective> </feature>Outline
Connectivity between Windows Vista computers and other networks (inclusive of the Internet and other computers) is provided in a variety of ways. Windows Vista computers utilize a variety of tools, applications, and protocols for connecting to networks. New to Vista is the Network and Sharing Center, which consolidates many of these applications and utilities into one convenient location from which you can create and manage different types of network connections as well as file and print sharing. This chapter reviews a wide variety of these components, including how to install, configure, or manage them:
Versions 4 and 6 of the TCP/IP protocol suite
Network and Sharing Center
Dial-up networking
Remote Desktop
Remote Assistance
Not only do you explore each of these components in this chapter, but you also look at their features and dependencies as they exist within the Windows Vista operating system.
The Transmission Control Protocol/Internet Protocol (TCP/IP) protocol suite is the default protocol for all editions of Windows Vista. With the omnipresent Internet, the usage of proprietary network protocol suites has diminished greatly in favor of seamless integration with the Internet, which requires TCP/IP. Since its introduction of the Active Directory in Windows 2000, Microsoft has made TCP/IP the protocol required for Windows networks that use Active Directory. This is largely because of the Active Directory’s dependence upon Domain Name System (DNS) to provide the name and address resolution for all Active Directory resources.
TCP/IP is a suite of protocols that govern the transmission of data across computer networks and the Internet. The following is a brief description of the major protocols that you should be aware of:
Transmission Control Protocol (TCP)—. Provides connection-oriented, reliable communication between two hosts, typically involving large amounts of data. This kind of communication also involves acknowledgements that data has been correctly received.
User Datagram Protocol (UDP)—. Used for fast, non–connection-oriented communications with no guarantee of delivery, typically small short bursts of data. Applications using UDP data are responsible for checking their data’s integrity.
Internet Protocol (IP)—. Handles, addresses, and routes packets between hosts on a network. It performs this service for all other protocols in the TCP/IP protocol suite.
Internet Control Messaging Protocol (ICMP)—. Enables hosts on a TCP/IP network to share status and error information. It is specifically responsible for reporting errors and messages regarding the delivery of IP datagrams. It is not responsible for error correction. Higher layer protocols use information provided by ICMP to recover from transmission problems. The
pingcommand uses ICMP to check connectivity to remote computers.Address Resolution Protocol (ARP)—. Used to resolve the IP address of the destination computer to the physical or Media Access Control (MAC) address, which is a unique 12-digit hexadecimal number that is burned into ROM on every network adapter card.
Refer to “Guide to TCP/IP, Second Edition,” in the “Suggested Readings and Resources” section at the end of the chapter for additional information on these protocols and details on the other protocols that make up TCP/IP.
By default, previous versions of Windows have used version 4 of the IP protocol, simply known as IPv4. With its 32-bit address space, this version has performed admirably well in the over 25 years since its initial introduction. However, with the rapid growth of the Internet in recent years, its address space has approached exhaustion, and security concerns have increased. Consequently, the Internet Engineering Task Force (IETF) introduced version 6 of the IP protocol with Request for Comment (RFC) 1883 in 1995 and updated with RFC 2460 in 1998. Simply known as IPv6, this protocol provides for 132-bit addressing, which allows for a practically infinite number of possible addresses, as well as the following benefits:
An efficient hierarchical addressing scheme—. IPv6 addresses are designed to enable an efficient, hierarchical, and summarizable routing scheme making way for multiple levels of Internet service providers (ISPs), which is becoming more common.
Simpler routing tables—. Backbone routers on the Internet are more easily configured for routing packets to their destinations.
Stateful and stateless address configuration—. IPv6 simplifies host configuration with the use of stateful address configuration, or configuring IP addresses in the presence of a Dynamic Host Configuration Protocol (DHCP) server, as well as stateless address configuration, or configuration of IP addresses in the absence of a DHCP server. Stateless address configuration enables the automatic configuration of hosts on a subnetwork according to the addresses displayed by available routers.
Improved security—. IPv6 includes standards-based support for IP Security (IPSec). In fact, IPv6 requires IPSec support.
Improved support for Quality of Service (QoS)—. IPv6 header fields improve the identification and handling of network traffic from its source to destination, even when IPSec encryption is in use.
Extensibility—. You can add extension headers after the IPv6 packet header, which enable the inclusion of new features as they are developed in years to come.
Using a new TCP/IP implementation known as the Next Generation TCP/IP stack, Vista enables a dual IP layer architecture enabling the operation of both IPv4 and IPv6 at the same time. Unlike previous Windows versions, you do not need to install a separate IPv6 component.
Exam Alert: Get to know IPv6
As the usage of IPv6 becomes more common, Microsoft expects that everyone receiving Windows certifications should have knowledge of IPv6 as well as the older version of TCP/IP, IPv4. Expect to see some questions on most certification exams that deal with this protocol.
Features of TCP/IP Version 4
Much of TCP/IPv4 is transparent to users and to administrators. The administrator might need to configure the address information applied to the network interface. This information consists of the following:
IP address—. The unique, logical 32-bit address, which identifies the computer (called a host or node) and the subnet on which it is located. The IP address is displayed in dotted decimal notation (each decimal represents an octet of binary ones and zeroes). For example, the binary notation of an address might be 10000000.00000001.00000001.00000011, which in dotted decimal notation is written as 128.1.1.3.
Subnet mask—. The subnet mask is applied to an IP address to determine the subnetwork address and the host address on that subnet. All hosts on the same subnet must have the same subnet mask for them to be correctly identified. If a mask is incorrect, both the subnet and the host address will be wrong. (For example, if you have an IP address of 128.1.1.3 and an incorrect mask of 255.255.128.0, the subnet address would be 128.1.0, and the host address would be 1.3. If the correct subnet mask is 255.255.255.0, then the subnet address would be 128.1.1, and the host address would be 3.)
Default gateway—. The address listed as the default gateway is the location on the local subnet to which the local computer will send all data meant for other subnets. In other words, this is the IP address for a router that is capable of transmitting the data to other networks.
Domain Name System (DNS) server address—. The DNS server address is the place where names of IP hosts are sent so that the DNS server will respond with an IP address. This process is called name resolution. DNS is a distributed database of records that maps names to IP addresses, and vice versa. A HOSTS file that maps names to IP addresses can be placed on the local computer and used instead of DNS, which renders this an optional setting, although it is rare that a network is small enough to make a HOSTS file more efficient than a DNS server. When a user types in a DNS name such as
JacksPC.mydomain.local, the computer sends the name to the DNS server. If the name is one that the DNS server knows, it sends back the IP address. Otherwise, the DNS server sends the name request to a higher-level DNS server, and this recursive process continues until either the IP address is found and returned to the original requestor or until all avenues have been exhausted and the original requestor is notified that the name cannot be found.Windows Internet Naming Service (WINS) server address—. The WINS server address is the location where network computers send requests to resolve NetBIOS names to IP addresses. WINS is used on Microsoft Windows networks where older Windows computers or applications require NetBIOS naming. When a user types in a NetBIOS name, such as JACKSPC, the computer sends the name to the WINS server. Because WINS is a flat-file database, it returns an IP address or a
Name not foundmessage. WINS server addresses, like DNS server addresses, are optional. A computer can use a local LMHOSTS file to map the NetBIOS names to IP addresses rather than use WINS.
Exam Alert: Know how to solve TCP/IP problems and use other skills
Administrators need to thoroughly understand TCP/IP. To make certain you understand these skills and to test you on the core exam requirements, you will find that questions that appear to be focused on one subject also incorporate a question about TCP/IP.
The Automatic Private Internet Protocol Addressing (APIPA) system provides an alternate configuration to DHCP for automatic IP addressing in small networks. When a computer uses APIPA, Windows Vista assigns itself an IP address and then verifies that it is unique on the local network. To work effectively, APIPA is useful only on a small local area network (LAN) or as a backup to DHCP.
Note: What is APIPA?
APIPA is not a protocol; it is an internal procedure that the operating system performs.
When a Windows Vista computer begins its network configuration, it performs the following procedures:
It checks to see whether there is a manually configured (or static) IP address.
If there is none, it contacts a DHCP server with a query for configuration settings. A response from a DHCP server leases—or validates the lease of—an IP address, subnet mask, and extended IP information such as DNS server, default gateway, and so on.
If there is no DHCP server response within six seconds, Windows Vista looks to see whether an alternate configuration has been applied by the administrator.
If there is no alternate configuration, Windows Vista uses APIPA to define an IP address unique on the LAN.
Note: Vista uses APIPA much faster than previous Windows versions
Windows Vista waits only six seconds for a response from a DHCP server before configuring itself with APIPA. This differs from previous Windows versions, which waited up to three minutes. For more information, refer to Knowledge Base article 931550, referenced in the “Suggested Readings and Resources” section at the end of this chapter.
APIPA defines its IP addresses in the range of 169.254.0.1 to 169.254.255.254. The subnet mask on these addresses is configured as 255.255.0.0. You do have administrative control over APIPA. When Windows Vista selects an address from this range, it then performs a duplicate address detection process to ensure that the IP address it has selected is not already being used, while continuing to query for a DHCP server in the background. If the address is found to be in use, Windows Vista selects another address. The random IP selection occurs recursively until an unused IP address is selected, a DHCP server is discovered, or the process has taken place 10 times.
IP addresses indicate the same type of location information as a street address. A building on a street has a number, and when you add it to the street address, you can find it fairly easily because the number and the street will be unique within a city. This type of address scheme—an individual address plus a location address—allows every computer on the Internet to be uniquely identified.
A static IP address is one that is permanently assigned to a computer on the network. Certain computers require static IP addresses because of their functions, such as routers or servers. Client computers are more often assigned dynamic addresses because they are more likely to be moved around the network or retired and replaced. DSL and cable modem users are usually given a static IP address, whereas dial-up users are provided with dynamic addresses.
As discussed earlier, IP addresses consist of two parts: one that specifies the network and the other that specifies the computer. These addresses are further categorized with classes, as described in Table 6.1.
Table 6.1. IPv4 Address Classes
Class | Dotted Decimal Hosts per Range | First Octet Binary | Usage | Number of Networks | Number of Hosts per Network |
|---|---|---|---|---|---|
A | 1.0.0.0–126.255.255.255 | 0xxxxxxx | Large networks/ISPs | 126 | 16,777,214 |
B | 128.0.0.0–191.255.255.255 | 10xxxxxx | Large or mid-size ISPs | 16,382 | 65,534 |
C | 192.0.0.0–223.255.255.255 | 110xxxxx | Small networks | 2,097,150 | 255 |
D | 224.0.0.0–239.255.255.255 | 1110xxxx | Multicasting | N/A | N/A |
E | 240.0.0.0–254.255.255.255 | 1111xxxx | Reserved for future use | N/A | N/A |
Loopback | 127.0.0.1–127.255.255.255 | 01111111 | Loopback testing | N/A | N/A |
Private IP Class A address | 10.0.0.0–10.255.255.255 | 00001010 | Reserved for a private network | 1 | 16,777,214 |
Private IP Class B address | 172.16.0.0–172.16.255.255 | 10101100 | Reserved for a private network | 1 | 65,534 |
Private IP Class C address | 192.168.0.0–192.168.255.255 | 11000000 | Reserved for a private network | 254 | 254 |
Note: Loopback testing
TCP/IPv4 has a predefined IP address that identifies a computer to dial itself up to perform loopback testing. If TCP/IP is configured, you should be able to run the ping 127.0.0.1 command when troubleshooting a connectivity problem. The private IP address classes are used on private networks that utilize Network Address Translation or proxy services to communicate on the Internet. Internet routers are preconfigured to not forward data that contains these IP addresses.
The portion of the address that decides on which network the host resides varies based on the class and, as you will see further on, the subnet mask. In the following list, the uppercase Ns represent the part of the IP address that specifies the network, and the lowercase Cs represent the part of the address that specifies the computer. This explains why there are differing numbers of networks per class and different numbers of hosts per network, as listed in Table 6.1.
Class A—. NNNNNNNN.cccccccc.cccccccc.cccccccc
Class B—. NNNNNNNN.NNNNNNNN.cccccccc.cccccccc
Class C—. NNNNNNNN.NNNNNNNN.NNNNNNNN.cccccccc
These address portions coincide with the default subnet masks for each address class. A Class A subnet mask is 255.0.0.0, a Class B subnet mask is 255.255.0.0, and a Class C subnet mask is 255.255.255.0.
Subnet masks enable you to reconfigure what constitutes the network portion and what constitutes the computer portion. When you apply the subnet mask to the IP address by using a “bitwise logical AND” operation, the result is a network number. A bitwise logical AND operation adds the bit, whether 1 or 0, to the corresponding bit in the subnet mask. If the subnet mask bit is a 1, the corresponding IP address bit is passed through as a result. If the subnet mask bit is a 0, a zero bit is passed through. For example, if the IP address is 141.25.240.201, you will have the following:
IP address—10001101.00011001.11110000.11001001
Subnet mask—11111111.11111111.00000000.00000000
Result from bitwise logical AND
Network—10001101.00011001.00000000.00000000
This shows the network address as 141.25.0.0 and the host address as 0.0.240.201. If you add bits to the mask, you will be able to have additional subnetworks when you perform a bitwise logical AND, and each subnetwork will have fewer hosts because fewer bits are available for the host portion of the address. Using the same address, and adding five bits to the subnet mask, you would receive the following:
IP address—10001101.00011001.11110000.11001001
Subnet mask—11111111.11111111.11111000.00000000
Result from bitwise logical AND
Network—10001101.00011001.11110000.00000000
In this case, the subnet mask changes the network address to 141.25.240.0. The host address changes to 0.0.0.201. Other IP addresses that are under the default Class B subnet mask that would otherwise be part of the same network, such as 140.25.192.15 and 140.25.63.12, are now on different subnets.
For an organization with a large number of physical networks where each requires a different subnet address, you can use the subnet mask to segment a single address to fit the network. You can easily calculate how many subnets and hosts you will receive when you subnet a network. The formula is 2n − 2, where n is the number of bits. The 2n is the number 2 raised to the power of the number of bits, and that result minus 2 (the addresses represented by all 1s and all 0s) equals the available subnets or hosts. Therefore, if you have a subnet of 5 bits as is shown here, you are able to achieve 25 − 2 = 32 − 2 = 30 subnets. Because there are 11 bits left for host addresses, each subnet will have 211 − 2 = 2048 − 2 = 2,046 hosts.
When you multiply 2046 by 30, you will see that you have 61,380 addresses available for network hosts and that you “lost” 4,154 addresses. This is the problem that Classless Inter-Domain Routing (CIDR) solves and is discussed in the sidebar.
Dynamic IP addresses are provided to a computer when it needs to be connected to the network. The provider is the DHCP server. When the computer is disconnected, the IP address becomes available for use by another computer. The address does not become available immediately, however. It is leased for a specified period of time (the administrator specifies this time period when configuring the DHCP server), and when the lease is up, the IP address is placed back in an IP address pool and can be delivered to another computer.
Before DHCP was developed, network administrators were forced to manually assign a separate IP address to each computer on the network. If a user left for a 2-month vacation and the computer was off the entire time, the IP address was unusable by anyone else. If the administrator (yes, to err is human) forgot to reuse an IP address for a computer that was retired, then the number of IP addresses available was also reduced. Other administrative errors included assigning duplicate IP addresses to computers on the network and misconfiguring the subnet mask, default gateway, and DNS server addresses. DHCP resolves these problems.
Exam Alert: The DHCP process
DHCP has a set communication process that is used to lease an IP address to a DHCP client. You might see a reference on the exam to a particular part of this process, so you should be able to relate the entire sequence of events and understand where a breakdown in communications might occur.
Client boots up and broadcasts a DHCPDiscover packet.
Server responds with a DHCPOffer packet, containing an IP address, subnet mask, and often including the default gateway and DNS server addresses.
Client replies with a DHCPRequest packet as a broadcast, requesting verification that it is okay to use the address. This notifies any other DHCP servers that they do not need to hold a reservation of an IP address for the client if they also responded to the original DHCPDiscover packet.
Server responds with a DHCPACK acknowledgement packet, and the client begins using the address.
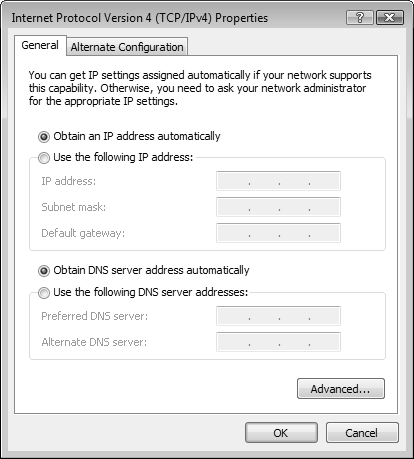
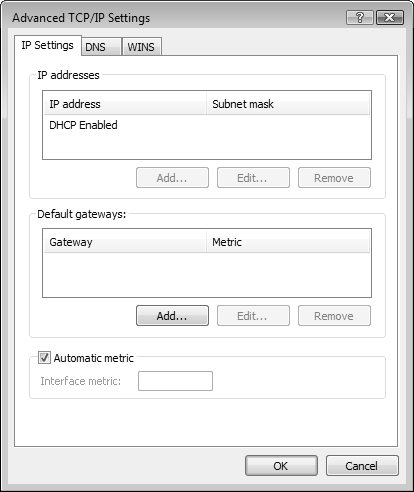
On a Windows Vista computer, you can configure any network connection to be a DHCP client by selecting the option to Obtain an IP Address Automatically, which is configured in the Internet Protocol (TCP/IP) Properties dialog box. If you change from a manual address to a dynamic one, you need to clear out the manual IP addressing information first.
Features of TCP/IP Version 6
The 128-bit addressing scheme used by IPv6 enables an unimaginably high number of 3.4 × 1038 addresses, which equates to a total of 6.5 × 10²³ addresses for every square meter of the Earth’s surface. This addressing scheme is complicated as a result, as described in this section.
Whereas IPv4 addresses use dotted-decimal format as already explained in the section, “Features of TCP/IP Version 4,” IPv6 addresses are subdivided into 16-bit blocks. Each 16-bit block is portrayed as a 4-digit hexadecimal number and is separated from other blocks by colons. This addressing scheme is referred to as colon-hexadecimal.
For example, a 128-bit IPv6 address written in binary could appear as follows:
0011111111111110  1111111111111111  0010000111000101 0000000000000000
0000001010101010  0000000011111111  1111111000100001 0011101000111110
The same address written in colon-hexadecimal becomes 3ffe:ffff:21a5:0000:00ff:fe21:5a3e. You can remove any leading zeros, converting this address to 3ffe:ffff:21a5::ff:fe21:5a3e. In this notation, note that the block that contained all zeros appears as “::”, which is called double-colon.
Corresponding to the network portion of an IPv4 address is the prefix, which is the part of the address containing the bits of the subnet prefix. IPv6 addresses do not employ subnet masks but rather use the same CIDR notation used with IPv4. For example, an IPv6 address prefix could be 3ffe:ffff:21a5::/64, where 64 is the number of bits employed by the address prefix.
IPv6 uses the following three types of addresses:
Unicast—. Represents a single interface within the typical scope of unicast addresses. In other words, packets addressed to this type of address are to be delivered to a single network interface. Unicast IPv6 addresses include global unicast, link-local, site-local, and unique local addresses. Two special addresses are also included: unspecified addresses (all zeros, equivalent to the IPv4 address of 0.0.0.0) and the loopback address, which is 0:0:0:0:0:0:0:1 or ::1, which is equivalent to the IPv4 address of 127.0.0.1.
Multicast—. Represents multiple interfaces to which packets are delivered to all network interfaces identified by the address. Multicast addresses have the first eight bits set to ones and so begin with “ff”.
Anycast—. Also represents multiple interfaces. Anycast packets are delivered to a single network interface that represents the nearest (in terms of routing hops) interface identified by the address.
Table 6.2 provides additional details on the IPv6 classes and subclasses:
Table 6.2. IPv6 Address Classes and Subclasses
Class | Address Prefix | Additional Features | First Binary Bits | Usage |
|---|---|---|---|---|
Global unicast | 2000::/3 | Use a global routing prefix of 45 bits (beyond the initial 001 bits), which identifies a specific organization’s network, a 16-bit subnet ID, which identifies up to 54,536 subnets within an organization’s network, and a 64-bit interface ID, which indicates a specific network interface within the subnet. | 001 | Globally routable Internet addresses that are equivalent to the public IPv4 addresses |
Link Local unicast | fe80::/64 | Equivalent to APIPA-configured IPv4 addresses in the 169.254.0.0/16 network prefix. | 111111101000 | Used for communication between neighboring nodes on the same link. |
Site Local unicast | fec0::/10 | Equivalent to the private IPv4 address spaces mentioned previously in Table 6.1. Prefix followed by a 54-bit subnet ID field within which you can establish a hierarchical routing structure within your site. | 111111101100 | Used for communication between nodes located in the same site. |
Unique local IPv6 unicast | fc00::/7 | Prefix followed by a local (L) flag, a 40-bit global ID, a 16-bit subnet ID, and a 64-bit interface ID. | 11111100 | Provide addresses that are private to an organization but unique across all the organization’s sites. |
Multicast | ff | Use the next 4 bits for flags (Transient[T], Prefix [P], and Rendezvous Point Address[R]), the following 4 bits for scope (determines where multicast traffic is forwarded), and the remaining 112 bits for a group ID. | 11111111 | Multiple interfaces to which packets are delivered to all network interfaces identified by the address. |
Anycast | (from unicast addresses) | Assigned from the unicast address space with the same scope as the type of unicast address within which the anycast address is assigned. | (varies) | Only utilized as destination addresses assigned to routers. |
To assist in the migration from IPv4 to IPv6 and their coexistence, several additional address types are used, as follows:
IPv4-compatible addresses—. Nodes communicating between IPv4 and IPv6 networks can use an address represented by 0:0:0:0:0:0:w.x.y.z, where w.x.y.z is the IPv4 address in dotted-decimal.
IPv4-mapped address—. An IPv4-only node is represented as ::ffff:.w.x.y.z to an IPv6 node. This address type is used only for internal representation and is never specified as a source or destination address of an IPv6 packet.
6-to-4 address—. Two nodes running both IPv4 and IPv6 across an IPv4 routing infrastructure use this address type when communicating with each other. You can form the 6-to-4 address by combining the prefix 2002::/16 with the 32-bit public IPv4 address to form a 48-bit prefix. This tunneling technique is described in RFC 3056.
More information on compatibility addresses and technologies used for transition to IPv6 is available in IPv6 Transition Technologies in the “Suggested Readings and Resources” section at the end of this chapter.
Objective: Configuring networking by using the Network and Sharing Center.
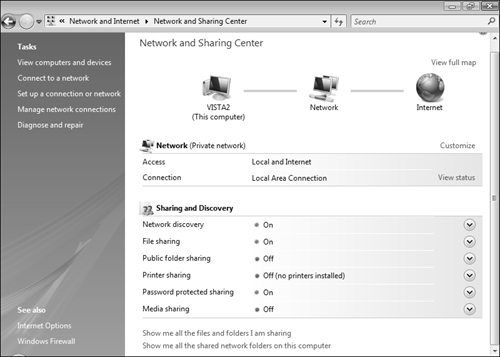
New to Windows Vista, the Network and Sharing Center, shown in Figure 6.1, brings all networking tasks together in a single convenient location. The diagram at the top indicates your connections to the network and the Internet and graphically indicates when a connection is unavailable.
You can open the Network and Sharing Center by using any of the following methods:
Click Start, right-click Network, and then click Properties.
Click Start and click Network. At the top of the Network window, click Network and Sharing Center.
Click Start and type
network and sharingin the Search text box. Then select Network and Sharing Center from the Programs list.Click Start, Control Panel. On the Control Panel home page, click Network and Internet and then click Network and Sharing Center or View Network Status and Tasks.
The Network and Sharing Center enables you to configure connections to other computers and networks; share folders, printers, and media; view devices on your network; set up and manage network connections; and troubleshoot connectivity problems.
The Network and Sharing Center enables you to configure either version 4 or 6 of TCP/IP, as described in the following sections.
You can configure TCP/IP version 4 on a Windows Vista computer either manually or dynamically. The default method is to dynamically configure TCP/IP. If the infrastructure includes DHCP services that deliver IP addresses to network computers, then a Windows Vista computer can connect upon logon with the default configuration of the network adapter. However, if you need to apply a static IPv4 address and other parameters, your only option is to manually configure the network adapter. Manually configuring one computer is time-consuming and error-prone. Multiply that by hundreds of computers, and you can see why dynamic configuration has become so popular. Step by Step 6.1 describes how to configure TCP/IP.
Tip: DHCP and routers
Many hardware routers, including those used when connecting home networks to high-speed Internet connections, include DHCP functionality. If you are using one of these, simply leave the defaults selected in step 5 of Step by Step 6.1.
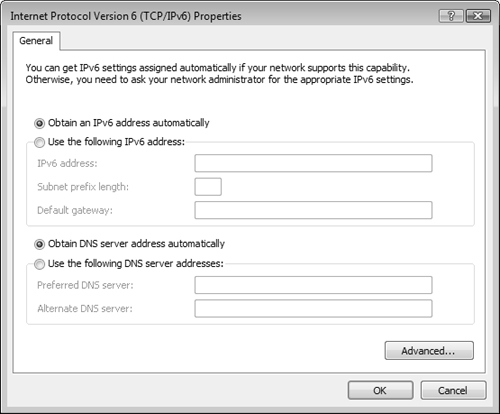
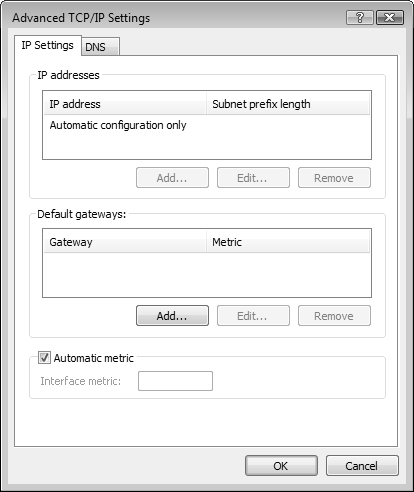
You can let IPv6 configure itself automatically with a link-local address described previously in Table 6.2. You can also configure IPv6 to use an existing DHCP server, or manually configure an IPv6 address as required. Configuration of IPv6 addresses is very similar to the procedure used with configuration of IPv4 addresses, as Step by Step 6.2 shows.
Note: Use of the command line to configure IPv6
You can also use the netsh.exe tool with the interface IPv6 subcommand to configure IPv6. For more information, refer to Configuring IPv6 with Windows Vista in the “Suggested Readings and Resources” section at the end of the chapter.
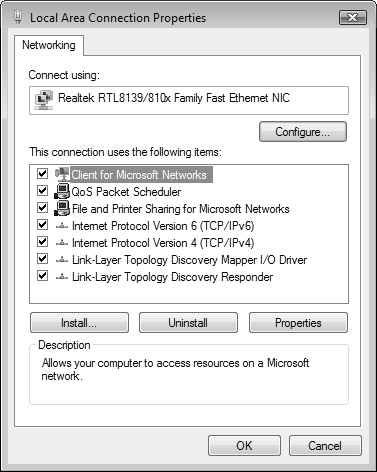
You cannot remove IPv6 from a Windows Vista computer. However, you can disable IPv6 on a specific connection. Follow steps 1 to 3 of Step by Step 6.2 to access the Local Area Connection Properties dialog box. Clear the check box beside Internet Protocol Version 6 (TCP/IPv6) and then click OK. You can do this selectively for each network connection on your computer.
You can also selectively disable IPv6 components. This is a more complex procedure that involves editing the Registry and is beyond the scope of this book. For more details, refer to Configuring IPv6 with Windows Vista in the “Suggested Readings and Resources” section.
The Sharing and Discovery section of the Network and Sharing Center enables you to perform actions related to sharing of resources on your computer with others on the network. It contains the following nodes, each of which can be turned on or off from the main Network and Sharing Center screen (refer to Figure 6.1):
Network Discovery—. Enables your computer to locate other computers and devices on the network and other computers to locate yours.
File Sharing—. Enables others on the network to access shared files and printers on your computer.
Public Folder Sharing—. Enables others on the network to access files in your Public folder.
Printer Sharing—. Enables others on the network to print from printers attached to your computer.
Password Protected Sharing—. Increases security by limiting access of shared files and printers to only those who have a user account and password on your computer.
Media Sharing—. Enables others on the network to access shared music, pictures, and videos on the computer and enables your computer to access these types of shared information on the network.
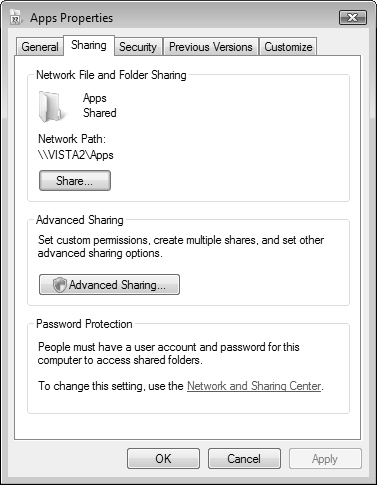
Shared folders are folders on the local hard drive that other users on a network can connect to. For the exam, it is critical that you understand how to manage and troubleshoot connections to shared resources, how to create new shared resources, and how to set permissions on shared resources. The process that Windows Vista uses to share folders is that an administrator selects a folder, regardless of its location in the local folder hierarchy, and shares it through the Sharing tab of the folder’s Properties dialog box. Shares can be managed through the Computer Management console snap-in.
Administrators might find that the Computer Management snap-in is helpful in file and folder security management. You can open Computer Management from within Administrative Tools, which is found in the System and Maintenance category of Control Panel, or by right-clicking Computer and choosing Manage. To manage file and folder security, navigate to the Shared Folders node in the left pane. Double-click Shares to see the shared folders. The hidden administrative shares are followed by a dollar sign ($) and cannot be modified. From the remaining shared folders, select one to double-click and view the security settings on the folder.
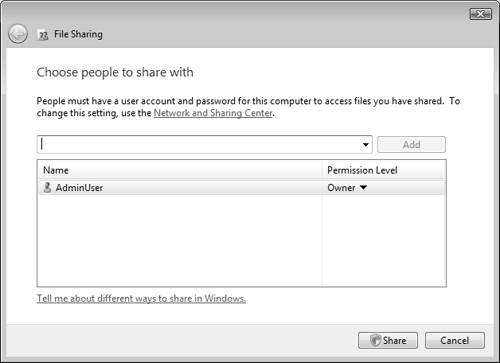
Aside from the Public folder (C:UsersPublic) and the default administrative shares, there are no folders that are automatically shared with the network. To share files with other users across the network, you must manually do so for each folder containing the files that you want to share. To share a folder with other network users, you can open any Explorer window and then follow the process shown in Step by Step 6.3.
To add people to the sharing list, follow the procedure of Step by Step 6.3 and select Change Sharing Permissions from the File Sharing dialog box. Then type the name of the required user and click Add. To remove a shared folder, select Stop Sharing from the File Sharing dialog box.
Modifying Shared Folder Properties
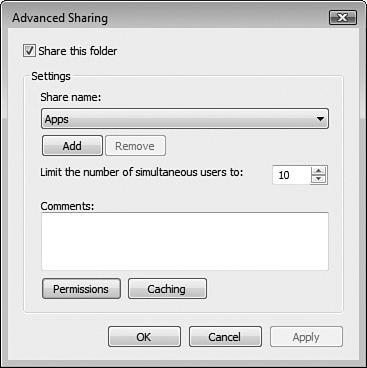
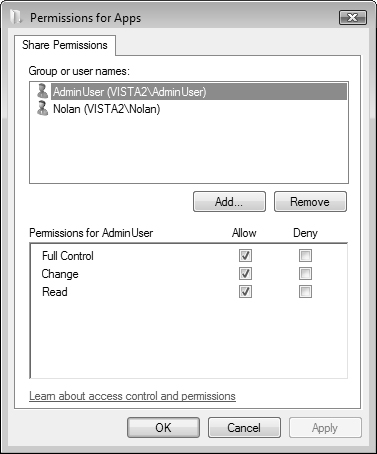
Windows Vista shares folders to others as Reader, which means that the users you specify can view but not modify available files. The Advanced Sharing feature in Vista enables you to modify these properties when necessary.
When granting full access to your local files to other users across a network, your computer becomes vulnerable to both unintentional and intentional attacks. Not only can the data simply be viewed for malicious purposes, such as corporate spying, but it can be altered or destroyed on purpose or accidentally. For this reason alone, you should always grant the most restrictive permissions necessary for a network user to conduct work on those files. Granting just enough permission without being too lenient requires careful consideration. If you are too stringent, users can’t get their jobs done. If you are too lenient, the data is at risk.
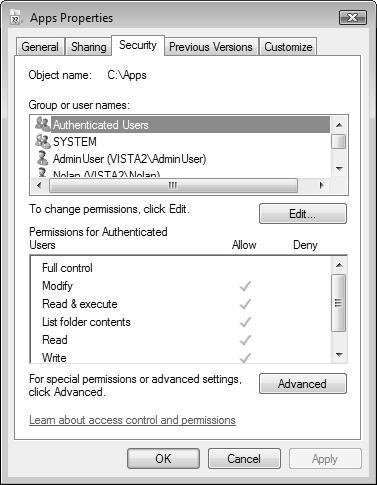
Follow Step by Step 6.4 to modify shared folder properties.
Windows Vista provides the Public folder as a location for sharing files as a default. By default, public folder sharing is turned off. To use this folder for sharing files, expand the Public Folder Sharing line under Sharing and Discovery on the Network and Sharing Center. You have the following options at C:UsersPublic:
Turn On Sharing So Anyone with Network Access Can Open Files—. Shares the folder with Read shared folder permission. If password protected sharing is turned on, a password is required.
Turn On Sharing So Anyone with Network Access Can Open, Change, and Create Files—. Shares the Public folder with Full Control shared folder permission. If password protected sharing is turned on, a password is required.
Turn Off Sharing (People Logged On To This Computer Can Still Access This Folder)—. Disables sharing of the Public folder.
By default, this folder is located at C:UsersPublic and becomes visible when you select either of the Turn on Sharing options. You can configure additional security options on this folder by accessing its Properties dialog box from this location and following the procedures outlined in Step by Step 6.4.
When you have installed a printer on your computer, you can configure printer sharing from the Sharing and Discovery section of the Network and Sharing Center. Expand this entry and select the Turn On Printer Sharing option. Then click Apply and click Continue on the UAC prompt that appears. By default, printer sharing is enabled with a password required if password-protected file sharing is turned on.
When password-protected sharing is turned on, only users with a local user account and password on your computer can access shared files and printers, including the Public shared folder. To enable others to access shared resources, expand the Password Protected Sharing section and select the Turn Off Password Protected Sharing radio button. Then click Apply and click Continue on the UAC prompt that appears.
Turning media sharing on enables users and devices on the network to access music, pictures, and videos in Windows Media Player and from devices attached to the computer such as digital cameras, portable device assistants (PDAs), cellular phones, and so on. In addition, the computer can locate these types of shared files on the network. To turn media sharing on, expand this entry in the Sharing and Discovery section of the Network and Sharing Center and click the Change button. For further information on media sharing, consult the Windows Vista Help and Support Center.
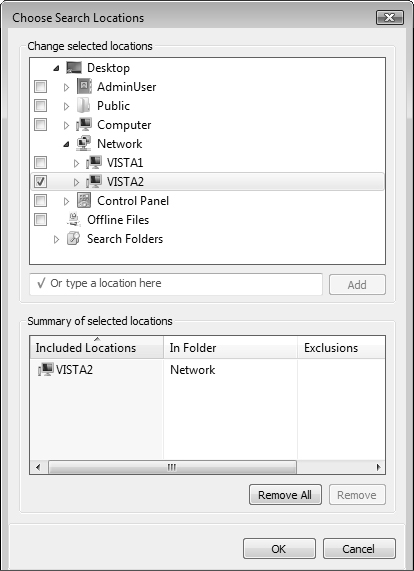
Windows Vista lets you search for computers on the network, even when connected remotely. To search for a computer, click Start and select Search from the list on the right side of the Start menu. In the dialog box that appears, select Advanced Search, and under Location, click Choose Search Locations. In the Choose Search Locations dialog box shown in Figure 6.13, expand the Network entry to display available computers. Click to select a computer on the network. In the box, type the name or partial name of the desktop or server that you want to access and then click OK. You can double-click any of the results and view the shared folders, files, printers, and other resources that the found computer provides.
The search utility is exceptionally cooperative. If you type in a partial name or similar name, Windows Vista displays the results. Therefore, misspellings do not prevent you from finding the computer you need to use. To search for a computer, click Start and then click Search.
If you do not know the name of the computer that you want to access, you can use the View Computers and Devices option in the Network and Sharing Center. You should see a list of the currently configured network location shortcuts that were either created by you or automatically configured by the operating system. Double-click the desired computer to view its shares.
The recent advances in wireless networking technology have enabled individuals to connect to networks from virtually any place a wireless access point is available. Many homes and small offices are taking advantages of the ease of setup of wireless LANs (WLANs), which allow for mobility and portability of computers and other devices located within the office. Public access points in locations such as restaurants and airports permit users to send and receive data from many places that would not have been thought of not too many years ago. Along with the convenience of wireless networking comes an increased chance of unauthorized access to the networks and the data they contain.
Because security is still not perfected for wireless networks, they have not made major inroads in corporate environments yet. Windows Vista supports the 802.11 protocols for WLANs and is capable of transparently moving between multiple wireless access points (WAPs), changing to a new IP subnet, and remaining connected to the network. Each time the IP subnet changes, the user is re-authenticated. In Windows Vista, you can configure wireless networking in the Network and Sharing Center. This enables you to connect to wireless networks, configure an ad hoc connection or use of a WAP, and manage your wireless networks.
Note: Wireless network protocols
Windows Vista supports three wireless protocols: the older 802.11b protocol, which operates at 11 Mbps, and the 802.11a and 802.11g protocols, which both operate at 54 Mbps.
While devices that support the 802.11a standard are generally incompatible with those that support 802.11b, some devices are equipped to support either 802.11a or 802.11b. The newest standard, 802.11g, extends the older 802.11b standard to the 54 Mbps rate and allows 802.11b and 802.11g devices to operate together on the same network. This standard was created specifically for backwards compatibility with the 802.11b standard.
Windows Vista improves upon the wireless support included with Windows XP so that wireless networking is as well integrated with the operating system as normal networking. Consequently, wireless network reliability, stability, and security are considerably enhanced over that of Windows XP. The following are some of the more important security improvements in Windows Vista wireless networking:
Vista minimizes the amount of private information such as the service set identifier (SSID) that is broadcast before connecting to a wireless network.
When connecting to an unencrypted public network (such as an airport or restaurant Wi-Fi hotspot), Vista warns users of the risks so that they can limit their activities accordingly.
Vista supports a complete range of wireless security protocols from Wired Equivalent Privacy (WEP) to Wi-Fi Protected Access (WPA and WPA2), Protected Extensible Authentication Protocol (PEAP), and its combination with Microsoft Challenge Handshake Authentication Protocol version 2 (MS-CHAP v2) and Extensible Authentication Protocol Transport Layer Security (EAP-TLS).
Vista uses WPA2-Personal for maximum security when communicating by means of an ad hoc wireless network (direct communication with another wireless computer without use of an access point). This helps to protect against common vulnerabilities associated with such unprotected networks.
Administrators can use Group Policy settings to configure Single Sign On (SSO) profiles that facilitate wireless domain logon. 802.1x authentication precedes the domain logon, and users are prompted for wireless credentials only if absolutely necessary. The wireless connection is therefore in place before the domain logon proceeds.
Vista supports the three network location types (public, private, and domain) together with their Windows Firewall settings for wireless networking. You learned about these settings in Chapter 5, “Configuring Windows Security Features.”
For more information on wireless security protocols and wireless security in general, refer to Chapter 7 of Implementing and Administering Security in a Windows Server 2003 Network Exam Cram 2 (70-299) in the “Suggested Readings and Resources” section. For more information on networking enhancements introduced with Windows Vista in general, refer to New Networking Features in Windows Server 2008 and Windows Vista.
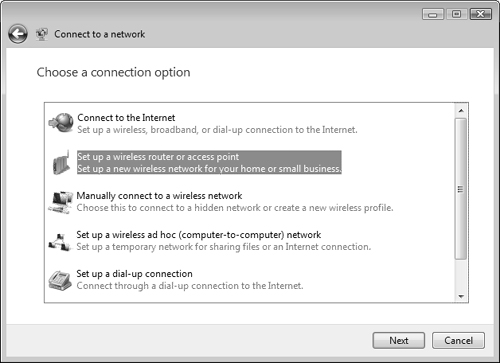
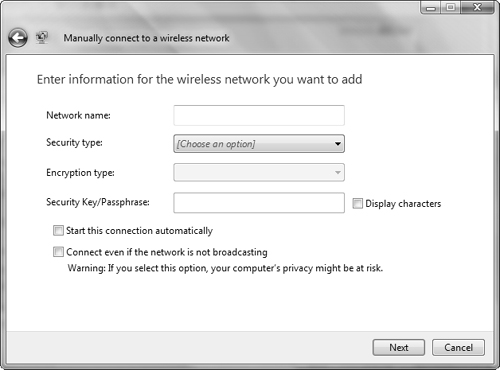
Windows Vista provides a wizard that simplifies the process of setting up various types of network connections and connecting to wireless and other networks. From the Start menu, click the Connect To option to display the available connection options in the Connect To a Network dialog box shown in Figure 6.14 (note that this dialog box might not display all these options according to the networking hardware attached to your computer):
Connect to the Internet—. Enables you to connect to the Internet from an existing wireless, broadband, or dial-up connection.
Set Up a Wireless Router or Access Point—. Enables you to configure a new wireless connection.
Manually Connect to a Wireless Network—. Enables you to connect to an infrastructure-based wireless network (a network with an access point)
Set up a Wireless Ad Hoc (Computer to Computer) Network—. Enables you to connect to another computer without passing through a wireless point
Set up a Dial-Up Connection—. Enables you to set up a remote access connection to a network. You learn about remote access connections later in this chapter in the section, “Configuring Remote Access.”
Connect to a Workplace—. Enables you to set up a VPN connection to a workplace. You learn about VPN connections in the section, “Using a VPN Connection to Connect to Computers.”
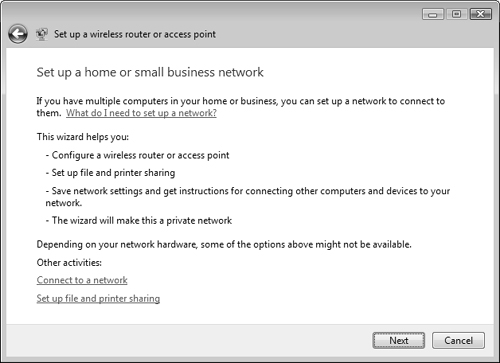
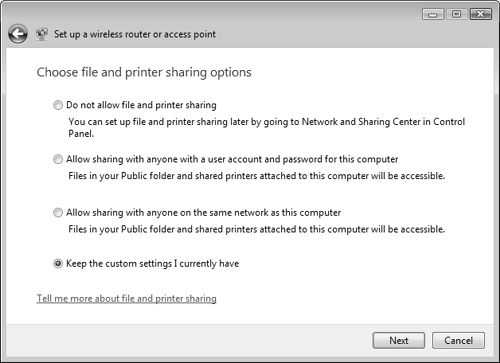
Follow Step by Step 6.5 to set up a wireless network connection.
This procedure copies the wireless settings plus a small utility application to the USB flash drive. You can use this flash drive to enter information to the wireless router or to configure other computers for wireless networking on the same access point.
You can use the same wizard to connect to an infrastructure wireless network, as Step by Step 6.6 shows.
Note: WPA2-Enterprise Security
WPA2-Enterprise security provides the highest level of wireless networking authentication security. It requires authentication in two phases: first, an open system authentication and second, authentication using EAP. It is suitable for domain-based authentication and on networks using a Remote Authentication Dial-In User Service (RADIUS) authentication server. In environments without the RADIUS server, you should use WPA2-Personal security.
The wireless network you configured is visible in the Network and Sharing Center, from which you can connect later if you have not chosen the Start This Connection Automatically option.
Exam Alert: WPA and WPA2 wireless security
You might be asked to choose between the four available types of WPA wireless security. You should select WPA (either Personal or Enterprise) to use TKIP encryption by default or WPA2 (either Personal or Enterprise) to use AES encryption by default. In addition, if you are required to type a security key or passphrase, you should select one of the Personal options. If you are not required to type a security key or passphrase, you should select one of the Enterprise options.
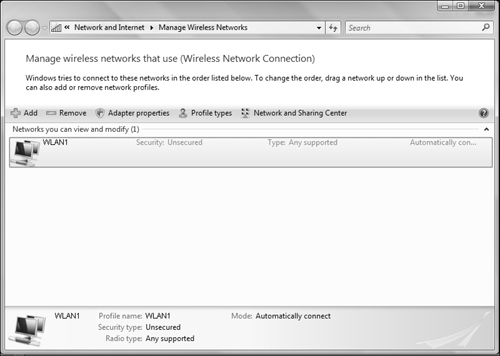
After you have configured one or more wireless network connections, you can manage them from the Manage Wireless Networks dialog box shown in Figure 6.18. You can access this dialog box from the task list in the Network and Sharing Center. This dialog box enables you to add new wireless networks, view or modify the properties of a wireless network connection, modify the sequence of preferred connection to these networks, or choose the type of profile to be applied to a network. You learn about wireless network profiles later in this section.
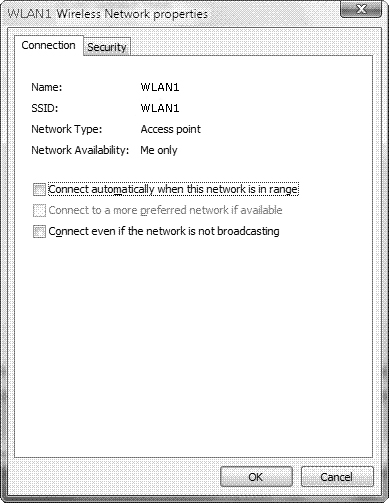
To modify the order in which Windows attempts to connect to the wireless networks, select the network to be connected first and drag it to the top of the list. To modify the properties of the wireless network connection, right-click it and choose Properties. This displays the dialog box shown in Figure 6.19. (This dialog box is also available from the completion page of the wizard in Step by Step 6.6 by selecting Change Connection Settings.)
From the Wireless Network Properties dialog box, you can modify the options previously selected to connect automatically or connect even if the network is not broadcasting. You can also choose to connect to a more preferred network if you have configured one and it is available (this option is unavailable if you have configured only one wireless network). The Security tab of this dialog box enables you to change the security and encryption types according to the types given previously in Table 6.3. From this tab you can also change the network security key if you have chosen a security type that requires this key.
The Manage Wireless Networks dialog box also enables you to manage wireless network profiles. Simply put, a wireless network profile is a set of wireless networks available to a given user on a Vista computer. The profile contains the SSID, the security settings as configured earlier in this section, and whether the network is an infrastructure or ad hoc network. There are two types of wireless network profiles:
Per-User Profiles—. These profiles apply to specific users of the computer and are connected when that user logs on to the computer.
Per-Computer Profiles—. This profile applies to all users of the computer and is connected regardless of which user is logged on to the computer.
In addition to using the Manage Wireless Networks dialog box, you can use the netsh command to manage wireless network profiles. You can also use Group Policy to deploy or maintain wireless network profiles. For more information, refer to Wireless Networking in Windows Vista in the “Suggested Readings and Resources” section.
Configuring and Troubleshooting Internet Connection Sharing
Quite often, it is not feasible for a small office or a home user to install a high-speed dedicated link to the Internet, such as a T1 line, or have each computer dial up to an ISP. Even dedicated broadband links offered to home users are reasonably priced only if they are connected directly to a single network adapter in a computer.
One of the growing trends for small office or home networks is to share an Internet connection with all the members of the network. Windows Vista contains a feature called Internet Connection Sharing (ICS), which enables a small office or home network to use one computer on the network as the router to the Internet.
Windows Vista’s ICS components consist of
Auto-dial—. A method of establishing the Internet connection when attempting to access Internet resources on a computer that does not host the Internet connection.
DHCP Allocator—. A simplified DHCP service that assigns IP addresses from the address range of 192.168.0.2–192.168.0.254, with a mask of 255.255.255.0 and default gateway of 192.168.0.1.
DNS Proxy—. Forwards DNS requests to the DNS server and forwards the DNS replies back to the clients.
Network Address Translation (NAT)—. Maps the range of IP addresses (192.168.0.1–192.168.0.254) to the public IP address, which is assigned by the ISP. NAT is a specification in TCP/IP that tracks the source private IP addresses and outbound public IP address(es), reformatting the IP address data in the header dynamically so that the source requests reach the public resources and the public servers can reply to the correct source-requesting clients.
ICS can be used to share any type of Internet connection, although it must be a connection that is enabled for all users on the PC dial-up for sharing to be effective. To enable ICS, you need to make sure that the Internet-connected computer has been configured with connections for a modem and a network adapter. If you are using broadband, you need two network adapters: one to connect to the broadband device for the Internet and the other to connect to the network. Perform Step by Step 6.7 at the computer that is connected to the Internet to set up ICS.
After you have shared your connection, you need to configure the other computers to use this connection. Step by Step 6.8 shows you how.
Caution: Check for use of IPv4 address 192.168.0.1
Before you configure ICS, you should ensure that no computers are currently assigned an IP address of 192.168.0.1 because the network adapter on the ICS computer is automatically assigned that address when ICS is configured.
If you have problems with ICS, you should open Event Viewer and check out the System log for any errors related to ICS. In addition you can view the NSW.LOG file to look for errors. The following are several additional suggestions in case users are unable to access the Internet from the client computers:
Check the configuration of the client Internet browser. Client configuration was mentioned in Step by Steps 6.7 and 6.8.
Ensure that the client can connect to the host computer. Check the connection by typing
ping 192.168.0.1. If this ping is unsuccessful, check the physical network connections.Check the client computer’s IP configuration. Use the
ipconfigcommand and ensure that the client has an IP address on the proper subnet and that the default gateway is set to 192.168.0.1.
For more information on the ipconfig and ping commands, see the section, “Using TCP/IP Utilities to Troubleshoot TCP/IP” later in this chapter.
Note: Network Address Translation
ICS is a simplified form of NAT, which is a protocol used on larger networks to hide internal IP addresses. NAT runs on a server and is capable of translating multiple external IP addresses to internal private IP addresses used on client computers. The NAT server can also be configured to provide DHCP services to the client computers.
Objective: Troubleshoot connectivity issues.
With any type of computer network, connectivity problems can and do occur. You should be aware of the types of problems that you might encounter and the steps to follow for determining the source of the problem and the means to correct it.
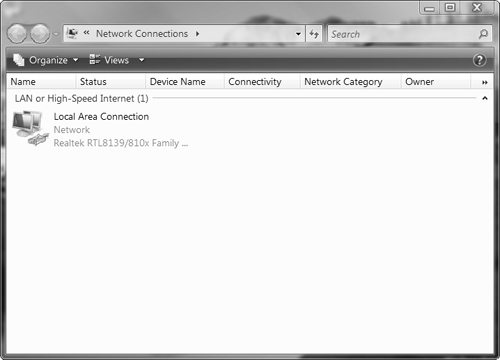
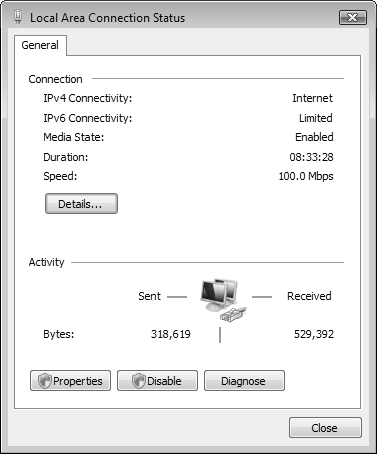
You can check the status of a LAN connection from the Network Connections folder. Right-click your connection icon and choose Status to display the Local Area Connection status dialog box shown in Figure 6.20. If you suspect a problem, click Diagnose to open a troubleshooter. You can also click Diagnose and Repair from the Tasks list in the Network and Sharing Center. You will be informed of any problem that exists. If no problem exists, Windows will inform you and offer to reset the network adapter. Click Yes and click Continue on the UAC prompt. To obtain details on your LAN connection, click Details. The resulting dialog box provides a subset of the information also provided by the ipconfig command discussed in the next section. To view or configure the properties of the connection, click Properties. This takes you to the same Properties dialog box discussed earlier in this chapter in the section “Configuring TCP/IP Version 4” and shown in Figure 6.3.
Many LAN connection problems can be traced to improper TCP/IP configuration. Before looking at the use of TCP/IP utilities for troubleshooting these problems, this section reviews briefly some of the problems you might encounter.
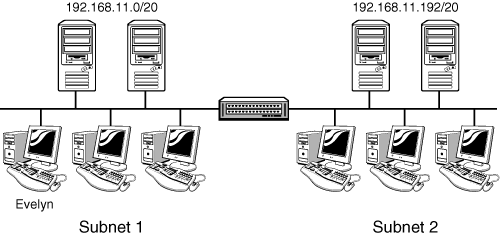
Recall from earlier in this chapter that the subnet mask determines the number of bits assigned to the network portion of the IP address and the number of bits assigned to the host portion. Be aware of the fact that the network portion of the IP address must match properly on all computers within a network segment and that the subnet mask must be configured appropriately to ensure that the computer is able to determine whether the computer to which it is attempting to connect is on the same or different subnet.
For example, suppose you are at a computer configured with an IP address of 192.168.1.2 with a subnet mask of 255.255.255.0. If you want to reach a computer with the IP address of 192.168.2.1, the subnet mask indicates that this computer is located on a different subnet. Connection will take place across a router. Should the computer you are at be configured with the same IP address but a subnet mask of 255.255.248.0, this would indicate that the destination computer with the IP address of 192.168.2.1 is on the same subnet. If in fact this computer is located across a router on another subnet, you will fail to connect to it.
Router problems could also cause a failure to access a computer on another subnet. These problems are beyond the scope of the 70-620 exam. For further information, consult a reference such as MCSA/MCSE Implementing, Managing, and Maintaining a Microsoft Windows Server 2003 Network Infrastructure Exam Cram 2 (Exam 70-291) in the “Suggested Readings and Resources” section.
If you configure your computer to automatically receive an IP address and the DHCP server is down, the computer will assign itself an IPv4 address in the 169.254.y.z range or an IPv6 link local unicast address on the fe80::/64 network. If you notice this when using ipconfig, check the connectivity to the DHCP server or contact an administrator responsible for this server. (You learn more about ipconfig in the section, “Using TCP/IP Utilities to Troubleshoot TCP/IP.”)
If your computer is using an IP address that duplicates another computer on the network, you will be unable to connect to any computer on the network. When this happens, the first computer on the network performs properly but receives a message when the second computer joins the network. Ping your computer’s IP address to check for this problem. This problem cannot occur if you are using DHCP to obtain an IP address automatically or if your computer is configured for an IP address using APIPA.
The Alternate Configuration tab of the TCP/IPv4 Properties dialog box (refer to Figure 6.4) enables you to configure an alternate IPv4 address, which is useful in situations where you need to connect to a second network—for example, when you are using a portable computer and traveling to a branch office of your company. However, to use the alternate configuration, your primary connection must be set to obtain an IP address automatically. If this is not the case, this tab does not appear. Note that this alternate configuration ability is not available when using IPv6.
One of Windows Vista’s standard troubleshooting tools is Event Viewer, which is incorporated into the Computer Management console. You can rely on this utility to be able to see errors and system messages. The ones that would be of most concern for a network problem are in the System Event log. You learn about Event Viewer in more detail in Chapter 8, “Maintaining and Optimizing Systems That Run Windows Vista.”
The TCP/IP protocol suite includes a number of tools that can help you isolate the source of connectivity problems. Windows Vista incorporates these tools as command-line executables. Each tool is different in what information it provides and when you might want to use it.
When you are troubleshooting a connectivity problem, remember that sometimes the problem is the hardware—a failed network adapter, a failed port on the hub, a failed switch, and so on. If the communication is between two different physical segments, it could be a problem with the router between them. And if you were able to communicate in the past and now cannot, the most likely suspect is a configuration change on one of the computers, and the second most likely is that a piece of equipment has failed. To check whether there is an adapter failure, you can look at Device Manager.
After data reaches the segment on which the IP address resides, it needs to discover the Media Access Control (MAC) address of the machine. The address resolution Protocol (ARP) is the protocol in the TCP/IP suite that resolves IP addresses to MAC addresses by creating an Address Resolution table in each host that transmits data on the network segment. The TCP/IP suite provides a utility called Arp that can check the table for errors. You should use the Arp utility when data is sent to a computer unexpectedly.
If you want to finger the culprit when a user has intentionally caused a problem, you can use Finger. This utility queries the computer about the services and users that are running on it and is typically used to query remote computers that are running non-Microsoft operating systems such as UNIX. Each operating system returns different output to the Finger command.
File Transfer Protocol (FTP) and Trivial File Transfer Protocol (TFTP) are not considered to be troubleshooting tools. Sometimes you need to make certain that a protocol is able to move data from one network segment to another, and these two utilities can help out in a pinch because they verify TCP and UDP specifically, as well as all the protocols down to the Physical layer of the stack.
If you want to verify whether the Transport Control Protocol (TCP) is functioning across a router, you can use FTP to download a file from an FTP server on another subnet. If you want to verify whether the User Datagram Protocol (UDP) is functioning across a router, you can use TFTP to download a file from a TFTP server on another subnet.
Windows Vista uses the ipconfig utility to display information about the IP address configuration of its network adapters. When you are experiencing a problem with connectivity, this is the first thing you should check (besides the link lights on the network adapter). If you are using DHCP, you can see whether the adapter was able to obtain an IP address lease. If you are using a static IP address, you can verify and validate whether it has been configured correctly. You can use ipconfig with the following switches:
ipconfig /all—. Displays all IP address data for all network adapters. Use this command to see whether an adapter has been misconfigured, or the adapter did not receive a DHCP lease.ipconfig /release—. Releases the current DHCP lease. Use this command to remove an IP address that is misconfigured, or when you have moved from one network to another and the wrong IP address is still leased to the adapter.ipconfig /release6—. Same as the/releaseswitch for IPv6.ipconfig /renew—. Renews (or tries to renew) the current DHCP lease. Use this command to see whether the computer can contact the DHCP server.ipconfig /renew6—. Same as the/renewswitch for IPv6.ipconfig /displaydns—. Displays the contents of the DNS cache. Use this command when the computer connects to the wrong network.ipconfig /flushdns—. Flushes the contents of the DNS cache. Use this command when the computer connects to the wrong network and you see incorrect entries after using theipconfig /displaydnscommand.ipconfig /registerdns—. Renews (or tries to renew) all adapters’ DHCP leases and refreshes the DNS configuration. Use this command when the network has temporarily disconnected and you have not rebooted the PC.ipconfig /showclassidadapter—. Shows the DHCP class ID. If you use the asterisk (*) in place ofadapter, you see the DHCP class ID for all adapters.ipconfig /setclassidadapter—. Changes the DHCP class ID for an adapter. If you use the asterisk (*) in the place ofadapter, you set the DHCP class ID of all adapters.
To determine whether the IP address the computer is using has been provided by APIPA, you can check the address of the interface by using the ipconfig command at a command prompt. The syntax for this command, which shows you the configuration of all network adapters, is ipconfig /all
In the resulting text, you can see whether the line Autoconfiguration Enabled is Yes or No. If Yes, and the IP address is 169.254.0.1 through 169.254.255.254, you are using an APIPA address.
The Nbtstat utility is used on networks that run NetBIOS over TCP/IP. This utility checks to see the status of NetBIOS name resolution to IP addresses. You can check current NetBIOS sessions, add entries to the NetBIOS name cache, and check the NetBIOS name and scope assigned to the computer.
The Netstat command-line tool enables you to check the current status of the computer’s IP connections. If you do not use switches, the results are protocol statistics and current TCP/IP connections. You should use Netstat to look for the services that are listening for incoming connections, if you have already checked the IP configuration and, though it is correct, the computer still displays a connectivity problem.
Name Server Lookup, or NSLookup, is a command-line utility that communicates with a DNS server. There are two modes to Nslookup: interactive and non-interactive. The interactive mode opens a session with a DNS server and views various records. The non-interactive mode asks for one piece of information and receives it. If more information is needed, a new query must be made.
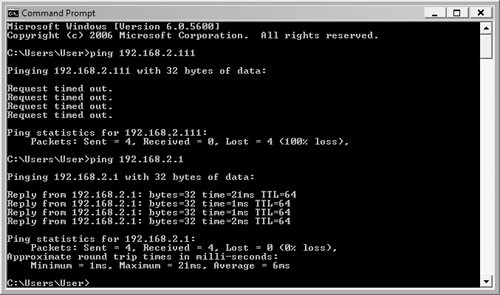
Packet InterNet Groper (Ping) is a valuable tool for determining whether there is a problem with connectivity. The ping command uses an Echo packet at the Network layer—the default is to send a series of four echoes in a row—transmitting the packets to the IP address specified. The Echo returns an acknowledgment if the IP address is found. The results are displayed in the command window. If an IP address is not found, you see only the response Request timed out. You see similar results to those shown in Figure 6.21, where the first address that was pinged was not found and the second address was found. The ping command indicates how long each packet took for the response. You can use the ping command to determine whether a host is reachable and to determine whether you are losing packets when sending/receiving data to a particular host.
You can use the ping command to determine whether the internal TCP/IP protocol stack is functioning properly by pinging the loopback testing address. The command for IPv4 is
ping 127.0.0.1
For IPv6, the command is
ping ::1
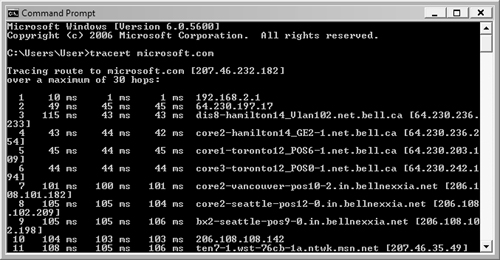
When you have a problem communicating with a particular host, yet you have determined that your computer is functioning well, you can use Tracert (Trace Route) to tell you how the data is moving across the network between your computer and the one that you are having difficulty reaching. The Tracert command offers a somewhat higher level of information than Ping. Rather than simply tell you that the data was transmitted and returned effectively, as Ping does, Tracert logs each hop through which the data was transmitted. Figure 6.22 shows the results of a Tracert command. Keep in mind that some network routers strip out or refuse to reply to Tracert requests. When this happens, you see Request timed out messages.
Note: Understand the typical response to a connectivity problem
The Microsoft troubleshooting process for TCP/IP is
Verify the hardware is functioning.
Run
Ipconfigto validate the IP address, mask, default gateway, and DNS server, and whether you are receiving a DHCP leased address.Ping 127.0.0.1 or ::1, the loopback address, to validate that TCP/IP is functioning.
Ping the computer’s own IP address to eliminate a duplicate IP address as the problem.
Ping the default gateway address, which tells you whether data can travel on the current network segment.
Ping a host that is not on your network segment, which shows whether the router will be able to route your data.
FTP a file from an FTP server not on your network, which tells you whether higher-level protocols are functioning. TFTP a file from a TFTP server on a different network to determine whether UDP packets are able to cross the router.
Many problems associated with wireless networking are similar to those with wired networking. You might need to utilize one or more of the TCP/IP utilities to check connectivity or Windows utilities such as Device Manager or Event Viewer. This section takes a brief look at several additional problems you might encounter with wireless networking.
Many corporate wireless networks have more than one access point configured to provide adequate signal strength across a large floor area or a multistory building. In this case, you will have more than one wireless network visible in the Manage Wireless Networks dialog box previously shown in Figure 6.18. So that random switching between wireless networks does not take place, you should ensure that the network corresponding to the best access point for your normal work location is listed at the top of the list in Figure 6.18. In addition, you should clear the check box labeled Connect to a More Preferred Network If Available, found on the Properties dialog box of your best wireless network and previously shown in Figure 6.19. Doing so ensures that your computer connects to the best access point when available and does not switch to another one.
If you are unable to connect to your wireless network, you should verify that it is available. Access the Network and Sharing Center and click Manage Network Connections from the Tasks list. Right-click your wireless adapter, select View Available Wireless Networks, and then verify that your network name or SSID is visible. If the wireless network name is visible, but you are unable to connect, one or more of the following might be the cause:
Improperly configured wireless network adapter settings. Right-click the wireless adapter and choose Repair to attempt an automatic repair of the settings. If the SSID is visible but is incorrect, you should access the Wireless Networks tab and select the check box labeled Use Windows to Configure My Wireless Network Settings. Select your wireless network and then click Configure. On the Association tab, type the correct SSID and then click OK twice to close the dialog boxes.
Improper configuration of your wireless security settings. Check the WEP configuration and ensure that it matches the settings specified on the access point. Temporarily disable your security settings and attempt to connect. If you are successful, you should check all security settings.
Improper configuration of the wireless access point. Can you connect to the access point from another computer, or can others reach the access point? Check with someone responsible for configuring the access point. You might need to reboot the router.
Interference from other devices such as cordless phones or microwave ovens. Turn these devices off temporarily or move them to another location.
Conflicts between your wireless network adapter and another network adapter on your computer. Use Device Manager to check the status of the network adapters. You might need to disable the other network adapter.
If the wireless network name fails to appear, check the following possibilities:
Improper configuration of the SSID on the wireless access point or the access point is configured not to broadcast its SSID. You might need to type the network information manually as previously mentioned. From the Network and Sharing Center, click Set Up a Connection or Network and then select Manually Connect to a Wireless Network (refer to Figure 6.14).
Problems with the access point, such as hardware or power failure, wireless channel number in use, data transmission rate, and so on.
Improper configuration of your wireless network adapter. Follow some of the suggestions provided earlier. You might need to verify the channel number from the Advanced tab of your network adapter’s Properties dialog box. Also use Device Manager to check for conflicts as already mentioned.
Caution: Remember to reenable your wireless security settings
If you disable wireless security settings to check for problems, ensure that you re-enable these settings as soon as you’ve corrected the problems. Otherwise, you become more vulnerable to intruders.
For additional hints at troubleshooting wireless network connectivity, refer to How to troubleshoot wireless connection problems and A Support Guide for Wireless Diagnostics and Troubleshooting in the “Suggested Readings and Resources” section. Additional hints can be found in the Vista Help and Support Center.
If you are not able to connect to any network and the link light on your network card is not lit, you most likely have a hardware problem. The same is true if your modem is unable to dial out to an external network. You can use Device Manager to check for hardware problems.
To open Device Manager, click Start, right-click Computer, and choose Properties. From the System applet in Control Panel, select Device Manager in the Tasks list and click Continue on the UAC prompt that appears. You can also type device in the Search text box in the Start menu. Device Manager informs you of problems that might exist as follows:
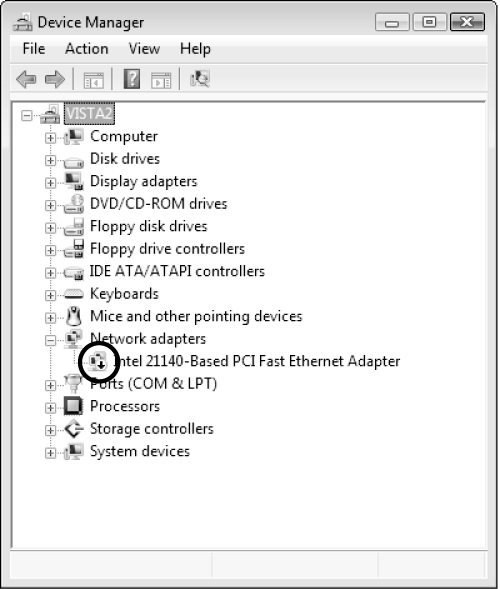
Disabled device—. Indicated with a black downward-pointing arrow icon on the device (see Figure 6.23).
Non-functional device—. Indicated with a yellow triangle with an exclamation point on the device. You should update the device driver if this icon appears.
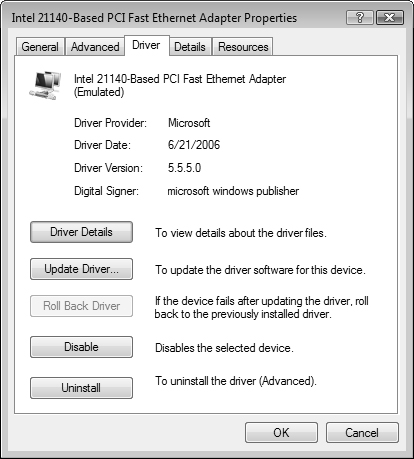
You can view the properties of a device by right-clicking it in Device Manager and choosing Properties. The Properties dialog box shown in Figure 6.24 provides the following information (not all tabs are present for all devices):
General tab—. Device type, manufacturer, and status.
Advanced tab—. Additional properties related to the device. You can select a property and change its value as required. Be sure you know what you are doing if you try to modify device properties here.
Driver tab—. Provides details about the driver files and allows you to update or roll back the driver or disable or uninstall the device.
Details tab—. Provides additional details about device properties.
Resources tab—. Provides information on hardware resources such as input/output (I/O) range, memory range, and interrupt request (IRQ).
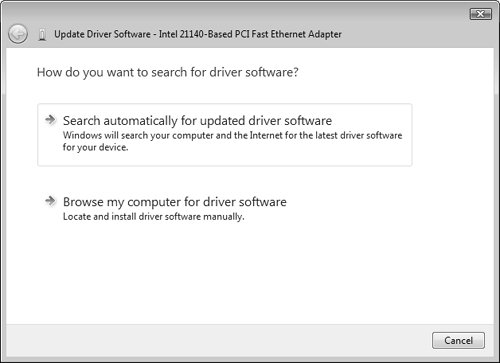
To update a device driver, right-click the device and choose Update Driver Software (or click Update Driver on the Driver tab of the Properties dialog box). The Update Driver Software dialog box shown in Figure 6.25 enables you to search the Internet or browse for drivers. Choose the appropriate option and follow the instructions provided.
Should an updated driver fail to function, you can roll back to the previous driver. Select Roll Back Driver from the Driver tab of the device’s Properties dialog box.
For modem problems, you should also check the Phone and Modem Options applet in the Hardware and Sound category of Control Panel. From the Diagnostic tab, click Query Modem and watch for an entry to appear in the Command/Response list. If you receive an error message, check the modem’s properties in Device Manager (which you can also access from the Hardware and Sound category).
For more information on troubleshooting hardware problems, see Chapter 7, “Configuring Applications Included with Windows Vista.”
Objective: Configure Remote Access.
Connectivity is the single most valuable capability in a computer. By connecting to other computers, a computer is able to access other information, applications, and peripheral equipment. Businesses have long since discovered that their employees will work longer hours and greatly increase their productivity when they are able to connect to the company’s network from remote sites. For this reason, they provide remote access servers (RASs) with either dial-up modems or VPN servers and Internet connections. Windows Vista computers link up with the Internet or corporate networks using dial-up networking connections. After Windows Vista connects with a dial-up connection, the user can open files and folders, use applications, print to printers, and pretty much use the network just as if he or she were connected to the network through its network adapter.
Standard protocols are used to make dial-up network connections:
Point-to-Point Protocol (PPP)—. A dial-up protocol that can support multiple networking protocols, such as TCP/IP and Internetwork Packet Exchange/Sequenced Packet Exchange (IPX/SPX), and can be used with compression and encryption. Note that support for the older Serial Line Interface Protocol (SLIP) has been removed from Windows Vista.
Point-to-Point Tunneling Protocol (PPTP)—. A protocol used to transmit private network data across a public network in a secure fashion. PPTP supports multiple networking protocols and creates a secure VPN connection.
Layer 2 Tunneling Protocol (L2TP)—. A protocol used to transmit private network data across a public network. L2TP supports multiple networking protocols. Used with IPSec, it creates a secure VPN connection.
Dial-up networking connections are used for any type of connection—between two different computers, between a computer and a private network, between a computer and the Internet, and from a computer through the Internet to a private network using a tunneling protocol. You can share a dial-up connection using ICS. All these functions and features offer different ways of connecting computers across large geographical distances.
When a computer connects to a remote access server, it performs functions nearly identical to logging on locally while connected to the network. The major difference is the method of data transport at the physical level because the data is likely to travel across a rather slow telephone line for dial-up and Internet connections. Another difference between a local network user and a remote access user is the way that the user’s identification is authenticated. If using Remote Authentication Dial-In User Service (RADIUS), the RADIUS server takes on the task of authenticating users and passing along their data to the directory service(s) in which the users’ accounts are listed.
Don’t confuse remote access with remote control. Remote access is the capability to connect across a dial-up or VPN link, and from that point forward, to be able to gain access to and use network files, folders, printers, and other resources identically to the way a user could do on a local network computer. Remote control, on the other hand, is the capability to connect to a network remotely and then, through the use of an application (such as PCAnywhere, Citrix, or Remote Desktop) create a session with a host computer where the desktop for that host computer is displayed on your PC, often within the application’s window, although most of these applications enable you to run the session “full screen.”
Authentication is the first perimeter of defense that a network administrator can define in a remote access system. The process of authenticating a user is meant to verify and validate a user’s identification. If the user provides invalid input, the authentication process should deny the user access to the network. An ill-defined authentication system, or lack of one altogether, can open the door to mischief and disruption because the two most common methods for remote access are publicly available: the Internet and the public services telephone network. Table 6.4 discusses the authentication protocols supported by Windows Vista’s dial-up network connections.
Table 6.4. Authentication Protocols for Remote Access
Acronym | Name | Usage | Security |
|---|---|---|---|
CHAP | Challenge Handshake Authentication Protocol | Client requests access. Server sends a challenge to client. Client responds using MD5 hash value. Values must match for authentication. | One-way authentication. Server authenticates client. |
MS-CHAPv2 | Microsoft Challenge Handshake Authentication Protocol version 2 | Requires both the client and the server to be Microsoft Windows based. Does not work with LAN Manager. Client requests access, server challenges, client responds with an MD5 hash value and piggybacks a challenge to server. If a match is found, server responds with a success packet granting access to client, which includes an MD5 hash response to the client’s challenge. Client logs on if the server’s response matches what client expects. Note that the older MS-CHAP authentication protocol is no longer supported in Windows Vista. | Mutual (two-way) authentication |
EAP | Extensible Authentication Protocol | Developed for PPP and can be used with IEEE802. Is capable of heading other authentication protocols, so improves interoperability between RAS systems, RADIUS servers, and RAS clients. Used with MD5-Challenge, smart cards, and certificate authentication in Windows Vista. | Not used to provide its own security; enables enhanced interoperability and efficiency of authentication process. |
PAP | Password Authentication Protocol | Client submits a clear-text user identification and password to server. Server compares to information in its user database. If a match, client is authenticated. | Clear-text, one-way authentication. Least secure method. |
Smart cards | Certificates | User must have knowledge of PIN and possession of smart card. Client swipes card, which submits smart card certificate and inputs PIN. Results are reviewed by server, which responds with its own certificate. If both client and server match, access is granted. Otherwise, error that credentials cannot be verified. | Certificate-based, two-way authentication. |
Exam Alert: Trusted publishers
The 70-620 exam touches on certificate authentication and might ask you about the relationship between trusted resources and certificates. When using certificate authentication, the client computer must have a way of validating the server’s certificate. To ensure absolutely that this validation will work, you can import the server’s certificate into the client’s Trusted Publishers list. If there is no way for a client to validate the server’s certificate, an error displays stating that the server is not a trusted resource.
Windows Vista can be configured in an assortment of ways to ensure that your remote access services meet your organization’s security criteria. Much of the configuration takes place on the server side of remote access. These security features are available on a Windows Vista computer when you configure it to receive remote access connections.
You can access the Local Security Policies snap-in through Administrative Tools under Control Panel’s System and Maintenance category, or by typing secpol.msc in the Run dialog box. The policies defined in this utility affect all users on the computer, unless the policies allow you to configure them on a per-user or per-group basis. This snap-in is shown in Figure 6.26.
You might configure the Account Lockout Policy on the local computer to increase security. Under the Account Lockout Policy, you can configure how many bad passwords the computer will accept before it disables the user from logging on, how long the user will be locked out, and how long to wait before starting to count invalid logon attempts again. Remember that the Account Lockout Policy does not only affect remote access users, but all users who try to log on to the computer. The following list describes the various Account Lockout Policy options:
If you set the Account Lockout Threshold policy to 0, Windows Vista does not lock out a user no matter how many times the user submits a bad password. You should set this policy to a number of invalid logon attempts that is acceptable, such as 3.
The Account Lockout Duration policy is the time period, in terms of minutes, that the account will be locked out. The longer the time period, the more strict the security. The default suggested time period is 30 minutes. You cannot set a duration until the Account lockout threshold has been configured to a number greater than zero.
The Reset Account Lockout Counter After policy has a default term of 30 minutes. This is the length of time that the computer waits after counting the last invalid logon attempt before resetting the counter. The longer the time period that this policy is set, the stricter the security.
You should always consider that because the default time periods are known quantities, an experienced hacker attempting to gain access to one of these accounts is likely to try again at intervals that will allow retries without locking the compromised account. To counter this, you should always set the policies to a longer duration than 30 minutes. If your computer is configured to accept VPN connections, you will probably want to establish IPSec settings. IPSec is a protocol used for authentication and encryption and is often used in VPNs in conjunction with L2TP.
Specifying callback settings is another method you can use to restrict misuse of a Windows Vista computer configured to accept incoming connections via dial-up. You can do this in the properties of the incoming connection. From the Network and Sharing Center, click Manage Network Connections to access the Network Connections applet and double-click the incoming connection. Click the Users tab. In the window, you see a list of users configured on the computer. By default, none of the users is enabled to log on to the computer through this connection. You can select the options for each user to whom you want to grant remote access. You can compel all users to use encryption by selecting the Require All Users to Secure Their Passwords and Data option. You can also eliminate the need for a password for incoming connections from handheld devices by selecting the Always Allow Directly Connected Devices Such As Palmtop Computers to Connect Without a Password option. Select a user and click the Properties button. Click the Callback tab. Select whether you want the user to provide a callback number (use this for travelers), or whether you want to set a permanent callback number. Using callback is a verification step to ensure the identity of the calling user.
On the General tab, you can specify whether to allow a VPN connection by selecting the Allow Others to Make Private Connections to My Computer by Tunneling Through the Internet or Other Network option.
We’ve already touched on VPN connections. The way a VPN works is rather interesting. The private network is connected to the Internet. An administrator sets up a VPN server that sits basically between the private network and the Internet. When a remote computer connects to the Internet, whether via dial-up or other means, the remote computer can connect to the VPN server by using TCP/IP. Then the PPTP or L2TP protocols encapsulate the data inside the TCP/IP packets that are sent to the VPN server. After the data is received at the VPN server, it strips off the encapsulating headers and footers and then transmits the packets to the appropriate network servers and resources.
The two tunneling protocols, although similar and both supported by Windows Vista and Windows 2003 servers, act somewhat differently. PPTP incorporates security for encryption and authentication in the protocol. L2TP does not. Instead, you must use IPSec to secure the data.
To establish the VPN client connection on Windows Vista, follow the instructions in Step by Step 6.9. To follow along with this exercise and to test it, you should have a client computer and a VPN server that can both connect to the Internet. These two computers should not be connected in any other way than through the Internet.
After you have set up a VPN connection, you can modify its properties if required. Right-click the connection in the Network Connections folder and choose Properties. The connection’s Properties dialog box consists of the following tabs, each with different types of configurations:
General—. This tab enables you to select which modem or device to use in the connection, and a Configure button leads to the device’s hardware configuration options. The Phone Number section lets you change the phone number and, by clicking the Alternates button, insert additional phone numbers and place them in an order to be dialed. If you select the box to use the dialing rules, the connection can automatically insert the correct leading numbers, such as long distance information when the computer is dialing from a long distance number or the code that will cancel Call Waiting.
Options—. This tab provides the presentation features, such as prompting for a name, password, certificate, and phone number, as well as the Windows domain, and redialing options if the line is busy or the connection dropped. The PPP Settings button enables you to use link control protocol (LCP) extensions and software compression, or to negotiate multi-link (use of multiple dial-up lines for increased transmission speed) for single-link connections.
Security—. As you can guess, the Security tab lets you select the security protocols to use, including EAP (for smart cards, certificates already on this computer, or trusted root certification authorities), CHAP, MS-CHAPv2, PAP, and so on. You can also configure encryption to be optional, required, or required at maximum strength.
Networking—. The networking dialog enables you to specify the use of TCP/IPv4 and TCP/IPv6, as well as File and Printer Sharing for Microsoft Networks, QoS Packet Scheduler, and the Client for Microsoft Networks. Click Install to install additional features, including network clients, services, and protocols. To install these features, you should have an installation disc.
Sharing—. This dialog lets you configure ICS in order to share the connection with other computers on your local network. You can also select options to establish dial-up connections when other computers attempt to access the Internet or allow other users on the network to control or disable a shared connection. Click Settings to configure ICS. Configuration of ICS was discussed earlier in this chapter.
Internet connections are configured identically to private network connections except that you must specify TCP/IP as the protocol. Most ISPs provide a CD-ROM with proprietary software to connect to and use the Internet. This software usually creates an Internet connection in the Network Connections applet for you. The reason ISPs do this is to make it very simple for a new user to configure a connection to his or her network.
To configure your own connection to an ISP, you use the same wizard used for creating other remote access connections. Start by accessing the Connect to a Network wizard previously shown in Figure 6.14. Select Set Up a Dial-Up Connection. The resulting dialog box enables you to enter the required connection parameters. Type the phone number of the ISP, the name and password that the ISP provided you, and provide a name for the connection. Select the option for whether you want other people to use this connection. Click Create when you are finished and then Close when informed that the connection is ready for use. You can right-click the connection and click Connect to then open up the Connect screen. If your ISP provided you with additional configuration information, you should click the Properties button to fine-tune your connection.
After you have successfully created a dial-up connection, you can specify the configuration options to match those of your remote access server. Right-click the connection icon and select Properties from the shortcut menu. The Properties dialog box for a dial-up connection is similar to that described in the previous section for VPN connections.
Windows Vista incorporates the Remote Desktop Protocol (RDP), which was originally introduced with Terminal Services and included with Windows XP Professional. The protocol allows any user to use the Remote Desktop application to run a remote control session of a Windows Terminal Server or of a Windows Vista computer that has been configured to provide Remote Desktop services. RDP also allows a remote session to be executed on a request basis so that an administrator can assist a user with a problem. This is called Remote Assistance, and it is located in the All Programs menu.
When Windows Vista is configured to be a Remote Desktop host, there is a restriction for usage that does not apply to a Terminal Services computer. This restriction is that only one user can ever execute an interactive session on the computer at any one time. So if you run a Remote Desktop session and a user is already logged on to the Remote Desktop server, that user will be logged off (at your request) for your own session to run. However, that users’ session will be saved so that he can resume it later.
You can run a Remote Desktop session with another computer running either Windows Vista or Windows XP. Follow the instructions in Step by Step 6.10.
Configuring the server portion of a Remote Desktop connection involves configuring the System applet in Control Panel. You can access this applet by right-clicking Computer and selecting Properties, as well as by finding it in Control Panel. In the Tasks list, click Advanced System Settings and click Continue on the UAC prompt that appears. On the System Properties dialog box that appears, click the Remote tab to display the dialog box shown in Figure 6.31.
In the Remote Desktop section, select one of the options for allowing Remote Desktop connections. The Network Level Authentication option is the most secure choice. It allows connections only from Windows Vista computers or older computers on which Network Level Authentication has been downloaded and installed. If you do not know the version of Remote Desktop being used on the remote computer, select the first option. Click the Select Users button. In the resulting dialog box, click the Add button and select the users who should be able to access the local computer.
Note: Administrators can always connect using Remote Desktop
Remote Desktop privileges are automatically granted to any member of the Administrators group.
You can configure the listening port from the default TCP 3389 to another port of your choice. When you do so, only the people who specify the port can connect and then run a remote session. In Windows Vista, you are able to adjust the port only by editing the Registry. Open the Registry Editor, supply your UAC credentials, and navigate to the HKEY_LOCAL_MACHINESystem\_CurrentControlSetControlTerminalServerWinStationsRDP-Tcp key. Select the PortNumber value, click the Edit menu, and select Modify. Click Decimal and type in the new port number. Click OK and close the Registry Editor.
On the client computer, you then make a connection by opening the Remote Desktop Connection (click Start, All Programs, then Accessories, and finally Remote Desktop Connection). In the Computer text box, type the name or IP address of the Remote Desktop host computer, concatenated with a colon and the port number. For example, if you edited the Registry of the host computer named NANC511 with an IP address of 192.168.0.8 and changed the port number to 4233, then you would type either NANC511:4233 or 192.168.0.8:4233 in the Computer text box of the Remote Desktop Connection dialog box.
Keep in mind that a Remote Desktop Connection functions across any TCP/IP link, whether dial-up, local, or otherwise. You can link to a host computer with older Windows versions—Windows 9x, Me, NT, 2000, or XP—but you need to have the client software to do so. You can install the client software from a Windows XP Professional CD-ROM or download it from Microsoft. When you configure a host computer, be sure to add users to the Remote Desktop users group and to create an exception for Remote Desktop traffic for the Windows Firewall. You should also create the exception on the client computer as well.
First introduced with Windows XP, Remote Assistance allows a user running a Windows Vista computer on a network to request assistance online or for an expert to offer assistance remotely. Regardless of how the session is initiated, the result is that the expert can remotely view the user’s console and provide assistance to the user by taking control of the session or can simply view the session and give the user specific directions on how to fix the problem the he or she is experiencing.
The requirements for Remote Assistance are that both computers must be configured to use it. If using an Active Directory network, Group Policy for Remote Assistance must also allow the user to accept Remote Assistance offers and must list from which experts the users can accept offers. An Active Directory network also requires both users to be members of the same or trusted domains.
Windows Firewall can affect whether a user can receive Remote Assistance offers or use Remote Desktop. To configure Windows Firewall to use either or both of these features, click Start, Control Panel. In the Security Category, open the Security Center and select Windows Firewall from the task list. Select Allow a Program Through Windows Firewall and click Continue on the UAC prompt that appears. On the Exceptions tab of the Windows Firewall Settings dialog box select the Remote Assistance and Remote Desktop check boxes. (If you have made changes to the port number of any service, you must click the Edit button and change the port number appropriately.) Click OK to close the applet.
To configure Windows Vista to accept Remote Assistance Offers, open the System applet in Control Panel and click the Remote tab. Select the Allow Remote Assistance Invitations to Be Sent from This Computer option in the Remote Assistance section (refer back to Figure 6.31). Click the Advanced button and select the Allow this Computer to be Controlled Remotely check box. If you want to allow connections only from computers running Windows Vista or Windows Server “Longhorn,” select the check box labeled Create Invitations that Can Only be Used from Computers Running Windows Vista or Later.
To send a Remote Assistance invitation, you can click Start and then select Help and Support. Scroll down to the Ask Someone title, click Use Windows Remote Assistance to get help from a friend or offer help. Click Invite Someone You Trust to Help You. There are two options on the following page, shown in Figure 6.32: Use E-mail to Send an Invitation or Save the Invitation as a File.
Depending on from whom you are requesting information and how, you should make a selection that will best reach the expert user. Whichever method you select for use, you can password-protect the session. If you have created an invitation for assistance and want to cancel it before it expires, you can use the View Invitation Status option and cancel the invitation.
After the expert receives the email or the invitation file, the expert is prompted for the password. When the password is supplied, the expert can initiate the session, and the user’s computer validates the password and invitation before the user is prompted to start the session.
The expert sees a Remote Assistance Expert console that provides a real-time view of the user’s session. This is called a shadow session. If remote control has been enabled, the expert can click the Take Control button, notifying the user that the expert is asking to share control of the keyboard and mouse. The user can prevent a remote control session by pressing the Escape key, pressing Ctrl+C, or clicking the Stop Control button in the chat window.
The Internet and TCP/IP offer an extensive array of tools, utilities, and applications that directly affect how Windows Vista interacts with other computers. By default, both versions 4 and 6 of TCP/IP are installed on all computers running Windows Vista, and these cannot be removed.
The Network and Sharing Center enables you to configure and troubleshoot all your networking connections. You can configure TCP/IP with entirely different specifications on each network adapter. Users can route Internet traffic through their personal computer to a small network using Internet Connection Sharing (ICS). You can configure a large range of connectivity and security options for wireless networking in Windows Vista.
You can share resources such as files, folders, and printers from the Network and Sharing Center or from a Windows Explorer window. You can grant shared resources the Full Control, Change, or Read permissions. You can also configure NTFS permissions for granular control on each file and folder as it pertains to each user and group. Remember that the most restrictive permissions always apply when accessing resources over the network. A Deny setting overrides all allowed settings.
Windows Vista offers the Ipconfig utility and Event Viewer as tools for troubleshooting TCP/IP. The TCP/IP protocol suite provides many command-line utilities, including Ping, Tracert, Nslookup, Arp, Netstat, and Nbtstat. This chapter also looked at a variety of other problems that can occur with both wired and wireless networking.
In Windows Vista, you can configure remote access for dial-up modems and broadband modems. You can create VPN connections and dial-up connections for linking directly to the Internet. Users can connect to other computers to run remote sessions with Remote Desktop or request help from an expert through Remote Assistance.
multicast IPv6 address
In the 70-620 exam, you are required to master the following networking skills:
Configuring and troubleshooting TCP/IP
Configuring and troubleshooting sharing
Configuring and troubleshooting dial-up networking connections to the Internet, private networks, and VPN, using either a network adapter or modem
Configuring and troubleshooting wireless networks
Enabling Remote Desktop and Remote Assistance
You must gain these skills to pass the 70-620 exam. You can supplement the exercises and questions with hands-on practice of configuring the various connections to connect to a private network or the Internet, share the Internet connection, configure the Windows Firewall, and establish a remote session. You need two computers to connect the computers.
Remote Desktop enables you to connect to a Windows Vista computer from another computer running various versions of Windows. The 70-620 exam tests your knowledge of configuring and troubleshooting this important resource.
Remote Desktop is included with Windows XP Professional and Windows Vista Business, Enterprise, and Ultimate. You can install Remote Desktop on computers running most older versions of Windows to enable connection to a Vista computer. Perform Exercise 6.1 if you have a computer running Windows 2000, Windows Millennium Edition (ME), Windows 98, or Windows NT 4.0. Follow the instructions provided in this exercise if you have a Windows XP Professional CD-ROM available. Otherwise, you can download the Remote Desktop client software. Navigate to http://www.microsoft.com/windowsxp/downloads/tools/rdclientdl.mspx and follow the instructions provided to download the Remote Desktop client software. Then follow this exercise from step 2. Estimated time: 5 minutes.
|
You have been returned to the logon screen, and your user is indicated as being logged on at the (computername) computer. If you have logged on with a different user account, you receive a Remote Desktop Connection message informing you that the user wants to connect to your machine. Click OK to disconnect and enable the Remote Desktop session to proceed. | |
The source computer is displaying the Windows Vista interface from the target computer, and the Notepad program starts automatically. | |
D. You should check the network connectivity from her computer to the DHCP server and verify that the DHCP server is operating normally. An IPv6 address in the range fe80::/64 is a link local unicast address, which is the IPv6 equivalent of an APIPA address. The computer configures itself with this address type when it is unable to access a DHCP server to obtain proper TCP/IPv6 information. You should not configure a manual IPv6 address because this might conflict with another address on the network and cause communication problems, so answer B is incorrect. The Alternate Configuration tab is available only for IPv4 and not for IPv6, so answer C is incorrect. You cannot configure an IP address in the Advanced TCP/IP Settings dialog box if the computer is configured to obtain an IP address automatically; this configuration is reserved for computers requiring more than one IP address. Therefore answer C is incorrect. For more information, see the section, “Configuring IPv6 Addresses.” | |
A. You should change the subnet mask on Evelyn’s computer to 255.255.240.0. This subnet mask reserves the first 4 bits of the third octet as part of the network ID and the last 4 bits of this octet as part of the host ID. The subnet mask of 255.255.255.0 currently on her computer makes the computer think that IP addresses on Subnet 2 are actually on Subnet 1. Consequently, attempts to access Subnet 2 computers do not cross the router and these computers cannot be found. If you were to change the subnet mask to 255.255.248.0, Evelyn’s computer would still be unable to access Subnet 2 computers and would also be unable to access some Subnet 1 computers, so answer B is incorrect. The default gateway is correctly specified and changing it would not enable connection, so answer C is incorrect. It does not help to give Evelyn’s computer a second IP address on the Subnet 2 network; moreover, this option is not available when IP addresses are statically assigned. Therefore, answer D is incorrect. For more information, see the section, “Using the Network and Sharing Center to Configure TCP/IP.” | |
C. The problem is apparently a share permission that is more restrictive than the NTFS permissions because the assistant can log on locally and use the files but cannot make changes to them from across the network. This means that there is no need to make changes to NTFS permissions, so answer A is incorrect. It also means that the share permissions should be increased by allowing Full Control (your only option in this case) rather than denying Read or denying Full Control, which is why answers B and D are incorrect. For more information, see the section, “Modifying Shared Folder Properties.” | |
B. You should configure the wireless network to broadcast its SSID. If the network does not broadcast its SSID, Vista computers display the network on the Network Connections page as Unnamed Network. A user attempting to connect to this network must type the SSID in order to connect. The Manually Connect to a Wireless Network option enables you to connect to an infrastructure-based wireless network (a network with an access point). This option does not provide the name of the wireless network to client computers, so answer A is incorrect. The Connect Even If the Network is Not Broadcasting option determines whether a Vista computer can attempt to connect even if the network is not broadcasting its SSID. This does not enable display of the wireless network name, so answer C is incorrect. The No Authentication (Open) option enables Open system authentication with no encryption. This also does not enable display of the wireless network name; furthermore, it opens the network to transmitting data as unencrypted clear text. Therefore answer D is incorrect. For more information, see the section, “Managing Wireless Networks.” | |
C. Kristin should select the WPA-Enterprise security method. This security method uses TKIP as its default encryption type as well as 892.1x authentication. The WPA-Personal and WPA2-Personal security methods both require preshared keys for authentication, so answers A and B are incorrect. The WPA2-Enterprise security method uses AES and not TKIP as its default encryption type, so answer D is incorrect. For more information, see the section, “Managing Wireless Networks.” | |
A and D. Tom should enable ICS on the network interface of his computer that is connected to the cable modem, and configure TCP/IP on Steve and Jim’s computers to obtain an IP address automatically. ICS enables other users to connect to the Internet through a Windows Vista computer. ICS also functions as a DHCP allocator, automatically configuring other computers on the LAN with IP addresses on the 192.168.0.0/24 network. Tom should not configure the other computers with static IP addresses because the ICS computer provides them with their TCP/IP configuration, so answer B is incorrect. NAT is used on larger networks and requires the use of a server computer, so answer C is incorrect. Tom should select Never Dial a Connection on Steve and Jim’s computers, so answer E is incorrect. For more information, see the section, “Configuring and Troubleshooting Internet Connection Sharing.” | |
B. The | |
A. You should set the type of VPN to PPTP VPN. The error message informed Barbara that the VPN connection was looking for a server certificate. This occurred because this connection type requires a machine certificate to operate. Selecting the L2TP IPSec VPN option will not work because this option requires a server certificate, so answer B is incorrect. The preshared key option would require the same key to be configured on the server. Furthermore, this would enable anyone knowing the key to connect, which would reduce the VPN network’s security. Therefore answer C is incorrect. Selecting the Optional Encryption option does not help because this is an authentication problem, not an encryption one; therefore answer D is incorrect. For more information, see the section, “Using a VPN Connection to Connect to Computers.” | |
A and G. To connect to the executive’s computer, you need to enable TCP port 4322 on each router by allowing it for incoming and outgoing traffic. Then, to connect to the computer via the new TCP port, you would use the computer’s NetBIOS name of | |
D. Louise should request that a network administrator open TCP port 3389 on the firewall. Both Remote Desktop and Remote Assistance are based on Terminal Services technology and use this port to establish remote connections. Most firewalls are configured to block incoming connections to this port; therefore, it is necessary to configure the firewall to open this port when using Remote Assistance. These connections usually fail in scenarios where the user requiring assistance is behind a firewall. Remote Assistance enables a user to create a shared connection with a remote expert, who can input information to the user’s computer and carry on a chat session with the user. Its chief purpose is to enable the expert (Louise in this case) to help a user (Andrew in this case) with a problem that he is having with his computer. Allow Connections Only from Computers running Remote Desktop with Network Level Authentication (more secure) option is used with Remote Desktop and not with Remote Assistance, so answer A is incorrect. The Allow This Computer to be Controlled Remotely option enables Louise to take control of Andrew’s desktop session so she can show him the steps to be followed or actually perform the steps for him. This option should be selected, so answer B is incorrect. The Remote Desktop Users list is used for enabling users to make a Remote Desktop connection, not a Remote Assistance connection, so answer C is incorrect. For more information, see the section, “Remote Assistance.” |
The following are some recommended readings on the subject of implementing, managing, and troubleshooting network protocols and services in Windows Vista:
Books
Barrett, Diane, Bill Ferguson, and Don Poulton. Implementing and Administering Security in a Windows Server 2003 Network Exam Cram 2 (70-299). Indianapolis, IN: Que Publishing, 2004.
Chappell, Laura and Ed Tittel. Guide to TCP/IP, Second Edition. Cambridge, MA: Course Technology, 2004.
Huggins, Diana. MCSA/MCSE Implementing, Managing, and Maintaining a Windows Server 2003 Network Infrastructure Exam Cram 2 (Exam 70-291). Indianapolis, IN: Que Publishing, 2003.
Course
Microsoft Official Curriculum course 5115, Installing and Configuring the Windows Vista Operating System. Module 5, Configuring Advanced Networking; Module 7, Configuring Network Security; and Module 8, Configuring Internet Explorer 7.0. Information available at http://www.microsoft.com/learning/syllabi/en-us/5115aprelim.mspx.
Websites
Microsoft Technet. IPv6. http://www.microsoft.com/technet/network/ipv6/default.mspx.
Microsoft. When a DHCP server is unavailable on a Windows Vista-based computer, Windows Vista uses an APIPA IP address much sooner than Windows XP does under the same circumstances. http://support.microsoft.com/kb/KB931550.
Davies, Joseph. Next Generation TCP/IP Stack in Windows Vista and Windows Server 2008. http://www.microsoft.com/technet/community/columns/cableguy/cg0905.mspx.
Microsoft Technet. New Networking Features in Windows Server 2008 and Windows Vista. http://www.microsoft.com/technet/network/evaluate/new_network.mspx.
Deering, S., and Hinden, R., RFC 2460—Internet Protocol Version 6 (IPv6) Specification. http://www.ietf.org/rfc/rfc2460.txt.
Microsoft Technet. IPv6 Transition Technologies. http://www.microsoft.com/technet/network/ipv6/ipv6coexist.mspx.
Davies, Joseph. Configuring IPv6 with Windows Vista. http://www.microsoft.com/technet/community/columns/cableguy/cg0506.mspx.
Davies, Joseph. Network Location Types in Windows Vista. http://www.microsoft.com/technet/community/columns/cableguy/cg0906.mspx.
Microsoft TechNet. New Networking Features in Windows Server 2008 and Windows Vista. http://www.microsoft.com/technet/network/evaluate/new_network.mspx.
Microsoft. How to troubleshoot wireless connection problems. http://support.microsoft.com/kb/831770/.
Microsoft Technet. A Support Guide for Wireless Diagnostics and Troubleshooting. http://www.microsoft.com/technet/prodtechnol/winxppro/maintain/wlansupp.mspx.
Microsoft. Wireless Networking in Windows Vista. http://www.microsoft.com/downloads/details.aspx?FamilyID=eb958617-b3d3-42cf-a434-87ad81259fc6&displaylang=en.

