
Objective group 3
Create custom document elements
The skills tested in this section of the Microsoft Office Specialist Expert exam for Microsoft Word 365 and Microsoft Word 2019 relate to creating custom document elements. Specifically, the following objectives are associated with this set of skills:
3.1 Create and modify building blocks
3.2 Create custom design elements
3.4 Create and manage tables of figures
Documents often have specific requirements. For example, a series of documents might require a common appearance or regularly include a content element such as a cover page or a disclaimer. You can create and save elements such as custom themes and building blocks to more efficiently work with these requirements. Business reports, academic papers, and book manuscripts are types of documents that often use references to help readers navigate the document or to meet a publisher’s or an organization’s requirements. Word includes features that help you create these references.
This chapter guides you in studying ways to create and modify building blocks, create custom design elements, create and manage indexes, and create and manage tables of figures.
Objective 3.1: Create and modify building blocks
Word provides building blocks for document elements such as headers and footers, cover pages, and tables. Galleries that you display by selecting commands on the ribbon are filled with these and other types of building blocks. You can create your own building blocks, save them in a gallery, and then use them again in related documents. For example, Quick Parts are a type of building block you can use to insert text or other document elements you use repeatedly. You can insert a logo or the text of a standard disclaimer in a document and then save this element to the Quick Part gallery, where it appears when you need to insert the Quick Part in a document. You can also edit the properties of building blocks.
This section describes how to create a Quick Part and edit and manage building blocks.
Create Quick Parts
Quick Parts can cover a range of elements that you use in multiple documents or repeatedly within the same document. By creating a Quick Part, you make a document element available directly from a gallery on the Insert tab. A Quick Part might contain a standard caption you use with figures or tables, a heading that is followed by placeholder text, a brief legal disclaimer, or a logo you insert at the top of correspondence or a report.
When you create a Quick Part (or another type of building block), you use the options in the Create New Building Block dialog box to name the Quick Part and specify other properties. By default, Word saves Quick Parts and other building blocks in a template file named Building Blocks.dotx. By saving a custom building block to that file (or to the standard Normal template—Normal.dotm), you make the building block available to all new documents. You can also save a building block in the template file attached to a document. The building block is then available to any document you create based on that template.
When you create a new building block, you can specify the following properties:
Name The name of the building block. You can insert a Quick Part by typing the first several characters in its name and then pressing Enter when prompted by Word.
Gallery The gallery in which you want the building block to appear. Use the built-in galleries (such as Quick Part or Cover Page) or one of the galleries Word provides named Custom. You cannot enter your own gallery name.
Category You can assign a building block to a category within a gallery. Items in a gallery are grouped by their category. Select Create New Category in this list to define a custom category.
Description Use this section to provide a description that appears in a ScreenTip when you point to the building block in a gallery and when you select the item in the Building Blocks Organizer.
See Also
For more information about working with the Building Blocks Organizer, see “Manage building blocks” later in this topic.
Save in This box specifies the template in which to save the building block. You can select Building Blocks.dotx (the template used to store building blocks by default), Normal.dotm (the default Word template), or the template attached to the current document. Select Building Blocks.dotx (or Normal.dotm) to make the building block available to all documents. Select the template attached to the current document to create a building block specifically for that template.
Options These options specify how the building block is inserted. The choices are Insert Content Only, Insert Content In Its Own Paragraph, and Insert Content In Its Own Page. The first of these choices places the building block at the cursor without adding a paragraph or page break.
To create a Quick Part
Select the content you want to include in the Quick Part.
On the Insert tab, in the Text group, click Quick Parts, then click Save Selection to Quick Part Gallery.
In the Create New Building Block dialog box, enter a name and a description for the Quick Part.
Select the gallery and category in which you want the Quick Part to appear.
In the Save in list, do either of the following:
To make the Quick Part available to all documents, click Building Blocks.dotx.
To include the Quick Part only in the template attached to the document, click that template.

Saving the Quick Part to Building Blocks.dotx makes it available to all new documents.
In the Options list, select the option you want to use to insert the Quick Part: Insert content only, Insert content in its own paragraph, or Insert content in its own page.
Click OK to apply the settings.
To insert a Quick Part in a document
 Enter the name of the Quick Part, then press F3.
Or
On the Insert tab, in the Text group, click Quick Parts.
In the Quick Parts gallery, do one of the following:
Click a Quick Part to insert it by using the default insertion option.
Right-click a Quick Part, then click one of the following insertion options:
Insert at Current Document Position
Insert at Page Header
Insert at Page Footer
Insert at Beginning of Section
Insert at End of Section
Insert at Beginning of Document
Insert at End of Document
Manage building blocks
You can view the range of building blocks that come with Word by displaying galleries (such as for cover pages or watermarks) from the ribbon. In addition, Word displays the list of building blocks in the Building Blocks Organizer, a dialog box you can open by clicking Quick Parts on the Insert tab and then clicking Building Blocks Organizer. Select a building block in the list to display a preview and a description. You can then modify the properties of the selected building block and remove building blocks you no longer need.

Each building block is defined by a set of properties that you can use to keep building blocks organized and to specify how Word inserts the building block. In the Modify Building Block dialog box, you can change the gallery a building block is assigned to, update its category, modify its description, and change other properties.
See Also
For a detailed description of building block properties, see “Create Quick Parts” earlier in this topic.

To open the Building Blocks Organizer
- On the Insert tab, in the Text group, click Quick Parts, then click Building Blocks Organizer.
- In the Quick Parts gallery, right-click a building block, then click Organize and Delete.
To open the Modify Building Block dialog box for a building block
- In the Quick Parts gallery, right-click the building block you want to modify, then click Edit Properties.
- Open the Building Blocks Organizer. In the Building blocks pane, click the building block you want to modify, then click Edit Properties.
To edit building block properties
Open the Modify Building Block dialog box for the building block that you want to modify.
Update the Name, Gallery, Category, Description, Save In, or Options properties, then click OK.
When Word prompts you to redefine the building block entry, click Yes.
To delete a building block
Open the Building Blocks Organizer.
In the Building blocks pane, click the building block you want to delete.
Below the Building blocks pane, click Delete.
When Word prompts you to confirm the deletion, click Yes.
 Open the WordExpert_3-1 document, and do the following:
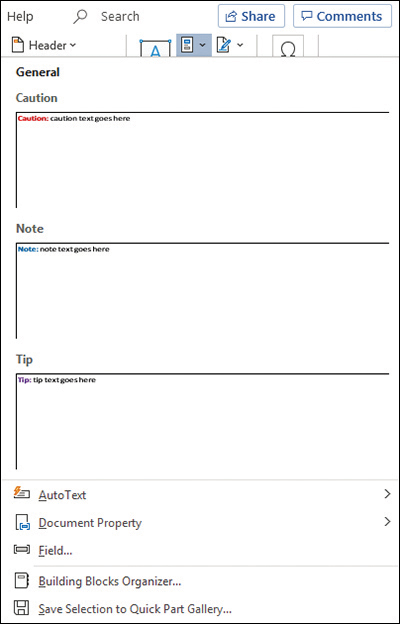
 Create a Quick Part from the “Tip: Tip text goes here” line of the document. Name the Quick Part Tip, add the description Inserts a Tip element, select the option Insert Content In Its Own Paragraph, and accept the other defaults.
- Create a Quick Part from the “Note: Note text goes here” line of the document. Name the Quick Part Note, add the description Inserts a Note element, select the option Insert Content In Its Own Paragraph, and accept the other defaults.
- Create a Quick Part from the “Caution: Caution text goes here” line of the document. Name the Quick Part Caution, add the description Inserts a Caution element, select the option Insert Content In Its Own Paragraph, and accept the other defaults.
- Open the Building Blocks Organizer. For the Tip, Note, and Caution Quick Parts in turn, move the Quick Part to a custom category named Sidebar building blocks.
- Save the WordExpert_3-1 document, then close the document. (Note that there is no results file for these practice tasks since building blocks are not stored within a regular Word document, as described earlier in this topic.)
Objective 3.2: Create custom design elements
Themes and styles provide ways to consistently format the content of a Word document. Themes specify default fonts for body and heading text, colors for headings and other elements, and text effects such as shadows. Styles specify settings for fonts, paragraphs, tabs, and other formatting that are applied as a group to paragraphs and characters. Style sets provide a means of changing the appearance of multiple styles at one time. This topic describes how to create custom color and font sets, custom themes, and custom style sets.
See Also
For more information about styles, see “Objective 2.3: Create and manage styles.”
When you work with themes, styles, and style sets, keep in mind that a template is defined (in part) by the styles it contains and the attributes for those styles. After you apply styles to the content of your document, you can apply a different template or style set to update styles with the same name to reflect the formatting defined in the new template or style set. If the styles in a template or a document are set up to use theme fonts and theme colors, you can display a different set of fonts and colors by applying a new theme.
You manage themes and style sets by using commands in the Document Formatting group on the Design tab.
Create custom color sets
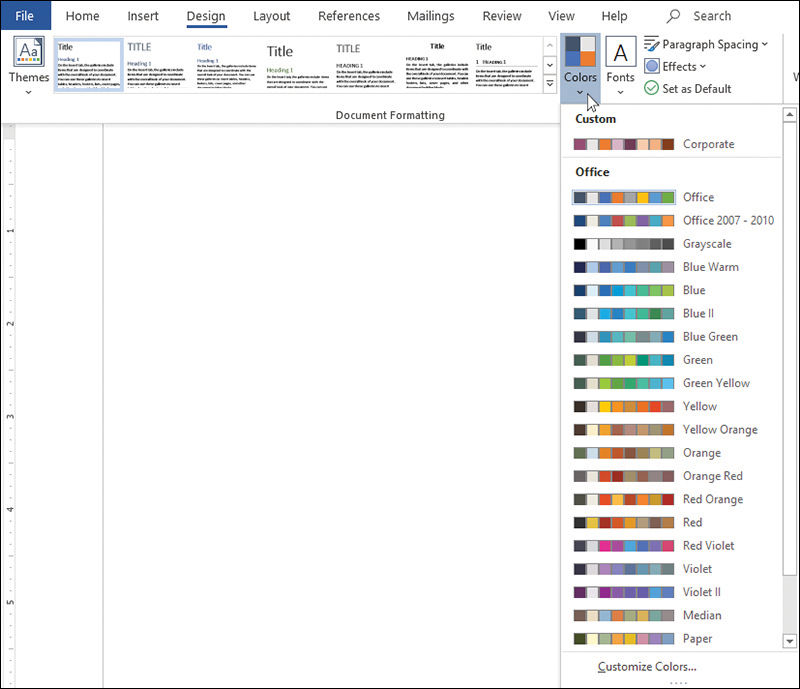
Word offers many tools for turning a plain, unformatted file into an attractive, professional-quality document. For example, features such as cover pages and Word’s numerous typography tools can make your document easy to read. The final touch involves adding just the right amount of color to your text. With colors, you can emphasize important results, shape the layout of your page, and add subtle psychological effects. Word comes with nearly two dozen built-in color sets (also called color themes) that make it easy to apply colors to your documents.
However, if no scheme offers the exact colors you want, you can create your own. Each scheme consists of 12 color elements:
Text/Background - Dark 1 The dark text color that Word applies when you choose a light background color
Text/Background - Light 1 The light text color that Word applies when you choose a dark background color
Text/Background - Dark 2 The dark background color that Word applies when you choose a light text color
Text/Background - Light 2 The light background color that Word applies when you choose a dark text color
Accent 1 through Accent 6 The colors that Word uses for accents, such as chart data markers
Hyperlink and Followed Hyperlink The colors that Word uses for worksheet links: the former for links that haven’t been clicked and the latter for links that have been clicked

For each element, you can choose a color from Word’s standard color palette, or you can create a custom color. Word offers two color models:
RGB This color model is based on the idea that you can create any color by combining three base colors: red, green, and blue. You assign a value between 0 and 255 for each color: the higher the number, the more intense the color.
Tip
In the RGB color model, when the red, green, and blue values are equal, you get a grayscale color. Lower numbers produce darker grays, and higher numbers produce lighter grays. Black has RGB values of 0, 0, 0 and white has RGB values of 255, 255, 255.
HSL This color model is based on three properties, each of which is assigned a value between 0 and 255:
Hue (which is more or less equivalent to the term color) measures the position on the color spectrum. Lower numbers indicate a position near the red end, and higher numbers move through the yellow, green, blue, and violet parts of the spectrum.
Saturation is a measure of the purity of a particular hue, with 255 giving a pure color and lower numbers indicating that more gray is mixed with the hue until, at 0, the color becomes part of the gray scale.
Luminance is a measure of the brightness of a color, where lower numbers are darker and higher numbers are brighter.

On the Custom tab, you can either specify RGB or HSL values, or you can drag the color pointer and the luminance slider.
To create a custom color set
On the Design tab, in the Document Formatting group, click Colors, then click Customize Colors.
Tip
If an existing color set is close to what you want, you can save some time and effort by using that color set as your starting point. On the Design tab, in the Document Formatting groups, click Colors, and then click the color set to apply it to the document and use it as the starting point.
For any theme color you want to modify, click the color picker to display a menu of color options, then do one of the following:
In the Theme Colors gallery, click one of the 12 existing theme colors or 60 variations to assign it to the color role.
In the Standard Colors gallery, click one of the 10 standard colors.
Click More Colors to open the Colors dialog box. On the Custom tab, in the Color model list, select either RGB or HSL, do any of the following, and then click OK:
If you chose RGB, enter specific values for Red, Green, and Blue.
If you chose HSL, enter specific values for Hue, Sat, and Lum.
To adjust the hue visually, drag the color pointer horizontally.
To adjust the saturation visually, drag the color pointer vertically.
To adjust the luminance visually, drag the luminance slider.
Repeat step 2 for each theme color you want to modify.
In the Name box, enter a name for your new color set.
Click Save to save the color set and apply it to the document.
Create custom font sets
Each Word theme comes with more than two dozen built-in font sets that make it easy to apply fonts to your documents. Each font set defines two fonts:
A Heading font that Word uses for title and heading text
A Body font that Word uses for regular document text
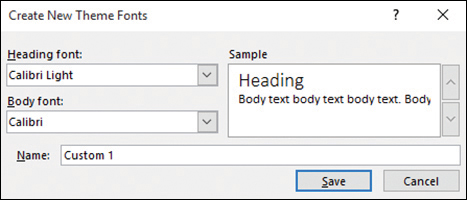
The typeface is often the same for both types of text, but some font sets use two different typefaces, such as Calibri Light for titles and headings and Calibri for body text. If no existing font set includes the typefaces you want, you can create your own.
To create a custom font set
On the Design tab, in the Document Formatting group, click Fonts, then click Customize Fonts.
In the Heading font list, select a font for worksheet headings.
In the Body font list, select a font for worksheet text.
In the Name box, enter a name for your new font set.
Click Save to save the font set and close the dialog box.
Create custom themes
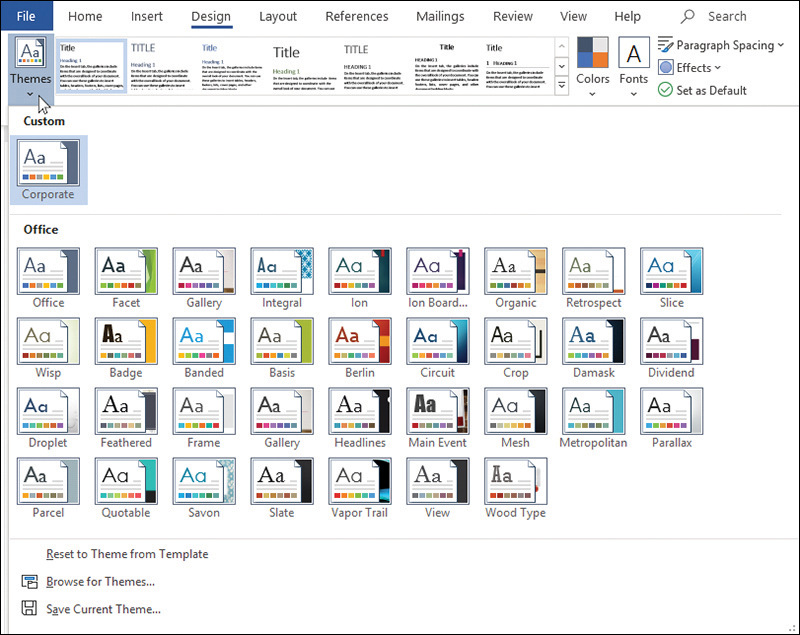
A theme is a predefined collection of color, font, and effect formatting options. Each theme comes with preset formatting in three categories: color scheme, font set, and effects (which include formatting such as drop shadows and 3D effects). Word offers more than three dozen predefined themes.
If none of the predefined themes offer the exact formatting you require, you can modify any theme by selecting a different color scheme, font set, or effects scheme. You can even create your own custom color and font sets. However, if you go to all this trouble to get your workbook formatting just right, it is time-consuming to have to repeat the same steps for other workbooks you open or create. To avoid this problem, you can save your theme customizations as a new workbook theme. This enables you to apply the custom formatting to any workbook just by selecting the custom theme.
Exam Strategy
The objective domain for Exam MO-101, “Microsoft Word Expert (Word and Word 2019),” requires you to demonstrate the ability to create custom color schemes, font sets, and themes. You will not be required to customize effect schemes.
To create a custom theme
In the active document, create or apply the color set, font set, paragraph spacing, and effects you want to include in the theme.
On the Design tab, click Themes, then select Save Current Theme to open the Save Current Theme dialog box.
Important
By default, Word displays the Document Themes folder, which is located in your user profile’s AppDataRoamingMicrosoftTemplates folder. Save your theme in this folder to ensure that it gets displayed in the Themes list.
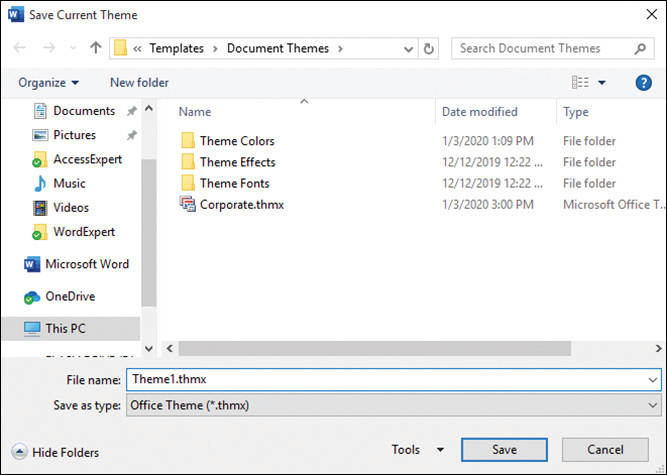
When saving your custom theme, be sure to store it in the Document Themes folder. In the File name box, enter a name for the custom theme.
Click Save.
Create custom style sets
Style sets are like themes; they can change the overall appearance of a document in a single step. In addition to fonts and colors, style sets can change character attributes such as font size and capitalization, and paragraph attributes such as line spacing, borders, and alignment. The use of style sets reinforces the advantages of applying defined styles to distinct document elements (headings, lists, and normal paragraphs, for example). With styles in place in a document, you can change the look of a document by applying a different style set.
Important
Style sets change only formatting defined by styles. Any formatting applied directly to a document element is not updated by applying a style set.
A style set’s definitions are contained in a .dotx file, the file name extension used for Word templates. However, applying a style set does not replace the template associated with a document; it only applies the style set’s style definitions. If, after applying a style set, you want to restore the formatting defined in the current template, you can revert to using the style definitions included in that template by clicking the Reset command at the bottom of the Style Set gallery.
When you create and save a custom style set, Word prompts you to save the file in your user profile, at C:Usersuser nameAppDataRoamingMicrosoftQuickStyles.
See Also
For more information about modifying styles, see “Modify existing styles” in “Objective 2.3: Create and manage styles.”
To create a custom style set
Set up a document with the style definitions you want to use. (Start with an existing style set if you want to.)
On the Design tab, in the Document Formatting group, click the More button to open the Style Set menu, then click Save as a New Style Set.
In the Save as a New Style Set dialog box, name the style set, then click Save.
- Open the WordExpert_3-2a document, and do the following:
- Apply the Savon theme to the document.
- Apply the built-in Green Yellow theme color set to the document.
- Apply the built-in Consolas-Verdana theme font set to the document.
- Observe how the font is applied to different elements and how the fonts change.
- Create a custom color set named WordExpertColors. Select Dark Green as the Accent 1 color.
- Create a custom font set named WordExpertFonts. Select Corbel as the heading font and Bookman Old Style as the body font.
- Observe how the font set is applied to different elements and how the fonts change.
- Apply the built-in Black & White (Capitalized) style set to the document and observe the changes.
- Modify the Heading 1 style to use a font size of 24 pt., with a bold italic style.
- Modify the Normal style to use the Times New Roman font. Set the paragraph spacing to 12 pt. after. Save the changes as a custom style set named WordExpertStyleSet.
- Save the WordExpert_3-2a document.
- Open the WordExpert_3-2a_results document. Compare the two documents to check your work. Then close the open documents.
- Open the WordExpert_3-2b document.
- Apply the WordExpertColors custom color set.
- Apply the WordExpertFonts custom font set.
- Apply the WordExpertStyleSet custom style set.
- Save the WordExpert_3-2b document.
- Open the WordExpert_3-2b_results document. Compare the two documents to check your work. Then close the open documents.
Objective 3.3: Create and manage indexes
A savvy buyer of nonfiction will examine a book’s index before deciding whether to purchase the book, and a savvy user of nonfiction will make regular use of a book’s index after buying it. In almost all nonfiction books, a good index is an essential feature.
Is an index essential in your Word documents? That depends on several factors:
Length The longer the document, the more likely an index is necessary or expected.
Complexity The more complex a document’s subject matter, the more likely an index helps cut through that complexity and enables your readers to find what they want.
Audience Some people simply expect an index and are inordinately upset if a document does not include one.
If you have a document that has some or all of these factors, then you ought to consider adding an index. However, I should mention early on that creating an index is tedious, time-consuming, and finicky work. Although some techniques are available that you can use to lighten the load, you should not make the decision to include an index lightly. Finally, although building a quality index for a large document such as a book requires special training, Word’s indexing tools are all you really need for more modest projects.
Before you add an index to a document, you need to complete two general steps: mark index entries (by inserting index fields) and set options for how Word generates the index. Word uses the entries and the options you specify to create the index, assigning page numbers to the entries based on their location in the document.

You can use several approaches to mark index entries:
Select the text you want to use as an entry.
Add an entry of your own at the location where you want the index marker.
Compile terms in a separate file, and have Word insert index markers based on the terms in the file.
An index entry must define at least one level, the main entry. Index entries can also include subentries and cross-references to other entries in the index. Entries can refer to a specific page or to a range of pages. For example, a main entry of macros might include subentries such as recording, editing, and assigning to a button. The page reference for the main entry might span several pages, with subentries covered on a single page or a span of fewer pages.
Mark index entries
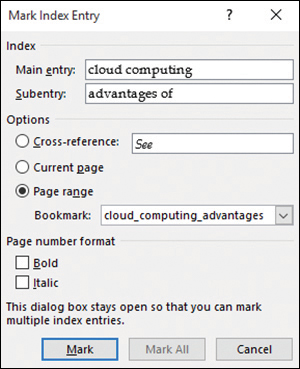
When you insert entries manually by selecting or entering text, you work in the Mark Index Entry dialog box. If text is selected when you open the Mark Index Entry dialog box, that text is displayed in the Main Entry box. You can keep the Mark Index Entry dialog box open as you work on a document. Text that is selected when you click the dialog box to make it active replaces any text currently in the Main Entry box. You don’t need to select text to create a main entry, however. You can define a main entry yourself by clicking where you want an index reference placed in the document and then entering the text in the Main Entry box.
Tip
You can apply formatting such as bold, italic, and underline to the text in the Main Entry, Subentry, and Cross-Reference boxes by selecting the text and then using the formatting keyboard shortcuts. For example, you might need to italicize the title of a book or journal or choose to display in bold terms that also appear in a glossary. The formatting you apply by using the formatting keyboard shortcuts does not override settings for index styles defined in the template attached to the document.
Subentries for a main entry must be entered manually. You can also create a third-level entry within the subentry or create a cross-reference (such as a See reference) to other index entries as needed.
Word defines index entries within hidden index fields. An index field is identified by the characters XE. Curly braces enclose the index field tag and text.
Tip
If index fields are not displayed in your document, display hidden formatting marks.
Here is an example of the information that an index field might contain:
{ XE "formatting:characters: font" "See also styles" }
An entry that spans a range of pages is associated with a bookmark that you define in the document. The bookmark is associated with the content that you want the index entry to refer to. The bookmark does not identify specific page numbers itself. The indexing feature in Word assigns page numbers to the bookmarked range when you generate the index.
The Mark All button in the Mark Index Entry dialog box inserts an index field at the first occurrence of the main entry in each paragraph of the document. For example, if the main entry is styles, clicking Mark All inserts an index field for the first occurrence of the word styles in each paragraph of the document. If you use the Mark All button, keep in mind that Word distinguishes between uppercase and lowercase occurrences of a term—in the previous example, occurrences of Styles would not be marked.
To display index entries and hidden formatting symbols in a document
- On the Home tab, in the Paragraph group, click Show/Hide ¶.
To open the Mark Index Entry dialog box
- On the References tab, in the Index group, click Mark Entry.
- Press Alt+Shift+X.
To mark index entries
Open the Mark Index Entry dialog box.
In the document, do either of the following:
Select the text for which you want to create a main index entry, then click the Mark Index Entry dialog box to make it active.
Click where you want an index marker to be in the document, and then in the Mark Index Entry dialog box, enter the text for the entry in the Main Entry box.
If you want to define a second-level index term, enter the term in the Subentry box. If you want to define a third-level entry, add a colon to the end of the subentry, then enter the third-level term.
In the Options area, do one of the following:
Click Cross-reference, then enter the text for the reference.
Click Current page.
Click Page range, then select the bookmark for the range of pages the entry is related to.
See Also
For information about bookmarking page ranges, see the next procedure.
In the Page number format area, if you want Word to apply specific formatting to the page number, select the Bold and/or Italic check box.
Do either of the following:
To insert a single index entry in the current location, click Mark.
To insert an index entry for the first instance of the term in each paragraph of the document, be sure the Current page option is selected, then click Mark All.
To create a bookmark that defines a page range
Select the paragraphs you want to include in the page range.
On the Insert tab, in the Links group, click Bookmark.
In the Bookmark dialog box, enter a name for the bookmark, then click Add.
Insert index entries from a file
You can create an index by maintaining a file that contains main entries in a separate document (also referred to as an automark file or a concordance file) that Word uses to mark entries in the document being indexed. The automark file can be saved as a Word document or in other formats, such as a text (.txt) file. Each entry is set up as a separate paragraph. Word then searches for each term or phrase in the automark file and inserts a corresponding index field for the first instance of the term or phrase it finds in each paragraph of the document.
For more flexibility, you can set up the list in a two-column table, with the terms you want to search for in the left column and the corresponding index entries in the right column. By using two columns, you can collect terms such as format, formatting, and formatted under the same main entry—list the terms separately in the table’s left column and enter the same main entry in the table’s right column.
The entries in an automark file are case-sensitive. For example, if the automark file includes the term text effects, Word won’t insert an index field for an instance of Text effects when it indexes the document.
To create an automark file
In a blank document, do one of the following:
Enter the index terms in individual paragraphs.
Create a two-column table. Enter terms that you want Word to index in the first column, and the index tags you want to associate with each term in the second column.
Save the file.
To mark index entries by using an automark file
On the References tab, in the Index group, click Insert Index.
In the Index dialog box, click AutoMark.
In the Open Index AutoMark File dialog box, browse to and select the automark file, then click Open.
Create and update indexes
After you mark index entries, you use the options in the Index dialog box to specify the index’s design and other options for the appearance of the index.
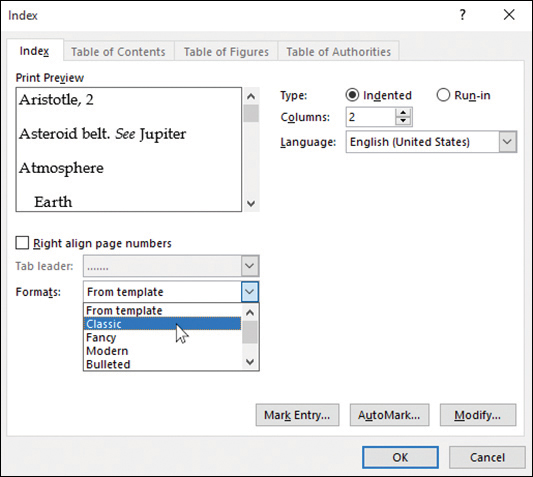
Word supports two index formats: indented and run-in. By default, both formats appear in a two-column layout and are wrapped to fit the width of the columns. In an indented index, the entries are listed in this format:
Styles
applying, 211
creating, 209
updating in template, 212
In a run-in index, an entry would appear as follows:
Styles: applying, 211; creating, 209; updating in template, 212
A run-in index saves space, which makes it a good choice if you have only a limited number of pages for the index. When you select an option for the type of index, Word displays an example in the Print Preview area of the Index dialog box.
You can change the number of columns (from 1 through 4) or set the Columns box to Auto (in which case the index uses the same number of columns as defined in the document). If you are using an indented index, you can change the alignment of page numbers. Word previews this format when you select the option, and you can then select the type of tab leader you want to include (or select None from this list). The Formats list provides several options for styling the fonts, line spacing, and other formats Word applies to the index entries when you generate the index.
Tip
If From Template is selected in the Formats list, you can modify the styles for index levels. Click Modify in the Index dialog box. In the Style dialog box, select an index level, then click Modify to open the Modify Style dialog box and make changes to the formatting attributes for that index level. For more information about modifying styles, see “Objective 2.3: Create and manage styles.”
If you need to edit an index entry, you should edit the specific index field and not the index that Word generates. By editing the entry, you ensure that corrections are included if you generate the index again. Locate the field in the document, and then edit and format the text enclosed in quotation marks within the curly braces that define the field.
After you make changes to index markers, you can update the index in place.
Tip
When editing index entries, you can move between fields by using the search features on the Find and Go To tabs of the Find And Replace dialog box. To locate fields from the Find tab, click Field in the Special list. To locate fields from the Go To tab, click Field in the Go To What list.
To specify index formatting options and generate the index
In the document, click where you want to insert the index.
On the References tab, in the Index group, click Insert Index.
In the Index dialog box, set the following options, then click OK:
In the Type area, click Indented or Run-in.
In the Columns box, enter or select the number of columns you want to arrange the index entries in.
If you are using a language other than the default language on your system, choose a language.
If you are using an indented index, select the Right align page numbers check box, then select the style of tab leader you want to use.
Select a format for the index, or keep From template selected.
To edit index entries
In the document, display index entries and hidden formatting symbols.
Locate the index entry you want to edit, and edit the text within the index tag.
To delete index entries
In the document, display index entries and hidden formatting symbols.
Locate the index entry you want to delete.
Select the entire field (including the curly braces), then press the Delete key.
To update an index
- Click anywhere in the index, and then, on the References tab, in the Index group, click Update Index.
- Right-click the index, then click Update Field.
- Open the WordExpert_3-3a document and do the following:
- Define a bookmark that starts with the section heading “Word’s formatting buttons” and includes the whole section. Name the bookmark formatting_buttons.
- Define a bookmark that starts with the section heading “Formatting from the keyboard” and includes the whole section. Name the bookmark keyboard_formatting.
- Work through the file and add index entries for the following terms:
character formatting
Create New Style from Formatting dialog box
Font group
Format Painter
formatting
Home tab
Mini Toolbar
paragraph formatting
Paragraph group
styles
Styles gallery
- After the heading “Word’s formatting buttons,” insert a main entry for formatting and a subentry for buttons. Use the bookmark named formatting_buttons to indicate the page range.
- After the heading “Formatting from the keyboard,” insert a main entry for formatting and a subentry for keystrokes. Use the bookmark named keyboard_formatting to indicate the page range.
- After the heading “Working with the Mini Toolbar,” insert a main entry for formatting and a subentry for Mini Toolbar.
- After the heading “Using the Format Painter,” insert a main entry for formatting and a subentry for Format Painter.
- In the section “Understanding formatting,” after the text “Here are the three main types of formatting,” insert a main entry for formatting and a subentry for types.
- In the section “Understanding formatting,” after the text “Here are the two main methods for applying character and paragraph formatting,” insert a main entry for formatting and a subentry for methods.
- Generate a run-in index, placing the index at the end of the document.
- Find the entries for formatting and edit the entries so that they read formatting text.
- Update the index to reflect your changes.
- Save the WordExpert_3-3a document.
- Open the WordExpert_3-3a_results document. Compare the two documents to check your work. (The number of entries and their placement in your document might differ from those shown in the result file.) When you are done, close the open documents.
- Open the WordExpert_3-3b document and do the following:
- In the blank document, create an automark file listing the same terms provided in the earlier list, pressing Enter after each term.
- Save the WordExpert_3-3b document.
- Open the WordExpert_3-3b_results document. Compare the two documents to check your work. Then close the open documents.
- Open the WordExpert_3-3c document and do the following:
- Insert index entries by referencing the WordExpert_3-3b automark file.
- Generate an indented index, placing it at the end of the document.
- Save the WordExpert_3-3c document.
- Open the WordExpert_3-3c_results document. Compare the two documents to check your work. Then close the open documents.
Objective 3.4: Create and manage tables of figures
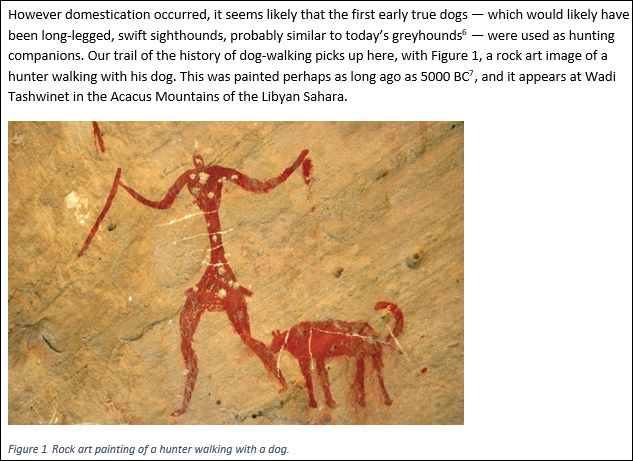
Descriptive captions are used to identify document elements such as illustrations, charts, tables, code listings, and equations. After captions are associated with a set of objects, you can generate a reference table that lists the captions and their positions within the document. A table of figures (TOF) is most commonly a listing of the figures or illustrations in a document, and it usually appears just after the table of contents (TOC). Like a TOC, the TOF can also include page numbers and you can set up each TOF entry as a hyperlink. You can also create separate TOFs for a document’s tables, charts, equations, and so on. When you define a caption, you associate it with a specific element (a label) and can set options for how similar elements are numbered and how captions are positioned. Word applies its built-in Caption style to the captions you create.
The Insert Caption command in the Reference tab’s Captions group opens the dialog box in which you enter a caption and define settings for how Word displays it.
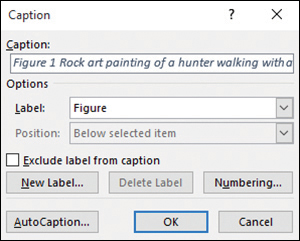
Referring to the Caption text box, you can see that a caption has three parts:
Caption label The type of element, such as a figure or table. In our example, the caption label is Figure.
Caption number The instance of the element in the document (where 1 refers to the first instance, 2 to the second instance, and so on). In our example, the caption number is 1.
Caption text The description of the element. In our example, the text is Rock art painting of a hunter walking with a dog.
In the Caption dialog box, use the Label list to select the type of element you are adding a caption to. The default choices are Equation, Figure, and Table. You can define captions for other document elements (charts or maps, for example). You can delete custom labels when you no longer need them, but you cannot delete the default labels.
By clicking the Numbering button, you open the Caption Numbering dialog box. You can use the options in this dialog box to switch to a different numbering format (such as Roman numerals) or to include a chapter number with a caption’s label (for example, Table 3-3). Chapter headings must be defined by using one of the built-in heading styles. You can also select a character to separate the chapter number and the figure or table number. A hyphen is used by default; other choices include a period or a colon.
Tip
If you often insert the same type of object in a document and you want these objects to have captions, click AutoCaption in the Caption dialog box. Select the type of object (such as Bitmap Image or Microsoft Excel Worksheet) that you want Word to provide a caption for when you insert an object of this type. You can select the label that’s used with specific object types (or create a new label), where Word positions the caption by default, and specify how captions for this type of object are numbered.
If you need to modify a caption, you can edit the caption text directly in the document or select the caption (including the label and number) and edit the caption in the Caption dialog box. With the Caption dialog box open, you can select a different label if needed, create a new label, or modify the numbering scheme for the captioned objects.
You can insert a table of figures to display a list of document elements with captions—tables, figures, equations, or elements you’ve added captions to that are associated with a label you defined. Word generates the table of figures from the captions associated with these objects.
The steps and options for creating a table of figures are like those for a table of contents. The Table Of Figures dialog box previews how Word will display the table in a printed document and online. You can choose a built-in format or use the style defined in the current template.

In the Caption Label list, you select the label for the type of element you want to display in the table of figures. You can select None (in which case, numbered entries are preceded by Caption), Figure, Table, Equation, or a custom label you define by using the Caption dialog box.
By default, Word uses its built-in Caption style and the associated label to create the table of figures. Any element to which that style is applied and that is identified with that label is included. In the Table Of Figures Options dialog box, you can select a style to use as the basis for the entries in the table of figures or use table entries you have defined manually. As you can with table of content styles, you can modify the styles Word uses to display the table of figures.
To insert a caption for a document element
Select the object you want to create a caption for.
On the References tab, in the Captions group, click Insert Caption.
In the Caption dialog box, in the Label list, select the type of object.
In the Caption box, enter the caption after the label.
In the Position list, select an option for where you want to insert the caption.
Important
The Position list is available only if you selected an object before opening the Caption dialog box.
Click Numbering to open the Caption Numbering dialog box, then adjust number formatting for the caption.
Click OK in each of the open dialog boxes.
To create a custom label
On the References tab, in the Captions group, click Insert Caption.
In the Caption dialog box, click New Label.
Enter a name for the label, then click OK.
To insert a table of figures
Click where you want to insert the table of figures.
On the References tab, in the Captions group, click Insert Table of Figures.
In the Table of Figures dialog box, set options for showing and aligning page numbers and choose the tab leader character and a table of figures format.
In the Caption label list, select the label you want to include with the captions.
If you want to remove hyperlinks from the table of figure entries, clear the Use hyperlinks instead of page numbers check box.
Click OK to insert the table of figures.
To set options for a table of figures
In the Table of Figures dialog box, click Options.
In the Table of Figures Options dialog box, do either of the following:
To base the table on a different style, select Style, then choose a style from the list.
To include manually marked table entries, select Table entry fields.
Click OK in each of the open dialog boxes to insert the table.
- Open the WordExpert_3-4 document and do the following:
- In the first blank paragraph after each table, insert a caption using the built-in Table label. Accept the other default caption settings.
- In the blank paragraph after the Tables heading, insert a table of figures that references the table captions.
- In the blank paragraph after each picture, insert a caption that uses a custom Image label named Screenshot. Accept the other default caption settings.
- In the blank paragraph after the Screenshots heading, insert a table of figures that references the image captions.
- Save the WordExpert_3-4 document.
- Open the WordExpert_3-4_results document. Compare the two documents to check your work. Then close the open documents.