
Objective group 1
Manage document options and settings
The skills tested in this section of the Microsoft Office Specialist Expert exam for Microsoft Word 365 and Microsoft Word 2019 relate to managing document options and settings. Specifically, the following objectives are associated with this set of skills:
1.1 Manage documents and templates
1.2 Prepare documents for collaboration
1.3 Use and configure language options
In today’s work environment, you often collaborate with coworkers and colleagues to write, revise, and finalize documents. Sharing documents within a group of users often entails specific requirements and tasks. You might need to track changes that reviewers make to a document, for example, or you might have to merge copies of a document that reviewers revised independently. In some cases, documents require the protection that a password provides so that only people with the password can open and modify the file. In preparing a document to use in a collaborative process, you might need to restrict who can edit specific sections of the document.
This chapter guides you in studying ways to manage documents and templates, prepare documents for collaboration, and configure language options.
Objective 1.1: Manage documents and templates
This topic covers a range of features that you use to manage documents and templates. It describes how to modify a template, compare and combine documents, and link to external data from a document. It also describes how to manage versions of a document, customize the Quick Access toolbar, display hidden ribbon tabs, and set the default font that Word uses when you create a document from the Normal template.
Modify existing document templates
One purpose of a template is to give related documents a common look and feel. Templates provide style definitions and can contain elements such as cover pages, custom headers and footers, themes, and macros. The components of a template help you create a document that meets a defined specification without having to design the document from scratch.
To modify a Word template that you created or that you downloaded from the Start screen or the New page of the Backstage view, you first open the template file. After you open the template, you can modify it by creating styles, changing the properties of existing styles, designing custom headers or footers, and making similar types of changes.
Templates that you create are stored by default in the Custom Office Templates folder, which is a subfolder of your Documents folder. (Word opens the Custom Office Templates folder automatically when you select Word Template in the Save As Type list.) Templates that you download are saved in the AppData folder in your user profile. You can open this folder from File Explorer by entering %UserProfile%AppDataRoamingMicrosoftTemplates in the address bar.
Important
%UserProfile% is an environment variable that represents the top-level folder of your Windows user account. For example, if your username is Biff and Windows is installed on drive C, then the %UserProfile% environment variable value is C:UsersBiff.
You can also modify a template when you are working on a document that is based on that template. For example, you can design a cover page for that template and then save that cover page as a building block. If you modify a template style while working in a document, you can apply the change only to the current document or to the template.
See Also
For more information about working with building blocks, see “Objective 3.1: Create and modify building blocks.” For more information about working with styles, see “Objective 2.3: Create and manage styles.”
To open an existing template for modification
From the Open page of the Backstage view, browse to the folder where the template is saved (such as the Custom Office Templates folder or the Templates folder in the AppData folder of your user profile).
Select the template you want to modify.
Click Open.
Or
Open File Explorer.
Browse to the folder where the template is stored.
Right-click the template, then click Open.
To modify an existing template
Open the template.
Make the changes you want to the template’s styles and other elements.
Save and close the file.
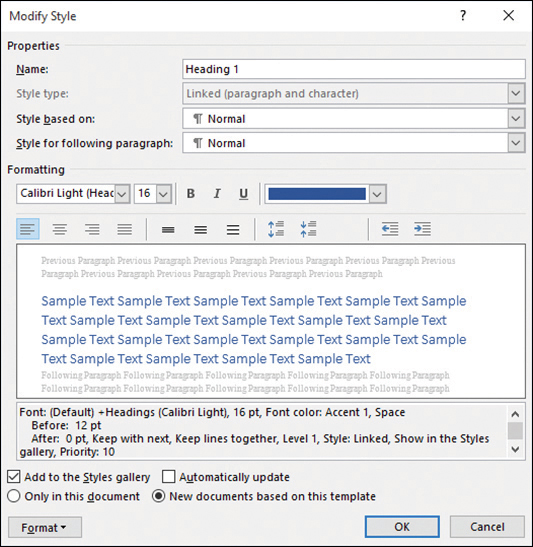
To update a document’s template while modifying a style in the document
On the Home tab, in the Styles group, right-click the style you want to work with, then click Modify.
In the Modify Style dialog box, modify the style as required.
Select New Documents Based On This Template, then click OK.
Save the document, and then click Yes when Word prompts you to save changes to the document template.
Manage document versions
Word uses its AutoRecover feature to save versions of a document as you write, insert content, and edit the document. You set the options related to automatically saving and recovering files on the Save page of the Word Options dialog box.

You can change the time interval for saving versions of your documents (the default interval is 10 minutes). You can also change the default AutoRecover file location, moving it from the AppData folder in your user profile to a folder that’s more easily accessible, for example. By default, Word also retains the last version that it saved automatically if you close a document without saving it. (These settings apply only to Word and not to other Office programs.)
You can manage and recover versions of documents on the Info page of the Backstage view. Versions of the file that were saved automatically are listed under Manage Document. Right-clicking an item in the list displays options that you can use to open that version, delete the version, or compare that version with the current one.
When you open an autosaved version, Word displays a message bar telling you that the version is a recovered file that is temporarily stored on your computer. On the message bar, you can click Compare to view the differences between the version you opened and the last saved version. Clicking Restore overwrites the last saved version with the version of the document you opened.
You can also recover an unsaved version of a document from the Info page. Clicking the Recover Unsaved Documents option displays the Open dialog box and shows the contents of the Unsaved Files folder, which is part of the AppData folder structure in your user profile. When you open a file from the Unsaved Files folder, Word displays the Save As button on the message bar.
To restore an autosaved version of a document
With the document open, click the File tab.
On the Info page, under Manage Document, right-click an autosaved version of the file, then click Open Version.
In the message bar, click Restore, then click OK to confirm the operation.
To recover an unsaved version of a document
On the Info page for the document, click Manage Document, then click Recover Unsaved Documents.
In the Open dialog box, select the file, then click Open.
On the message bar, click Save As, and in the Save As dialog box, name and save the file.
Compare and combine documents
When you work with other authors and reviewers on multiple copies of the same document, you can collect the copies and then use the Combine command to merge the documents and produce a single document that displays and identifies revisions.
Other times you might simply want to compare two versions of a document to view how the versions differ. In this instance, you aren’t concerned about who made revisions; you just want to know how the content in one version compares with the content in the other.
The Compare and Combine commands on the Review tab provide similar results when you merge documents, but you apply these commands in different circumstances. Use Compare when you want to view the differences between two versions of a document. Use the Combine command to merge revisions made in multiple copies of a document and to identify who made the revisions.
When you compare two versions of a document, the differences between the original document and the revised document are shown in the original document (or in a new document) as tracked changes. To get the best results when you use the Compare command, make sure that the original and the revised documents do not contain any tracked changes. If either document does, Word treats the changes as accepted when it compares the documents.
In the Compare Documents dialog box, you select the original document and the revised document. Clicking the More button to expand the dialog box enables you to choose settings for the types of changes Word will mark and to specify whether Word shows the results of the comparison in the original document, the revised document, or a new document.
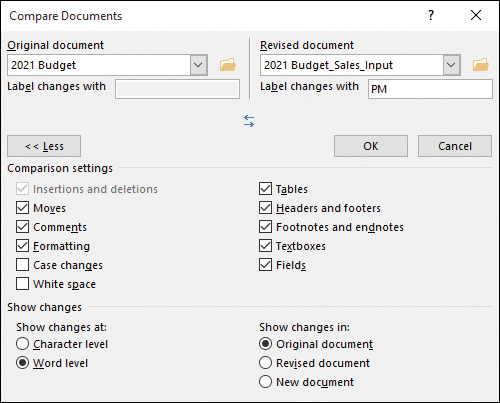
By default, all the options in the Comparison Settings area are selected. You can clear the check box for any option other than Insertions And Deletions. If you don’t need to view formatting differences, for example, clear the Formatting option. If you are interested chiefly in comparing the differences in the main body of each document, you might also clear the check boxes for Comments, Case Changes (whether a character is lowercase or uppercase), White Space, Headers And Footers, and Fields. In the Show Changes area, Word Level is selected by default. Select the Character Level option if you want Word to mark when a change is made to a few characters of a word, such as when only the case of the first letter is changed. At the Word level, the entire word is shown as a revision when the documents are compared; at the Character level, only the letter is shown as a revision.
In the Show Changes In area, you can select Original Document to display the differences in that document (although you might not want to alter the original document in that way). Or you can select Revised Document to add changes to that document or New Document to create a document based on the original, with the differences made in the revised document shown with tracked changes.
The differences that are shown in the document created by a comparison are attributed to a single author. You can use the Previous and Next buttons in the Changes group on the Review tab to move from change to change, view the changes, and accept or reject the differences.
Exam Strategy
The objective domain for Exam MO-101, “Microsoft Word Expert (Word and Word 2019),” requires you to demonstrate the ability to navigate changes in the comparison document. You will not be required to manage tracked changes in any other way.
You can also view the compared, original, and revised document at the same time (if that isn’t the view Word provides when it completes the comparison) by clicking Show Source Documents on the Compare menu and then clicking Show Both. Other options on the Show Source Documents menu include Hide Source Documents (which removes the original and the revised document from the view, keeping the compared document), Show Original, and Show Revised.
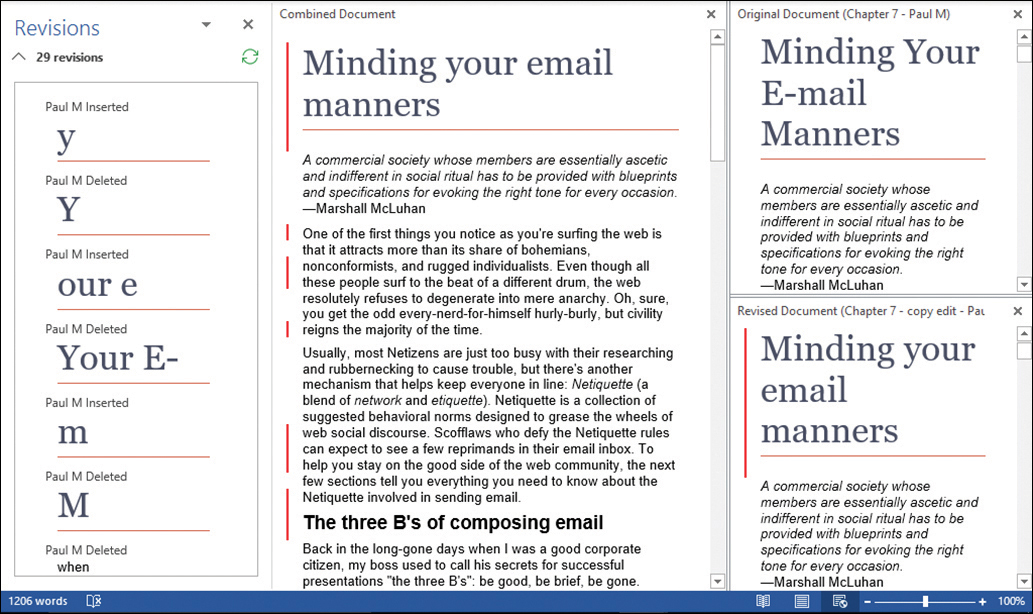
The Combine Documents dialog box is set up in essentially the same way as the Compare Documents dialog box. When you combine documents, differences between the original and revised documents are shown as tracked changes. If a revised document includes tracked changes, these changes are also displayed in the combined document as tracked changes. Each reviewer is also identified in the combined document.
When you click OK in the Combine Documents dialog box, Word is likely to display a message box telling you that only one set of formatting changes can be stored in the merged document. You need to choose between the changes in the original document or the revised document to continue merging the documents. Word displays the results of combining the documents in a set of windows that shows the combined document in a central pane and the original and revised documents in smaller panes at the right.
Word also displays the Revisions pane along the left side of the window.
Tip
In the window that Word displays after you combine documents, you can scroll through the combined document and the original and revised documents at the same time. Your location in each document is synchronized, so you can refer to any of the documents as you need to.
You can combine another copy of the document with the merged document by choosing Combine from the Compare menu again, selecting the combined result document as the original document, and selecting the next file you want to merge.
After you save and name the combined document, you can open that document and work through the variations (indicated by tracked changes), accepting and rejecting them to achieve a final document.
To compare documents
Do any of the following:
Open a blank document.
Open the original document.
Open the revised document.
On the Review tab, in the Compare group, click Compare, then click Compare on the menu.
In the Compare Documents dialog box, select the original document (if it isn’t already selected) from the list or by clicking the folder icon and browsing to the location where the document is saved.
Select the revised document you want to compare with the original document.
In the Label changes with box for the revised document, specify the username or initials you want to attribute differences to.
If the Comparison settings area is not displayed, click More.
In the Comparison settings area, clear or select the check boxes to specify the document elements you want Word to use in its comparison.
In the Show changes at area, choose whether to show changes at the character level or at the word level.
In the Show changes in area, choose where you want Word to show changes: in the original document, in the revised document, or in a new document.
Click OK. If Word prompts you about tracked changes, click Yes to complete the comparison.
To combine two or more documents
Open a blank document in Word. (You can also start with the original document or one of the revised documents open.)
On the Review tab, in the Compare group, click Compare, then click Combine.
In the Combine Documents dialog box, select the original document (if it isn’t already selected) from the list or by clicking the folder icon and browsing to the location where the document is saved.
Select the revised document you want to combine with the original document.
In the Label changes with box for the original and revised document, specify the username or initials you want to attribute differences to.
If the Comparison settings area is not displayed, click More.
In the Comparison settings area, clear or select the check boxes to specify the document elements you want Word to use in its comparison.
In the Show changes at area, choose whether to show changes at the character level or at the word level.
In the Show changes in area, choose where you want Word to show changes: in the original document, in the revised document, or in a new document.
Click OK.
In the message box, specify whether to use formatting in the original document or the revised document.
Click Continue with Merge.
Link to external document content
The tasks involved in managing documents can encompass not only working with multiple Word documents but also working with external data or files that you link to from a Word document. You can link to the content in another Word document and to files created in other Office programs or to Adobe Acrobat documents, for example. You can link to the content of the source file, embed the contents of a file, or display the file as an icon. You can also create an object (such as a chart or a slide) to insert in a Word document.
To link to external data, you use either the Object dialog box or the Insert File dialog box. In the Object dialog box, you can create an object by selecting the object type from a list. You can display the object as an icon instead of the full object; then, in the Word document, you can double-click the icon to open the object. By default, Word embeds the content of the file you select in the document. If you select Link To File, Word creates a link to the source file so that updates to the source file are reflected in the Word document. When you link to a file, Word displays an image of the file in the Word document. Double-clicking this image opens the source program.
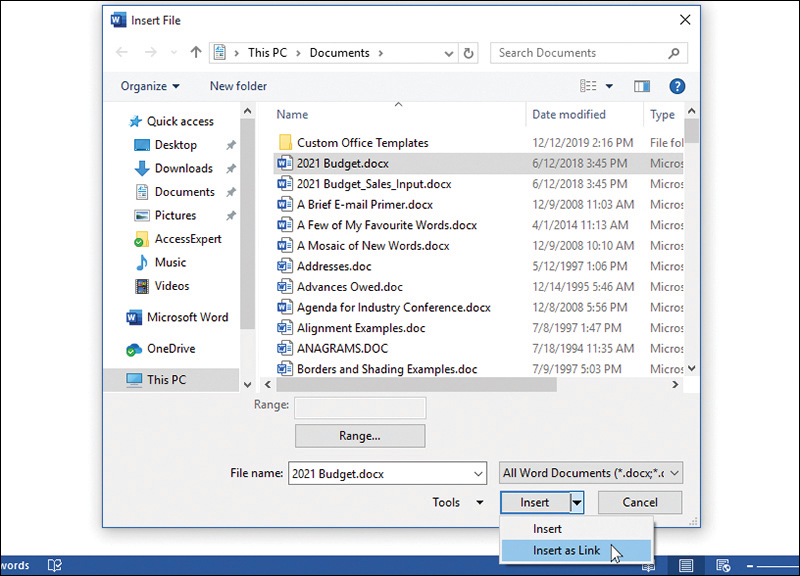
In the Insert File dialog box, you can select a file to include in the current document. When you select the Insert As Link command to link to the file, Word inserts a field code by using the INCLUDETEXT field. This field creates a dynamic link to the source file so that updates to that file are reflected in the document in which you created the link. Be mindful that the INCLUDETEXT field uses the full path to the file you insert. If you move or rename the file you have linked to and then update the field, Word displays an error message indicating that the field refers to an invalid file name.
To link to external data
On the Insert tab, in the Text group, click Object.
In the Object dialog box, click the Create from File tab.
In the File name box, enter the name of the file you want to link to, or click Browse and then navigate to and select the file.
In the Object dialog box, select the Link to file check box, then click OK.
To link to a file
On the Insert tab, in the Text group, open the Object menu, then click Text from File.
In the Insert File dialog box, click the file you want to insert.
Click the Insert arrow, then click Insert as Link.
Customize the Quick Access toolbar
The Quick Access Toolbar offers one-click access to common commands such as Save and Undo. By default, the Quick Access Toolbar appears above the ribbon. This spot is good if you have only a few commands on the Quick Access Toolbar because the relatively small size of the Quick Access Toolbar means that Word has enough room to display the document title and application name. If you want to load up the Quick Access Toolbar with several commands, consider moving it below the ribbon. Doing so gives the Quick Access Toolbar the full width of the window, although it does reduce slightly the amount of vertical space available for your document content. To regain that vertical space (and then some), you can collapse the ribbon.
To get the most out of the Quick Access Toolbar, populate it with the commands you use most often. Note that you are not restricted to just a few commands. If you place the Quick Access Toolbar below the ribbon, you can use the full width of the window, plus you get a More Controls icon at the end of the toolbar that enables you to display a whole other row of commands.

To change the position of the Quick Access toolbar
Click Customize Quick Access Toolbar.
Click Show Below the Ribbon.
To customize the Quick Access toolbar commands
 If the command you want to add is on the ribbon, right-click the command, then click Add to Quick Access Toolbar.
Or,
Click Customize Quick Access Toolbar.
Click More Commands.
In the Word Options dialog box, on the Quick Access Toolbar page, use the Choose Commands From list to select the command category you want to use.
Click the command you want to add.
Click Add.
To change the command position within the Quick Access Toolbar, click the command, then click Move Up or Move Down.
Click OK.
Tip
If you no longer need a command on the Quick Access Toolbar, right-click the command and then click Remove From Quick Access Toolbar.
Display hidden ribbon tabs
The tabs that Word displays on the ribbon change when you work in different contexts and with different elements of a document. For example, when you select a table, Word displays the Table Tools tabs—Design and Layout. These are known as contextual tabs, since they are hidden until Word’s context changes (for example, you click a table to select it).
However, don’t confuse tabs that are hidden when they are out of context with those tabs that Word hides by default (that is, no matter what the context). You can change which tabs are displayed on the ribbon yourself by choosing settings in the Word Options dialog box. Among the options are whether tabs that are hidden by default are displayed. The Developer tab is an example of a hidden tab that you can choose to display.
Exam Strategy
The objective domain for Exam MO-101, “Microsoft Word Expert (Word and Word 2019),” requires you to demonstrate the ability to display hidden ribbon tabs. You will not be required to customize the ribbon in any other way.

To display hidden ribbon tabs
On the File tab, click Options.
In the Word Options dialog box, click Customize Ribbon.
Tip
You can display the Customize Ribbon page of the Word Options dialog box directly by right-clicking anywhere within the ribbon or the Quick Access Toolbar and then clicking Customize The Ribbon.
On the Customize Ribbon page, in the Customize the Ribbon list, select the check box for the tab you want to display. For example, select the Developer check box to display the Developer tab.
Click OK to apply your settings.
Change the Normal template default font
When you set a default font, documents you create use that font and the settings you defined for it (font size, font color, and so on). In Word documents based on the Normal template, the default font is used in the definition of the Normal style and for styles based on the Normal style. The default font is also associated with the body font that is defined for the currently applied theme. You can change the Normal template default font by specifying settings in the Font dialog box and then clicking the Set As Default button.
See Also
For information about building custom theme fonts, see “Create custom font sets” in “Objective 3.2: Create custom design elements.”
To change the default font
Create or open a document that is based on Word’s Normal template.
On the Home tab, in the Font group, click the dialog box launcher.
On the Font tab of the Font dialog box, select the options that you want to use for the default font.
Click Set As Default.
In the message box that appears, select All Documents Based On the Normal Template.
Click OK.
 Start Word and do the following:
 Use the Combine command to merge the WordExpert_1-1a (original) and WordExpert_1-1b (revised) documents, using the default settings and merging formatting from the WordExpert_1-1b document.
- Save the document in the practice file folder as WordExpert_1-1_combined.
- Open the WordExpert_1-1a_results document. Compare this document with WordExpert_1-1_combined to check your work. Then close the WordExpert_1-1a_results document.
- Open the WordExpert_1-1c document, and then insert the text of the WordExpert_1-1c document into the WordExpert_1-1_combined document after the title.
- Open the WordExpert_1-1c_results document. Compare the two documents to check your work.
- Close all open documents.
Objective 1.2: Prepare documents for collaboration
Preparing a document for collaboration with other users can involve several steps. You might need to restrict the editing of a document so that reviewers can only enter comments, for example, and not make changes directly to the text. You can also specify sections of a document that can be edited only by certain individuals.
Word also provides options to protect a document with a password and to mark a document as final, which notifies users who open the document that the document is considered complete.
This topic guides you in studying the steps involved in preparing documents for collaboration.
When you share a document to obtain comments from peers or colleagues or for someone to make revisions to sections of the document, you don’t want reviewers to modify the document at will by changing the formatting, adding or deleting content, inserting graphics, or making other modifications. Documents that contain important data or that you plan to use as the focus of a report or presentation can be protected before you share them. You can use options available in Word to restrict the types of changes users can make to a document, specify who can edit a document, and mark which sections of a document specific individuals can edit.
To control how a document can be edited, you set options in the Restrict Editing pane.
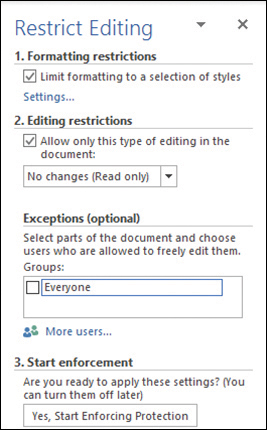
The pane has three sections:
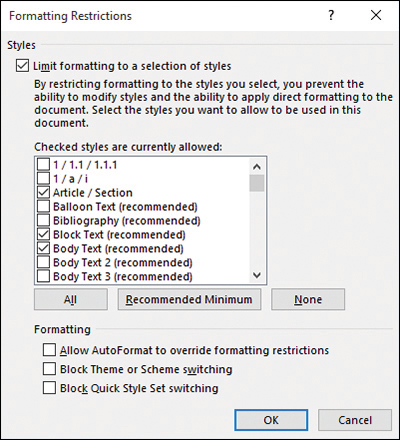
Formatting restrictions Select the check box in this area to limit formatting to a specific set of styles and to prevent users of a document from modifying styles and applying local formatting. From the Restrict Editing pane, you can open the Formatting Restrictions dialog box, where you can select the styles that are available to users working with the document. You can allow all styles, allow only a minimum set of styles recommended by Word, specify that no styles can be applied, or select the specific styles you want to use. The options at the bottom of the Formatting Restrictions dialog box control whether users can switch themes or substitute quick styles and whether settings for automatic formatting can override the restrictions you specify.
Select the styles and formatting options you want to allow in a document. Editing restrictions Use the Editing Restrictions area to control the types of changes users can make to the document. Word offers the following four settings:
No changes (Read only) This prevents users from making revisions, although you can set up exceptions that allow specific users to edit all or certain sections of the document.
Tracked changes Revisions made to the document are indicated by revision marks. Tracked changes cannot be turned off without removing protection from the document; removing protection can be controlled by defining a password.
Comments Users can add comments to the document, but they can’t make revisions to the document’s content itself. For this option, you can set up exceptions for specific users.
Filling in forms This option lets you restrict input to filling in form controls (such as check boxes and list boxes) that are part of a document.
Start Enforcement After you define the formatting and editing restrictions you want to apply to the document, use the Start Enforcing Protection dialog box to define a password that’s required to remove protection from the document.
If you select No Changes (Read Only) or Comments, you can use the Exceptions area to specify users who can edit the whole document or sections of it. Exceptions apply to the complete document by default, but you can apply exceptions to a particular section of a document by selecting that section and then designating the people who can edit it. You can also allow everyone to edit specific sections, and you can apply different exceptions to different sections of a document. Clicking the More Users link opens the Add Users dialog box, where you can specify the names of people who are granted an exception.
Important
The More Users link in the Exceptions area works only if you are part of a network domain. If you are part of a domain, you can use More Users to add users who are also part of the same domain. If you are not on a domain, you won’t be able to add exceptions for individual users.
If you specify editing exceptions, you and other users can locate and display the sections of a document that a specific user can edit by selecting the check box beside a user’s name in the Restrict Editing pane.
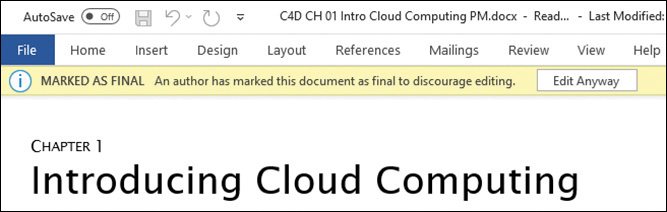
As a step in completing a document you have worked on with a group, you can mark the document as final so that colleagues or coworkers know the document’s status. Marking a document as final provides a notification of its status; it does not prevent users from making changes (users can turn off the feature), and it does not provide the same level of protection as applying a password to the document.
When a user opens a document that is marked final, Word displays the message bar, notifying the user of the document’s status. In addition, the title bar of the document window indicates that the file’s status is read-only.
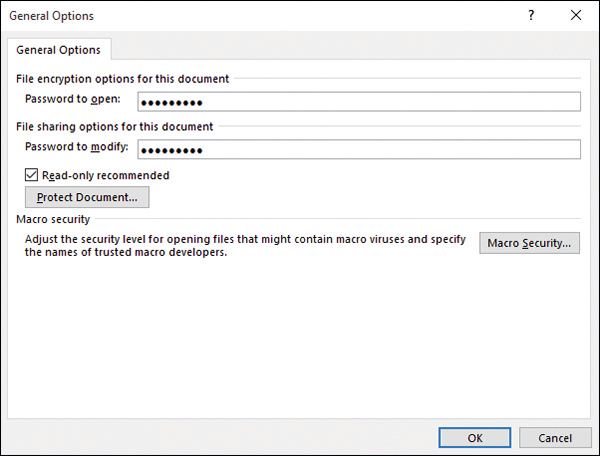
When you save a document from the Save As dialog box, you can display the General Options dialog box and then define a password that users need to enter to open the document, in addition to a password that’s required to modify the document.
Important
Be careful to retain the passwords you assign. Word provides no way for you to recover these passwords.
Keep in mind that requiring users to enter a password before they modify a document is intended to protect a document from unintentional editing. Defining this password does not encrypt a document to help secure it from malicious users.
Tip
Encryption enhances the security of a document by scrambling the contents so that it can be read only by someone who has a password or another type of key.
To protect a document through encryption, you can use the Protect Document command on the Info page of the Backstage view. When you define an encryption password, Word cautions you that the password cannot be recovered.
To restrict editing and formatting
On the Review tab, click Restrict Editing.
Tip
Alternatively, click File, click the Info page, click Protect Document, and then click Restrict Editing.
In the Restrict Editing pane, select the options you want to apply:
To specify a set of styles users can apply, select the Limit formatting to a selection of styles check box, then click Settings. In the Formatting Restrictions dialog box, select the set of styles and formatting options you want to make available in the document, then click OK.
To control the type of editing allowed in the document, select the Allow only this type of editing in the document check box, then choose from the options in the list. Define exceptions by selecting a section of the document and then choosing which users can edit the selected section.
Click Yes, Start Enforcing Protection.
In the Start Enforcing Protection dialog box, if you want to prevent other readers from removing the protection without permission, enter and reenter a password. Then click OK.
To mark a document as final
On the Info page of the Backstage view, click Protect Document, then click Mark as Final.
Click OK to confirm the operation and save the document.
Tip
Word might display a message box describing the effects of marking a document as final. Select the Do Not Show Again check box if you no longer need Word to display this message, then click OK.
To define passwords required to open or modify a document
Click File, click either Save As (for a local file) or Save a Copy (for a OneDrive file), and then click More Options.
In the Save As dialog box, click Tools, then click General Options.
In the General Options dialog box, do either or both of the following:
In the Password to open box, enter a password for opening the document.
In the Password to modify box, enter a password for making modifications.
In the General Options dialog box, click OK.
In each Confirm Password dialog box that opens, reenter the appropriate password.
In the Save As dialog box, click Save.
To encrypt a file with a password
On the Info page of the Backstage view, click Protect Document, and then click Encrypt with Password.
In the Encrypt Document dialog box, enter the password you want to use, then click OK.
In the Confirm Password dialog box, reenter the password, then click OK.
To remove password protection
Open the General Options dialog box or the Encrypt Document dialog box.
Delete the password that you want to remove, then click OK.
- Open the WordExpert_1-2 document, and do the following:
- Display the Restrict Editing pane.
- Configure the editing restrictions to permit only comments and no other changes.
- Set up an exception that allows users to edit the Preface section of the document.
- Start enforcing protection and assign the password WordExpert to enforce protection (and to turn off protection when necessary).
- Encrypt the document content by assigning the password WordExpert to the document.
- Mark the document as final.
- Save the document.
- Open the WordExpert_1-2_results document, using the password WordExpert. Compare the two documents to check your work. Then close the documents.
Objective 1.3: Use and configure language options
Word offers a number of options for working in different languages. For example, you can add new authoring languages and you can configure other languages for the ribbon, buttons, and other display features. With extra languages installed, you can add and edit text in another language, proof in another language, and translate sections of text and entire documents. This section takes you through Word’s options for configuring and using other languages.
Configure authoring and display languages
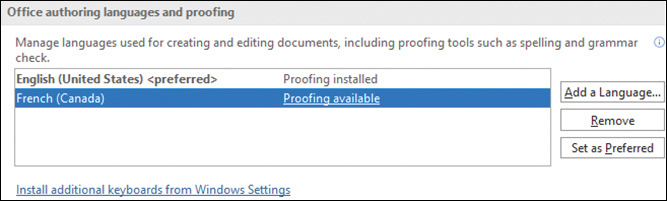
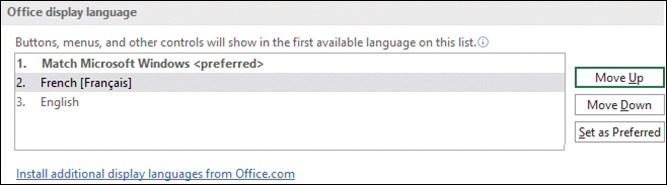
You can change the language that Word uses for authoring and for the display (the ribbon, buttons, tabs, and other interface features). You are free to apply a different language for authoring and display, depending on the languages available in the version of Windows or Office that you are using and the Windows language packs that you have installed. You can install additional languages from the Language page of the Word Options dialog box. If you have multiple languages installed, you can tell Word which language you prefer to use. You can also set a language priority order, which tells Word which languages to use, in order, if the display language is not available in your default language.
To add an authoring language
Click File, click Options.
In the Word Options dialog box, on the Language page, click Add a Language.
Use the Add an Authoring Language list to select the language you want to install.
Click Add. Word adds the language to the Office Authoring Languages and Proofing list.
Tip
For your new language, if you see Proofing Available, then you need to install the associated language pack from the Office.com website. Click the Proofing Available link to display the language pack page, click Download, and then run the downloaded file to install the language pack.
To change the display language priority order
- In the Word Options dialog box, on the Language page, click a language in the Office Display Language list, then use the Move Up (higher priority) and Move Down (lower priority) buttons to position the language in the list.
Tip
To add more display languages, click the Install Additional Display Languages From Office.com link, which opens a page that enables you to download a language pack accessory for Office.
To set the preferred languages
- In the Word Options dialog box, on the Language page, click a language in the Office Authoring Languages and Proofing list, then click the Set Preferred button that appears to the right of the list.
- In the Word Options dialog box, on the Language page, click a language in the Office Display Language list, then click the Set Preferred button that appears the right of the list.
To remove an authoring language
- In the Word Options dialog box, on the Language page, click a language in the Office Authoring Languages and Proofing list, click Remove, and then restart Word to put the change into effect.
Use language-specific features
With your languages configured, you can now switch from one language to another within Word. For example, you can switch to another language to add or edit Word data and you can set another language as Word’s default proofing dictionary.
Another language tool that comes in handy when you are working with other languages is the Translate command on the Review tab. This command opens the Translator task pane, which includes From and To boxes, where From shows the original text and To shows the language to which you want the original text translated. Translator attempts to recognize the original language, but if it gets the language wrong, you can select the correct language from a list. You can also select the language to which you want the original text translated.
To add and edit text in another language
- In the Word Options dialog box, on the Language page, click a language in the Office Authoring Languages and Proofing list, then click the Set Preferred button that appears to the right of the list.
To proof in another language
Click File, then click Options.
In the Word Options dialog box, on the Proofing page, click Custom Dictionaries.
Use the Dictionary Language list to select the language you want to use, then click OK.

Use the Dictionary Language list to select a proofing language.
To translate a selection of text
Select the text you want to translate.
On the Review tab, in the Language group, click Translate, then click Translate Selection. The Translator pane appears.

Use the Translator pane to translate text from one language to another. If Translator did not select the correct original language, use the From list to select the language.
Use the To list to select the language to which you want the original text translated.
To translate an entire document
Open the document you want to translate.
On the Review tab, in the Language group, click Translate, then click Translate Document. The Translator pane appears.

The Translator pane for the translation of an entire document. If Translator did not select the correct original language, use the From list to select the language. If you are not sure which language to use, select Auto-Detect instead.
Use the To list to select the language to which you want the original text translated.
Click Translate. Word creates a new document for the translated text.
- Open the WordExpert_1-3 document and do the following:
- Add the authoring language French (Canada).
- Add the language French as a display language.
- In the Office Display Language list, select French, and move its priority up and then down.
- In the Office Authoring Languages and Proofing list, select French (Canada), set it as the preferred language, and then return the preferred language to the original.
- In the Office Authoring Languages and Proofing list, select French (Canada), remove it, restart Word, and then reopen the WordExpert_1-3 workbook.
- Select the document title, and run the Translate Selection command to translate the French text into English.