“I think I’ll call him Stampy.” | ||
| --Bart Simpson | ||
To have a secured workstation, all aspects of the machines’ security need to be considered. From physical security to account management to boot options, the quality of the base configuration of your operating system makes a huge difference in the overall security of the host. There are many analogies that can be used to describe the need for secure OS configuration; A house needs a solid foundation to survive a storm, a chain is only as good as its weakest link, a tree with shallow roots is easily toppled. Regardless of which analogy you prefer, realize that the more effort and attention to detail you provide to your base configuration, the more secure and reliable your host will be.
This advice holds particularly true for Mac OS X. OS X is a powerful, modern operating system with a UNIX core. When using the operating system for day-to-day activities, it is easy to use and provides a stable platform for your applications. However, in the hands of a malicious user attempting to gain access to your data or resources, it is powerful and dangerous. Through proper configuration and maintenance, your Mac OS X workstation can provide a stable and secure platform for your applications.
Mac OS X as it ships out of the box is designed to be user friendly. However, to be user friendly, some sacrifices have been made that make it less secure. Also, there are some common configuration practices that can further reduce the overall security of the core operating system. This chapter presents techniques that you can employ that make Mac OS X more secure and have a minimal impact on the usability of the system.
Physical security is a trait often overlooked when attempting to secure a host. However, it is an important aspect of information security. Lack of physical security in a workplace can allow illicit and almost untraceable access. According to various reports, between 38% and 70% of all computer attacks are insider attacks. Insider attacks are violations of the security of a resource by someone within your organization. These attacks are common because not only will an insider potentially have the motivation to attack, they will have easier access to trusted resources than an outside entity. Controlling physical access to a host is the first step in preventing an insider attack.
The first step in keeping a machine secure from prying fingers is keeping the host in a restricted location. How restricted you keep the host depends on the risk and potential loss of someone gaining illicit physical access. Depending on your level of risk, you may use locked doors, electronic security systems, or even armed guards. Even in an office environment, a coworker may be your worst enemy. Simply closing and locking your office door while you are away from your host may be enough to keep your machine secure from prying hands and eyes.
Remember, you are not securing only your host. Any resource your host can access is vulnerable if your host is compromised. Your host is only a link in a chain.
Assuming someone gains access to your host, all is not lost. There are ways to prevent a person from gaining various types of access. Unfortunately, there are things that you can’t stop. A malicious user can steal a whole machine or open it up and steal sensitive parts such as the hard drive or other storage media. Some computer cases have locks or places where antitheft devices can be attached. These mechanisms can make theft much more difficult for the casual attacker. The antitheft techniques differ from machine to machine, so consult the documentation that came with your computer.
Your Mac’s bootstrapping process is controlled by something called Open Firmware. Open Firmware is a small program contained on a chip within your computer that controls its boot process. Open Firmware was developed many years ago and is used for many different computing platforms, including Sun and Apple’s Macintosh series. It is similar to a BIOS on a PC but provides much more functionality and extensibility than a typical BIOS implementation.
Newer versions of Open Firmware password-protect your boot process. To make use of this functionality, you must be running Open Firmware version 4.1.7 or newer. You can find what version your machine is running by launching System Profiler and looking for the Boot ROM Version section (see Figure 3.1). If you need to upgrade your Open Firmware, go to http://www.info.apple.com/ and search for the correct upgrade based on your platform. Alternatively, firmware updates are also available on your Mac OS X 10.2 installation CD.
After you have updated your machine, download the Open Firmware Password application from http://docs.info.apple.com/article.html?artnum=120095 or install it from the Mac OS X 10.2 installation CD. This application allows you to password-protect certain functions of Open Firmware when the system is being booted, including
Booting to CD-ROM, NetBoot, or a specific disk
Booting in verbose mode
Booting into single user mode
Booting to the Open Firmware prompt (Command-Option-O-F at startup) and issuing commands
Figure 3.2 shows the Open Firmware Password utility in action. Be sure you use a difficult-to-guess password.

These features are great in a lab environment when a normal unattended boot is desired, but booting to a CD would generally only be done by a malicious user. Unfortunately, many people would like to have a higher degree of security by requiring a password at boot time to simply bring the operating system up. This functionality is analogous to a POST password on a PC. Although Apple does not supply a tool for directly configuring a boot password, Open Firmware does support this concept.
nvram is a program accessible via the Terminal program that displays the contents of many variables stored within Open Firmware. Running it as a normal user allows you to view the public values and not modify any of the values. Running it via sudo nvram prints any private fields, such as the password, and allows modification of the Open Firmware contents. The -p flag prints the contents of Open Firmware:
bash-2.05a$ sudo nvram -p
Password:
... a great deal of output...
security-mode   command
... more output...
security-password     %e8%cc%d2%cf%c1%c1
Rather than use the nvram command, a machine can be booted directly to the Open Firmware prompt. Pressing Command-Option-O-F as a machine is being booted, bypasses the normal boot process and provides you with a prompt that directly controls Open Firmware. The security mode can be reset to none by issuing the setenv security-mode none command at the Open Firmware prompt. printenv displays all Open Firmware variables. Typing reset-all reboots the host after resetting the password. For a complete discussion of Open Firmware commands, see Apple Tech Note 1061 at http://developer.apple.com/technotes/tn/tn1061.html.
The security mode set by the Apple Open Firmware Password application is set to command. This provides the level of functionality listed earlier. To set the security mode to the original value that shipped with your machine, execute sudo nvram security-mode="none". To enable password protection for all Open Firmware activities, including booting to the default disk, set the security-mode to full. This forces a user who wants to boot a machine to know the Open Firmware password to access the normal operating system. To make brute forcing the password unlikely, be sure to set a password that is difficult to guess and contains a variety of characters.
Password-protecting Open Firmware does not ensure the host cannot be booted in a manner counter to what you intend. An attacker who can open the case of the computer can force a password reset. By adding or removing memory, the host is put into a mode where it is possible to reset the PRAM by pressing Command-Option-P-R at boot time. Once the PRAM is reset three times, the password protection is removed. This quirk in the Open Firmware architecture underscores the reason for physical locks on your hosts.
Also, a utility called FWSucker allows an attacker, once logged in to a host, to harvest the Open Firmware password. Even guest users can decrypt the password. FWSucker is available from http://www.msec.net/software/. Again, Open Firmware password protection must be treated as a tool in protecting your host, not absolute protection.
If a malicious user manages to successfully boot your machine, there are still more configuration options that will make their life difficult. By default, Mac OS X logs in automatically to the primary account on the machine. This gives anyone with the capability to boot the machine full access to the operating system. This can be disabled in the Accounts System Preferences panel. Under the Users tab, uncheck the line labeled Log in Automatically as [username]. This causes a login window to be displayed after the next boot.
In the Login Options tab (see Figure 3.3), there are several other default options that should be changed. The Login Window can display a list of user accounts on the machine and allow you to select one or it can simply display a blank username input field. By selecting Name and password you force a local attacker to know both the account name and the password. This might not be a huge barrier, but it is one more thing the attacker must know. Please note that starting in Mac OS X 10.2, the previous login name is not shown.
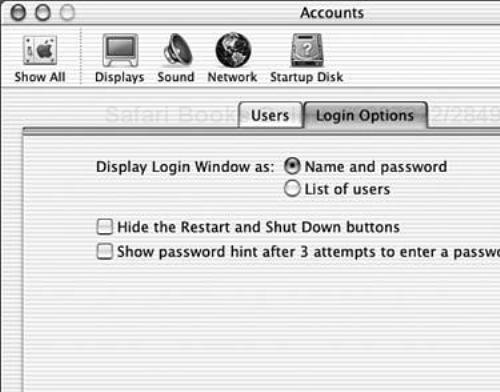
You also might want to check the Hide the Restart and Shutdown Buttons check box. This prevents users from shutting down or restarting the machine by one mouse click from the login screen. However, be aware that the power button still works so it is still possible to power off the machine.
Finally, uncheck the check box for Show Password Hint After 3 Attempts to Enter a Password. Selecting this causes the hint that was entered when the user was created to be displayed on the login screen. This can be handy if you have forgotten your password, but it can also be handy for an attacker. Make a point of remembering your password and you will need this option. Besides, after you get used to logging into your machine, entering your password will become second nature to you.
All these configuration steps are useful if an attacker gains access to a host that is powered off. Things are a bit different when you are logged into a host and have stepped away for a moment. If you leave your machine unattended while you are logged in, you have bypassed all boot security mechanisms for an attacker with physical access.
Luckily, the screen saver for Mac OS X can be password-protected. Under the Activation tab in the Screen Effects Preferences panel there is a radio button to force the screen saver to ask for your password when normal operation resumes (see Figure 3.4). This effectively locks the screen while Screen Effects are active. There is also a slider on the same tab that controls how long the machine needs to be idle before the screen is locked.
This timer is great in instances when you forget to lock your workstation. However, it is not practical to stand watch over your machine for a series of minutes while you wait for Screen Effects to turn on. On the Hot Corners tab of the Screen Effects Preferences panel you can specify a corner (or corners) where you can drag your mouse to lock your screen. This allows you to lock your workstation at will without having to wait.
You may have noticed a lock in the bottom-left corner of some System Preferences panes. The capability to lock a preference pane is present in the Network and System panes primarily and may also be available in panes provided by third-party software. This lock enables you to password-protect sensitive system settings, preventing unauthorized or unintentional changes. By clicking the lock within a pane, users of the workstation cannot change the configuration of that pane. When a change needs to be made, click the lock again and you will be prompted for a username and password. Type the credentials of your administrative user account and the pane will once again allow modification. Figure 3.5 shows a pane as it looks before and after locking has been utilized. The locking mechanism provided by the preferences lock only applies to the current user. It is not a global lock for all users, therefore its utility is limited. Use specific attributes for user rights to control their ability to modify Preferences panes. See User Accounts and Access Control later in this chapter for more information on per user access control.

The idea of running more than one operating system on a single host is a relatively new idea to mainstream Mac users. The idea of dual booting a host where you can select from several operating systems at boot time has been common on the PC platform for years. PC users may commonly have several operating systems they use depending on their needs, especially if the user periodically uses Linux.
With the advent of Mac OS X, running two operating systems became a fact of life for most Mac OS X users. Mac OS X is a completely different operating system from previous versions of Mac OS. Rather than attempt to provide backward compatibility with previous Mac OS applications directly within Mac OS X, Apple opted for what it calls the Classic Environment. Classic provides support for previous apps by actually running a previous version of Mac OS on top of Mac OS X. Mac OS X effectively provides an emulation environment for Mac OS 9 to run in as a complete operating system. Mac OS 9 runs as a process within Mac OS X.
When a Classic application launches, Mac OS X automatically launches Classic to provide an environment for the application to run in. If you click the collapsible triangle, you can actually see Mac OS 9 booting within Mac OS X (see Figure 3.6).

Classic requires a great deal of system resources to run. Because you are running two complete operating systems at one time, your machine’s resources are split between them. Most notably, Mac OS 9 uses a large amount of RAM. Mac OS X gives Classic hooks to other resources, such as disks and network interfaces.
Like any other application, it is best to remove or not install Classic if you do not require it. Even though Classic is run through emulation on the host, it has access to many of the system’s sensitive devices. Mac OS X attempts to intercept access to restricted data or devices through the Security Services interface. However, this method may not be bulletproof to all types of attacks.
The Mac platform provides a means to boot multiple operating systems on the same host. This capability is controlled by the Startup Disk control panel. If you have Classic installed on a host, you have the opportunity to boot directly to Mac OS 9. This option is provided for applications that require direct hardware access under Mac OS 9. Mac OS X runs Classic through an emulator. This emulator abstracts the hardware from Mac OS 9 applications. If an application uses special hardware or needs low-level access, booting directly to Mac OS 9 provides a means for these specific applications to work. For example, a video game may have been written to directly access a joystick connected to a host. This game will not work properly under Mac OS X.
Mac OS 9 has very few security features compared to Mac OS X. When Mac OS 9 is booted on a host that also contains Mac OS X, many of the security features of Mac OS X are completely bypassed. Mac OS 9 has complete access to all the hardware on a host, and subsequently has access to all the data on that hardware. Filesystem level access control, such as files limited to only the superuser account, can be bypassed within Mac OS 9.
If you require Classic applications without direct hardware access, you can install Mac OS 9 into a disk image created with DiskCopy. This disk image will automatically be mounted by Mac OS X when it needs to launch the Classic environment. However, because the disk image is a file within Mac OS X, it prevents direct booting to Mac OS 9. If you require direct hardware access in Mac OS 9, be sure you install an OpenFirmware password to prevent unauthorized booting.
To help mitigate the risk of an Mac OS 9 application accessing Mac OS X data, you should ensure Mac OS X is installed on a UFS partition. Mac OS 9 cannot natively read UFS filesystems. Therefore, data stored on the UFS partition will be safe from modification due to Mac OS 9 applications.
Other operating systems, such as Linux, can be booted on a Mac. These other operating systems may also have the capability to bypass the security model of Mac OS X because they have direct access to the hardware. Even worse, the Mac OS X installation can be used to boot a host and reset the root password. Again, the best option if you have to boot to two bootable operating systems on a host is to require an Open Firmware password.
Any operating system, regardless of who wrote it and on what platform it runs, will eventually be found to be vulnerable to some type of attack. After these vulnerabilities are found, it is important for vendors to release a patch in a timely manner. It is also important for administrators to have an intuitive and effective way to stay current with the latest patch levels.
Apple has gone through a bit of a revolution in how it handles patches. In the early days of Mac OS X, patches were slow to arrive and the patching mechanism provided within Mac OS X was not secure. However, based on user feedback, Apple is now much more responsive about releasing security patches. They have also updated their patching mechanism to provide assurances of the integrity of the patch and where it came from.
Due to the UNIX core of Mac OS X, many of the vulnerabilities that affect other UNIX variants, such as FreeBSD and Linux, will also affect Mac OS X. Mac OS X has also had its fair share of vulnerabilities specific to itself. It is important to stay current with the patches released by Apple to protect yourself from attackers attempting to utilize known vulnerabilities.
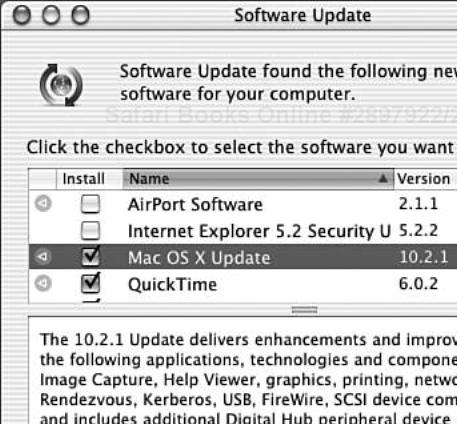
The Software Update Preferences pane controls Mac OS X’s automatic update features. The Update Software tab controls the frequency of when Software Update runs. Set this to daily to be as current as reasonably possible. If you feel you need to check for updates by hand, there is a Check Now button that will run Software Update manually. When Software Update runs, it queries a server at Apple for any patches and fixes available for software installed on your computer (see Figure 3.7). If it finds anything that requires updates, it will display them to you and verify that you want the updates installed. After Software Update has run, run it manually another time. Due to dependencies on other updates, some updates may not be installed the first time. By running Software Update a second time, any packages with previous dependencies should be installed.
After you have selected the updates you want to install, Software Update downloads the patches and installs them. Generally the core security updates will require a reboot of your machine, so be sure you have saved all your work before you start the update process. Depending on how far behind on patches you are, you may have to run Software Update several times.
There is also a command line software update program, softwareupdate, that can be run from the Terminal application. When run without any parameters passed to it, it will contact the servers at Apple and determine what patches need to be installed:
bash-2.05a$ sudo softwareupdate
Software Update Tool
Copyright 2002 Apple Computer, Inc.
Software Update found the following new or updated software:
  - 3359
         QuickTime (6.0.2), 19620K - restart required
  - 3339
         StuffIt Expander Security Update (7.0), 4420K
To install a particular patch, reference it by name as a parameter. For example sudo softwareupdate 3339 will install the StuffIt Expander Security Update. softwareupdate is convenient if you are maintaining workstations remotely and need to update them without terminal access.
One of the driving principles of information security is the idea of Least Privilege. Least Privilege is the concept that an entity should be given only the fewest possible rights to perform its required activity and no more. For instance, if a user only needs to surf the Internet, he does not need the capability to change the system’s IP address or add new users. By giving a user more access than he requires, you are opening the door to, at the very least, system instability and possibly security compromises. Unfortunately, most modern operating systems were not designed from the ground up to adhere to Least Privilege. Usability and extensibility won the day. Locking down users to a small subset of commands is a difficult job. Thinking about what your users need to accomplish and being diligent with systems configuration will drive up the security of your systems.
When Mac OS X is first installed on a host, a user is created with administrator privileges. This user has a great deal of control of the workstation, either directly through the various System Preferences panes or through other mechanisms such as sudo. Mac OS X attempts to limit the direct access this administrative user has by requiring an administrative password be supplied when an especially sensitive activity is performed. For example, when installing a third-party application that needs to modify your network stack, Mac OS X will launch an authentication screen to verify the activity. When launching commands through the Terminal program sudo, you are prompted for a password as well.
However, there are still a great number of activities that an admin user can perform that you may not want to allow everyone to do. Mac OS X comes with a robust user creation utility that allows you to have a reasonable amount of control over what users can and cannot do. If someone other than yourself will use your host, for example, a coworker or relative, it is advisable to create a user account specifically for that person which grants only the access they require.
The Users tab in the Accounts System Preferences pane controls all user accounts on the system. Adding a new user is as simple as clicking New User and filling in all the required fields (see Figure 3.8). The Name field is what is commonly known in the UNIX world as the GECOS field. This should contain the user’s full name and any relevant contact information. The Short Name field corresponds to the UNIX username. When filling in the password field, be sure to use a strong password. A strong password is not guessable and should contain a combination of letters, numbers, and special characters. Be sure the user changes her password when she first logs on to the host.

Leave the Password Hint field blank. As mentioned before this will be of great help to an attacker and should be disabled for the login screen. If need be, give the user administration privileges, but only do so if absolutely required. Also, you can allow the user to log in from a Windows host via SMB. This enables SMB access for the entire host and grants that user access to his or her files on the system. Again, only grant this access if it is required for your network. For more information on SMB and other network services, see Chapter 6, “Internet Services.”
After the user has been added to the system you can further limit his access by clicking Capabilities in the Accounts pane. This allows for fine-grained control over what the user can and cannot do on the host. You can control whether the user can modify system settings, burn CDs, or even launch certain programs. Note that the Capabilities button is not available if the new user has administrator privileges. There is an option to enable the Simple Finder for the user. Simple Finder allows you to limit what applications a user can see. By selecting applications in the Applications list view, Simple Finder will only display the allowed applications. Also, Simple Finder can only open documents containing the users Documents folder in their Home. The Simple Finder cannot open ordinary folders.
The underlying mechanism that controls user accounts is not the standard UNIX /etc/password architecture. NetInfo is a distributed user management system that is employed by Mac OS X for authentication and authorization issues. When making changes to a user, you are really making the changes to the NetInfo database. For more information on NetInfo see NetInfo in Chapter 10, “Directory Services.” The UNIX /etc/password construct is used by Mac OS X only in the event of booting to single user mode.
Even when an attacker has complete access to your host, you can still use encryption to protect your most sensitive data. Properly implemented, encrypting files is a great way to keep private data from being read by the wrong people. Historically, however, encrypting data you use on a regular basis has been a difficult and awkward process. The tools available for most operating systems were very complex and required the user to have deep knowledge of cryptography and system administration.
Thankfully, modern operating systems have made huge advances in useable encryption. Microsoft Windows XP and Mac OS X both have the capability to encrypt user data in a manner that is secure and relatively transparent. This is a great leap forward as it allows for your data to be secure even in the event of theft. Previously this was only possible with very specialized software or with a great deal of effort.
At the heart of filesystem encryption in Mac OS X are two applications: DiskCopy and KeychainAccess. DiskCopy is used to create and copy disk images to drives. KeychainAccess is used to automatically handle passwords and passphrases for programs and web sites. KeychainAccess is discussed in detail in Chapter 5, “User Applications.”
Primarily DiskCopy is used to burn CD-R and DVD-RAM discs. However, it can also create disk images that will exist on top of a normal hard disk filesystem. These disk images are convenient for storing personal data and moving it between machines. Images created by DiskCopy are also used for software distribution. Many popular freeware and shareware software packages ship as disk images that can be mounted on a machine, used to install the software, then discarded. The disk image, typically with a .dmg extension, is downloaded and saved to a local disk. When the image is activated, DiskCopy will verify the checksum of the image, and then mount the volume contained in the image on the desktop. You can then access the data in the volume like any disk. When you are done with the volume, it can be unmounted by ejecting it as if it were removable media.
DiskCopy also allows for these disk images to be encrypted using AES to protect the data inside. AES, the Advanced Encryption Standard, is a symmetric cryptographic mechanism endorsed by the United States government. AES has gone through detailed analysis and is generally considered secure. For most uses it is secure enough to be unbreakable.
Before you make your new volume, determine how large you need it to be. If you are going to be storing email or other small files only, a few megabytes should work fine. If you are going to be storing multimedia files and other types of large data, you may need to allocate several hundred megabytes. Be aware that when you make the disk image it uses all the space when it is created. It does not grow based on your needs up to a maximum nor can it be grown later if you fill it up. It should be big enough to hold the data you need but not so much to run yourself out of space.
To create an encrypted volume, launch DiskCopy from the Utilities folder. Create a new disk image by selecting File, New, Blank Image. A window pops up enabling you to configure properties for the new image (see Figure 3.9). The Save As field is the name of the file in which the image will be saved. The Volume Name is the name the volume will have once it is mounted. Choose the format required for your workstation. For a discussion of the differences between HFS+ and UFS and why you would choose one or the other, see Chapter 2, “Installation.” Finally, set the required size, select AES encryption, and click Create.
DiskCopy will then create and format the image. It will then prompt you for a passphrase for the image. This password is what will protect your sensitive data, so be sure it is a strong password with a combination of letters, numbers, and special characters. If the Remember Password check box is checked, this passphrase will then be stored in your keychain so you do not have to type it in every time you need to mount the volume. After the passphrase is entered and verified, the volume will be mounted and you can begin using it.
After your next reboot, the volume will not be mounted automatically. To use the volume, double-click on the disk image. DiskCopy launches, accesses your keychain with your log-in credentials, and decrypts and mounts the volume. If you need to unmount the volume, simply drag it to the trash or type Command-E to (virtually) eject it.
In the networked world we live in, it is easy to forget about console security. It is important to remember that some of the most dangerous attackers are the ones with direct physical access to your machine. After you have properly secured your host from local attackers, you need to examine the applications you will be using, as well as the network services you are running.