“UNIX is simple. It just takes a genius to understand its simplicity.” | ||
| --Dennis Ritchie | ||
Behind the advanced Aqua interface, and the glitter of the Quartz windowing system, Mac OS X is a modern UNIX operating system. By now you have probably heard this a million times. This chapter focuses on the most critical aspects of UNIX security and, specifically, those aspects particular to Mac OS X. Those with a UNIX background will benefit most from the exposed peculiarities of this system. Those who come from more of a Mac OS background will benefit most from learning about the awesome difference in power and, in turn, the incredible responsibilities that go along with this new version of Mac OS.
First, we will cover the basics of the command line interface, and the security concerns surrounding the use of the terminal application that ships with Mac OS X. Next, we will cover some key command line applications that can be helpful in managing the security of Mac OS X system(s). Topics in this chapter also include the details of modifying file permissions and file ownership, as well as an exploration of the nature of certain files that are installed with the OS.
Finally, we will cover some common UNIX security topics, including administrative issues surrounding the sudo application.
Now that we have a full-bore UNIX operating system to toy with, it is important to know how to do so without burning ourselves in the process.
The first versions of UNIX did not have complex graphical interfaces. In fact, they had no real graphical interfaces at all. The human computer interaction that took place was always through a command line interface. Most modern UNIX systems still use the command line as the primary interface, treating graphical interfaces as an optional set of applications. Mac OS X is a little different in this respect; the user is automatically presented with a graphical interface as the primary interface on boot.
Apple has probably done the best job yet of placing a usable graphical interface on top of a UNIX system. However, under the hood Mac OS X is still a UNIX-based system. Throughout this book, we will be concerned with issues of security and often these issues cannot be fully addressed without making use of the command line interface.
Apple has also done a decent job of securing Mac OS X right out of the box. Keeping it secure requires knowledge and understanding of the UNIX foundation that supports this operating system. This understanding begins with the command line interface.
There are different ways to obtain command line access on a Mac OS X system. You can gain access via remote login, you can use the Terminal.app from within the Aqua interface, you can boot into single user mode as described in Chapter 3, “Mac OS X Client General Security Practices,” or you can log in to the console directly.
By default, the legacy UNIX remote access methods, including telnet, remote shell (rsh), and remote login (rlogin) are disabled. This is a good thing. All these access methods present security risks to your system and are ideal targets for attackers. With telnet, the login process is conducted without encryption, as is all subsequent communication. By default, rlogin and rsh suffer the same problem.
Secure Shell (SSH) solves these issues, and more. SSH protects the authentication process, as well as all communication between the client and the remote host. SSH is essentially a secure replacement for these legacy UNIX access methods. SSH is also disabled by default but can easily be enabled through the GUI, using System Preferences.app. In the Sharing pane, select the Services tab. Select the Remote Login service and click the Start button (see Figure 4.2). This will perform the steps needed to start the SSH server. Apple calls the SSH server the “Secure Login Server.” From that point on, the server will be started automatically at boot time until specifically disabled.

Mac OS X is inherently a multiuser operating system. Thus, multiple users can be logged in simultaneously with access to a command line interface. This, combined with the operating system’s networking capabilities, makes Mac OS X more of a target for attackers than previous versions of Mac OS. It is important to be aware of other users on the system, and their actions. This is covered more later in this chapter when we discuss the who and ps commands.
As an administrator, it is essential that you understand the details of remote and direct access and how to control them. As a user it is important to understand the risks involved with command line access. Information pertaining to securing system services will be discussed throughout the remainder of this book.
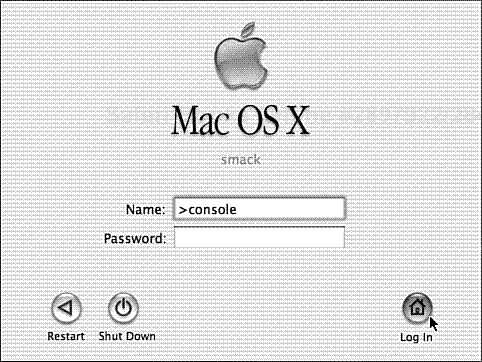
Terminal.app reveals a familiar UNIX command line interface (see Figure 4.3). This interface provides access to applications that modify important files and change the state of the system. In fact, many of these operations can be done only on the command line. The potential for disaster is probably more potent than any other application installed with the operating system. While it is possible to unintentionally wreak havoc on a system through the GUI, it is generally a lot harder. This is especially true with Mac OS X. The graphical interface is very user friendly. This is often not the case with the command line interface.

A good rule to follow is: Never run terminal commands unless you know the effects they will have on the system and other users. This is especially important while executing commands as root. An administrator armed with root privileges can be very dangerous. With a single command the root user can destroy a system, or render it unable to boot. A root shell is like a gun. It must be handled very carefully or you can wind up shooting yourself in the foot. If you have doubts about a certain command, consult the man page for details about its behavior.
In the same vein, never hastily paste commands into a terminal window unless you know what you are doing. With the growing popularity of Mac OS X, many online resources exist that provide tips and tricks for tweaking the system or manipulating the file system. The command line interface is a lot less forgiving of mistakes. The Finder, for example, will often prompt in the case of deleting a file. By default, most shells will simply delete the file(s).
It is also important to understand how your shell interprets special characters. Filenames can contain characters that the shell might interpret in a different way than you might think. Here is a simple example. Suppose you want to delete a file named “*a”; you could use the rm command:
bash-2.05a$ rm *a
This deletes the file in question, as well as every file ending in “a”! The correct way to remove only the intended file would be to escape the asterisk, which would force the shell not to treat it as a special character. To escape a character, use a backslash, for example:
bash-2.05a$ rm *a
Also, refrain from entering sensitive information, like passwords, as arguments to commands. For convenience purposes, many shells keep a history file of recent commands. Sensitive information entered on the command line would then be left in such a file. More importantly, the operating system maintains a list of running commands in the system process list. Tools exist that allow users to view the currently running applications, including the arguments. These tools are available to all users on the system.
Often there are ways around the password issue. For example, some applications that require passwords accept command line arguments that cause the application to prompt for a password instead of forcing the user to enter it as part of the command.
There also are various convoluted ways to attempt to remove such information from the process list, but none of them are completely safe. It is best to assume that any arguments given to commands can be seen by other users.
The crux of the UNIX security model has to do with enforcing file permissions. Everything, including devices and memory has a file representation of some kind. In turn, access to files is restricted based upon user and group credentials. Understanding how this model works is essential for anyone concerned with protecting his or her data.
This section covers the details of Mac OS X file permissions, including how to modify ownership, access control, and certain special attributes of files.
Every file belongs to a single user and a group. In addition, every file has an associated set of permissions. These permissions define who can access the file and what types of operations are permitted. The “who” aspect of these permissions include:
The owner of the file
The group that owns the file
All other users
For each of these three elements, the permissions further define allowable modes of access for that user type. These modes are
Read
Write
Execute
Each file has permissions data attached to it. These permissions consist of a sequence of bits that reflect the preceding elements. Thus, we have nine bits designating read, write, and execute privileges. Actually, every file has twelve permissions bits associated with it. The other three are the Set User ID bit, the Set Group ID bit, and the sticky bit, covered later in this chapter.
Permissions are usually represented as a string reading from left to right. This string is organized into three main sections (see Figure 4.4). The first section denotes permissions for the owner, the second section for the file’s group, and the last section for all other users.

Each section contains three elements, one for each access type. The “–” symbol denotes the denial of access. Table 4.1 illustrates the possible values for a section.
The permissions for a file can be displayed with the ls command line application, using the -l option (meaning long listing). For example:
bash-2.05a$ ls -l /usr/bin/grep
-rwxr-xr-x  1 root  wheel  93348 Nov 22 16:44 /usr/bin/grep
The first item is the permissions string, in this case (rwxr-xr-x). With this file, the owner is root and has read, write, and execute privileges (rwx). The wheel group has read and execute privileges (r-x). All other users have read and execute privileges (r-x).
Read access to a file means the contents of that file can be revealed. Read access to a directory means that the contents of the directory can be listed.
Write access to a file means that the contents of the file can be altered. Write access to a directory allows the addition and removal of files contained in that directory.
Execute privileges for a file means that the file can be loaded and run as a program. The capability to execute a directory means it can be entered with the cd command, or searched.
From Figure 4.4, you can see that the leftmost element of the permissions string denotes the file type.
Everything in UNIX is represented as a file. As a result, there are certain files that must comply with specific format or purpose. Some files serve to represent devices; other files represent memory. These files are known as special files.
Most files on Mac OS X are so-called regular files, meaning they contain an arbitrary format of binary or textual data. Regular files are represented by a dash (-) in the permissions string.
Block and Character files are usually tied to a device or a piece of hardware. Sometimes this is to a pseudo device, such as a terminal application. These files are used as a means of communication between the device and the operating system. Block files communicate in blocks, or multiple characters of data at a time. Character devices communicate one character at a time. Block and Character files are represented in a permissions string by the letters “b” and “c,” respectively.
Directories contain files. A directory is more or less a regular file, but it has a specific format, or structure. Directories are represented in a permissions string by the letter “d.”
A symbolic link is a reference to some other file that may or may not exist. The symbolic link file basically contains a path. A symbolic link has permissions, but they are meaningless. Symbolic links can point to other files, other directories, or even other symbolic links. Symbolic links are represented in a permissions string by the letter “l.”
A socket file is used to facilitate the communication of data between two applications running on the same machine. Socket files are represented in a permissions string by the letter “s.”
This system of file access control is relatively simple, and for many UNIX folks, not unfamiliar. However, there are some caveats to watch for:
If a user owns a file, and is also a group owner, the group permissions are ignored and the user permissions apply.
Read access to a directory does not affect the permissions of the files contained in that directory. Read permissions provide access to the directory attributes. This includes the capability to list the files that the directory contains. Disabling read access does not necessarily prevent the contained files from being opened, modified, or even deleted.
Write access to a directory enables a user to delete any file in that directory regardless of the permissions for the files (except when the “sticky bit”—see the later section, “Sticky Bits”).
Disabling write access to a directory does not affect the capability to write to existing files in the directory, but does deny the capability to create or remove files.
Execute permissions on a directory allows access to the contents of that directory. Regardless of the permissions of the files contained, denying executable permissions on a directory prevents access to those files (and prevents shells from entering the directory).
So far, we have covered only nine of the twelve permissions bits. The permissions that deal with read, write, and execute privileges are fairly straightforward. However, there are three additional elements to a file’s permissions that are not as simple.
Normally, a process runs with the same privileges as the user who executed the application. The Set User ID bit allows a file to execute as if the owner of the file had executed it. That is, the resultant process always runs with the same privileges as the file’s owner.
Every process has a real UID and an effective UID associated with it. The real UID is the ID of the user that started the process. The effective UID determines user privileges for the process. The effective UID can change during the life of a process, but usually, the real and effective UID values are the same. The Set User ID bit causes the effective UID of the process to be that of the owner of the file. A file with the Set User ID bit set is commonly referred to as SUID.
Directories can be SUID; but on Mac OS X, this has no effect. On some UNIX systems, creating a directory SUID makes any new files in the directory automatically owned by the owner of the directory.
A file that is SUID is represented as such in the owner executable portion of the permissions string. Although it does affect the execution of a file, the SUID bit is distinct from the owner execute bit; however, they both occupy the same position in the permissions string. Because of this, there are certain symbols to denote which bits are set. Table 4.2 shows the possible values for the owner executable portion of a permissions string.
Table 4.2. File Owner Execute Bit Possible Values
VALUE | MEANING |
|---|---|
– | Not executable by owner, not SUID |
x | Executable by owner, not SUID |
s | Executable by owner, and SUID |
S | SUID, not executable by owner |
An example of a SUID file is the passwd application:
bash-2.05a$ ls -la /usr/bin/passwd
-r-sr-xr-x  1 root  wheel   30492 Nov 22 16:45 /usr/bin/passwd
Sometimes it is necessary to give unprivileged users access to system files. For example, many UNIX systems have a password file that is owned by root, and can only be read or written to by the root. Users need read access to this file when logging in, for verification of their password. They need write access to the file when changing their password. For obvious security reasons, it makes no sense to allow normal users the capability to arbitrarily read and write to such a file. However, by making the login and passwd programs SUID, users have the capability to read and write to the file in a (hopefully) controlled fashion. The difference is that these programs place constraints on the nature of the access. They dictate exactly what can be read or written, and how.
This is a benefit of the SUID bit, but there are also dangers associated with this permissions attribute that will be covered later in this chapter.
The Set Group ID bit serves the same function as the Set User ID bit, only it applies to group privileges. Likewise, it is often referred to as the SGID bit. When a SGID file is executed, the effective group ID of the process is the same as the GID of the file. As with the SUID bit, setting the SGID bit on a directory in Mac OS X has no effect.
The SGID bit is represented in the permissions string the same way as the SUID bit. The only difference is that it is represented in the group executable position. An example of a SGID file is the uptime application that shows how long the operating system has been running:
bash-2.05a$ ls -la /usr/bin/uptime
-r-xr-sr-x  1 root  kmem  19536 Nov 22 16:44 /usr/bin/uptime
The sticky bit applies to directories on Mac OS X, and is used to further restrict write access to files. In a sticky directory, only root and the owner are allowed write access to each file. This is true even if the owner allows write access to all other users. This is commonly used for temp directories, and Mac OS X is no exception with the /tmp directory being a sticky directory.
On older UNIX systems, it is possible to set the sticky bit on regular files with a completely different effect. Some systems still allow this. On Mac OS X, setting the sticky bit only affects directories.
A directory that is sticky is represented as such in the others executable portion of the permissions string. The sticky bit is distinct from the others execute bit. Because of this, there are certain symbols to denote which bits are set. Table 4.3 shows the possible values for the others executable portion of a permissions string.
Table 4.3. File other Execute Bit Possible Values
VALUE | ALLOWED ACCESS |
|---|---|
– | Not executable by owner, not sticky |
x | Executable by others, not sticky |
t | Executable by others, and sticky |
T | Sticky, not executable by others |
Another example of a sticky directory is the /cores directory:
drwxrwxrwt 2 root wheel 68 Jul 14 00:20 cores/
The permissions we have covered so far are apparent to users. That is, they are seen with most of the applications used to display file permissions. However, there are other flags associated with files that are not so apparent. These flags are inherited from BSD, and most derivatives of BSD implement some permutation of these hidden flags. Linux users familiar with the chattr command might recognize some of these flags. Mac OS X supports the flags shown in Table 4.4.
Table 4.4. Hidden File Flags
FLAG | DESCRIPTION | PRIVILEGES REQUIRED |
|---|---|---|
| user immutable | owner or root |
| system immutable | root only |
| user append-only | owner or root |
| system append-only | root only |
| nodump flag | owner or root |
| allow to archive | root only |
| opaque directory | owner or root |
These flags can actually be seen with the -lo options to the ls command. For example,
bash-2.05a$ ls -lo /tmp/myuchgfile
-rw-r--r--  1 brian  wheel  uchg 0 Nov 29 22:32 myuchgfile
The user immutable flag (uchg) prevents the user from modifying the file in any way, regardless of the permissions.
The system immutable flag (schg) prevents any user (including root) from modifying the file. After the system immutable bit has been set, even root cannot change it back. The only way to reset the bit, or remove the file, is to boot into single user mode.
The appnd flags only allow data to be appended to the file; the existing content in the file cannot be altered. Like the schg flag, the sappnd flag can only be set by root and removed by root in single user mode.
The dump flag signals to the dump(8) utility to skip this file when conducting backups.
The arch and opaque flags set attributes that do not deal with access control.
The flags to be most concerned with are the immutable (uchg/schg) and append (uappnd/sappnd) flags. In fact, some BSD distributions make use of the chg flags for critical system files. The basic idea is that intruders are unable to modify schg files unless they have physical access to the box and know the root password. If this is ever the case you have bigger problems to worry about. The best thing to do in such a situation is panic.
The capability to remove some of these flags is directly related to the security level of the kernel. Booting into single user mode reduces the kernel security level thereby allowing these bits to be altered. Kernel security levels will be covered later in this chapter.
So far we have seen how file permissions are organized, and the types of access control available to files on Mac OS X. Here we reveal the tools used to modify permissions and ownerships of files.
The chmod command line application can be used to modify file permissions. This includes all twelve of the permission bits. The hidden flags, such as uchg and uappnd, cannot be modified by chmod. Only the owner and root can change the permissions of a file.
There are basically two methodologies that can be used with chmod: the octal method or the symbolic method. In either case, the basic syntax is
chmod mode file
The symbolic method uses the characters u, g, and o to represent the user (owner), group, and others section of the permissions. The characters r, w, x, s, and t represent the same bits they do in the permissions string. This is best explained with some examples:
chmod u=rwx,g=rx,o=r foo.txt
These permissions give read, write, and execute privileges to the owner, read and execute privileges to the group, and read access to all other users.
chmod g+x foo.exe
This sets the group execute bit; all other permissions remain the same.
chmod o-w foo.exe
This makes the file foo.exe not writeable by other users. All other permissions stay the same.
chmod u+s foo.exe
This sets the foo.exe application to be SUID. All other permissions stay the same.
When using the octal method, the mode is a sequence of four integers that define the value for each of the twelve permission bits. The first number applies to the SUID, SGID, and sticky bits. Table 4.5 shows the possible values for this first number.
Table 4.5. File Permissions Octal Mode Values for SUID/SGID and Sticky Bits
MODE VALUE | PERMISSIONS |
|---|---|
0 | No bits set |
1 | Sticky bit |
2 | SGID |
3 | Sticky and SGID |
4 | SUID |
5 | SUID and sticky bit |
6 | SUID and SGID |
7 | SUID, SGID, and sticky bit set |
The second number applies to the owner permissions, the third number to group permissions, and the final number for the other section of the permissions. Table 4.6 shows the possible mode values, and associated permissions.
Table 4.6. File Permissions Octal Mode Values for read, write, execute Bits
MODE VALUE | PERMISSIONS STRING |
|---|---|
0 | --- |
1 | --x |
2 | -w- |
3 | -wx |
4 | r-- |
5 | r-x |
6 | rw- |
7 | rwx |
Here are some examples using the octal method, and the corresponding permissions strings:
chmod 0744 foo.exe     becomes: rwxr--r--
chmod 4755 foo.exe     becomes: rwsr-xr-x
chmod 0777 foo.exe     becomes: rwxrwxrwx
chmod 2655 foo.exe     becomes: rw-r-sr-x
The chmod command also can be applied recursively to all files in a directory using the -R option.
Using the octal method is nice because all twelve permissions bits can be changed with a relatively short command. This can also be viewed as a more safe way to change file permissions; because you specify a value for each element of the permissions, there is less of a chance that you will accidentally allow unintentional access to a file. The downside is that it can be cumbersome to remember what the numbers actually mean. For some, the symbolic method for changing permissions is a lot easier to remember. Reference the chmod man page for detailed usage information.
The chown command changes the owner (UID) and/or the group owner (GID) of a file. For security reasons, only the root user can change the ownership of a file. The basic syntax is as follows:
chown user:group file
With this command, it is possible to change a file’s owner, group, or both. For example:
bash-2.05a$  cd /tmp
bash-2.05a$  touch myfile
bash-2.05a$  ls -l myfile
-rw-r--r--   1 brian  wheel  0 Dec  1  00:32  myfile
bash-2.05a$  sudo chown root:staff myfile
Password:
bash-2.05a$  ls -l myfile
-rw-r--r--   1 root staff 0 Dec 1 00:32 myfile
The chgrp command changes the group owner (GID) of a file. Only the owner or the root user can change the GID of a file. In addition, the user changing the group must also be a member of the new group. The basic syntax is
chgrp group file
For example:
bash-2.05a$ cd /tmp
bash-2.05a$ touch myfile
bash-2.05a$ ls -l myfile
-rw-r--r--  1 brian  wheel   0 Dec  1 00:20 myfile
bash-2.05a$ chgrp staff myfile
bash-2.05a$ ls -l myfile
-rw-r--r--  1 brian  staff  0 Dec  1 00:20 myfile
Just like chmod, the chown and chgrp commands also can be applied recursively.
The hidden file flags cannot be changed with the chmod command. Instead, use the chflags command. To set a flag, use the flag name listed in Table 4.4. To remove a flag, prefix the keyword with no (Except for nodump; to remove this flag use dump). For example, to set the user immutable flag:
chflags uchg <file>
To remove that same flag:
chflags nouchg <file>
This might be a bit confusing at first because you use uchg to not allow changes, and nouchg to allow them. To verify the flags set on a file, use the -lo options to the ls command:
bash-2.05a$ ls -lo
total 0
drwx-wx-wx    3 brian  staff   -            102 Oct 16 13:27 ./
drwxr-xr-x   22 brian  staff   -            748 Oct 16 13:22 ../
-rw-r--r--    1 brian  staff   uappnd, uchg  0 Oct 16 13:27 random_file
bash-2.05a$
The flags to be most concerned with are the uchg/schg and uappnd/sappnd flags. In fact, some BSD distributions use the chg flags for critical system files. The basic idea is that intruders are unable to modify schg files unless they have physical access to the box and know the root password. If this ever is the case, your best recourse is to panic.
See chflags(1) for more information about these flags. For developers, see chflags(2).
Permissions also can be modified through the Finder using the Get Info dialog. After selecting a file, the Get Info dialog can be invoked in three ways. Select the Get Info option from the File menu, Control-click the file and choose Get Info, or use the Command-I keyboard sequence.
Use the Ownership & Permissions section (see Figure 4.5) of this dialog to modify the owner, group, and basic file permissions.

This dialog provides the capability to set read and write privileges. It also allows the owner and the group for the file to be changed. The root user is referred to as “system” in this dialog. Likewise, the wheel group is referred to as “system.”
The “Locked” check box, when checked, sets the uchg flag of the file in question. None of the other special flags can be set with this dialog.
Obviously, Get Info does not come close to providing the same degree of control over file permissions as with the chmod application. Some basic permutations of the read and write bits can be set, but with this dialog it is not possible to alter the SUID or SGID bits. Likewise, the Get Info dialog does not reveal a lot of important permissions bits.
Mac OS X is littered with useful command line applications. Some of these applications can be very useful from a security perspective. They shed light on the happenings of the UNIX layer of Mac OS X. They allow a user or an administrator to monitor and manage system behavior. In this section we will cover a few such commands.
Most of the commands covered here accept many options and can be used in various ways. The following sections are not complete descriptions of each command; they serve to point out how these commands can be used, including some examples. Reference the man pages for a complete and detailed explanation of these commands.
The top command (see Figure 4.6) displays information and statistics about running processes and system memory. The information is divided into two main sections. The upper portion contains information about the overall system memory and CPU usage. The bottom portion displays information about specific processes. This application takes over your console (or terminal window) and keeps running until you press the Q key.
The good thing about top is that it can provide quick access to updated information about multiple processes. Thus, you can do a quick sanity check of overall system behavior. By default, top sorts the processes by PID with the highest PID value at the top. You also can sort the list by the most CPU-intensive applications with the -u command line option. As a result, the top application is a good place to pinpoint, for example, a process that is consuming too many system resources.
By default, top updates the information displayed in the table every second. You can set the update interval in seconds by using the -s command line argument. The defaults to top are usually sufficient.
The ps command also is used to get information about running processes. Although top is usually used as a means to get a rough overview of the system, ps is used to get much more detailed information about specific process or set of processes. The ps command enables the user or administrator to gain important information about who is running what applications, and how those applications are effecting the state of the system. See the man page for the list of process attributes available with this command.
The following are some simple examples:
ps -uU root
This displays all the commands currently being run by the root user, including the command line arguments. A command like this can be used to quickly view the applications being run by any specific user.
ps -auxe
This displays every command running on the system, and the environment for each command.
ps -aux | grep telnet
This displays information about any currently running telnet command, started by any user.
These examples show how easy it is to obtain information about running processes. The output from ps also includes all the command line arguments to applications and the environment in which the application is running. On Mac OS X, the root user is not excluded from this. Also, some UNIX systems only allow root to see the environments of other user processes. On Mac OS X, all users can see the environment of any process.
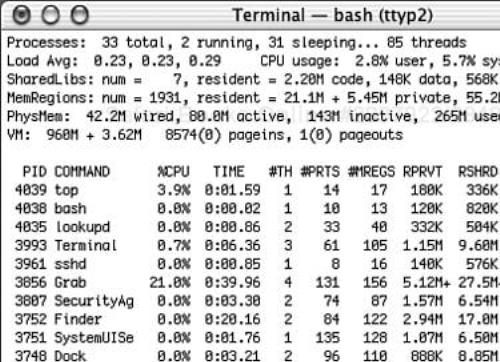
Mac OS X also has a graphical application called the Process Viewer.app that functions similar to the ps command (see Figure 4.7). This application is located in /Applications/Utilities/Process Viewer.app. However, compared to ps it does not provide the same level of detail.
The kill and killall commands are used to send various types of signals to running processes. Signals are a way to notify a process about important events. The signal interrupts the execution of the application and the application must then react to the signal. The operating system can issue signals, and processes can send signals to each other. There are many different signals, only some of which can actually kill the process. These commands can be used to stop out of control applications, or any application that poses a threat to the security of the system.
To see the list of available signal types, use the -l command line option:
bash-2.05a$ kill -l
 1) SIGHUP        2) SIGINT      3) SIGQUIT    4) SIGILL
 5) SIGTRAP       6) SIGABRT     7) SIGEMT     8) SIGFPE
 9) SIGKILL      10) SIGBUS     11) SIGSEGV   12) SIGSYS
13) SIGPIPE      14) SIGALRM    15) SIGTERM   16) SIGURG
17) SIGSTOP      18) SIGTSTP    19) SIGCONT   20) SIGCHLD
21) SIGTTIN      22) SIGTTOU    23) SIGIO     24) SIGXCPU
25) SIGXFSZ      26) SIGVTALRM  27) SIGPROF   28) SIGWINCH
29) SIGINFO      30) SIGUSR1    31) SIGUSR2
To send a signal, specify the signal type, then the process ID that should receive the signal. The process ID is often referred to as a PID, and can be acquired with an application like ps or top. The signal numbers can be used instead of the name. For example, to try to kill a process with PID 6677 by sending the TERM signal do the following:
kill -TERM 6677
or
kill -15 6677
The default behavior for the TERM signal is for the application to quit. Applications can ignore signals, but the SIGSTOP and SIGKILL signals cannot be ignored. The Force Quit option from the Apple menu is equivalent to issuing a kill -KILL, the non-ignorable terminate signal. This also is known as a kill -9 and can be very useful to halt an application that has stopped responding.
The kill application is not SUID root. Therefore, users can only kill processes that they own, but the root user can kill any process.
The killall command is different from the kill command. This command can kill all applications owned by a specific user, attached to a specific tty, or matching a name. For example, this command would kill all instances of ping:
killall ping
The default signal is the TERM signal, but you also can specify a signal type to send.
The last application displays a list of logins, some of which may still be active. The list includes the username, terminal port, hostname, start and stop dates, and the duration of the login session. The file /var/log/wtmp is where login session information is stored. The list displays the more recent logins first. Usually, the output of this command is quite verbose. To see the 10 most recent logins, pipe the output through the head command. For example:
bash-2.05a$ last | head
brian     ttyp1                  Tue Dec 3 19:49 still logged in
brian     ttyp1                  Tue Dec 3 19:49 - 19:49 (00:00)
brian     ttyp1                  Tue Dec 3 19:21 - 19:49 (00:27)
brian     ttyp1                  Tue Dec 3 19:21 - 19:21 (00:00)
brian     ttyp1                  Tue Dec 3 16:24 - 19:21 (02:57)
brian     ttyp1                  Tue Dec 3 16:24 - 16:24 (00:00)
brian     ttyp1                  Tue Dec 3 16:21 - 16:24 (00:02)
brian     ttyp1                  Tue Dec 3 16:21 - 16:21 (00:00)
brian     ttyp1                  Tue Dec 3 15:59 - 16:21 (00:21)
brian     ttyp1                  Tue Dec 3 15:59 - 15:59 (00:00)
The who command displays a list of users who are currently logged in, including remote login sessions. The list includes the username, terminal port, the login time, and a hostname if the user is logged in remotely.
The who command, as with the file where the information is stored, is only visible to root and admin users.
The find command locates files. It recursively searches a list of directories and produces a listing of files that match specific search criteria. Aside from the obvious day-to-day activities that a command like this would be useful for, the find command can be very helpful in maintaining host security. Also, the file search capabilities in the Finder do not come close to the capabilities of find.
The find command can be used to easily locate files that might be considered risky, such as SUID root files. It can be used to identify files of a specific type, or that have specific permissions, size, group membership, or owner. The use of this command is better explained with some examples. The following examples search for files starting from the root level directory.
find / -user root ( -perm -001 -or -perm -010 -or -perm -100 )
Find all the executable files on the system that are owned by root, and executable. The -perm option allows you to restrict the find operation to the specified permissions mode. In this case, any file that has any executable bits set is included.
find / -type f ( -perm -02000 -or -perm -04000 )
Find any files with the SUID or SGID bit set. The -type f option allows the search to be limited to regular files. Files of any other type are ignored.
find / -user root -type f -perm -04000
Find any files that are SUID, and owned by root.
find / ! -type l -perm -2l
Find any files that are writeable by others, not including symbolic link files.
find / -type l -ls
Find any symbolic links. This also prints a long listing of the files, so that the files the links point to are also listed.
find / -name "*core"
Find any core files, specifically, any files that end with the word “core.” If wildcards are used, you must use double quotes.
find / -nouser -nogroup
Find any files that do not belong to a known user or known group.
find / ( -flags uchg -or -flags schg )
Find any files with the uchg or schg flags set.
The find command also can make use of regular expressions, which can make it possible to perform quite complex and customized searches.
The netstat command shows information about the status of your local network. Not every UNIX service on Mac OS X has a graphical configuration tool. Applications and services can open up local network ports and expose a system to attacks. Most services have well-known ports. If an open port is not recognized, reference the /etc/services file for a description of the service.
You quickly can see what ports your system is listening on with the following netstat command:
bash-2.05a$ netstat -na | grep LISTEN
tcp4        0      0  127.0.0.1:631             *.*      LISTEN
tcp4        0      0  *:22                      *.*      LISTEN
This example shows two network ports listening for requests. The first port (631) is the port used by the Common UNIX Printing System (CUPS). This can be used to configure local printers. The column 127.0.0.1:631 means that this port only accepts requests from the local machine. However, the next open port is the SSH server. The * means this server is accepting requests from any host. Detailed information about securing network services will be covered in Chapter 6, “Internet Services.”
Another useful feature of netstat is the capability to obtain network statistics with the -s option. This shows information about connection attempts, packet errors, current open connections, failed connections, and others. Information about specific protocols can be obtained with the -p option. The application Network Utility (/Applications/Utilities/Network Utility.app) is a graphical version of netstat, but provides only a subset of the information obtainable from netstat.
Mac OS X comes packaged with a version of OpenSSL, a popular cryptographic toolkit and secure transport library. The OpenSSL package also includes a useful command line application. This application can be used to create certificates and certificate requests, perform checksums, encrypt data, and conduct SSL tests.
One simple, but handy feature of the openssl command line application is the capability to calculate the message digest of a file. A message digest for a file is a fingerprint. In theory, no two files that differ in content have the same fingerprint. This concept can be applied to verify that certain files have not been tampered with. Although Mac OS X also has a md5 application, the openssl command includes many different message digest algorithms, including MD5, SHA-1, and ripemd-160. The following is an example of computing the SHA-1 checksum for the ls command:
bash-2.05a$ openssl sha1 /bin/ls
SHA1(/bin/ls)= fb1c94f7d2f552977be3d6d0b0315e7cc8a5b8ff
It is not uncommon for a checksum to be published alongside software available for download. The idea is that the integrity of the downloaded file or files can be verified before unpacking and installing them. The openssl command line makes it easy to perform such verification. However, there are a lot of things to consider when verifying the integrity of a file in this manner. We will discuss all these considerations in Chapter 12, “Forensics.”
This section covers some additional aspects of UNIX security. This includes SUID and SGID files, kernel security levels, and the management of the sudo command.
When dealing with UNIX file permissions, one of the most popular security concerns is with regard to SUID and SGID applications. SUID and SGID applications exist mainly to allow users to perform privileged operations or gain access to resources that require root privileges. As a result, most SUID applications are owned by root. This combination can be deadly to the integrity of a system.
The best way to deal with SUID or SGID files is to not have any of them. However, this is not realistic. Applications such as login and passwd are required to be SUID in order to function. One thing to consider with applications such as login and passwd is that they are somewhat tried and tested applications. Not all software is so fortunate. When installing applications, be mindful of file permissions. The installation of additional SUID root applications should not be done in haste. Many applications provide a means to drop in to a shell or execute a command. The vi command line text editor allows this. Even the less command allows commands to be executed by pressing the ! key. Reasonable assurance that a SUID application is benign can only be acquired by knowing all the ways in which that application can be used, misused, and abused.
Mac OS X permits shell scripts to be SUID and/or SGID. For security purposes, some operating systems (such as Linux) do not allow them to exist. A shell script should never be SUID or SGID. There are far too many ways to exploit a shell script. A shell’s environment, or the applications used in the script, can be exploited or abused. Never create SUID root shell scripts. Ever.
By default, removable media such as CDs, disk images, and network shares under Mac OS X do not permit the existence of SUID or SGID files. This includes disk images created with hdiutil or Disk Copy.app.
Finally, know all the applications that are installed as SUID or SGID, especially those owned by root. A quick examination using the find command can produce a listing of all applications currently on the system with such permissions. The following command produces a listing of all SUID or SGID files:
sudo find / -type f ( -perm -04000 -or -perm 02000 ) -ls
This is a quick way to perform a SUID audit on Mac OS X. A more robust method of doing so will be discussed in Chapter 12. Also, a complete list of the SUID and SGID applications installed with Mac OS X at the time of this writing can be found in Appendix A, “SUID and SGID Files.”
The kernel on Mac OS X and Darwin can run at various security levels, similar to other versions of BSD. There are four levels of security ranging from –1 to 2, with 2 considered the most secure. The basic idea is that the kernel does not allow certain operations on the filesystem while running under higher security levels. The security levels are
–1 No Security. Always run at security level 0.
0 Insecure. Any filesystem can be written to provided the permissions allow it. The hidden
schgandsappndflags can be set or unset.1 Secure. The
schgandsappndflags cannot be removed from files.2 Most Secure. The
schgandsappndflags cannot be removed from files. Filesystems cannot be altered, and it is not possible to create new filesystems.
The root user can raise the security level, but only the init process can lower it. The init process is the master process. It creates all other processes and always has a process ID of one. By default, the Mac OS X kernel runs at security level one after booting. This is reasonable. Running at security level 0 renders the schg and sappnd file flags useless.
The following command shows the current kernel security level:
sysctl kern.securelevel
The root user can raise the security level with the following command:
sysctl -w kern.securelevel=2
In most cases, the default security level will suffice. However, if your security policy demands the kernel run at security level 2, there are basically two options:
Raise the security level during the last stages of the boot process. This involves adding the preceding command to the bottom of the
/etc/rcfile.Recompile a new kernel after making a minor adjustment to the source. The man page for
initdescribes this process.
The first option is obviously easier, but is also easier to circumvent. Building a new kernel is relatively involved, but is also slightly more resilient to being tampered with. To run the Mac OS X kernel at security level 0 (other than single user mode), it is necessary to recompile the kernel.
The sudo command is used to execute a command as another user. Usually sudo is used to execute a command as root, but it also can be used to execute a command as any other user. The following example shows the execution of the id command as a regular user, then as root:
bash-2.05a$ id uid=501(brian) gid=20(staff) groups=20(staff), 80(admin) bash-2.05a$ sudo id Password: uid=0(root) gid=0(wheel) groups=0(wheel), 1(daemon), 2(kmem), 3(sys), 4(tty), 5(operator),20(staff), 31(guest), 80(admin)
To execute a command as a non-root user, use the -u option and specify the username. For more information regarding the syntax of the sudo command, refer to the man page.
The sudo command can be useful for many reasons. First, let’s look at some advantages associated with using sudo:
Users are not left in a root shell. The dangers of using the root account as a regular account have previously been stressed.
sudoenables administrators to obtain root privileges only when necessary. As soon as the command terminates, the privileges are dropped.The root password stays private. When a non-root user executes a command using
sudo, it asks for that user’s password, not the root password. Thus, it is possible to allow administrators to perform privileged operations without giving out the root password.The capability to perform privileged operations can easily be revoked. Because the root password is not disclosed to
sudousers, removing their capabilities involves revokingsudocapabilities. The root password does not necessarily have to be changed.sudocommands are logged. With Mac OS X, all uses ofsudoare logged to the system log, by default. This small audit trail includes the user who executed the command, their terminal port, the directory they were in, and the complete command that was executed.Finally, the use of
sudois conveniently quick compared to logging in as a different user. All that is required is to prefix a command with thesudocommand.
Now that we have conducted a sales pitch for sudo, let’s be realistic. sudo access is root access. The sudo command (unless configured otherwise) can be used to execute commands as root, or to spawn a root shell as follows:
sudo bash
The root password doesn’t have to remain private. There is nothing to stop a user from changing the root password with:
sudo passwd root
The point here is that a user with sudo capabilities can do anything that the root user can do. In fact, he or she can become the root user. The greatest benefit of the sudo command is that it allows administrative tasks to be performed, without the need to login as root. sudo can protect the root user from themselves. Using a root shell, it is a lot easier to accidentally delete files, or whack a filesystem.
This being the case, it is critical that you not allow just any user the capability to use sudo. Granting uncontrolled sudo capabilities to a user is like handing them the root account, and doing so should only be done when deemed absolutely necessary. Also, the use of sudo must be accompanied by strict control over what those users can do. Fortunately, controlling which users can use sudo and what those users can do is quite easily configured. The next section describes how access to sudo can be controlled.
After the installation of Mac OS X and Mac OS X Server, there is a single account capable of using sudo. This is the admin account, which is created during the installation process. Normal users created using the Accounts pane in the System Preferences application are not granted sudo capabilities.
The capability to use the sudo command is actually controlled by the contents of the file /etc/sudoers. This file specifies what users and groups have access, and what they can do with that access. For security reasons, this file is readable only by root and the wheel group. The initial contents of this file are
# User privilege specification
root         ALL=(ALL) ALL
%admin       ALL=(ALL) ALL
This configuration allows root and any member of the admin group the capability to run any command, as any user, on any host. The first word is the user or group. Groups are prefixed with a % character. A breakdown of the syntax used here is
user host=(user) command
The host, user, and command sections can be a list of comma separated items or aliases. There are four different alias types. If no user is specified, ALL is assumed. For example:
User_Alias      ADMINS=bob,sue,fred
Cmnd_Alias      ADMIN_CMDS=/bin/ls,/usr/bin/tar
ADMINS          ALL=ADMIN_CMDS
This allows the users bob, sue, and fred the capability to execute the ls and tar commands, on any host, as any user (including root).
With the default /etc/sudoers file on Mac OS X, the root user is allowed full access, as is every member of the admin group. After installation, there is only one admin user. However with the configuration, new admin users are automatically given sudo access because they are members of the admin group. One way to solve this is to comment out the admin line and individually add users to this file as necessary.
The actual syntax for the /etc/sudoers file is complex. There are many options that can be used in the /etc/sudoers file, and far too many to cover in this section. The amount of customization and effort that goes into configuring this file will vary depending on your security policy. For many, the default will work just fine. For more information, reference the sudoers man page for detailed information and options.
The substitute user command (su) is yet another way to gain a root shell. Although sudo executes a command as another user, su actually brings up a shell as another user. The default is a root shell.
If the root account is disabled as described in Chapter 1, “Security Foundations,” the su command will not bring up a root shell. However, this application can still be useful for an administrator to quickly assume the identity of a different user. As with sudo, the su command also leaves an audit trail in the system log.
The sudo command is generally considered a safer bet, for a couple of reasons. First, you can control exactly who can use the command, and what they can do with it. Second, the sudo configuration can specify a timeout value. This requires the user to authenticate after a certain amount of time passed. Thus, if a careless admin leaves his desk, his sudo abilities are not as easily exploitable once the timeout takes effect. A root shell obtained through the su command, however, would not be so lucky.
Mac OS X is a complex UNIX-based system. The security model includes users and groups and is largely based on the enforcement of file permissions. Although seemingly simple compared to operating systems such as Windows, Mac OS X file permissions have some dangerous elements to watch out for, such as hidden file flags and SUID files. Privilege elevation with sudo can be controlled, but an understanding of its configuration is essential.
Some users and administrators may find Mac OS X’s UNIX foundation familiar, but for many it can be overwhelming. See Appendix C, “Further Reading,” for some recommended reading material about UNIX security and UNIX in general. UNIX is a major part of Mac OS X and effective security begins with a solid understanding of this aspect of the operating system.