
“Now that we have all this useful information, it would be nice to do something with it. (Actually, it can be emotionally fulfilling just to get the information. This is usually only true, however, if you have the social life of a kumquat.)” | ||
| --Unix Programmer’s Manual | ||
Modern industrial society is all about information. Modern computing is all about sharing this information. To do this, we connect our lonely individual computers together into networked communities of computers. Once connected into networks, we set about sharing our bits of data, sometimes for pleasure; other times for business or education. Life would be simple if we wanted to share all of our information with everyone, and everyone played nice, but reality and human nature creep in and dictate otherwise. Sometimes we find that only certain people should have access to certain information, and that not all people play nice. So into our perfect little IT world the specter of malicious attack falls. The very network services we rely upon to share information with our friends and associates become the points of attack against our data and systems. The brief history of networked computing is riddled with vulnerability after vulnerability, exploit after exploit, attack after attack, and patch after patch.
We have made this point earlier, but it bears repeating. Past versions of the Mac OS have been less susceptible to attack than most other operating systems of the era. Whether one considers this to be due to inherent security in the operating system or an inherent inability to network depends on whether one considers an inherent inability to network to be inherent security. Previous versions of the Mac OS simply were not capable of many of the networking feats we attribute to most modern general-purpose operating systems. Such claims of inherent security are specious logic. It is like saying an old fashion hand drill is inherently more reliable than my 24V cordless drill because the hand drill does not require a battery. It is true in a sense, but that cordless drill is capable of so much more work (especially with me, Preston, behind the hand drill) that it makes the conclusion invalid. In the same way, older versions of the Mac OS are often thought of as being more secure against network attacks because they do not have the wealth of network services provided by other operating systems.
Mac OS X has changed this thinking. The operating system now has the infrastructure to support any number of network services. Out of the box, Mac OS X can share files with other Macs and UNIX systems as well as Windows-based PCs. With little work and no additional installation, a Mac OS X can be a full-fledged web server, email server, or DNS server. This is a far cry from the older operating system line, in which most of these services required third-party applications to be installed.
But with our new-found capabilities comes new risk. Now that our Macs are full-fledged systems on the networks of the world, our Macs are also full-fledged targets on those same networks. Fortunately, Apple has chosen to disable all these services by default, helping us to ensure that “out-of-the-box” security is reasonably sound. This chapter will introduce readers to these new network services and provide details on how to configure and secure them so that these new capabilities do not become holes to be exploited by those who do not play nice.
Mac OS X is not the first Apple operating system to ship with a web server built in. In early 1997, Apple released Personal Web Sharing as a 20-dollar add-on to System 7.5.3 (it would later be integrated into Mac OS 8, released later that year). It provided basic HTTP serving capabilities as well as some capability to handle CGI applications (it was mostly compatible with MacHTTP and WebSTAR CGI applications, two popular Mac OS-compatible HTTP servers of the day).
Instead of shipping its own Personal Web Sharing software, Apple now ships the venerable Apache HTTP Server with Mac OS X. More Internet web servers run Apache than all others combined, with about 64% of all active sites according the Netcraft survey (see http://www.netcraft.com/survey). In both Mac OS X Server and Client the default http server is Apache version 1.3.x. In addition, Mac OS X Server also includes version 2 of the HTTP server, although version 1.3.x is the default when the web service is enabled. Like most other services under Mac OS X, Apache is not enabled in a default configuration of Mac OS X.
In this section, we will discuss various security considerations for the Apache HTTP Server, including potential modifications to the default configuration. Apache has a rich configuration language—far too rich for us to go into in any depth in this book; there are entire books dedicated solely to configuring and managing Apache. As we indicate in Appendix C, “Further Reading,” one of the best books available is O’Reilly & Associates’ Apache: The Definitive Guide. For any administrator serious about managing an Apache web server, we suggest obtaining and digesting this tome. Because of this, we will be assuming that readers have familiarity with the Apache configuration syntax and should be able to apply general concepts involving various configuration directives to their own specific configurations and needs.
Before we get too far into the security discussion, we feel it is necessary to discuss some of the differences between Mac OS X’s Apache configuration and that of a “standard” installation. We also want to point out the differences between the configuration of Mac OS X and Mac OS X Server. In each of the two editions of the operating system, Apple has made different assumptions about the end use of the web server. These differences in configuration cause issues that will have bearing upon a number of the following discussions.
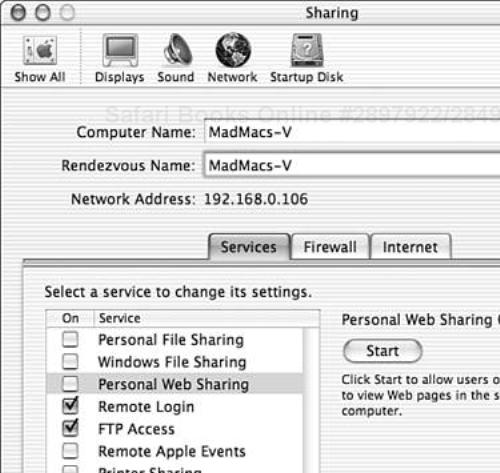
Of the two editions of Mac OS X, the client edition has the most “standard” install of Apache. In the client edition, the binaries, scripts, headers, modules, and log files are located within the traditional UNIX directory structure; binaries and shell scripts are kept in the /usr/bin and /usr/sbin directories, modules are kept in /usr/libexec/httpd, and log files are kept in /var/log/httpd. There are only a few ways in which Mac OS X differs from a normal Apache installation. The first and probably most quickly noticeable difference is the addition of a simple graphical interface for stopping and starting Apache, aka Personal Web Sharing. This simple GUI is available from the Sharing pane of the System Preferences application (see Figure 6.1). On the Services tab, the web service (and the rest of the more common of Mac OS X’s services) can be stopped or started by selecting the service and clicking the Start button just to the right of the list of services. This is as far as the UI goes; any configuration changes must be completed manually by editing the configuration files. It is likely that Apple considers the client edition to be only a light-duty web server that requires no advanced features and thus no advanced user interface. It also helps to differentiate the service from that found in Mac OS X Server (more on this in a moment).
Another aspect of Mac OS X that is different from the usual configuration is the way it deals with user directories. Typically, Apache configurations use the UserDir directive to specify directories to be used for individual users’ sections of a website, and Mac OS X is no different. However, it does differ in the way the user directories themselves are specified. Most often, user directories are specified with a directory directive that includes a wildcard for user directory names (such as <Directory /home/*/Sites>). Mac OS X instead has a directory within the configuration directory, which is where it stores individual users’ configuration files. These configuration files get added to the main Apache configuration by an Include directive. When a user is created, a file of the form username.conf is created in the users subdirectory (/etc/httpd/users), which explicitly adds the Sites subdirectory of the user’s home directory to the Apache configuration. The other major difference in a Mac OS X Apache installation is the inclusion of an additional module, mod_hfs_apple, which enables Apache to properly handle the case-insensitivity of HFS+ filesystems. As of Mac OS X v10.2.4, Apple also includes mod_rendezvous_apple, which publishes the web server via the Rendezvous protocol.
Although Mac OS X clients contain only minor differences from a standard Apache configuration, the server edition of Mac OS X is different in several ways. Here again, one of the major differences is the addition of a graphical interface for managing Apache. Mac OS X Server’s GUI goes far beyond that of the client edition of Mac OS X. The graphical interface, which is available via the Server Settings utility application, permits much more than simply stopping and starting the daemon, such as configuration of SSL, WebDAV, and Tomcat support. The default Apache web site listens on port 9010, but does not offer up any web pages. Actual web sites are individually configured as virtual hosts via the user interface. Most of the common settings for a site are available through this interface (see Figure 6.2).
All of this gooey GUI goodness creates some interesting issues when it comes to the configuration files. Mac OS X Server moves most of an Apache configuration from the usual /etc/httpd/httpd.conf file into another file: /etc/httpd/httpd_macosxserver.conf. Apple’s UI uses comments throughout the file to provide their application points of reference for modifying the configuration. The file is well-documented in the comments, including various admonishments not to futz with any of the pseudo-directives placed throughout the file. Technically, this configuration file is as modifiable by hand as the one in the client edition of Mac OS X, but one gets the distinct feeling that the gates of hell may open beneath one’s chair should one do so. In fact, Apple states in the Mac OS X Server Administrator’s Guide: “However, Apple does not provide technical support for modifying Apache configuration files.” We have been warned. Unlike the configuration in the Mac OS X client edition, Mac OS X Server’s version of Apache does not support user directories for web sites. As in the client edition, Apple includes the modules mod_hfs_apple and mod_rendezvous_apple, as well as a few other modules to provide additional functionality to the web server. Among these modules are mod_macbinary_apple (used to convert some web files to macbinary on-the-fly), mod_sherlock_apple (used to give administrators an easy way to interface their web site with the Sherlock application), and mod_auth_apple (used to provide additional user authentication capabilities to Apache).
All these configuration oddities will affect the way any configuration suggestions we may have will be applied. In the case of Mac OS X Server in particular, some of what we speak will not apply, at least to the preinstalled instance of Apache. It is certainly possible to download and compile one’s own copy of Apache if one wants to avoid the existing install at all, and in some cases, it may be the preferable choice. Whatever the path, most of the following discussion will apply just the same.
As we push more and more functionality upon the http protocol, web servers have more and more of an effect upon overall system security. Web servers themselves have a history of both vulnerabilities and commonly available exploits, and Apache is no exception. Lucky for us, Apple has been prompt in releasing patched versions of Apache for its customers in the few instances where they have been needed.
Security issues with Apache tend to derive from one of a few different sources: poor permissions management, misconfiguration, insecure modules and CGIs, and bugs within Apache itself. Because software bugs are generally beyond the control of us mere mortals, what we need to do is concentrate on configuration and maintenance.
Typically, one of the first things to do to secure an Apache install is to ensure that permissions are set appropriately—as is the default behavior, only root has write permission to the log files (located in the /var/log/httpd/ directory), the executables (which are in the /usr/bin and /usr/sbin directories), the directory in which the pid file is located (/var/run/), and the modules directory (/usr/libexec/httpd/).
For the sake of usability, Apple has chosen to give the group admin write permissions to the document tree’s root (/Library/WebServer/Documents/), to which only root is given write permissions by default. This allows any member of the admin group to create, modify, delete, and execute any document in the web server’s document tree. These permissions also extend to the CGI directory (/Library/WebServer/CGI-Executables/). If this is unacceptable for a system, permissions can be tightened by changing the group ownership and write permissions on the directory and its contents:
bash-2.05a$ sudo chown -R root:wheel /Library/WebServer
bash-2.05a$ sudo chmod -R g-w /Library/WebServer
By default, Apache appends a line containing its version and virtual hostname to some of the pages it generates (error pages, directory listings and a few others). This can sometimes give would-be attackers information that is useful in tailoring an attack on the server. Changing the value of the ServerSignature to Off in httpd.conf will turn this off. Unfortunately, this does not provide much protection from attack these days. Most attacks on the Internet these days do not involve checking server versions (or vendors, even); the chosen exploit is attempted regardless because it is generally faster to attempt and fail than to check the version, and then attempt, and then possibly still fail. It is the much rarer (and typically more dangerous) targeted attack that takes the time to figure out which version of which web server is running. For those administrators who want to take no chances, this little change will make the server leak a little less information.
Server Side Includes (SSI) tends to be a hot topic when it comes to web site security. SSI is a mechanism (in its basic form) that allows the contents of one file to be included inline in another file and it is enabled with the Includes option (intuitively an argument for the Options directive). This is often used by webmasters to create single instances of commonly used HTML elements in their web sites, such as page headers, footers, or navigation bars. One of the other things SSI can do is to “include” the output of a CGI. This is not necessarily a problem in those situations where the system’s administrator is also its webmaster, but it becomes one when there are many webmasters on a system (such as when an ISP hosts many of their users’ web sites). Allowing CGIs to be executed from any directory provides the same potential issues we have previously discussed. The best thing to do is to use ScriptAlias directives to provide set directories in which CGI applications are to be stored and then use the IncludesNoExec option instead of the more permissive Includes option. Users can still use SSI with CGI applications, but only those in the ScriptAlias directories.
While we are on the topic of CGI applications, we should note that they are all executed as the same user (www by default; we will discuss this user more in a moment). Again, this is not much of a concern in single-web site shops, but gets to be a problem when multiple sites are hosted on a single server. If one of the hosted users does not play nice, it may be possible for the bad user to use shared access to a CGI application to affect other users’ use of the CGI, perhaps even overwriting data generated thereby. An Apache add-on commonly used to avoid this is suexec, which is a special wrapper program that allows CGIs to be executed as specific users rather than global default. Combined with judicious use of the ScriptAlias directive, it can allow CGIs with differing permissions to reside on the same server. This feature, however, is not enabled in the default distribution, and although the man pages are shipped with Mac OS X, it is not enabled with Apple’s configuration, either. Enabling suexec requires it to be done at make (compile) time, so enabling this under Mac OS X would require administrators to compile their own installation from downloaded source code.
Several of the options (including access control) in the Apache configuration file can be overridden on a directory-by-directory basis with .htaccess files. This is yet another situation waiting to be abused in a multiuser, multisite situation. In general, administrators do not want their users overriding their configuration settings, so Apple’s Apache configuration (mostly by default) includes several AllowOverride directives with their values set to None. This value should not be changed unless there is a very good reason, and the administrator promises not to whine if he or she gets bitten by the modification.
There is another issue for Apache, and it pertains equally to a server hosting a single site as well as one serving many. Because it listens on a privileged TCP port by default (the standard for the HTTP protocol: 80), Apache’s httpd daemon starts as root. This is a cause for some concern. Web servers are commonplace on both local area networks and the Internet as a means of distributing data to the masses. This commonality makes http servers prime targets. No code is perfect: Vulnerabilities are found and exploits are released. Apache is no exception to this rule. When exploits are successful, it is common for the malicious code to attempt to execute further commands on the exploited host. Such exploits perform actions as the user that started the web server. Because this would be the user root (and root has the permissions to do anything), this is obviously a bad thing.
To combat this, Apache starts as root and then creates child processes as the user and group defined by the User and Group directives in its configuration file (located at /etc/httpd/httpd.conf on Mac OS X and at /etc/httpd/httpd_macosxserver.conf on Mac OS X Server) to perform the actual serving. This user and group have fewer privileges than root, so they protect the system from some of the effects of a successful exploit. In Mac OS X, the user and group are www. They should never be given write permissions to any part of the system without good reason, especially anything the user root may execute. Doing so could allow even a minor configuration mistake or vulnerability to allow a user (bad guy or not) to damage the system. One notable exception is when utilizing Web-based Distributed Authoring and Versioning (WebDAV, which we will discuss in more detail in Chapter 7, “File Sharing”), which requires additional write privileges for the www user and group, but only on items that root should not be executing.
And, just in case it is not obvious, never ever run Apache fully as root. Ever.
For many sites, this is as far as they need to go with securing Apache—other than keeping up with the odd patch now and then. There are many Apache-based web sites on the Internet that do no more than this and remain free of compromise. But, as we shall soon see, for those who have the necessity and the ability to create still more secure configurations, it is certainly possible, but with added complexity of administration and maintenance. Whether this added complexity is too much to bear or whether the added level of security is necessary will depend both upon the administrators and security policy involved.
Due to extra doses of paranoia or because of security policy, some sites disallow any network processes from running as the root user. In these cases, even Apache’s user switching is not good enough because the parent process continues to run as root, allowing it to listen on TCP port 80.
There is a way to combat the issue of running Apache’s httpd as root, and that is to run the daemon on a non-privileged port as a non-privileged user. If httpd is compromised while running as this non-privileged user, the exploit will not likely be able to further damage the system because the user simply does not have the permissions required to do so.
This may sound like a great solution, but it may not be the panacea it appears to be; there are some definite caveats. Top of the list is that it makes the Apache install non-standard in Apple’s eyes. When the changes are complete, the GUI can no longer be used to manage the daemon; for this reason, we will not be using the GUI to make most of the modifications for this configuration. Chances are also high that some part of the configuration may be overwritten the next time Apple releases an OS update or security update for Apache. This means that an administrator would be faced with redoing some of the steps listed here if the configuration were overwritten.
The other major downside to running httpd on a non-standard port is that URLs such as http://www.example.com/ no longer work for web site visitors. Web browsers assume the standard port is to be used. This means clients must manually specify the port on which they wish to communicate when attempting to browse at a non-standard port (that is, http://www.example.com:8080/ where 8080 is the non-privileged port the server is configured to communicate with). This anomaly can often be sidestepped at sites in which firewalls are in use. It is generally possible for firewalls to accept connections on one port and redirect them to another. In other words, the firewall could accept http requests on TCP port 80 (the standard port) and redirect these requests to the server’s http port (TCP port 8080). This allows users to use an unmodified URL (http://www.example.com) to access the web server.
Finally, the Apache’s user switch has been time-tested to be safe for all but the most stringent of security regimes, so this change may not be worth the effort involved.
To run Apache on a non-privileged port, one must modify a few configuration files, some files’ permissions and a user account, all of which must be done as root (either directly or by using sudo appropriately). Before making any of the following configuration changes, we want to take a moment to remind the reader to make backups of any files prior to making modifications to them. Additionally, for reasons we discussed earlier in this chapter, this entire process is not suggested for use with the default Apache installation on Mac OS X Server. Finally, ensure that Personal Web Sharing is not running. Apache can be turned off by opening the Sharing pane of the System Preferences application, selecting Personal Web Sharing on the Services tab, and clicking the Stop button.
The first file we will modify is Apache’s main configuration file: /etc/httpd/httpd.conf. Open the file in an editor and locate the PidFile directive. The root user is the only one with write permissions to the /private/var/run directory (where the pid file is usually stored). We do not wish to change the default permissions to such an important directory, so we must change the location of the pid file to a more suitable location. Once located, change the PidFile directive’s value to "/private/var/run/httpd/httpd.pid".
#
# PidFile: The file in which the server should record its process
# identification number when it starts.
#
PidFile "/private/var/run/httpd/httpd.pid"
Next, we must change the port on which the httpd daemon listens. To do this, locate the Port directive in the configuration file and change it from 80 to a non-privileged port, such as 8080. After this is completed, save and exit the file.
#
# Port: The port to which the standalone server listens. For
# ports < 1023, you will need httpd to be run as root initially.
#
Port 8080
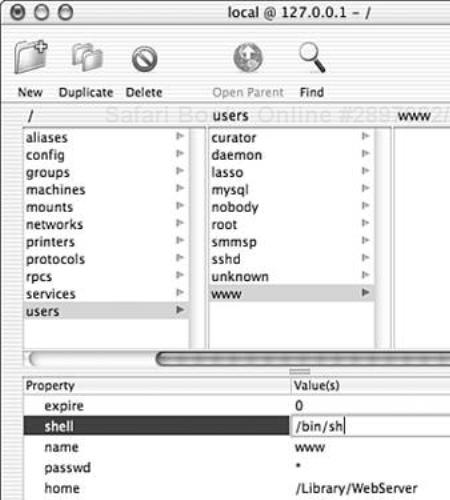
Typically, the www user should not have a valid shell with which to log in, but in this configuration, it is necessary so that the account may execute Apache’s startup script. To do this, we must modify the user’s account information with the NetInfo Manager application (/Applications/Utilities/Netinfo Manager.app). Authenticate NetInfo Manager; then locate /users/www. Next, locate the shell property and set its value to /bin/sh (see Figure 6.3); then save the changes and exit the application.
Now we need to create the directory for the pid file we referenced previously (/var/run/httpd), as well as grant the necessary permissions to it. Do so by executing the following commands in a terminal window:
bash-2.05a$ sudo mkdir /var/run/httpd
bash-2.05a$ sudo chown www:www /var/run/httpd
We also need to give the www user permissions to write to the directory and files where Apache keeps its logs.
bash-2.05a$ sudo chown -R www:www /var/log/httpd
The management script (/usr/sbin/apachectl) for Apache must also be updated with the new location of the pid file. This change is one that is most likely to be undone by an Apple update to Apache. Open the file for editing, locate the line that begins with the string PIDFILE, modify the path that follows accordingly, and then save the changes and exit. It should look like the following snippet when changed.
# |||||||||||||||||||  START CONFIGURATION SECTION  |||||||||||||||||||
# -------------------                               -------------------
#
# the path to your PID file
PIDFILE=/private/var/run/httpd/httpd.pid
We next need to modify the startup scripts so that Apache can start automatically when the system starts. Locate the /System/Library/StartupItems/Apache and copy it to /Library/StartupItems. Then, rename the directory to NonRootApache. Next, locate the file named Apache within the NonRootApache directory and change its name to NonRootApache as well.
bash-2.05a$ sudo cp -R /System/Library/StartupItems/Apache/Library/StartupItems /Library/StartupItems/NonRootApache bash-2.05a$ sudo mv /Library/StartupItems/NonRootApache/Apache/Library/StartupItems
Now we need modify the NonRootApache file in the NonRootApache directory to start Apache as the www user. Locate and replace the line containing apachectl start with su - www -c "/usr/sbin/apachectl start". Then locate the line containing apachectl restart and replace the text with su - www -c "/usr/sbin/apachectl stop". Finally, replace the two instances of the string WEBSERVER with NONROOTWEBSERVER. The completed file should look like the following:
#!/bin/sh

##
# Apache HTTP Server
##

. /etc/rc.common

StartService ()
{
    if [ "${NONROOTWEBSERVER:=-NO-}" = "-YES-" ]; then
        ConsoleMessage "Starting Apache web server"
        su - www -c "/usr/sbin/apachectl start"
    fi
}

StopService ()
{
    ConsoleMessage "Stopping Apache web server"
    apachectl stop
}

RestartService ()
{
    if [ "${NONROOTWEBSERVER:=-NO-}" = "-YES-" ]; then
         ConsoleMessage "Restarting Apache web server"
         su - www -c "/usr/sbin/apachectl restart"
    else
         StopService
    fi
}

RunService "$1"
When the modifications are complete, save the changes and close the file.
Finally, we need to edit /etc/hostconfig to tell the system to start the Apache httpd server when it boots. Add a line containing the string NONROOTWEBSERVER=-YES- after the last line in this file; then save and close the file.
That should be all that is required to start Apache on the non-privileged port the next time the system starts. To test the configuration without rebooting, type sudo /Library/StartupItems/NonRootApache/NonRootApache start in a terminal window. If the following output is displayed, Apache is probably up and running as its new, less-privileged self.
bash-2.05a$ sudo /Library/StartupItems/NonRootApache/NonRootApache start
Starting Apache web server
Processing config directory: /private/etc/httpd/users
 Processing config file: /private/etc/httpd/users/curator.conf
/usr/sbin/apachectl start: httpd started
To double-check, one can use ps to make sure that the httpd process is running (and that it’s running as the www user) and use netstat to make sure it is listening on the designated port (8080 in our example).
bash-2.05a$ ps -auxww   |  grep httpd
www        860    0.0   0.1           2776  1236  ??  Ss  11:04PM  0:00.01  /usr/sbin/httpd
www        861    0.0   0.0           2776   276  ??  S   11:04PM  0:00.00  /usr/sbin/httpd
curator    863    0.0   0.0           1828    76 std R+   11:04PM  0:00.00  grep httpd
bash-2.05a$ netstat -an | grep LISTEN | grep 8080
tcp4       0       0  *.8080                      *.*                       LISTEN
If this is not the case, check the error logs (/var/log/httpd/error_log) for messages and retrace the preceding steps to determine if any errors were made. Otherwise, the web server should be fully functional in its new configuration and reachable in a browser at http://www.example:8080 (where www.example.com is the hostname of the server, and 8080 is the port Apache is listening on).
As we shall see in the next section, simply forcing Apache to listen on an un-privileged port is not the ultimate in security.
There is an additional method that administrators can use to provide further security for an Apache installation and that is to put it in a jail, otherwise known as chroot’ing. In Mac OS X, like other UNIX-based operating systems, / is considered the root file system, below which all other directories exist and file systems are mounted. What chroot’ing does is to force Apache to see a different directory (/usr/local/jail, for instance) assigned by the administrator as its root directory. Once jailed, Apache would not be able to access any directory not beneath the new root directory (in other words, it would not be able to escape the jail). In a situation in which Apache is compromised, this would theoretically disallow the exploit from damaging anything outside the jail hierarchy.
This section will cover how to perform a basic jailing of the preinstalled version of Apache httpd. Like the previous section on running Apache on a non-privileged port, this section does not attempt to provide details on how to perform this action on Mac OS X Server. Mac OS X Server is complicated enough that if an administrator is considering creating a jailed installation of Apache, it is probably easier to do so with a separate installation from source (see Appendix C). Also, like the previous section, this configuration cannot be managed by the standard Mac OS X GUI tools, as should be apparent. Root user permissions will also be required.
The steps for creating a jailed installation of Apache (or any daemon really) are as follows:
Create the jail directory hierarchy.
Copy files into the jail (includes any necessary executables, configuration files, and libraries).
Modify or create startup scripts to start the daemon in the jail.
The first item of step 1 is to create the root of the jail. This can be anywhere the system has adequate space; for our purposes, it will be /usr/local/jail.
bash-2.05a$ sudo mkdir -p /usr/local/jail
Next, we need to make the directories that we know Apache will need. These include the configuration directories, the document tree, the log file directory, the built-in icons, and the directories for the executables and modules.
bash-2.05a$ sudo mkdir -p /usr/local/jail/private/etc/httpd/users
bash-2.05a$ sudo mkdir -p /usr/local/jail/Library/WebServer/CGI-Executables
bash-2.05a$ sudo mkdir -p /usr/local/jail/Library/WebServer/Documents
bash-2.05a$ sudo mkdir -p /usr/local/jail/usr/sbin
bash-2.05a$ sudo mkdir -p /usr/local/jail/usr/bin
bash-2.05a$ sudo mkdir -p /usr/local/jail/usr/libexec/httpd
bash-2.05a$ sudo mkdir -p /usr/local/jail/usr/share/httpd/icons
bash-2.05a$ sudo mkdir -p /usr/local/jail/private/var/log/httpd
bash-2.05a$ sudo mkdir -p /usr/local/jail/private/var/root
bash-2.05a$ sudo mkdir -p /usr/local/jail/private/var/run
bash-2.05a$ sudo mkdir -p /System/Library/Frameworks
Experience tells us that there are a few other directories that will be needed (and tend to be common whenever jailing any daemon). Among these are the directories for the time zone files and character set, the base binary directory (/bin), the directory /dev (for /dev/null and /dev/zero), and /usr/lib and /usr/lib/system, which contain system libraries.
bash-2.05a$ sudo mkdir -p /usr/local/jail/bin
bash-2.05a$ sudo mkdir -p /usr/local/jail/dev
bash-2.05a$ sudo mkdir -p /usr/local/jail/usr/lib/system
bash-2.05a$ sudo mkdir -p /usr/local/jail/usr/share/locale
bash-2.05a$ sudo mkdir -p /usr/local/jail/usr/share/zoneinfo
Now we need to make a few symlinks within the tree to simulate those in the original directory structure.
bash-2.05a$ cd /usr/local/jail
bash-2.05a$ sudo ln -s private/etc etc
bash-2.05a$ sudo ln -s private/var var
When finished, the basic tree is in place and it’s time to move on to copying the necessary files. We will start with the Apache executables in /usr/sbin and /usr/bin.
bash-2.05a$ sudo cp /usr/sbin/ab /usr/local/jail/usr/sbin
bash-2.05a$ sudo cp /usr/sbin/apachectl /usr/local/jail/usr/sbin
bash-2.05a$ sudo cp /usr/sbin/apxs /usr/local/jail/usr/sbin
bash-2.05a$ sudo cp /usr/sbin/httpd /usr/local/jail/usr/sbin
bash-2.05a$ sudo cp /usr/sbin/logresolve /usr/local/jail/usr/sbin
bash-2.05a$ sudo cp /usr/sbin/rotatelogs /usr/local/jail/usr/sbin
bash-2.05a$ sudo cp /usr/bin/checkgid /usr/local/jail/usr/bin
bash-2.05a$ sudo cp /usr/bin/dbmmanage /usr/local/jail/usr/bin
bash-2.05a$ sudo cp /usr/bin/htdigest /usr/local/jail/usr/bin
bash-2.05a$ sudo cp /usr/bin/htpasswd /usr/local/jail/usr/bin
Next, we need to copy the configuration files, icons, modules and the document trees.
bash-2.05a$ sudo cp -R /etc/httpd /usr/local/jail/etc
bash-2.05a$ sudo cp -R /usr/share/httpd/icons /usr/local/jail/usr/share/httpd
bash-2.05a$ sudo cp -R /usr/libexec/httpd /usr/local/jail/usr/libexec
bash-2.05a$ sudo cp -R /Library/WebServer /usr/local/jail/Library
Rather than copying the log files, we will simply create them.
bash-2.05a$ sudo touch /usr/local/jail/var/log/httpd/access_log
bash-2.05a$ sudo touch /usr/local/jail/var/log/httpd/error_log
Beyond copying these files, Apache needs some additional files that are not readily apparent. Two of these are files in the jail’s /dev directory: /dev/null and /dev/zero. These files cannot be copied, but must be created and given the proper permissions.
bash-2.05a$ sudo mknod /usr/local/jail/dev/zero c 3 3
bash-2.05a$ sudo mknod /usr/local/jail/dev/null c 3 2
bash-2.05a$ sudo chmod 666 /usr/local/jail/dev/zero
bash-2.05a$ sudo chmod 666 /usr/local/jail/dev/null
Most binaries on Mac OS X require at least one shared library, /usr/lib/libSystem.B.dylib, but some may require more. To determine the libraries an application uses, we use the application otool (from the Developer Tools).
bash-2.05a$ otool -L /usr/sbin/ab
/usr/sbin/ab:
         /usr/lib/libSystem.B.dylib (compatibility version 1.0.0, current version 60.2.0)
This shows us that we need the shared library for ab, Apache’s standard benchmarking tool. Now we must see what other libraries are required by the libSystem.B.dylib library.
bash-2.05a$ otool -L          /usr/lib/libSystem.B.dylib
/usr/lib/libSystem.B.dylib:
         /usr/lib/libSystem.B.dylib (compatibility version 1.0.0, current version 62.0.0)
         /usr/lib/system/libmathCommon.A.dylib (compatibility version 1.0.0, current
 version 40.1.0)
It appears that libSystem.B.dylib needs the library libmathCommon.A.dylib to work. A further check reveals that libmathCommon.A.dylib does not require any further libraries.
bash-2.05a$ otool -L  /usr/lib/system/libmathCommon.A.dylib
/usr/lib/system/libmathCommon.A.dylib:
         /usr/lib/system/libmathCommon.A.dylib (compatibility version 1.0.0, current
 version 40.1.0)
We then must repeat this process for each of Apache’s binaries and modules, compiling a list of libraries that need to be copied into the jail. This list includes the two libraries we have already determined that we need, as well as a few others.
bash-2.05a$ sudo cp /usr/lib/libSystem.B.dylib /usr/local/jail/usr/lib/ bash-2.05a$ sudo cp /usr/lib/system/libmathCommon.A.dylib /usr/local/jail/usr/lib/system/ bash-2.05a$ sudo mkdir -p /usr/local/jail/System/Library/Perl/darwin/CORE bash-2.05a$ sudo cp /System/Library/Perl/darwin/CORE/libperl.dylib /usr/local/jail/System
Some of the executables used by Apache are simply shell scripts, which reference other scripts and binaries. These executables are /usr/sbin/apachectl, /usr/sbin/apxs, and /usr/bin/dbmmanage. A quick perusal through these files shows that they need /bin/sh and /usr/bin/perl (for the scripts themselves) and a handful of other executables. After we have gathered the list of need files, we can copy them in place.
bash-2.05a$ sudo cp /bin/sh /usr/local/jail/bin
bash-2.05a$ sudo cp /usr/bin/perl /usr/local/jail/usr/bin
bash-2.05a$ sudo cp -R /System/Library/Perl /usr/local/jail/System/Library
bash-2.05a$ sudo cp /usr/lib/libncurses.5.dylib /usr/local/jail/usr/lib
bash-2.05a$ sudo cp /bin/cat /usr/local/jail/bin
bash-2.05a$ sudo cp /bin/kill /usr/local/jail/bin

bash-2.05a$ sudo cp /usr/bin/awk /usr/local/jail/usr/bin
bash-2.05a$ sudo cp /bin/stty /usr/local/jail/bin
bash-2.05a$ sudo cp /bin/ps /usr/local/jail/bin
bash-2.05a$ sudo cp /usr/bin/gzip /usr/local/jail/usr/bin
Experience has also shown that there are a few additional files that most jailed applications require. These files include character sets, time zones, the dynamic link editor (dyld), and /etc/resolv.conf and /etc/hosts files for DNS resolution.
bash-2.05a$ sudo cp /var/run/resolv.conf /usr/local/jail/etc
bash-2.05a$ sudo cp /usr/lib/dyld /usr/local/jail/usr/lib
bash-2.05a$ nidump hosts . / > /tmp/hosts
bash-2.05a$ sudo cp /tmp/hosts /usr/local/jail/etc
bash-2.05a$ sudo cp -R /usr/share/locale /usr/local/jail/usr/share
bash-2.05a$ sudo cp -R /usr/share/zoneinfo /usr/local/jail/usr/share
There are two items remaining to be copied for the jail. By default, Mac OS X creates user subdirectories for the website (that is, /Users/sally/Sites becomes http://www.example.com/~jane), which are added to the configuration with files in the /etc/httpd/users directory. These user directories are meant to give users of a system a place to put their own web pages, without requiring permissions to the parent web site’s files and directories. This gets a little disturbed in a jailed installation because user directories are not in the jail. What to do about this is left up to the administrators. Possible solutions include periodically copying the user’s Sites directory into the jail in the appropriate location or (what we think will be more common for chroot environments) just eliminating support for user directories in the web site. To do the latter, one must only comment out the line containing Include /private/etc/httpd/users in the configuration file. The other remaining item is the web-based Apache documentation. In a default configuration, these are symlinked into the document tree (/Library/WebServer/Documents/manual) from a location outside the normal tree (/Library/Documentation/Services/apache). The method we used to copy the document tree into the jail does not follow the symlinks to also copy the files and directories located therein, but instead simply copies the symlink itself. After the web server is in the chroot environment, the symlink will point to a nonexistent directory within the jail. The fix for this is simple: Either delete the symlink (if is unneeded) or copy the necessary directory structure into the jail so the symlink references a valid location.
After these final two issues are cleared up, the chrooted environment is complete, and we can progress to the final step in the process—modifying the startup configuration. As before, this begins with creating our own StartupItem, which we will do by copying the existing one for Apache to a new location.
bash-2.05a$ sudo cp -R /System/Library/StartupItems/Apache /Library/StartupItems/ChrootApache bash-2.05a$ sudo mv /Library/StartupItems/ChrootApache/Apache /Library/StartupItems
Next, open the /Library/StartupItems/ChrootApache/ChrootApache file in the directory for editing. Locate the line containing apachectl start and replace it with /usr/sbin/chroot /usr/local/jail /usr/sbin/apachectl start. Then find the line containing apachectl stop and replace it with /usr/sbin/chroot /usr/local/jail /usr/sbin/apachectl stop. Next do the same, replacing apachectl restart with /usr/sbin/chroot /usr/local/jail /usr/sbin/apachectl restart. Finally, replace the two instances of the string WEBSERVER with CHROOTWEBSERVER; then save the file and exit the application. When completed, the file should appear as follows:
#!/bin/sh

##
# Apache HTTP Server
##

. /etc/rc.common

StartService ()
{
    if [ "${CHROOTWEBSERVER:=-NO-}" = "-YES-" ]; then
        ConsoleMessage "Starting Apache web server"
        /usr/sbin/chroot /usr/local/jail /usr/sbin/apachectl start
    fi
}

StopService ()
{
    ConsoleMessage "Stopping Apache web server"
    /usr/sbin/chroot /usr/local/jail /usr/sbin/apachectl stop
}

RestartService ()
{
    if [ "${CHROOTWEBSERVER:=-NO-}" = "-YES-" ]; then
        ConsoleMessage "Restarting Apache web server"
        /usr/sbin/chroot /usr/local/jail /usr/sbin/apachectl restart
    else
        StopService
    fi
}

RunService "$1"
Finally, open /etc/hostconfig for editing and append a line with the text CHROOTWEBSERVER=-YES- to the end of the file; then exit, saving the changes.
This concludes the configuration for the jailed Apache. Now that we have done all this work, we should state that most of the preceding is scriptable, especially after one knows all of the subsidiary libraries and miscellaneous files the daemon needs. In fact, a shell script to create the simple jail is available on the book’s website (http://www.macsecurity.org/macosx10.2security). One can test the configuration by typing sudo /Library/StartupItems/ChrootApache/ChrootApache start in a terminal window.
bash-2.05a$ sudo /Library/StartupItems/ChrootApache/ChrootApache start
Starting Apache web server
/usr/sbin/apachectl start: httpd started
If the web server does not start for some reason, the Apache error logs (remember, they are located in /usr/local/jail/var/log/httpd now) may provide some helpful hints, and a review of the above steps is probably in order.
If Apache does start without error, we have succeeded in our goal and can go take a nap knowing that our Apache is secure in its jail, but only for a little while. Inevitably, either the users or the administrator will want to add more services to the Apache install, such as MySQL access or Tomcat for Java servlets. Each of these will require their own integration into the jail, following much the same process used here for Apache. Apache and the rest of the applications within the jail will continue to need patches and updates, and a method must be devised for this (whether it is manually copying the files or creating a shell script to do the refreshing automatically). Also, for added security, one might want to combine this section with the previous and have Apache run in the jail on a non-privileged port. The steps required to do so are easily adapted from this material, and thus are left as an exercise for the reader.
Sometimes, administrators find it necessary to share information over the Internet via their web servers but do not wish to share the information with everyone on the Internet. The most intuitive way to do this is to require some form of authentication to access the site.
One of the most basic methods of controlling access to a web site is host-based authentication or host-based access control. This method uses some aspect of a client computer’s hostname or address to determine whether the client is allowed access to the web site. Configuring host-based authentication involves three directives: Order Allow, and Deny. The Order directive specifies the order in which the Allow and Deny directives are applied. A configuration of Order Allow,Deny means that Allow directives are processed before the Deny directives and that access is denied by default; Order Deny,Allow enforces the opposite situation. The Allow and Deny directives take space-delimited lists of fully qualified hostnames, partial hostnames, addresses, or partial addresses and intuitively determine whether a certain host is to be allowed or denied.
<Directory "/foo/bar">
    Order Allow,Deny
    Allow from 127.0.0.1 good.example.com
</Directory>
This example explicitly allows access to the localhost (127.0.0.1) and the host good.example.com, and denies access to all other hosts implicitly.
<Directory "/foo/bar">
    Order Deny,Allow
    Deny from .mil .gov
    Allow from nsa.gov
</Directory>
In this example, the .mil and .gov TLDs are denied access explicitly (except the nsa.gov domain, which is explicitly granted access). All other hosts are implicitly allowed access.
This is a useful mechanism for access control, but only to a point. It should not be used as the sole means for controlling access to a sensitive area of a web site; hostnames and IP addresses are too easily faked or subverted.
User authentication comes in a couple of different flavors in the typical Apache configuration. The first and most basic type is Basic authentication (go figure). Basic authentication uses a flat file containing username and encrypted password pairs. When a user attempts to access a directory protected with Basic authentication, the user is presented with a dialog box, displaying the name of the protected area of the web site they are trying to access (known as the “realm”) and a request for their username and password. Assuming that the user types in a username and password, these credentials are sent to the server, which attempts to validate them against its password file. If the username and password are valid, the request continues through the authorization phase to determine whether the authenticated user is allowed to view the particular page they have requested. If the authentication fails, access is denied and an appropriate error returned to the browser.
Basic authentication is relatively easy to configure. As an example, we will configure Apache to require authentication for users accessing its online manual. The first step is to create the password file. This is done in a terminal window, using the htpasswd application. To create the password file we pass htpasswd the -c flag (which tells the application to create the file), followed by the location in which we want the password file created and the first user to be stored in the file.
bash-2.05a$ sudo htpasswd -c /etc/httpd/htpasswd alice
New password:
Re-type new password:
Adding password for user alice
Because this password file has encrypted passwords in it, it is a good idea to restrict access to this file accordingly. The root user needs to write to the file to modify the database, and the www user needs to read the file to perform the authentication. Other than that, no other users should need access to the file, so we will remove all permissions for others and give the www group read access. We should also mention that the password files should not be placed anywhere in Apache’s document tree; doing so is an unnecessary risk that can only lead to trouble.
bash-2.05a$ sudo chgrp www /etc/httpd/.htpasswd
bash-2.05a$ sudo chmod 640 /etc/httpd/.htpasswd
Additional accounts added to the file are also created with the htpasswd application.
bash-2.05a$ sudo htpasswd /etc/httpd/.htpasswd bob
New password:
Re-type new password:
Adding password for user bob
Notice the lack of the -c flag. Issuing the htpasswd command with the -c flag and the path of an existing database will overwrite the database and cause a bad day to spontaneously occur.
With the password file created and populated, we must now modify the configuration to require authentication for access. Open the Apache configuration file for modification and locate a Directory directive for /Library/WebServer/Documents/manual. Insert a line before the </Directory> with the text AuthName "restricted manual". This configures the realm for this section of the site. Inserting another line with the text AuthType Basic sets the authentication method to basic. On the next line, we will tell Apache where to find the authentication database, with the text AuthUserFile /etc/httpd/.htpasswd. Finally, we must let Apache know who is authorized to view the manual, and this is done with the phrase require valid-user. When complete, the Directory directive should appear as follows:
<Directory "/Library/WebServer/Documents/manual">
         Options Indexes FollowSymlinks MultiViews
         AllowOverride None
         Order allow,deny
         Allow from all
         AuthName "restricted manual"
         AuthType Basic
         AuthUserFile /etc/httpd/.htpasswd
         Require valid-user
</Directory>
After the configuration file is saved, Apache must be restarted for the configuration to take effect:
bash-2.05a$ sudo apachectl restart
/usr/sbin/apachectl restart: httpd restarted
With the configuration complete and Apache restarted, any attempt to browse to the manual pages (http://localhost/manual) should be greeted with a login page with the realm set to “restricted manual.” Any user with a valid username and password should be able to type in her credentials and get access to the manual, any user without should be forbidden.
Basic authentication can also be configured to provide group-based user access.
<Directory "/Library/WebServer/Documents/manual">
         Options Indexes FollowSymlinks MultiViews
         AllowOverride None
         Order allow,deny
         Allow from all
         AuthName "restricted manual"
         AuthType Basic AuthUserFile /etc/httpd/htpasswd
         AuthGroupFile /etc/httpd/htgroups
         Require group theone
</Directory>
Here, the AuthGroupFile directive determines the file Apache will use for looking up groups. Require group theone tells Apache to allow access by users that are members of the group theone. The group file can be created with a simple text editor and has the format of a group name followed by a colon, followed by a comma-separated list of users to include in that group. Thus, the following would put Alice in the group theone, Bob in theotherone, and both in yetanotherone.
theone: alice
theotherone: bob
yetanotherone: alice,bob
Now not just any user with a valid username and password is authorized to access the site, but only those that have valid credentials that are members of the group theone.
Mac OS X Server provides a slightly different method of authentication—configured completely via a graphical interface, but which remains based upon Basic authentication. It uses an Apple-specific module (mod_auth_apple), which allows Apache to use Mac OS X Server’s password database for authenticating users. To configure a web site on Mac OS X Server to require users to authenticate, first select Configure Web Service from the Web icon on the Internet tab of the Server Settings application (/Applications/Utilities/Server Settings.app). From the Sites tab of the resulting dialog box, select the target web site to be modified and click the Edit button. Next, select the Access tab from the web site configuration dialog box; then click the Add button.
In the new dialog box (see Figure 6.4), enter a descriptive name into the Realm Name text box. Next, select the directory that comprises the realm with the Select button. By default, everyone is allowed to access this realm. To change this, deselect the Everyone check box, which expands the dialog box to include an area for specifying the users and groups that are allowed access. Users and groups can be dragged from the Accounts pane of the Workgroup Manager (/Applications/Utilities/Workgroup Manager.app). Simply open the Workgroup Manager application and select the User tab (the single-user icon on the left side) of the Accounts pane; then drag the chosen users into the Users and Groups who can Browse and Author box in the Realm dialog (see Figure 6.5). To include groups in the realm, select the Group tab (the multiple-user icon on the left side) in Workgroup Manager and drag the group into the same box in the Realm dialog.


When finished selecting users and groups, click the Save button. If the Web Service is already running, a dialog box will appear, reminding us that the web server needs to be restarted for the changes to take affect. To do so, select Stop Web Service from the Web icon menu, followed by Start Web Service from the same menu. User authentication is now enabled for specified directory in the web site.
Though it seems to provide a web site with some measure of security, Basic authentication has a major security issue. Basic authentication is a plain-text authentication method, meaning that the credentials are sent to the server unencrypted. This means that anyone sniffing packets off the wire on any network between the user and the server would be able to recover the username and password. And because the credentials are sent with every request to the server, it would be obscenely easy. Because of this, anyone really seeking to provide a secured realm within their web site should not use Basic authentication.
Digest authentication provides a more secure alternative to Basic authentication by not sending passwords in the clear; instead, it sends passwords back to the server as MD5 hashes. Digest authentication like Basic is relatively simple to implement. Here too, the first step is to create a password database, which is done with the htdigest application.
bash-2.05a$ sudo htdigest -c /etc/httpd/htpasswd "restricted manual" alice
Adding password for alice in realm restricted manual.
New password:
Re-type new password:
As we can see, the syntax for the htdigest command is similar to that of htpasswd used in Basic authentication. The -c flag again indicates that the database at the following path should be created (and will happily overwrite any existing file in this location). The third argument to htdigest is the realm, and the fourth is the first user to be created.
Just as before, the database file needs to be protected from prying eyes and reckless deletes.
bash-2.05a$ sudo chgrp www /etc/httpd/htpasswd
bash-2.05a$ sudo chmod 640 /etc/httpd/htpasswd
Next, we must edit the Apache configuration file to enable the module that manages Digest authentication. To do this, edit the file and then locate and uncomment the lines containing LoadModule digest_module and AddModule mod_digest.c.
As with Basic authentication, we must modify the Directory directive for the manual to require digested authentication.
<Directory "/Library/WebServer/Documents/manual">
         Options Indexes FollowSymlinks MultiViews
         AllowOverride None
         Order allow,deny
         Allow from all
         AuthName "restricted manual"
         AuthType Digest
         AuthDigestFile /etc/httpd/htpasswd
         Require user alice bob
</Directory>
As in the Basic authentication example, AuthName specifies the realm. Apache is told to require Digest authentication with the AuthType directive, and the password database location is specified with the AuthDigestFile directive. The last line (Require alice, bob), allows access to Alice or Bob by username rather than group (although Digest authentication will gladly perform group-based access using the same syntax as Basic authentication). Like any other changes to Apache’s configuration files, the new authentication method will take effect when Apache is restarted.
Like Basic authentication, Digest authentication is not without its own security issue. The problem is that although the passwords are now hashed when sent to the server, someone could still sniff the hashes off an intervening network and, with a little HTTP protocol fu, use them to log into the web site. This is definitely more difficult than compromising Basic authentication, but certainly not any great impediment to entry. Apache does provide additional alternate methods of authentication, but they are concerned with improving scalability of the authentication, not with improving its security. Also neither Basic nor Digest authentication encrypts the content as it is being sent between the server and the client. Presumably, if sites contain data worth restricting access to, they also probably contain data beyond the username and password that should not be sent in the clear where a malefactor can sniff it. The best way to do this is to encrypt all the data sent between the client and the server.
The most common method of encrypting traffic on the Internet is through the use of Secure Sockets Layer, otherwise known as SSL. There is also a protocol based on (and the successor to) SSL, named TLS (Transport Layer Security), which provides the same features, but which currently has less software support. SSL is commonly used with the HTTP protocol, referred to as HTTPS, as well as numerous other common application layer protocols, such as IMAP, POP3, SMTP, and LDAP. SSL sits between the TCP/IP layer and the higher layer application protocol, making the use of SSL essentially transparent to the upper layer protocols. In addition to encrypting all session traffic, SSL can also provide for client-based authentication of the server and server-based authentication of the client. This section will cover the basics of enabling SSL encryption for Apache with the mod_ssl module.
For us, the process of enabling SSL under Apache begins with the certificate. During the initial negotiation of an SSL session, the server sends its certificate to the client, which supposedly uses it to verify that the server is who it claims to be. I say “supposedly” because it is up to the individual client applications to take care of this validation, and more than a few do not or at least do not do it well. The certificate contains a number of pieces of information including a valid date range, the name and signature of the certificate authority (CA) that issued the certificate, and the hostname of the system that the certificate was issued to.
Certificates are given a finite range of dates when they are valid, not just to give commercial CAs ongoing revenue streams, but to ensure that even if a certificate has been silently compromised, the compromise will have a limited lifetime. This is a bit analogous to changing locks every so often just to ensure that no one that may have copied a key can access a property indefinitely. If a client determines that the current date is outside the valid range, it should return an appropriate error. Some clients will flat-out deny access to web sites with expired certificates; others will simply warn the user, and still others (thankfully a dwindling few) will completely ignore it.
Client applications use the issuing CA’s name and signature to determine whether they should really trust the certificate that the server is sending them. Client applications have a store of “trusted signers”: certificate authorities that they trust to sign and issue certificates. If a server sends a certificate that is signed by a CA not in this list or whose signature does not match the one in the store, a client is generally warned. Again, some clients will deny, others will either warn or simply ignore the issue.
One of the final pieces of the certificate a client uses to authenticate a server is the hostname off the server sending the certificate. Clients do this to ensure that the server at www.example.com is not sending out a certificate that indicates it came from evilwww.example.com in an attempt to keep the session from being subject to man-in-the-middle attacks. Perhaps surprisingly, this is not a mandatory feature of SSL communications, but it is widely used nonetheless.
Certificates can be issued in a number of different ways, each with its own advantages. The cheapest and easiest method is to create a self-signed certificate. This means that a host issues itself a certificate for use by the server. Although cheap and fast, this method is really only good for internal systems that do not need rigorous security. Because the issuing CA (the host itself) is not in the list of trusted certificate issuers on any client, the server cannot be adequately verified, and the client will likely generate warnings to that effect. It also opens the communications up to easier man-in-the-middle attacks. Still, it can be useful for test purposes or for situations in which encryption is necessary but server validation is not, and the risks of man-in-the-middle attacks are extremely low.
For production systems in which real security is required, certificates should be purchased from a commercial vendor. Commercial certificates can be purchased from a number of different vendors (VeriSign, GeoTrust, and Comodo among others), each of which competes with the others on price, service, and “trust.” The first two items are straightforward and should be evaluated as they would in any business purchase. The final aspect of this competition, trust, is a bit more slippery to grasp. There are essentially two components to this trust: browser penetration and reputation. Each web browser has a list of trusted certificate authorities; if the browser is sent a certificate that is not in the list, an error is generally generated for the user. The more web browsers supporting a CA as a trusted signer, the greater is that signer’s browser penetration. If a company buys a certificate from a vendor, it behooves them to use a vendor that has a sizeable browser penetration; otherwise, the company must teach its users how to get their browsers to trust the issuing certificate authority, if it is even possible. Reputability is a more subjective aspect of trust. If people do not trust the entity that issued a business’ certificate, they may not trust any transactions that are to be secured by that certificate. In practice, however, this has not been much of an issue.
The most notable example of this is the when VeriSign issued a couple certificates to an individual who had fraudulently represented himself as a Microsoft employee. This made a fair amount of news, but caused no real impact on VeriSign’s business, nor Microsoft’s. For the most part, consumers with browsers do not pay much attention to SSL. The more knowledgeable among them know to look for their browsers’ indications that they are using SSL when it is warranted, but nothing more. So, why should an administrator use a commercial certificate if most users ignore SSL, anyway? For one, not all customers ignore SSL. Also, web browsers tend to care very much about SSL, so much so that if everything is not just right, they will not let users access the malfunctioning site. It is also incumbent upon administrators to do the right thing, even though it is a thankless job.
Some companies may (instead of or in addition to purchasing commercial certificates) establish their own certificate authorities. This is usually done as part of a larger public key infrastructure (PKI) initiative designed to provide larger enterprises with a method enhancing corporate-wide security. This includes the use of single sign-on mechanisms in which client (users and systems) are given certificates with which to authenticate themselves to all systems within the enterprise.
The process for enabling SSL under Mac OS X is essentially the same whether using a commercial certificate or one that is self-signed. The first step in either case is to determine the fully qualified hostname that web browsers will be using to access the site. This information will be used in the remaining steps to properly generate a certificate for the specified host.
The second step is to create a key file, which is an RSA key pair that is used by SSL to encrypt the key exchange for the symmetric algorithm that will actually be used to encrypt a browsing session’s data. To create a key file, open a terminal window and create a directory to store the key file in; we suggest /etc/httpd/ssl.key (it may already exist in Mac OS X Server):
bash-2.05a$ sudo mkdir /etc/httpd/ssl.key
bash-2.05a$ sudo chmod go-rwx /etc/httpd/ssl.key
Next, we will use the openssl application to generate the key file using this random data (replacing www.example.com for the fully qualified domain name of the host the certificate is being created for):
bash-2.05a$ sudo /usr/bin/openssl genrsa -des3 -out /etc/httpd/ssl.key/www.example.com.key
The genrsa command tells the openssl application to generate a 1024-bit RSA key with random data from the default source (/dev/random) for the Triple-DES symmetric algorithm (-des3), and to output it to a file (-out/etc/httpd/ssl.key/www.example.com.key).
As part of the process of generating the key file, openssl requests a pass phrase. This password will be required to start up the SSL-enabled web server, which among other things means that the web server cannot be started at boot time. Some administrators will be tempted to use a blank password, and we strongly discourage this. If someone should compromise a host and gain access to this file, the password is the only barrier that would keep that someone from using the certificate themselves in an attempt to impersonate the original web site.
Before we move on to the next major step, we need to lock down the permissions on the key file.
bash-2.05a$ sudo chmod go-rwx /etc/httpd/ssl.key/www.example.com.key
The third step is to generate a certificate signing request (CSR). Intuitively, this is a file used by an issuing certificate authority to generate a certificate for the requested host. Like generating the key file, generation of the CSR is completed with the openssl application. For administrative purposes, we will create a directory to store the request file first, then use openssl to create the actual request:
bash-2.05a$ sudo mkdir /etc/httpd/ssl.csr bash-2.05a$ sudo openssl req -new -key /etc/httpd/ssl.key/www.example.com.key -out /etc
This pass phrase is the one we used in the previous step when we created the key file. Following the request for the pass phrase is a series of questions that will be used in creating the certificate. These questions include the following:
Country Name. A two-letter code indicating the country in which the organization which owns the server is based (US for the United States).
State or Province. The full name of the state or province in which the organization that owns the server is based.
Locality Name. (Optional) The city in which in which the organization that owns the server is based.
Organization Name. The name of the organization that owns the server.
Organizational Unit Name. (Optional) If it exists, the specific department or division that maintains the server.
Common Name. The fully qualified domain name of the web server.
Email Address. A valid administrative address to which the certificate can be sent.
After these questions are answered, two more questions will be asked (about a challenge password, and an optional company name); leave these items blank. The CSR has now been created at the specified location.
At this point, the paths of a self-signed certificate and one obtained from a commercial certificate authority diverge for a step. With a commercial CA, this request would be sent, along with proof that the request is valid. Some time later, the CA would be in contact with information on how to properly download the new certificate. Once obtained, the certificate needs to be copied to the server and protected appropriately. The directory may already exist in Mac OS X Server installs.
bash-2.05a$ sudo mkdir /etc/httpd/ssl.crt
bash-2.05a$ sudo chmod go-rwx /etc/httpd/ssl.crt
bash-2.05a$ sudo cp acertfromca.crt /etc/httpd/ssl.crt/www.example.com.crt
bash-2.05a$ sudo chown root:wheel /etc/httpd/ssl.crt/www.example.com.crt
bash-2.05a$ sudo chmod go-rwx /etc/httpd/ssl.crt/www.example.com.crt
With a self-signed certificate, we have to take the role of the certificate authority upon ourselves. As readers may have already guessed, this is done with the openssl application. First, we will create a directory (which may already exist in Mac OS X Server) to hold the certificate and then use openssl to generate the certificate.
bash-2.05a$ sudo mkdir /etc/httpd/ssl.crt bash-2.05a$ sudo chmod go-rwx /etc/httpd/ssl.crt bash-2.05a$ sudo openssl x509 -req -days 30 -in /etc/httpd/ssl.csr/www.example.com.csr
The preceding command indicates that we will be performing a certificate function (x509), generating a self-signed certificate (-signkey /etc/httpd/ssl.key/www.example.com.key) whose request will be read from a file (-in /etc/httpd/ssl.csr/www.example.com.csr). It also indicates that the certificate will be valid for 30 days from the creation date (-days 30) and be output to a file (-out /etc/httpd/ssl.crt/www.example.com.crt). The requested pass phrase is the same one used to create the key file earlier in this section. Now that the certificate file has been created, it must be properly secured.
bash-2.05a$ sudo chmod go-rwx /etc/httpd/ssl.crt/www.example.com.crt
The final step in the process is to configure Apache to enable its use. Though SSL support in Apache is enabled through the mod_ssl module in both Mac OS X and Mac OS X Server, enabling it differs between the two.
In Mac OS X Server, enabling SSL for a web site can be done completely via the GUI. To add SSL support for a web site under Mac OS X Server, open the /Applications/Utilities/Server Settings.app application, select the Internet tab, and then select Configure Web Service from the Web icon menu, which will spawn another dialog box (intuitively enough), allowing one to configure the Web Service.
Before an individual site can be configured for SSL, it must be enabled for the entire server. On the General tab, ensure that the Enable SSL Support check box is checked (see Figure 6.6), and then click the Save button to save the configuration.

Next, select a target web site on which to enable SSL from the Sites tab, and click the Edit button. On the Security tab of the resulting dialog box (see Figure 6.7), check the Enable Secure Sockets Layer (SSL) check box. Click the Edit Certificate File button and paste the contents of the certificate for the web site (in our example, this is /etc/httpd/ssl.crt/www.example.com.crt). Next, click the Edit Key File button and paste the key file’s content into the resulting dialog box (/etc/httpd/ssl.key/www.example.com.key in our example). The pass phrase for the key file can also be set here. Doing so causes Mac OS X Server to place the password in plain text in its configuration file (/etc/httpd/httpd_macosxserver.conf).

Finally, change the Port setting on the General tab from 80 to 443 and save the changes by clicking the Save button. Upon saving the changes, a dialog box will appear, asking whether the service should be restarted; doing so will complete the enabling of the SSL for the target site.
Mac OS X lacks Mac OS X Server’s easy graphical configuration of SSL, but still supports it via manual modification of the Apache configuration file. To enable SSL support in Apache, open the configuration file (/etc/httpd/httpd.conf), locate and uncomment the line containing the text #LoadModule ssl_module libexec/httpd/libssl.so, and then locate and uncomment the line containing #AddModule mod_ssl.c. Next, append the following lines to the end of the configuration file:
<IfModule mod_ssl.c>

       Listen 80
       Listen 443

       <VirtualHost _default_:443>
          SSLEngine on
       </VirtualHost>

       SSLCertificateFile /etc/httpd/ssl.crt/www.example.com.crt
       SSLCertificateKeyFile /etc/httpd/ssl.key/www.example.com.key

       SSLRandomSeed startup builtin
       SSLRandomSeed connect builtin

</IfModule>
This process enables SSL on the default web site. Virtual hosts can be individually configured to require SSL as well. A typical VirtualHost directive would look as follows:
<VirtualHost 192.168.1.1:443>
     ServerName        www.example.com
     DocumentRoot      /Library/WebServer/www.example.com
     ErrorLog          /var/log/httpd/www.example.com.error.log
     CustomLog         /var/log/httpd/www.example.com.access.log combined
     <Directory "/Library/WebServer/www.example.com">
         Options       None
         Override      None
         Order         allow,deny
         Allow from all
     </Directory>
     SSLEngine On
     SSLCertificateFile /etc/httpd/ssl.crt/www.example.com.crt
     SSLCertificateKeyFile /etc/httpd/ssl.key/www.example.com.key
     SSLRandomSeed  startup    builtin
     SSLRandomSeed  connect    builtin
</VirtualHost>
These are obviously fairly basic configurations of mod_ssl and Apache. Like Apache in general, there are many other possible aspects to an SSL deployment that an administrator may need to configure, and mod_ssl provides a wealth of directives to do so. In fact, there are far too many directives configurable in far too many combinations to explain in the book that is not entirely about Apache. Appendix C contains additional suggested reading on configuring all of the aspects of mod_ssl as well as Apache as a whole.
And Apache is not the only Internet service that Mac OS X is capable of running, of course, and therefore not the only Internet service that may need to be secured. We will discuss the most common of these in the following sections, starting with mail services.
Email has been a backbone service on the Internet since well before web browsers were browsing. As such, it has often been the target of much abuse. Whether it is Sendmail buffer overflows common in days of yore, worms, hoaxes, scams, or spam, the history of email is full of nasty problems. For sites using email services, making sure that these services are secured is an important aspect of not only the server’s security, but of the security of all the server’s email users.
Mac OS X and Mac OS X Server ship with different applications to handle email. In Mac OS X, there is only an MTA, Sendmail, which is the most common SMTP server on the Internet. It is not enabled by default and requires some work to even get the daemon to run. Mac OS X Server ships with a different default mail server called MailService (Mac OS X Server also includes Sendmail, but it is not enabled). Each of these different email services has different capabilities and methods for securing them.
Apple has actually helped administrators by not enabling Sendmail by default in Mac OS X. Given its history of issues and the unlikelihood of an average user being able to properly manage the daemon, this can be seen only as a good thing. Apple does not provide a GUI with which to manage Sendmail, and most of the niceties of a typical Sendmail installation are missing (such as scripts to compile the configuration files when the service starts). There are few reasons for a client operating system to ever have its own SMTP server, and Apple seems cognizant of this fact with the hoops one must jump through to make the client version of Mac OS X a full-fledged email server. Sendmail is like a redheaded stepchild to Apple; they would rather it didn’t exist, but it is family, so they include it anyway. Just barely. In other words, Apple seems to include it simply because it is a “standard” in many UNIX-based operating systems, and for no other reason.
If Sendmail is enabled, one of the most important aspects of its security is simply maintaining patches. Apple is pretty good about releasing patches in a timely manner, so judicious use of the Software Update application is probably all that is needed. Relaying is another consistent problem with any SMTP server. True to form, Apple has disabled relaying by default. If relaying is enabled by hand, it must be done with care.
An unfortunate downside of Apple’s treatment of Sendmail is that those wishing to use it in a serious manner are forced to make up a lot of the features of a typical OEM install themselves. For instance, Sendmail was not compiled to allow for SSL-encrypted sessions, so administrators who want to provide secure authenticated relaying would be forced to compile and install their own version of Sendmail.
The bottom line is that there are few reasons to enable Sendmail on a client. If there is a genuine need, administrators should be aware of the risk and read a book or two on proper Sendmail configuration before proceeding. In general, one should not consider using Sendmail unless forced to do so with threats of bodily harm, eternal damnation, or unemployment. There are easier MTAs to use that do not have the lengthy history of vulnerabilities that Sendmail does.
In contrast with Sendmail, which is only an MTA, Mac OS X Server’s MailService is a full-featured server that supports not only SMTP, but also IMAP and POP3. In addition, MailService also supports encrypted transports for all these services, as well as basic anti-SPAM measures.
MailService is not a redheaded stepchild. It sports a comprehensive GUI to manage its configuration, which is stored in the NetInfo database. Like most Mac OS X Server services, MailService is configured through the Server Settings application (see Figure 6.9). With this interface, it is possible to stop and start the service, as well as configure the server’s settings. The Configure Host Settings dialog modifies DNS usage, relay settings, and other parameters. The specifics of how the various email protocols are used are governed by the Configure Mail Services dialog box. Both dialog boxes contain settings affecting the security of both the service itself and its use by users.
The Configure Host Settings dialog box contains three tabs: Incoming Mail, Outgoing Mail, and Network Setting. On the Incoming Mail tab, administrators can set the hosts that are allowed to relay through the server. Clicking the Add button brings up a simple dialog box with a text box that accepts a hostname, domain name, IP address, range of IP addresses (192.168.1.1-254), or a subnet (192.168.1.0/255.255.255.240). The dialog box does not perform rigorous sanitizing of the input text, so administrators must be extra careful to type correctly. The Outgoing Mail tab allows administrators to decide whether to even allow the server to send mail outside the organization (see Figure 6.10). By default, outgoing mail is limited to local users and hosts (those hosts identified in the Configure Mail Service dialog box’s Local Hostnames box). Setting the top pop-up menu to Allow outgoing mail allows the server to deliver mail to servers outside the organization (that is, those on the Internet). The final tab specifies how the server should handle hostname lookups for outgoing email and the outgoing TCP port it should use. The defaults are reasonable and should be changed only if truly necessary.

The Configure Mail Service dialog box configures more of the protocol-specific aspects of MailService and consists of four tabs: General, Messages, Filter, Protocols. The General tab contains the previously discussed Local Hostnames box (which contains the hostnames of other email servers within the organization). This tab also allows administrators to move the mail store. Extra care should be taken to preserve the permissions (allowing only root read and write permissions; everyone else is denied access) on the files and directories if the mail store is moved. Among other things, there are privacy concerns involved with the storage of an organization’s email, so making sure that only root has access to the mail database is important. The mechanism that clients are allowed to authenticate with can be set with the pop-up list in the middle of the panel. Administrators can choose Kerberos, standard SMTP, or Any Method (see Figure 6.11).
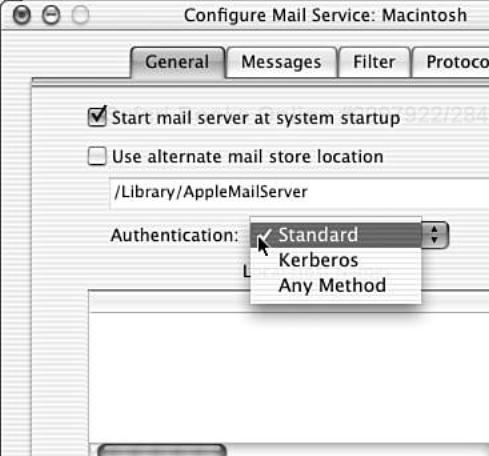
Setting a message size limit on the Messages tab (see Figure 6.12) can keep someone from maliciously consuming the server’s resource (disk and network bandwidth) by sending numerous large files to users. However, it may also anger those users who routinely use email as their primary file-sharing protocol (engineers with giant AutoCAD drawings seem especially prone to this disease). For those sites with concerns about email retention for legal reasons (such as Microsoft), the Message tab also allows administrators to configure the retention of both read and unread mail messages.

The third tab, Filter (see Figure 6.13), permits administrators to cut down on the amount of unwanted email their users process. The top option specifies the address of an ORBS (Open-Relay Behavioral modification System) server to be queried to determine whether a sending host is an open relay that can be used for SPAM. These servers generally require paid subscriptions for access, but can markedly decrease the load of junk mail transiting a server. ORBS are not bullet proof, however, because some servers are mistakenly added to the lists. Also, even though a server may be an open relay for SPAM, it probably has legitimate users as well that may be trying to conduct important business via email.
Clicking in the check box next to Reject if name does not match address is another method that can be used to reduce SPAM. It is a common tactic for some junk mailers to make their messages appear to come from one location when they really come from another; thus, MailService will check to ensure that the address and hostname are appropriate for each other. This also is not foolproof because there are occasionally valid reasons why a server may appear to have a different address than its name would indicate. The final box on the Filter tab lets administrators specify specific servers to be disallowed from sending their server email.
The fourth and final tab, Protocols (see Figure 6.14), contains options for each of the three major protocols supported by MailService (SMTP, POP3, and IMAP), as well as an oddment named NotifyMail (which is a proprietary protocol for notifying users when they have new mail without having the client’s email client poll for new messages). Each of the three major protocols has an option for a secure mode of authentication (CRAM-MD5 for SMTP and IMAP; APOP for POP3). Rather than enabling these kinds of authentication—which attempt to secure only the authentication phase, not the entirety of the session—we suggest using SSL to encrypt the entire sessions.
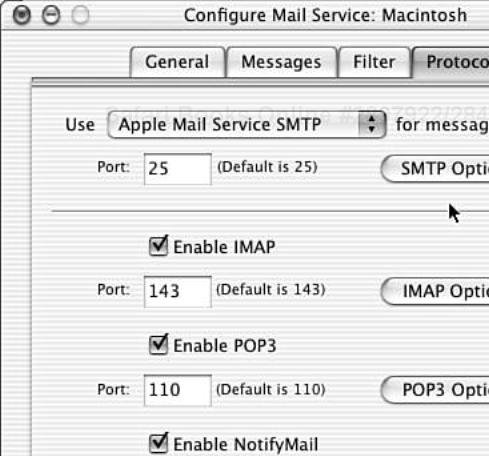
Like the configuration of most SSL-enabled services, enabling SSL for MailService consists of four basic steps:
Generate a Certificate Signing Request (CSR).
Obtain a certificate using the CSR.
Insert the new certificate into the certificate store.
Configure MailService to use the certificate.
The CSR for MailService must be created as root (logged into the console, not via a terminal session) with the certtool command-line application. We must also create a certificate store in which to put the certificate (otherwise known as a keychain).
bash-2.05a# cd /var/root/Library/Keychains/
bash-2.05a# /usr/bin/certtool r csr.txt k=certkc c
This listing creates a keychain for root named certkc and starts the certificate request process. The application will prompt for a passphrase in the GUI to use for the new keychain; then return to the terminal session to continue the certificate request process. The first question asked when generating the CSR is for a key and certificate label (which must be separated by spaces). A good choice here is the domain name of the organization for the key and MailService for the label. The rest of the questions asked are standard to any CSR process and should be answered accordingly (see “Enabling SSL with Apache” previously in this chapter). After all questions have been answered, a CSR will be generated in a text file named csr.txt in /var/root/Library/Keychains. This text should then be submitted to the certificate authority (CA) of choice.
After the CA issues the new certificate, it must be injected into the keychain so that it may be used. To do this, we again log in to the console as root and use the certtool application.
bash-2.05a# /usr/bin/certtool i example.crt k=certkc
Assuming that this process is successful, there is one remaining step: to put the passphrase for the certkc keychain in a text file so that MailService can read the passphrase when it starts. To do this, create a text file with vi (or any other plain text editor) that contains only the passphrase. Be sure not to include any whitespace (spaces, tabs, or carriage returns) after the passphrase. Save this file as certkc.pass in /var/root/Library/Keychains and change the permissions so that only root has read and write permission (everyone else has no access). Apple’s knowledge base contains a useful document providing more detail on setting up SSL for MailServer (Article ID 75335).
A quick restart of MailService, and that’s all it takes to enable SSL for all three of MailService’s protocols. There is no further configuration needed (or possible). It is not, for instance, possible to require users to use IMAP-SSL from within MailService (though it is certainly possible using a firewall). Regardless, using SSL is probably the best way to secure email sessions without diving into IPSec, and is one of the biggest ways to improve security when using MailService.
FTP is one of the older and more cantankerous (due to its dual-channel nature) protocols on the Internet. Mac OS X and Mac OS X Server ship with different FTP servers, much like they ship with different mail servers. The FTP server that ships with the client version of Mac OS X (lukemftpd) is a typical basic ftp daemon. Apple chose not to provide any configuration utility for it beyond the start and stop in the Sharing Preference pane. For the Mac OS X Server FTP server (xftpd, based upon Washington University’s wu-FTPd), Apple created a simple user interface in the Server Settings application. Apple also added a number of capabilities, including Kerberos integration, on-the-fly conversion of compressed files, and the capability to export sharepoints into the FTP server’s filesystem root (the FTProot).
Its use of clear-text authentication and data transmission makes FTP an obsolete protocol for anything more than anonymous downloads. Additionally, the software basis for xftpd, wu-FTPd, has a lengthy history of vulnerabilities and readily available exploits. We highly suggest that no one use FTP for anything but anonymous downloads, even with all of Apple’s additions. Even this concession is a bit of a stretch; for such situations, it often makes more sense from both the client and server sides to set up a small web server (or section of a website) to allow people to browse for and download files. The http protocol allows for all the needs of anonymous downloads without all the hassle of the ftp protocol and the vulnerabilities typical in the servers used to implement it. The http protocol can even provide for authentication and encryption, if needed.
For those wanting FTP-style access with authentication, SFTP clients, which use a much more secure protocol (see the following section on Remote Login), are readily available for most platforms while providing a similar user interface to FTP. SFTP is also easier to manage at the firewall because it uses a single channel for both commands and data transfer.
What Apple calls Remote Login in its control panel (refer to Figure 6.1), the rest of the world calls OpenSSH. OpenSSH is an open-source suite of network tools implementing the Secure Shell protocol and providing encrypted communications between networked hosts. Among its various utilities are replacements for common unencrypted protocols such as RCP, TELNET, and FTP. OpenSSH can also automatically forward X11 connections over an established tunnel, compress data as it is transmitted (for slow connections or inefficient protocols such as X11), and perform RSA-based client and server authentication. With all its features and the wide availability of clients, there is quickly becoming no reason to use the less-secure applications SSH was meant to replace. Table 6.1 presents a rundown of OpenSSH applications and what they do.
Table 6.1. OpenSSH Applications and Their Usages
APPLICATION | USAGE |
|---|---|
| SSH server |
| SFTP subsystem server |
| Part of the SSH client, used for managing SSH2’s host-based authentication |
| SFTP client |
| Secure network file copying utility |
| SSH client |
| Adds identities to ssh-agent |
| Client-side authentication agent |
| Manages authentication keys |
| Key gatherer for public keys |
| A symlink to |
As with all network services, Mac OS X ships with Remote Login disabled by default. Disabling Remote Login means that only access to Mac OS X as an SSH server (/usr/sbin/sshd) is disabled; it does not disable the command-line client applications. SSH will likely be useful only to those users who utilize the command line on occasion and should only be enabled in such situations.
As it ships, Mac OS X includes a mostly default configuration for both the SSH server (/etc/sshd_config) and the client utilities (/etc/ssh_config). The good news is that Apple’s default configuration is reasonably sane. The only non-default setting it has applied is the enabling of the SFTP subsystem for sshd. Even though the default configurations are sound, there are a few items that administrators may want to consider for their own systems.
Access to the SSH server can be controlled in a few different ways by using various keywords in the configuration file. User-based access control is managed with the keywords AllowUsers and DenyUsers. Both parameters accept a space-delimited list of users that are either allowed or denied login. Asterisks or question marks can be used as wildcards for multiple characters and single characters, respectively. Usernames can also take the form of username@host, which allows administrators to permit access from certain users originating from certain hosts. Group-based access is controlled in a similar fashion to user-based with the keywords AllowGroups and DenyGroups. Similar to user-based access control, the group-based access control keywords accept space-separated lists of groups that explicitly allowed or disallowed the right to login. By default, all users and groups are allowed to log in to the SSH server.
The following is a snippet of an example configuration that allows access by users whose usernames start with the letter a, denies access by users whose name ends with the letter z from the host evil.example.com, and allows access to any member of the group admin while denying access to members of the group enemy.
AllowUsers      a*
AllowGroups     admin
DenyUsers       *[email protected]
DenyGroups      enemy
Another area of concern for a server configuration is the protocol with which it communicates to clients. By default, sshd speaks either version 1 or version 2, preferring the latter. There are known issues with the version 1 protocol that allows for some man-in-the-middle attacks. Beyond this, various implementations and versions of SSH1 are prone to a host of different vulnerabilities. There is a tool called dsniff (see http://naughty.monkey.org/~dugsong/dsniff/) that will even automate an attack. For this reason, we suggest disabling the version 1 protocol if at all possible. This can be done by using the Protocol keyword and setting it to a value of 2 (as opposed to 2, 1, which is the default).
Properly maintaining the security of the server’s key file is another important aspect of securing Remote Login. This aspect is configured properly out of the box, but it must be maintained throughout the lifetime of the server. A simple directory listing shows the proper permissions that should be maintained:
-rw-------   1  root   wheel   668 Nov 26 15:21 /etc/ssh_host_dsa_key
-rw-r--r--   1  root   wheel   599 Nov 26 15:21 /etc/ssh_host_dsa_key.pub
-rw-------   1  root   wheel   524 Nov 26 15:20 /etc/ssh_host_key
-rw-r--r--   1  root   wheel   328 Nov 26 15:20 /etc/ssh_host_key.pub
-rw-------   1  root   wheel   883 Nov 26 15:20 /etc/ssh_host_rsa_key
-rw-r--r--   1  root   wheel   219 Nov 26 15:20 /etc/ssh_host_rsa_key.pub
Of note here are the files that end with the .key extension. These are the server’s private keys and thus need the most protection. They should never be readable or writeable by any user other than root to prevent modification or theft.
For those sites whose policy dictates it (and the account is enabled), it is possible for administrators to disallow direct logins by the root user. This is accomplished by modifying the configuration to set the PermitRootLogins to no.
Although there are a lot of other keywords available in the SSH server configuration file (54 by our count), few are worthy of modification unless there is an overriding need. Many will serve only to decrease the overall security of the conservative default configuration.
Client configuration can come from three different sources and is gathered in this order: command-line flags, a user-specific configuration file (~/.ssh/config), and the system-wide configuration file. If an option is specified in multiple configuration sources, the first instance is used.
Client security is less exciting than security for the server. By default, all the user-specific files are stored in the .ssh hidden directory at the root of each user’s home directory. This directory holds the user’s known_hosts file; any public and private keys the user may be using; and a user-specific configuration file, if the user has one. As with the server key files, any private keys a user may have should be protected, allowing only read and write permissions to the owning user. This goes for configuration files as well. Also, like the server configuration, we suggest not changing the defaults in the ssh client configuration unless there is a clear and well thought-out reason to do so.
Some readers may be wondering why we are not talking about protocol versions for the client. The unfortunate reality is that though SSH use is widespread, many implementations rely upon the older version 1 protocol. A lot of the systems we deal with are manufactured by Cisco, which supports SSH. However, Cisco supports only version 1 of the protocol, which it has stated is the only version that it will ever support. It is because of this stance that we have a hard time restricting clients from using it if necessary; the default for the client is to prefer version 2 of the protocol, but use the older protocol, if necessary. It’s a case of the alternate being telnet, which makes version 1 “secure enough” for our purposes.
Another nice feature of SSH is its capability to create tunnels for other protocols. For instance, I do some work for a university museum, which has a firewall that wisely blocks external access to an Oracle database. My work requires me to have access to this database from remote locations, which presents me with a problem. Here is where SSH can come to the rescue. With the following command, I can create a tunnel to the remote oracle server through SSH.
bash-2.05a$ ssh -C -L 1521:museum.example.com:1521 museum.example.com
This command sets up a socket to listen on TCP port 1521 on the loopback interface. To connect my computer to the museum’s database, I configure the database client software to connect to the database via the localhost address, which is all that is required to give me the access I need in a reasonably secure and efficient manner.
This method can be used to secure all manner of TCP-based communications. SSH tunnels are a great way to secure many unencrypted protocols. For awhile, before Mail.app was able to do IMAP-SSL, the easiest way for my associates and I to securely use our IMAP server was to use SSH tunnels to the mail server. Tunnels can be used with POP3, AFP, and NFS.
There are other aspects to using SSH that we have not broached here. Additional documentation on SSH usage can be found in Appendix C.
Remote Apple Events (RAE) allows Macintosh’s applications to be driven by any other workstations on the network. Under Mac OS 9.x and its predecessors, this was called Program Linking. This is a very handy feature for those who need it. For instance, if an administrator runs a horde of Adobe Photoshop workstations, she can instruct all of the machines to perform rendering operations on graphics files, all from a centralized location. Applications must be coded by their developers in order to take advantage of Remote Apple Events. Developers can even leverage the technology to create quasi-clustering or Beowulf solutions.
Just don’t. In all seriousness, this is definitely a service that should not be enabled unless there is a very good reason to. At the very least, this service should never ever be accessible through the Internet, and access to its service port (TCP port 3031) should be strictly controlled. Authentication is required for remote access to a machine’s applications, but this is not foolproof because it is still possible to cause problems on a host by consuming resources just by connecting to the host. To allow access to a Mac OS X host by a Mac OS 9 host, the preference pane requires a password. Mac OS X stores a hash of this password in a world-readable file (/Library/Preferences/com.apple.AEServer.plist). It is a good idea to change the permissions on this file:
bash-2.05a$ sudo chmod go-r /Library/Preferences/com.apple.AEServer.plist
Also never set the Mac OS 9 compatibility password to the same password used for other trusted operations or accounts.
Since the early days of UNIX-based operating systems, they have shipped with applications called super-servers. In its most basic form, a super-server acts as a network listener for the services for which it is configured. Upon executing, a super-server parses its configuration file(s) and determines the network services it is responsible for. It then begins listening on the ports or sockets on which its servers communicate. When the server receives a request on the port, it starts the configured server to further handle the service request. There are exceptions to this scheme, mostly for single-threaded servers, wherein the super-server starts the single-threaded server. The single-threaded server then takes care of service requests until the server itself dies. This tactic can be more efficient than having each server (of which there may be many) start and patiently wait for requests themselves.
As of version 10.2, Mac OS X ships with xinetd, a secure replacement for the inetd super-server (which Jaguar also includes for backward-compatibility). xinetd has several features to recommend it as a replacement for inetd. These features include access control (based on source address, destination address, and time), extensive logging, and the capability to bind services to specific interfaces. In this section, we will attempt to illustrate several of most common features of xinetd, as well as how to manage its configuration in Mac OS X.
Under Mac OS X, xinetd’s configuration consists of a main configuration file (located at /etc/xinetd.conf) and a configuration directory (/etc/xinetd.d/). In general, a complete xinetd configuration consists of a defaults entry that establishes default values for specified parameters to be used throughout the configuration. The defaults entry is followed by one or more services entries, which specify the configuration for individual services. Mac OS X’s main configuration file specifies only the defaults entry, which leaves individual services to be defined in the configuration directory. Any modification of an xinetd configuration file requires xinetd to be restarted for it to take effect (that is, killall xinetd). Also, if xinetd is started (or restarted) and it is not configured to listen for any connection (as is the default), xinetd will terminate itself peacefully.
This is Mac OS X’s default main configuration file for xinetd:
# man xinetd.conf for more information

defaults
{

         instances           = 60
         log_type            = SYSLOG daemon
         log_on_success      = HOST PID
         log_on_failure      = HOST
         cps                 = 25 30
}

includedir /etc/xinetd.d
In any xinetd configuration file, lines beginning with a pound sign (such as the first line of xinetd.conf) or containing only whitespace (the second line) are ignored. The defaults entry begins on the third line of the configuration file with the keyword defaults. A typical defaults entry consists of the defaults keyword, a left curly brace, one or more parameters, and then a right curly brace. Each parameter in the defaults entry (as well as any service entry) is of the following general form:
<parameter_name> <assignment_operator> <value1> <value2> ... <valueN>
In the preceding example, the first <parameter_name> would be instances, the <assignment_operator> would be the equals sign, and <value1> would be 60. Some parameters (such as log_type, log_on_success, and cps in this example) accept or require multiple values, which are separated by spaces after the equals sign. The defaults entry accepts only the equals sign as an assignment operator, but the service entries support additional assignment operators (-= and +=), which we will discuss a little bit later.
The first parameter (instances = 60) specifies the maximum number of requests or connections any service may handle at one time. This can provide some sanity-checking that helps guard against Denial-of-Service attacks against a host. Unless specified, instance defaults to the value UNLIMITED, which means that xinetd will place no limits upon the number of connections.
The second setting (log_type = SYSLOG daemon) configures xinetd services to log to the syslog daemon using the daemon facility (for more information on logging in Mac OS X see Chapter 11, “Auditing”). A third value can be added to this line, specifying the log-level (from debug to emerg) to be logged; otherwise, the log-level defaults to info. Logging can also configured to use a file instead of the syslog daemon by modifying the line accordingly:
log_type = FILE /var/log/xinetd.log
File-based logging is enabled with the value FILE, and the path to the log file is set with the second value (/var/log/xinetd.log (in this example, however, it can be any valid filename).
The second and third parameters in the defaults entry (log_on_success and log_on_failure) determine what is to be logged upon successful or failed connections to a service. For log_on_success, these include the following:
PID. Logs the process id of the responding server.HOST. Logs the IP address of the remote host.USERID. Logs the userid of a connecting user, provided that the host is running identd, and the requested server is a multi-threaded server.EXIT. Logs exit events from the responding server.DURATION. Logs the duration of a connected session.
log_on_failure accepts a slightly smaller list of values: HOST, USERID, and ATTEMPT (which logs each failed attempt and is implicitly included by the other two options). Both log_on_failure and log_on_success accept multiple values.
The final value in the defaults entry (cps = 25 30), which stands for “connections per second,” provides a way to rate limit connections to a particular service. The first value (25) defines the rate at which clients can connect. If the connections exceed this rate, further connections are disallowed for the number of seconds indicated by the second value (30). Unless otherwise specified, xinetd’s default is to limit connections to 50 in a 10-second interval.
xinetd’s defaults entry allows an administrator to provide default values for some but not all the configuration parameters available for individual services. In addition to those already discussed, the defaults entry supports no_access, only_from, per_source, passenv, groups, umask, disabled, and enabled.
Both the disabled and enabled attributes accept lists of services that will be explicitly disabled or enabled and are unique to the defaults entry. If the disabled parameter is used, any service not listed will be considered enabled. The same is true of the enabled parameter, except that anything not listed is implicitly disabled. If a service is listed as being both enabled and disabled, the service is considered disabled.
The passenv parameter provides a list of environment variables that xinetd will pass from its own environment to any server it starts. The number of connections from individual IP addresses can be limited with the per_source parameter, which accepts an integer specifying the maximum number of connections allowed from any one IP address.
Sometimes it is necessary for xinetd to start servers with access to the groups that their effective UID is a member of, which is configured through the groups parameter. Most BSD-based operating systems such as Mac OS X require this, so they set groups equal to yes. In Mac OS X’s configuration, each individual service definition specifies this setting, although Apple could have included it in the defaults entry.
For those services that may need to create files on the server, xinetd allows an inherited umask to be set with the umask parameter. This umask allows an administrator to specify the default permissions on any files created by xinetd’s services. Like the command-line application of the same name, the umask parameter expects an octal value (such as 002). If umask is not specified, the umask will default to xinetd’s own umask OR’d with 022.
The remaining two parameters, only_from and no_access, form the basis of xinetd’s address-based access control. These parameters are also of the most interest to those wishing to add security to any of the services that xinetd can provide. Values for both parameters are lists of host addresses or ranges of addresses, and can be specified in a number of different formats, including CIDR notation (192.168.1.0/24), dotted-decimal quads (192.168.1.2), factorized quads (192.168.1.{1,2,3,5}), and hostnames (www.example.com). If either parameter is left blank, it is the equivalent of saying “none.” That is, an empty value for no_access translates into “allow from any address,” and the converse for only_from. If both no_access and only_from are specified, the best match wins. This means that if a connection were attempted from the host 192.168.0.1, and only_from were set to 192.168.0.0/24 and no_access to 192.168.0.1, access would be denied. In cases of a tie, no_access takes precedence. As with all parameters, any access control specified in the defaults entry applies to all defined services, but can be overridden individually by those services. Any settings established in individual service entries apply only to the entry in which they are defined.
The final line of xinetd.conf (includedir /etc/xinetd.d) tells xinetd to parse and process any files in the directory /etc/xinetd.d (except those either containing a period character or ending with a tilde character) as part of its configuration. It is in this directory where we find the entries for all the services xinetd is configured to manage.
Out of the box, xinetd is configured to manage 19 different services (20 for Mac OS X Server), although none of them are enabled by default. Of these 19, only one has a GUI with which to manage it: ftp. Management and configuration of all other services are done through editing the text files. To make management of each service easy, Apple has created a single file for each service that is defined, with each of these files being the name of the service that is configured therein.
For our first example, we will use the tftp service definition (/etc/xinetd.d/tftp):
service tftp
{
          disable         = yes
          socket_type     = dgram
          wait            = yes
          user            = nobody
          server          = /usr/libexec/tftpd
          server_args     = /private/tftpboot
          groups          = yes
          flags           = REUSE
}
In this example, we can see the major aspects of a service entry. An entry begins with the keyword service followed by the service name, which is the name defined in /etc/services (tftp in this case). Next comes a left curly brace, the list of parameters and their values, and finally the right curly brace. As with the defaults entry, any whitespace line is ignored, as is any line beginning with a pound sign.
Minimally, most services entries require six parameters to be defined: socket_type, wait, user, server, server_args, and (because Mac OS X is a BSD-derived operating system) groups. RPC-based services (which are generally not managed by xinetd due to performance issues) additionally require the parameters protocol and rpc_version.
The first parameter in the example service entry is disable, which accepts the strings yes or no and dictates whether xinetd should start listening for connection attempts for the tftp service. The GUI management tools for ftp simply set the value of disable to no, and start (or restart) xinetd. The parameter socket_type defines the type of network socket to create for connections. Most TCP-based services should set the value to stream; most UDP services are dgram. The parameter wait tells xinetd whether a server is multithreaded or not; most of the servers that are commonly started by xinetd are not and would set the value to yes. The user with which to start the server is set by the value of the parameter user.
The server parameter is used to set the path to the application or daemon xinetd should use to respond to connection attempts. Sometimes it is desirable to start the server with additional arguments, which may specify an alternative configuration file, modify the logging configuration and location, or use some other runtime option. To do this, administrators can use the server_args parameter; the setting indicated in the example tells tftpd to restrict access to files in the indicated directory (/private/tftpboot, which does not exist). The final parameter in the example, flags, is used to pass a number of different configuration options to xinetd itself, most of which tell xinetd about special requirements for the server or its connections.
As with the defaults entry, xinetd provides additional parameters to allow administrators to provide access control for their services: only_from, no_access, and access_times. The first two parameters, only_from and no_access, are configured in the same manner as the corresponding parameters in the defaults entry. The last parameter, access_times, allows administrators to specify periods of a 24-hour day in which a service is accessible. The values are a range of times formatted as HH:MM-HH:MM, where HH is the two-digit hour using a 24-hour clock, and MM is the two-digit minutes after the hour. The load and connection-limiting parameters available in the defaults entry (per_source and cps) are also available in individual service entries and are configured in the same way.
As discussed previously, the service entries support more than one assignment operator for some parameters. These parameters are only_from, no_access, log_on_success, log_on_failure, passenv, and env. All of these parameters accept the equals sign as well as += and -= (except env, which does not support -=). A += means that values listed thereafter are added to an already established list (such as one defined in the defaults entry) rather than simply replacing a list, which is the default behavior. Items are subtracted from a set value using the -= operator. All these parameters may also be specified multiple times in a single service entry.
To configure xinetd to listen for tftp connections, explicitly denying access from a few troublesome hosts (192.168.0.1, 192.168.0.23, 192.168.0.24), and allowing access only during business hours (8 a.m. to 5 p.m.), one would modify the tftp service to appear as follows. We will also chroot tftpd to the /tmp/ folder just for safety’s sake (with the argument, -s /tmp/) and log additional information for successful connections.
Before we move on, there is one more trick that xinetd can do that we would like to share. Among its other attributes, xinetd has the capability to redirect TCP streams from one address to another. This means, for instance, that xinetd can accept connections on the port a web server typically listens on and forward it to another computer, which has the actual web server running on it. This can be especially handy when the machine running xinetd is acting as a firewall for a network. Using port redirection, one could easily allow connections from an external host to an internal host. This is probably not the best way of handling this kind of redirection (one should generally use the firewall software itself for that because the firewall can perform many more sanity checks upon the connections, providing better security overall), but there may be valid reasons to do so.
Redirection is initiated using the redirect parameter, which accepts a destination IP address and TCP port. It is also possible to use a hostname in place of the IP address, but we would advise against this because the lookup for the name is done only once, when xinetd is started, an aspect that could be abused. When redirecting, the server parameter is not a required parameter.
An example of redirecting http connections (TCP port 80) from the host running xinetd to another would appear as follows:
service http
{
          disable         = no
          socket_type     = stream
          wait            = no
          user            = root
          groups          = yes
          bind            = 192.168.1.1
          redirect        = 10.11.12.13 80
}
Observant readers will notice the bind parameter in this example. It is used to force xinetd to monitor for connections on a single IP address, as opposed to all IP addresses the host may have (which is the default).
xinetd has several other parameters that we have not described here and has features that are beyond discussion in a book of this type. We urge readers to read the man pages for xinetd (see man xinetd and man xinetd.conf), which provide a lot of useful information, including examples of sample configurations.
Mac OS X ships with a number of services never before seen in an Apple operating system, providing capabilities once only dreamed of by Macintosh administrators. The Mac OS now has the capability to coexist on the Internet on the same terms and at the same level of interaction as any other modern operating system. This also means that Mac OS X is subject to same risks as every other modern operating system. Fortunately, Apple has chosen wisely in disabling all of the services we have discussed here. Hopefully, we have provided readers with enough incentive to better understand the powerful tools that they have been given and to internalize the fact that (as the cliché goes) just because one can do a thing does not necessarily mean that one must do that thing. None of the preceding services should be enabled without reason; any one of them can negatively affect the security of the system. Even OpenSSH, with its very essence being security, has seen its share of vulnerabilities, and its support of an older protocol could be dangerous in the wrong environment.
Mac OS X’s newfound capabilities extend beyond just these Internet services, however. As we shall see in the following chapters, these new capabilities reach a little closer to home with new file-sharing capabilities and outward again with enterprise directory integration.