
“They have an Internet for computers now?” | ||
| --Homer Simpson | ||
Network security historically has been a topic reserved for devices at the edge of a network or for road warrior machines. Firewalls, Virtual Private Networks, and link-level encryption are generally difficult to configure and require third-party products. Mac OS X, however, brings simple and robust network security mechanisms to every server and workstation. Although the implementations are not without faults, they provide a mechanism every user can utilize to secure their host from network-based attacks.
Firewalls are typically network devices that control the flow of traffic. Companies will place firewalls in front of networks they want to protect in an effort to limit unwanted packets from entering or leaving that particular part of the network. This reflects the typical “security at the edge” idea employed in most enterprises.
However, this model is not bulletproof. A network attack that occurs within the border of your network firewalls can still pose a risk to your internal resources. In January 2003, a worm targeted at Microsoft’s SQL implementation ravaged many corporate networks. After the worm propagated to one internal machine via some mechanism, it rapidly exploited the SQL vulnerability on every possible machine within each enterprise. The border firewall did nothing to stop the infection once it started.
Besides staying current with application and operating system patches, host-based firewalls can go a long way toward controlling threats from inside attacks. By running a firewall application directly on the host you are trying to protect, access can be controlled in a fine-grained manner.
Mac OS X has a built-in firewall called ipfw that operates at the kernel level. ipfw is a BSD-based firewall that has been used in FreeBSD for years. Apple has then leveraged this kernel-level firewall by implementing graphical tools to control it.
ipfw is capable of being a robust border firewall. However, that is not a typical deployment scenario for most Mac OS X machines. Apple’s utilities are designed to protect the host itself, not an entire network. Regardless of your situation, you should use the firewall capabilities of Mac OS X. For a laptop using a public wireless network or a server providing QuickTime videos to an intranet, the host firewall allows you to enforce least privilege to each service running on a host.
This section examines the native firewall tools for Mac OS X Client and Server. Then we will dive under the hood and control ipfw from the terminal to handle nonstandard situations.
The tools provided in Mac OS X are designed to protect the core operating system and standard mail, web, and file-sharing applications that Mac OS X users usually deploy. They are effective at the services they know how to protect, but the tools are lacking in their capability to control the more advanced features of ipfw.
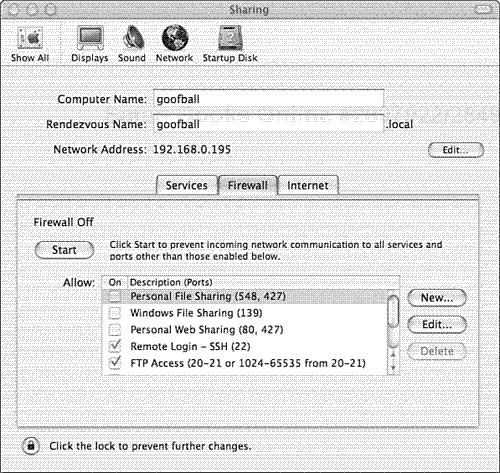
In Mac OS X Client, the firewall is controlled through the Sharing System Preferences pane. By default, the firewall is turned off and allows all communication to and from the host. When you visit the firewall tab for the first time, any services you have running on the host will be checked to allow incoming connections. Even though the firewall is off, the configuration is tailored around your services. You cannot change this behavior. Any service that is enabled in the sharing tab is allowed through the firewall. Figure 8.1 shows the Firewall tab in the Sharing System Preferences pane.
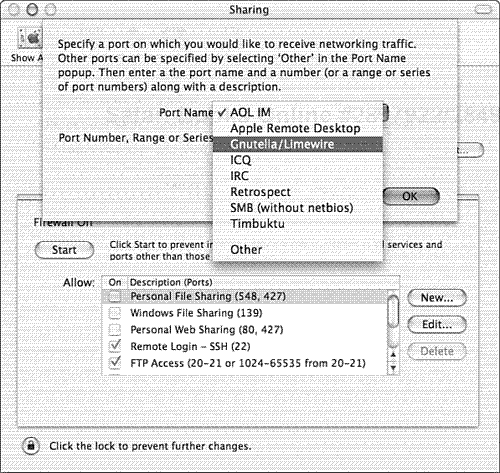
Also you may have services that are not listed in the default ruleset, such as AIM or Gnutella. These programs actually require some degree of inbound access. By clicking on the New button, you can add particular services by hand.
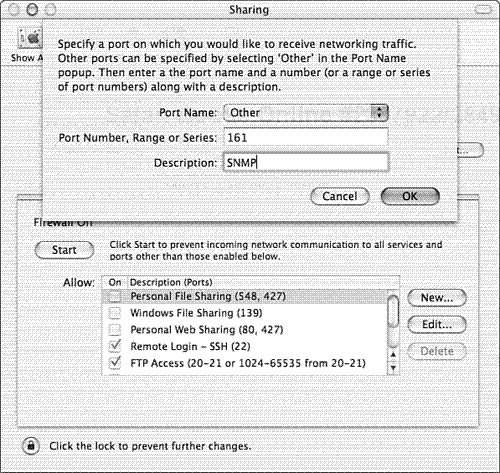
Figure 8.2 shows how to add support for Gnutella. If you have another service that is not in the standard list of services provided by Apple, you can add ports by hand by selecting Other from the pull-down menu (see Figure 8.3).
If you are using FTP to transfer files, you will need to configure your host to use passive mode for the transfer itself. FTP is an old protocol that was designed before security was really a concern with network applications. An active mode FTP connection will result in the remote server making a connection to a random port on the client machine in an attempt to transfer the requested file. When the client machine is protected by a firewall, that inbound connection will fail. Passive mode FTP gets around this problem by forcing the client to initiate the connection for the file. Figure 8.4 shows how to configure passive mode FTP in the Proxies tab of the Network System Preferences pane.

After you have the correct services listed in your firewall rule, click on Start. The firewall is running and only allowing in the services you have specified in the ruleset.
The firewall configuration utility in Mac OS X Server has a completely different feel to it than the client utility. It allows for much more detailed firewall rules, including controls on IP addresses and logging information. It is still not a complete representation of everything ipfw can do, but it is much more appropriate for a firewall tool running on a server.
Due to the enhanced capabilities of Mac OS X Server’s firewall utilities, you will have to do a bit more planning to create a functioning ruleset. Determine what services you want others to access and, if possible, what IP addresses those requests will be coming from. You also should determine what services the server needs to access as well. Using this list of services, source IP addresses, and destination addresses, you will create your firewall ruleset.
First, you should set up your overall firewall configuration options. On the Network tab in Server Settings there is an icon for a Firewall service. Click on that icon and select Configure Firewall to bring up the global firewall configuration options.
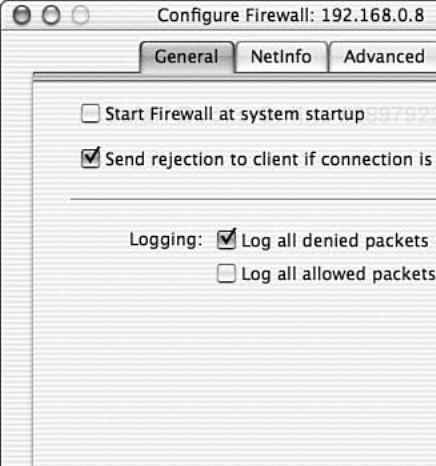
Under the General tab you can control how the firewall handles rejected packets. By selecting Send Rejection to Client If Connection Is Denied, the firewall service will send a TCP reset packet in response to queries to closed ports. This option speeds up client recognition that the port is closed and may avoid some client performance issues. However, it provides an attacker with detailed information on your firewall’s configuration. It also may cause a denial of service (DoS) to the server in the event of large amounts of denied packets. Under extreme circumstances a server may become so preoccupied with sending reset packets that it is unable to service legitimate requests. However, in the event of a DoS attack, you may have many other problems as well that also are preventing service. Enable this option if you feel it is necessary.
In the same tab you can control logging. Logging traffic allowed or denied through your firewall can be useful for troubleshooting or tracking down an attacker. However, logging all denied packets can result in an attacker filling up your filesystem by sending large amounts of denied traffic. Similarly, if you decide to filter UDP traffic, then do not log all allowed packets. When a TCP session is allowed through the firewall, only the first packet is logged. The rest are allowed through transparently because the firewall understands that TCP is stateful. Because UDP is stateless, each packet that is allowed through the firewall is logged. This can result in huge amounts of data being logged, especially in the event of running streaming services over UDP. Only enable logging if you are troubleshooting or not concerned with running out of disk space. Figure 8.5 shows the General tab under the Configure Firewall pane.
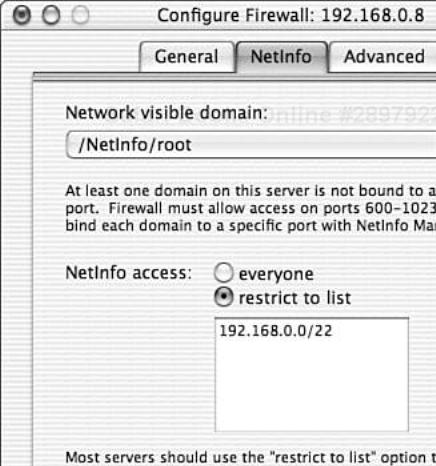
Under the NetInfo tab, the firewall service can be configured to allow only certain IP addresses to connect to the NetInfo process running on your server. By default all IP addresses are allowed access to NetInfo. Also by default, the NetInfo process listens on a random UDP port between 600 and 1023. This means the firewall must allow access to all ports between 600 and 1023 for the machines trusted to make NetInfo requests. By using NetInfo Manager, each domain can be bound to a specific UDP port. This allows the firewall to be much more restrictive in its access to NetInfo. If you must have network visible NetInfo domains, lock down the domains to specific ports and then filter on IP address for each domain. Figure 8.6 shows the NetInfo tab in the Configure Firewall pane.
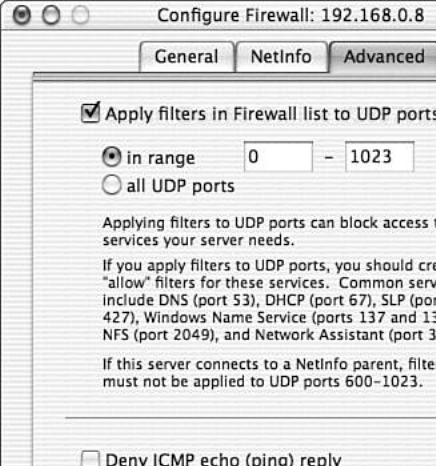
Under the Advanced tab, the firewall can be configured to control UDP traffic. By default, all UDP traffic is allowed through the firewall. After filtering is turned on, the selected UDP ports are blocked. Unfortunately, UDP connections are stateless. This means the firewall cannot differentiate between a new inbound connection and a reply packet in an existing UDP stream. Blocking all UDP ports breaks any UDP traffic. By only blocking ports above 1024, you are effectively allowing inbound connections to UDP services. Ports that are open below port number 1024 must be controlled by a process running as a privileged user, for example a server. Conversely, by blocking access to the low numbered UDP ports, the firewall is attempting to control access to UDP server running locally while allowing outbound communication on UDP. If you choose to block UDP ports, you must configure specific allow rules for any services within that range.
This tab also controls the configuration of ICMP reply messages. ICMP replies are commonly associated with the ping utility. When a client pings the server, an ICMP reply is issued by the server to inform the client the server is up. By blocking ICMP reply packets, clients cannot ping the server to determine reachability. Although this tactic may fool an unsophisticated attacker, it also makes troubleshooting difficult. Finally, this tab presents an option to control how the firewall handles IGMP messages. IGMP is used in environments where multicast applications are present. Generally you will know if you need to allow IGMP. Figure 8.7 shows the Advanced configuration tab in the Configure Firewall pane.
After the general properties of the firewall have been set up, the specific rules for your services need to be created. In the Server Settings Network tab, click Firewall Service, and select Show Firewall List.
By default the firewall denies all traffic. Any services that need to be accessed from the network need to have rules added to the firewall list. Clicking the New button creates a new rule and provides you with a window to configure it. For each service offered on the network, add a rule allowing access from required IP addresses. Figure 8.8 shows a rule that allows Apple File Sharing access from the 10.1.0.0/24 network.

After adding all rules, start the firewall by clicking the Firewall Service in Server Settings and select Start Firewall. Carefully verify that services on the server are accessible in a manner you expect. If there are problems, it is advisable to temporarily turn on logging of denied packets. Information about traffic that is dropped by the firewall is written to /var/log/system.log. After you have properly tuned your firewall, set the logging option to its original value.
The graphical firewall configuration utility for Mac OS X Server and Client may be adequate for your needs. However, if you want more advanced capabilities or need to understand exactly what the firewall is doing, you can use the ipfw utility in Terminal to configure and view the firewall settings.
One of the most useful aspects of ipfw is the capability to show the current firewall ruleset and determine how often any given rule is being exercised. Here is example output from ipfw show:
bash-2.05a$ sudo     ipfw    show
00010     516        65224    allow ip from any to any via lo*
00030       0            0    deny log ip from 224.0.0.0/3 to any in
00040       0            0    deny log tcp from any to 224.0.0.0/3 in
00100       0            0    allow tcp from any to any 548 in
00100       0            0    allow udp from any to any 548 in
21433       3          196    allow tcp from any to any 22 in
21433       0            0    allow udp from any to any 22 in
65000       0            0    unreach net log tcp from any to any in setup
65000       1           77    unreach net log udp from any to any 0-1023 in
65535    2100        334718   allow ip from any to any
The first column is the rule number, the second is the number of packets that have matched the rule, and the third column is the number of bytes that have matched the rule. This ruleset was created by adding SSH and AFP to the Firewall List in the OS X GUI configuration. Note that the GUI configuration adds both TCP and UDP allow rules for services. This may or may not be acceptable to you.
Rules can be dynamically added to the firewall ruleset by using ipfw. This manual mechanism for modifying the firewall ruleset provides for functionality above and beyond the GUI, including the capability to filter on source address and port, as well as destination address. For example, if you want to add a rule after the ssh rule to allow access to a local Internet Relay Chat server on port 6667 from any host on the 10/8 network, issue the following command:
bash-2.05a$ sudo ipfw add 21440 allow tcp from 10.0.0.0/8 to any 6667 in
This rule is active only until the firewall service is restarted. If this rule is to be made permanent, add it via the GUI. To delete the rule, use the following command:
bash-2.05a$ sudo ipfw delete 21440
The ipfw man page contains information on all the features in the firewall. If you need more features than the GUI offers, create a shell script with the required firewall rules in it. Then run the shell script at boot time to cause the firewall to load automatically. See “Static ARP,” later in this chapter for an example of how to run a script automatically at boot time.
There are firewall options in the kernel that can be controlled by the sysctl utility. Table 8.1 shows some of the more important options and what they control. All options are in the net.inet.ip.fw branch. Configure them as required for your server. Generally, these do not need to be changed from their default values.
If you find the GUI supplied by Apple does not suit your needs and the command line interface to ipfw too clunky, there are other options. There are several shareware programs that provide alternative GUIs to that of Apple’s. Brian Hill’s BrickHouse utility is an excellent replacement for the stock Apple interface. BrickHouse is shareware and can be found at http://personalpages.tds.net/~brian_hill/brickhouse.html. Similarly, FirewalkX also presents an alternative method for configuring ipfw. FirewalkX is shareware and available from http://www.pliris-soft.com/.
Some companies, such as Network Associates, provide complete replacement firewalls for Mac OS X. ipfw does not yet make an effective stateful firewall. Commercial firewalls typically address weaknesses or missing features in ipfw. However, they may cost $50.00 (USD) or more per installation. For many, the built-in capability of ipfw is enough protection.
A Virtual Private Network (VPN) means different things to different people. There are also many reasons people will deploy VPNs. In general, a VPN is a mechanism for connecting a remote host or network to another in a secure and authenticated manner. Data within a VPN is generally encrypted (hence “private”). Also the connection between the two entities in a VPN connection is usually transparent, even if the networks are really on other sides of the planet (hence “virtual”).
There are many different types of VPN technologies. Mac OS X has the capability to handle two of the major protocols used in VPNs: IPSec and PPTP. However, the graphical tools used to configure these protocols are limited (if they exist at all). To make full use of IPSec you will have to use command line utilities and a little elbow grease.
IPSec is a powerful protocol. It has been through rigorous analysis and has proven itself through years of use. However, it is incredibly complicated and can frustrate even the most sophisticated security professional. Books have been written that discuss nothing but IPSec VPNs. This section is designed to get your feet wet with IPSec and show an example configuration. If you require information above and beyond what is presented here, see http://vpn.shmoo.com/ for more IPSec resources.
To properly set up even a simple IPSec connection you should understand what makes IPSec tick. IPSec is made up of two protocols: Encapsulated Security Payload (ESP) and Authenticated Header (AH). ESP provides confidentiality of data by encrypting it. AH, on the other hand, provides authentication and integrity of data on a per-packet basis. ESP and AH can be used independently or in combination, depending on your requirements.
IPSec can provide for tunneled or transparent connections between endpoints. Tunneled IPSec encapsulates an entire IP packet in another IP packet. This allows for a remote endpoint to act as a gateway to an entire protected network. For instance, tunneled connections are utilized when accessing an office network when you are traveling. A transparent connection merely protects the data in the packet and replaces the header information. Transparent mode connections cannot connect whole networks, only host to host communication.
When two IPSec hosts need to communicate, the first must form a security association (SA). An SA is a unidirectional relationship between IPSec hosts specifying various cryptographic information. Because an SA is unidirectional, at least two SAs must be present for a bidirectional conversation between hosts—one for outgoing communication and one for incoming.
A Security Policy Database (SPD) is a database of SAs and topology information. This effectively tells the host what traffic to encrypt, how to encrypt, and where to send it.
The Internet Key Exchange protocol (IKE) was created to facilitate the creation of SAs between hosts. Setting up SAs between hosts is time consuming. IKE allows for many hosts to be set up automatically. Under Mac OS X, the racoon utility handles IKE negotiations. After racoon has established SAs, the setkey utility is used to create SPD entries. racoon and setkey are terminal programs and have decent man pages.
racoon stores files in /etc/racoon. The following is an example racoon.conf used to talk to an IPSec gateway in tunneling mode. This example configuration is a minimum functional configuration for racoon to function. The file is broken into two parts. The first part, remote, specifies information about the IPSec gateway to which you connect. The second part, sainfo, controls how security associations are handled by racoon. Although this file looks complex, it is very effective for OS X to OS X IPSec connections. If you need to interoperate with other IPSec implementations, such as Checkpoint’s VPN-1 or FreeS/WAN under Linux, consult the racoon man page and the documentation for the VPN endpoint for configuration options.
path include "/etc/racoon" ;
path pre_shared_key "/etc/racoon/psk.txt" ;
# "log" specifies logging level. It is followed by either "notify", "debug"
# or "debug2".
log debug;

# anonymous here means use these settings for all connections
# an IP address can be specified for specific gateways
remote anonymous
{
         exchange_mode aggressive,main;
         my_identifier user_fqdn "[email protected]";
         nonce_size 16;
         lifetime time 1 hour;     # sec,min,hour
         initial_contact on;
         proposal_check obey;    # obey, strict or claim
         proposal {
                  encryption_algorithm 3des;
                  hash_algorithm sha1;
                  authentication_method pre_shared_key ;
                  dh_group 2 ;
         }
}
# again anonymous can be replaces with particular SA endpoint info
sainfo anonymous
{
         pfs_group 1;
         lifetime time 3600 sec;
         encryption_algorithm 3des ;
         authentication_algorithm hmac_sha1;
         compression_algorithm deflate ;
}
Run racoon at boot time. See “Static ARP,” later in this chapter for an example on how to execute programs automatically when a machine boots.
The racoon.conf file references /etc/racoon/psk.txt. psk.txt should contain the shared secrets a user will use to make an IPSec connection. The file is simply a listing of email addresses and passwords. Because the passwords are not hashed, the file must be read-only by root to ensure passwords are not compromised. For example, the user in the preceding example may have the following entry in psk.txt:
[email protected] secret
racoon provides for mechanisms other than email address for identifying users in psk.txt. For example, rather than specifying an identifier of user_fqdn in racoon.conf, you can use the address identifier. By using address, the psk.txt file will contain IP address and password pairs. For example, a gateway at 10.0.2.3 may have the following entry in psk.txt:
10.0.2.3 secret
Launch racoon by executing the following:
racoon -f /etc/racoon/racoon.conf
Finally, security policies need to be added to the SPD. The easiest way to accomplish this is to create a file, /etc/racoon/ipsec.spd containing commands that will be fed to setkey. The example shown here is for a client IPSec machine. If you are running an IPSec gateway, your file will contain information for each client connecting. For this example, the client is at 192.168.0.100, the IPSec gateway is at 192.168.0.1, and all traffic is to be routed through the gateway. This is a typical setup for using IPSec on a wireless network:
spdadd 192.168.0.100/32 0.0.0.0/8 any --P out ipsec esp/tunnel/192.168.0.100-192.168.0.1/require ; spdadd 0.0.0.0/8 192.168.0.100/32 any --P in ipsec esp/tunnel/192.168.0.1-192.168.0.100
To load the security policy, use setkey in the following manner:
setkey -f /etc/racoon/ipsec.spd
At this point, you should be able to access the Internet through your IPSec gateway. If there are any problems, examine /var/log/system.log for errors.
PPTP support under Mac OS X is more integrated into the GUI configuration utilities. Depending on your situation, it may be a more viable VPN option than IPSec. Microsoft operating systems historically have robust PPTP support, but little to no native IPSec support.
PPTP is an extension of PPP. It is a much simpler VPN protocol than IPSec. PPTP runs on top of a standard TCP connection on port 1723. The packet destined for the remote location is encapsulated in PPP. The PPP payload in turn is encapsulated in a Generic Router Encapsulation (GRE) tunnel and sent to the PPTP gateway. Unlike IPSec, there are not alternate ciphers to use or different encapsulation mechanisms. PPTP is a relatively inflexible protocol, but because of the ease of use on Windows platforms and the simple configuration, it is the VPN of choice for many.
To configure a PPTP client in Mac OS X, use the Internet Connect utility. From the File menu, select New VPN Connection Window. Enter the name or IP address of the remote server, your username, and password for the PPTP connection. Figure 8.9 shows an example VPN Connection window. Click Connect, and all your traffic will now go through the PPTP connection. If the process fails, check the error logs on the PPTP server side.

Mac OS X server has a PPTP server, vpnd, built into the operating system. Apple has not advertised the existence of vpnd. There is a man page for the service, but there is no mention of it in the Mac OS X Server Admin Guide.
However, vpnd is a viable PPTP server. It can be set up quickly, and it easily integrates with Mac OS X Client machines. The man page is informative for setup, and it will likely be expanded in future releases of Mac OS X.
When clients connect to a vpnd server, the server assigns the clients IP addresses on the local subnet. This is basically a NAT for the tunneled client connections. These local IP addresses are where the rest of the network thinks the clients reside. In order to set up vpnd, you will need enough local IP addresses to handle your anticipated client base. Enter these IP addresses one at a time in /etc/ppp/pptp_addresses.
bash-2.05a$ sudo cat /etc/ppp/pptp_addresses
# Example pptp_addresses file
192.168.0.4
192.168.0.5
192.168.0.6
vpnd does not use NetInfo for authentication. A separate file, /etc/ppp/chap-secrets, must be created to store the authentication credentials for vpnd. Each entry in chap-secrets is made up of a username, the server name, the user’s password, and the IP address associated with the user. If you do not wish to specify an IP address for each user, a * indicates that vpnd should use the first available IP address from those listed in pptp_addresses. Because the user’s password is stored in the clear, this file should be readable only by root. Here is an example entry for a user, bob, in chap-secrets:
bob 192.168.0.1 secretpass *
Comment out the word nodetach from /etc/ppp/pptp_service. The entry of this word into the pptp_service file seems to be a bug that Apple will likely fix in a future release. Add the following lines to /etc/hostconfig to ensure the VPN service starts after rebooting:
VPNSERVER=YES
VPN_ARGS=""
Start vpnd manually with SystemStarter start VPNService. Test the service by connecting with a remote PPTP client. If there are any problems, vpnd logs to /var/log/system.log.
That is it. PPTP is much more straightforward to configure than IPSec, but the underlying architecture of PPTP is not as secure, scalable, or robust as IPSec. However, for a quick-and-dirty VPN solution, it works well.
Easy, fast wireless networking is a major selling point with Apple’s product line. Wireless networking capability is provided through Apple’s AirPort product line, which has been designed from the ground up to fully integrate into the complete Apple image. This push for wireless networking has helped propel Apple users to the forefront of the wireless networking movement.
The original AirPort products were designed to conform to the IEEE 802.11b standard. AirPort cards and access points operate at speeds up to 11 megabits per second. The AirPort Extreme equipment uses the 802.11g standard, which is backward compatible with 802.11b. AirPort Extreme gear will work up to 54 megabits per second. Regardless of which version of AirPort equipment is used, the security mechanisms are the same.
Wired Equivalent Privacy (WEP) provides encryption and authentication for wireless connections. WEP uses a shared cryptographic key between a wireless access point and wireless station (such as a laptop with an AirPort card). The WEP key must be the same on the access point and stations for the station to properly associate to the access point.
WEP keys are either 64- or 128-bits long. Generally longer keys are much more secure than shorter ones. However, due to problems with the architecture of WEP, 128-bit keys are not as secure as they should be. Still, if your wireless equipment supports it, use 128-bit encryption.
Your WEP key may be provided in ASCII characters or hexadecimal digits. ASCII keys are 5 characters long for 64-bit encryption or 13 characters for 128-bit encryption. If you are using hexadecimal, then a 64-bit key will be 10-digits long and a 128-bit key will be 26-digits long.
WEP is configured under the AirPort tab of the Network Preferences pane for your AirPort card. ASCII WEP keys should be entered in quotes (for example, “secrt”). Hexadecimal keys need to have a dollar sign prepended to the key (for example, $123456780a). Figure 8.10 shows a 64-bit hex key supplied for this network.

LEAP is a Cisco proprietary authentication protocol common on wireless networks. To use LEAP you need to use an access point that understands LEAP and provide a back-end authentication server. AirPort Access Point does not support LEAP natively and setting up a LEAP-enabled infrastructure is outside the scope of this book.
If your network uses LEAP, enter your LEAP username and password in the location where you would normally enter your WEP key. Your LEAP username and password should be separated by a slash and the entire string must be surrounded by angle brackets.
In any LAN situation, there is a danger of an attacker performing man-in-the-middle attacks against your traffic. In a wireless LAN, man-in-the-middle attacks are even more likely given the complete lack of control over physical access to the transmission medium. An attacker is likely to use an ARP spoofing attack to gain the ability to perform man-in-the-middle attacks.
To combat ARP spoofing attacks, you should statically encode ARP entries for hosts you are likely to communicate with on your local network. The most important host you should statically encode is your local gateway. All traffic to the greater Internet goes through your gateway, so it is an ideal target for an attacker to perform a man-in-the-middle attack.
Using the arp utility in the BSD subsystem, ARP entries can be statically added to the ARP table to prevent ARP spoofing attacks. Assuming your gateway is 192.168.0.1 with a MAC address of 11:22:33:aa:bb:cc, add a static ARP entry by executing the following in a Terminal window. You can also use arp to verify the arp table.
bash-2.05a$ sudo arp -s 192.168.0.1 11:22:33:aa:bb:cc
bash-2.05a$ arp -an
? (192.168.0.1) at 11:22:33:aa:bb:cc permanent
The arp man page has a complete description of the functionality offered by the arp utility.
To avoid spoofing problems at boot time, the arp entries should be added at boot time. Create a StaticArp directory in /Library/StartupItems and add the following files:
          StartupParamters.plist

{
   Description      =   "Static ARP Entries";
   Provides         =   ("Static ARP entries");
   OrderPreference  =   "First";
   Messages =
   {
     start = "Adding Static ARP Entries";
     stop = "Clearing Static ARP Entries";
   };
}

         StaticArp

#!/bin/sh
# Script to add static ARP entries
StartService ()
{
   # add all static arp entries here
   /usr/sbin/arp -s 192.168.0.1 11:22:33:aa:bb:cc
}
StopService ()
{

     # delete static arp entries
     /usr/sbin/arp -d 192.168.0.1
}

RestartService ()
{
     StopService
     StartService
}
RunService "$1"
StaticArp is a shell script that will be interpreted by the sh shell. For more information on shell scripts, see the sh man page or http://steve-parker.org/sh/sh.html.
Now, every time the host boots, the ARP entries for the gateway will be loaded to the ARP table.
Mac OS X 10.2 has the capability to act as a wireless base station. This enables you to create a wireless network when you do not have a hardware access point. This feature is referred to as a Software Base Station.
When creating a Software Base Station, you should enable WEP encryption. The Software Base Station allows both 40-bit and 128-bit encryption. Again, you can enter the key material in ASCII or in hexadecimal. Ideally, use a 128-bit hexadecimal key to make the best use of your key material. Figure 8.11 shows how to add WEP encryption to your Software Base Station. To bring up this window, click on the AirPort icon in the menu bar and select Create Network.

Defending against viruses is a fact of life on Windows machines. Virus writers have spent a great deal of time attacking the Intel/Microsoft platform. Viruses vary in type and effect on WinTel machines. Some viruses are destructive in nature and will destroy the operating system. Others are more benign and their effects go unnoticed. Regardless of their outcome, a huge antivirus industry has cropped up to defend WinTel hosts from infestation.
UNIX operating systems historically have not been susceptible to virus attacks. They have a much more rigid access control mechanism that prevents a user process from destroying the operating system in the same way Windows viruses can. Through the use of user accounts that operate with less privilege than the core operating system, malicious code running with user rights only affects data owned by the user. Further, virus writers have not devoted the amount of time to UNIX systems that they have to Windows hosts. UNIX hosts have been in the crosshairs of the hacker community for years. However, the hacker community has generally not employed viruses in its bag of tricks against UNIX systems because they are not likely to succeed.
These two factors make discussing antivirus on Mac OS X an odd situation. As security professionals, we would be remiss not to warn you of viruses and their potential for destruction. On the other hand, a little common sense and a few best practices will do more to prevent viruses on Mac OS X than an antivirus program will.
Viruses generally cannot infest a machine on their own. They need to be activated by performing some action or opening a document. By taking a few precautions with your daily computing, you can avoid the typical pitfalls that activate viruses.
Some document types, notably Microsoft Word, can have macros embedded directly into documents. When a document is opened, the macros run and add dynamic logic and activities to the document. However, the language that makes these macros possible also enables virus writers to access parts of your system, such as your address book, email client, and other documents you own.
Do not open any unknown document that may contain a macro. Regardless of how you received the document, if you do not recognize it, don’t open it. Also, for programs that allow document types with embedded macros, turn on macro warning dialogs. Figure 8.12 shows Microsoft Word’s Preference pane with Macro Virus Protection turned on. With this option enabled, a user will be prompted whenever a document with a macro is opened.

Many popular email clients have a preview pane that displays email in a frame in the mail client’s window. Although this option is convenient for viewing mail quickly, it also executes any HTML that is present in the email and in some circumstances may actually automatically open attachments.
This execution is exactly what allows viruses to spread. To keep malicious code in email messages from automatically launching, you should disable the preview pane in your email client. This way you can delete emails with attachments without having to open them. As a rule of thumb, if you receive an email with an attachment from a person you do not know, your best bet is to simply delete it. Similarly, if you are contacting someone for the first time, do not include attachments. Mail.app allows you to disable its preview pane by double-clicking the bar that divides the index listing from the preview pane.
You also should prohibit the mail client from displaying images and embedded objects in emails after they are opened. This way even when you do open an email, malicious embedded objects will not execute. This is configured in the Viewing section of the Mail.app Preferences window (see Figure 8.13).

Another way viruses end up on a host is via writeable network shares. Unless absolutely necessary, do not allow write access to shared data. This may seem like common sense, but far too often someone will “temporarily” create a share and never go back to shut it off. This share is then a vector for a network-based virus to attack your system.
Unfortunately, being diligent will not always protect you from virus infections. Either through a new propogation method or simply letting you guard down, it is likely a virus will eventually find a way to your system. By using antivirus software, you can protect yourself from the virii that make it past your primary defenses. Luckily, the Mac OS X antivirus space is competitive and the quality of the products that exist in the market are generally quite high. At the time of this writing, both Symantec (http://www.symantec.com) and Network Associates (http://www.nai.com) offer antivirus software compatible with Mac OS X 10.2. These companies are leaders in the antivirus field and their products will likely meet your expectations.
Securing your Mac OS X hosts from network attacks requires a broad approach. Firewalls, encryption, and antivirus software provide means for protecting your host and auditing the traffic hitting it. By being diligent and adhering to the principle of least privilege in your network communications, network-based attacks will be much less likely to succeed.