
“If you reveal your secrets to the wind you should not blame the wind for revealing them to the trees.” | ||
| --Kahlil Gibran | ||
This chapter is about general application security. An application’s security features (if any) are often ignored, not understood, or not used properly. Sometimes, users do not even know that certain actions are risky, let alone why. Experienced users may not understand how security features work, or how to use them effectively. General application security is not just for administrators and computer security professionals. The average Mac OS X users can take steps to secure important information and protect their privacy.
This chapter discusses ways to ensure better security while engaged in the most common of user activities. This includes a few web browsers common to Mac OS X, including Safari, OmniWeb, and Internet Explorer. We will also discuss the many issues of email security with the use of Mail.app. Let’s start by discussing the service that is the keystone of the security of many Mac OS X applications: the keychain.
Before we dive into some specific security issues with the previously mentioned applications, it makes sense to provide some background into what we mean by the term “application security.”
First, you must realize that the risks surrounding the use of an application can vary in origin. The underlying design or behavior of the application can pose a threat to the security of the user and possibly the system. A lot of software today still suffers from bad design, careless programming, and an ignorance of required security considerations. Users cannot (realistically) audit each and every stage in the execution of all run applications; this would not be practical. Thus, the use of any application involves some degree of trust. Fortunately, more and more software is being scrutinized and audited as a result of an increasing awareness and concern over computer security. Not only that, the findings of such audits are also being given deserved attention. Security patches and updates to software are not uncommon. It is important to stay current with software security advisories and apply updates to software when necessary. Appendix C, “Further Reading,” lists many online references for staying current with software security advisories. Another helpful tool for staying current with security updates on Mac OS X is the built-in software update application discussed in Chapter 3, “Mac OS X Client General Security Practices.” Besides system updates, Software Update.app also provides updates to certain applications. For example, at the time of this writing Software Update has passed down three security-related patches specifically for Internet Explorer since the initial release of Mac OS X.
Misuse of an application as a result of ignorance on behalf of the user also can be an issue. It is not uncommon for users to be a threat to themselves by not understanding the consequences of their interactions with an application. This includes not understanding aspects of the technologies being used. A good example of this is the assumption that any use of SSL automatically secures the use of a web browser. Users may not understand how sensitive data is stored by an application, where that data is stored, or what constitutes secure storage. We will discuss such issues in more detail when we deal with web browser and email security later in this chapter.
Yet another aspect of application security has to do with intentional abuse or misuse. Good software does not only behave according to expectations, it prevents undesired functionality and takes measures to reduce side effects that can be abused or considered a threat to the security of the user or the system.
Secondly, it is important to understand what your risks are. Risks will vary depending on the type of application being used. For example, privacy is often an issue with web browsers, as is theft of important information such as credit card numbers. Other common risks include identity theft, denial of service, or hijacking of various login credentials or passwords. The degree of risk will vary depending on the sensitivity of the information involved.
Here are some general questions you might ask yourself when considering the security of an application:
Is there any authentication involved?
If so, consider what the consequences are if the credentials are compromised. Often mail server passwords are the same as a shell account, which could mean access to web pages and other private information.
How is any network-based authentication process protected from eavesdropping or tampering?
Applications such as web browsers and mail clients often can be made to use SSL, but usually they do not by default. A web page may require HTTP authentication, but does it use SSL to protect that authentication process? Also, an application is not automatically secured by the use of SSL. The SSL protocol can be used for authentication, integrity, and encryption, but all this effort is of no use if you do not make sure you are properly authenticating a remote host and that the intended recipient is the only one capable of decrypting the exchanged data.
What does this application do with my password?
Even if a password is not thrown onto a network, the application may be guilty of being careless with it. Some applications take care to remove passwords from memory as soon as they are no longer needed; some do not. Still others take steps to prevent sensitive data, such as passwords, from being written to disk by the virtual memory management system.
How is confidential or sensitive data stored, and where?
Some applications offer to permanently remember passwords or other private information. Consider what steps are taken to keep that information from getting into the hands of other users; in some cases there are none. We have even seen security applications that allow passwords to be stored in the clear without informing the user. In that case, you might as well write those passwords on sticky notes and pin them all over your monitor.
Does the application require administrative privileges?
If so, consider what the application does, what resources it has access to, and what the worst-case scenario is if the application goes berserk. Administrators should be wary of running unfamiliar applications that require super-user privileges. The integrity of the system is at the mercy of such applications. As an administrator, if you do not know what an application does, find out.
Mac OS X supports what are known as keychains, a secure store for certificates, passwords, or any small bits of information to be kept private (known as secure “notes”). The primary purpose of a keychain is to facilitate the management of passwords for various applications and accounts such as mail and ftp servers, web sites, or encrypted disk images. The basic idea is that a single password, the keychain password, is used to unlock access to all passwords stored in that keychain. Whenever you use an application that is keychain-aware, that application can store and retrieve any needed password(s). Users can have multiple distinct keychains, but every user starts out with a single keychain, considered that user’s default keychain. The name and password for this default keychain is the same as the user’s login name and password. This allows for that keychain to be automatically unlocked upon login.
The keychain service found on Mac OS X is significant for two major reasons. First, it uses strong cryptography. Over time, many applications have provided the capability to store passwords but have failed to do so in a way that can be trusted or considered safe from compromise. Second, the storage and retrieval of all passwords is handled by a single service, not individual applications. After you have decided to trust this service, any time you are asked to store a password you don’t have to worry about the means by which it is protected. What you do need to be careful of, though, is what applications you allow to make use of your keychain(s). When you unlock a keychain and allow an application to access a password, you open the door for that application to slip up and compromise the security of that password (more on this later). Although the keychain provides strong secure storage for passwords, any application can make use of the keychain API. Thus, be mindful of the applications for which you grant access to your keychain(s).
In this section we will discuss keychain management and configuration with Keychain Access.app and discuss some general security considerations regarding the use of keychains on Mac OS X.
Figure 5.1 shows the Keychain Access application (/Applications/ Utilities/Keychain Access.app) used to configure keychains. Keychain files are stored in each user’s ~/Library/Keychains directory—one file for each keychain. Initially, there is a single keychain known as the default keychain. New keychain files can be created by selecting File, New, New Keychain. To show all the keychains, select View, Show Keychains or use the Keychains icon on the far right of the toolbar. The toolbar of the Keychain Access application allows for the creation of new keychain items, including passwords and notes. The lock button on the toolbar can be used to lock or unlock the currently selected keychain.

The initial settings for the default keychain leave some room for improvement.
First, we recommend turning on the keychain menu bar icon. This icon allows you to quickly see if any of your keychains are unlocked. The locked icon means all keychains are locked, whereas the unlocked icon means at least one keychain is unlocked. The pull-down menu for this icon also allows for the locking and unlocking of each keychain, including an option to lock all keychains. Another nifty feature of this icon’s menu is the capability to lock your screen if you have a password-protected screensaver setup. But be careful, this will only lock your screen if you have your screensaver configured to prompt for a password, otherwise it simply starts the screen-saver. To enable the keychain icon in the menu bar, choose the Show Status in Menu Bar option from the View menu of the Keychain Access application.
Second, we recommend some adjustments to the settings for the default keychain. With your default keychain selected, from the Edit menu, choose the Settings option. This brings up the Settings dialog similar to that shown in Figure 5.2.

At the very least, be sure the Lock When Sleeping option is checked. Although it can be cumbersome to re-authenticate on waking up the machine, it means anyone else who has access to it in that state will also have to supply a password. Next, specify a reasonable idle timeout value for the keychain. After a certain number of minutes without use, the keychain will automatically become locked. This is a good idea in case you find yourself away from your machine for an extended period of time. Finally, if you do not want your default keychain to be unlocked automatically after logging in, change the password for that keychain. When logging in, you can then easily unlock the keychain through the menu bar icon or wait for an application to request a password stored in that keychain.
Besides passwords, the keychain also can be used to secure small amounts of important data, such as a PIN number or a password list. To create a secure note, choose the Note icon from the toolbar. Enter a name for the item and the text for the note as shown in Figure 5.3. Notes like this are useful, but we recommend creating a new keychain for items like this, as opposed to storing them in your default keychain. Keep that keychain locked and unlock it only when you need access to the items.

Keychains can contain passwords and passphrases for web sites, mail servers, encrypted disk images, and many different third-party applications. Each item in your keychain can be configured differently to allow access only to certain applications. For example, there is probably no good reason for applications other than your email program to have access to your mail server password. This can all be configured through Keychain Access.app.
The bottom half of the Keychain Access window contains a tabbed view pane for configuring attributes and settings related to access control for each keychain item. The Attributes pane (see Figure 5.4) consists of metadata about the item, including the name, description, username, and URL associated with the keychain item. The Show passphrase check box allows you to view the passphrase for that item. Showing the password for an item requires you to enter the keychain password unless access is always allowed as described in the next section.

The Access Control tab (see Figure 5.5) is where all the access control settings for the selected keychain items are configured.

The Always Allow Access to This Item option still requires the keychain to be unlocked, but allows applications to access the passphrase without prompting the user. There are very few cases, if any, where this option is a good idea. One such example is for messaging or chat clients that have little risk attached to them.
The Confirm before Allowing Access option always prompts the user for permission before releasing a passphrase (unless that application is in the always-allowed list described here later). If the Ask for Keychain password box is checked, not only is the user informed upon each access request, but the user is also required to enter the keychain password before the passphrase is released.
Underneath the access options is a list of applications that are always authorized to retrieve the passphrase from the keychain. That is, any application found in this list has access to the passphrase without having to inform the user or ask for approval (provided the keychain is unlocked). When applications add passwords to the keychain they sometimes add themselves to this list. If you have a passphrase you want to keep tight tabs on, it is a good idea to keep this list empty so that you are aware of every request for that passphrase.
Many applications can store passwords in the keychain; sometimes this is the only interaction users ever have with their keychain. Depending on how the access control for a passphrase is configured, you may see a dialog similar to the one shown in Figure 5.6. A passphrase that requires confirmation with each access is presented with three options: Deny, Allow Once, or Always Allow.
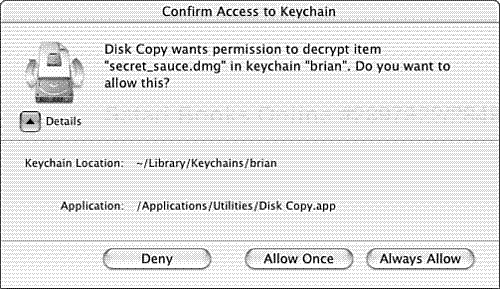
To Deny access means that the user must then specify the passphrase for the application and the keychain is ignored.
To Allow Once grants the requesting application access to the password. Subsequent requests display this same dialog.
To Always Allow changes the configuration for this keychain item by adding the requesting application to the always-allow list.
This dialog also may request the keychain’s password if the Ask for Keychain password option is set. It is a good idea to show the details on this dialog to verify the application path of the application that is requesting access to the passphrase; by default these details are hidden.
Generally, yes. The main password used to unlock a keychain is not stored on disk, and is never available to any other application, ever.
However, if there is any part of the keychain that warrants concern it is the handing off of passwords to other applications. After an application takes possession of a passphrase the keychain no longer has any control over the security of that passphrase. An application can compromise the security provided by the keychain by storing the passphrase unencrypted on disk, sending it across a network in the clear, or allowing it to be paged to disk by the virtual memory manager. Obviously, there is a need for trust on behalf of the applications that make use of any keychain(s).
As a user, don’t assume that because an application makes use of a keychain that any involved passwords are automatically safe. Also, periodically audit the access lists of each item in your keychain file to be sure that only the necessary applications are allowed access.
There are many facets of security involved with the practice of sending and receiving email. First, you need to consider the communications between the client application and the mail server. Allowing the authentication process to be conducted without strong encryption can result in a variety of evils, including the compromise of mail account credentials, tampering with the contents of mail messages, or invasions of privacy. Email can be encrypted so that only the recipient can decrypt it. It can be digitally signed to determine the authenticity of mail content.
This section covers using SSL or SSH with Mail.app to secure communications to a mail server. We will discuss methods to secure how Mail.app stores mail data with Mac OS X’s built-in support for encrypted disk images. Finally, tools such as PGP and GnuPG can be used to provide powerful longstanding security to email messages.
Mail.app has built-in support for both the secure sending and receiving of email using SSL. This provides for the confidentiality of any exchanged information to the mail server, including any sent or received email messages. However, we would like to point out that this confidentiality is only between Mail.app and your mail server; additional measures must be taken to ensure confidentiality between the sender and receiver of any email transaction. This will be covered later in this chapter when we discuss the use of GnuPG and PGP.
Two benefits of SSL are authentication and confidentiality. Mail.app can be made to use the SSL protocol; however, it does not perform any certificate validation. The mail server’s SSL certificate can be changed or not signed by a trusted root and Mail.app will still silently trust and use it. The bottom line is that Mail.app does not perform any real authentication of the remote host. This is not to say that using SSL with Mail.app is worthless. It is not. Using SSL still provides a reasonable amount of security and is certainly better than talking to the mail server in the clear. If you are ultra-paranoid about this issue, we recommend using SSH port forwarding described in the next section.
Setting up Mail.app to use SSL is a quick and simple process. The underlying issue is whether your mail server supports the use of SSL, and if so, for which mail services. If you receive your mail via IMAP or POP, that server must support SSL connections. Likewise, any SMTP server used to send mail must support SSL connections.
To set up Mail.app to use SSL when sending mail, do the following:
Locate the SMTP configuration dialog. First, choose the Preferences option from the Mail menu. From the Accounts pane, select your account and choose the Edit button. Next, locate the Outgoing Mail Server section at the bottom of the Account Information tab. Be sure your SMTP server is selected and click the Options button. This brings up the SMTP Server Options dialog shown in Figure 5.7.
To enable SSL, be sure the Use Secure Sockets Layer (SSL) check box is checked. Set the port correctly if your secure SMTP port is different from the default.
To set up
Mail.appto use SSL when receiving mail, navigate to the Advanced tab of your account settings (see Figure 5.8). Near the bottom of the dialog be sure the Use SSL check box is checked. Set the port correctly if your server port is different than the default.


If SSL is not an option, SSH can be used to secure connections to your mail server (provided the mail server supports SSH logins). The basic idea is that a SSH tunnel is established to your mail server and local ports are forwarded through the tunnel to the appropriate ports on the mail server. Instead of having Mail.app connect to the remote mail server, it connects to designated ports on the local machine. The downfall to this approach is that it requires some additional setup measures. The benefit is that it provides authentication for the remote host, something not provided with the SSL feature described in the previous section.
First, set up the SSH tunnel to the remote mail host. For example, to secure SMTP and a POP account on the host
example.com, make a SSH connection on the command line as follows:ssh example.com -L2020:example.com:25 -L2021:example.com:110
This forwards the local port 2020 to the SMTP port on
example.com. Likewise, the local port 2021 is forwarded to the POP server port onexample.com. You will need to replaceexample.comwith the hostname for your mail server and your choice of local ports. The local port numbers are arbitrary, as long as they are not being used and are not privileged ports; only root can forward privileged ports (ports less than 1024). The concept is the same if you use IMAP, differing only by the value used for the remote port (usually 143).The first time you connect to a host using SSH, it will present the remote host’s public key and allow you to trust this key or not. We recommend verifying the public key over a different trusted path before accepting the initially offered key. This is because SSH saves that key locally (in the file
~/.ssh/known_hosts) and checks against it with every subsequent connection to that host. If the host changes its key, or if the verification of the remote key fails for any reason, SSH will (by default) fail to connect and print a harsh warning message. If you encounter such a message do not connect to the mail server until you find out why the key verification failed. Once again, the use of SSH in this manner is good because it not only encrypts all the traffic, but it provides an acceptable way to ensure that you are talking to the intended mail server and encrypting the data such that only that host is able to decrypt it.Setting up this SSH connection each time you log in can be cumbersome. There are ways to make this process easier, such as creating a shell script that is executed each time you log in. There are also different methods of SSH authentication that can be used. That being the case, we will leave any efforts to automate the setup of the SSH tunnel as an exercise for the reader.
Now that the SSH tunnel has been established,
Mail.appneeds to be configured to make use of it. First, open your mail account settings dialog; locate the Incoming Mail Server field under the Account Information tab. Enterlocalhostfollowed by a colon and the local port specified when the SSH tunnel was setup. Following this example, you would enter:localhost:2021
Next, locate the Outgoing Mail Server section at the bottom of the dialog, select your SMTP server, and then click Options to bring up the SMTP Server Options dialog. Change the hostname to
localhostand enter the local port specified when the SSH tunnel was setup (see Figure 5.9).

For users that read their mail via POP, Mail.app can be configured such that all mail is deleted from the server immediately after it has been retrieved. This might be an issue in the case where the mail server is not trusted as a permanent storage location for mail data.
To configure Mail.app so that mail is not retained on the server, open your mail account settings dialog and select the Advanced tab; be sure the Remove Copy from Server After Retrieving a Message check box is checked. Right under this check box is a combo box of options related to when mail will be deleted from the server; select the option named Right Away as shown in Figure 5.10.

Whether you use IMAP or POP, it is a good idea to encrypt any locally stored email. In the unfortunate event that an attacker gains access to your machine, including physical access, your email will remain protected.
Create an AES encrypted disk image with
Disk Copy.app. This process was described in Chapter 3. The size of this image will vary depending on the volume of mail received. If it turns out the created volume becomes too small, it is possible to transfer your data to a bigger volume.Next, configure
Mail.appto store any downloaded mail data on this encrypted volume. By default,Mail.appstores all mail data in your~/Library/Mail/directory. If you are setting up an account for the first time, the storage location can be specified on the Advanced tab of the account settings dialog. Locate the field named Account Directory and enter the appropriate path to your encrypted volume.If you have already setup your mail account(s),
Mail.appwill not allow you to change the path found in the Account Directory field. However, there is way to move your mail data without having to re-create and configure any accounts. First, copy the entire contents of~/Library/Mail/directory to the desired location on your encrypted disk volume; be sure to closeMail.appbefore doing this. Next, create a symbolic link from~/Library/Mailto the path where you moved your Mail directory. For example, if you moved your Mail directory to/Volumes/mail-safe/Mail, then you would create the link as follows:ln -s /Volumes/mail-safe/Mail/ ~/Library/Mail
Although Mail is still configured to use
~/Library/Mail/, all the data will actually be stored on the encrypted volume.Finally, verify the permissions on the directory used to store the mail data; other users should not have access to these files.
PGP is a collection of products that use public key cryptography to provide secure messaging and data storage capabilities on a variety of platforms. It provides a mechanism to encrypt messages for confidentiality and sign messages for authenticity and integrity verification.
Philip Zimmermann originally authored PGP; however, the current suite of PGP products is now owned by PGP Corporation. The source code for PGP is still available for review. There is a freeware version of the product available for Mac OS X from http://www.pgp.com. This includes a graphical key management interface, integrated mail facilities for Mail.app, and a PGP Service that allows for PGP operations on any selected text or files.
With PGP, the basic idea is that messages can be encrypted such that only the intended recipient or recipients can decrypt them. PGP makes use of public key cryptography. Each participating user has at least one keypair consisting of a public key and a private key. The public key is made available to anyone who wants to participate in encrypted communications, whereas the private key is kept private, disclosed only to the owner. To send an encrypted message to someone, all that is needed is his or her public key. Data encrypted using the public key can only be decrypted with the private key. Also with PGP comes the capability to digitally sign email messages. This is useful for two reasons: to guarantee the original sender, and to guarantee that the message has not been tampered with. For more information about PGP and public key cryptography, see the references listed in Appendix C.
On Mac OS X, PGP is generally more usable than the GNU alternative GnuPG discussed in the next section. First, PGP is far easier to set up and use on Mac OS X than GnuPG. Often security tools such as PGP do not find themselves in widespread use because the installation and configuration is so cumbersome. Encrypting email should not be made to be a difficult process for the average user. Second, PGP benefits from a uniform suite of integrated applications and graphical tools. GnuPG is basically a command line application with independent development efforts providing add-on modules for various graphical environments. Finally, PGP integration into Mail.app is user friendly as opposed to the GnuPG bundle, which is basically a wrapper around the command line interface.
One distinction between the free version of PGP (PGP Freeware) and the licensed version is that the free version does not include the plug-in for Mail.app. The noticeable difference is that the licensed version contains toolbar icons for quick access to PGP operations on selected mail messages. However, PGP Freeware works just as well with Mail.app.
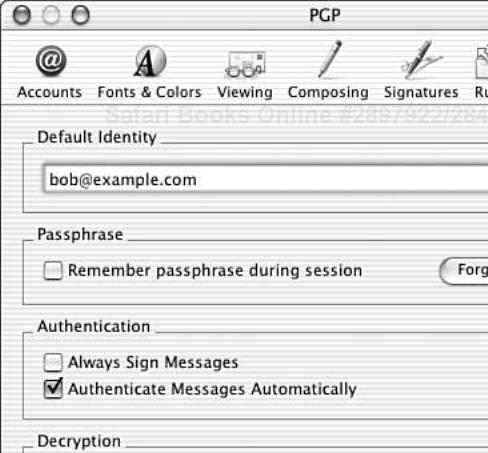
To adjust how PGP behaves in Mail.app, open PGP.app and select Preferences from the PGP menu. On the left side select Email to reveal the options shown in Figure 5.11.

If you plan on making regular use of PGP, we recommend placing the icon in the dock. The PGP dock icon context menu can open the preferences dialog, purge the passphrase cache, perform PGP file and mail operations for Mail.app, and perform PGP operations on the contents of the Clipboard.
To encrypt and/or sign a message while using Mail.app, compose the desired message and select all text with the Command-A keyboard shortcut. Next, from the Mail menu, navigate to the Service submenu and select the desired operation from the list of PGP menu items. If you are encrypting a message, the PGP Recipients dialog will appear so that you can adjust which keys will be incorporated into creating the outgoing ciphertext. When complete, the selected text in Mail.app will be replaced with the resulting encrypted and/or signed data. This procedure also can be used outside of Mail.app because it makes use of the PGP Service. Services are a handy feature of Mac OS X that allow for specific functionality of an application to be made available to all other applications.
To decrypt or verify a PGP message from within Mail.app, select the PGP block of the message and use the PGP service similar to the process described previously. It is also possible to set the PGP preferences to automatically decrypt and verify received messages. The only drawback with this option is that the preferences for PGP do not allow automatic decryption and verification to be specified independently.
By default, both the public and private keyrings created by PGP are protected by file permissions. However, in the unfortunate case that our host is compromised, we would like to prevent an attacker from gaining access to our private keyring; an almost perfect solution is to place both keyrings on an encrypted volume. We consider this almost perfect because if the host is compromised while the volume is mounted, it is still possible for an attacker to obtain the key files. This is why it is important to understand the concepts of physical security covered in Chapter 3. Locking your screen will go a long way toward prevent unauthorized access in this case.
Copy the PGP keyring files to the desired location on your encrypted disk volume. By default, PGP stores the public keyring file in
~/Documents/PGP/PGP Public Keyring.pkr, and the private keyring file in~/Documents/PGP/PGP Private Keyring.skr.Next, change where PGP will look for your keyring files. Open
PGP.appand select the Preferences option from the PGP menu. Select the Files option from the Preferences panel on the left, and then use the Browse buttons to locate and specify the path for each keyring. If the volume where the keys are stored is not mounted when PGP tries to read these files, it will ask you to locate them. If this happens, you can quit PGP, mount the disk image, and try the operation again.
Using PGP to Effectively Delete Files
While we are covering PGP, one of the features that we would like to point out is the capability to “wipe” files. When a file is deleted, or moved to the trash, the operating system frees up the disk space but does not always purge the contents of the file from disk. If a disk is stolen or seized and examined, those files can easily be resurrected.
PGP freeware comes with a utility called PGPmail. Open PGP.app and from the Window menu, choose PGPmail to bring up the toolbar shown in Figure 5.12.
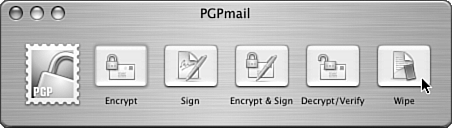
The last toolbar item named Wipe can be used to more effectively delete files. When selected, this button brings up a standard file-open dialog that allows you to select multiple files for deletion. There is a confirmation before the files are wiped; however, there is no confirmation that the operation was successful.
The basic idea is that the contents of the files are zeroed out, and then deleted. Although this is not a foolproof means of removing any trace of data, it’s certainly better than dragging files to the trash, or even removing them with the rm command. However, if you do not have PGP, the -P option to the rm command is better than nothing. This option wipes the contents of the file three times, alternating between 0x00 and 0xff, before actually deleting the file.
GnuPG is essentially the same kind of animal as PGP but it is licensed under the GNU Public License. GnuPG is just a command line application. Additional front-ends have been created to work with GnuPG to provide for key management, preferences (options) management, GnuPG related services, and Mail integration. Most of these front-ends can be found at the Mac GnuGP SourceForge project site (http://macgpg.sourceforge.net). Stéphane Corthésy maintains a bundle designed specifically to bring GnuPG functionality to Mail.app. This bundle (and source code) is available for download at http://www.sente.ch/software/GPGMail/English.lproj/GPGMail.html and is free for personal use.
To use GnuPG with Mail.app, all that is required is GnuPG and the GPGMail bundle mentioned previously. If you have the developer tools installed and would prefer to build GnuPG from source, the source distribution from http://www.gnupg.org compiles just fine on Mac OS X. Otherwise, there are prebuilt Mac OS X installer packages available from http://macgpg.sourceforge.net.
To build from source, download and verify the distribution file.
bash-2.05a$ openssl sha1 gnupg-1.2.1.tar.gz
SHA1(gnupg-1.2.1.tar.gz)= 27b94f42fbc5a620a51e124ad4244f708addcb1a
bash-2.05a$ curl https://knowngoods.org/search.php?release=gnupg-1.2.1.tar.gz&item=sha1
27b94f42fbc5a620a51e124ad4244f708addcb1a
Next, unpack, configure, build, and install the application with the following commands:
tar xvfz gnupg-1.2.1.tar.gz
cd gnupg-1.2.1
./configure --disable-asm
make
sudo make install
Now that GnuPG is installed, you need to install the
Mail.appbundle. Create a bundle directory if it does not already exist.bash-2.05a$ mkdir ~/Library/Mail/Bundles
Next, mount the downloaded GPGMail disk image and copy
GPGMail.mailbundlefrom that image into the newly created Bundles directory; be sureMail.appis not running at the time.Finally, enable
Mail.appto use bundles.
bash-2.05a$ defaults write com.apple.mail EnableBundles YES
The next time Mail.app starts, an additional icon will appear in the account settings dialog. Figure 5.13 shows the settings dialog for the GPGMail bundle. These settings are for how GnuPG is handled from within Mail.app and have nothing to do with the GnuPG options file or the behavior of the GnuPG command line application.
The installed GPGMail bundle makes use of the command line installation of GnuPG; the bundle itself does not perform any of the cryptographic operations. As a result, any existing GnuPG keyrings will automatically be used, but there are some limitations to how GnuPG can be used from within Mail.app. First, only a single private key can be used. If multiple private keys exist in the private keyring, then the default key is automatically used to sign and decrypt messages. Second, if a recipient does not match any IDs in the keyring, the send operation fails. This is unlike PGP where the user is allowed to choose from a list of public keys from the public keyring.
GnuPG operations can be performed within Mail.app from the PGP submenu found under Mail.app’s Message menu. There are four options:
The Decrypt option attempts to use the default key in your secret keyring to decrypt the currently selected message.
The Authenticate option attempts to verify any digital signature attached to the currently selected message against a corresponding public key from the public keyring.
When composing a new message, the Encrypt New Message option flags that message for encryption to all recipients. GnuPG does not actually encrypt the message until the user attempts to send the message. The public keyring must have a corresponding public key for each recipient, otherwise a warning dialog appears and no message is sent.
Likewise, when composing a new message, the Sign New Message option flags that message to be signed using the default key in the secret keyring.
Besides these menu options, the toolbar for the various message composition dialogs can be customized to add icons for encrypting and signing outgoing messages. To add these icons to the toolbar, select Customize Toolbar from the View menu and drag the appropriate GnuPG icons to the toolbar.
As with PGP, GnuPG can be configured to use keyring files stored at a more secure location, such as an encrypted volume.
To set up GnuPG to use key files located someplace other than the
~/.gnupg/ directory, edit the GnuGP options file and specify the full path to each file. For example, suppose you want to store the keyrings in a directory keys on a mounted volume name named secret-sauce. Add the following two lines to the~/.gnupg/gpg.conffile:keyring /Volumes/secret-sauce/keys/pubring.gpg secret-keyring /Volumes/secret-sauce/keys/secring.gpg
Next, copy the keyrings to the locations specified previously:
cp ~/.gnupg/pubring.gpg /Volumes/secret-sauce/keys/
cp ~/.gnupg/secring.gpg /Volumes/secret-sauce/keys/
Now, when gpg is run on the command line, or through
Mail.app, it reads the options file and makes use of the specified keyring files.
Web browsing is easily one of the most common of day-to-day computer activities. In this section, we will cover security issues related to the use of some well-known web browsers for Mac OS X including OmniWeb, Safari, and Internet Explorer. Although these browsers differ considerably, there are some common changes to their default settings that can make their use more secure.
SSL is the primary means of securing browser-based transactions over the Internet. Many users are comforted by seeing a little lock icon somewhere on their browsers and assume that they have a secure connection, and often this is the case. However, there is more to a web browser’s use of SSL than the lock icon.
The goal of using SSL with a web browser (in most cases) is to provide authentication of a remote host, and confidentiality of any communication to that host. The authentication serves to protect the user from being duped into conversing with an imposter and potentially disclosing private information, whereas the confidentiality aspect serves to protect against eavesdropping or the invasion of privacy.
At the time of this writing, Safari is still somewhat of a new browser on Mac OS X and lacks a lot of the needed security features for dealing with SSL certificates. However, there is a relatively hidden debug menu that can be turned on to allow for the configuration of certificate checks. Use the following command to turn on the Safari debug menu:
defaults write com.apple.Safari IncludeDebugMenu 1
Use the same command and specify 0 to turn it off again. The settings for certificates are located under the Security menu. Choosing Strict Checks will inform you when you encounter a SSL-enabled site that makes use of an unknown root certificate.
Internet Explorer has a list of trusted root authorities for SSL certificates. Choose the Preferences option from the Explorer menu. Next, select the Security bullet from the Web Browser menu on the left to show the trusted root certificates.
Out of the three browsers, OmniWeb is the only browser that gives considerable control over how it conducts SSL transactions. For example, some users may not feel comfortable making use of SSLv2 because it is susceptible to truncation and downgrade attacks. Among other things, with OmniWeb, you can adjust the preferences so that the browser will only negotiate the more trusted SSLv3 or TLSv1 connections. Figure 5.14 shows the SSL configuration dialog for OmniWeb.

In this section we will discuss security issues related to web browser cache and cookie management, but first some background information on both.
Web browser cache is a collection of previously viewed web page content, including text and images stored on the local disk by the web browser. The idea is that frequently viewed sites will load quicker because the unchanged elements of the site can be loaded from the cache instead of downloaded from the remote web server. Another piece of information these three browsers store is a list of recently visited URLs. This is the list that is used to help complete URLs as you enter them. Our concern here is that most browsers are set up to store this information by default, thus leaving a trail of surfing habits on your hard disk. The issue in both cases is one of privacy.
Cookies are small pieces of information originating from a web server that the web browser allows to be stored in a local file, part of this information being the URL from which the cookie originated. When the browser is directed to a URL that is found in the cookie file, that cookie is then returned to the web server. Cookies are a result of the stateless aspect of HTTP. By its nature, HTTP is a stateless protocol, meaning that there is no built-in mechanism for HTTP to maintain data about a browsing session between the many individual requests that may occur during that session. By using cookies, the idea is that a user’s interaction with a web site can be maintained across multiple requests without the need for obscenely long URLs, JavaScript, or tricks with form values. There are essentially two uses for cookies: practical web site session management and fueling the evils of advertising.
The security issue with web cache data is simply one of privacy; you either disable the cache or store it on an encrypted volume. With cookies, however, there is often confusion about whether they constitute a security risk. We will explore that issue in the next section.
No. Initially cookies were given a bad reputation. Web users were often told that cookies constituted a serious security threat and, unless disabled, would lead to one’s bank accounts being drained within seconds. If this ever happens, it is probably not the result of enabling cookies on your web browser. The reality is that cookies can be abused, but they also can be put to practical use.
The practical use of cookies is for session management as described in the previous section. It is important to understand that all the data in a cookie originates from the web server. When a web browser returns a cookie, the remote site has access to the same information it originally sent to the browser, and nothing more. Thus, cookies cannot be used to steal information from a browser or other cookies; they can only be used to deposit information that you have already provided to the remote host. However, still be mindful of sensitive information you send to hosts that you know make use of cookies, for example, an online banking site. Web browsers have had bugs in the past that allowed unauthorized access to cookie information.
The abuse of cookies has to do with the invasion of privacy. Basically the way this works is that certain Internet advertising companies (that do not deserve to be named) use cookies to collect and correlate the browsing habits of Internet users. All this collected data is then used to display advertisements that might appeal more to the user than, for example, a randomly chosen advertisement.
An HTTP cookie consists of six elements:
Name
Value
Expiration date
Path
Domain
Secure
The name and value elements are mandatory but the other four are optional. The name and value are arbitrary data supplied by the remote site and will vary depending on the purpose of the cookie. The expiration date is a timestamp specifying when the cookie should expire. The path is used to designate in what subset of a site the cookie is considered valid. Likewise, the domain is used to specify for which hosts the cookie is valid. The secure element is a Boolean value; when set this means that the cookie should only be transferred across a secure connection. The “secure” element is not really defined, but you might think this means SSL. For detailed information about cookies, see the Request For Comments document, HTTP State Management Mechanism (RFC 2109).
At this point in time, you might be wondering how some of these constraints are enforced, such as the domain and secure elements. If there is any element to worry about in this system, it is the browser. The browser is supposed to delete expired cookies, the browser is supposed to respect the secure element of a cookie, the browser is supposed to deal with parsing the cookie data and writing it to disk, the browser is responsible for limiting how much cookie data can be written to disk, and the list goes on. As mentioned earlier, be mindful of what data is being stored in your cookies file. The browser is supposed to enforce this security, but that doesn’t mean it actually does. The location of cookie files for the various browsers is specified in the next section.
The bottom line is that cookies are useful and can be invasive, but they don’t have to be. OmniWeb, and Internet Explorer (like many browsers) allow you to audit all cookie requests. Cookies can be seen before accepted. They can be rejected on a per-domain basis and put in black lists so that you are never bothered by their requests again. And for those that simply do not want to deal with cookies at all, most browsers allow you to reject all cookies.
There is no best way to configure and manage cookies. There are those that are paranoid about them, and those that could care less. In reality, the only real concern is that of privacy. Cookies can and are being used to anonymously track web browsing habits. Here we will point out where to configure cookie settings in the previously mentioned browsers and leave the configuration choices to the reader.
To configure how cookies are handled in Internet Explorer, choose the Preferences option from the Explorer menu. Next, select the Cookies bullet from the Receiving Files menu on the left to show the cookies configuration dialog. Internet Explorer stores cookie data in the plist file ~/Library/Preferences/com.apple.internetconfig.plist as a base-64 encoded block of data. The key to look for in the plist file begins with HTTP Cookies. Notice that this is also the same file that holds all the preferences. The only way to easily view and edit the cookies is through the Preferences dialog.
To configure how cookies are handled in Safari, choose the Preferences option from the Safari menu and select the Security pane. At the time of this writing, Safari stores cookie data in the file in the ~/Library/Application Support/WebFoundation/Cookies.plist.
Of all three browsers, OmniWeb has the most configurable and user-friendly interface for managing cookies. To configure how OmniWeb handles cookies, choose the Preferences option from the OmniWeb menu and select the Cookies pane (see Figure 5.15).

OmniWeb stores all cookie information in the file ~/Library/Application Support/OmniWeb/Cookies.xml.
The main concern over stored web browser cache is one of privacy. Whether you are using a corporate laptop, a shared computer, or whether you are paranoid that the FBI is going to break in and seize your equipment at any second, this issue can be dealt with by either disabling web cache altogether or storing it on an encrypted volume.
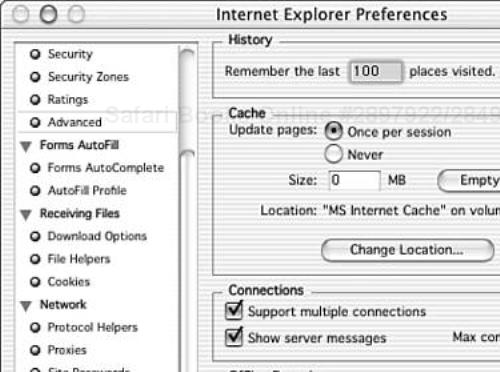
Unfortunately, of the three browsers we are concerned with here, Internet Explorer is the only browser that will allow the user to specify the location for web cache data. Both OmniWeb and Safari have a cache, but the location of that cache cannot be configured.
By default, Internet Explorer stores its cache in the ~/Library/Preferences/MS Internet Cache/ directory. To configure Internet Explorer to store cache files somewhere more secure do the following:
Choose Preferences from the Explorer menu.
Next, select the Advanced bullet from the Web Browser menu on the left. In the middle of the dialog is the cache configuration (see Figure 5.16). Click the Change Location button and select an appropriate directory on your encrypted volume.
To disable the cache altogether, clear the cache by clicking the Empty Now button, then set the size to be zero megabytes.
While this dialog is open, notice that the history list can also be configured, but not where it is stored. Internet Explorer’s history list data is stored in the file, ~/Library/Preferences/Explorer/History.html. One solution for securing this file is to move it to an encrypted location and create a symbolic link to it, similar to the method used to secure email files in the previous section. As with the cache, set the size to zero to completely disable the storing of this information.
At the time of this writing, Apple’s Safari web browser does not allow cache or history settings to be configured. The cache files are stored in the ~/Library/Caches/Safari directory, as is the history information. To clear the current cache, choose the Empty Cache option from the Safari menu.
Likewise, the OmniWeb browser does not allow the location of cache and history information to be configured. OmniWeb stores cache information in the /tmp directory; history information is stored in the file ~/Library/Application Support/OmniWeb/PersistentHistory.plist. To clear the current cache in OmniWeb, choose the Flush Cache option from the Tools menu.
With Mac OS X being a widely accepted and useful desktop environment, web browsing and email are not uncommon activities. Mac OS X now comes with both a built-in web browser, as well as a feature rich email client. However, the default settings for these applications are not desirable from a security standpoint.
In this chapter we have discussed some concepts related to general application security. We have seen some of the security issues surrounding the use of common web browsers and Mac OS X’s Mail.app. We have also shown that steps can be taken to secure the privacy and confidentiality of personal data involved in the use of these applications. Although these steps are effective, they are not always obvious. Security in an application requires effort on the part of the user as well as the developer.