
Lesson 2. Adding Pages and Text
One unique aspect of FreeHand is that it lets you create multiple distinct pages in a single document. Of course, there is nothing unique about multiple pages in a document, but with FreeHand, each page can be a different size. This feature gives you tremendous flexibility in your projects. For example, you can create a corporate identity package, creating the logo on one page, business cards on another page, and letterheads and envelopes on other pages. Each page will be the size needed, and all of the design pages will be saved in one file. Instead of sending several files to the printer, you need to send just the one file.
You can create all of your marketing materials using FreeHand. You will use the text editing tools to format the text on each of the pages.
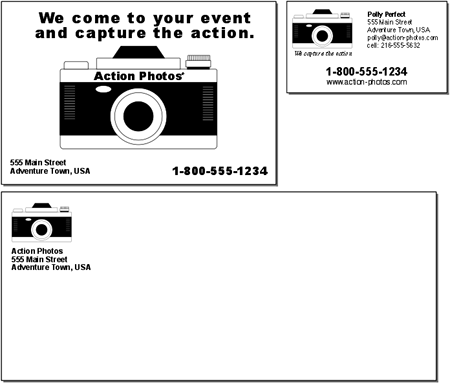
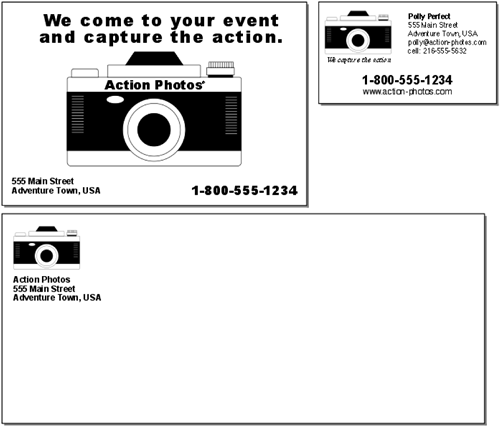
In this lesson, you will add some text to the camera you created in Lesson 1 to create a company logo. Then you will set up a document with multiple pages and combine the logo with some text to create a postcard, business card, and envelope.
WHAT YOU WILL LEARN
In this lesson, you will:
• Create a default document template
• Add new pages and change the page size
• Import graphics for your document
• Use the Text tool to enter and format text
• Apply kerning and range kerning to text
• Add special characters to your document
• Shift text off the baseline
APPROXIMATE TIME
This lesson takes approximately 2 hours to complete.
LESSON FILES
Media Files:
None
Starting Files:
Lesson02Startcamera.fh11
Completed Projects:
Lesson02Completedcorp_identity.fh11
Creating a Default Document Template
In Lesson 1, you saw how helpful guides are for placing objects on the page. To use the guides, the page rulers must be visible. Although the rulers are easy to show and hide, you might want to customize FreeHand so that they appear each time you create a new page.
When you create a new page, FreeHand uses the default document template and opens it as an untitled document. If you find yourself changing the same settings or adding the same colors for every document, all you need to do is change the default template, and those changes will be made automatically for each new document.
1) Choose File > New to create a new document and then choose View > Page Rulers > Show.
If you want to change any other settings, make those changes as well. For example, if you like the Snap to Object feature, make sure that option is on.
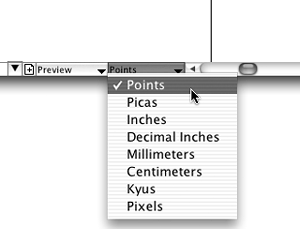
2) Click the Units pop-up menu and pick Points from the list if it is not already selected.
Values you are instructed to use later in this lesson assume that you are using Points as your measurement system. If you use another system, you will need to adjust some of the values.
3) Choose File > Save As. In the Save Document dialog box, type MyDefaults as the file name and then choose FreeHand Template from the Save as Type (Windows) or Format (Mac OS) pop-up menu.
Templates are stored in the Macromedia > FreeHand > 11 > English > Settings folder within your user-specific Application Data (Windows) or Application Support (Mac OS) folder. Navigate to this location on your hard drive. Since this file will serve as your default FreeHand document, you want to save this file in a permanent location.
Note
The extension for a FreeHand template is .ft11.
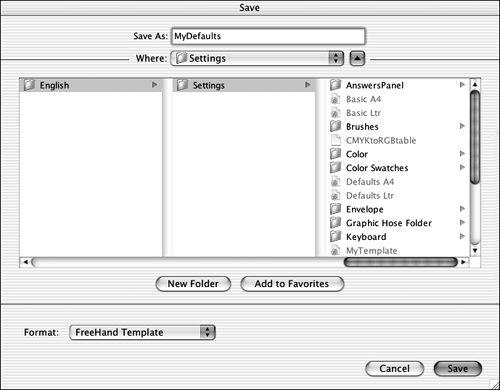
4) Click Save.
Your default template is saved.
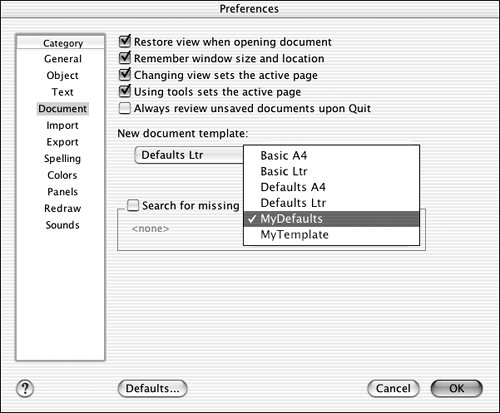
5) Choose Edit > Preferences (Windows and Mac OS 9) or FreeHand MX > Preferences (Mac OS X) and click the Document tab (Windows) or Document category (Mac OS).
In the Document section of the Preferences dialog box, you can change the document view and window placement to control the way documents appear when they are opened.
6) From the New Document Template pop-up menu, choose MyDefaults. Click OK to close the Preferences dialog box.
Your new default document appears in the New Document template pop-up menu because you saved your document in the Settings folder. If you save your template in another location, you then need to click the ellipsis button next to the New Document Template pop-up menu and locate your template. The next time you create a new document, the page rulers (and any other settings you specified) will be turned on.
The template you just created will be used as the FreeHand default page, but you can create templates for any projects where you find yourself repeatedly using the same settings. For example, if you are creating documents for a client where you are always copying the corporate logo, create a template that contains that logo. Then you’ll have it ready to go on the page. Instead of creating a new page, you can open the template. It will open as an untitled document with your settings and graphics.
Changing the Page Size
The camera you created earlier will be used as part of the logo for the Action Photos company. Instead of changing the camera file, you will import the graphic into another document and add some text. Then, in that file, you will add other pages of different sizes to create a business card, envelope, and letterhead.
1) Choose File > New to create a new document.
If you already have an untitled document open from the previous task, you can use that instead. The document contains one page with the default page size.
2) Change the measurement units to inches using the Units pop-up menu on the Status toolbar (Windows) or at the bottom of the document window (Mac OS).
The rulers change to display inches.
Note
We changed the measurement system here to make it easier to define new page sizes. If you prefer to define your page size using different units, choose those units instead. You’ll then need to make the conversion from inches to your measurement unit in step 5.
3) Choose Window > Document to display the Document panel.
The Document panel is normally grouped with the Object panel in the Properties panel group. You can also click the Document tab in that panel group to select the panel.
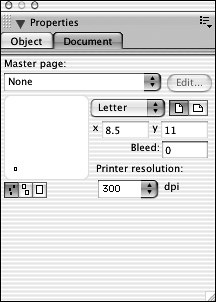
4) Choose Custom from the Page Size pop-up menu on the Document panel.
You can choose from several preset sizes in the list, or you can define your own size using Custom.

5) Select the value in the X text box and type 4 as the width of the page. Press the Tab key to select the Y text box and type 6 as the height of the page. Press Enter (Windows) or Return (Mac OS) to apply these changes to your page.
Your page changes to this new size.
6) On the Document panel, click the landscape page orientation button.
The page switches to 6 inches by 4 inches. You will use this page to create a postcard, and so it needs to be horizontal.
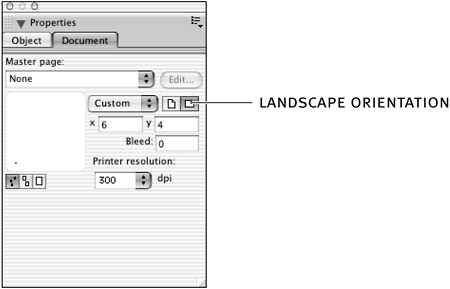
7) Save your document as corp_identity.fh11 in the Projects folder.
Adding Custom Pages
In this section, you will add more pages to your document, each page a different size. You will also move the pages around the pasteboard to make them easier to manage.
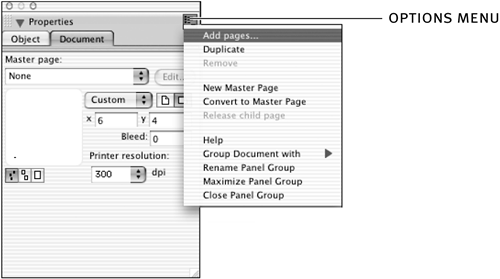
1) From the Document panel Options menu, choose Add Pages.
The Options menu is located at the top right of an open panel. It contains commands that are unique to each panel.
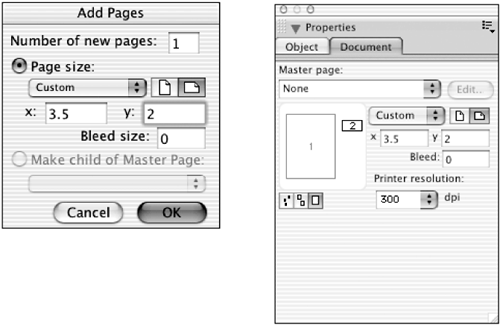
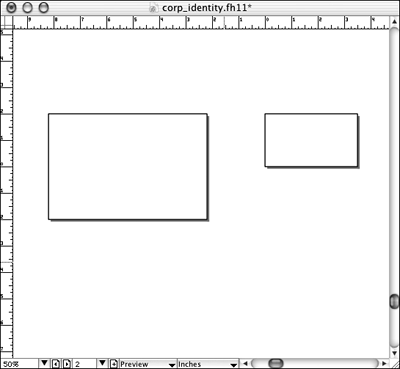
2) In the Add Pages dialog box, choose Custom for the page size, select landscape mode, and type 3.5 as the X value and 2 as the Y value. Click OK.
This new page you are adding will be for the business card. When you click OK, the new page is added to your document, to the right of the first page. You may not see it in the document area, depending on your view magnification. However, you should see a new page added in the page area of the Document panel.
3) From the Magnification pop-up menu, choose Fit All.
You should now see both pages in the document window.
4) Select the Page tool from the Tools panel and click the second page.
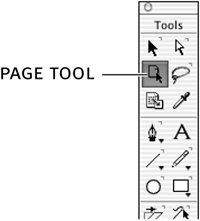
When you click to select a page, a blue outline with handles appears around the page.
The Page tool allows you to move, resize, or change the page orientation of a selected page. Move the pointer over one of the handles of the selected page. The cursor changes to either a straight double-arrow cursor or a curved double-arrow cursor. With the straight double-arrow cursor, you can drag to change the page size. With the curved double-arrow cursor, you can drag to change the page orientation. If you want to experiment with these options, look at the Document panel as you change the page. You’ll see the new page size in the X and Y text boxes as you drag the handles. If you want specific page sizes, the easier approach is simply to enter the dimensions in the Document panel. If you want to make changes, just reenter the correct values to reset the page size.
5) Using the Page tool, drag in the center of the new page and move the page to the top right corner of the first page.
FreeHand won’t let you place a page on top of another page. If you move the page so it overlaps another page, the selected page snaps back to its original location when you release the mouse button. If you get close to the other page, the two pages snap together.
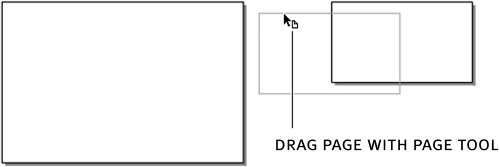
6) Position the Page tool over the second page. Hold down Alt (Windows) or Option (Mac OS) and drag down about 8 inches.
As you drag, you’ll see a blue outline of the page. Holding the Alt or Option modifier key as you drag makes a copy of the page. Release the mouse button when the outline of this new page is below the first page.
Note
You can move pages around the pasteboard using the page icons in the Document panel, but the process is much easier with the Page tool. Below the page icons on the Document panel are three buttons that change the icon sizes.
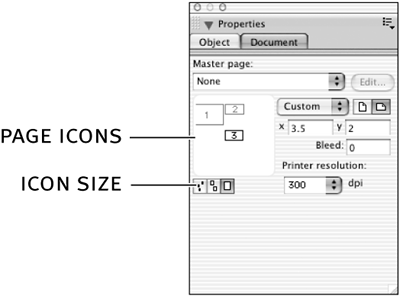
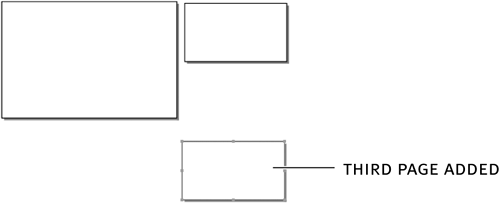
7) Use the Page tool to select the third page. In the Document panel, change the X value to 9.5 and the Y value to 4.125. Press Enter (Windows) or Return (Mac OS) to apply the changes to the page.
This new page is the size of a #10 commercial envelope.
Note
If your third page is not placed below the first page, you may get an error message indicating that FreeHand can’t change the page size because the page would overlap another page. Click OK to dismiss the dialog box, move your page with the Page tool, and then repeat step 7.

Tip
You can delete a page by selecting it with the Page tool and then pressing the Delete key.
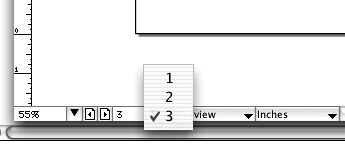
8) Select each page with the Page tool and note its page number in the Go to Page pop-up menu on the Status toolbar (Windows) or at the bottom of the document window (Mac OS).
The page number is determined by the placement of the page on the pasteboard, from left to right, not the order in which you created the page. You can use the Go to Page pop-up menu to move from page to page in your document.
Power Tip
There are other shortcuts you can use with the Page tool. Hold down Alt (Windows) or Option (Mac OS) and double-click the page to open the Modify Page dialog box. Hold down Alt (Windows) or Option (Mac OS) and double-click the pasteboard to open the Add Page dialog box.
Importing Graphics
Many times when you create your documents, you will want to use existing graphics or images. If you created a graphic in FreeHand, such as the camera you created in Lesson 1, you could just open the other document, select the camera, copy it, and then paste it in this document. But what if you don’t have the application that created the other graphic? FreeHand imports several types of file formats, including: Macromedia Fireworks PNG, Adobe Photoshop PSD, Adobe Acrobat PDF, Adobe Illustrator EPS and AI files, GIF, JPEG, TIFF, and BMP. In the next task, you will import your camera and then add some text.
1) From the Go to Page pop-up menu, choose page 1.
The Go to Page pop-up menu displays the selected page, changing the view magnification to fit the page. The first page should be the postcard page.
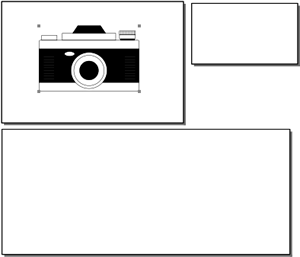
2) Choose File > Import. Select your camera.fh11 file and then click Open. Click to place the imported camera on the postcard page.
You can use the camera.fh11 file in the Start folder of the Lesson02 folder if you can’t find your camera file. The pointer changes to a corner cursor when you import files. Once the graphic is on the page, you can use the Pointer tool to move or resize it.
Tip
If you drag with the pointer instead of clicking, the imported graphic is sized to fit the area of the marquee you drag.
3) Hold down Shift and drag one of the corner handles of the graphic to resize it.
The graphic is grouped. When you select it with the Pointer tool, you’ll see four handles around the graphic. You want the camera to fill most of the area within the page, so resize it if necessary. Move the camera so there is some room at the top of the page for a headline.
4) Save your file.
Using the Text Tool
FreeHand gives you almost all of the text-formatting tools you’ll need to add and modify text on your pages. Although FreeHand is not designed for extensive page-layout duties, it can certainly serve your purposes for many of your designs. If you have a text-laden newsletter, stick to a page-layout program. If you have a product datasheet, you can create the graphics, import the text, and then format the text all in FreeHand.
Note
Check with your printer to make sure the company has FreeHand MX if you plan to send your files to be printed from FreeHand. If the printer doesn’t have the current version but has an earlier one, you can export your file and save it as a FreeHand 8, 9, or 10 document.
Before you can format text, you need to create the text. You can either type text directly in your FreeHand document or import it. In the next task, you will type some text using the Text tool. In a later lesson, you will import some text.
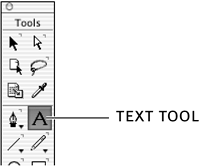
1) Select the Text tool from the Tools panel.
The pointer changes to the I-beam cursor, indicating that you are in text mode.
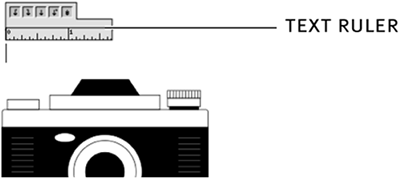
2) Click at the top of the page.
When you click with the Text tool, you’ll see the blinking cursor and the text ruler.
Note
If you don’t like the text rulers, you can turn them off from the View menu. Choose View > Text Rulers to show or hide the text rulers.
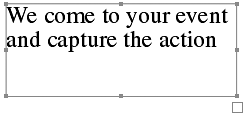
3) Type the following text: We come to your event and capture the action.
You should be able to type the text without its wrapping to the next line. Don’t worry if the text does wrap; you’ll fix that in a later step.
4) Click away from the text to exit text-editing mode; then click the text again.
Notice that you did not need to switch from the Text tool. FreeHand automatically switches to the Pointer tool when you move the pointer away from the text. Clicking the text now selects the text as an object—a text block.
The selected text block has handles on the corners and sides and a small box at the lower right corner—the Link box. If a small circle appears within the Link box, then the text box contains more text than what is displayed in the text block. You will need to delete some of the text, increase the size of the text block, or link the text to another text block.
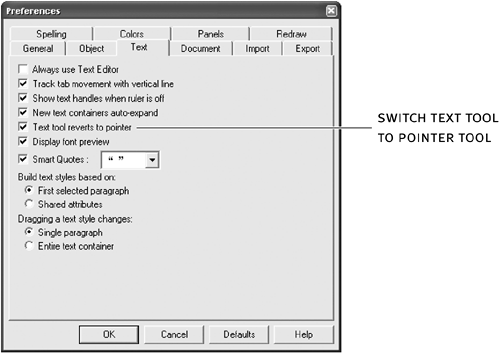
Tip
The automatic switching to the Pointer tool is a preference that is set by default. If you want to remove that functionality, choose Edit > Preferences (Windows and Macintosh OS 9) or FreeHand MX > Preferences (Macintosh OS X), click the Text tab (Windows) or Text category (Mac OS), and deselect the option to switch the Text tool to the Pointer tool. If the option is deselected, then the Text tool remains the active tool until you change tools.
5) Resize the text block by dragging the lower right handle (not the Link box) down and to the left.
Did the text block resize? If it springs back when you release the mouse button, look at the side handles on the text block. If the left and right side handles are hollow, then horizontal auto-expansion is on; if the bottom handle is hollow, then vertical auto-expansion is also on.

Auto-expanding text blocks expand either horizontally or vertically as you type within them. If auto-expansion is on, you can’t drag the corner handles to change the width of the text block.
6) If the bottom and right side handles are hollow, double-click them to remove auto-expansion and then drag the lower right handle to the left to resize the text block.
The handle should be solid. If it is not, double-click it again. Resize the text block so that the text “We come to your event” is on the first line and the remaining text is on the second line. Don’t worry if you have some empty space at the bottom of the text block. In the next step, you will delete the space.
The Object panel also displays auto-expansion buttons that you can use to turn the expansion option on and off. With the text block selected, select Text Block in the property list of the Object panel. Next to the width and height dimensions of the text blocks are the horizontal and vertical expansion buttons. Click each button to turn the option on or off.

7) Double-click the Link box.
The text block resizes vertically to fit the text. The Link box is also used to link text blocks, which you will do later in this lesson.
Formatting Text
Once you have the text on the page, you can format it to your liking, changing the font, size, color, and paragraph formatting such as alignment and line spacing. You can use the Text menu, Text toolbar, or Object panel to apply your formatting. The advantage of the Object panel is that you can see all current settings in just a glance.
If you select the entire text block, you can apply formatting to all of the text within the text block. If you select specific text within the text block, you can apply formatting to just the selected text.
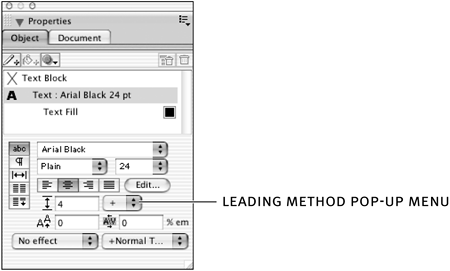
1) Use the Pointer tool to select the text block and then select the Text property on the Object panel.
Text formatting options appear on the Object panel. The left column contains five text attribute buttons: Character, Paragraph, Spacing, Columns, and Adjust Columns. When you click one of these buttons, the Object panel changes to display a different set of formatting controls.

2) Click the Character attribute button (the abc button), choose a font from the Font pop-up menu, and choose a point size from the Size pop-up menu. Select Center alignment.
This text is a headline, so use a big, bold font such as Arial Black with a size of 24 points.
All of the text changes to that font and size. If the font you choose is larger than the original font size, your text may overflow the text block; in this case, a circle will appear in the Link box. Resize the text block to show all the text.
3) On the Object panel, type 4 in the Leading text box. Choose + from the Leading Method pop-up menu.
The spacing between the lines in the heading increases.
Text characters sit on an imaginary line called the baseline. Leading (pronounced “ledding”) is the distance between one text line to the next one. When you increase the leading amount, you are increasing the spacing between the lines.
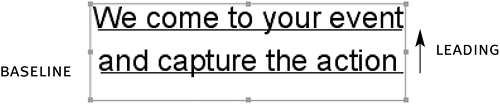
FreeHand gives you three ways to set the leading: by adding extra leading, by setting the absolute leading amount, and by using a percentage. Next to the Leading text box is a pop-up menu that you can use to pick the method you want to use. Select the plus sign to add extra leading, select the equal sign to use a fixed value, or select Percentage to use that method.
The extra leading method adds the point size of the largest character in your text block to the number you enter in the Leading text box. The percentage method uses a leading value equal to a percentage of the largest character in the text block. If you choose either of these methods, the leading value changes if you change the point size of your text. If you choose the absolute leading amount, the leading remains at that value even if you increase or decrease the point size.
Power Tip
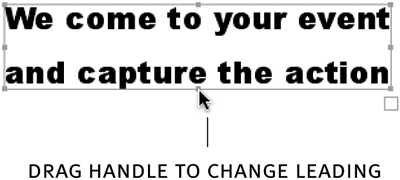
You can also increase or decrease the leading amount by dragging the center handle on the bottom of the text block. This is a faster way to increase or decrease the leading amount when you are more concerned about the way the text looks on the page than using a specific amount.
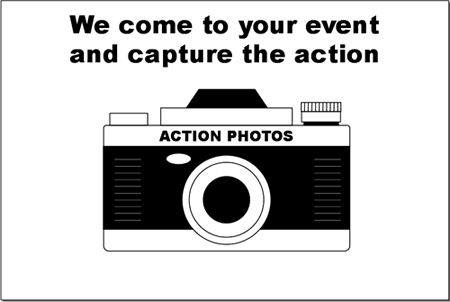
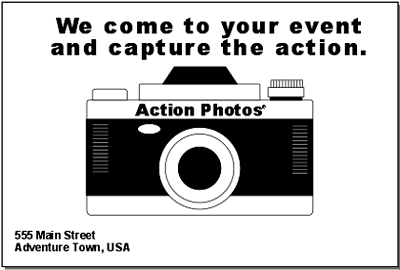
4) Add the text ACTION PHOTOS to the page. Place that text on the top white part of the camera body. Change the font and size so the text fits within that area.
Make sure that you type the text in all uppercase letters.
You entered the company name in all uppercase letters. But what if your design changes? Or what if you just don’t like the way the text looks? You could retype the text, but an easier method is to use the Convert Case command.
5) Choose Text > Convert Case > Title.
Your text is retyped using uppercase for only the first letter of each word. Convert Case can change the case of a text selection to uppercase or lowercase, small caps, title caps, or sentence caps.
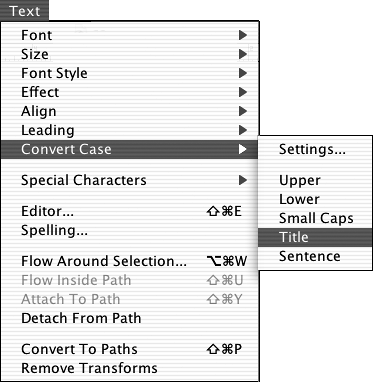
When you change case, you may have some words, such as company names, that you don’t want changed. You don’t need to fix these manually. Instead, you can add these words to an exception list.
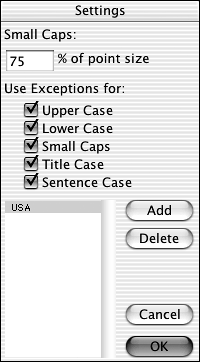
6) Choose Text > Convert Case > Settings. Select all of the options for the exceptions (Upper Case through Sentence Case) and then click Add. Type USA in the exception field that FreeHand adds to the list. Click OK.
The case of the word doesn’t matter in the exception field; you could have also typed usa. Continue to click Add to add other words to the list, such as company names or abbreviations you typically use. The words you add to the exception list will be ignored when you use the Change Case command.
7) Use the Text tool to enter the following address and then move this text box to the lower left corner of the camera. Format the text to fit within this area.
555 Main Street
Adventure Town, USA
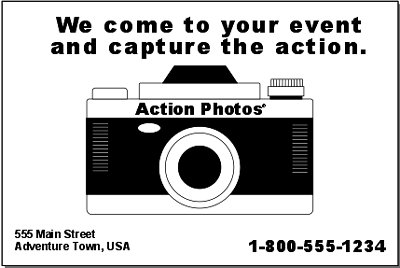
8) Add another text block for the phone number and type 1-800-555-1234. Move this text block to the lower right corner of the camera.
9) Choose Window > Toolbars > Text. Change the font and size of the address and phone text blocks to your liking using the Text toolbar.

The Text toolbar is also convenient for changing the font, size, and leading. It doesn’t contain all of the formatting controls of the Object panel, but it provides another quick way to format text.
Tip
If you have a large monitor, you can dock the Text toolbar below the top menu bar. Drag the toolbar to the top of your screen, and it will dock itself below the menu bar. If you have already docked the Info toolbar, the Text toolbar is docked below it.
10) Save your file.
Kerning and Range Kerning
When you use headings or large text in a logo, you may find that the space between each letter in the heading or logo is too large or too small. You can control that spacing using the kerning and range kerning controls. Kerning is the adjustment of the space between two characters; range kerning (sometimes called tracking) is the adjustment of two or more selected characters.
FreeHand kerns in percentages of an em. An em is a unit of measure used in typography that was originally equal to the width of the letter M. You can think of an em as being equal to the size of the type. For example, if you are using 24-point type, an em will be 24 points. In FreeHand, you can kern your type in increments as small as 0.01 percent of an em, either adding or subtracting that amount to the spacing.
1) Using the Text tool, position the insertion point between the A and the c in the word Action.
When the insertion point is between two characters, you are adjusting the spacing between only those characters.
Note
Some fonts contain kerning values that FreeHand recognizes and displays in the kerning text box.
2) Select the Text property in the Object panel and then click the Character options button. Type –1 in the Kerning text box and then press Enter (Windows) or Return (Mac OS) to apply the kerning.
When you enter a negative number, the letters move closer together. A positive number increases the spacing.

3) Select the text block with the Pointer tool and then repeat step 2.
When you select the text block or select multiple characters, you are performing range kerning. In this instance, all of the letters are tightened by –1 percent of an em. The spacing between the A and the c still retains the kerning you applied in step 1, with the range kerning amount added to the kerning amount between the two letters.

You can also use keyboard shortcuts for kerning:

Adding a Register Mark
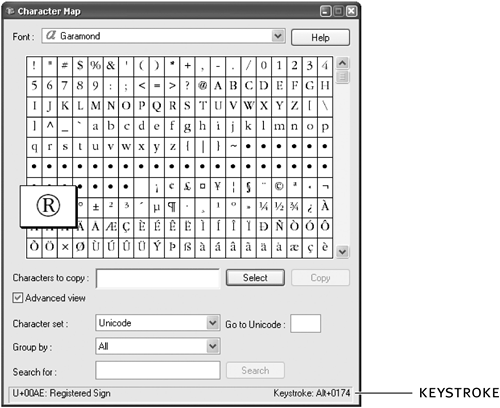
There are several characters that don’t appear on your keyboard; you have to use a combination of keystrokes to enter the character. For example, the registered mark (®) doesn’t appear on the keyboard. How do you type it on the page? If you are familiar with word processing or page layout programs, you may have come across this question before.
In Windows, you can use Character Map (Start > Programs > Accessories > System Tools > Character Map) to find the character you need, copy it, and then paste it in your document. In Mac OS, you can choose Keycaps from the Apple menu (OS 9) or the Character palette (OS X).
Note
In Macintosh OS X, open System Preferences and choose International. Click the Input Menu tab and then choose Character Palette. The Input menu is added to the menu bar, allowing you to access the Character palette from any application.
In the next task, you will enter the registered mark after the company name and then resize it and move it up off the baseline.
1) Position the insertion point after the last character in the company name. Use the character utility for your platform to insert the registered mark.
In Mac OS, you can press Option+R to enter the registered mark.
Power Tip
In Windows, when you select a character in the Character Map, the keystroke is displayed at the bottom right of the dialog box. For example, the registered mark keystroke is Alt+0174. To enter this, you hold down the Alt key and then type the numbers on the numeric keypad. When you release the Alt key, the character is inserted in your text block. You must use the numbers on the numeric keypad, and you must type all four numbers, including the zero.
2) Select the registered mark and make the point size smaller.
The registered mark should be readable but should not detract from the company name.
Using Baseline Shift
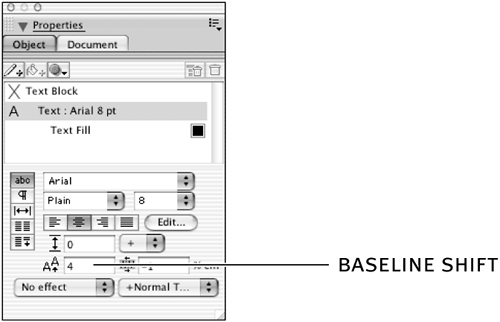
If you need to adjust the baseline of a character so it is different from the baseline of other text in the text block, you can use the baseline shift controls. You can move the character baseline either above or below the baseline of the other characters. For example, if you want the expression H20 on your page, you can use baseline shift to move the 2 down. In this exercise, you want to move the registered mark above the baseline.
1) Change the measurement units to points.
When shifting text off the baseline, as you will do in the next step, it is easier to use points instead of another measurement system since text size is expressed in points.
2) Select the registered mark with the Text tool. Select the Text property on the Object panel and then click the Character button. Type 4 in the Baseline Shift text box and then press Enter (Windows) or Return (Mac OS) to apply the setting to the text.
A positive number moves the character up; a negative number moves the character down. You may need to adjust the number to match your text.
Power Tip
You can also use keyboard shortcuts to adjust the baseline. Press Ctrl+Alt+Up Arrow (Windows) or Option+Up Arrow (Mac OS) to move the baseline up one point, or press Ctrl+Alt+Down Arrow (Windows) or Option+Down Arrow (Mac OS) to move the baseline down one point.
3) Position the insertion point before the registered mark and kern the spacing tighter between the last letter and the registered mark.
Try using the keyboard shortcuts to kern between the letters.
4) Save your file.
On Your Own
Make a copy of the camera logo from the postcard page and paste it on the business card and envelope pages. You’ll need to make the logo smaller to fit those pages. Remember: since the camera object is grouped, you can resize it by holding down the Shift key as you drag a corner handle. Add your name and address, plus the phone number. Format the text to your liking.
What You Have Learned
In this lesson, you have:
• Created a default document template using your FreeHand preferences (pages 42–44)
• Added new pages, changed the page size, and rearranged the pages of your document (pages 45–50)
• Imported graphics for your document (page 51)
• Used the Text tool to enter text and formatted the text (pages 52–60)
• Applied kerning and range kerning to text to improve its appearance (pages 61–62)
• Added a special character to your document (page 62)
• Used baseline shift to move text off the baseline (page 64)