How Many Days Until the Next MAKE?
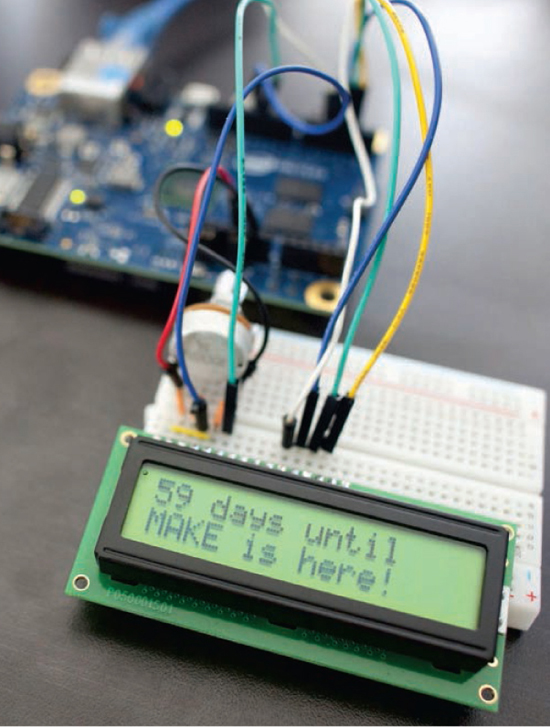
Use the Intel Galileo to make networked gadgets — like this countdown display for your favorite magazine.
Written and photographed by Matt Richardson

USING THE INTEL GALILEO FOR INTERNET-OF-THINGS PROJECTS is a natural fit. With Arduino pin compatibility, networking, and Linux, it’s a powerful yet flexible board that can control hardware, handle computing jobs ordinary microcontrollers can’t, and send and receive information from the internet. And what information is more important than knowing when to expect the next volume of MAKE?
I’ve created a website called How Many Days Until MAKE Comes Out? that serves one simple purpose: It tells you how many days until the next issue of MAKE magazine is scheduled to hit newsstands. The source code is available at github.com/mrichardson23/nextmakemagazine if you want to see how I made it.
Go to nextmakemagazine.appspot.com in your web browser, and you’ll see the information is formatted to be viewed and understood by a human. Next, visit nextmakemagazine.appspot.com/simple and you’ll see the server is also configured to speak directly to microcontrollers, by stripping away all the extra style and language and only returning the number of hours until the next issue is released.
Your Galileo can use its internet connection via Ethernet to connect to this URL, receive the data, and evaluate how to display it in your home. We’ll pass this data from the Linux side to the Arduino side — a powerful feature of this board — and then display it on a standard LCD.
This project is adapted from the new book Getting Started with Intel Galileo, available from the Maker Shed (makershed.com).
NOTE:
FOR THIS PROJECT, YOU’LL NEED TO BOOT OFF OF GALILEO’S SD CARD IMAGE, WHICH YOU CAN DOWNLOAD FROM INTEL AT makezine.com/go/galileoimage.
Testing the Connections
First, make sure your Galileo can connect to the server.
1. Connect the Galileo via an Ethernet cable to your network, plugging it into your router or an active Ethernet jack.
2. Connect the Galileo to power.
3. Connect your computer to Galileo via the USB client port.
4. Launch the Arduino IDE software and select File → Examples → Ethernet → WebClient.
5. Click Upload.
6. Open the Serial Monitor.
You’ll see text start to appear in the Serial Monitor. This example programs your Galileo to do a Google search for the term “Arduino.” As the HTML response from Google’s server is received, it sends those characters to the Serial Monitor.
WHAT IS GALILEO?
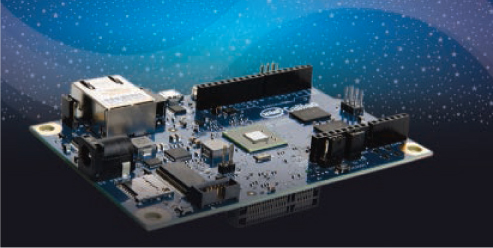
The Intel Galileo is an innovative new microcontroller that runs Linux out of the box and supports Arduino programming and most Arduino shields. It’s based on the Intel Quark SoC X1000, a 32-bit Intel Pentium-class system on a chip, so it’s more capable than many other controller boards.
In addition to the familiar Arduino hardware, the Galileo board has a full-sized Mini-PCI Express slot, 100Mb Ethernet port, MicroSD slot, RS-232 serial port, USB Host port, USB Client port, and 8MByte NOR flash memory.
The Galileo also has the ability (unlike others) to multitask while operating an Arduino sketch — which opens up a world of new opportunities for your projects.

Now that you’re sure the network connection is working, tell your Galileo to connect to the How Many Days Until MAKE Comes Out? server:
1. Create a new sketch and enter the code in Figure A.
2. Upload the code and then open the Serial Monitor.
If it worked, you should see the number of hours out printed every 5 seconds in the Serial Monitor.
The loop function has only 2 lines of code. The delay(5000) is what ensures that each iteration of the loop only happens every 5 seconds. But what about Serial. println(getHours());? The innermost function, getHours(), is defined right below the loop function. It requests data from the server, stores that response in a file, and then reads the file and returns an integer value representing the number of hours you’ll need to wait for the new magazine. It’s the atoi() function that looks at the ASCII characters sent by the server, (say, 4 and 5) and outputs their value as an integer (45), which you can use for arithmetic.
Having the Linux command write the data to a file and then having the Arduino sketch read that file is just one way that you can get data into your sketch. This unique Galileo feature is a powerful way to connect different parts of a project together since there are so many ways to read and write files.
Parsing JSON with Python
The example in Figure A is easy because it handles only one simple piece of data. But lots of web services provide several pieces of data structured in a format called JSON, or JavaScript Object Notation.
JSON has become the standard format for transmitting structured data through the web. If you want to read data from a site that offers JSON, you’ll have to parse it. Since this would be difficult to do with Arduino code, you can use other languages on the Galileo to do this job and pass the appropriate information into the Arduino code.
To preview JSON data, visit nextmakemagazine.appspot.com/json in your web browser:
{"totalHours":1469.0,"volumeNumber":"40","daysAway":61}
There are 3 key/value pairs: the number of hours until the next issue, the next volume number, and the number of days until the next issue.
The code in Figure B uses the Python programming language to connect to the server’s JSON feed at nextmakemagazine.appspot.com/json and parses the volume number and number of hours.
1. Connect to Galileo’s command line using SSH, Telnet, or serial.
2. Change to root’s home directory.
# cd/home/root/
3. Launch the text editor vi with the filename json-parse.py to create that file.
# vi json-parse.py
4. Along the left side of the screen you’ll see a column of tildes (~). Type the letter i to enter insert mode. An I will appear in the lower left corner of your screen.
Time Required: 1–2 Hours Cost: $80–$100
MATT RICHARDSON
MAKE contributing editor Matt Richardson (mattrichardson.com) is a Brooklyn-based creative technologist and Resident Research Fellow at ITP.

Materials
» Intel Galileo microcontroller board Maker Shed item #MKING01, makershed.com
» Ethernet cable
» USB cable
» LCD character display, 16×2 Maker Shed #MKAD30
» Breadboard Maker Shed #MKEL3, MKKN3, or MKKN2
» Jumper wires Maker Shed #MKSEEED3
» Potentiometer, 10kΩ or 2kΩ
» Header pins, male (optional) if your LCD lacks breadboard-compatible pins
Tools
» Computer with Arduino IDE software free download from arduino.cc
» Soldering iron and solder (optional) if your LCD lacks breadboard pins
5. Enter the code from Figure B into vi.
6. Hit the Escape key to switch from insert mode to command mode. The I in the lower left corner will disappear and you’ll see a dash instead.
7. Type :x and press Enter to save the file and exit vi.
8. Test the script by executing the code from the command line.
# python json-parse.py
If you got everything right, you should see the following output on the command line:
Volume 40 will be released in 1473.0 hours.
As you can see, parsing a JSON response from a website isn’t hard when you have Python available to you on Galileo. Now you’ll simply connect the response from Python to your Arduino code.
To try that now, first modify json-parse.py:
1. On Galileo’s command line, be sure you’re still in root’s home directory:
# cd/home/root/
2. Open the file for editing in vi:
# vi json-parse.py
3. Type the letter i to enter insert mode. An I will appear in the lower left corner of your screen.
4. Edit the file so that it reflects the code in Figure C.
5. In the Arduino IDE, create a new sketch with the code in Figure D. You’ll see it’s very similar to the Arduino code Figure A. Instead of calling curl from the command line, it uses Python to run the script you wrote.
6. Upload the code to the board and open the Serial Monitor.
Now you should see the response from the server as the number of days until the next issue of MAKE comes out.
Connecting an LCD Character Display
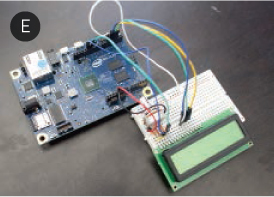
What good is this information if it can only be seen in your Serial Monitor? Let’s hook up an LCD display to read out the info where anyone can see it (Figure E).
To connect the LCD to Galileo:
1. Disconnect your Galileo board from your computer’s USB port and from power.
2. Insert the LCD into the breadboard (solder header pins onto it if necessary).
3. Insert the potentiometer into the breadboard as well.
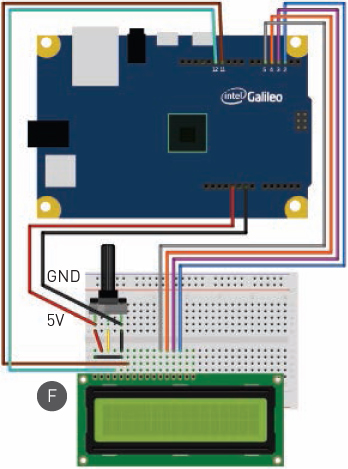
4. Using your jumper wires, connect the potentiometer and LCD to Galileo as shown in Figure F.
5. Connect power to Galileo.
6. Connect Galileo to your computer via USB.
7. From the Arduino IDE, upload the code in Figure G.
Conclusion
Now you can easily keep tabs on when the next MAKE will hit newsstands! This is a simple example — you can just imagine the tricks Galileo can do with almost any data on the web. Pick up a copy of Getting Started with Intel Galileo for more network-connected Galileo projects. ![]()


