
Classic Lego Space Flight Jacket
Learn to paint on leather with this design for veterans of the Lego Space Corps.
Written by Windell Oskay

Space image — iStock.com/Juliann Brown; Lego jacket — Lenore M. Edman/Evil Mad Scientist Laboratories
HERE’S A LITTLE PROJECT THAT WE’VE BEEN WORKING ON FOR A LONG TIME: a custom-painted leather flight jacket featuring the “Classic Lego Space” logo. (Yes, I totally spent years serving in the Lego Space Corps!) If you’ve ever wanted to make your own painted leather jacket—whatever the theme—here’s how to do it.
For this project we used Angelus leather paints, which are highly flexible acrylic paints from the Angelus Shoe Polish Company, designed specifically for painting items like shoes and jackets. We used black, metallic gold, white, and red paints, which are available in 1 oz and 4 oz (and sometimes larger) bottles. We ended up using less than ½ oz of each paint color in this project.
Besides the paints, you willl also need their “Leather Preparer and Deglazer” (for which some people simply substitute acetone), as well as a clear acrylic top-coat finisher. We also used a couple of different sized natural-hair paintbrushes.
The jacket is a “black current issue A-2” leather flight jacket from US Wings, an updated version of the iconic A-2 jacket famously used by pilots in World War II and well known as the classic substrate for painted bomber jackets. We felt black best fit our outer-space theme. Look for one with a solid, one-piece back, so that there aren’t any seam lines where you’ll be painting.
It’s certainly possible to start with a lower-cost jacket or to get a used jacket for much less. However we are following a piece of advice that we learned from our friends in the art car community: If you’re going to invest the time in decorating a car, it’s a good idea to start with a new one so it lasts longer and you have fewer maintenance issues.
This design is the “Classic Lego Space” logo, no longer in use but prominently featured in popular Lego sets like the Galaxy Explorer and on space-themed minifigures from 1978 to 1987.
If you look closely at pictures of the Galaxy Explorer and minifigures, you might notice that there are actually two versions of the graphic from that era. One, found on larger bricks and flags, has a light-yellow moon with darker craters; while the other, found on small bricks and minifigures, has a metallic gold circle without craters. Since the design on the jacket is large, we went with the cratered version, but exercised artistic license to use light and dark metallic golds, rather than yellows, for the moon’s colors.

1. Prepare the stencils
Create the design that you would like to apply to the jacket. For each color in your design, cut a stencil out of cardstock. You can use simple tools like a pencil and a hobby knife for this step, or take more of a high-tech approach. For our design, we used high-resolution pictures of Lego bricks to model the logo in Inkscape (inkscape.org), and laser-cut the cardstock stencils. You may find it helpful to use your cardstock cutouts as mock ups to see how they will look on the jacket in a variety of sizes and positions.

2. Prepare the substrate
Position the stencil for the base (lowest) layer of your painting where you want it to go on the jacket and gently fix it in place with blue painter’s tape. Place a board under the jacket back so that you have a smooth and flat workspace.
Use the leather preparer and deglazer solution to strip the shiny outer finish off of the leather inside the stencil. Doing a thorough job of this takes about 30 minutes of hard scrubbing with a washcloth, leaving the cloth thoroughly blackened and that area of the jacket still black, but with a matte finish.
Time Required: 2 Days Cost: $100–$400
WINDELL OSKAY
is the co-founder of Evil Mad Scientist Laboratories. He has one childhood’s worth of experience building Lego spaceships.

Materials
» Leather jacket, black, A-2 style
» Leather paints, 1 oz in each color that you will use, and clear top-coat finisher Angelus brand, angelusshoepolish.com
» Leather preparer and deglazer angelusshoepolish.com
» Cardstock
Tools
» Laser cutter or hobby knife
» Computer and Inkscape software
» Natural-hair paintbrushes
» Painter’s tape
CAUTION:
WEAR GLOVES FOR THIS STEP — YOU PROBABLY DON’T NEED TO STRIP THE FINISH OFF YOUR FINGERS.
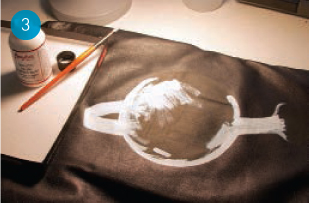
3. Paint a base layer
After the leather dries from the prep stage, it’s time to begin painting. Angelus recommends making the first layer thin and allowing it to dry thoroughly before adding the subsequent 2-3 layers necessary to reach full opacity. We used white for our base layer, even under the parts that will be red or gold in the final painting. The brush strokes are quite visible and the opacity is marginal with only a single layer.
This is the easiest layer of painting, because — with the exception of black areas like our little triangle — you can just paint over all of the areas that have that initial matte appearance.

4. Add color and opacity
Once the paint is dry (30 minutes, no touching), use your other stencils as guides to mark where the color layers will go. Align each stencil to the base layer and trace it very gently with a pencil or spudger. Using those (barely visible) marks as guides, paint each color in your design, in sequence. For each color, let the paint dry for at least 30 minutes before doing the next layer, and alternate between all of the colors in your design.
After four layers of white and three each in red and gold, our white and colored areas were well defined, bright, and distinct.
NOTE:
PAINTING THE INTERIOR CURVES TO APPEAR SMOOTH TAKES A FAIR AMOUNT OF TIME AND STEADY HANDS.
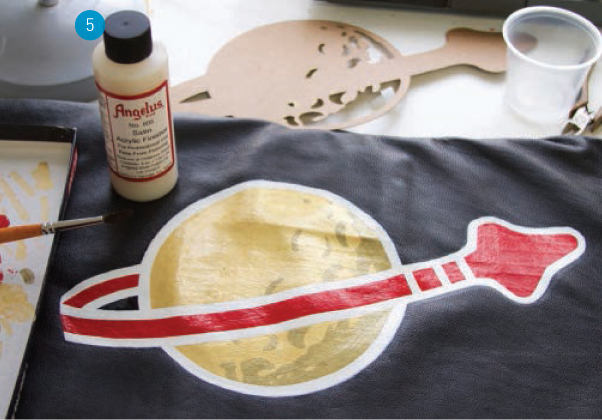
5. Mixing custom colors
Our design called for light and dark metallic gold. However, Angelus only offers a single (but gorgeous) shade of metallic gold paint, which is alternately referred to as “Antique Gold” or just “Gold.” The good news is that you can custom mix your own paint colors. To make a darker gold paint, simply mix in a few drops of black.
For low-contrast accents like our craters — dark gold atop regular gold — a single layer of additional stencil-guided paint works well. Touch it up, as needed using both the lower and upper paint colors..
6. Apply clear finish
Allow the paints to dry overnight, and add the final top coat — a thin and colorless acrylic finish that dries clear. The finisher is available in five different luster levels, from matte to glossy. We used “Satin,” but found it to be glossier than the rest of the jacket, so we’d recommend “Flat Top,” listed as having the lowest sheen. Apply 2 coats of the finish and allow it to dry overnight.
And we’re done!
A final word about the paints: These paints are (as advertised) incredibly flexible and well matched to leather. You can flex and fold the material, and the paint goes right along with it, flexing and folding as though it isn’t there at all. Neat stuff! ![]()