
PRINT-AND-FOLD AMES ROOM
This classic illusion makes objects — and hobbits — seem to change size.

Photograph by Sam Murphy
Print out the template, then cut, fold, and deceive your eyes.
An Ames room is a distorted box that creates an illusion, from one vantage point, of varying depth, distance, and size. Invented by American ophthalmologist Adelbert Ames Jr. in 1934, setups like this were used to make the hobbits look small next to Gandalf in the Lord of the Rings movies.
Here’s how I constructed a miniature Ames room out of paper and cardboard. I’ll start by explaining how I derived the template that I used, which you can download at makezine.com/14/amesroom. You can make your own template using this explanation or just use my template to make your own room.
1. Derive the Ames room template (optional).
The goal is to make a room that looks perfectly even and rectangular from 1 viewpoint. You’ll start by drawing a box and your viewpoint, and then ray-trace the corners of the box away to find new, distorted planes that will fit together along the same sightlines. I did this using Google’s free design software, SketchUp (though you can use any 3D graphics program).
First draw a rectangle and use the Push/Pull tool to create a 3D rectangular room. On the menu View ⇒ Face Style, choose both X-ray and Shaded views. The room can be any size, but it’s easier to design it smaller than you want your final room to be. I made mine 15" high by 25" wide by 30" deep.
Use the Freehand tool (Draw ⇒ Freehand or Command-F) to draw a viewpoint A, a few inches outside the center of 1 wall, the front wall; mine was 10" away. Switch to the Line tool (pencil icon, Draw ⇒ Line, or Command-L) and draw a window on the opposite, far wall.
Then draw a series of lines from A that intersect with and extend past all the corners of the room: B, C, D, E, F, G, H, and I. These are the sightlines you want to maintain (Figure A).

Generating false perspective shapes with SketchUp.
Fig. A: Apparent box and sightlines.
I decided to make the right side of the room the farther one, so objects would seem to shrink as they moved from left to right. To do this, mark a point D2 about 60" from A along the projected line AD, to the upper right corner. From there, drop a vertical line to AE and mark the intersection as E2, for the lower right corner. Then repeat the procedure on the left side, dropping a vertical line between B2 and C2 that connects AB and AC.
These 2 vertical lines determine the scale of the illusion, and D2-E2 should be twice as long as B2-C2. My D2-E2 on the right measured 20", so I found a point for B2 that made B2-C2 measure 10".
Draw horizontal parallel lines B2-B3, C2-C3, D2-D3, and E2-E3 to meet 4 new points on the sightlines that project through the near corners of the room, AH, AI, AF, and AG, respectively. Whatever distance these turn out to be is fine.
To complete the outlines of the Ames room, draw vertical lines B3-C3 and D3-E3. Both the ceiling and the floor are sloped; the rear and long-side walls are trapezoids, while the peephole and short-side walls remain rectangular (Figure B).
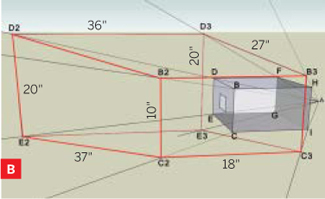

Fig. C: Flat view of one wall.
Now you need to obtain a completely flat view of each face, and export it as a separate 2D graphic. Begin by switching SketchUp to Parallel Projection.
Use Camera ⇒ Standard to display flat, frontal views of the room’s non-skewed faces (the side walls).
For the skewed ones, use the Rotate tool to show the face such that its width and height are at their maximum. In this position, 2 of the axes will be aligned, and 1 edge of the original cube will be aligned directly behind the corresponding edge of the face.
For example, a flat view of face D2-E2-C2-B2, the back of the room, results when the red and green axes are aligned, and line B-C is directly behind line B2-C2 (Figure C). My floor and ceiling shapes turned out to have corners measuring 45°, 105°, 75°, and 135°, while my trapezoidal walls had corners that measured 80° and 100°.
Export each flat face view as a 2D graphic file (File ⇒ Export ⇒ 2D Graphic). Then bring all 6 files into an image editor. I used Photoshop. Use some image editing skills to erase any text or unwanted lines, then bring all 6 clean faces together onto 1 large canvas. Orient and join the faces together to obtain your template. You might have to resize some of them so that everything fits.
After the shapes are joined, draw the windows, doors, and floor. Here’s how to draw an 8×8 checkerboard tile pattern for the floor. First, find the midpoint on one of the short, undistorted sides. Then draw 2 diagonal lines across the floor from corner to corner. Draw a line bisecting the floor, from the side midpoint, through the point where the diagonals cross (the yellow dot), and across to the other side.
Follow the same procedure recursively to bisect each half of the floor, then all 4 quarters of the floor, for 7 total lines (Figure D). Then do it all over again from the perpendicular short side of the floor, to draw the other 7 lines of the grid.

Finally, add tabs to the outside edges of the template to help with taping the box together. Your template is complete.
2. Construct the room.
The larger the room, the more noticeable the illusion, so it’s best to print it big. Use your template, or download mine at makezine.com/14/amesroom.
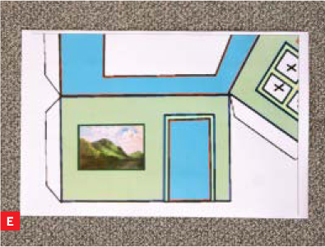
In Photoshop, I resized my final template to 48"× 54", but you can make it even larger, especially if your printer can handle poster size. The one I used could print up to 12"×18", so I used Photoshop to divide the image into 12 sections, and printed each one separately (Figures E, F).

Photography by Ed Troxell
I laid the sheets out on the floor, cut away the white borders, and taped them all together (Figure G). Then I cut out the windows, skylight, and peephole, marked with Xs on the template (Figure H). Finally, I folded in the tabs, carefully folded together the entire room, and secured all the edges with more tape (page 60, top).


3. Test the illusion.
The final step is to test the illusion using various objects such as pens, keys, playing cards, or small toy figures.
Place an object in one corner of the back wall and look through the peephole to view the inside of the room. Move the object slowly to the other corner and notice its apparent change in size. Identically sized objects, such as playing cards, that move across each other will seem to shrink and grow as they exchange places along the back wall.
![]() Watch a video of Ranjit B.’s Ames room at makezine.com/14/amesroom.
Watch a video of Ranjit B.’s Ames room at makezine.com/14/amesroom.
Ranjit B. is a freelance graphic designer and web developer.

For an event at the Children’s Hospital where I work, I was asked to make an interactive display for kids. It had to be cheap enough to dispose of because there was no telling what kind of cooties it might transmit. I removed the front of an old webcam/kids’ digital camera and glued it on top of a thrift store microscope. The results were fantastic using the original webcam software, the total cost was nil, and it even had the ability to take still shots if someone wanted a keepsake.
–John Dunlap