
SCANNER CAMERA
Mod a flatbed scanner to take photos that deconstruct time and motion.
Photography by Mike Golembewski
A scanner’s image sensor captures a scene slowly, line by line.
Several years ago, I built my first scanner camera. The idea was simple: I would use an ordinary flatbed scanner with a homemade large-format camera. The camera would focus the image onto the scanner bed in place of photo paper or film. I expected this to be a quick little art project made with a cardboard box, the cheapest flatbed scanner I could find, and lots of duct tape.
But when I got it all to work, the results were wonderful. Stationary objects photographed normally, but moving objects appeared twisted and distorted into fascinating shapes. At first I thought there was something wrong with my contraption, but then I realized that the movement of the scan head was meshing with the movement in the recorded scene. The distortion is similar to the effect created by moving an original on a photocopier mid-copy, but extended into the real world.
Making and using a scanner camera is a lot of fun as a technical exercise, but more importantly to me, it provides an interesting photographic perspective on time and movement.
Here’s how to build 2 versions: a simple cardboard-and-duct-tape one that keeps the scanner intact, and a warranty-voider version that’s more portable and flexible, and takes sharper pictures.
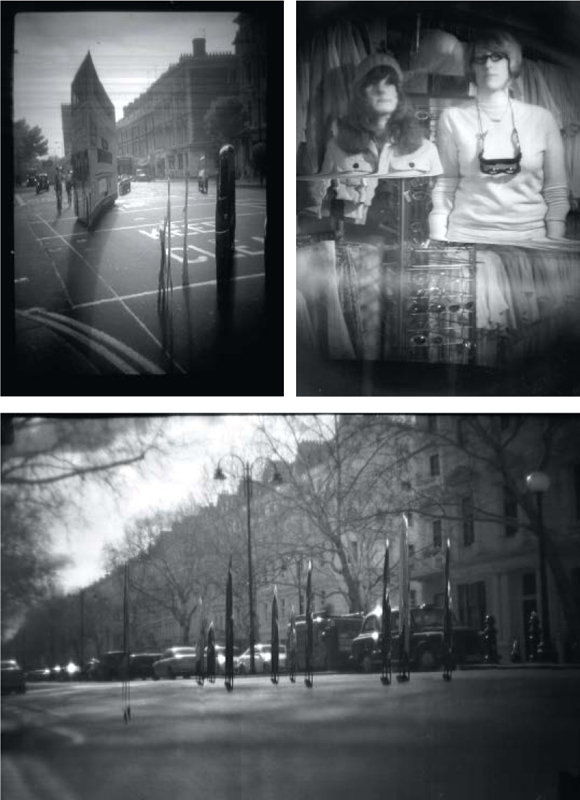
SIMPLE SCANNER CAMERA PHOTOGRAPHS: Traffic study at Notting Hill Gate, London; Moreen and Rowan, Brighton; traffic study at Queensgate, London.
Simple Scanner Camera
1. Build the baseboard.
Cut a piece of black foamcore that fits exactly over your scanner’s glass bed, then cut a 7" square hole out of the center. This will be the baseboard for your camera.
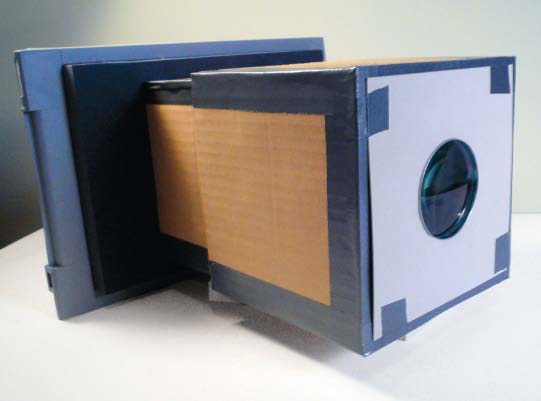
2. Make the boxes.
Make 2 boxes that slide together for focusing. Using cardboard and glue, make a 7"×7" inner box with both ends open, and then an outer box with a lid on top, slightly larger than the inner box, so that they nest snugly together. Line all box edges with duct tape. Cut a 3½"-diameter hole in the lid of the outer box.
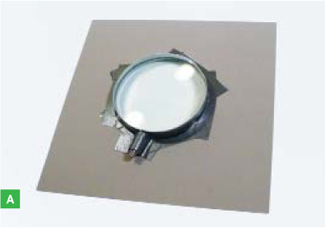
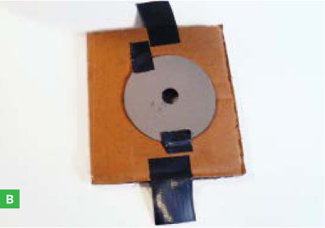
3. Make the lens board and aperture cards.
Remove the lens from your magnifying glass and cut a hole in the center of a 6"×6" cardboard square to hold it. Tape the edges of the lens securely into place on the cardboard (Figure A). This is your lens board. Out of heavy cardstock, cut a set of covers for the lens, with different-sized holes in the middle. These are the aperture cards, which you’ll tape over the lens to control how much light gets into the camera, just like an iris in a regular camera (Figure B).
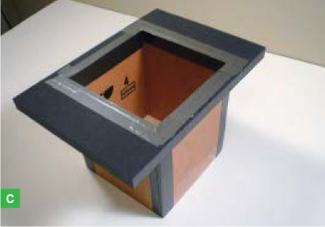
4. Assemble the camera.
Fit 1 end of the inner box into the baseboard and duct tape it in place from the inside (Figure C). Slip the outer box over the inner box and make sure you can slide it back and forth. Tape the lens board to the outer box with the lens centered over the 3½" hole.
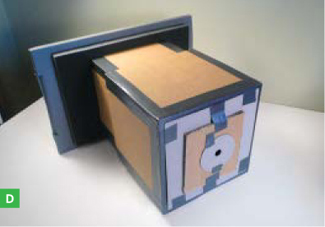
5. Take some photos.
Your scanner camera is ready to go! To focus it, tape a piece of tracing paper over the hole at the back of the baseboard, then point the lens toward a brightly lit scene. Slide the outer box back and forth until the image comes into focus on the tracing paper. With my 2½" magnifying glass lens, I needed a focal distance (distance between lens and image) of about 7" to 12" for objects in the same room.
Tape the camera to the front of your scanner and start up your imaging application. Use the Preview button for fine-tuning the focus, and when you’re ready, click Scan to take a picture. To adjust the image brightness, try different lens aperture cards (Figure D).
Deluxe Model Scanner Camera
Photographs taken with the simple scanner camera typically feature heavy vignetting, where brightness drops off farther away from the center. Also, the scanner’s lamp can add undesired interference to a shot’s lighting.
If you’re willing to mod your scanner and dedicate it to camera use, you can get higher image quality and greater flexibility. Once you make these modifications you won’t be able to use it as a normal scanner. And if you mess things up by working too quickly, you run the risk of rendering your scanner permanently and totally useless. Assuming you’re still with me, read on.
1. Install the software.
First you need to install open source drivers from the SANE project (Scanner Access Now Easy) that allow your scanner to skip the calibration step and take scans even after being hacked. Download the latest version of the TWAIN SANE interface at www.ellert.se/twain-sane and follow the installation instructions.
You should be able to access your scanner via the SANE-TWAIN plugin from any TWAIN-compliant imaging application.
With the software installed and the scanner plugged in, you should see a new SANE item in your Mac’s System Preferences. Open it up, find “plustek” in the driver list, and click its Configure button. This will open the preferences file for the back end of your scanner, where we’ll need to change a few lines:
On line 105, change option skipCalibration 0 to option skipCalibration 1
On line 111, change option skipFine 0 to option skipFine 1
On line 116, change option skipFineWhite 0 to option skipFineWhite 1
Click OK to confirm the changes. Your scanner software is now ready to use with a modified scanner camera.
2. Open up the scanner.
Remove the lid from the scanner; you won’t be needing it anymore. Two gray rails run along the long sides of the scanner and are held in place with tape. Insert the tip of your hobby knife under each rail and gently pry it up until it detaches. Remove the rails, then lift off the glass plate (Figure E, previous page). Set the glass and rails aside, and try not to touch the glass more than you need to.

3. Take apart the scan head assembly.
Locate the scan head assembly, which pulls itself back and forth on a geared thread. Gently pull it to the middle of the scanner, then orient the scanner so that the scan assembly runs left to right and the ribbon cable that feeds it bends toward you.
The assembly has 2 main components: a gray metal housing that contains motors and electronics, and the thinner, black plastic sensor bar with the image sensor and lamp. Find and remove the white plastic tabs at each end of the sensor bar and set them aside.
The sensor bar is secured to the scanner housing by a metal clasp on its left side. Use pliers to bend the clasp so that it no longer holds the peg (Figure F, page 81). You’ll need to bend it back into place later, so don’t mangle it. There is also a small spring on the right side of the scanner housing, beneath the sensor bar. Take it out and set it aside.

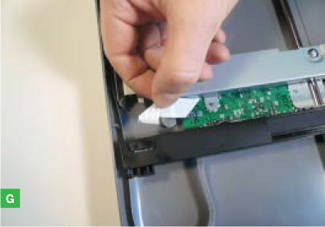
4. Remove the sensor bar.
The sensor bar connects to the scanner housing by a white ribbon cable. Carefully remove the ribbon cable from the sensor bar by slowly pulling it straight out (Figure G, page 81). Don’t wiggle it. Place the sensor bar on a clean surface and keep the rest of the scanner and the pieces you removed in a safe place.
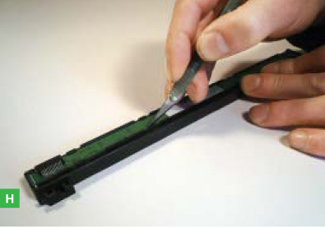
5. Remove the contact image sensor (CIS).
From this point on, you need to be careful. The contact image sensor (CIS) is the green PCB inside the sensor bar. It’s delicate, and damaging it renders your scanner useless. The CIS is also what lets us make this camera; it’s easy to hack and uses very little power, allowing the scanner to be powered by a laptop USB connection.
Place the sensor bar facedown. Carefully remove the 3 pieces of tape covering the CIS and set them aside. Next, remove the 10 molded plastic tabs that hold the CIS in its black plastic housing. Use an X-Acto knife to lightly score along the base of each tab until it falls off (Figure H). Use tweezers to remove each detached tab. Make sure that neither the knife blade nor the tweezers touch the CIS. Take your time; this should take 20–30 minutes.
Remove the green PCB from the sensor bar. Use as little force as possible. If it won’t lift out easily, work on the tabs some more, then try again. Once it’s removed, place it gently in a clean, safe place, away from your work area.
6. Modify the sensor housing.
You need to allow as much light from the lens as possible to hit the CIS. To do this, you’ll modify its plastic housing. First, carefully remove the clear plastic prism and the black rectangle of dense plastic that run the length of the sensor housing.
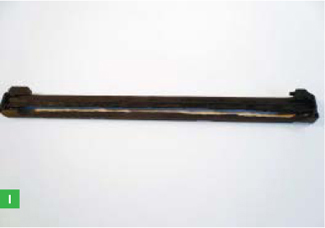
Now you’ll want to cut out the middle and flatten the top of the sensor housing, so that more light can get through to the CIS and the sides won’t cast shadows. Use the Dremel with a sanding band bit to grind the top of the sensor bar flat. Work at a slow speed — if you try to work too quickly, the plastic will melt. Once you’ve flattened down the top of the sensor bar housing, use the abrasive point tip to clear out a long slot in middle (Figure I).
Clean off excess shreds of plastic with your X-Acto knife and fine sandpaper. Vacuum everything up at this point — you don’t want any of that black plastic dust getting onto the sensor or into the scanner.
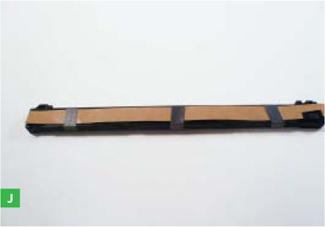
7. Cover the lamp and replace the CIS.
Bring the CIS board back to your workspace. The white tab sticking up at 1 end is the LED light source. Cover it completely on both sides with electrical tape to prevent any light from escaping. Then insert the CIS back into the modified housing and replace the original pieces of black tape on the back of the bar. Cut a piece of paper to fit over the entire bottom of the sensor bar and tape it in place with small pieces of duct tape (Figure J).
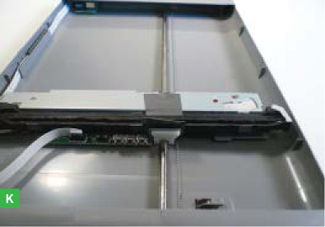
8. Put the scanner back together.
Take the scanner back to your workspace. Reconnect the white ribbon cable to the sensor bar. Place the sensor bar into position, and bend the metal clasp back into place. Replace the spring and the white plastic clasps. Add 2 folded-over tabs of duct tape to the scanner assembly, next to the metal bar (Figure K). These will help prevent reflections from the metal bar from affecting your image.
Replace the glass plate — make sure it’s clean first! Reattach the gray plastic strips. If you need to, use tape to secure them. There! Your scanner is back in one (modified) piece.
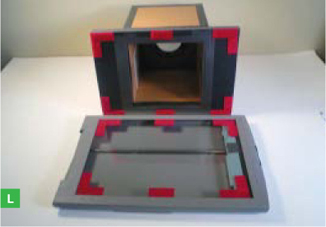
9. Attach the camera.
Use velcro tape to attach your camera to the scanner (Figure L). Attach the pointy side of the velcro to the glass (to avoid scratches). Run duct tape around the outside of the baseplate, to keep out all outside light.
Your camera is complete. Plug it into your computer, start up your imaging application, and load the SANE-TWAIN plugin. If everything went according to plan, you’ll be taking scanner photos in no time. Follow the method described in Step 5 of the simple camera. Explore the options in the SANE-TWAIN interface; they give you a high level of control over the image quality. Enjoy, and good luck!
Tips for the Scanner Photographer
Once you’ve made the deluxe scanner camera, think of the scanner itself as a photo back, and try using it with other camera bodies. I’ve assembled scanner cameras from Brownie box cameras, cardboard boxes, PVC tubes, and even old stage lights and magic lanterns. With a little effort, you can also mount a scanner camera back on a large-format monorail or field camera.

Large-format lenses for cameras are expensive, but you can find lenses that may work just as well inside old photo enlargers, overhead projectors, stage lights, and even toys!
The nice thing about the CIS-based scanners used for this project is that they’re powered via USB. Hook your camera up to your laptop, and take it on the road.
The motion distortion is the most interesting thing about the scanner camera. Spend some time getting to understand it, and you’ll start thinking about time and movement in photography in a whole new way — and this will start to inform your traditional photography as well.
![]() For more photos taken with the simple and deluxe scanner cameras, see makezine.com/14/scannercamera.
For more photos taken with the simple and deluxe scanner cameras, see makezine.com/14/scannercamera.
Michael Golembewski is an artist and interaction designer who lives in Brooklyn, N.Y. Visit his Scanner Photography Project at golembewski.awardspace.com.
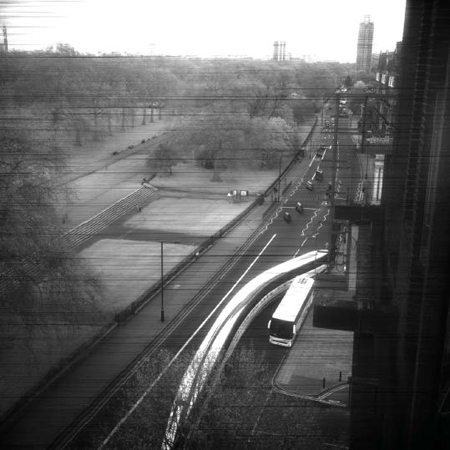


DELUXE SCANNER CAMERA PHOTOGRAPHS: Portrait of Abigail Durrant, London (opposite); traffic study with moving bus at Hyde Park, London; portrait of Astrid Askberger, London; in the pub at the All Tomorrow’s Parties festival, Camber Sands, U.K.