ELECTRONICS
For our 5-axis conversion, we replaced the
original Prusa i3 electronics board with the
RepRap firmware-compatible 3D printing board
called Duet 2. Duet 2 supports the addition
of an expansion board called Duex 5 that
allows up to 5 additional stepper motors.
Replacing the board is straightforward: you
simply rewire the existing electromechanical
elements from the original Prusa i3 board to
corresponding pins on the new Duet 2 board.
We share full connection details in our Open5x
repository (github.com/FreddieHong19/Open5x).
We found the Duet Web Control interface very
user friendly to monitor and control the 5-axis
system. Duet also has an active community forum
where we sought advice when we needed to.
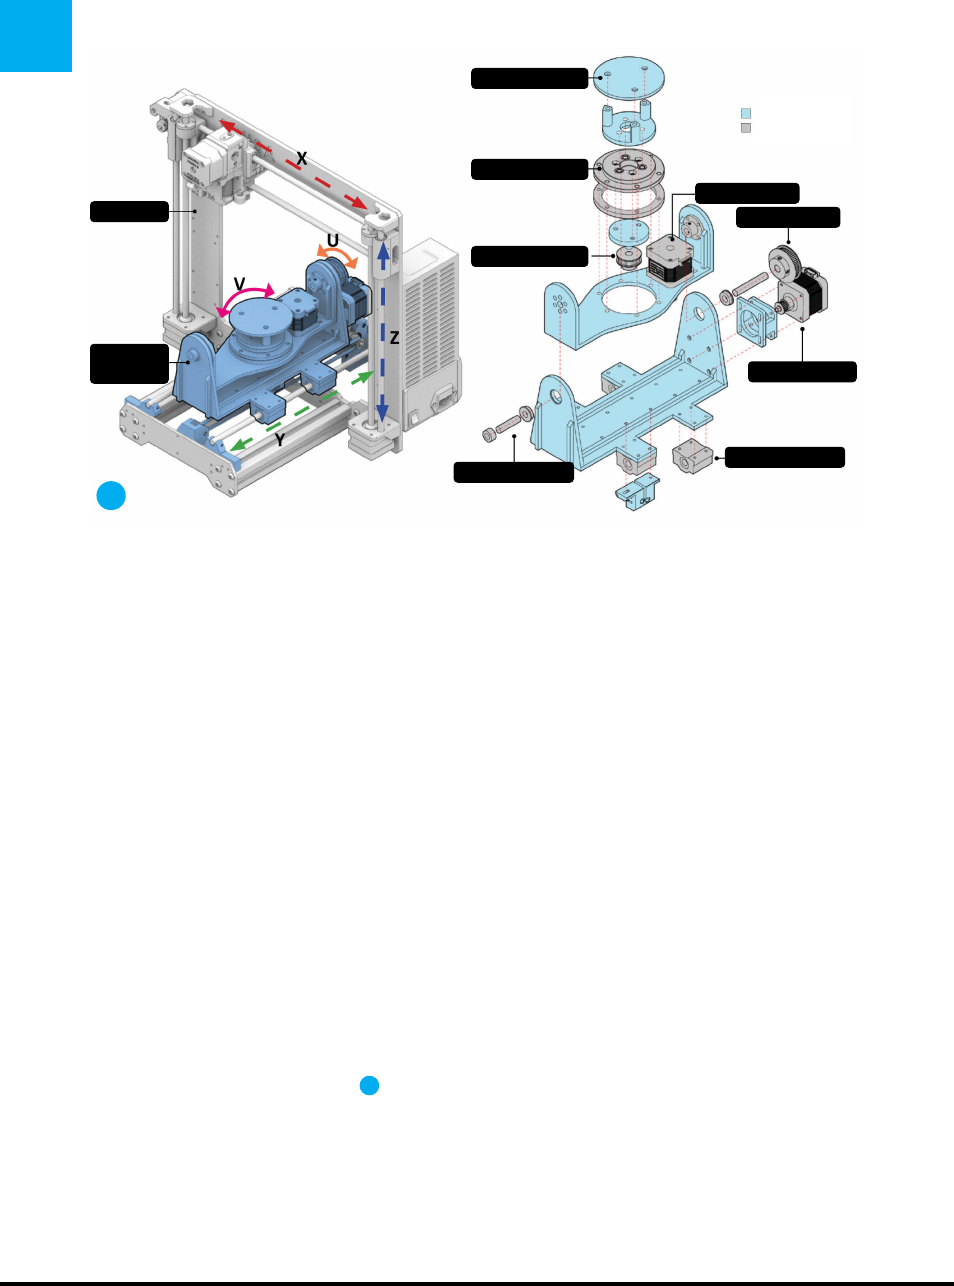
BUILDING 4TH AND 5TH AXES
Our video at youtu.be/C3vKHuxUmjc shows a
detailed walk-through of how to assemble the two
rotary axes, known as the U-axis and V-axis. The
exploded isometric drawing (Figure
D
) shows the
overall assembly guideline. Parts colored in blue
are 3D-printed parts and the parts colored in gray
are consumer hardware.
You can 3D print the STL files from our
repository, and we also share Rhino and Fusion
files so you can modify them to fit different
hardware. We tried using both ABS and PLA with
solid infill settings, and found that solid PLA has
better rigidity.
The trickiest part of assembling the current
iteration is mounting the U-axis stepper motor,
but this will be changed in the next iteration. It’s
also tricky to fit the Y-axis belt, but not much
harder than ordinary Y-axis tensioning.
TOOLPATH GENERATION
With extra freedom of design, 5-axis 3D printing
also requires more considerations by the user.
For example, you need to decide the direction
of the filament extrusion, select supportless
structures, and revise the toolpath to avoid
collisions.
First you import the 3D model into
Grasshopper and select the surface or a
geometry that you want to slice and 3D print in
5-axis. Then you decide on printing parameters
such as layer height, infill direction, and so on. In
our current version of the slicer we can preview
the toolpath before proceeding to produce the
G-code.
G-CODE GENERATION AND
SIMULATION
When ready, you can start the G-code production
in Grasshopper by clicking a button for slicing.
Bear in mind that slicing for 5-axis takes much
longer than conventional slicing, due to the two
B
Freddie Hong/Open5x
Prusa i3
V-axis bearing
V-axis motor
GT2 pulley
U-axis motor
Y-axis bearing
3D printed parts
Mechanical parts
U-axis bearing
Print bed
GT2 pulley
Rotating
gantry
D
PROJECTS 5-Axis 3D Printer
90 makezine.com
M83_088-91_5Axis3DP_F1.indd 90M83_088-91_5Axis3DP_F1.indd 90 10/11/22 9:41 AM10/11/22 9:41 AM
..................Content has been hidden....................
You can't read the all page of ebook, please click here login for view all page.