
1
PuzzleScript Basics
In this chapter, you’ll learn the basic components of PuzzleScript using a simple puzzle game. We call a game a puzzle game when it’s turn-based, spatial, and solvable.
Turn-based means that events or actions in the game happen one at a time, like in a game of Checkers. The player makes a move, looks at the board, thinks about what to do next, and then makes another move. Thinking and planning are usually important parts of puzzle games.

Spatial means that it matters where objects are on the screen. In a classic puzzle game called Sokoban, the player tries to push crates onto special panels. Crates get in the way of other crates, so playing the game involves thinking carefully about where all the crates are and where to move them.
Solvable means that every screen in the game has a winning condition. For example, when the player gets all the crates onto the panels in Sokoban, they’ve solved the puzzle! Then they go on to the next puzzle.
There are ways to make PuzzleScript games that aren’t turn-based, don’t require objects to be in certain positions, or don’t require the player to solve puzzles. But the easiest game to make with PuzzleScript is one that involves all three features. The PuzzleScript demonstration game is a basic example of this, so it’s a good way to start learning about PuzzleScript.
Getting Started with PuzzleScript
Open https://www.puzzlescript.net/ in a web browser, and you should see something like this.

Click the Make A Game button to see something like this:
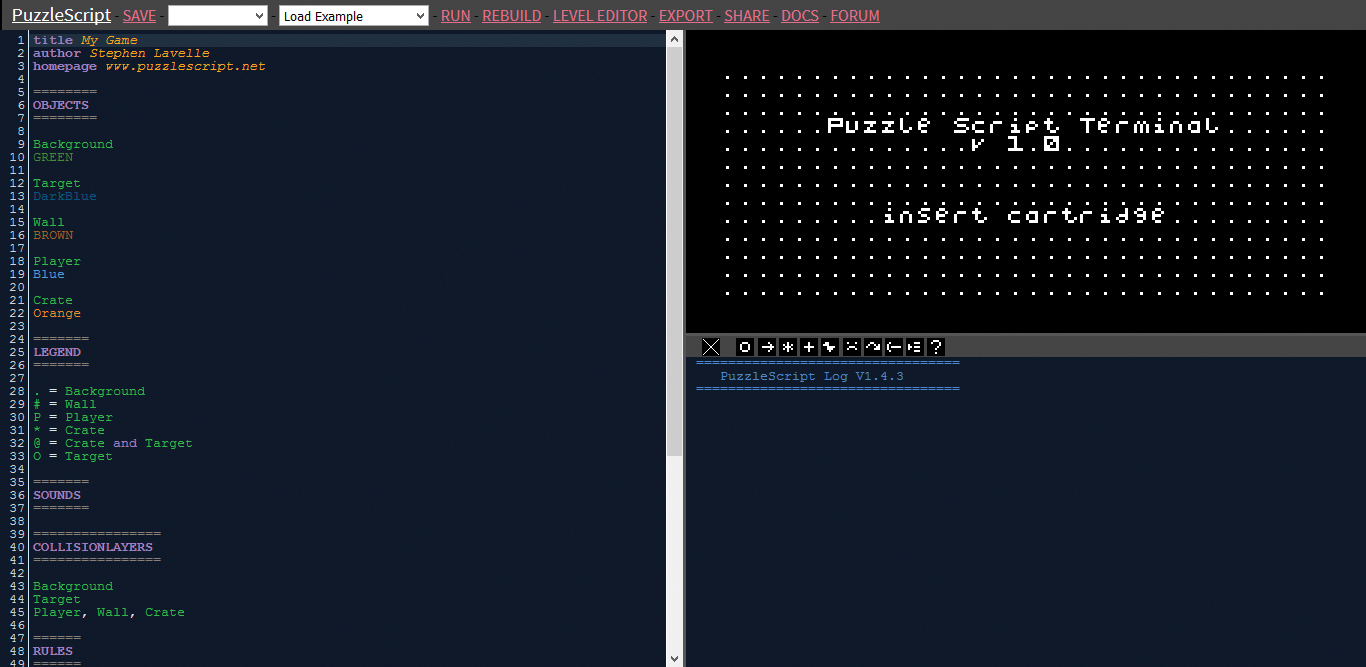
This is PuzzleScript! The box on the left is your game code, and the box on the right, Puzzle Script Terminal – Insert Cartridge, is where your game will appear.
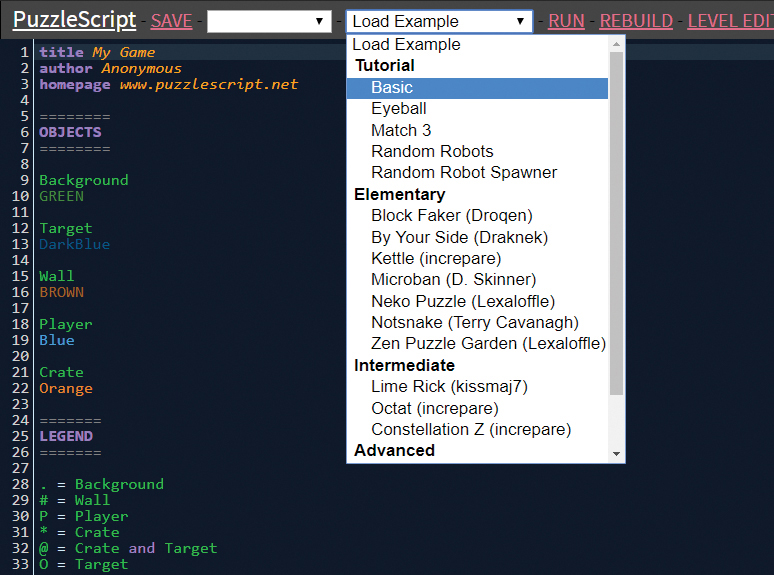
Let’s look at a sample game. Click the Load Example drop-down menu at the top of the screen, and then choose Basic. This demonstration game was made by Stephen Lavelle, the creator of PuzzleScript.
Click Run at the top of the screen. The game’s title screen, Simple Block Pushing Game by Stephen Lavelle, should appear in the window at the right. This simple game is a good place to start learning how PuzzleScript works.
Press the X key on your keyboard to start the game. If the game doesn’t start, try clicking the title screen and pressing X again. When the game starts, you should see this screen.

Try playing the game! You’re the little person. The goal of the game is to get all the orange boxes onto the black squares. Use the arrow keys on your keyboard to move the person, and push an orange box by moving into it. This puzzle is tricky, so don’t worry if you can’t solve it! Just play for a little while to get a feel for what a PuzzleScript game is like.
Parts of PuzzleScript
The colored text on the left side of the screen is the actual script of the game, which tells the game what to do. Let’s walk through all the different parts quickly.
Adding Basic Information
At the very top of the script you see a game’s basic information:
title Simple Block Pushing Game
author Stephen Lavelle
homepage www.puzzlescript.net
When you run the game, you see the title as Simple Block Pushing Game with the author, Stephen Lavelle, listed underneath. If you change the title or author name, you change the game’s title screen too. For example, to call your game Mystery of the Missing Socks by Clarence LeFrou instead, simply replace the text next to title with Mystery of the Missing Socks and the text next to author with Clarence LeFrou like this:
title Mystery of the Missing Socks
author Clarence LeFrou
homepage www.puzzlescript.net
Now when you run your game again, you should see this.

Let’s now move on to objects.
NOTE: The homepage just lets you put a link at the bottom of the page when you share your game. You can just leave it as is or change it to your website if you have one.
Creating Objects
Objects are one of the most important parts of your PuzzleScript game! They’re all the little pieces that make up your game—all the things that move or don’t move and that are moved by other things.
To add a new object to your game, you put it in the game code’s OBJECTS section. Here’s what the OBJECTS section of the Simple Block Pushing Game looks like.
========
OBJECTS
========
Background
LIGHTGREEN GREEN
11111
01111
11101
11111
10111
Target
DarkBlue
.....
.000.
.0.0.
.000.
.....
Wall
BROWN DARKBROWN
00010
11111
01000
11111
00010
Player
Black Orange White Blue
.000.
.111.
22222
.333.
.3.3.
Crate
Orange Yellow
00000
0...0
0...0
0...0
00000
As you can see, the Simple Block Pushing Game has five objects: Background, Target, Wall, Player, and Crate.
Each object is assigned a name (Background, Target, and so on), so PuzzleScript knows when you’re referring to it, and a description of what it looks like. The list of colors tells PuzzleScript what colors an object should be, and the numbers after them tell PuzzleScript where to put those colors. For example, the player’s colors are black, orange, white, and blue. Those colors give the player black hair, orange skin, a white shirt, and blue pants.
Later, we’ll draw our own pictures to represent all the objects in our game. But for now, let’s try something simple: change the green Background to purple or pink. Then click Rebuild to see how the game changes.
Defining Objects in the Legend
The next part of the script is the legend and is similar to the legend on a map, which explains which symbol represents a mountain or a forest, for example.
In your game, you’ll create levels to tell PuzzleScript where all the objects should go. Levels are saved as text characters, such as letters, numbers, and symbols like ., #, P, and so on. The items in the LEGEND section tell PuzzleScript which symbol refers to which object. Here’s the LEGEND section of the Simple Block Pushing Game:
=======
LEGEND
=======
. = Background
# = Wall
P = Player
* = Crate
@ = Crate and Target
O = Target
You can pick any keyboard symbol to represent any object, including the walls and the floor. But it’s best to pick symbols that, when you look at your levels later, will make it easy for you to identify what the level is at a glance. I usually pick # for walls because it’s dense and squarish, and pick . for the background because it’s the closest-looking symbol to empty space. For other objects, it’s easy to remember something like P represents Player.
This is the first level of the Simple Block Pushing Game:
=======
LEVELS
=======
####..
#.O#..
#..###
#@P..#
#..*.#
#..###
####..
It shouldn’t be too hard to tell what the shape of the walls is and where all the objects are located inside it. The LEGEND tells us that the letter P is the player; the asterisk (*) is an orange crate, and the O is the target the player is trying to push the crate onto. The at symbol (@) represents a combined crate and target (you’ve pushed the crate onto the target), which tells PuzzleScript to put both objects in the same space.
Adding Sounds
Any sounds in your game go in the SOUNDS section. There’s just one sound in this sample game, that of a crate being pushed.
=======
SOUNDS
=======
Crate MOVE 36772507
The number 36772507 represents the sound to play, and Crate MOVE tells PuzzleScript what action to link that sound to. When you click the numbers, you’ll hear the sound play.
Setting Collision Layers
The code’s COLLISIONLAYERS section tells PuzzleScript which objects bump into others and which objects are on top of other objects. PuzzleScript manages collisions by moving objects in layers. The Simple Block Pushing Game has three collision layers.
================
COLLISIONLAYERS
================
Background
Target
Player, Wall, Crate
To visualize these layers, think of your flat screen as if it has three dimensions, going from front to back. The Background layer is the layer farthest back into the screen. The Target layer (the dark squares) is the middle layer in front of the Background layer. And the frontmost layer is the one that contains the player, walls, and crates.
Because the player, walls, and crates are on the same layer, the player can’t move through either walls or crates, although they can push crates. Crates can’t move through walls or through other crates: if you try pushing a crate through another crate, it will be blocked and won’t move. For example, in the second level of the Simple Block Pushing Game, if the player tries to push down on the crate below them, it won’t budge because it’s blocked by another crate.
When you create new objects, you need to add them to the COLLISIONLAYERS section. Most objects will probably go on the same layer as the player. But sometimes you’ll want objects to share the same space as other objects, like crates and targets.
Writing Rules
In the RULES section we describe what should happen in your game—the way objects interact with each other. The Simple Block Pushing Game contains just one rule that describes how the player pushes crates:
======
RULES
======
[ > Player | Crate ] -> [ > Player | > Crate ]
On the left side of the arrow (->) are the objects the game is looking for. If the game finds these objects in the order written from left to right (a player next to a crate), the game changes those objects into the set of objects on the right side of the arrow (a player next to a crate). The difference is that in the first case, the player is moving. In the second case, the player and the crate are moving: that is, the player is pushing the crate.
The rule is saying that if the first set of objects exists, change it to the second set of objects. Change this to that: [ this ] -> [ that ].
You use square brackets ([]) to enclose a set of objects and a vertical bar (|) to separate objects inside the square brackets. For example, the following line means a player is right next to a crate.
[ Player | Crate ]
But the rule in the Simple Block Pushing Game is looking for this:
[ > Player | Crate ]
Here, the greater than sign (>) means that the player is trying to move. The > is pointing toward that crate, which means the player is moving toward the crate. When the player moves toward a crate, the crate should move too, because the player is pushing it. So to push a crate, you turn Crate into > Crate to say that it’s moving in the same direction as the player.
All this happens before any of the objects actually move. The > really means “I want to move.” So a > Player and a > Crate will move at the same time. It’s a little confusing, so let’s walk through it step-by-step.
Each time you press an arrow key in the Simple Block Pushing Game, this happens:
- The Player moves in the direction of the arrow key, turning the Player into a > Player.
- PuzzleScript checks to see whether it can find any objects on the level that looks like [ > Player | Crate ]; that is, a player trying to move into a crate. If it finds a match, it changes those objects into whatever the rule says to change it to, which in this case is [ > Player | > Crate ].
- All the objects marked with > will try to move in that direction. If they’re not blocked by something else, they should move. If they’re blocked, they should stay in place.
Keep in mind that PuzzleScript rules are checked in every direction. So even though the following rule is written left to right, it still will let a player push a crate from above, below, or the left.
[ > Player | Crate ] -> [ > Player | > Crate ]
You can read this rule as “If the player is moving toward a crate, make the crate move in that same direction.” The rule doesn’t specify the direction.
Setting Win Conditions
The WINCONDITIONS section in a PuzzleScript game explains what the player has to do to win the level and advance to the next level. This is the Simple Block Pushing Game’s win condition:
==============
WINCONDITIONS
==============
All Target on Crate
This condition means that when all target spaces (the dark squares) have a crate occupying the same space, the player wins the level! Why not write this as All Crate on Target? Well, there’s a subtle difference between the two.
- All Target on Crate means every target must have its own crate.
- All Crate on Target means every crate must have its own target.
Let’s say there are more crates than targets. Then, in the case of All Target on Crate, if every target had a crate on it, the win condition would be satisfied, even if some crates were left over. But if the win condition were All Crate on Target, every crate would need to be on its own target. In this particular scenario, there aren’t enough targets to satisfy this win condition, so the player could never win the game.
Other games might have other win conditions. Here are some examples of valid win conditions:
- No candy: A game where you try to eat all the candy
- Some purple: A game where you try to mix colored paint to make new colors
- No puppy in the doghouse: A game where you try to take every dog out for a walk
NOTE: To learn more about PuzzleScript win conditions, read the official PuzzleScript documentation at https://www.puzzlescript.net/Documentation/documentation.html. Click Docs at the top of the screen and then click Bird’s-Eye View of a PuzzleScript File ▸ WinConditions.
Making Levels
Your game’s levels go in the LEVELS section of your PuzzleScript script, as symbols, one after the other. (Fortunately, you don’t have to enter all your levels manually; PuzzleScript has a neat level editor, which you’ll learn about in Chapter 2.)
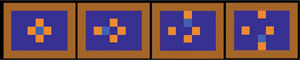
The Simple Block Pushing Game has two levels, which the player will see in the order in which they appear in the list:
=======
LEVELS
=======
####..
#.O#..
#..###
#@P..#
#..*.#
#..###
####..
######
#....#
#.#P.#
#.*@.#
#.O@.#
#....#
######
Recall from the LEGEND section earlier that # represents walls, . represents open space, P is the player, * is a crate, O is a target, and @ is a crate on a target. The contents of the LEGEND tells PuzzleScript how to “read” this level and turn it into a playable game with all the objects in their correct places.
When you build your levels, use the level editor. But make sure that all finished levels end up in the LEVELS section in text form so they’ll be included in your game. (We’ll talk more about levels in Chapter 2.)

What You Learned
Phew! Now that you’ve learned the basic components of a PuzzleScript game and how PuzzleScript works, let’s take a short break. Take a deep breath, pet your cat, go for a walk, or make yourself a sandwich. You could even try playing some of PuzzleScript’s other built-in sample games by clicking the Load Example drop-down menu at the top of the page.
Remembering to take breaks is a very important part of game making! If you keep working nonstop, you’ll get tired and frustrated, and you won’t get anything done! So make sure you take a moment to step away from the computer every now and then. I always get my best ideas for games when I’m away from the computer.
When you get back from your break, we’ll make a game called Herding Cats from scratch!