
6
Robot Heist: Refining Your Level Design
Now that all your operatives are in place, like a true mastermind, you can begin planning your heist of the century. You can start with the game you built in the previous two chapters or visit https://tinyurl.com/robotsneedlevels/ to find a fully programmed version of Robot Heist just waiting for some levels!
Brainstorming the Story
So far, we have two characters with different abilities, and we have a bunch of objects for them to interact with. How do we make our game feel like a heist? Before we start designing levels, let’s think about the shape of our story. What’s the story structure those levels will fit into? When I made Robot Heist, I took some time to brainstorm a bunch of ideas for the game and tried to use just the good ones.
We want Vertibot and Horibot to work together to pull off the heist. How do we show this idea to the player? One way is to have the player start with only one robot. If the player starts as Vertibot, there are things they simply won’t be able to do until they find Horibot. This also makes sense when we’re thinking about difficulty. Managing two different robots at the same time can be tricky. Giving the player only one robot to start with gives them time to learn the basics before the second robot appears.
Because this is a heist, let’s say Horibot is locked in prison for a heist he committed a long time ago. Vertibot’s first task will be to bust him out. Once they’re reunited, they can pull off the final job that will set them up for life. And what if the treasure they’re trying to steal is an object they can push around, like a crate, and they have to work together to get it out of the bank? That way they really need to use teamwork!
Now that we have a general picture of what the story might be, let’s map it out:
Act 1: The Prison Break Vertibot breaks into robot prison alone to rescue Horibot.
Act 2: The Bank Job Reunited, Vertibot and Horibot work together to break into the Data Bank.
Act 3: The Getaway Vertibot and Horibot find the solid gold superconductor and abscond with it using maximum teamwork.
All right, now we have an idea of how our game will start. Before we make our levels, let’s look at what’s in the level editor!
Exploring the Palette
If you loaded the preprogrammed version of the game from the URL mentioned earlier, you might be wondering what all the objects in the level editor are. If you’re working with your own game, feel free to skip this section. Here’s what’s in the Robot Heist level editor:
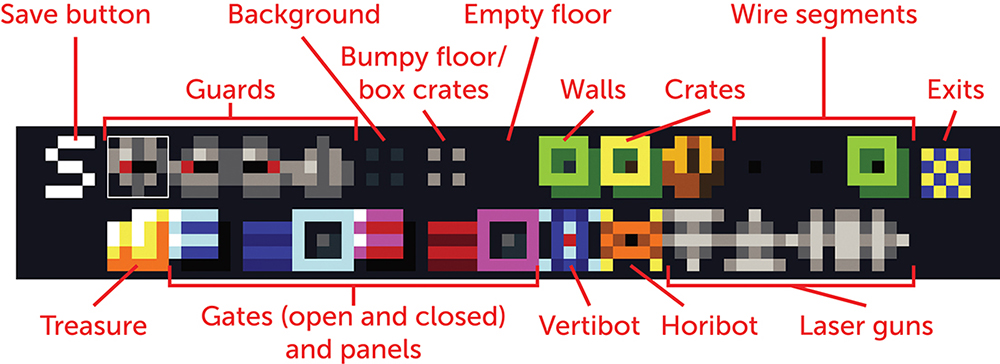
- Guards and laser guns have four different versions, each facing a different direction.
- The floor has three different versions: normal, bumpy, and blank. The bright gray bumpy floor blocks crates from being pushed onto it. Also, patrolling guards won’t cross over empty floors, so you can use them to shape the guards’ paths.
- Walls are two different colors, purely for style reasons.
- Wire segments draw wires along the floor (in my levels, I use them to draw trails from gates to the panels that open and close them). These look like dots, but when they’re next to other wire segments, they create a continuous line. The first wire segment produces a line (with four dots) over a normal background tile; the second produces a line (no dots) on an empty background; and the third produces a line that goes through a wall. Don’t worry too much about these wires.
- Treasures are the solid gold superconductors. If a superconductor is in a level, the player can finish the level only by getting both robots and the superconductor to the exit.
- Gates come in two colors: blue and pink. They also have two states: open and closed. Whichever state a gate starts the level in, putting something on the same colored panel will make it switch to the other state. (Closed gates will open; open gates will close.)
In this version of the game, Vertibot always starts a level awake and Horibot starts asleep. This means you can make levels that feature only Vertibot but not levels that feature only Horibot. If you want to make levels featuring only Horibot, you’ll need to make a symbol for his awake object.
Remember that these are just the objects that have symbols in the legend. Now that you know where everything is, let’s make some levels!
Creating Your First Level
One feature of level design is that it introduces the player to all the important game elements. Robot Heist has five important elements: switching robots, pushing crates, opening gates, avoiding lasers, and eluding guards. Can we design levels that introduce each of those objects or ideas? Which one should we start with?
Well, you can’t do a lot with gates without crates to hold them open. And you can’t get very far with lasers without crates to block them. It seems like pushing crates is the first concept the player needs to understand, so let’s start with a level that teaches them that.

Introducing New Objects
Because I start the game with just Vertibot and introduce character switching later, I want my first level to introduce the idea of pushing crates and also to make the player realize they can only push objects vertically.
What does a level like that look like? Try to make your own first. Then I’ll explain how I came up with my first Robot Heist level. Don’t read ahead until you’ve taken a crack at this!
What does your level look like? Does it teach the player pushing but also make it clear that they can only push objects vertically?
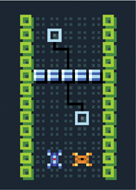
Here’s what I came up with.
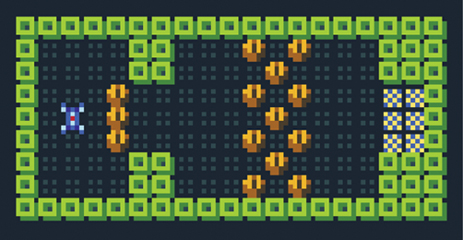
Example of a horizontal level
I tried to make a level that was horizontal where objects look like they should move horizontally, but if the player tries to push that way, they’ll realize they can’t. Why? Remember when we talked in Chapter 4 about how failure is important? By trying actions they can’t do, the player learns the rules of the game!
This level has two main parts: the first part displays a door the player can’t get through until they push crates out of the way. That’s just to introduce the idea of pushing vertically. The player can’t actually get to the second part of the level until they understand two ideas:
- They can push crates.
- They can only push crates vertically.
The second part of the level builds on that understanding. To get through that wall of crates, the player needs to create a path for themselves by pushing crates vertically, moving horizontally, and repeating those movements until they get through. It’s the same kind of movement they do at the beginning of the level, but they have to do it a bit more thoughtfully. Good level design introduces ideas and then builds on those ideas!
The exit tiles are on the right side of the screen. This is the first time the player sees them. How do they know they’re the goal of the level? Because they’re all the way on the opposite side of the screen from where the player starts! The level forms a visual path leading the player’s eye from where Vertibot starts on the left over to where the exit is on the right. That’s called composition: I’ll talk more about that in a minute!
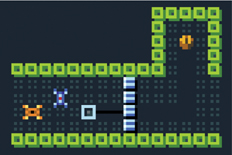
Adding a Second Concept
We’ll introduce another basic concept in this level. One of the most important reasons the player would want to push a crate is to keep a gate open. Let’s close the level with a simple introduction to a gate.
Now three actions happen in this level, from left to right: first, the player learns to push crates vertically. Second, they navigate through an obstacle by using that knowledge. Third, the player encounters a gate that only opens when something is on a panel. The solution is to push a crate vertically onto the panel. Each part of the level emphasizes the same idea: pushing crates vertically is important!
But there are some problems with this last action. It’s possible to get stuck and have to restart the level.
If the player pushes the final crate down or if they push it all the way up past the panel, the crate will get stuck. Because the wall blocks the player from getting around and pushing the crate from the other side, the player is stuck as well. They’ll have to restart, and that’s a huge bummer when they’re so close to the end of the level! Is there a way to fix this?
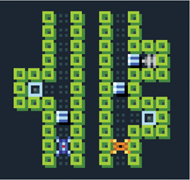
Creating Bumpy Floors
To get around the problem of getting stuck, I created a new object for the game, which is the bumpy floor I mentioned earlier in the chapter. This kind of floor will stop crates, but the player can still walk on the floor. We can use these floors to prevent the player from pushing crates all the way up to a wall and getting stuck without room to push it back.
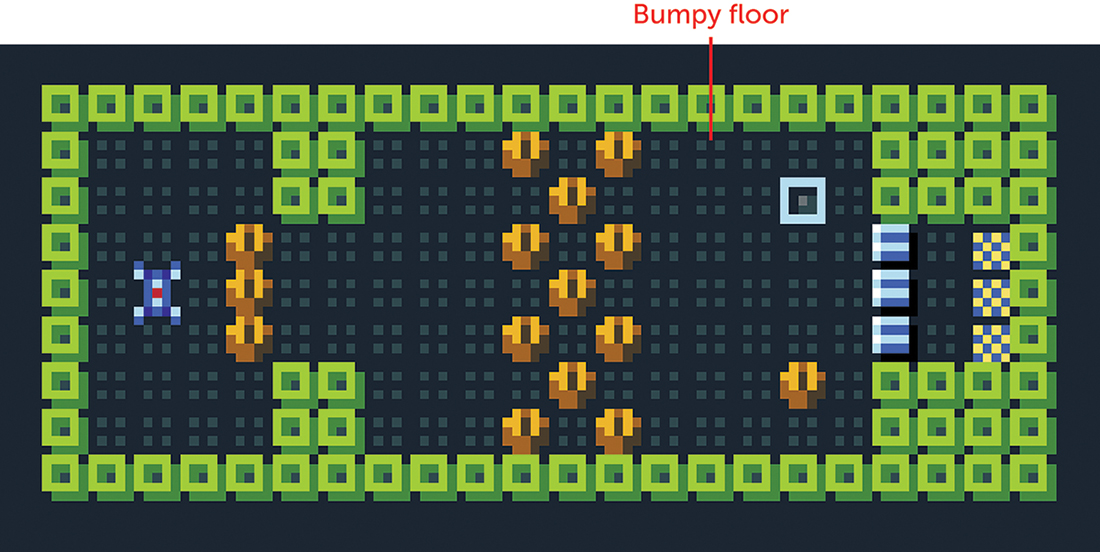
Example of bumpy floors
The bumpy floors are the tiles with the bright gray dots on them. If you haven’t implemented these floors in your version of the game, they’re very easy to make. Just add this line to the RULES section after your other code lines about pushing:
[ > Pushable | Gravel ] -> [ Pushable | Gravel ]
I named the object Gravel. If the player tries to push anything onto a Gravel object, it just cancels that object’s movement. But the player can still walk onto it freely.

Maybe you’re wondering why I spent time earlier emphasizing that letting the player make mistakes and mess up is important, only to prevent the player from failing here. There are a few reasons:
- The point of this part of the level is to teach the player how panels and crates interact. If they get the crate stuck before it can reach the panel, they don’t learn anything. The game just seems to be broken.
- This is the first level, and the player is still learning the basics. Later, we can give them more room to mess up. Think of these bumpy tiles as training wheels. In later levels, when the player knows what they’re doing, we can take the training wheels off.
- Messing up when they’re close to the end of a level is no fun at all.
Adding “training wheels” like this just makes gameplay a little easier while the player is getting used to the basics.
Refining Your First Level
As a level designer, you should always play your levels, see how well they’re working, and find ways to make them better. There’s room to make the gate part of this first level better. Why? Well, I want to make sure the player learns the important ideas about panels and gates. It’s essential to know that panels open gates only when something is on them. If the player steps onto the panel, the gate will open. When they step off the panel, it’ll close again. That’s why they need the crate.
But what if the player just sees the crate and immediately pushes it up and onto the panel without even trying to stand on the panel first? They’ll miss this critical step and the information it provides.
Is there a way we can make it more likely the player will step on the panel first, before pushing the crate onto the panel? To do this, I put the panel right in front of the gate and the crate off to the side. Getting the crate up is now more of a puzzle: the player has to push the crate down first and then go around and push it back up. The panel, on the other hand, is right there. The player is far more likely to check out the object that’s right in front of them before trying the weird puzzle that’s off to the side.

Guiding the player to the panel
Always try to think about what your players will do in your levels. It’s hard, but try to imagine you’re playing through your own levels, seeing them for the first time. What’s the first action you might take? You won’t always know, which is why it’s important to get other people to play your games; however, you can usually make some good guesses!
Giving Structure to a Level
A level is a series of challenges for the player to solve or explore. But it also represents an imaginary place, not to mention an image on a screen. When we’re thinking as level designers, we should be thinking about our level in all these ways at the same time. What kind of place is our level? What does it look like?
In Robot Heist, Vertibot breaks into a high-security robot prison to rescue Horibot. How do I make a level feel like a player is breaking in?

Structure of the finished level
In the finished level, the player starts outside of something! I turned the level I designed into just one corner of a larger building, the robot prison. Now the player starts on the outside and has to break in to complete the level.
You can think of levels as pictures the player looks at. Composition means the balance of different picture elements and how they relate to each other. To make the player feel like they were on the outside of a place, I thought a lot about composition.
Creating Sections Within a Level
This first level is made up of two L shapes: the one on the outside and the one on the inside. The outside L has no borders: it opens up to the edge of the screen. The inside L has heavy borders: the outline is two walls thick. I also made the outside prison wall look a little like the battlements on top of a castle. I wanted it to look like something built to keep people out.
I used a few other tricks to make the inside L and outside L look different from each other. On the outside, I used empty floor spaces to make the ground look patchy and irregular—think of patches of grass on a hillside.

Irregular patchy floor
Notice that the ground is the patchiest where the player is, and then it gradually gets less patchy toward the door to the robot prison. I wanted to use the ground to lead the player’s eye from their starting position toward where they need to go. Although the ground outside is patchy, the floor inside is completely regular, like the floor in a bank lobby.

Regular floor pattern
I used another technique to connect with the two themes of being unable to push objects horizontally and breaking into a place: there are two hallways leading away from the level, and one of them is blocked by crates. Because Vertibot can only push vertically, they’re forced to find a second way through (the crate and gate puzzle). Always look for ways to try to tell simple stories with your levels!
I also added a message before the level that introduces the Vertibot character and gives the player some instructions: as long as you’re Vertibot, you can only push objects vertically.
Giving instructions to the player
So there’s the finished level! Try playing through the first few levels of the finished Robot Heist game at http://tinyurl.com/robotheist/. Can you identify what each level is teaching and how?
Designing Levels for Both Robots
The first level was designed with just Vertibot in mind, but at the heart of Robot Heist is the theme of having both robots work together to get through challenges. Can you come up with levels about teamwork? The following sections provide you with some ideas to use as starting points.
Basic Teamwork
Here is a very simple example of how to use gates to force cooperation: a robot can pass this gate only if the other robot is holding down one of the panels on either side of it.
Taking turns to hold the gate open
Getting both robots through requires each of them to take a turn holding the door for the other.
Using a Crate
Here’s a more complicated example: to hold the gate open, the robots need to push a crate onto the panel.
Getting to the crate
Because the crate is located up and to the right of the panel, it requires each robot to do some pushing and some door holding. Note that I used the floor patterns to show a path from the crate to where it needs to be pushed.
In the next scenario, the robots have to coordinate their movements more closely.

Working together with a crate
Horibot has to move into just the right position to push the crate when Vertibot moves it in front of him. In later levels, as the player gets better at teamwork, you can design situations that require them to coordinate the robots in more complicated ways.
Splitting Up the Robots
What do you think about this idea? After the robots have learned to work together, try splitting them up!
Robots split up
Even though they’re in different areas, they still need to look out for each other by opening gates and blocking lasers. A cool part of level design is that once the player thinks they know how everything works, you can add a twist to shake things up and keep them on their toes!
Each idea is just one moment to fit in a larger level. What kind of levels can you build around these ideas? Can you come up with different challenges?

Putting It All Together
After we’ve introduced different objects to the player, we can start combining them. What does a level that combines lasers and gates look like? What about a level with crates and guards?
Here’s a level I made that combines lasers, gates, and guards. It’s one of the first levels I made, and it ended up in the finished game almost unchanged from the original version.
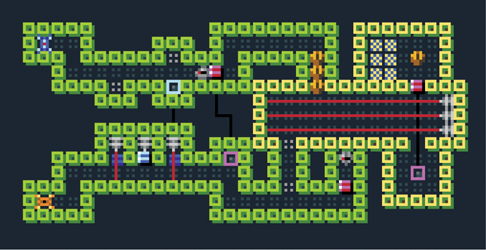
A level with lasers, gates, and guards
In this level, the guard patrols around its room, moving on and off the blue panels. When it’s on the panels, the gates blocking the way to the exit open. When it moves off the panels, the gates blocking the lasers open, zapping the player if they’re standing in the wrong place! This level is all about the player using the right timing to get across the screen.
This level works only if the player has already learned about gates, lasers, and guards and how they work. Before you can combine objects like this, you need to introduce each object on its own; otherwise, the player will have no idea what’s going on.
What You Learned
In this chapter, you learned about level design in more depth. Level design introduces concepts, builds on them, and combines them in fun and unexpected ways. A level is a set of challenges but also a virtual place and an image. When you’re thinking as a level designer, you should consider all three of these perspectives at the same time. And always look for ways to make your levels play better.
That’s all the time we’ll spend on Robot Heist. If you’re curious about what any of the later levels look like, take a peek at them in the PuzzleScript editor. Remember that you can CTRL-click on any level to load it into the game.
You’re now a PuzzleScript maestro! Congratulations! In the next and final chapter, I’ll recommend some other PuzzleScript games to check out and present some game design challenges to try.