
Last, and very often least for most Outlook users, comes the Journal module. This module rates so low on the Outlook totem pole that it doesn't even get a navigation button on the Navigation Pane unless you go to the trouble of placing the Journal button there yourself. (Curiously enough, the Journal module does have its own keyboard shortcut — Ctrl+8.)
One reason that the Outlook Journal may be so underrated is that, at first glance, it doesn't seem as active and full-featured as the other modules, at least not in the same way that the Mail processes your e-mail messages, the Calendar keeps your appointments, and Tasks maintains your to-do list. Compared with these worker-bee modules, the Journal module appears downright anemic and rather passive.
Another part of the problem, I think, is that referring to this module as a journal is somewhat misleading. Typically, you associate a journal with a diary — a place where you write down your daily activities, thoughts, and feelings. And the Outlook Journal, as a rule, acts more like a mechanical log that automatically records an array of different daily activities that you want documented.
This log can not only automatically document when you sent and received e-mail messages to and from a particular contact but also your meeting and task requests and responses, thus helping you keep track of important correspondence you receive and events that have transpired. In addition, the Journal can help you keep track of your interactions and activities by recording the amount of time you worked with a contact as well as the date and time you worked with files in other Office applications, including Word, Excel, Access, and PowerPoint. And perhaps most important of all, this document tracking feature enables you to quickly locate the documents that you've worked on, an invaluable feature when you discover you need to reopen a file.
Although the run-of-the-mill Outlook user may not find the Journal's time- and activity-tracking capabilities particularly useful, I trust that that's not the case for someone like you who's approaching Outlook as a means by which you can increase your personal productivity. In your case, the Outlook Journal provides an easy way to chronicle a lot of the time you spend working on particular projects and with particular clients and co-workers.
Note
Having the Journal's log to refer to can really help you become more aware of where you spend your time. In turn, this awareness can help you find new ways to better manage the time you spend with the people and projects that you have to work with. Moreover, if you regularly work with other Office applications such as Word or Excel, you can use the Journal not only to chronicle the time you spend editing their documents, but also to help you quickly locate their files later on when they once again need printing or editing. This is because the Journal keeps a record of the directory path to every document you create and modify with a tracked Office application — which means you'll never have to worry again if it has completely slipped your mind where on your system you've saved a particular document or file you'd recently been working on.
The first time you open the Outlook Journal (Ctrl+8), Outlook 2003 displays an alert dialog box asking whether you want to turn on the Journal, while at the same time seeming to downplay some of its capabilities by means of the following notice:
The Journal can automatically track Office documents, and also e-mail associated with a contact. However, the Activities tab on the contact item is the best way to track e-mail and does not require the Journal. Do you want to turn the Journal On?
In Outlook 2007, you receive a similar message. According to this version of the introductory message, the Activities page in a Contact record simply provides another way (not necessarily the "best" way) to track e-mail messages from this contact without requiring the use of the Journal.
If you dare to go ahead and click the Yes button to turn on the Journal after reading this faint praise of its capabilities (at least as far as e-mail goes), Outlook opens the Journal Options dialog box, similar to the one shown in Figure 14-1.
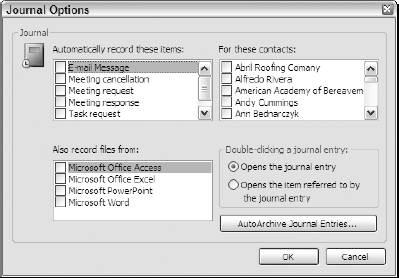
Figure 14-1. Selecting the items and contacts you want the Journal to automatically track in the Journal Options dialog box.
In the Automatically Record These Items list box, click the check boxes for all the Outlook items you want the Journal to automatically record. Next, click the names of the contacts in your Outlook address book for whom you want them recorded in the For These Contacts list box.
To also record file usage with documents you create and modify in other Microsoft applications, select all of the check boxes for the programs you want tracked (Microsoft Office Access, Microsoft Office Excel, Microsoft PowerPoint, and Microsoft Word) in the Also Record Files From list box.
And, if you want Outlook to open the item referred to in an entry when you double-click it in the Journal (rather than simply open a dialog box for the Journal entry), select the Opens the Item Referred to by the Journal Entry option button in the Double-Clicking a Journal Entry section of the dialog box before you click OK.
Note
If you ever decide that you no longer need to track Outlook items for a particular contact or certain Office application files, you can remove them from the Journal. Simply open the Journal Options dialog box by choosing Tools
After you select the Outlook items and Office applications that you want Outlook to track automatically in the Journal, Outlook begins adding them to this module using the default By Type view shown in Figure 14-2.
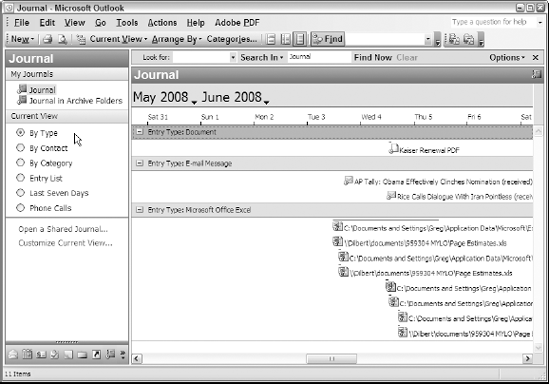
Figure 14-2. Viewing the tracked Outlook items and modified Office files in the Journal in the default By Type view.
As you can see in this figure, this default Journal view groups together the various Outlook items and Office applications that the Journal automatically tracks and records and then places them on a timeline using a daily scale. When an item or file has a duration that spans more than one date, the Journal shows this by drawing a bar on the timeline, the start of which indicates the start time and the end of which indicates the end time.
As with any other Outlook module, you can switch from the default view to any of the predefined views (By Contact, By Category, Entry List, Last Seven Days, Phone Calls, or Outlook Data Files) by clicking its option button in the Current View section of the Journal Navigation Pane.
Tip
Switch to the Entry List view when you want a tabular view of your Journal entries that you can re-sort and edit easily. When you make Entry List the current view, Outlook displays the entries in groups by type and sorts them by start date in descending order (most recent to least recent). To sort the entries in this list on another field or in ascending order in the Start field (least recent to most recent), all you have to do is click the field name. To edit or print entries in the list, select them, then right-click the selection and then choose the appropriate option from its shortcut menu (Open, Print, or Delete).
Of course, you can also customize any of the predefined Journal views as well as create new ones of your own. To customize the current view, choose View
Although most of your Journal entries will undoubtedly be created automatically by setting their items and application options in the Journal Options dialog box, you can manually add Journal entries as well. You would want to do this, for example, when you spend time on a telephone call that isn't generated through Outlook or on a document that's not saved in an Office file format automatically tracked by the Journal but which you still want recorded as a Journal entry.
To add a manual Journal entry, follow these simple steps:
Press Ctrl+Shift+J from any Outlook module.
Outlook then opens an Untitled – Journal Entry dialog box, similar to the one shown in Figure 14-3.
Enter a description for the new entry in the Subject field.
By default, Outlook assigns all new manual Journal entries to the Phone Call category. If your manual entry falls into another classification, you need to follow Step 3 to select a different Entry type.
If you're not recording a phone call, select the appropriate classification for your entry in the Entry Type drop-down list.
(Optional) Fill out as much supporting information about the journal entry as you can.
This information can include any or all of the following:
Company: If you want to associate the Journal entry with a company, enter its name in the Company text box.
Start Date: If needed, click the drop-down buttons on the two Start Date combo boxes to assign a new date and time to the Journal entry's start date. By default, Outlook assigns the current date and time as the Start Time for the new Journal entry.
Notes: Enter any notes that you want to record about the entry in the dialog box's text box. Just as with other Outlook items, you can add notes describing the entry in more detail.
Associate a contact: When using Outlook 2003, you associate the entry with a particular contact in your address book or assign it categories by clicking the Contacts button or Categories button, respectively. In Outlook 2007, you associate contacts by clicking the Attach Item button on the Insert tab and assign categories by clicking the Categories button on the Options tab.
Private: To mark the entry as private, click the Private check box (Outlook 2003) or Private button (Outlook 2007).
Start Timer: To have Outlook calculate the amount of minutes you spend on an entry, click the Start Timer button.
Duration: To designate the amount of time you intend to work with the entry or to have the entry last, click the Duration combo box and enter the number of minutes, hours, days, or weeks you intend to spend (followed by one of these units) or select the amount of time on its drop-down list.
Click the Save and Close button.
After you click this button, Outlook adds your new entry to the current Journal view.

Note
Use the automatic timer in the Journal Entry dialog box to have Outlook calculate the total amount of time you spend working with or on a Journal entry (phone call, meeting, document, and so forth) whenever it's important to track this kind of information. Simply open the entry in the Journal module of Outlook right before you're ready to start timing the entry and then click the Start Timer button to begin. You can minimize the Journal Entry on the Windows task bar while Outlook times the event, but you can't close the Journal Entry dialog box (because doing so automatically pauses the timer). When you've finished working on or with the entry and you want Outlook to calculate the elapsed time, select its Journal Entry dialog box to maximize it again on your desktop and then click the Pause Timer button before you click the Save and Close button.
Note
Keep in mind that you can speed up the process of creating a new Journal entry for a particular contact in your Outlook address book by right-clicking the contact's name in the Contacts module and then, in Outlook 2003, choosing New Journal Entry for Contact from the shortcut menu. In Outlook 2007, you do this by pointing to Create on the shortcut menu and then clicking New Journal Entry for Contact on its continuation menu. Outlook then opens a new Journal Entry dialog box with the contact's name already entered in its title bar and in the Subject field.