
In the last chapter, you took the first step in gaining mastery over your wayward e-mail by performing a much-needed, initial Inbox housecleaning. In this chapter, you find out how to take the second step — the one that enables you to maintain nearly the same level of control over your Inbox as part of the process of increasing your personal productivity with Outlook.
To help you achieve this goal, this chapter explores strategies designed specifically for dealing effectively with new e-mail on an ongoing basis. Adopting these strategies — when combined with developing some new habits regarding when and how you respond to e-mail — can go a long way in making sure that your Inbox doesn't again become a forbidding part of Outlook that you dread to face.
In evaluating these strategies and creating these new habits, you have to take into consideration exactly how you've organized your Inbox subfolders for storing active e-mail using the information covered in the previous chapter. (See Chapter 7 for details if you haven't yet gone through this process.) You may also find modifying some of your e-mail default settings advantageous — and it wouldn't hurt to create some additional rules for automatically managing your e-mail messages.
And finally, to make sure that all your hard housekeeping work is not in vain, you need to learn how to back up your Outlook data files and then actually get into the habit of backing the stuff up!
Now that you've followed the plan outlined in the previous chapter and you've got your e-mail Inbox empty or nearly empty, you have to work hard to keep it that way. The first order of business is to evaluate strategies for actually achieving this goal. Then, you're ready to develop some new habits that help you implement these strategies and make them the normal way of "doing your e-mail."
David Allen and Sally McGhee, two noted productivity experts who counsel knowledge workers who have committed to using Outlook as their Personal Information Manager, have developed a very similar strategy for dealing with new e-mail — a strategy that complements their respective personal productivity systems.
Allen and McGhee both argue that one's first order of business when dealing with e-mail is to determine whether a particular e-mail message you receive is "actionable." That is, can you respond appropriately to the e-mail message within two minutes? If you can, you go ahead and deal with the message right after reading it. If not, you put off dealing with it until a later time or forward it to someone else who will deal with it for you.
To accommodate this two-minute actionable strategy, David Allen developed what I call his Three Ds of dealing with new e-mail (Do, Defer, or Delegate), to which Sally McGhee's strategy adds a fourth: Delete. Put them together and you come up with the following list of techniques:
Do it: If you can formulate a reply to an e-mail message within two minutes, go ahead and do it.
Defer it: If you can't formulate a reply to a message within two minutes, defer it by moving it a folder where you won't forget it (a Deferred Mail subfolder or Action Mail subfolder, for example).
Delegate it: If you're not the best person to reply to a message, send it on to the person who is by forwarding the message.
Delete it: If you read a message (or its preview lines, if you view your e-mail messages using Messages with AutoPreview as your current Mail view) and find that it clearly falls into the junk category, move it into your Deleted Items folder by pressing the Delete key.
Personally, I don't think that determining whether an e-mail message is actionable (regardless whether that action takes two minutes or two hours) is the most strategic question. Instead, the basic question you need to answer is whether the message is important. In other words, ask yourself, "Is this e-mail message junk?"
If you answer yes to this question, you know right away what to do with the message: You move it into the Deleted Items folder and you're done with it. On the other hand, if you answer no to this basic question, that's when you have to ask yourself whether you need to respond to the message (either by simply acknowledging or by actually replying to it), and if you do, what kind of response is needed.
Therefore, so as not to be outdone by the experts, I've developed the Three Rs of dealing with new e-mail, which I offer as an alternative to the 4 Ds. These three techniques, as you see in the following list, are very different in nature from Allen's and McGhee's 4Ds because they only get you ready to work on so-called "actionable" e-mail, rather than actually calling for any action (in the Allen/McGhee sense) on your part:
Read it: Determine from the subject and body of each new message whether it's junk.
Register it: If the message is not a piece of junk mail, immediately assign it to the principal category that it seems to fit. (See Chapter 6 for details on categories and how to create and use them.) If it's a message you need to respond to, you also need to flag it for follow up.
Route it: Move junk e-mail to the Deleted Items folder (and if you want to block the sender from being able to send future messages, choose Actions

Note
The assumption here is that batches of e-mail messages periodically flood your Outlook Inbox, and the most efficient way to deal with them is by batch processing them. You do this initial batch processing by going through the messages with the sole purpose of classifying each one and then moving it into the most appropriate Inbox subfolder (kind of the way your company's mail room or the U.S. Post Office does when it initially organizes snail mail by placing it into different pigeonholes or mail bags). At the end of this initial pass, all the messages that arrived together are moved out of your Inbox and safely tucked into their respective Inbox subfolders. and the only messages that concern you right away are the ones you routed to your Action Mail subfolder.
Categorizing new messages
In Chapter 6, I cover the care and feeding of Outlook categories that help you classify a module's various items for quick and easy grouping and retrieval. As part of the initial processing of new e-mail, I strongly suggest that you get in the habit of immediately assigning categories to all incoming messages that you determine are not junk mail.
Think of categorizing new e-mail messages as the very first step in the batch processing of them. If you find that a new message doesn't fall into the junk e-mail category, there must be other categories that you think pertain to it. By assigning the most obvious and important of those categories to the nonjunk mail message upon reading it, you get a head start on correctly routing it, the second step in batch processing.
Note
Remember that you don't need to take the time to put junk e-mail messages into a junk category. Simply route the message straight to your Deleted Items folder by pressing Delete after reading its subject or text and determining that you need neither to respond to the message nor keep it around.
Note
If you're using Outlook 2007, you can speed up the categorizing process by assigning shortcut keys to the categories that you assign to most of your nonjunk e-mail messages. This version of Outlook enables you to assign shortcut keys to eleven categories, using the keys Ctrl+F2 through Ctrl+F12. (See Chapter 6 for details on how to assign shortcuts to your top 11 e-mail message categories.) You can also assign a default, Quick Click category by clicking the empty rectangle in the Categories column displayed in the Information Viewer to the immediate right of the Date and Time column (thus turning the category rectangle red). To change the Quick Click category (initially the Red Category), choose Actions
Flagging new messages for follow up
You need to flag all the new e-mail messages in your Inbox that you conclude require some sort of response on your part for follow-up (even if it's ultimately to forward the message to someone else in your organization who can better handle its content).
Note
Adding the For Follow Up Search folder to the Outlook 2007 Navigation Pane
The great thing about flagging the new e-mail messages that require a response is that Outlook automatically adds any flagged message to a Search Folder named For Follow Up. This feature enables you to display all flagged messages in the Information Viewer by clicking the For Follow Up folder icon in the Navigation Pane (either in the Favorite Folders at the top or under Search Folders in the Mail Folders section below). It's a breeze to then select these messages and move them to your Action Mail folder for later processing.
Unfortunately, Outlook 2007 doesn't automatically add the For Follow Up folder to your Search Folders (although it does automatically add a Categorized Mail Search folder for you and displays the subject of all flagged items in its To-Do Bar).
However, these simple steps will add this custom Search folder to your Outlook 2007 Navigation Pane:
Choose File
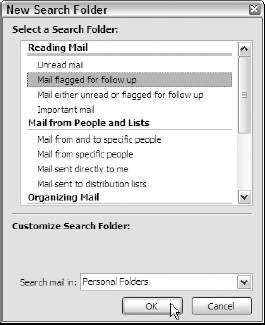
NewSearch Folder or press Ctrl+Shift+P.Outlook opens the New Search Folder dialog box, shown in Figure 8-1.
Click Mail Flagged for Follow Up in the top Reading Mail section of the Select a Search Folder dialog box to select it and then click OK or press Enter.
Outlook closes the New Search Folder dialog box, and the For Follow Up folder is now added to the Search Folders section in the Navigation Pane.
Adding the Flag column to the current view
If your current view in the Information Viewer of the Outlook 2003 Mail module doesn't include the display of the Flag column on the right, you can add the column to the Viewer by customizing the current view as follows:
Choose View
Arrange ByCurrent ViewCustomize Current View from the Outlook 2003 menu bar.Outlook opens the Customize View dialog box for the current view (usually Messages or Messages with AutoPreview).
Click the Other Settings button.
Outlook opens the Other Settings dialog box, similar to the one shown in Figure 8-2.
Select the Show Quick Flag Column check box and then click OK or press Enter twice, first to close the Other Settings dialog box and then to close the Customize View dialog box.
After Outlook 2003 closes the Customize View dialog box, the Quick Flag column appears on the right side of the Information Viewer in the Mail module.
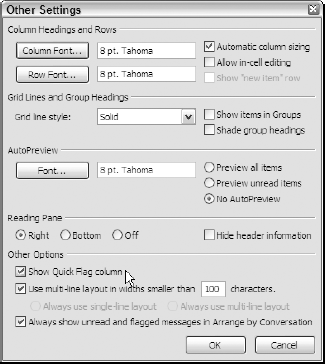
Figure 8-2. Customizing the current view to include the display of the Quick Flag column in the Outlook 2003 Information Viewer.
Changing the default Quick Click flag in Outlook 2003
Initially, Outlook 2003 uses the red colored flag as the default Quick Click flag automatically assigned when you click the empty flag icon in the Information Viewer (or set up a rule that automatically flags certain incoming messages). You can easily select another color for the default flag. You may want to reserve red for flagging the most urgent messages to which you must immediately reply and use a less cautionary color as the general marker for messages needing responses.
To change the default flag in Outlook 2003, choose Actions
Note
Changing the default Quick Click flag in Outlook 2007
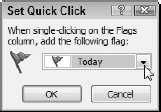
In Outlook 2007, all the follow up flags are red (the only difference between them being the intensity of the red tint). In place of different colors, this newer version of Outlook adds different date labels to the reddish flags as a way of telling them apart. These flag labels not only identify the due date assigned to the e-mail message but also determine the group to which the message is assigned in the Outlook To-Do Bar (in all Outlook modules), the Daily Tasks pane (in the Mail module), and the to-do list (in the Tasks modules).
Outlook 2007 gives you a choice of the following flags, each with its own start date and due date. The dates determine where the subject of the message appears on the Task List of the To-Do Bar in all Outlook modules, the Daily Task List in Calendar module, and the to-do list in the Tasks module and when the reminder appears — if you assign one:
Today: This default flag assigns the current date as both the start date and due date. A Reminder appears one hour before the end time of the current workday.
Tomorrow: Assigns the current date plus one day as both the start date and due date. A Reminder appears at the start time of the current date plus one workday.
This Week: Assigns the current date plus two days for the start date and the last work day of current week as the due date. A Reminder appears at the start time of the current date plus two workdays.
Next Week: Assigns the first workday of the following week as the start date and the last workday of the following week as the due date. A Reminder appears at the start time of the first workday of the following week.
No Date: Uses neither a start date nor a due date. A Reminder appears one hour before the end time of the current workday.
Custom: Enables you to assign a custom start date and due date to replace the provisional current date. A Reminder appears one hour before the end time of the current workday unless you've set a new due date — in which case, the reminder appears one hour before the end time on that date.
To select a new default Quick Click flag in Outlook 2007, choose Actions
Note
Keep in mind that flagging an e-mail message with any of the available flags automatically adds a reference to that message in your For Follow Up folder. The icon for this Search folder appears in the Favorite Folders section at the top of the Mail module's Navigation Pane as well as under Search Folders in the Mail Folders section (after you add the Search folder to the Navigation Pane, as explained earlier in this chapter in "Adding the For Follow Up Search folder to the Outlook 2007 Navigation Pane"). Also, note that clicking a flag you've already assigned in the Quick Click column of the Information View when this message is selected marks the message as complete (indicated by the check mark that replaces the flag icon). Marking a message as complete causes Outlook to immediately remove the reference to the message from the For Follow Up Search folder.
Routing new messages to the appropriate Mail folder
After you've gone through and completed the initial processing of all the messages in the new batch of e-mail in your Inbox, your Inbox should be in the following condition:
All junk e-mail is moved from the Inbox to the Deleted Items folder.
All e-mail that you have to respond to is flagged and appears listed in your For Follow Up Search folder.
All e-mail that you want to store for future reference is classified by category.
Then, all you have to do at this point is move the flagged e-mail into your Action Mail Inbox subfolder and the other categorized e-mail messages to the Inbox subfolder set up for their respective categories:
In the Inbox of the Mail Module, click the Arrange By drop-down button on your custom Productivity toolbar (see Chapter 6 for details) and then click the Flag option (in Outlook 2003) or the Flag: Start Date (in Outlook 2007) option.
Outlook displays all the e-mail messages you just flagged at the top of the Information Viewer.
Click the first flagged message at the top of the Information Viewer and then hold down the Shift key as you click the last flagged message in the list.
Outlook selects all the messages in between — including the first one you clicked and last one you Shift-clicked.
Press Ctrl+Shift+V.
Click the icon of the Inbox subfolder in which you store all the e-mail that you still need to respond to in some fashion (your Action Mail subfolder) in the Move the Selected Items to the Folder list box and then click OK or press Enter.
Outlook moves all the flagged messages from your Inbox into your Action Mail subfolder.
Click the Arrange By drop-down button on your custom Productivity toolbar and then click the Categories option.
Outlook groups all the e-mail messages remaining in your Inbox by category (listed alphabetically by category name).
Select all the messages in the first category by clicking the first message and Shift-clicking the last message, press Ctrl+Shift+V, and then click the name of subfolder where this category of messages is stored before you choose OK.
Repeat the process outlined in Step 6 for every category that contains e-mail messages in your Inbox until all the categorized e-mail messages are stored in their respective Inbox subfolders.
Once again, your Inbox is nice and empty (at least for the time being).
Click the Arrange By drop-down button on your custom Productivity toolbar and then click the Date option (or whatever you normally prefer when viewing the new e-mail that comes into your Inbox).
After doing the batch processing that empties your Inbox, if you still have some discretionary time for doing e-mail, you'll want to turn your attention to processing the e-mail messages you have moved into your Action Mail subfolder that still require some type of response on your part.
The response you make to an individual e-mail message can take the form of any of the following actions:
Reply to the Message: Press Ctrl+R and then type your response at the top of the copy of the message before clicking the Send button.
Forward the Message: Press Ctrl+F and then click the To button to select the recipient's e-mail address from your address book or type the e-mail address in the To text box. Type any message that you want to add above the message's header before clicking the Send button on the message editor's Standard toolbar.
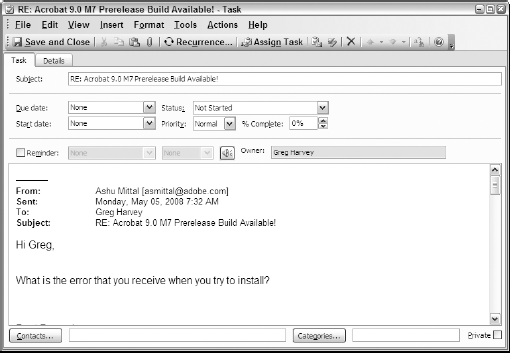
Convert the Message into a Task: To convert a message into a task on your Tasks module to-do list, drag the message from the Information Viewer to the Tasks navigation button at the bottom of the Mail module's Navigation Pane. Outlook then opens a Task dialog box (similar to the one shown in Figure 8-4) that displays the e-mail message in the bottom description area. You can then modify the Subject, Start Date and Due Date, Status, Priority, and % Complete fields as needed (see Chapter 12 for details) and specify a reminder, contacts, and categories as needed (again, see Chapter 12 for details) before you click the Save and Close button.
Note
As soon as you reply to a message or forward it to another individual, don't forget to mark it as complete before moving on to the next message listed in your Action Mail subfolder. The easiest way to do this is by clicking its flag in the Information Viewer, thus converting the flag into a check mark. Note that when you order the messages using the Flag Arrange By option, all completed messages with check marks appear together (sorted by date at the end of the list), making it easy to move them out of the Action Mail subfolder and into their respective category subfolders for future reference.
In addition to converting a message into a task that then appears on your to-do list, you can also assign the message a new priority level (High or Low; Normal is the default) in your Action Mail subfolder. Assigning priority levels enables you to sort any e-mail messages that remain in a folder by their relative priority simply by selecting By Importance as the Arrange By option (choose View
To assign a new priority to an e-mail message, follow these steps:
Right-click the message in the Information Viewer and then click Options (Message Options in Outlook 2007) at the bottom of the contextual menu that appears.
Outlook opens the Message Options dialog box.
Choose either High or Low from the Importance drop-down list at the top of this dialog
Click the Close button in the Message Options dialog box.
Outlook displays an alert dialog box asking you to confirm saving your changes.
Click the Yes button in the alert dialog box.
After you assign a new priority, Outlook indicates that you've done so by placing a symbol in the Information Viewer. When you assign High importance to a message, Outlook indicates this status by adding a red exclamation point at the end of its Subject line in the Information Viewer, whereas items you've marked as being of low importance get a blue downward-pointing arrow added to them.
Note
It's when you're determining the best response to the e-mail message gathered in your Action Mail subfolder that I think something akin to the Allen/McGhee two-minute rule kicks in. As you go through the e-mail messages in this subfolder, you probably want to take the time to reply only to those messages that you can answer very quickly — in, let's say, just five minutes total (two minutes may be pushing it). When you come upon a message in this subfolder that's going to take significantly more time to answer, convert that message into a task on your to-do list. That way, you can be sure that you won't forget about it and will take care of it as soon as you have adequate time to do so.
Message rules tell Outlook how to automatically handle certain messages you receive, either by flagging them or moving them into a particular Inbox subfolder. Message rules can really help automate the batch processing of new e-mail messages that you receive.
For example, if you periodically receive messages from a certain sender that you routinely store in a particular Inbox subfolder as valuable reference material, you can set up a message rule so that Outlook automatically moves the message into that subfolder. Likewise, if you receive messages from a particular sender (such as your boss or an important client) that you invariably have to respond to, you can have Outlook automatically flag any message that comes in from that sender and store that e-mail in your Action Mail subfolder.
To see how easy it is to create these kinds of rules, follow along with the steps for creating a rule that states that any e-mail message I receive from my Acquisitions Editor, K Feltman, is to be flagged with a red flag and moved into my Mail Action folder for processing:
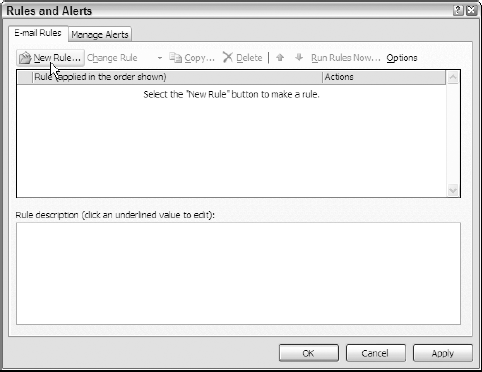
In the Mail module, choose Tools
Rules and Alerts from the Outlook menu bar.Outlook opens the E-Mail Rules tab of the Rules and Alerts dialog box, similar to the one shown in Figure 8-5.
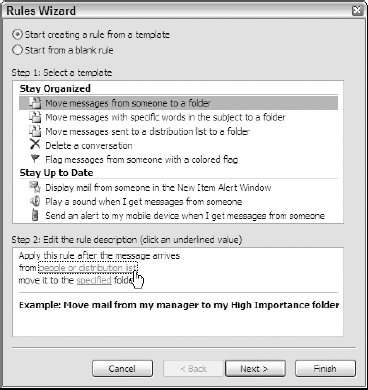
Click the New Rule button.
Outlook opens the initial Rules Wizard dialog box similar to the one shown in Figure 8-6. In Outlook 2003, the Start Creating a Rule from a Template option button selected (this setting is just assumed in Outlook 2007 and therefore its dialog box doesn't have this button) and the Move Messages from Someone to a Folder option highlighted in the Select a Template list box.
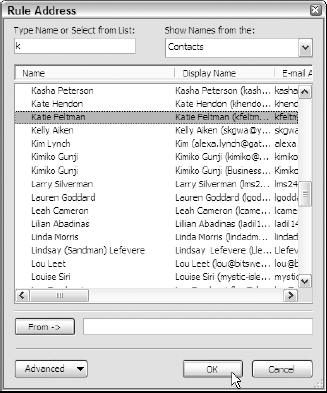
Click the People or Distribution List link in the Step 2: Edit the Rule Description section at the bottom of the dialog box.
Outlook opens the Rule Address dialog box, similar to the one shown in Figure 8-7.
In the dialog box's Rule Address list box, click the name of the contact whose e-mail message will trigger the new rule you're creating and then click the OK button.
Outlook closes the Rule Address dialog box and substitutes the name and e-mail address you select in the "Apply This Rule After the Message Arrives From" text in the Step 2: Edit the Rule Description list box.
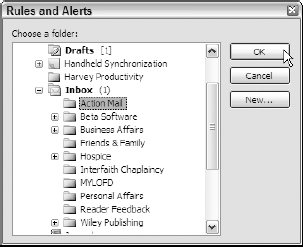
Click the underlined Specified link in the text "Move It to Specified Folder" in the Step 2: Edit the Rule Description list box.
Outlook opens the Rules and Alerts dialog box, shown in Figure 8-8.
Click the icon of the folder into which the message is to be moved and then click OK or press Enter.
Outlook closes the Rule and Alerts dialog box and substitutes the name of the folder you select in the "Move It to Specified Folder" text in the Step 2: Edit the Rule Description list box.
Click the Next> button at the bottom of the Rules Wizard dialog box.
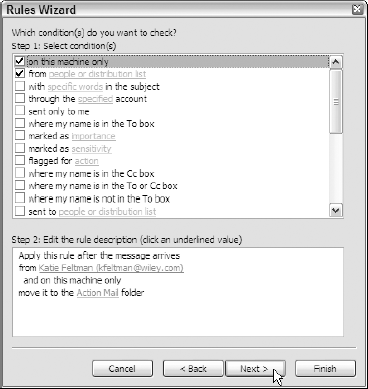
Outlook displays the second Rules Wizard dialog box, shown in Figure 8-9, where you can modify the conditions under which the new rule is activated.
Modify any of the conditions by clicking their check boxes before you again click the Next> button at the bottom of the dialog box.
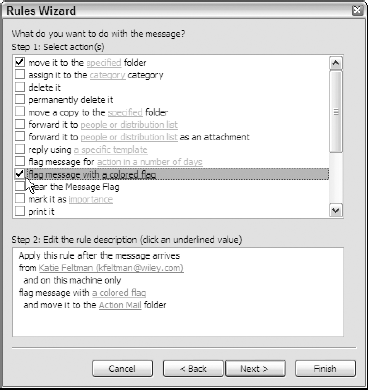
Outlook displays the third Rules Wizard dialog box, shown in Figure 8-10, where you can modify the actions that the new rule takes.
Click the Flag Message with a Colored Flag check box (in Outlook 2003) or the Flag Message For Follow Up at This Time check box (in Outlook 2007).
Outlook adds the text "Flag Message with a Colored Flag" (Outlook 2003) or "Flag Message for Follow Up at This Time" (Outlook 2007) in the Step 2: Edit the Rule Description list box.
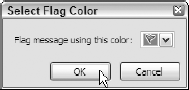
Click the underlined Colored Flag link (Outlook 2003) or the Follow Up at This Time link (Outlook 2007) in the Step 2: Edit the Rule Description list box.
Outlook opens the Select Flag Color dialog box (shown in Figure 8-11 as it appears in Outlook 2003).
Click OK or press Enter to accept the default Quick Click flag (red, unless you've changed it in Outlook 2003 and Follow Up for Today in Outlook 2007).
Outlook replaces the text "Flag Message with a Colored Flag" with "Red" in Outlook 2003 and the text "Flag Message for Follow Up at This Time" in Outlook 2007 with "Follow Up Today" in the Step 2: Edit the Rule Description list box.
Click the Finish button.
Outlook closes the Rules Wizard dialog box, and your newly created rule now appears at the top of the list box on the E-Mail Rules tab of the Rules and Alerts dialog box.
(Optional) Click the Run Rules Now button at the top of the E-Mail Rules tab if you want Outlook to apply the new rule to the e-mail messages that are currently in your Inbox.
Click OK or press Enter.
Outlook closes the Rules and Alerts dialog box. After that, Outlook applies the new rule to all incoming e-mail messages in the order in which the rule appears in the list box on the E-Mail Rules tab of the Rules and Alerts dialog box.
In addition to using e-mail rules to help automate the management of the new batches of e-mail messages you receive, you can also sometimes reduce the amount of manual processing you have to do in your Inbox by the careful setting of Outlook's e-mail options.
In this regard, two kinds of e-mail options that you may want to take a look at are the following:
Junk E-Mail: Enables you to set the level of junk-mail protection so that the more suspect e-mail messages go directly into your Junk E-mail folder; you can also specify which particular senders are to be considered safe and which ones are to be blocked.
E-Mail Options: Enables you to set all sorts of message options, including how and where messages are stored and how Outlook alerts you to the arrival of new messages in your Inbox.
Junk e-mail options
To change any of Outlook's junk e-mail settings, open the Options dialog box (choose Tools
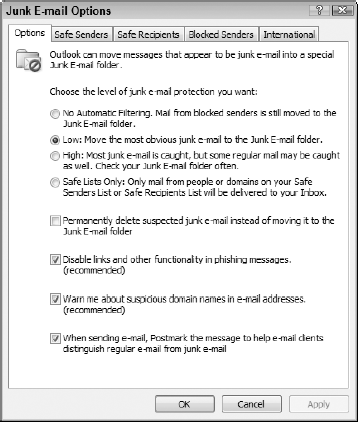
The first group of settings on the Options tab enables you to change the general level of junk e-mail protection. By default, this level is set to Low, so if your Inbox is currently getting swamped with spam e-mail, you may well want to change this to High by clicking the High option button and see how this works. Because Outlook may well divert bona fide messages to your Junk E-Mail folder, you will want to check this folder on a regular basis after increasing the level to High to make sure that Outlook isn't moving too many messages that you need to respond to into this folder.
Tip
If you're really serious about weeding out spam from your Inbox, you can try using the Safe Lists Only setting. After you select this setting, Outlook delivers e-mail into your Inbox only from those people or Web domains you have added to the list boxes on the Safe Senders and Safe Recipients tabs of the Options dialog box. E-mail messages from all other sources are automatically diverted to your Junk E-Mail folder.
Warning
Don't select the Permanently Delete Suspected E-Mail Instead of Moving It to the Junk E-Mail Folder check box on the Options tab unless you're willing to thoroughly check your Deleted Items folder for bona fide messages that get sent there by mistake prior to emptying this folder.
E-mail message-handling options
If you want to change any of Outlook's general e-mail settings, open the Options dialog box (choose Tools
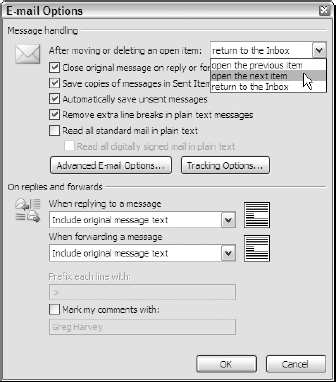
Of the message-handling options displayed in the top section of the E-Mail Options dialog box, you may save a little time processing e-mail messages by changing the first two options:
After Moving or Deleting an Open Item: By default, Outlook automatically returns you to the Inbox after you move or delete the message you currently have open in its own dialog box in Outlook. Select the Open Next Item option on this setting's drop-down list to have the program automatically open the next new e-mail message in your Inbox in this dialog box instead. That way, the next new message is automatically open for your inspection as soon as you finish the initial processing of its predecessor.
Close Original Message on Reply or Forward: Select this check box to have Outlook automatically close the original e-mail message as soon as you click the Reply or Forward button to draft and send your reply or to forward it to someone else for processing.
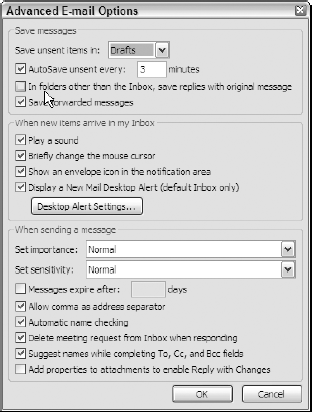
In addition to changing these kinds of general message-handling settings in the E-Mail Options dialog box, you can also modify some of the more specialized e-mail options by clicking the Advanced E-Mail Options button. Clicking this button opens the Advanced E-Mail Options dialog box, shown in Figure 8-14.
The options in this particular dialog box cover three areas of message-handling: saving messages, receiving messages, and sending messages. When it comes to saving messages, you may want to select the In Folders Other Than the Inbox, Save Replies with Original Message check box to activate this option. That way, when you reply to messages in Inbox subfolders such as your Action Mail folder, Outlook saves your replies together with the original e-mail message.
Note
When it comes to new messages coming into your Inbox, if you find that you're constantly being distracted by the audiovisual alerts that Outlook automatically gives you (such as playing a high-pitched sound and displaying a semi-transparent desktop alert on your computer's Status bar), by all means use the Advanced E-Mail Options dialog box to turn these alerts off. (The When New Items Arrive in My Inbox section houses all the controls for such alerts.) Most of the time you're much better off ignoring new batches of messages until you have time to deal with them.
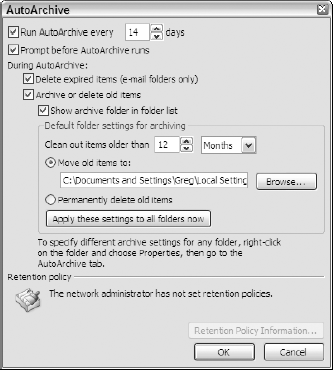
In the previous chapter, I cover the process for archiving your older e-mail messages to reduce the clutter of old e-mail that you'd stored up over time. Provided that your IT department permits it, after manually archiving your e-mail messages in this manner, you can then activate the AutoArchive feature and let Outlook take over doing this job for you.
To turn on the AutoArchive feature, follow these steps:
Choose Tools
Options from the Outlook menu bar.Outlook opens the Options dialog box.
Click the Other tab and then click the AutoArchive button.
Outlook displays the AutoArchive dialog box (see Figure 8-15).
Select the Run AutoArchive Every check box to select this option and then set the archive interval, either by typing in the days between archive sessions in the option's text box or by selecting the value with its spinner buttons.
(Optional) If you want the program to prompt you each time before it starts archiving your messages, click the Prompt Before AutoArchive Runs check box to select it.
By default, when Outlook archives your e-mail, it cleans out all messages that are older than a year by moving them into an
archive.pstfile located inside your personal Outlook subfolder.(Optional) To change how messages are included in archiving, select a new value in the Clean Out Items Older Than text box and, if necessary, replace Months in the drop-down list box to its right with Weeks or Days.
Click OK or press Enter twice, first to close the AutoArchive dialog box and then to close the Options dialog box.
I'd be greatly remiss if I were to finish this chapter on developing good e-mail practices without adding a discussion of backing up your Outlook data files. After all, it won't do you much good to carefully maintain your various Inbox subfolders if you're only going to go and permanently lose all their messages in a computer hard drive crash.
Note
Keep in mind that if you do suffer a serious computer crash that entails having to reinstall Outlook and restore backups of your active and archived e-mail, you'll also have to recreate your Inbox subfolders and go through the process of grouping the messages and then moving them into their appropriate folders. The good news, however, is that because you had the foresight to make regular backups of your Outlook data files, you will be able to recreate your original Outlook setup because the messages (and the contacts, tasks, notes, and so on) will still be available for your use. If you don't bother to back up your Outlook data files and you have such a computer disaster strike, you'll have nothing but the memory of this data, and you'll be starting literally from scratch!
If your company uses Outlook with Exchange Server, your messages are automatically stored on a server, and this server is probably automatically backed up on a regular basis by the network administration team. If, however, you don't use Outlook with Exchange Server, your active e-mail messages (along with addresses and other Outlook data) are stored in Outlook .pst files in your Personal Data folders, and your archived messages are stored in an archive.pst file in your Archived Data folders, both of which reside locally on your hard disk.
This means that, even when your computer is networked with others and the data on your company file server is routinely backed up, the local Outlook .pst data files stored on your hard drive are probably not. In such a case, you need to take the time to routinely back up your Outlook .pst data files by copying them to another hard drive (I have a USB 2.0 hard drive connected to my PC that I use for this kind of data file backup), backup tape, or optical disc such as a CD or DVD.
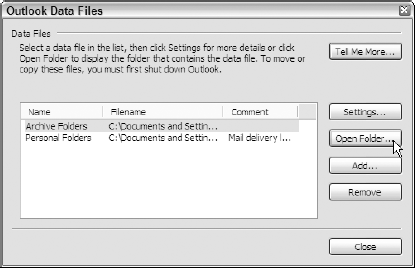
Backing up your Outlook .pst data files is a cinch when you know where to find them on your hard disk. (They are, I have to admit, buried pretty deeply on your hard disk, using a fairly convoluted file path.) Fortunately, Outlook helps in this regard, as you see in the following steps:
Choose File
Data File Management from the Outlook menu bar.Outlook 2003 opens the Outlook Data Files dialog box, similar to the one shown in Figure 8-16. Outlook 2007 opens the Account Settings dialog box with its Data Files tab selected. The list box in these dialog boxes shows the path for both your Archive Folders and Personal Folders.
Click Archive Folders selection in the list box and then click the Open Folder button.
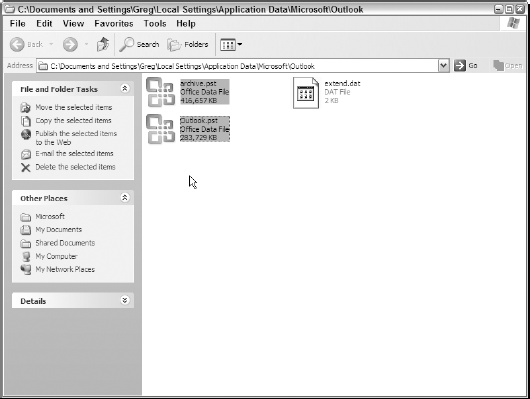
Outlook 2003 opens the Documents and Settings Outlook folder containing both your
archive.pstandOutlook.pst, similar to the one shown in Figure 8-17. Outlook 2007 opens your Outlook folder containing these files.Control-click the file icons for both the archive.pst and Outlook. pst files and then copy them to the Windows Clipboard by pressing Ctrl+C.
After copying the Outlook
.pstdata files to the Windows Clipboard, you're ready to paste the copies of these files in a folder on the drive or disc you use to hold your backups in case of a computer drive crash.Use Windows to open a dialog box for the drive where you want to back up the
archive.pstand Outlook.pstfiles and then paste them into one of its folders by pressing Ctrl+V.
If, heaven forbid, you should ever suffer a hard drive crash that makes it impossible for you to use the original Outlook data files, you can restore your backup copies of the Outlook.pst and archive.pst files to the new or repaired hard drive. All you have to do, after reinstalling Microsoft Outlook, is to copy these .pst data files into your rightful Documents and Settings Outlook folder.
To locate this folder, open the Outlook Data Files dialog box in Outlook 2003 or the Data Files tab of the Account Settings dialog box in Outlook 2007 by choosing File
After Windows finishes copying these backup .pst folders, when you next open Outlook your active e-mail will once again reappear in your Inbox folder (unfortunately, all the messages will be jumbled together and will not be all nicely organized into your various subfolders, meaning you'll have to retrace the housecleaning steps you followed in Chapter 7) and your archived e-mail shows up in your Archive Folders in the Mail module.