The Calendar module in Outlook provides one of the most important means of attaining peak personal productivity and maintaining it in your pursuit of work/life balance. Because the Calendar module in both version 2003 and version 2007 adds basic task management to appointment and meeting scheduling, this module makes the perfect home base from which you can conduct all your Outlook business.
In this chapter, you discover the basic strategies and techniques for using the Calendar module to schedule all your appointments and meetings as well as keep on top of the tasks you need to accomplish on a given day. I hope that during this discovery process you not only become super comfortable using the Calendar's many wonderful features but also find the Calendar the most natural place from which to use Outlook as a full-fledged personal information manager.
Although Outlook's Calendar module comes after the Mail module as far as using Outlook as your personal information manager, you can easily make it number one. This is because the Calendar module can provide you with a quick view not only of your daily, weekly, or monthly task list but also of the tasks currently on your to-do list.
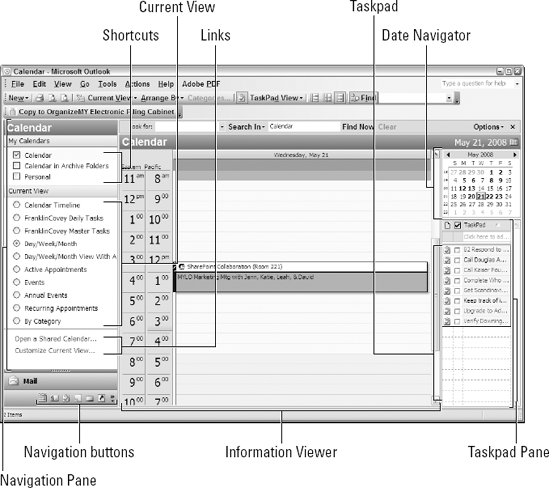
Figure 10-1 shows the Calendar module as it typically appears in Outlook 2003. In the 2003 version, the program window is divided into the following three areas:
Navigation Pane: This pane is divided into the following four sections:
Shortcuts: Here you'll find your My Calendars options, which enable you to hide and display the different Outlook calendars you keep. Current View: The options here enable you to select a new view for the appointments and meetings scheduled on the current calendar, depending on how you've chosen the dates to be displayed. Links: Click a link to open a shared calendar or customize the current Calendar view. Navigation buttons: The buttons here enable you to select a new Outlook module. Information Viewer: This pane typically displays the appointments and meetings that are scheduled on your daily, weekly, or monthly calendar.
TaskPad: This pane is divided in the following two sections:
Date Navigator: Lets you select a new day, week, or month to display in the Information Viewer, depending on how you've chosen the dates to be displayed. TaskPad: Displays the tasks currently on your to-do list.
Note
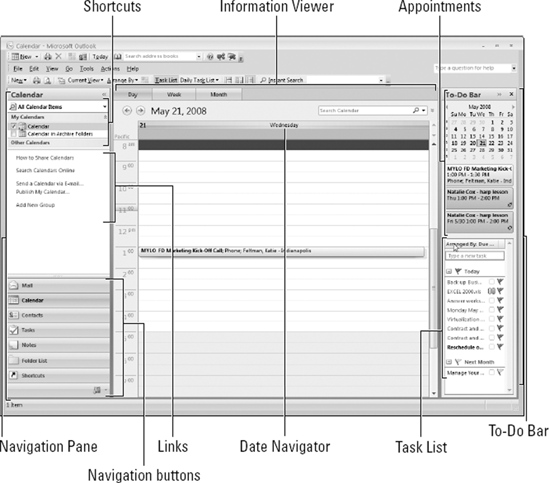
Outlook 2007, as shown in Figure 10-2, has a slightly different look, with its replacement of the TaskPad with the To-Do Bar. In the 2007 version, the program window is divided into the same three areas, with these variations:
Navigation Pane: This pane is divided into following three sections:
Groups: This section automatically includes the My Calendars familiar to you from Outlook 2003, but it also includes People's Calendars (where you can hide and display calendar snapshots other people send you by e-mail) as well as Other Calendars (where you can hide and display the Internet calendars to which you subscribe). Links: Click the links here to display Internet help information on sharing calendars, find Internet calendars, send calendar snapshots by e-mail, publish a calendar to Office Online, and add a new group. Navigation buttons: The buttons here enable you to select a new Outlook module. Information Viewer: This pane typically displays the appointments and meetings scheduled on your daily, weekly, or monthly calendar. It can also include the display of a Daily Task List subpane at the bottom, showing a list of the tasks that are overdue or have due dates corresponding to the dates displayed in the area immediately above it.
To-Do Bar: This pane is divided into the following three sections:
Date Navigator: Use this section to select a new day, week, or month to display in the Information Viewer, depending on how you've chosen the dates to be displayed. Appointments: In this section, the three most imminent appointments on your calendar are listed. Task List: Here you'll find your to-do list tasks grouped by their due dates.
Note
If you're now using Outlook 2007, you can easily download or subscribe to an Internet calendar (also known as an iCalendar, or iCal for short) to use in Outlook's Calendar module. You can even compare these Internet calendars side by side with any of the other regular Outlook calendars you maintain.
Note
Keep in mind the difference between downloading and subscribing to an online calendar. When you download an Internet calendar, Outlook 2007 actually copies a Calendar Snapshot, in essence a static reproduction of the calendar with its current appointments and comments. When you subscribe to an Internet calendar, Outlook periodically refreshes the Calendar Snapshot it downloads, therefore keeping the iCalendar's information up-to-date. Note also that not all iCalendars that you download or subscribe to enable you to edit their contents. A few of these calendars are read-only, meaning that you can't add your own appointments and meetings to it.
When you start searching for them online, you'll find that there are all sorts of iCalendars available for use in Outlook. The most popular, of course, are those iCalendars that mark national holidays, the birthdays of famous people, or the anniversaries of significant historical events.
Downloading and subscribing to Internet calendars in Outlook 2007
The process for downloading or subscribing to an iCalendar from Outlook 2007 is a very straightforward one:
Launch Outlook as you normally do and then, if necessary, open the Calendar module (press Ctrl+2).
Click the Search Calendars Online link in the Links section of the Navigation Pane.
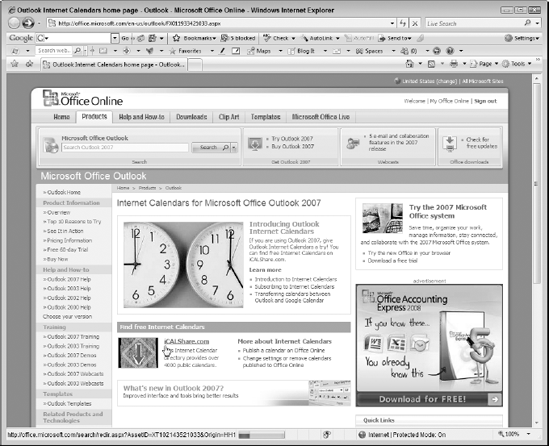
Outlook launches your default Web browser, which displays the Outlook Internet Calendars Home page (similar to the one shown in Figure 10-3).
Click the
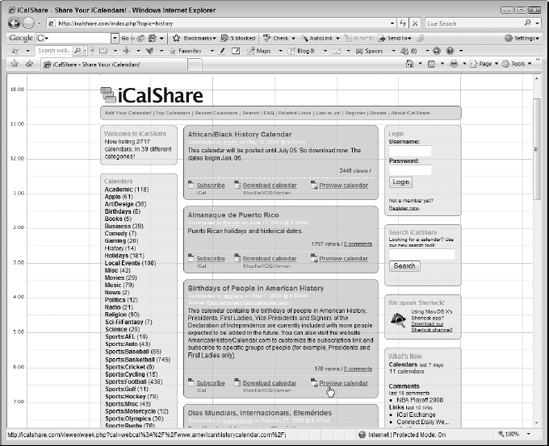
iCALShare.comhyperlink under the Find Free Internet Calendars heading in the middle of the Web page.Your Web browser opens the iCalShare – Share Your Calendars! Web page (similar to the one shown in Figure 10-4).
Click the link for the category of the iCalendar you're interested in or enter keywords in the Search iCalShare text box and then click its Search button.
iCalShare displays a list (sometimes partial, if there's more than one page) of the iCalendars in the category you selected or that meet the search text you entered.
(Optional) Click the Preview Calendar hyperlink to display a sample month (corresponding to the current month) of the calendar you're potentially interested in using.
Your Web browser displays a sample of the events noted on the selected calendar for the current month and year.
When you've found the iCalendar you want to use in Outlook 2007, you can either download it or subscribe to it.
If you previewed the iCalendar, click your Web browser's Back button to return to the page with the description of the iCalendar you're interested in. Then, to download a static Calendar Snapshot for Outlook, click the iCalendar's Download Calendar hyperlink. To subscribe to the calendar so that its content is periodically updated in Outlook, click the Subscribe hyperlink instead.
If you click the Download Calendar hyperlink, Outlook opens the File Download dialog box asking whether you want to open or save the calendar file. After you click Open, if you're running Internet Explorer under Windows Vista, an Internet Explorer Security alert dialog box opens, where you click the Allow button.
If you click the Subscribe hyperlink and you're running Internet Explorer under Windows Vista, an Internet Explorer Security alert dialog box opens, where you click the Allow button. After you click Allow, a Microsoft Office Outlook dialog box appears on top of the Outlook window, asking whether you want to add this Internet calendar to Outlook and subscribe to updates. Click the dialog box's Yes button.
No matter which hyperlink route you follow, Outlook adds the name of the iCalendar you just downloaded or subscribed to under the Other Calendars in the Navigation Pane. The program also displays this iCalendar side by side with the Outlook calendar that's currently being displayed in the Calendar module.
Switch over to your Web browser showing the iCalShare Web page and then exit the browser (Alt+F4).
Windows returns you to the Calendar module in Outlook 2007.
(Optional) To display just one calendar in Outlook's Information Viewer, select the check box in front of the name of the calendar you want to hide in the Navigation Pane. To display a tab for each calendar you have open in Outlook that you can then click to have that calendar displayed on top of the others, click the View

Overlay mode makes switching between any of the calendars open in Outlook 2007 easy. Keep in mind, however, that whatever calendar display you select for the calendar on top (Day, Week, Month, and so on) is also used to display any other open calendar that you bring to the top in the Information Viewer.
Bringing your Google calendar into Outlook 2007
Note
If you're a Google enthusiast who maintains an online Google calendar, you can download your Google calendar into Outlook 2007. All you have to do to import your Google calendar is follow these steps:
Launch Outlook 2007 and then launch your Web browser and use it to log on to your Google calendar.
The fastest way to bring up Google is by clicking the Google button on your Google toolbar, if you have it displayed in your Web browser.
If necessary, select from the pane on the left side of the Web page the name of the Google calendar whose snapshot you want to import into Outlook.
Doing so ensures that the correct dates and appointments are displayed in the Web browser.
Next, you need to display details about the Google calendar you're viewing.
Back in left pane of your Google calendar Web page, choose Calendar Settings from the drop-down list to the immediate right of the name of your Google calendar.
Google replaces your calendar display with a list of details about your Google calendar.
Scroll down and then click the ICAL button in the Private Address section of your Google Calendar details.
Google displays a Calendar Address dialog box containing a hyperlink to the private URL address for your Google calendar.
Click the hyperlink address in the Calendar Address dialog box.
Your Web browser displays a File Download dialog box asking whether you want to open or save the calendar file.
Click the Open button in this dialog box.
If you're using Internet Explorer on Windows Vista, the Internet Explorer Security dialog box appears.
Click the Allow button.
Windows runs a program that adds a Calendar Snapshot of your online Google Calendar to your copy of Outlook 2007.
Click the OK button in the Calendar Address and then exit your Web browser before you switch to Outlook 2007.
When you return to the Outlook 2007 Calendar module, the Calendar Snapshot of your Google calendar appears in its Information Viewer side by side your current Outlook calendar, and the name of your Google calendar is now displayed under Other Calendars in the Calendar Navigation Pane.
Sometimes you may have to synchronize the changes you make to your Google calendar online in your Web browser with the changes that you made to a snapshot of it in Outlook. (A Calendar Snapshot of your Google calendar is not read-only, so you are free to modify its contents.)
Unfortunately, Outlook doesn't yet provide some sort of synchronize command to automatically update different snapshots of the same calendar. This means that you have to manually reconcile modifications you've made online with your Web browser with those you've made to an earlier version in Outlook.
To do this, you need to follow the previous sequence of steps and download another (more recent) snapshot of your Google calendar that has all the changes you made online. This more recent Calendar Snapshot automatically has a number appended to its calendar name, such as Gregory Harvey (1), to differentiate it from an earlier download named just plain old Gregory Harvey (containing all the updates you made in Outlook that are not reflected in the online latest Google version). After that, you follow these simple steps to reconcile the differences between the earlier and more recent Google Calendar Snapshots so that you end up with just a single Google calendar in Outlook 2007:
Select the check boxes in front of the names of the earlier and more recent Google calendars — Gregory Harvey and Gregory Harvey (1) in my example — in the Outlook Calendar Navigation Pane.
Leave all other check boxes deselected. That way, only the two versions of your Google calendars are displayed side by side in the Outlook Information Viewer.
Click the Month button above the calendar display in the Information Viewer.
Now the entire current month for both versions of your Google calendars are displayed side by side in the Outlook Information Viewer.
Drag any appointments you've added to the more recent Calendar Snapshot you just downloaded — Gregory Harvey (1) in my example — and then drop them on the same dates in the Google calendar you've been using in Outlook for some time — Gregory Harvey in my example.
Note that if you see that you've deleted some appointments from the more recent Google calendar snapshot that still show up on your original Google calendar in Outlook, you can delete them by clicking them and then pressing the Delete key.
If you've made any online changes to months ahead of the current one, click the Forward button with the right arrow in Outlook and then use the same procedure outlined in Step 3 to reconcile these changes.
After you've finished reconciling all the months where you made changes online that were not reflected in the original downloaded version in Outlook, you're ready to jettison the recent Google calendar snapshot.
Right-click the name of the more recent Google calendar you just downloaded in the Navigation Pane — Gregory Harvey (1) in my example — and then click the Delete option on its shortcut menu — Delete "Gregory Harvey (1)" in my example.
Outlook displays a Microsoft Office Outlook alert dialog box asking you to confirm the deletion.
Click the Yes button in the alert dialog box.
Outlook deletes the more recent Google calendar snapshot, leaving only the originally downloaded version of your Google calendar that now reflects all the changes you made to it online. In my example, the Gregory Harvey (1) version disappears, leaving only the reconciled and updated Gregory Harvey Google calendar displayed in Outlook 2007.
To achieve peak productivity using the Calendar module (especially if you make it your Outlook home base), you surely need to know how to work with and display different calendars as well as move easily between the components in the Calendar module. You also need to know how to quickly modify the date display in the Outlook Information Viewer when you select a Calendar View that displays dates graphically.
Adding new calendars and displaying them
Many Outlook users maintain at least two calendars: one to keep track of their business appointments and meetings and another to keep track of all their personal appointments and meetings. Some even try to maintain more than just a business and personal calendar, adding calendars that track special events or occasions such as the iCalendars discussed earlier.
Note
Just because you can maintain multiple calendars in Outlook doesn't mean doing so is a particularly good idea, especially from the personal productivity point of view. Although keeping your personal appointments separate from business may make your workday appear less hectic, it can also mean — if you're still using Outlook 2003 — that you may miss a dental or doctor's appointment or double-book a business meeting with your child's soccer championship game. (Fortunately, if you're using Outlook 2007, this version automatically shows the appointments you may schedule on any one calendar on all the calendars you maintain, thus preventing just this kind of thing.)
Tip
Therefore, my advice (especially if you're still using Outlook 2003) is to keep a single Outlook calendar accessible either from home or office that tracks all your business and personal appointments and events. If doing this contradicts company policy (some managers don't want to see personal appointments showing up on company time) or if it's way too disheartening to see all those activities lined up one after the other in a single day, by all means maintain a separate business and personal calendar. However, in that case, you simply must know how to compare them side by side (as described in this section) to prevent any double-booking or missing out on important appointments or events that show up on one calendar but not the other.
Assuming that you're already using the default calendar (simply called Calendar) that Outlook automatically creates for you as your business calendar, here are the steps for creating a new, personal calendar and then displaying it side by side with your original business calendar:
Launch Outlook as you normally do and then, if necessary, select the Calendar module (press Ctrl+2) before you press Ctrl+Shift+E.
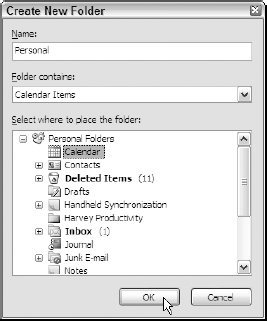
Outlook opens the Create New Folder dialog box, similar to the one shown in Figure 10-5, with the Calendar folder already selected.
Type the name you want to give your new personal calendar (such as Personal) in the Name text box and then click OK or press Enter.
Outlook adds the name of your new personal calendar to the list of calendars in the My Calendars section at the top of the Calendar Navigation Pane.
In the Navigator Pane, select the check box in front of the name of the new personal calendar just added to the My Calendars section.
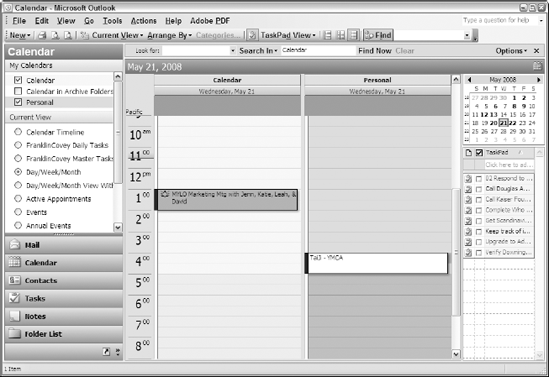
Outlook displays your new personal calendar side by side to the right of your default (business calendar) in the Information Viewer, as shown in Figure 10-6. Note that Outlook applies the same Day, Week, or Month date display to both calendars as was originally used to display the appointments and events on the sole business calendar in the Information Viewer.
Note
I strongly suggest that after you create a personal calendar in Outlook 2003 to go with your original business calendar, you keep both of them displayed in this manner most of the time when using the Outlook Calendar module. Keeping both calendars displayed helps keep you from missing appointments that show up only on whatever calendar is hidden. It also helps you avoid creating conflicts when booking appointments and gives you an overview of what part of your day, week, and month is devoted to business rather than personal activities. This overview can actually end up helping in your ongoing endeavors to better balance your personal and professional lives.
Note
If you're using Outlook 2007, you can overlay your business and personal calendars one on top of the other rather than have to always display their daily, weekly, or monthly contents (at a much smaller size) side by side. To overlay these calendars, click the View in Overlay Mode button (the one with the left-pointing arrow) on the tab of the right calendar or choose View
In Overlay mode, Outlook then displays both Calendar and Personal tabs that you can click to immediately display whichever calendar is currently hidden by bringing it to the top. If you later find that you need to compare a particular day or part of the day in each calendar, you can switch back to the side-by-side display by clicking the View in Side-by-Side button (with the right-pointing arrow) on the tab of either calendar or by choosing View
Using the Date Navigator to select different dates to display
Outlook automatically displays the Date Navigator (that miniature monthly calendar with current month and year displayed on its title bar) at the top of the TaskPad in Outlook 2003 or the To-Do Bar in Outlook 2007. Whenever you hide the TaskPad (choose View
As its name implies, you use the Date Navigator to select the different dates you want displayed in the Calendar module's Information Viewer when using a Calendar View that displays dates as days, weeks, or months.
Note
Keep in mind that when you select a Calendar view in Outlook 2003 that doesn't display dates in the Information Viewer — the By Category view, for example, or Active Appointments — Outlook removes the Date Navigator from the window. (Outlook doesn't move the Date Navigator to the top of the Navigation Pane as it normally does when you close the TaskPad.) In Outlook 2007, the Date Navigator continues to appear at the top of the To-Do Bar as long as you don't close this pane by clicking its Close button.
To display a new date in the Information Viewer, you simply click it in the Date Navigator. To display multiple consecutive dates, drag through them in the Date Navigator.
If the date or dates you want to select aren't currently visible in the Date Navigator, you first need to select their month and year. You can do this by clicking the Forward or Back buttons that appear at the left and right edges of the Date Navigator title bar as needed.
If the month containing the date(s) you want to select is either three months before or after the month currently displayed in the Date Navigator, you can display it by clicking the current name of the month and year (such as May 2009) in the Date Navigator title bar. Doing so displays a pop-up menu with the names of the three previous months (April 2009, March 2009, and February 2009) listed above the current one on the menu and the names of the next three months (June 2009, July 2009, and August 2009) listed below. All you then have to do is click the name of the month and year you want displayed in the Date Navigator.
Note that as soon as you click a date in the Date Navigator, Outlook displays only that day, showing the times of all the appointments and events you've scheduled in the Information Viewer. So, for example, if Day/Week/Month with AutoPreview is the current Calendar view and Work Week the current date display and you click a date in the Date Navigator, Outlook immediately switches to the Day date display in the Information Viewer.
Tip
Typically, the Date Navigator displays the days and weeks for a single month — normally the current one — in the Outlook TaskPad (2003) or To-Do Bar (2007). If you can afford to give up screen real estate in the Information Viewer, you can expand the Date Navigator display to include two months (normally the current month and the one after). All you have to do is widen the TaskPad or To-Do Bar sufficiently to accommodate this two-month display by dragging the border between the Information Viewer and TaskPad/To-Do Bar to the left. This new arrangement not only makes it a snap to select dates in the current and upcoming month but also makes reading the list of tasks that appears in the pane on the right a great deal easier.
Switching the date display
In keeping with my Master Your Productivity Tools strategy, to be fully capable using the Outlook Calendar module, you need to know how to instantly switch from one date display to another in the Information Viewer. Table 10-1 gives you all the major shortcut keystrokes for quickly changing the date display in Outlook.
Table 10-1. Shortcut Keys for Changing the Calendar Display
Press This | To Display |
|---|---|
Alt+1 through 9 | The number of days equal to the number you type (Alt+1 displays the current day, Alt+2 displays the current and next day, Alt+3 displays the current day and next two days, and so on.) |
Alt+0 | The next 10 days, including the current day |
Alt+– (hyphen) | The current seven-day week |
Alt+= (equal sign) | The current month |
Ctrl+Alt+1 | The current day (Outlook 2007 only) |
Ctrl+Alt+2 | The current work week (Outlook 2007 only) |
Ctrl+Alt+3 | The current seven-day week (Outlook 2007 only) |
Ctrl+Alt+4 | The current month (Outlook 2007 only) |
Note that when it comes to displaying the current month in the Information Viewer in Outlook 2007, you have a choice between pressing Alt+= (equal sign) and Ctrl+Alt+4.
If you want to display the current work week in Outlook 2007, you can do so by pressing Ctrl+Alt+2 or clicking the Week button at the top of the calendar display and then making sure that the Show Work Week option button is selected. If you want to do this same thing in Outlook 2003, you have to choose View
You may find yourself a lot happier and more productive in the Calendar module if you change a few of its default settings. To make changes to the calendar defaults, you need to open the Calendar Options dialog box (similar to the one shown in Figure 10-7). To open this dialog box, simply choose Tools

As you can see in Figure 10-7, the calendar default settings are presented in three groups: Calendar Work Week, Calendar Options, and Advanced Options. You use the Calendar Work Week options to change the days that make up your work week or the day that begins a work week as well as to modify the start and end time of your workday. (If it were only as simple as 8 a.m. to 5 p.m.!)
You use the Calendar Options group to change a wide array of calendar options, including assigning a background color to your calendars (for the borders) and adding national holidays. (Outlook automatically adds the holidays celebrated in the United States of America to its calendars.)
You use the Advanced Options group to make such changes as enabling alternate calendars for different nationalities (such as Japanese or Chinese) and systems (such as the Hebrew lunar calendar) and changing the time zone used by your calendars or to add an additional time zone to them.
Tip
If you deal with people in an office in a different time zone with whom you routinely schedule appointments on your calendar, you may want to use the Advanced Option group's Time Zone button to add their time zone to your calendars. That way, when you schedule a telephone call or other online meeting, your calendar synchronizes the times by showing their alternate time zone to the immediate left of your local time zone in the Calendar Information Viewer when you select either the Day or Work Week display in Outlook 2003 or the Day, Work Week, or Week display in Outlook 2007.
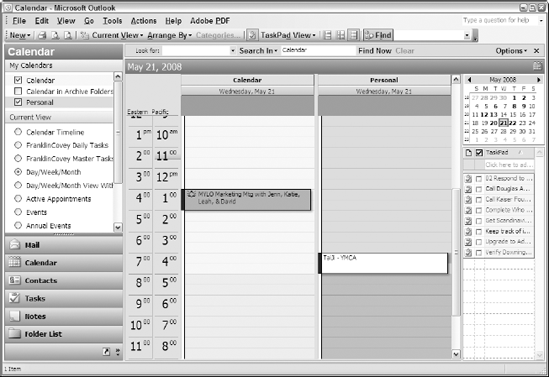
For example, because I have so many meetings with people in the Eastern Time zone, I went ahead and added it as the alternate time zone to my calendar. Figure 10-8 shows you the results. Here, you see my calendar in Day display that now shows the Eastern time zone in a column to the immediate left of my local Pacific time. Note that I could easily modify this display so that the Pacific time appears in the column to the immediate left of the Eastern time zone simply by clicking the Swap Time Zones button in the Time Zone dialog box (opened by clicking the Time Zone button in the Calendar Options dialog box).
As with the other Outlook modules, the Calendar program offers a number of different ways to view the appointment and event information you maintain in your calendars. By default, Outlook adopts a Day/Week/Month view for the Calendar module that depicts this information on a daily, weekly, or monthly calendar (as you'd typically enter it in a standard paper day planner). In addition, you have a choice between a variety of different predefined Calendar views, including a Day/Week/Monthly view with AutoPreview (that displays details for a selected appointment in a pane at the bottom of the Information Viewer) and an Active Appointments and All Appointments view that lists only upcoming appointments on your calendar or all the appointments (including past ones).
Note
Keep in mind that you can also customize any of the predefined Calendar views as well as create new ones of your own design (following the same general procedure you would for customizing and creating new views for the Mail module, as outlined in Chapter 6). For example, you might want to create a new custom view — named something like Calendar Timeline view — which would use the Timeline type of view (one of the types of views that's not predefined) that presents your appointment and meetings on a daily, weekly, or monthly timeline (depending on the date display you select).
The whole point of the Outlook calendar is to keep track of the time-bound obligations that you have. In Outlook, these kinds of obligations fall into one of three distinct types:
Appointment: An activity normally involving you and one other participant that's scheduled at a particular time and often for a particular period of time but whose scheduling does not involve directly coordinating with the other participant's calendar and getting his or her agreement by e-mail.
Event: An all-day occurrence that may or may not affect other workday activities you would otherwise try to accomplish that day. For example, the celebration of your spouse's birthday would not normally affect your workday in the same way as the celebration of a national holiday.
Meeting: An activity normally involving you and multiple other participants that's scheduled at a particular time and often for a particular period of time, and whose scheduling very often involves coordinating with the other participants' calendars and getting their agreement by e-mail.
The practical repercussions of these distinctions are rather straightforward in Outlook. The procedure for adding a new appointment and an event to your calendar is identical except that when you specify an appointment, you also designate a particular start and end time, but when you schedule an event, you designate its duration as being all day.
When it comes to scheduling a new meeting, you send out e-mail invitations to all the participants that both inform them of the meeting's date and time as well as ask them confirm their ability and willingness to attend. If you're using Outlook with the Exchange Server, you can even check the other participants' Outlook calendars to determine those times when most are free so that you can figure out the best time for scheduling the meeting before you invite them to attend. Finally, if you're using Outlook with the Exchange Network, you can use Outlook to reserve available meeting resources (including physical meeting rooms and audio-visual equipment) and to set up an online Meeting Workspace, where you can store files containing all the supplementary material you want your participants to have beforehand, such as the meeting agenda and special informational handouts.
The process for putting a new appointment or event on your Outlook calendar is really quite simple:
If the Calendar module is current, click the date of the new appointment in the Date Navigator and the hour of the appointment's start time in the Information Viewer before you press Ctrl+N. If the Calendar module is not current, press Ctrl+Shift+A instead.
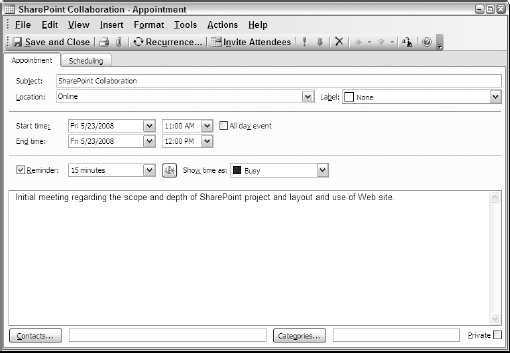
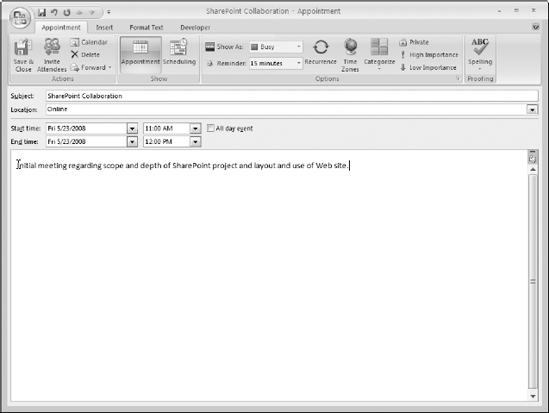
If you're using Outlook 2003, the program opens the Untitled Appointment dialog box, similar to the one shown in Figure 10-9. If you're using Outlook 2007, the program opens a slightly different version of the Appointment dialog box, similar to the one shown in Figure 10-10.
Type a short description of the appointment in the Subject text box.
Try to keep the appointment description as short as possible; otherwise, you won't have the foggiest idea of what appointment you have on a particular day when you switch your calendar display from Day to Week or Month.
(Optional) Add the location of the appointment by clicking the Location text and then typing in a description of the locale or its actual address.
If you routinely schedule appointments in a particular spot, you may be able to enter the locale or address by choosing it from the drop-down list rather than having to type it into the text box all over again.
If necessary, modify the date and time of the appointment using the Start Time and End Time date and time combo boxes. If you're scheduling an event rather than an appointment, select the All Day Event check box instead.
You can select the hour the appointment starts and ends in the Start combo boxes either by typing the 12-hour time (as in 3:30 p.m.) or 24-hour time (as in 15:30), or you can choose the hour (in half-hour increments) from the associated drop-down lists.
You can enter the start, or stop (or both) date for the appointment or event by typing the date number (6/6/09 or 6-6-09) in the appropriate date combo box or by clicking its drop-down button and then clicking the date on the drop-down Date Navigator.
Note that whenever you click the All Day Event check box, the combo boxes that record the starting and ending time are hidden, leaving only the date combo boxes visible in the Untitled Appointment dialog box.
(Optional) Click the list box in the bottom section of the Untitled Appointment dialog box and then type in a longer description of the appointment or note down any special information of which you need to be aware.
Outlook automatically reminds you fifteen minutes before the start time of an appointment by displaying an alert dialog box and playing a default reminder sound. You can modify the reminder or remove it entirely.
(Optional) To reset the amount of time before the appointment that you're to be reminded, choose a different time from the Reminder drop-down list. To remove the reminder, select the Reminder check box in Outlook 2003 or choose None from the Reminder drop-down list in Outlook 2007. To reset the sound in Outlook 2003, click the Sound button or (in Outlook 2007) choose Sound from the Reminder drop-down list to open the Reminder Sound dialog box. There, you can select a new sound to play by entering its filename in the text box or mute any reminder sound by deselecting the Play the Sound check box before you click OK.
Be default, Outlook automatically indicates the status of the time assigned to all new appointments as Busy and new events as Free on all copies of your calendar that you share with others (see the "Sharing Your Outlook 2007 Calendars" section that follows). Sometimes, you may need to change this default appointment or event status to something more appropriate, such as Out of the Office or Tentative.
(Optional) To change the status displayed for the new appointment or event on copies of the calendar you e-mail or share with others, click the Show Time As drop-down button (Outlook 2003) or the Show As drop-down button (Outlook 2007) and select the new status (Free, Tentative, Busy, or Out of Office) from its drop-down list.
If the appointment or event falls into a category that you may later need to use to filter the engagements listed on your calendar, you may want to assign it to various categories.
(Optional) To assign an existing category to the new appointment or event in Outlook 2003, click the Categories button at the bottom of the Untitled Appointment dialog box and then select the check boxes in the Categories dialog box that appears for all the categories you want to assign before you click OK. In Outlook 2007, click the Categorize button in the Ribbon and, in the new dialog box that appears, click the name and color of each appropriate category from its drop-down list.
Be default, Outlook shows any appointment, event, or meeting that you add to your calendar whenever you share that calendar with others. If you need to protect privacy by omitting a particular engagement from shared calendars, be sure to perform the following step.
(Optional) To mark a new appointment or event as private to hide it on shared calendars in Outlook 2003, select the Private check box. In Outlook 2007, click the Private button in the Ribbon.
For some of the new appointments and events you put on your calendar, you may want to have instant access to the person's or company's contact information, just in case you need to look up the physical address or telephone number.
(Optional) To insert the contact information for a person or company into the new appointment or event in Outlook 2003, click the Contacts button at the bottom of the Untitled Appointment dialog box and then click the name of the contact to add in the Select Contacts dialog box before you click OK. In Outlook 2007, click the Insert tab and then click the Attach Item button to open the Insert Item dialog box. There, click the Contacts folder in the Look In list box and click the name of the contact in the Items list box before you click OK.
Note that after inserting contact information in an appointment or event, you can display this information by opening the engagement in the Calendar Information Viewer and then clicking its contact link in Outlook 2003 in the Appointment dialog box or double-clicking the business card icon in the Event dialog box in Outlook 2007.
Now you're ready to save your new appointment or event and add it to your calendar.
Click the Save and Close button.
Outlook closes the Appointment or Event dialog box, and the engagement now appears on the calendar in the Calendar Information Viewer.
After you add an appointment or event to your calendar, a block covering the hours of the appointment and showing as much of the text of the subject that can appear in the current Day/Week/Month display appears in the Information Viewer (assuming that the Calendar module is in a view that uses a Day/Week/Month calendar display). In addition, the number corresponding to the date appears in boldface type in the Date Navigator.
Note that when you add an all-day event to your calendar, the text of the subject of that event appears at the top of the Information Viewer when it's in Day display mode.
Some of the appointments and events that you schedule on your calendar are not one-time affairs. For example, you may be adding an appointment that's just the first of a series of weekly or monthly engagements. In such a case, rather than spend your valuable time copying the first occurrence of the new appointment or event to the other pertinent days of the calendar in the Information Viewer, you can get Outlook to do all that for you simply by indicating that the appointment or event is a recurring one.
To indicate a recurring event, you follow the same steps I outline in the previous section for creating the first instance of the appointment or event and then, before you click the Save and Close button, you click the Recurrence button. Doing so opens the Appointment Recurrence dialog box, similar to the one shown in Figure 10-11.
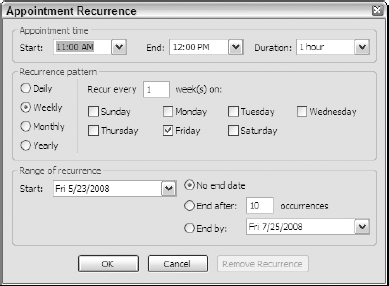
Figure 10-11. Using the Appointment Recurrence dialog box to indicate the recurrence pattern and end time for a recurring appoinment.
When setting up a recurring appointment, you first need to click the appropriate Recurrence Pattern option button (Daily, Weekly, Monthly, or Yearly). Depending on which option button you choose, you have other option buttons and check box settings that you can change (such as whether a Weekly recurring appointment is every week, every second week, and so forth on the same or a different weekday). Then, after you specify the Recurrence Pattern settings, you may still have to modify the end date or the number of occurrences in the Range of Recurrence settings before you click OK.
After you select OK and close the Appointment Recurrence dialog box, Outlook automatically adds as many appointments or events to the upcoming days, weeks, and months of your calendar as required by the settings you specified.
To later edit the settings of a recurring appointment, double-click the single occurrence on the calendar display in the Information Viewer that needs changing or any occurrence if they all require some modification. Outlook then opens an Open Recurring Item dialog box that enables you to choose between editing just the one occurrence or the entire series. To modify only the occurrence you selected, make sure that the Open This Occurrence option button is selected when you click OK. To edit the entire series, click the Open the Series option button before you click OK.
Note that the process for deleting a recurring appointment or event is very similar. When you press the Delete key after clicking a particular occurrence of a recurring appointment or event on the calendar display, Outlook opens the Confirm Delete dialog box, which enables you to choose between a Delete This Occurrence option button (to get rid of the single selected engagement) and a Delete The Series option button (to get rid of all appointments or events in the entire series).
The process for planning a new meeting and putting it on your Outlook calendar is very similar to that for adding a new appointment. The big difference comes at the time you set up the meeting's date, time, and location, when you have an opportunity to send out meeting requests that both inform all your potential meeting participants of the meeting's proposed date and time as well as seek their confirmation in attending.
The general steps for setting up a new meeting and sending out meeting requests to the potential participants are as follows:
Launch Outlook as you normally do and then press Ctrl+Shift+Q.
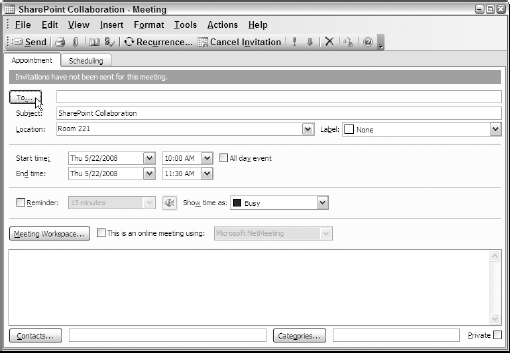
Outlook 2003 opens an Untitled – Meeting dialog box with the Appointment tab selected, similar to the one shown in Figure 10-12. If you're using Outlook 2007, the program opens this dialog box with the Appointment button in the Show group selected on the Ribbon's Meeting tab.
Use the various fields to enter a descriptive meeting title along with the meeting's location, date, starting and ending times, and notes. If desired, specify what kind of meeting reminder to have Outlook display, just as you would do if you were specifying a new appointment for your calendar.
Now you're ready to send out meeting requests to all your potential meeting participants.
Click the To button in the Untitled – Meeting dialog box.
Outlook opens a Select Attendees and Resources dialog box, similar to the one shown in Figure 10-13, where you specify the people you want to attend the meeting.
Note that you can differentiate between those whose attendance is critical (by inserting their e-mail addresses in the Required text box) and those whose attendance is not mandatory (by inserting their e-mail addresses into the Optional text box). Step 4 shows you how.
Ctrl+click each of the names of the mandatory attendees in the Name list box and then click the Required button to insert them into the Required text box. If you have any people you want to invite whose attendance is not mandatory, Ctrl+click their names in the list box and then click the Optional button to add them to the Optional text box before you click OK.
Outlook closes the Select Attendees and Resources dialog box, returning you to the Meeting dialog box, where the e-mail addresses of all the potential attendees you just selected appear in the To text box.
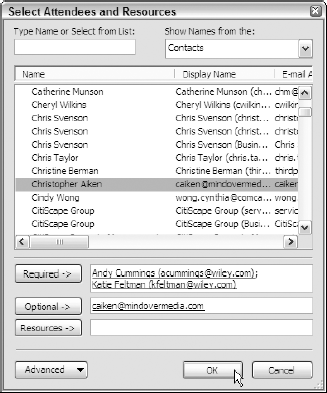
Figure 10-13. Indicating the required and optional attendees and resources for the new meeting in the Select Attendees and Resources dialog box.
If you use Outlook with Microsoft Exchange server and your attendees share their calendars on a free/busy server (see "Sharing Your Outlook 2007 Calendars," later in this chapter, for details), you can use the Untitled – Meeting dialog box's Scheduling tab (in Outlook 2003) or the Scheduling button (in Outlook 2007) to look for any conflicts and make any necessary last-minute changes to the meeting date and time. Step 5 shows you how.
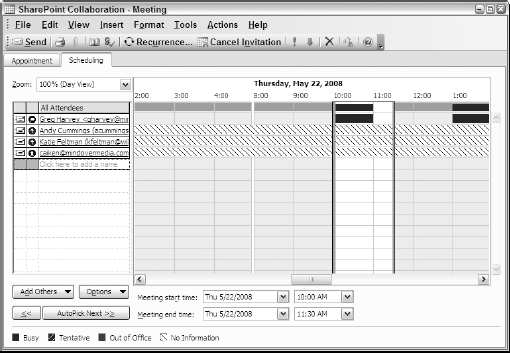
(Optional) Click the Scheduling tab in Outlook 2003 or the Scheduling button in Outlook 2007.
The Scheduling tab (similar to the one shown in Figure 10-14) appears, indicating the busy times and times out of the office for each of the meeting attendees. Use this information to locate meeting conflicts and to make any necessary changes to the meeting date and starting and end times in the appropriate drop-down lists before you click the Appointment tab (2003) or button.
Note that the Scheduling tab indicates the status of each of the attendees with the following icons:
Magnifying glass icon indicates the meeting organizer
Upward-pointing arrow icon indicates a required attendee
Letter "I" icon indicates an optional attendee
The last thing you may need to do before e-mailing invitations to the attendees of your new meeting is to set up a Meeting Workspace, which is an online Web site (usually a Microsoft SharePoint site) where your participants find background information and materials they need for the meeting. Step 6 covers setting up a Meeting Workspace.
(Optional) To designate a Meeting Workspace that you've set up on your SharePoint Web site for the meeting, click the Meeting Workspace button to open the Meeting Workspace pane and then click its Create button.
(Optional) In the new pane that appears, choose an existing meeting location from the Select a Location drop-down menu.
To select a new location, click the Other option on this drop-down menu and then enter the URL of the SharePoint Meeting Workspace in the Other Workspace Server dialog box before you click OK. You can then create a new workspace or select an existing one using the Select a Workspace drop-down menu before you click the OK button to close the Meeting Workspace pane.
Retaining meeting requests
As soon as you respond to an e-mail meeting request, Outlook automatically moves that e-mail message into the Deleted Items folder. If you prefer to retain the meeting requests you receive in your Inbox until you move them into the appropriate Inbox storage subfolders you've created, you can do so by following these steps:
Choose Tools
Click the E-Mail Options button in the Options dialog box.
Click the Advanced E-Mail Options button in the E-Mail Options dialog box.
Click the Delete Meeting Requests from Inbox when Responding check box to removes its check mark and then select OK three times to close all the open dialog boxes.
Now you're ready to invite your potential attendees to the meeting.
Click the Send button.
Outlook closes the Untitled – Meeting dialog box and e-mails meeting requests to each of your required and optional attendees.
Each of the potential attendees you added to the required and optional lists receives an e-mail message similar to the one shown in Figure 10-15. This message informs each attendee of the meeting date and time and contains a series of buttons in the Info Bar portion that gives him or her the option of responding in one of the following ways:
Accept: Click this button to accept the meeting date and time without any change.
Tentative: Click this button to tentatively accept the meeting date and time.
Decline: Click this button to indicate that you can't attend the meeting at its scheduled date and time.
Propose New Time: Click this button to open a Propose New Time dialog box, where you can select a new meeting date and time that you are able to attend and then propose it to the meeting organizer by clicking its Propose Time button.
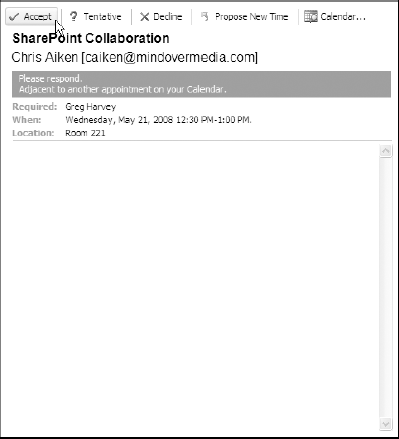
Figure 10-15. A typical Meeting Request e-mail asking you to accept or decline the invitation or to propose a new meeting time.
When a potential attendee selects one of these options, Outlook sends you (as the meeting organizer) an e-mail with his or her response. Note that you can track the responses of the potential attendees you invited to the meeting. Simply double-click the meeting block on your calendar in the Information Viewer to reopen its Meeting dialog box, which now contains a Tracking tab (Outlook 2003) or a Tracking button (in the Show group in Outlook 2007). Click the Tracking tab or button to review the status of the response of each of the invited attendees.
Note
One of the best things about keeping your appointment schedule in an Outlook 2007 electronic calendar (as opposed to a paper day planner) is the ease with which you can share this information with other co-workers and clients who also need be informed of your daily, weekly, or even monthly activities.
The simplest way to share your Outlook 2007 calendar is to e-mail a copy of it. You can also publish it to the Internet and invite others to view it as a Web page.
To e-mail a copy of your calendar to a co-worker or client, follow these steps:
Launch Outlook as you normally do and then make the Calendar module current, — if it's not already current — by pressing Ctrl+2.
Click the Send a Calendar via E-mail link in the Calendar Navigation Pane.
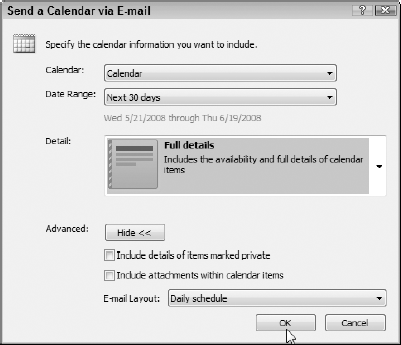
Outlook 2007 then opens a new message and displays the Send a Calendar via E-mail dialog box, similar to the one shown in Figure 10-16.
By default, Outlook e-mails the default calendar named, appropriately enough, Calendar. You can, however, e-mail a copy of any other calendar you maintain in Outlook.
(Optional) If you want to send a calendar other than the default Calendar, choose its name from the Calendar drop-down list.
By default, Outlook includes only the appointments and events that are scheduled for the current date on your calendar. You can, however, send any range of dates you wish, as Step 4 makes clear.
(Optional) If you want more than just the current day's calendar information included in the e-mail, specify the dates you want included by choosing the appropriate option from the Date Range drop-down list: Tomorrow, Next 7 Days, Next 30 Days, or Whole Calendar. If you want to select another range of dates, click the Specify Dates option and then enter the beginning date in the Start combo box and the last date in the End combo box.
By default, Outlook e-mails only the availability information (Free, Busy, Tentative, and Out of the Office) for the hours on the dates specified by selecting the Availability Only option in the Detail section. You can, however, include the subjects of your calendar engagements with the availability information by selecting the Limited Details option or include full descriptions by selecting the Full Details option.
(Optional) Choose the Limited Details option from the Details drop-down menu to display the subjects of your calendar engagements along with the availability information, or choose the Full Details option to display all the information about your calendar engagements, including availability.
By default, Outlook shows engagements for all hours of the day on your calendar for the dates included. To limit the engagements to working hours only, perform Step 6.
(Optional) To limit the engagements to working hours in the e-mailed calendar, select the Show Time Within My Working Hours Only check box. (If you need to check or reset your working hours, click the Set Working Hours link to open the Calendar Options dialog box, where you can modify the hours by editing the Start Time and/or End Time before you click OK.)
By default, Outlook e-mails your calendar using the Daily Schedule layout that includes the hours you're free as well as those when you're busy or out of the office. If you prefer to switch to the List of Events layout that displays a list without the free hours, follow Step 7.
(Optional) Click the Show button in the Advanced section and then choose List of Events from the E-mail Layout drop-down list. If you've selected Limited Details rather than Availability Only as the Detail option (see Step 5), you can also click the Include Details of Items Marked Private to include all private engagements in the daily schedule or the list of events. If you have selected Full Details as the Detail option, you can also click the Include Attachments with Calendar Items to include any files that you may have attached to the appointment, event, or meeting to the new e-mail message.
Now you're ready to close the Send a Calendar via E-mail dialog box so that you can address and send the new message containing a copy of your calendar.
Click the OK button.
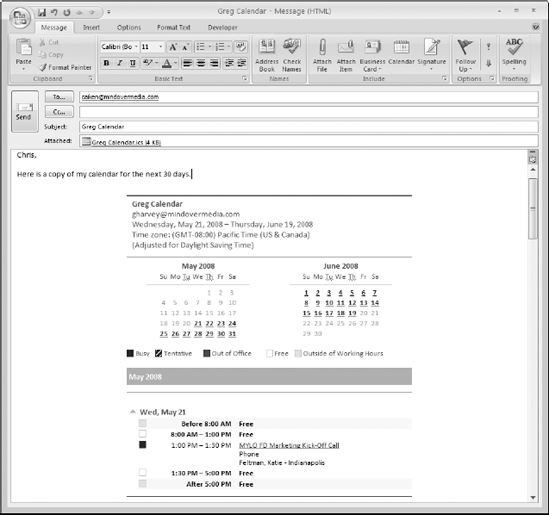
Outlook closes the Select a Calendar via E-mail dialog box and adds the calendar information using the layout and level of detail you specified for the selected date range (see Figure 10-17) to the otherwise blank e-mail message.
Fill out the e-mail header by selecting the e-mail address of the primary recipient(s) in the To text box and that of any secondary recipient(s) in the Cc text box. Make any modifications you deem necessary to the Subject text box and additions to the body of the message before you click the Send button.
Outlook e-mails the message to all your designated recipients containing the copy of your Outlook 2007 calendar.
If you use Outlook 2007 with Microsoft Exchange Server, your free/busy schedule is automatically shared with the other users who have access to the server. If you want to share this type of calendar information with folks who don't have access to the Exchange Server or don't use Outlook 2007 with Exchange Server, you can still share this info by publishing your calendar to Microsoft Office Online on the Internet (an Web-based, online extension of Microsoft Office software that offers you free workspaces where you can share items such as photos, documents, and calendars with others).
Note
Publishing your calendar to Microsoft Office Online enables co-workers and clients who are not using Exchange Server to use your free/busy information to help them in scheduling meetings that you need to attend. This is because after you publish a calendar to Microsoft Office Online and grant people access to it, your free/busy information appears in their copies of Outlook. They can then use this information when they schedule a new meeting, thus potentially saving lots of time that would otherwise be spent in back-and-forth meeting requests trying to find a time when you're free to attend.
The process of publishing your calendar to Microsoft Office Online is similar to sending your calendar to recipients via an e-mail message. (You even use a similar dialog box that enables you to specify the time span and type of detail to include.) The major difference is that you can allow anyone to search and view the calendar information (rather than keep it restricted to just those people you invite), and you can have Outlook periodically update the calendar information by automatically uploading new versions to the Microsoft Office Online Web site.
To publish your default Calendar to Microsoft Office Online, click the Publish My Calendar link in the Calendar Navigation Pane. (If you want to publish another calendar you maintain in Outlook, right-click the calendar in the Navigation Pane and then choose Publish to Internet
Outlook then displays the Publish Calendar to Microsoft Office Online dialog box, similar to the one shown in Figure 10-18. Here, you use the various controls to specify the time span, level of detail, and permissions for your online calendar. Note that if you allow anyone to view and search for your published calendar, Outlook enables you to enter keywords that users can employ to find the calendar online in the Description list box.
Also, if you don't want Outlook to automatically upload updates to this calendar to Office Online and you want to include engagements marked private in the uploaded calendar, you need to click the Advanced button and then select the Single Upload: Update Will Not Be Uploaded option button and the Include Details of Items Marked Private check box before you click OK in Published Calendar Settings dialog box that appears.
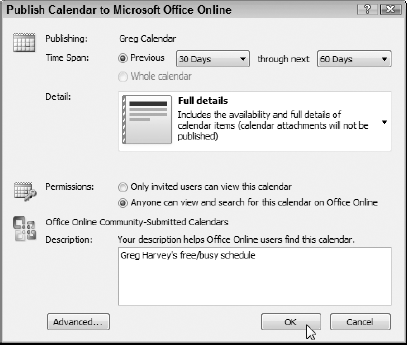
Figure 10-18. Publishing limited details from my calendar for the previous 30 days and next 60 days to Microsoft Office Online.
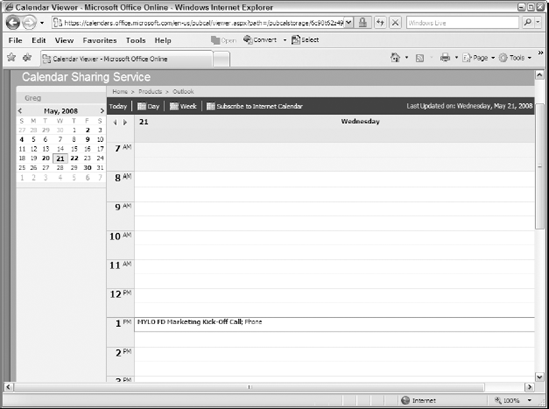
After you click OK in the Publish Calendar to Microsoft Office Online dialog box, Outlook publishes your calendar to a new Web page on Microsoft Online. If you restricted access to the published calendar to only those individuals you invite, you can then invite them to view your calendar by right-clicking the calendar you just published in the Navigation Pane and then choosing Publish to Internet
Outlook then opens a Share dialog box containing a new e-mail message with the subject line already filled in. All you have to do is select the e-mail recipient(s) in the To and Cc text boxes and then type any personalized text you want to add about your calendar in the body of the message before you click the Send button. Outlook mails this e-mail message to each of your recipients, and they can then click the message's Preview Calendar button (if they're using Outlook 2007) or paste the calendar's URL address into their Web browser's Address text box (Outlook 2003) to open your published calendar on its own Web page on the Microsoft Office Online Web site (see Figure 10-19).