
You probably remember from Hives and Files of Chapter 2, that each hive of the Registry is stored in a separate file. While it might seem reasonable to assume that you can just back up these files as though they were Word documents or some other innocuous file, the harsh reality is that you can’t. The NT kernel always keeps the Registry data files open, so ordinary backup software won’t be able to back them up. However, there are ways to successfully duplicate the files for safekeeping; we explore three ways in the remainder of this section.
In Chapter 2 you learned that the Registry’s made up of several hives, which are actually files that live on your disk. They’re normally stored in the System32Config subdirectory of your system volume; you can always find the correct location by examining the value of HKLMSYSTEMControlCurrentControlSethivelist.
If you change to System32Config (or wherever
your files are) and get a directory listing, you’ll see five
files whose names match the hives listed in Table 2-1: DEFAULT, SAM, SECURITY, SOFTWARE, and SYSTEM.
(The other hives, SID and HARDWARE, aren’t stored here.) The
hive files themselves don’t have extensions on them, but there
are other files with the same names that do have extensions. Files
whose names end in .LOG contain log and auditing
information for the corresponding hive, while files with the
.SAV extension keep backup copies of Registry
transactions so a hive can be automatically restored if the system
crashes. Finally, there’s one file with its own unique
extension: SYSTEM.ALT contains a transaction log
of the SYSTEM hive. If the computer crashes, the
boot loader can automatically replace the SYSTEM hive with
SYSTEM.ALT if the latter has more current data.
You can back up any or all of them; however, as long as you’re going to the trouble of backing them up at all you should back them all up. Special note to the curious: you can’t rename, move, or delete these files while the operating system is running, since the kernel owns them and is holding them open for exclusive access; other applications that try to modify the files cause a sharing violation when they try.
In the days before Windows NT and Windows 2000, backing up Windows’ configuration files was simple. You could just boot into DOS without starting Windows, then do whatever you needed to do. In fact, the “boot-edit system files-reboot-run Windows” routine is familiar to most Windows users, not just heavy-duty administrators. Windows 95 and 98 modified this tactic a bit; not only could you boot directly into DOS, you could use the built-in “safe mode” to tweak configuration files before rebooting. Windows 2000 offers a safe mode, but in safe mode the OS still has a firm grip on the hive files, so you can’t use it to back up or restore your files. (Of course, NT itself has no safe mode at all.) By booting into another operating system (DOS, Windows, Linux, OS/2, or whatever else you have installed) or the Windows 2000 recovery console, you can still copy your files. There are four basic things you need to do a manual backup of your Registry files; which ones you use depends on your system configuration:
If you want to back up your Registry to a backup device, you need appropriate drivers for it (whether you’re using a tape drive of some sort or a removable-media drive like a Zip, Jaz, Orb, or similar). If you’re using the recovery console, note that you can’t load any extra drivers in it.
If you can’t (or don’t want to) use the recovery console, and you don’t already have another bootable operating system installed on your machine, you’ll need a DOS, Linux, or OS/2 boot disk that includes a command shell.
If your system partition uses the NTFS filesystem, you need a driver to allow your alternate OS to read it.
You may need some kind of compression utility (unless you’re booting into a Win32 OS to do your backup, don’tdepend on WinZip32, which won’t run under DOS or Windows 3.x). You need this because the uncompressed hive files can be several megabytes in size, so you won’t be able to store them on a floppy without compressing them.
Tip
You can’t use a system boot floppy to accomplish this task if your boot partition is NTFS; even though the floppy contains its own copy of the boot loader and kernel, it will use the configuration settings in the Registry on your “normal” system volume. You can use a separate boot disk if it contains a complete 2000/NT installation, as it would if you installed the OS onto a Zip or Jaz removable disk and booted from it.
Once you’ve gathered all these things, you’re ready to proceed. The first step in making a backup is to determine whether you can boot from another OS on your disk. If you can’t, you need an alternative way to boot your machine from a floppy or removable disk. Once you’ve arranged a bootable configuration, you must also identify what type of filesystem your boot and system partitions are using; that determines whether your boot disk or OS needs additional drivers.
If your boot and system partitions are both using FAT, you don’t need any special drivers (other than those you need for whatever backup device you’re using). However, if your boot partition uses the NTFS filesystem, you’ll need an additional driver to allow whatever OS you boot to read it. For Windows 3.1, 95/98, or DOS, you can use the excellent (and free!) NTFSDOS driver. NTFSDOS comes in several versions, including a read-only free version and versions that run under MS-DOS and Windows 9x. They’re all available from http://www.sysinternals.com/. If you’re using Linux, a similar read-only driver is available from http://www.informatik.hu-berlin.de/~loewis/ntfs/.
Once you’ve accomplished these two steps, you’re ready to back up the files themselves. Here’s what to do:
Boot your computer, using whatever OS you’ve chosen. Get to a command prompt and change to the System32Config subdirectory of your installation directory. Make sure you can see the hive files you want to back up.
If you’re using a backup program, start it, point it at the hive subdirectory, and tell it which hive files to back up. It should do the rest.
If you’re not using a backup program, use your preferred compression utility to create a new archive containing the files from the System32Config directory you want to back up.
Safeguard your backup archive, tape, or disk; it contains a complete and readable copy of your entire Registry.
You might wonder whether this approach is worth the hassle. The answer is “it depends.” Windows 2000 does a great job; as a bonus, it allows you to back up files even without a tape drive. On the other hand, if you don’t have a tape drive, you can’t use Windows NT Backup. Many third-party backup utilities can back up to floppies or removable disks, but not all of them can back up the Registry. You can always use REGBACK and REGREST, but they may not always be available when you need them. The ERD mechanism works well and is easy to use, but it has a critical defect: it doesn’t back up the entire Registry, just what Microsoft thought were the most important parts.
As part of the overall Windows 2000 facelift, Microsoft threw out the old NT backup utility and replaced it with a new tool they licensed from Veritas. The resulting tool is still called NTBACKUP.EXE, but other than that it’s quite different in most respects. In particular, its user interface is completely revamped, and it takes advantage of Windows 2000’s media services toolkit to let you do backups using tape autoloaders, optical jukeboxes, hierarchical storage management (HSM) packages, and other exotica.
Windows 2000 Backup takes an all-or-nothing approach to backing up the system’s configuration data. When you select what data you want to back up, you’ll see a category called System State; when you back that up, there are actually five separate pieces of data that get backed up. The bulk of the Registry constitutes one piece, the Active Directory database is another, as are the system’s boot files, the COM+ class registry (drawn from HKCR) is the fourth, and the system volume (or SYSVO; the Windows 2000 equivalent to the NETLOGON share in NT) is the final item.
Earlier in the chapter (Figure 3-1), you saw the Welcome screen that appears when you start Windows 2000 Backup. In keeping with the overall wizard-ization of Windows 2000, the first two buttons on that screen will take you directly to the Backup and Restore wizards respectively. The corresponding Backup and Restore tabs offer similar functionality, and since the wizards are easy to understand once you grasp the manual process, I’ll start there.
Here’s how to do a manual backup of the Registry using Windows 2000 Backup:
Launch Windows 2000 Backup (Start→Programs→Accessories→System Tools→Backup). Click the Backup tab. (If you prefer the wizard interface, either use the Tools→Backup Wizard command or click the Backup Wizard button on the Welcome tab.)
Use the tree control on the left side of the Backup tab to select the items you want backed up. In particular, make sure the System State item is checked. (Note that you can’t select or deselect individual subparts of the System State item.) Of course, you should feel free to include any other files or folders you want backed up.
Use the Backup destination control to select where you want the backup file to go. On systems without a tape drive, the default is to store the data to a backup file (with a
.bkfextension) in a directory you specify. If you have a tape drive, you can select it instead of the default setting of “File.”Select the file or tape you want the backed-up information to be stored on with the “Backup media or file name” field and its associated Browse... button.
Click the Start Backup button. The backup will run; by default, you’ll get a summary log file. If you use the Tools→Options command, you can use the Log tab to change the level of logging detail. Don’t turn it off altogether.
Microsoft provides a backup utility, NTBACKUP.EXE, as part of the standard NT Workstation and Server installations. As with many other bundled utilities, it’s not the be-all of backup tools, but it works tolerably well and it’s included for free. It can back up local or network volumes (as long as they’re already mounted), and it does a good job of logging errors and exceptions.
Lots of tools can do the same things as NTBACKUP, but unlike some other backup tools (particularly those designed for Windows 95), NTBACKUP has one important feature: it can back up the Registry to any supported tape device.[18] This Registry backup captures an up-to-date copy of the Registry files from the local machine ; if you’re backing up network drives and include the Registry, you get the Registry of the machine that’s running NTBACKUP along with data from whatever drives you’ve mapped. NTBACKUP doesn’t back up Registry data from any remote machine, so don’t depend on it to do so, or you’ll be seriously disappointed.
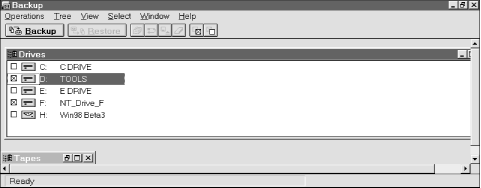
Figure 3-6 shows the main interface of NTBACKUP. The main window contains two child windows at startup. The Drives window shows a list of all mounted volumes on the current machine (including shares connected over the network), while the Tapes window shows a list of all the available tape devices.
A basic backup with NTBACKUP requires just three simple steps:
Use the Drives window to select the drives and files you want backed up. Double-clicking a drive expands it into a File Manager-like window with two panes. The left pane contains a tree view of the folders on the disk, while the right pane contains a list of the files in the selected folder. Each item in either pane has a checkbox next to its file or folder name. If the checkbox is marked, the file or folder is backed up; if it’s cleared, it won’t be. Figure 3-7 shows a sample window with some files marked.
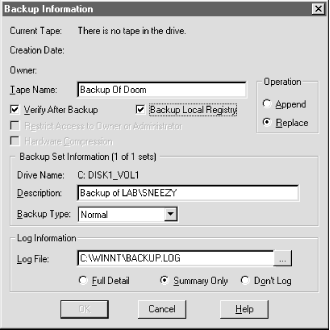
Click the Backup button or use the File menu’s Backup command. You see the dialog shown in Figure 3-8. Make sure the Backup Local Registry checkbox has an X in it, then click OK. The backup will start.
Go do something else while the backup runs. When it’s done, put the tapes in a safe, secure place.

For best performance, you may want to run NTBACKUP only after stopping other applications on your computer. The Registry files will be backed up even if system components are using them; however, other files (like SQL Server databases, Office documents, or any other file) are backed up only if they’re closed. To ensure a complete backup of all of your machine’s data, I recommend closing all other applications and stopping any shared services (IIS, SQL Server, Netscape FastTrack or Enterprise, and so on) whose files you want to back up.
Tip
Use the Log File field in the Backup Information dialog (see Figure 3-8) to specify where you want the log to go. If you want to make sure you see it, put it in the Administrator’s desktop folder (try %systemroot%PROFILESAdministratorDesktop) .
The REGBACK utility does pretty much what its name implies: it allows you to back up all or part of the Registry. Microsoft recommends that you use NTBACKUP for making Registry backups if you can, but REGBACK is still a useful tool in its own right, since you can use it to export parts of the Registry for storage onto media that the Windows NT backup utilitydoesn’t support, namely floppies and removable-media drives. You can also execute REGBACK from the command line, so you can schedule Registry backups or perform them as part of a batch file. For example, you can schedule a nightly Registry backup of some, or all, of your machines and put the backup files on a central server. In addition, REGBACK stores its output as uncompressed files, so you don’t have to worry about having the correct decompression tool handy.
There are some caveats to using REGBACK, though; let’s examine them before I tell you how to use it:
The account that you use to run REGBACK must have the “Back up files and directories” right. Windows 2000 uses this right internally to let certain accounts copy files without giving them read access; this allows a backup-only account to copy files owned by other users without being able to open them. The Administrator account has this right by default, as do any accounts that you’ve placed in the Backup Operators group.
REGBACK backs up only the hives in the System32Config directory, not any of the other files stored there. In addition, it won’t back up inactive hives that you’ve unloaded with RegEdt32. However, it warns you with an error message indicating what files it found that need to be copied manually.
REGBACK isn’t very flexible. If you try to back up files to a device that doesn’t have enough space, it will silently fail. If the destination for your backup already has hive files in it, the backup will silently fail. NTBACKUP doesn’t have either of these limitations.
You can run REGBACK in two modes. In the first mode, every active hive in your Registry is backed up to a directory you specify, like this:
regback directoryThe specified directory has to be on a mounted volume; you can’t use UNC paths. REGBACK cheerfully back ups all the Registry hives it finds on your machine and warns you of any files it didn’t back up, like this:
C:>regback
egsave
saving SECURITY to
egsaveSECURITY
saving SOFTWARE to
egsaveSOFTWARE
saving SYSTEM to
egsaveSYSTEM
saving .DEFAULT to
egsaveDEFAULT
saving SAM to
egsaveSAM

***Hive = REGISTRYUSERS-1-5-21-1944135612-1199777195-24521265-500
Stored in file DeviceHarddisk0Partition1WINNTProfilesAdministrator
                ntuser.dat
Must be backed up manually
regback <filename you choose> users S-1-5-21-1944135612-1199777195-24521265-500
Notice that REGBACK warned that it didn’t copy my user account hive, but it gave me a command line that would do so--the last line of its output. This command line uses the second mode that REGBACK supports, one that allows you to back up a specified hive instead of the entire Registry:
regback output hivetype hivename- output
Specifies where you want the saved hive to go; can be a full or partial pathname, but cannot be a UNC path.
- hivetype
Accepts only two hive types:
machinerepresents HKLM, whileusersrepresents HKU. If you supply any other hive type, REGBACK fails with an error message.- hivename
Specifies a subkey immediately beneath either HKU (either .DEFAULT or one of the SID-identified subkeys) or HKLM (SOFTWARE, SYSTEM, and so on). If you specify a key that’s not immediately beneath either HKLM or HKU, REGBACK will fail.
This form of REGBACK saves the entire contents of the specified hive to the file you specify; there’s no way to save individual values within a hive. If you want to back up an entire Registry, you may still prefer to use this form of the command, since you can specify the filename for each hive’s output file--a valuable feature when you want to back up several machines on a network to the same directory on a server. This snippet shows the output from me telling REGBACK to preserve my main subkey under HKU:
C:>regback d:
egsavepaul users S-1-5-21-1944135612-1199777195-24521265-500
saving S-1-5-21-1944135612-1199777195-24521265-500 to d:
egsavepaul
REGBACK returns standard DOS-style error codes: for success, 1 if there were files that need to be manually backed up, and 2 if something else went wrong (disk full, bad hive type, and so forth). You can use the ERRORLEVEL construct in a batch file to branch when errors occur. For example, this small batch file attempts to back up HKLMSOFTWARE to a central directory:
regback  j:save-meenigma-software  machine  SOFTWARE
if ERRORLEVEL 1 echo "Some files weren't backed up"
if ERRORLEVEL 2 echo "An error occurred."
Tip
The Windows 2000 Resource Kit costs about $300, and the NT Resource Kit is around $150. You might wonder whether it’s a necessary expense. The answer is a resounding “yes.” The REGBACK and REGREST utilities alone can literally save you days of effort when rebuilding a trashed machine. In that light, the cost of the Resource Kit seems more reasonable, and I recommend it highly.
You can do some rudimentary backup and restore tasks with nothing more than RegEdt32. It allows you to load previously stored hives into your Registry, then unload them later (though you can only unload hives you loaded yourself). In addition, you can export keys and hives in a format that RegEdt32 can reload at a later time.
You can’t actually save any of the predefined hives (i.e., the hives stored in System32Config) from RegEdt32, but there’s a good reason for this limitation: those hives are already saved as disk files! Remember, a hive is a disk file that contains Registry keys. You can load a hive that you’ve saved in RegEdt32 (or gotten from somewhere else); see the section Using RegEdt32 and RegEdit later in this chapter for more details.
RegEdt32 does allow you to do something else, though; you can save any key that’s not a root key into a hive file. To keep from confusing the “big” hives (which store the root keys’ contents) from the files you can create, I’ll call them “honeycombs” (after all, what’s a hive full of? Well, besides bees). When you create a honeycomb file, RegEdt32 takes the specified key and its subkeys and stores them in a file that uses the hive format. You can then move the file to any other Windows 2000 machine and load it into that machine’s Registry (with some caveats that I’ll discuss later).
The mechanics of doing this are simple: select the key or subkey that you want to save, then use RegEdt32 ' s Registry→Save Key command. When the standard Save dialog appears, specify a filename; the editor happily saves your key’s contents to the file (assuming you have adequate permission to read all the keys and their values). Once the save is finished, you can copy, compress, fold, spindle, and mutilate your new honeycomb file just like any other, plus you can load it into the Registry on any Windows 2000 machine--either in place of or in addition to existing keys.
You might think that using a plain-text file to represent the Registry is crazy. While it’s not the best way to make a complete copy, and it’s not a very good way to make copies for restoration use, there aresome sensible reasons to use this method. For example, if you periodically dump the contents of a Registry key (whether a root key or any subkey) to a text file, you can use a file comparison tool such as WinDiff to highlight changes between the two files. This is an invaluable strategy when you’re trying to figure out what Registry keys and values have changed due to software installation or user tinkering. It’s also a winning plan for tracking what your own home-grown software does to the Registry and how that matches up with what you wanted it to do.
There are a number of tools for dumping Registry contents to text files. Which one you use is largely a matter of personal preference; they’re all free, and they all work well.
RegEdt32 can save any Registry key (and its subtrees) as text. The output is pretty verbose, as shown in this sample from HKLMSOFTWARENetscape:
Key Name:          SOFTWARENetscapeNetscape Navigator4.0 (en)Main
Class Name:        <NO CLASS>
Last Write Time:   6/24/97 - 11:26 PM
Value 0
  Name:            Install Directory
  Type:            REG_SZ
  Data:            C:Program FilesNetscapeCommunicator

Value 1
  Name:            Java Directory
  Type:            REG_SZ
  Data:            C:Program FilesNetscapeCommunicatorProgramJava

Value 2
  Name:            NetHelp Directory
  Type:            REG_SZ
  Data:            C:Program FilesNetscapeCommunicatorProgramNetHelp
To save a subtree, all you need to do is select the subtree (or root key) you want to save, then use RegEdt32 ’s Registry→Save Subtree As... menu command. You are prompted for a file to save the data in, then RegEdt32 spits out the data you selected. However, it’s worth noting that there’s no way to import this data back into the Registry again! You can use a file-comparison utility such as WinDiff to compare two file dumps generated by RegEdt32, but you can’t restore the Registry’s contents based on a RegEdt32 file.
Andrew Schulman’s REGDUMP [19] produces similar output to that generated by RegEdt32, but it’s more nicely formatted, as you can see from this sample:
Netscape Navigator
  CurrentVersion="4.0 (en)" -> ""
  4.0 (en) -> ""
    Main
      Install Directory="C:Program FilesNetscapeCommunicator"
      Java Directory="C:Program FilesNetscapeCommunicatorProgramJava
      NetHelp Directory="C:Program FilesNetscapeCommunicatorProgramNetHelp"
Like the output from RegEdt32, REGDUMP output is primarily useful for your reading pleasure; there’s no way to take a dumped file and import it back into the Registry. However, because REGDUMP ’s output is compact and neatly formatted, it lends itself well to use with WinDiff.
Alone among the utilities in this chapter, RegEdit can generate text dumps of the Registry that it can actually import and restore again. When you run RegEdit, you can use its Registry→Export Registry File... command to produce output that looks like this:
[HKEY_USERSS-1-5-21-1944135612-1199777195-24521265-500Softwareinetstp
	Netscape NavigatorBookmark List]
"File Location"="C:\Program Files\Netscape\Navigator\Program\bookmark.htm"
"Start Menu With"="Entire Listing"
"Add URLs Under"="Top Level of Listing"

[HKEY_USERSS-1-5-21-1944135612-1199777195-24521265-500Softwareinetstp
	Netscape NavigatorCache]
"Cache Dir"="C:\Program Files\Netscape\Users\cache"
"Disk Cache SSL"="no"
"Disk Cache Size"=dword:00001388
"Memory Cache Size"=dword:00000400
Note that each key is enumerated with its full path; this makes it possible for RegEdit to tell exactly where a key and its values belong when it reimports the exported file. Choosing the command produces the dialog shown in Figure 3-9. The controls in the “Export range” group let you export the entire Registry or just the currently selected branch. In addition, you can edit the branch shown in the “Selected branch” field to further tighten the output’s scope.

Tip
At this point, you might be wondering why the Resource Kit’s REGINI utility isn’t discussed here. Although it can change the contents of the Registry based on the contents of a text file, there’s no way to automatically generate that text file from an existing Registry; you have to build the .REG file yourself.