
RegEdt32 allows you to set permissions on any key in the Registry. Since most of the data in the Registry belongs to system components, you must use this feature carefully; if you change permissions on a key so that the application that needs it can’t get to it, you may destabilize or destroy your system.
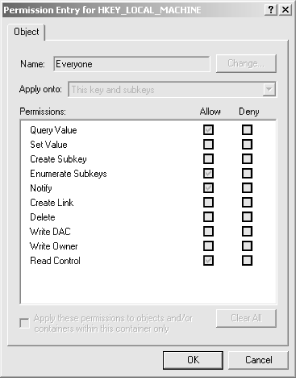
The Security→Permissions... command, which displays the Permissions dialog as shown in Figure 5-12, is the only security-related command in the Windows 2000 version of RegEdt32. To use it, select a key in any root key window, then select the command. When the dialog opens, it shows which key you’ve selected and what ACEs are in effect for that particular key. This is different from the NT 4.0 version of the same dialog; that’s because the standard security dialog in Windows 2000 has been substantially enhanced.

The Name list shows the current list of accounts and groups that have ACE entries on this key. The names of domain groups are expanded to show the domain they belong in. You can change which users and groups are in the ACL with the Add and Remove buttons to the right of the list.
The Permissions field shows the predefined composite DACs listed in Table 5-3. The two checkboxes to the right of each entry let you specify whether to allow or deny specific permissions, according to the rules I mentioned earlier in this section.
The Advanced button opens the Access Control Settings dialog, which contains three tabs: Permissions, Auditing, and Owner. Each is discussed in more detail in the next three sections.
The “Allow inheritable permissions from parent to propagate to this object” checkbox controls whether the permissions applied to parents of the currently selected key will be applied to this key (and possibly its subkeys, if they have this same checkbox set).
To set permissions on a Registry key in Windows 2000, you have to use the Permissions tab of the Access Control Settings dialog (see Figure 5-13). This tab contains a summary of the contents of the selected key’s DACL and SACL, listing each ACE individually.

The ACLs shown in the Permission Entries list are pretty vanilla, but they still bear explanation:
The Type column shows whether the ACE allows or denies the specified permission. Notice that Deny entries are always listed first; that makes sense, since they’ll always be evaluated first.
The Name column shows the name of the account or group to which the ACE applies. Local and domain accounts and local groups may be assigned permissions. There are also several built-in account proxies (such as CREATOR OWNER, which represents whichever account originally created an object, and ANONYMOUS LOGON, which indicates any account that can log on anonymously) that may have DACs attached.
The Permission column shows the effective DAC granted by this ACE. You’ll see either a composite DAC from Table 5-3 or “Special Access”, the synonym used when there’s some combination of DACs that don’t match a predefined composite DAC.
The Apply to column indicates whether the specified ACE is applied to the selected key only, the selected key and its subkeys, or the subkeys alone. Normally, ACE changes apply to the selected keys and all subkeys, although this may change if you change the permission inheritance settings.
You modify ACE entries with the Add..., Remove, and View/Edit... buttons below the permission list. Let’s deal with removal first, since it’s the most straightforward case: select an ACE, click Remove, and it’s gone (though the change isn’t actually recorded in the Registry until you OK the Access Control Settings and Permissions dialogs).
Adding and viewing or changing ACE entries are similar in concept and execution. When you add a new entry by clicking the Add... button, you must begin by specifying the user or group account to which the ACE applies. Once you choose a subject for the ACE, you see a dialog like the one shown in Figure 5-14.
The Name field (and the associated Change... button) shows the user or group specified for this ACE and allows you to change it.
The Apply onto pulldown lets you choose what the new or modified ACE applies to. By default, the pulldown is set to “This key and subkeys”, meaning that the ACE is blasted onto all subkeys of the current key when you finish twiddling it. You can also choose to apply permissions to the current key only by choosing This key only, or to the subkeys only with the Subkeys only option.
The Permissions list shows you the actual DACs and lets you allow or deny them in any combination. While the user interface items shown look like checkboxes, they behave like radio buttons in that you can either allow or deny any DAC, but not both. The Clear All button unchecks everything in both columns.
The “Apply these permissions to objects and/or containers within this container only” checkbox acts as a modifier to the Apply onto pulldown’s Subkeys only and “This key and subkeys” values. When you check this box, the DACs you select are applied only to the current key and its immediate subkeys.
Microsoft apparently realized that the inheritance scheme for Windows 2000 permissions is a little confusing, because they took the welcome step of adding a plain-spoken description of the inheritance settings in effect for the current key. For example, Figure 5-13 says “This permission is defined directly on this object. This permission is inherited by child objects”: that’s a remarkably clear statement of the inheritance settings in effect for that key. The contents of the text description depend on the setting of the two checkboxes at the bottom of the dialog:
“Allow inheritable permissions from parent to propagate to this object” controls whether the parent’s permissions are applied to the selected key and its values. Normally this box is checked, so permission settings are passed down to subkeys when a parent’s permissions are changed.
Warning
This default setting means that if you make some boneheaded change to a parent key’s permissions, you will wreck permissions on all its subkeys. Be careful when changing permissions, and be doubly careful when using this option.
“Reset permissions on all child objects and enable propagation of inheritable permissions” allows you to specify that you want any existing ACEs on subkeys of the current key to be removed. When you check it, the subkeys’ ACLs are cleared, their “allow inheritance” flag is enabled, and permissions set on the parent object you’re editing take effect when you approve them.
The Auditing tab, shown in Figure 5-15, summarizes the auditing ACL entries for the selected Registry key. Its appearance is similar to the Permissions tab shown in Figure 5-13; that’s by design, since the mechanisms for reviewing and setting ACEs for auditing or object access are similar. The Auditing Entries list shows each audit ACE entry defined for the current Registry key, using a format that’s almost identical to the format used for ACE entries. The primary difference is that the Type field for audit entries are either Success or Fail; this indicates whether audit log entries will be generated for successful or failed access attempts.
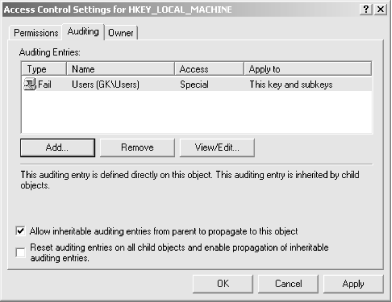
You manage auditing entries with the Add..., Remove, and View/Edit... buttons. Like their counterparts on the Permissions tab, these buttons allow you to change the individual ACEs that make up the auditing ACL on the key you’re modifying:
The Add... button prompts you to designate a user or group to whom the new auditing settings apply. It then displays the dialog shown in Figure 5-16. By checking the Successful or Failed checkboxes for each DAC, you can control whether the system records an audit message in the event log for each successful or failed attempt to exercise the corresponding permission.
The Remove button removes the selected auditing entry, without asking for confirmation. Note that your changes aren’t saved until you click OK in the Access Control Settings dialog and again in the Permissions dialog itself.
The View/Edit... button displays the dialog from Figure 5-16, with which you can edit the existing auditing controls on a key.

Since the Permissions and Auditing tabs are so similar, it might not be surprising that the Auditing tab contains the same plain-English[29] description of the audit settings you apply. The two checkboxes at the bottom of the tab have exactly the same effect as their counterparts on the Permissions tab; they work together to control how your audit settings are propagated to subkeys of the current key.
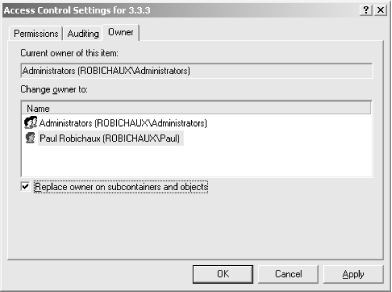
Changing the ownership of a particular key in Windows 2000 is pretty straightforward; that’s the sole function of the Owner tab in the Access Control Settings dialog, shown in Figure 5-17. Normally, you won’t change ownership of a key that belongs to the system, although in some security-related circumstances (usually dictated by a Microsoft security bulletin) you might. More often, you’ll change ownership of keys used by applications you’ve installed to keep users from fiddling with them. The actual process of changing ownership is simple: switch to the Owner tab and select the new owner you want for the key. The Change owner to list is filled with accounts and groups that can own the current key, based on its parentage and the inheritance settings currently in force. Checking the “Replace owner on subcontainers and objects” applies the change recursively to the subkeys and values beneath the current key. Leaving it in its default unchecked state changes ownership only of the selected key and its values.
[29] Literary license allows me to ignore the fact that you may be using a language other than English.