
When using RegEdt32 under NT, you’ll notice a few things that differ between Windows 2000 and NT. For starters, the Security menu has more commands in it; when you use these commands, the user interface is different as well. However, for the most part the underlying behavior is the same. If anything, NT is less flexible than Windows 2000 because it doesn’t have all the same inheritance and permission controls.
The Security→Permissions... command displays the Registry Key Permissions dialog (see Figure 5-18). To use it, select a key in any root key window, then give the command. When the dialog opens, it shows which key you’ve selected and which account owns it (you can’t change either of them from the dialog, however). The controls in the dialog give you access to the permission settings for the key.

The “Replace Permission on Existing Subkeys” checkbox tells RegEdt32 whether to apply the permission changes you specify to all subkeys of the current key or not. When subkeys are created, they inherit the parent key’s access controls. However, by the time you change the parent key’s access controls, the subkeys may have different controls in place. Use this option only when you intend to override any access controls that have been applied to subkeys.
The Name field lists the current access controls in force on the key. Each line in the list shows an account name and the DAC granted to that account. The standard DACs are listed in Table 5-2 and Table 5-3. The Type of Access combo box lets you change the DACs for any account in the Name list. Changes you make are immediately reflected in the list, but aren’t applied until you click OK.
The Add... button allows you to use NT’s standard “Add Users and Groups” dialog (see Figure 5-19) to add new accounts to the ACL. The accounts you add from this dialog appear in the Name list with Full Control as the default DAC; make sure you change this to avoid opening a security hole.

Auditing allows you to keep a trail of evidence to identify problems and pin their start down to an exact time. NT’s auditing facility lets you audit specified actions taken by specified accounts. For example, you can audit any attempt to change security policy by any accounts, or you could audit failed attempts to log on by a single account. This combination of specifying who and what makes auditing pretty flexible.
While auditing is useful, it also takes time. By default, NT leaves system auditing turned off. Before you can audit Registry access (or anything else), you have to enable auditing on the machine you want audited.
You do this with the User Manager or User Manager for Domains,[30] yet another of the standard administrative utilities NT includes to simplify your job. Here’s how to enable auditing on a single server or workstation:
Run User Manager on the target machine. To change auditing control settings, you have to be logged in with an account that has Administrator privilege on the target machine.
Use the Policies→Audit... menu command to display the Audit Policy dialog, shown in Figure 5-20.
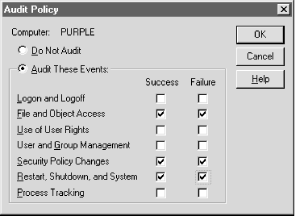
Make sure the “Audit These Events” radio button is turned on. Otherwise, NT still happily refuses any auditing requests you make in other applications, including RegEdt32.
Use the checkboxes to select which classes of events you want to audit. For Registry access auditing, make sure the “File and Object Access” checkboxes are marked. You may also want to enable other types of auditing, but they’re not strictly necessary.
Click OK, then exit the User Manager.
Once you take these steps on a machine, you won’t have to do them again; auditing on that machine will remain enabled unless you manually turn it off using the same procedure. You do, however, have to execute these steps on every machine for which you want to enable auditing. Once you’ve done so, you can actually turn on auditing for the Registry.
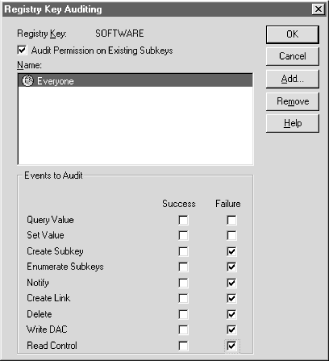
The Registry Key Auditing dialog, shown in Figure 5-21, appears when you choose the Security→Auditing... menu command.
This dialog can be a little confusing at first, so a look at what its controls do will demystify it some:
The “Registry Key” field shows you what subkey you’ve selected, but it doesn’t tell you what root that subkey belongs to. You may need to move the entire Registry Key Auditing dialog around to make sure you’re auditing the key you intended to audit.
The “Audit Permission on Existing Subkeys” checkbox tells RegEdt32 whether you want the audit changes you specify to apply to all subkeys under the selected key or just the selected key. If you audit all subkeys of a large root key like HKLM, your performance will suffer. Sometimes, though, this type of shotgun auditing is necessary so you can see which keys are being changed when you don’t know in advance which ones you need to audit.
The “Name” list shows which accounts will be audited. You can think of this list like the FBI’s Most Wanted list: names on this list are the ones scrutinized, while other names are ignored. The Add... and Remove buttons let you change the members of this list using an interface like the one shown in Figure 5-19. In addition to actual user accounts, you can audit the built-in accounts like Everyone, INTERACTIVE, and SYSTEM.
The two columns of checkboxes in the “Events to Audit” group are the meat of this dialog, since they control what actions are logged for the specified accounts. Each of the DACs listed earlier in Table 5-2 may be audited. When you check a DAC’s Success checkbox, the system creates an audit record any time an account on the Name list succeeds in using that DAC. Conversely, the Failure checkbox causes NT to generate an audit record when a listed account tries to use the DAC and fails.
For example, let’s say you add the account peanut to the audit list for HKLMSoftwareMicrosoft, then check Success for Create Subkey and Failure for Write DAC. Once you save those settings, NT generates an audit record whenever peanut succeeds in creating a new subkey under the selected key or fails while trying to change the DACs for an ACL entry.
As you’d expect, the OK and Cancel buttons allow you to preserve or discard changes you make in this dialog.
Once you’ve told RegEdt32 what to audit, you still need to see the audit entries that have been generated. If you’re accustomed to administering Unix machines, you’re probably familiar with the syslog service. NT has a similar feature; it keeps an event log that applications and system components may write to. The NT event log is actually three separate logs: one for system data, one for application-generated data, and one for security data. Auditing messages (no matter their source) go into the security log.
To view these log messages, you’ll need to use Microsoft’s Event Viewer application. A complete discussion of how to use the Event Viewer is outside the scope of this book, but the basic process is simple enough to boil down into a few concise steps:
Launch the Event Viewer (eventvwr.exe). There’s a shortcut to it in the Start menu, too; look under Programs→Administrative Tools (Common)→Event Viewer to find it.
When Event Viewer opens, you see a window like the one shown in Figure 5-22. Use the Log→Security command to display the security log.
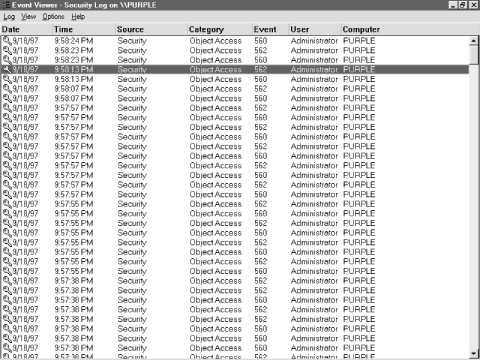
Event Viewer shows you a passel of events (the exact number depends on how big the event log is). You can sort, filter, and view events using the commands in the View menu. If there’s a particular event you’re interested in, double-click it or use the View→Details... command to get the dialog shown in Figure 5-23, which gives all the pertinent event details in one place.

Like every other object in NT’s world, each Registry key has an owner. As with Unix, NT allows the owner to control access to objects it owns to a certain extent; the superuser or Administrator account can always take ownership of an object and change its permissions when necessary. NT does, however, provide a standard auditing mechanism that logs all manually initiated changes of ownership, so you’ll always have an audit trail that shows when someone’s taken over one of your objects.
When you use this command, you’re telling RegEdt32 to change the owner of the currently selected key and all its subkeys to the current account. This blanket change of ownership can lead to unexpected behavior, since many NT components assume they’ll always have unrestricted access to all subkeys of HKLM and many subkeys of HKCU and HKCR. However, it’s usually a good idea to set appropriate ownership of HKU ’s subkeys, as well as those subkeys of HKLM that are safe to reset. The best way to set ownership is with a utility like David LeBlanc’s everyone2user, which is discussed in Fixing Registry Security ACLs in Windows NT in Chapter 9.
If you insist on doing it manually, RegEdt32 allows you to take ownership of Registry keys with the Security→Owner... command. The Owner dialog, pictured in Figure 5-24, shows you what key is selected and which account owns it. The Take Ownership button changes the key’s (and its subkeys') ownership to whatever account you’re logged in as, while the Close button cancels the command without changing anything. Of course, if you don’t have Administrator privileges you can’t take ownership of any key you don’t already own.

[30] Which one you get depends on whether you’re using Windows NT Workstation or Server. Workstations always get the vanilla User Manager, and servers (in or out of a domain) always get User Manager for Domains. Fortunately, they’re very similar, so I’ll treat them here as identical.