
Chapter 8
Introduction to Libraries
SharePoint libraries are lists intended to be used for managing documents. Their list items are focused on the files attached to them, with features specific to handling the creation and editing of those files, such as requiring check-in/checkout, versioning, and content approval. Libraries make it easier for users to work together on documents in a consistent and secure manner. Libraries are often the most compelling reason people even consider using SharePoint. They are generally the foundation of the collaborative work users might need to accomplish, whether that involves sharing documents, spreadsheets, slide shows, or forms.
In this chapter, you'll learn how to
- Create a library
- Use the different kinds of libraries
- Set check out, content approval, and versioning
- Manage content types
What Are Libraries?
Libraries are lists that are known by, and focused on, the kinds of files they will contain. There are four types of libraries:
Document Library The name document library rather obscures what this type of library really is. A document library is a list that creates a new file of some type whenever you create a new list item. The file type depends on what template you associate with the list itself (and doesn't have to be a document template). If you enable content types, the file type depends on what type of library list items (and their associated template) you want to have available for the list. This list also has features such as content approval, versioning, RSS, and incoming email. In addition, libraries can also mark their list items as checked in or checked out, locking the list item and its attached file as read-only on checkout and unlocking the item upon check-in to the library. This feature is unique to libraries. Document libraries also have an option to open the library with Explorer that lets you see the contents of the library as file system icons instead of list items. SharePoint document libraries are supposed to replace file shares; opening the library in Explorer helps make users comfortable with the transition. This view makes it easy to drag and drop files that need to be stored in a library from a file share. In addition, document libraries can make good use of content types and folders that may not be clearly useful for other types of lists. A document library can also spawn a document workspace subsite. This kind of list is meant to integrate with Office, because the templates associated with library list items are mostly Office templates such as Word, Excel, PowerPoint, or even InfoPath. In addition, like any list, a document library can also be opened in Access, exported to Excel (well, the metadata anyway), and connected to Outlook.
Form Library This type of library requires Microsoft Office InfoPath, preferably InfoPath 2007 or newer. InfoPath is a program that creates forms for users to fill out. More specifically, it lets you design your own form templates; when a user opens the template, it creates a form instance, which allows the user to fill the form with data. InfoPath 2010 comes in two flavors, InfoPath Designer and InfoPath Filler. You design and publish InfoPath forms to a forms library using InfoPath Designer, and the users can fill out the form using InfoPath Filler. InfoPath files are XML files, and they require InfoPath to be installed locally on the machine from which you will be using the library. This type of library is useful for companies that process vacation requests, purchase orders, and other kinds of InfoPath forms that need to be filled out by the users. Because InfoPath forms are based on templates, if you move a file from one form library to another, you'll need to relink it to its template.
Picture Library This type of library is intended to store images that you can access elsewhere on the site; each image file is given a direct URL that can be referred to in an image web part or hyperlink field of a list item (such as an item in a Contacts list). You may have noticed that images aren't inserted into fields of web parts (such as the Content Editor) or RSS pages; instead, these features all refer to an image's location and display the image from there. No embedding is necessary. Image files in a picture library are stored in the content database, so they are convenient to the entire site and are backed up when the content databases are backed up. A picture library uses the Picture Manager that is installed with Office (preferably 2010, but 2007 and 2003 have one, too) to edit images and add multiple images to the library. A user who does not have an Office product installed will only be able to upload one picture at a time to the library. The picture library also has several unique views, and this version of SharePoint even has a picture library slide show web part, if you would like to add a slide show from one of your picture libraries to a page (the web part takes a lot of processor power for the client viewing it, though).
Wiki Library This type of library is basically a document library of HTML files that support the wiki syntax when linking to other files in the same library. This library is unique insofar as it displays the contents of the wiki file called Home instead of displaying its contents in a list on its content page. To access the actual content page for the library, you can click the library's link in the content breadcrumb. A wiki library has versioning enabled by default, and it does not allow content types. Unlike the other library types, it does not support Open with Explore, so you cannot drag and drop multiple files into the library. Wiki libraries have no means to upload existing pages.
Creating a library is easy, but before you create one, you need to do some planning first. You should ask yourself these questions:
- Is there a maximum file size you want to allow on SharePoint sites? The default is 50 MB.
- Are there any types of files you do not want to be uploaded to a library? Some file types are helpfully blocked by default in Central Administration. You may want to block different files or unblock the defaults. This setting applies per web application, so you need to keep it in mind when planning for document libraries.
- Does the library or certain files require special permissions?
- Does the library require checkout/check-in, versioning, or content approval?
- Should the library have a single kind of file template associated with it, or should it have content types enabled so you can have several kinds of templates available to be created from the same library?
- Is the list going to contain thousands of documents? If so, should this library be organized as a list or as folders? (When creating a view for a list containing folders, remember to decide whether the view should display content from those folders in the library's default view.)
- Like any list item, a library item has fields such as Name, Title, Created By, and so on. What additional fields do you want to create for your library items? They will become the metadata or properties associated with the file attached to the library item.
LIBRARY PLANNING FOR WORKFLOWS
Like any list, a library can have new fields for categorizing, organizing, and creating workflows. For example, to enforce a review process, you can create a choice field called Status with three choices, and an Assigned To field; then you can apply the Three-State workflow to the library and create tasks in a Tasks list (with email notifications) for each document. If your organization has custom document management workflows, consider their needs when creating your libraries.
To get a feel for libraries in general, let's use the document library called Shared Documents that is created by default for the team site. To get to the Shared Documents library, simply click its link in the Quick Launch bar.
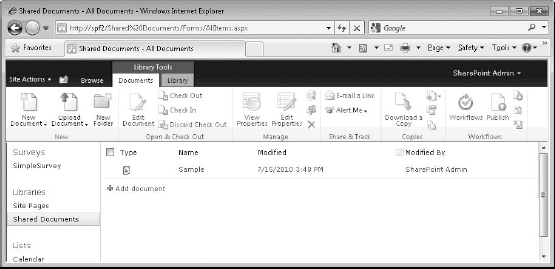
The Shared Documents content page looks very much like any list. It has a content area to display the library items, and the fields for the All Documents view are Type, Name, Modified, and Modified By. The Type field will display an icon relating the type of file or template used for the library item. This is useful if you are uploading or creating different files of different types in this library. People can accidentally give two kinds of files the same name, such as the ProjectPlans Word document and an accompanying ProjectPlans PowerPoint presentation. You can tell them apart by their file type icon.
The ribbon bars are a little different because they include the capacity to upload a file (rather than just create a new item), to check in or check out a document, and to view the page in an Explorer window. Otherwise, the Documents and Library ribbons contain the buttons you would expect in any standard list. When you first get to a library, you can see the title area. To see the ribbon bars, you can click on their tabs in the top ribbon bar or simply click on an existing item in the library, which will also activate the Documents ribbon. (see Figure 8.1)
Libraries can be used to create new documents—depending on how the templates those new documents will be based on are managed—or you can upload existing files to the library. Keep in mind that templates apply to only what is newly created in a library. Any templates associated with the library are not a limitation on the types of files (text files, image files, audio files, and so on) that can be uploaded there. You can upload any kind of existing file (unless it is explicitly blocked administratively) to a document library.
FIGURE 8.1 The Shared Documents content page
Uploading a Document to a Library
To upload one or more files to a library, just click the Add Document link at the bottom of the library's content area, which opens the Upload Document box (see Figure 8.2). It has a check box that allows you to save over an existing file and add the changes you've made to that file's version history (if versioning is enabled).
FIGURE 8.2 The Upload Document box
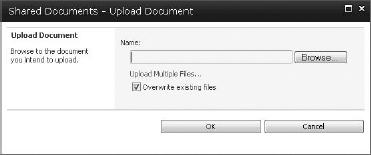
Notice also that, if you have an Office (2003, 2007, 2010) product installed, you could choose to upload multiple files, which would open a page where you can browse to a location and select more than one file to upload. (You can also choose to upload multiple files by clicking the down arrow under the Upload Document button in the Documents ribbon and choosing it from the drop-down menu.)
My example keeps things simple and uploads only one file (named uploaded in this case). Simply browse to the file you'd like to upload, select it, and click Open in the Choose File dialog box. Once the path for the file is listed on the Upload Document page, click OK to add the file to the document library. (Keep in mind that you can only browse to a file; you cannot type in the path manually.)
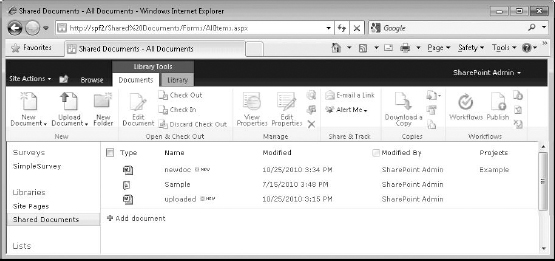
When you add a file to a document library, it actually creates a library list item and adds the file to it. In Figure 8.3, you can see by the icon in the Type column that the file type for my example's new library item is a Word document. SharePoint will try to figure out what the file type is and indicate it; otherwise, it will display a default file icon. The name of the file is the linked field for the library item.
FIGURE 8.3 An uploaded file in the Shared Documents library

WHAT'S THAT SAMPLE FILE?
You may have noticed there was already a file in the library that we didn't upload. Actually, I uploaded that file, named sample.txt, in Chapter 4, “Introduction to the SharePoint Interface,” to demonstrate how the interface works.
In a standard list, if you click the linked field of an item, it will open the item's View page and display that list's field contents. But because a library is so focused on the files associated with the library item, the linked field is linked to the file, not the library item itself. So in this case, if you click that library item's linked field, it will trigger the appropriate application to open the file and allow you to work on it. To see the fields of the actual library item, you must specifically select View Properties from the item's drop-down menu.
In addition to the Name field, there are the Modified Date and Modified By fields, which are automatically filled in upon creation of the library item and when any edits are made to the item or its attached file. There are other fields that can be used for an item in this library as well, such as for the item ID, file size, or version, but they are not available in the default All Items view for document libraries (I mention them in case you'd like to use them in a custom view of your own).
By default, the Shared Documents document library uses a Word 2007/2010 document template. This is why, while working in the Shared Documents library, I will be working with documents. But keep in mind that you can have a document library focused on PowerPoint presentations just as easily as you can Word documents. Then you would be creating and working on presentations instead of documents. Don't be limited by the name of the type of library or my simple example; document libraries can use other kinds of templates and therefore focus on other kinds of files.
Creating a New Document
When you create a new document in a library rather than uploading an existing one, it creates a new file based on the template associated with the library, opening the file in the correct application (you must have that application installed locally). When you save the file to the library for the first time, it also creates the library item for the file and populates the item's fields with the properties of the file associated with it.
To create a new document based on the library's template, follow these steps:
- Click on the Documents tab in the top ribbon bar if the Documents ribbon is not already active. Then click the New Item button in the Documents ribbon.
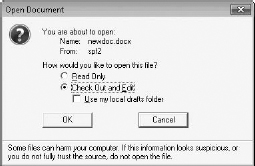
- You very likely will get a dialog box ironically warning you that some files can harm your computer and that you are opening a template.docx file from the SharePoint server. Click OK if that Warning dialog box appears.
- A new Word document will open. Simply type some text into the document, and save it.
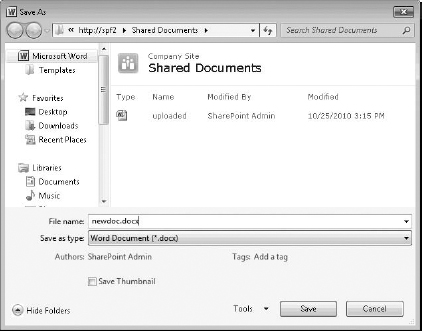
You'll be prompted to name the file; my example uses newdoc (Figure 8.4). In the Save As dialog box, the file is being saved to the Shared Documents library on the SharePoint server, which is http://sp2 in my example.
FIGURE 8.4 Saving a new document to the Shared Documents library
- Name the file, and click Save.
- Close the Word document.
TEMPLATE VERSIONS
The Shared Documents library is set to use a Word 2007/2010-compatible .dotx template. However, you can create a document library that uses a .dot template if you need the backward compatibility.
Two Word documents are now in the Shared Documents library.
If you select a document in the list, it will activate the Documents ribbon and enable most of the buttons. The document name field is capable of triggering a drop-down menu at the end of its column, the same as any item in any list, to edit, view properties, and do other individual item tasks. You will see some familiar list item options and some new ones (these options can change depending on the configuration of the library and even the item itself):
View Properties This option is used to see the metadata, or field data, for the library item. It corresponds to the View Item option in a standard list; however, in this environment, you should think of the item fields as document properties.
Edit Properties This option lets you edit the metadata of the library item.
Edit In Microsoft Office Word As the option says, it allows you to open the library item's attached file for editing in Microsoft Word. For this to work, of course, you must have Word installed locally on the machine with which you are browsing the site. This menu item is also triggered when you simply click the name of the library item. The menu item will reflect the type of the attached file (if SharePoint can identify it).
Check Out This option locks a document from being checked out and makes it read-only for everyone but the person checking it out. This helps limit the amount of overlapping work that might be done on a document simultaneously. When a user is done with a document, they can check it back in, making it available to be edited by someone else. Check Out is not required by default. If it is required, then no document can be edited unless it is checked out. Thus, to edit a document, a user must check it out; otherwise, it will be read-only. Check Out can be overridden by someone with the permission to do so, usually an administrator or list manager.
Alert Me This setting is the same as for standard lists; it means you can configure email notification if there are changes made to library items, based on a limited set of criteria, such as changes made only to documents you created or to all documents.
Send To This menu option has several functions. Items in a library can be sent to other libraries and locations. As SharePoint and its document libraries have evolved, libraries have become more connected to other libraries and site resources; a document workspace can be generated from a document in a library, or finished documents from a library can be sent to a final archive library.
By default, Send To offers the options to email a link, create a document workspace for the document, download a copy, or send a copy of the document to another location (such as a different library). There is also an option in the overall library settings to define a custom library or location to use as a default place to send a copy of the document. Documents sent to a different library can be updated with changes from the original library. The secondary location is generally meant to be an archive. What that means is the secondary location cannot update changes made to the document copy there back to the original library. The updates are only one-way.
Manage Permission This option lets you apply unique permissions to the library item. Because all objects on the site inherit that site's permissions, you first would break inherited permissions and then alter the permissions for the item to fit.
Delete This is the option that removes the document and its library item from the library and puts it in the user's SharePoint Recycle Bin. Remember that when things are deleted from lists or libraries, they are not completely gone until either they are also removed from the Recycle Bin or the Recycle Bin times out and all items of a certain age are deleted (30 days by default).
Most people focus on the documents in a library, but they are just attachments for the library list items. You can create fields for any library item just as you could any list. You can require that those fields be filled out before the item and its document are saved. This makes it possible to require users to enter data that can be used to track documents, search for them, or trigger workflows.
DROP-DOWN MENU OR RIBBON BUTTON?
There are two ways to access the tasks available for a document item. One is to use the buttons on the Documents ribbon, and the other is to use the drop-down menu associated with each item. Because a number of the buttons in the ribbon are without labels and are organized in sections that might initially seem unintuitive, I've opted to do most of the exercises here using the item drop-down menu, rather than the ribbon buttons. The menu is organized simply, and all options are labeled for easy identification. There is no need to scan through the ribbon to see which buttons are grayed out and which aren't. However, feel free to select an item and then use the ribbon bar buttons instead of using the drop-down menu.
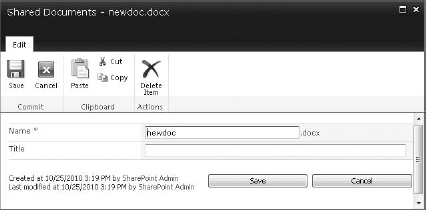
Right now there are very few editable fields for this library. To see what those fields are, in the item's drop-down menu, select Edit Properties. In Figure 8.5, you can see that the Name and Title fields are available for data entry. Name is the only required field, and it is automatically populated with the filename of the document you upload or create from a template in the library. The Title field is not required; therefore, you generally don't get prompted to fill in the Title field when you create a document, which is why it is empty.
FIGURE 8.5 Edit properties of library item
DETERMINING THE WORD VERSION
As you probably know, Word changed its file format between the 2003 (.doc) and 2007 (.docx) releases. In a SharePoint document library, you can see which Word documents are formatted for 2003 and earlier and which are Word 2007 or later in the Type column. Documents that are formatted as .docx have a square blue outline with the top-left corner folded down behind the stylized W of the icons; .doc documents have a completely square blue outline behind the W on their icons.
If you are further looking to confirm the file extension of a document in the library, don't try to view it, because that form doesn't display the extension; instead, choose Edit Item. That form shows the file extension.
Adding a Required Field to a Library
One of the nice things about having a library item associated with a document is that its fields can be used as the document's properties. So if you want additional fields that better identify a document, you can add them to the library item. Better yet, by setting a field to be Required, you can force the property to be filled in when a user creates, uploads, or edits a document in the library. My example creates a Project metadata field that requires the user to enter a value so anyone can see at a glance which projects are associated with which documents.
Adding fields to a library is exactly like adding fields to a list, although how the library handles fields is different, as you'll see in a moment.
- Simply click the Library Settings button in the last section of the Library ribbon (click the Library tab in the Library Tools toolset in the top ribbon bar if you need to activate the ribbon).
- Then, on the Document Library Settings page, in the Columns section, click Create Column. (There seem to be only four columns by default for this library, but that is not the case; the columns displayed are the only ones that are editable by the user.)
THE CREATE COLUMN BUTTON
You might have noticed that you can also use the Create Column button in the Manage section of the Library ribbon to create a column. This will pop up the settings in a dialog box instead of a page, but I prefer pages because more settings can be seen without scrolling. Feel free to use the button if you prefer.
- On the Create Column page, as you can see in Figure 8.6, name the column (for my example, the column is named Project). Keep the data type set to Single Line Of Text, give it a description, and require that the field contain information, which is the whole point of this required field. For the other settings, do not enforce a unique value, do keep the default maximum characters, make sure to leave the default value blank, and add the field to the default view to ensure that the field shows up in the default view of the library. The field doesn't require validation.
- Once the settings are complete, click OK to finish creating the new Project field.
FAST ENOUGH FOR YOU?
I am assuming that you've at least glanced through the preceding chapters about lists, so I am going rather quickly through creating a new, required field. To get a detailed look at columns, data types, settings, and more, check out Chapters 6 and 7.
- On the Document Library Settings page for the library (where you should be able to see that the new field is in the Columns list and is required), click the library's link in the Quick Launch bar, or the Shared Documents link in the title breadcrumb, to get back to the library's content page. Project should be a new column heading on the right of the content area.
FIGURE 8.6 Setting properties for the new column

Of course, the required field will be blank for the documents already in the library because they were created before the field was. However, because the field is required, if these documents are edited, the field will have to contain data before their changes can be saved—and of course, this field will need to be filled in for new documents as well.
Editing a Document with a Required Field
To prove that we can't save a document that doesn't have required fields filled in, let's edit the document we created.
- To edit a document in a document library, there are a few options (from this point, I'll probably always suggest only one). You can simply click its filename or click the down arrow at the end of the Name field to trigger the item's drop-down menu and select Edit In Microsoft Office Word. You can also select the item and click Edit Document in the ribbon.
- A Warning dialog box will come up reminding you that you will be opening a file. Make sure it displays the filename you want, and click OK.
Word might prompt you for your SharePoint login. Your login does two things. It confirms that you can access the location of the file. And if you want to use the shared workspace pane (available only to versions prior to 2010) to work with the document, your login tells Word who you are so it can propagate the pane with the correct data.
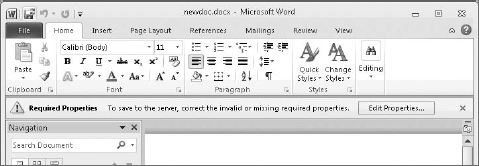
- If you open the document in Word 2010, you will likely get a warning like the one in Figure 8.7, because the document now has required properties. If you get the warning, click the Edit Properties button. It will open the Document information panel and display the editable fields for the document library.
If you are feeling left out because you didn't get prompted to log in, fear not. If you are logged into the client computer with the same account used to access the library and the site's address is a local intranet zone in that computer's Internet Explorer, then you may not get the prompt to log in because it will pass the local user's credentials transparently.
FIGURE 8.7 The properties warning in Word 2010
SERVER PROPERTY FIELDS
The fields for the library are considered server property fields, because most Word documents come with properties of their own, such as summary, author, tags, and so on. If you use the document properties, rather than the server document properties, they will not show up in SharePoint. Make sure you are looking at the server properties to access the document library fields for the document.
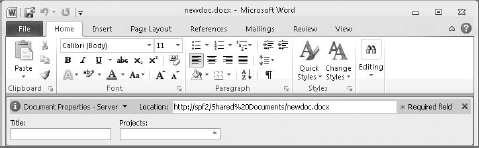
In Figure 8.8, the Project field is marked with a red asterisk. This means it must contain data if you want to save the changes you will be making to this document. Also displayed in the information panel is a Location field, showing you the URL of the location where Word thinks the document came from and where it will be shared to.
FIGURE 8.8 Document Properties – Server fields for a library document
- As a test, edit the document but don't fill in the required field, and then click Save to save your changes. You will immediately get an Error dialog box warning you that this file cannot be saved because some properties are missing or invalid. This means, in this case, that you did not fill in the Project field. To fix the issue, click the Go To Document Information Panel button in the dialog box (Figure 8.9). It will take you back to the Document information panel so you can enter the required data. (If you are using a version of Word prior to 2007, a pop-up box will appear when you save changes instead of an information panel. You can enter your data changes in the pop-up box.)
FIGURE 8.9 Required field warning dialog box
- In the Document information panel, enter data into the Project field. In my example, I used the word Example as the data in the Project field. Then click the convenient Retry Save button, which will be located just below the Document information panel in a Required Properties banner. Now that the field has data in it, the Save function will work fine. Close Word, and go back to the Shared Documents library in SharePoint.
Back in SharePoint, as you can see in Figure 8.10, the newdoc item (or whatever you named your document) now has data in its Project field. If your users are using Word 2010, encourage them to use the Document information panel. This provides a convenient way to see the library item fields for the document and easily manage data.
FIGURE 8.10 The new document with Project field data in the library
- The Document information panel generally doesn't open automatically unless there is an empty field that requires data. To open it manually within Word 2010, select the File tab.
On the right side of the document's information page, the properties for the document will be displayed. There users can edit or fill in fields (Figure 8.11) without the information panel. Remember that there are two kinds of properties: Word and Server (SharePoint). Be sure the users are on the Document Properties – Server information.
- Now that there is a required field, if you upload a file to the Shared Documents library, you will be prompted to fill in the required field before the upload can finish. To demonstrate this, click the Upload Document button in the Documents ribbon, and upload a file (my example is called Samp1e2003 and was created in Word 2003). After you choose a file to upload and click OK, the Properties dialog box for the document item will prompt you to enter data in the required field (as you can see in Figure 8.12). Notice that Word 2003 automatically uses the first line of the document for the Title field; Word 2007 and 2010 don't do that.
FIGURE 8.11 Document information page properties
FIGURE 8.12 The Library item properties page during file upload


When you upload a file that requires its fields to contain data, the file will be in a checked-out state (unavailable to everyone but you) until you fill in the required fields. Basically, the document can be uploaded, but it's not considered “done” and ready to be seen by anyone else until all the necessary fields are filled out.
Required fields work differently in Word 2003 than they do in Word 2007 or 2010, and maybe better, for two reasons. The first is that when a field is required, it doesn't show up as an error and is, therefore, less likely to cause any user anxiety. If a field is required, a box pops up when the document is being saved, or the application is closed, prompting users to enter data in the required fields.
The second reason required fields work better in Word 2003 is that when a field is required for a document in a library, every time the file is edited, the prompt to enter data in the fields pops up during the Save process. This regularly reminds the user that those fields are there and can be edited, for example changing the status of a document from Editing to Completed. The user isn't obligated to change the data; they can just save it as is. Neither Word 2007 nor 2010 reminds the users of the required fields (at least not consistently) if the field is not empty. That means once a field has data, the user must remember to edit the field manually if the required field contains information that needs to be updated.
Opening the Library with Windows Explorer
Libraries have an additional way of being viewed as well. Because SharePoint was originally used mainly for document management, Microsoft knew that companies would need a quick, familiar, and easy way to dump documents from a file share into a document library. Because of this, libraries (except the wiki library) can be opened with Windows Explorer.
Opening the library with Windows Explorer opens a Windows Explorer window and displays the library like a web folder so you can simply drag and drop files into the library from a location on the local machine or a network share. You may think that's no big deal, but remember, a library is actually located in the content database. This feature allows you to see the library as if it were a shared folder for those users unfamiliar with the concept of a list holding their files.
EXPLORER VIEW
The previous version of SharePoint allowed the library to be opened in a separate window in Explorer, or it actually displayed Explorer view in the browser itself. This was compatible with the design idea of keeping the users in the familiar interface of the browser. That is not the case in this version, as it only supports opening the library in a separate Explorer window.
Unfortunately, there is one (maybe inconsequential) thing to worry about when viewing any library with Explorer: the library stores its template, forms, and standard view pages (like allitems.aspx or upload.aspx) in the library in a folder called Forms. Most users will not be able to see the Forms folder, but administrators/owners will (particularly if they have their folder options set to show hidden files on the machine they are using to access the library). So, teach them to be careful not to accidentally drag and drop files into that folder. Keep in mind that the Forms folder is a system folder, and adding another folder to the library with the same name can cause intermittent issues with the original folder. You can use the Forms folder to access and easily edit the template for the library, as well as access the standard ASPX pages for the library such as AllItems.aspx (which is the All Documents default view for the library).
SERVER SAYS NO
The Server OS does not have the WebClient service installed by default, which is required in order to use the Open With Explorer capability. To be able to open libraries in Explorer while on the server, you have to install the Desktop Experience feature on the server, which will install the WebClient service (along with a bunch of stuff you probably don't want). Then you need to start the service.
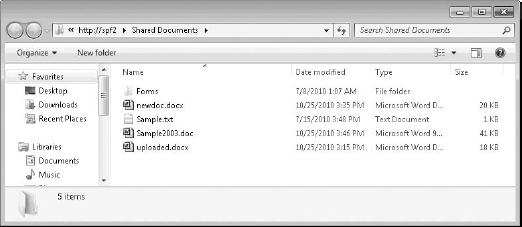
To open Explorer to display the library's contents in a separate window (Figure 8.13), activate the Library ribbon, and then select the tiny Open With Explorer button in the Connect & Export section. You may be prompted for your SharePoint login credentials again to make certain you have the right to access the library as a web folder.
FIGURE 8.13 The Open With Windows Explorer window
PERMISSIONS AND OPEN WITH EXPLORER
Your login permissions on the local computer will impact which user account SharePoint will use when accessing a resource. Because Explorer is part of the operating system, it will use the locally logged-in account as the context allowed to access that library, regardless of the credentials you use to log in to SharePoint in the browser.
This is generally not a problem for most users. If their workstations are part of the domain, they are logged into that machine with the same login they would use in SharePoint. However, if you are testing what Open With Explorer might look like for a user with lesser permissions than you have, from your machine it might look like they have access to more than they actually do. You need to log on locally as that user and then access SharePoint to see the full effect of their permissions. This also affects the way Page View web parts work if they are accessing shares where permissions might be an issue.
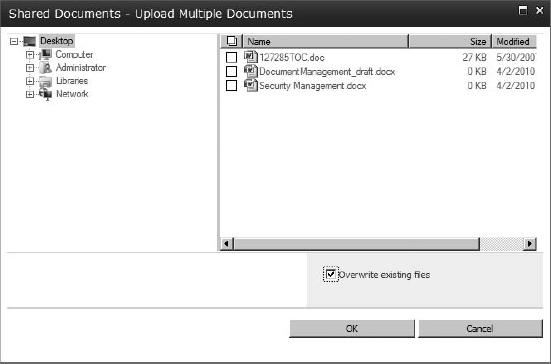
To easily move files from a file share to the library, simply drag and drop them into the Explorer window. For example, a document named Security Management.docx was dragged and dropped from a folder on my hard drive to the library in Figure 8.14. Transferring files this way is essentially the same as uploading them; the files will be considered checked out and unavailable to other users until data is entered into the required fields and the files are checked in.
FIGURE 8.14 A document added to the library using Open with Explorer

BULK LOADING
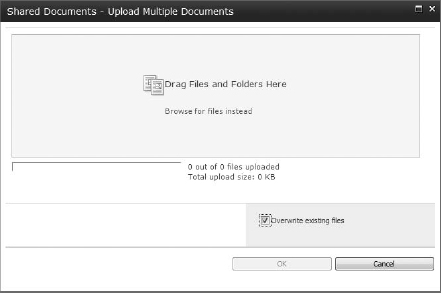
It's easy to add multiple documents to a library, either using an Explorer window or doing an upload of multiple files using the Upload button on the Action bar. If you upload multiple files at once, remember that if they have required fields, they are checked out until you fill in those fields, and then you can check them in. Keep in mind that an uploaded file is not visible to any other user until it is checked in.
If you choose to upload multiple files on a machine without Silverlight, the interface will look like this (personally I prefer it this way):
With Silverlight, it will look like this:
You can then use Datasheet view to more easily fill in the required fields of those items in bulk, rather than entering each item individually. Chapter 6, “Introduction to Lists,” covers Datasheet view and manipulating views in general.
Of course, as an administrator, not only are you going to need to know how to use Open With Explorer, you are going to need to be able to troubleshoot it as well. Because of this, there are some details that you might need to know about how Open With Explorer works with SharePoint in order to support it.
SharePoint's Windows Explorer capability uses Web Distributed Authoring and Versioning (WebDAV) to make Open With Explorer possible. Occasionally, there are issues using Explorer with SharePoint. Here are two of the most common problems and their solutions:
Common Tasks Bar Shows Up on Left Side of Explorer Window Explorer is controlled by the user's Folder Option settings on the computer they are using to access SharePoint. To get rid of that bar, open Windows Explorer on that computer, go to the Tools menu, and select Folder Options. Set the folder to use Windows classic folder view.
Open with Windows Explorer Won't Work This particularly occurs on servers, which don't have WebDAV enabled by default. Make certain that the WebClient service is running on the computer being used to access the library. For Server 2008 or 2008 R2, you will need to install the Desktop Experience feature on the server itself (using Server Manager) to make WebClient available. It will then need to be enabled (the role just makes the services available).
STUPID FOLDER TRICKS
As you know, if folders are enabled, you can add them to lists and libraries. This feature is enabled by default on most libraries, and the button is usually the third one in the Documents ribbon.
Folders are essentially containers. They can contain library items or other folders. Adding a folder and double-clicking it essentially “opens” it so you can add documents to it. This lets you organize your documents and lets users who prefer file shares be more comfortable. However, there is one interesting thing about folders and SharePoint. Have you noticed that there is no Move button or menu item?
So, what do you do if you have a document in the library, you have made a folder, and now you want to put that document in that folder?
Well, you could edit the document and then Save As specifically to that folder in the library (but that would leave you with two copies, one in the folder and one not—until you deleted the first one). You could download the file and then upload it to the folder (by opening the folder first and then clicking the Upload button). Or you could drag and drop it.
That's right—Explorer to the rescue. The easiest way to move files around in a library is to open the library in Explorer. Then just drag and drop the file into the folder (or back out again). Keep in mind that, if the library requires check out, moving files might mark them as checked out
Requiring Checkout
As I've mentioned before, a document that is marked Checked Out (in a standard view, a checked-out document is indicated by a green arrow on the bottom-right corner of the Document Type icon) is set to be read-only for everyone but the person who checked the item out. When you check out a document, only you are allowed to edit it until it's checked back in.
Requiring Check Out is a good thing. If it is set, then users cannot open a document without explicitly choosing to check it out for editing (which locks it for everyone else) or to open it only for reading. If you don't check out a document when Check Out is required, then all you can do is read it, and changes made to it cannot be saved back to the library.
YOU CAN USE FORCE
Don't panic. As an administrator, you can force a document to be checked in if someone leaves the company with a document checked out or simply forgets to check a document back in for too long. Their changes will be discarded, but at least the document will be available for others to work on it. I'll cover this a little later in this section.
Keep in mind that there is an issue with allowing Check Out to be voluntary. A user can choose to check out a document they are editing by clicking Check Out on the document's selection box drop-down menu before opening it or by choosing to check the document out when prompted by Word when it is being opened. However, this can be a hit-or-miss thing, because they can still edit the document even if it is not checked out, and, meanwhile, so can anyone else. This means that if Require Check Out is not enabled and the user forgets to check out the document, while they are editing it, someone else can also open the document and edit a copy of it as well. This can cause essentially two versions of the document to exist, one with the edits of one person and another one with the edits of the other. The last person to save the document will have their edits displayed as the most recent document, making the other person's edits seem as if they have been “lost” because they were saved as an “older” version of the document.
To require that a document automatically prompts to be checked out when someone edits it and cannot be checked in by anyone but that person, you must enable the requirement under the library settings.
A setting at the bottom of the Versioning Settings page allows you to require Check Out. The Versioning Settings page actually has all kinds of useful settings that we will revisit later in the “Versioning” section of this chapter.
Take these steps to access the Require Check Out setting:
- Click Library Settings in the Library ribbon.
- On the Document Library Settings page that appears, select Versioning Settings under the General Settings category.
- On the Versioning Settings page, scroll to the bottom to the Require Check Out section (see Figure 8.15), and select Yes to require documents be checked out before they can be edited.
FIGURE 8.15 The Require Check Out setting
- Then click OK to finish. That should take you back to the Document Library Settings page for the library.

To return to the content page, click the name of the Shared Documents library in the title breadcrumb.
Checking Out a Document
Back on the Library content page, let's see what happens if we try to edit one of the documents that now require check out. There are two ways to check out a document:
- Manually do so by selecting Check Out in a document's drop-down menu or selecting the item and clicking the Check Out button in the Documents ribbon.
- When check out is required, simply open the document. It will prompt you to either check the document out or open it read-only.
1. For an example of the second method, click the new document you created earlier (my example is Newdoc) to edit it in Word.
As you can see in Figure 8.16, with Require Check Out enabled, when you prepare to open a library document, the prompt won't just ask you whether you want to read or edit the document; it will ask whether you want to read or check out and edit the document.
FIGURE 8.16 The dialog box for choosing Read Only or Check Out And Edit a library document
SAVING A DOCUMENT LOCALLY
SharePoint also can let you save a copy of the document locally in case you need to work offline. 1 would rather not have two copies of the document at any one time, so 1 do not save a draft copy to a local folder. However, if that is allowed in your environment, it lets the users work on a document they have checked out while disconnected from the network. After working on the document locally, when they reconnect to the network and are able to access the SharePoint server, they can save their changes to the library. When they do, they will be prompted to check the document back in if they are done working on it.
To edit the document, you must check it out.
2. Select Check Out And Edit from the two options, and click OK. This will open the file in Word to be edited. You may be prompted for your login credentials.
3.Make some changes, and then save and close the document.
4.When you try to close the program, you will be prompted (see Figure 8.17) to check in the document so others can see the changes. If you save but don't check in the document, it will still be set to Read Only for everyone else, allowing you to continue to edit the document without anyone else accessing it until you check it in. Also, your saved changes will not be visible to anyone else until the document is checked in.
FIGURE 8.17 The Check In prompt after editing a document

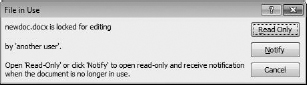
If another user clicks the Check Out button, a dialog box informs them that the document is checked out by someone else (Figure 8.18). They could save a copy of the file locally and work on it there; however, that is not a good idea because it doesn't show the changes of the version currently being edited by the person who has it checked out.
FIGURE 8.18 Read Only or Notify dialog box options
OLD SCHOOL
In Word 2003, if you open a document that is checked out, you don't really get any warnings. It only lets you know that the document is set to Read Only after you try to save the changes you made after opening it.
That leaves us with the need to check that document back in.
Checking In a Document
There are two ways to check in a document: within the Library content page by selecting Check In on the drop-down menu for the item (or selecting the item and clicking the Check In button in the Documents ribbon) or after you save changes and are closing out of Word. For example, our newdoc file is checked out and open in Word. Go ahead and save the document back to the library. You will be prompted to check it back in (Figure 8.19).
FIGURE 8.19 Check In dialog box for version comments

You should type a comment in the box. Do not select Keep The Document Checked Out After Checking In This Version, because versioning isn't enabled yet (we will be doing that later in the chapter), and click OK to finish.
CHECKING IN WHILE STAYING OUT
You might think this is a contradiction of terms, keeping the document checked out after checking it in, but you can save a copy of your changes as a version of the document in the library and then keep it checked out to work on it some more. This lets you make a backup version of the document in the library, just in case.
In the Shared Documents library, newdoc no longer has the green arrow indicating it is checked out. It is free to be checked out by other contributors. If another user accesses the document now, it will show all changes, including those withheld from everyone else while the document was checked out. This really indicates why no one should be using the document until the user who checked it out is finished editing it.
Discarding Checkout
What happens if someone checks out a document for too long? What would happen if documents are left checked out because of a user emergency or because the user left the company? To recover a document that is checked out by someone else, you can log in as that user and check in the document for them, or you can go into the Document Library settings and discard their checkout.
As you know, you can have items that may be checked out with no saved changes and no versions in the library (for example, if a file is dropped into a library in Explorer). However, if a document has been changed at least once in a library, then it can be “rolled back” to its state before it was checked out most recently. This is useful in those situations when the document must be returned to the library to be checked out by others. In that case, the administrator or someone with the permission Override Check Out can click Discard Check Out in the item's drop-down menu (Figure 8.20). You could also select the item and click the tiny Discard Check Out button (it has the same icon) in the Documents ribbon.
FIGURE 8.20 Discard Check Out in the item drop-down menu
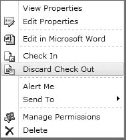
Either way, this will check in the document and discard the changes made to the document and its property fields while it was checked out (basically reverting it to its most recent version before checkout).
Managing Checked-Out Files
If the document has never been checked in, if it was uploaded by someone, or if it was left checked out and otherwise has no versions to roll back to, then it needs to be managed in a different way. Changing that file from checked out to checked in requires that someone take ownership of it:
- Click the Library Settings button in the Library ribbon.
A BIT OF SLEIGHT OF HAND
To do this exercise, I logged in as a user (saffron) other than our usual SharePoint admin (shareadmin) and dragged a document into the library without entering data in the Project field. That left the document checked out without any changes. Then I logged back in as shareadmin to continue this process. This created a document that the administrator could take ownership of for this demonstration.
- In the Document Library Settings page, click Manage Files Which Have No Checked In Version under the Permissions And Management category.
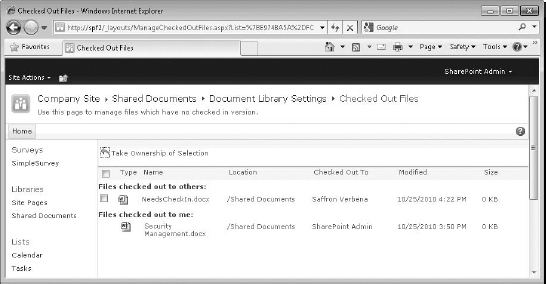
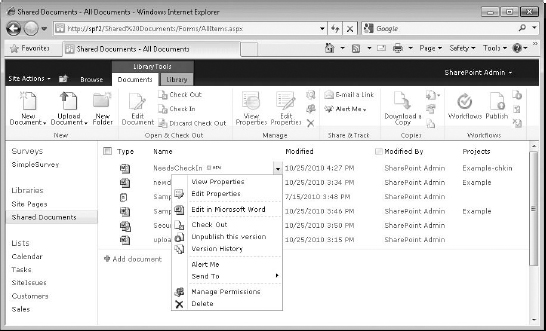
On the Checked Out Files page (Figure 8.21), you'll note that although there may be many checked-out files in the library, only those with no checked-in version are listed (see the subheading below the breadcrumb). Earlier in the chapter, a document was dragged into the library using Explorer. It should still be waiting for you to enter data into its required field so you can check it in. However, you already own that library item, so you don't need to take ownership of it (it's in the Files Checked Out To Me section). Note that the file is a link and has no check box next to it to select it. That's because to check that document in, all you need do is simply check it in yourself back on the library's content page. If there are documents that are checked out but don't belong to you, they will be listed under Files Checked Out To Others.
FIGURE 8.21 The Checked Out Files page
- In my example, the document checked out by someone else is NeedsCheckIn. To check in that document, you need to take ownership of it and then check it in yourself. To take ownership of a document, put a check in the check box next to it, and then click Take Ownership Of Selection.
- You'll be prompted with an Are You Sure dialog box; click OK if you're sure.
- Then go back to the Shared Documents content page (click Shared Documents in the title breadcrumb). The document item will show up in the content area of the library (for your view only, since it's still checked out, but now you own it).
- To check in the document in this case, you still need to fill in the required field. So, add data to the Project field by selecting Edit Properties from the drop-down menu.
- In the Edit Properties page, enter some data into the Project field, and click OK.
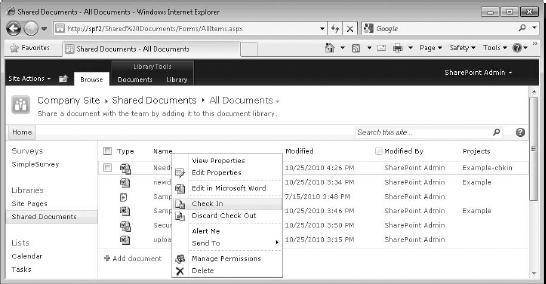
- To check the document in, simply select Check In from the drop-down menu (Figure 8.22). You might have noticed the option to discard checkout is listed, but you cannot discard checkout because there is no previous version to go back to.
FIGURE 8.22 A document being checked in after a change in ownership
- Selecting Check In will trigger a Check In box where you can enter a comment and decide whether to keep the document checked out after checking in this version. Make certain that the setting is No, because the whole point of this exercise is to check in the document.
- Once you've entered a comment, click OK to finish checking in this document item. The document will no longer be checked out and can now be worked on by other people allowed to contribute to the library.
So, you know how to create, upload, and edit a document. You've learned how to add a required field to the library and know what effect that has on saving documents. You've learned about using the Open With Windows Explorer feature of a library and how to manage Check In and Check Out. Now it's time to move on with configuring a library. A library can be configured, to support versioning, as well as content approval, content types, and even incoming email and RSS. Versioning is one of the important features of document management. Keep in mind that each version of a document is a copy of that document and can take up quite a bit of space. If storage is an issue, consider limiting the number of versions.
CO-AUTHORING
A new feature of Office 2010 is co-authoring, which allows two users to work on a Word, PowerPoint, or OneNote 2010 file simultaneously. Instead of locking an entire file for check out, co-authoring locks the document by paragraph, allowing multiple people to work in one document at one time but on different paragraphs.
This method does have its drawbacks:
- It requires that all users working on the document to be using the 2010 version of their software. If someone on the team opens the document in, say, Word 2007, it will lock the document as read-only for everyone else.
- The file must be saved as a 2010 version file for Word and PowerPoint. OneNote can support co-authoring with either 2010 or 2007 files.
- You cannot co-author Excel files using the Office 2010 client (but, oddly, you can if you are using Office Web Apps). So if you are doing full-featured work with Excel spreadsheets, even if they are 2010, you will not be able to do co-authoring.
- Word 2010 need to be set to allow store random numbers to improve Combine accuracy (a Trust Center, Privacy Option, document-specific setting).
- The file cannot be co-authored if it contains ActiveX controls, OLE objects, SmartArt, Chart, or Ink objects; contains HTML framesets; is to be published as a blog entry; or, in the case of a Word document, has subdocuments (as most master documents do).
- It is not compatible with check out. Checking out a document sets it as read-only for everyone else, which defeats the purpose of co-authoring. This is something to consider if you have a library of Office 2010 documents that are only going to be worked on by people using Office 2010. You can safely not worry about editing conflicts, because Office 2010 manages that inside the document.
Co-authoring does support versioning. Every time one of the authors saves their changes, it updates that change in the document for all other authors to see as soon as they save their changes (as soon they click Save), and it saves a version of that document in the library.
Co-authoring simply works. If a user opens a Word 2010 document, for example, from a library, and then another user also opens that document in Word 2010, it will indicate that two people are using the file in the status bar of the window (and generate a little pop-up for a moment to let you know when they opened the document).

If one user types in a paragraph, it is indicated to all other users with the document open in Word 2010. This will lock the paragraph that user is editing (and indicate which user is editing it), but the rest of the document will be available to edit for everyone else.
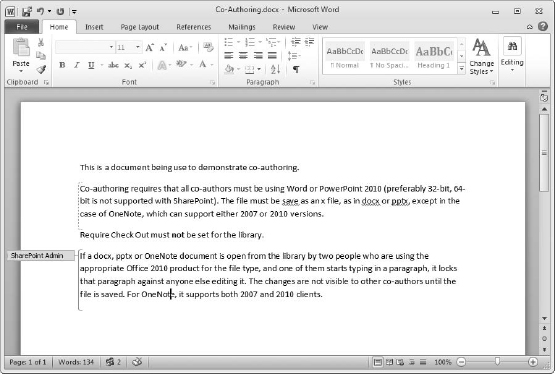
The changes a user makes in their paragraph aren't readily visible to everyone else until that user clicks the Save button. Then it will automatically update in the document for everyone currently editing it as soon as they click Save as well, which causes the document to refresh and show everyone's saved changes).
This process is new with Office 2010. It does have its limitations, but it is a great step toward simultaneous, real-time collaboration.
Versioning
All lists, including libraries, can do versioning (which means that the principles you learn here can be applied to other lists as well). SharePoint keeps a copy of a list item whenever a change is made so the user can “roll back” to the previous version of the item if necessary.
Thus, every time a document that is attached to a library item is edited and the changes saved to the library, it is considered a new version of the document and its library item. Versions are saved (you can enforce how many) to the version history of that library item, and versions can be restored or deleted there. When a version of a document is restored, it becomes the most recent version and is the one that will be opened when you click the link for that document in the library. The version that is being replaced as the most recent is pushed down one place in the list—it is not deleted. SharePoint also supports major and minor (or draft) versions of an item. Major version numbers are whole numbers, like 1.0 or 2.0. Minor versions are indicated with decimal numbers like 1.1, 1.2, and so on.
When a document is edited, saved, and checked into a library, it is considered a minor version until you choose to publish the version as a major version. That elevates the version number from a minor version, such as version number 1.2, to a whole number, such as version 2.0. If you enable content approval on a library that also has versions enabled, documents will remain as minor versions until they are approved (more on that in a few pages).
Do the following to enable versioning:
- Click Library Settings in the Library ribbon.
- On the Document Library Settings page, click the Versioning Settings link in the General Settings category.
- The Versioning Settings page has a content approval section. In a library, you can choose to have a document remain in a draft state until approved. This can be useful with document management. However, we are not going to do content approval just yet, so leave this unchecked.
Other sections for this page are Document Version History, Draft Item Security, and one you've already seen, Required Check Out.
Document Version History is where you set how versioning will be handled by this library. It's here that you actually enable versioning, configure it to use only major versions or major and minor versions, and set limits on the number of those versions.
Enabling major and minor (draft) versions unlocks the Draft Item Security section. That is where you can also limit the ability to see a minor version of a document to anyone who can read items in the lists, only people who can edit items, or only those allowed to approve items if you enable content approval.
- In this library, let's allow the creation of both major and minor versions. See Figure 8.23 for the settings to limit the number of versions allowed per document in this library to six major versions and allow only five of those to have drafts. For draft item security, let's allow anyone who can read items in the library to be able to see minor versions of documents. This will change when you enable content approval.
FIGURE 8.23 Versioning settings
- Once the settings are complete, click OK at the bottom of the page to finish enabling versioning.
- Now that versioning is enabled in the library, let's go to the library's content page and start creating document versions. To do this, click the Shared Documents link in the breadcrumb above the title of the page.
NO MINORS ALLOWED
If versioning is enabled but major and minor versioning is not selected, then all versions are major versions using a whole-number versioning scheme.
- When you're on the Shared Documents content page, click the down arrow for one of the library items to access the drop-down menu. In addition to the standard menu items, there is now a Version History option (Figure 8.24).
FIGURE 8.24 The version options for library items
In addition, now when you select an item, the tiny Version History button in the Manage section of the Documents ribbon will be available.
On library items that are not checked out, there is also a publishing option. Publishing takes a draft or minor version and makes it a major version. If the document has only a major version available or the most recent version of the document is a major version, the menu will display Unpublish This Version. If the most recent version of a document is a minor version, Publish A Major Version will appear so you can elevate it to major.
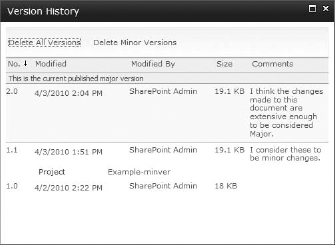
- My example is going to use the uploaded file from earlier in the chapter (my example is literally uploaded). Like all other documents in this library, it currently has only one version; this is why the publishing option in the item's drop-down menu is Unpublish This Version. Select Version History from the item's drop-down menu.
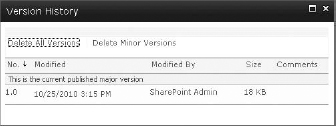
In the Version History box, you can see that there is only one version of this document in my example (Figure 8.25). Because it is the only version, it is a major version by default. Published major versions are indicated by the highlighted color of the background surrounding the entry (it varies depending on the theme you use).
FIGURE 8.25 The Version History page for uploaded.docx

Creating a New Minor Version of a Document
Now that you've verified that there is only one version of this document in the library, it's time to make more. Versions are created when you edit a file in a library (or its library item). The most practical way to create another version of a library item is to open the item's file and edit, just as any user would.
- Close out of the Version History box to go back to the content page.
- From there, click the filename for uploaded, or the name of the file with which you want to work, to open it in Word. This will trigger a Warning dialog box for you to confirm the filename and offer you the option to read or check the file out and edit it. Select the Check Out And Edit option, and click OK.
- In Word, edit the document and add whatever text you'd like. The file uploaded in my example also requires that the Project field contain data, so make certain it's filled in too.
- When you are done, save the changes and close Word.
- When you are prompted, choose to check in the document (Figure 8.26).
PROMPTING MAY BE OPTIONAL
Remember that you will be prompted to choose minor or major when using Word 2007. With 2003, it will save the document as a minor version by default.
FIGURE 8.26 Check In with versions enabled
- When you check in the edited document in a library that has major and minor versions enabled, SharePoint asks you which version you'd like this document version to be. For my example, I would like to make this a minor version. So, make sure that 1.1 Minor Version is selected and add a comment. Do not keep the document checked out, and click OK.
- On the Shared Documents library content page, the file is there and is not checked out. If you take a look at the item's drop-down menu, you'll see that where it previously said Unpublish This Version, it now says Publish A Major Version. If you click Version History in the item's drop-down menu, you can see that there are now two versions of the document, 1.0 and 1.1 (Figure 8.27). The most recent and minor version is at the top of the list (and will be the version associated with the Name field if you click it).
FIGURE 8.27 The version history for recently edited item

Creating a New Major Version of a Document
If you edit the document again, you will see that the most recent version, despite its minor status, will be the one that opens. This means you can edit it until you think it is ready to be considered a major version of the document. You can promote a minor version of a file to a major version by publishing it. You might do this if you change your mind about the appropriateness of the version type you chose when you checked a document in. Usually, though, a minor version of a document simply needs to be edited, and then the final changes are checked in as a new, major version. Take the following steps to create a new major version of a document:
- Make sure you're in the document library (Shared Documents in this example), and click the filename for the library item you are working on (mine is uploaded). When prompted, check out and edit the item.
- Once the item is open, you'll see that the changes made in the recent version are there. Add additional text, save the file, and then close out of Word.
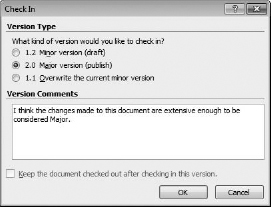
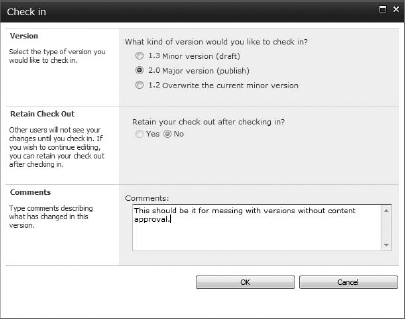
- You will be prompted to select the version type for the changes you just made to the document. Notice in Figure 8.28 that there are now three version options for this document: 1.2 Minor Version (Draft), 2.0 Major Version (Publish), and Overwrite The Current Minor Version. Select 2.0 Major Version (Publish), and add a comment. If you choose to publish the version, the Keep The Document Checked Out option is grayed out.
FIGURE 8.28 The Check In prompt
- When you are done with the Check In settings, click OK.
- In the Shared Documents library, the document is not checked out, but otherwise it looks unchanged. To see how the version history looks, select it from the item's drop-down menu.
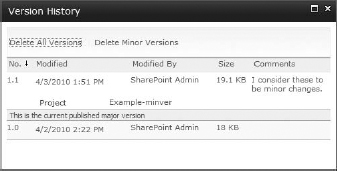
On the Version History page (Figure 8.29), the topmost 2.0 version is now the published major version and is highlighted with a background color appropriate for the site theme to indicate at a glance that it is not a minor version.
FIGURE 8.29 The Version History page with a new major version
On the Version History page you can do several things with the saved versions of the document. You can restore any one of the previous versions to the top of the list (which means that version is edited when you click the linked field for a document in the library).
You can delete a previous version (or even delete all minor versions), but not the current version. A current version of a document will need to be replaced at the top of the list before it can be deleted. This is usually done by creating a different new version or by restoring a previous version of the document to the top of the list. On the Version History page, you can also view the properties of the document for each version if you'd like (View on the drop-down menu). This is where having users fill in Status or Progress fields would come in handy to track the progress of a document via its fields.
To either unpublish or delete, restore, or view the properties of a version on the Version History page, just move your cursor over the version's date and time (which is the linked field for this list), and click the down arrow in the selection box that appears around it. In the drop-down menu are Restore, View, and Delete for the previous versions. If you select the most recent, major version of the document (Figure 8.30), it will not have a Delete option and will have an Unpublish This Version option instead—just as it would on the library's content page for the document.
Unpublishing a Major Version
If you unpublish a major version of a document, it is demoted to a minor version. To see how this works, in the selection menu of the current, published version of the document, select Unpublish This Version. (Note that you could also do this from the item's drop-down menu on the content page.) The document version will not be removed from the top of the list; it will still be the most current version and the one that will be edited from the content page; however, its version number will go from a major whole number to a minor (draft) decimal number, 2.0 to 1.2 in my example (Figure 8.31).
FIGURE 8.30 The drop-down menu for the current version of the document
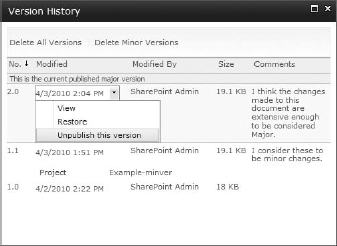
FIGURE 8.31 Unpublishing a published version of a document
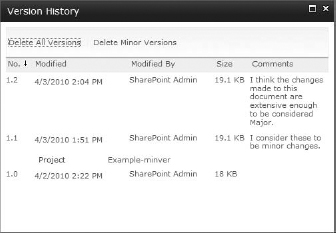
Remember that draft numbered documents can be hidden from users who can only read documents in the library. If content approval is enabled, those allowed to approve items can see a minor version of a document. Similarly, if you publish a minor version of a document to a major version, it will become viewable by those who otherwise couldn't see it in draft form. Keep these things in mind as you manage who sees what in a library.
Back on the Shared Documents content page, if you access the item's drop-down menu, you will see that the Publish A Major Version option is now listed, because we unpublished the current version to a minor version. If we publish the current version of the document, it would be brought back up to version 2.0 once again. However, at this time, let's leave the most recent version of the document in a minor state.
Restoring a Previous Version of a Document
Let's say that the edits for the most recent version of this document are going in the wrong direction and you need the document to be restored to previous edits. To restore a previous version of the document to the top of the version list, you first need to check it out.
Why do you need to check out a document before you restore a previous version of it? It's because you previously set Require Check Out on all document items in the library. So if you are going to roll back all changes to a document and its properties, you need to check out the document.
- In this two-step process, select Check Out from the drop-down menu for the library item you've been working with (my example is uploaded). A dialog box will ask you to confirm that you want to check out the file (don't store a copy in a local drafts folder); click OK. That will simply add a green arrow to the bottom-right side of the content type icon for the document.
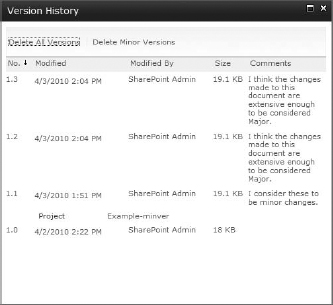
- The next step is to select Version History from the item's drop-down menu. In the Version History box for the document, notice that simply checking out a document causes it to generate a minor version without even opening the file yet (Figure 8.32).
FIGURE 8.32 The checkout created another version before edits.
- To restore a previous version (my example uses 1.1), simply select Restore from the version's drop-down menu. You will be warned that you are going to replace the current version with the selected version. That's fine, so click OK.
- you'll see that the most current version of the document is a copy of the old version 1.1 (it will be the same size), but it will have been renumbered to assume the most current version number available. To verify that it is the correct version (the less current one, the one that does not have the major-version, final changes), click the Time And Date link for it.
That will open the document (with the requisite warning that you are opening a document), and because you checked it out, it will otherwise open without prompting you because it is not set to Read Only. Take a look; the last edits you made in the document should be missing. So if those edits weren't what you wanted, you could continue the document from this point.
- You are just looking and won't be making any changes at this time, so close the document, leave it checked out, and go back to the Version History box.
If you open a version of a document in Word 2007 that isn't the most recent, it will warn you that there are newer versions and try to encourage you to make a copy. Although I appreciate the warning about the version being less than new, I can't understand Microsoft's intentions with the option to make a local copy of the older version of a document. Luckily, this doesn't seem to be default behavior with Word 2010.
Now that you've had some fun, you can return version 1.2 to its rightful place at the top of the Versions list and delete the version you just created. To do that, just select Restore from the drop-down menu for version 1.2. You might be prompted with a warning; click OK if you get one.
That will leave the truly most recent version as the correct one. When you make a previous version of a document the official, most recent version by restoring it, that version sits in limbo, uncertain as to its version number until you assign it. Depending on how you check it in, the version can overwrite the version it replaced, have its own minor version number (leaving its predecessor alone), or be made a major version (again, not overwriting anything).
- To finish off committing to the restored version, check in the document you've been working on by going back to the Library content page and selecting Check In from the item's drop-down menu.
- This will trigger a Check In box with the three options concerning how to handle the current version number for this version (Figure 8.33). In this example, let's publish it as a major version (committing 2.0 as the version number), make a comment, and then click OK to check in the document.
FIGURE 8.33 The Check In page with version options
If you were to go to back to the version history of the document you've been working with, you should be familiar with each version, including the most current major version you just checked in and the original version of the document with which you started. Versions are useful; just remember that you can restore an older version to the current version position, but that doing so doesn't delete the version that was replaced. That version won't be deleted unless you manually do it.
To delete a version, simply go to the version history of the document, and select Delete from the version's drop-down menu. You'll then be prompted with a warning that the version will be sent to the SharePoint end-user Recycle Bin. Click OK, and the version will be deleted. In fact, using the links at the top of the Version History page, you can even delete all minor versions or all versions altogether (except the most current, which can't be deleted from this page).
VERSION LIMITS
Just a word about those limits you set for the maximum number of major and minor versions kept for items in a library. They are not as exact as you might hope. Version history focuses on the major versions and will generally keep only the limit you imposed, plus one (the most recent major version). If you reach beyond that one-over limit, the oldest minor and major versions will be deleted.
As for minor versions, you might think that the second setting for limiting versions directly limits draft versions. It doesn't. Major versions can have up to 511 draft versions apiece. What the draft limitation does is limit the number of major versions that will be allowed to have drafts. Go over that number, and the oldest major version will lose its drafts.
At this point, you've gotten an idea of how versions work, what major (publish) and minor (draft) versions are, and how to manage them. However, the real usefulness of minor versions can be seen when content approval is enabled. Let's take a look at how content approval works and why minor versions are referred to as drafts.
Using Content Approval
Content approval means that new items or new versions of items in a list or library require approval before they can be seen by everyone able to view a list (depending on how it's set up). With a normal list, after content approval is enabled, new items start out with the status of pending. Then a person with the right to approve list or library items can decide to either approve or reject an item and add comments to explain their decision. If an item is approved, it can be viewed by everyone who can read list or library items. If an item is rejected, it remains pending and can be seen only by the administrator, someone who can approve items, and the creator of the item. This means that new items go through the simple process of pending approval and then being either approved and therefore visible to all or rejected and therefore continuing not to be visible to all.
If you use content approval in conjunction with versions in a library, then drafts can come into play (if you enable them). No longer does content approval have just the approval levels of Pending, Rejected, and Approved; in a library with versioning, it has Draft, Pending, Rejected, and Approved.
ENABLING CONTENT APPROVAL
When you enable content approval, major and minor versions work differently than they do without it. When a document is checked in as a minor version, its approval status is Draft. If that document is published as a major version, its status becomes Pending. Only Pending versions can be approved; you cannot approve a minor version. When that Pending document is approved, that's it. It's approved, and everyone can finally see it.
If a major version is rejected, it is indicated as such and treated as if it is still pending, meaning that others can't see that version of the document, and it is still not editable by anyone but the owner or people allowed to view draft documents.
SEEKING APPROVAL
The approval process may sound a little complicated, but it works like this in practice: when you are jotting down ideas for a document and creating a really rough draft of what you have in mind, you might want to save a copy to the library for safekeeping. If you don't want everyone to read it, you can save it as a minor version. That makes it a draft in the library that is not ready for approval yet and not visible to average contributors of the list—if you set draft item security correctly.
You keep working on it, fleshing it out. You then save your changes to the library again, but this time you save the changes as a major version. Now they are pending approval, so the people on your staff who can approve items in the library are aware that they need to look at the document now.
Then one of them reads the pending document and either approves it for everyone to work on or rejects it from general consumption with a comment so you can see what you need to fix in order for the document to be ready to be contributed to.
Every time a user opens the document and edits it, a new version is saved, in which they can decide whether their changes are minor or major, and the approval process starts again.
To enable content approval on a library, follow these steps:
- Go to that library's content page; click Library Settings in the Library ribbon.
- On the Document Library Settings page, click the Versioning Settings link in the General Settings category.
The Versioning Settings page will appear (Figure 8.34). The first section, Content Approval, is where you choose Yes or No to require content approval for submitted items. The Draft Item Security section is where you can configure who can see a draft or unapproved document item.
- To configure your Content Approval settings on this page, click Yes in the Content Approval section.
- In the Draft Item Security section, select Only Users Who Can Approve Items (And The Author Of The Item) for this example.
- All other settings on this page have already been configured, so click OK. Go back to the Shared Document library's content page.
FIGURE 8.34 Setting the Content Approval and Draft Item Security settings
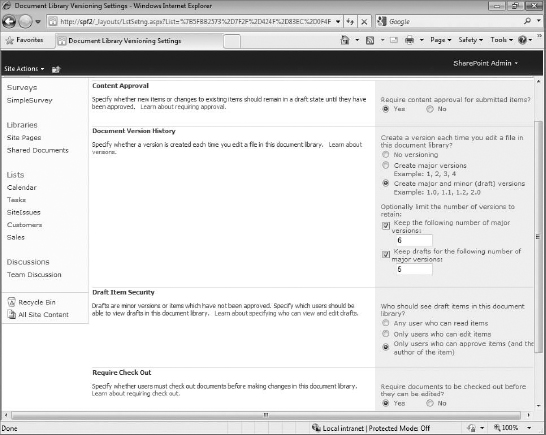
The Shared Documents library should now be set to require content approval. There is a new column in the All Documents view indicating the approval status of the items, and two new views (Approve/Reject Items and My Submissions) to help you keep track of approved items. Any item that was a major version in the library prior to enabling content approval is automatically approved—because everyone has been looking at it anyway. Minor items are considered drafts.
Let's create a new document item and see how content approval works. In this demonstration, you are going to create the document as a SharePoint site collection administrator, so make sure that is how you are logged in now. Later you can log in to a workstation as a normal user with edit permissions on the library to see what that user would see, but you will be working in the library with administrative privileges.
- Click the New Document button in the Documents ribbon to create a new document.
- You might get a Warning dialog box reminding you which document template you are opening. You can safely ignore the warning about the template, and click OK.
You might be prompted for your SharePoint username and password because Word needs to know who you are in case you want to use the Shared Workspace task pane. This occurs particularly if you are logged into SharePoint with an account that doesn't match the one with which you logged into the computer.
- When the document opens, enter a relevant value in the Project field in the Document information panel.
- In the document, enter some sample text.
- When you finish the document, click Save, name the document (my example uses approvaltest), and then close Word.
- Check in the document as a minor version, enter a comment (my comment is “keeping it minor”), do not keep the document checked out, and click OK.
As you can see in Figure 8.35, the new document is in the Shared Documents library with its approval status listed as Draft. All other documents are shown as approved because their most current versions were major versions (and they were already visible) when content approval was enabled.
FIGURE 8.35 The new draft document in the Shared Documents library with content approval enabled
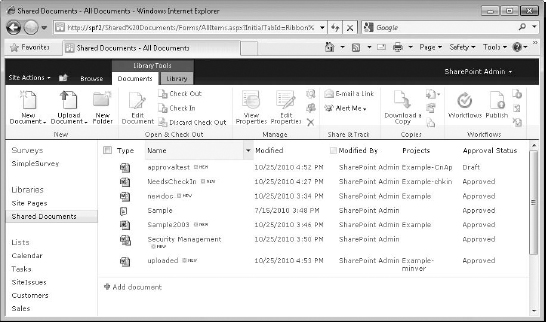
You are able to see that the new document is a draft version because you own the document and you have approval rights. However, if you happen to log on to a different workstation using a standard user account with edit permissions and look at the Shared Documents library, you will be unable to see the new document. It will not show up in the user's view of the library because it is a draft (minor) version and not approved.
Let's see what can be done with the new document as far as content approval and versioning. (Of course, you need to be logged in as someone allowed to do content approval.)
In the drop-down menu for the new document, you have the standard options—nothing that indicates content approval is enabled. As you can see in Figure 8.36, Approve/Reject is not listed for this draft document because only major versions are allowed to be approved or rejected.
ELEVATING A MINOR VERSION TO A MAJOR VERSION
If you elevate this draft version of a document to a major version, the approval status will change from Draft to Pending, which will allow you to approve or reject a document.
- In the drop-down menu for the new document, select Publish A Major Version. A Publish Major Version page will appear. As you can see in Figure 8.37, the Comment box contains the comments you made when you created the version, so you can add to them if you'd like before making this minor version a major version. You don't get a new blank Comment box, because you are not creating a new version of the document; there were no changes made to it or its properties. You are just changing the version number.
FIGURE 8.36 The options available for a draft version of a document
FIGURE 8.37 The Publish Major Version dialog box
- Add to the comment about the change in version if you'd like, and click OK. On the library's content page, you can see that the new document now has Pending approval status (Figure 8.38).
- Check out the item's drop-down menu; it will have two new options. Now that the current version of the document item is a major one, you can approve/reject the item or cancel approval (Figure 8.39).
- Before you change the approval status of this version of the document, verify that there is only one version of the document. In the item's drop-down menu, select Version History (Figure 8.40).
FIGURE 8.38 The approval status change for the new document
FIGURE 8.39 Approve/Reject is now available for the document item.
FIGURE 8.40 Version of pending document
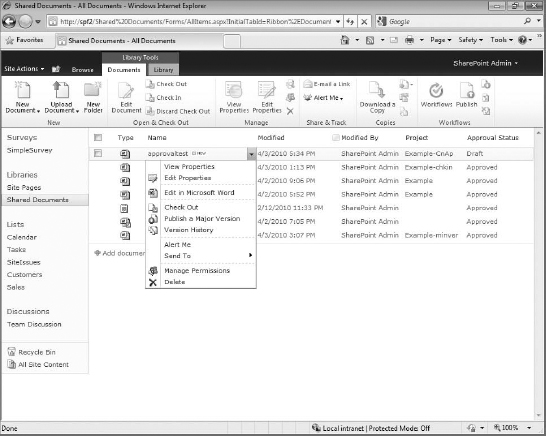


As you can see in Figure 8.40, there is only one version for this document, and the version number is 0.1. Although you might think that publishing a document to a major version may change the version, with content approval enabled it doesn't. Publishing a document only moves the document from a Draft state to a Pending approval state (you can see that its Approval Status setting is Pending in the Version History box). If you go from draft to major or even save a document as a major version, the version will not actually change to a whole number until it is approved.
Remember also that this is exactly what drives draft item security. People who are not allowed to see draft versions cannot see a version of a document if it is not approved. Pending, Rejected, or Draft items are not viewable by anyone who can't approve items and isn't the creator of the items with our current draft item security setting. If the version is not a whole number and draft item security is set to allow only authors and approvers to see a draft version, then users will not be able to access or even know about a draft version of a document until it is made a major version and then approved. This process is designed to help prevent a document from exposing data that might still be speculation or poorly worded and revealing it to less-informed, less-qualified, and possibly less-secure library users.
WHAT DO YOU MEAN IT'S ALREADY CHECKED OUT?!
There is an interesting glitch in the way the library displays versions when content approval is enabled and Draft Item Security is set to allow only those who can approve items to view drafts. If a document was approved in the past, even if its current version is in a draft stage, that past version will be displayed to all users as Approved. Users may be tempted to click the document so they can edit it.
When they do, the document might fail to open (depending on the version of Word you are using) with a clear error.
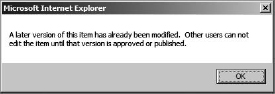
In other cases (say, with Word 2010), the user might be able to open it, but it will unexpectedly be read-only (even if they checked it out before opening it), and they will not see the latest version of the document but the previous, approved one. Further, there will be a warning saying the document is checked out to someone else, even if they just checked it out themselves.
In other words, with Draft Security set to allow only the author or approvers to see draft items, a new document that is in a draft state and has never been approved will be completely invisible to users who don't have the right to approve items (or are not the item creator) until the item is approved and suddenly appears in the library. However, if a previous version of the document was ever approved, the document will not be invisible. In fact, it will not correctly display its status (Pending, Rejected, or Draft) to nonapproving users because they are not supposed to see the status. All they will see, mistakenly, is the approved version of the document listed.
This is unfortunate. It can make trying to figure out what can be edited and what can't be edited very frustrating. One way around this problem is to let users who can edit items see draft versions of documents, so they at least know when a document's current version is a draft. Just remember, that means they can access it too.
Now you know that a minor version of a document is considered a draft and cannot be approved. Only versions waiting to be major can be approved—or rejected for that matter. Most people edit a document several times, save the changes as minor versions, and then when they are comfortable, either check in their final changes as a major version or take their most current minor version and publish it to a major version. What can confuse people is the fact that if they indicate a version should be major, all that does in a content approval–enabled library is change its status to Pending, meaning the document is going to major as soon as it is approved.
To approve a document item that is pending, follow these steps:
- In the document item's drop-down menu, select Approve/Reject.
ANOTHER WAY TO APPROVE/REJECT
You can also approve/reject a version by viewing a document item's properties and clicking the Approve/Reject button in the ribbon bar. You can do basically anything in the item drop-down menu that you can do in the ribbon bar for the properties view.
- The Approve/Reject box (Figure 8.41) has three options: Approved, Rejected, and Pending (the current state). To approve this version, select Approved, and enter some text in the comment box. Click OK.
FIGURE 8.41 The Approve/Reject box

On the content page for the Shared Documents library, the document (approvaltest in my example) now shows Approved in the Approval Status field. If you were to log in to a workstation as an ordinary site member and go to the Shared Documents library, it would finally be visible to that user.
WHAT IF YOU WANT TO CHANGE YOUR MIND?
What do you do if you changed a document version from minor to major by mistake? If you checked in a document as a major version, but you meant it to be minor, can you correct the error? You can kick it back down to Draft status by clicking Cancel Approval. That basically unpublishes the version of the document and returns it to a minor version number and draft status.
You know what versions are, you know what content approval is, and, more importantly, you know how they work together. You should have some idea as to how to use these features in your business or whether they should be used at all. Eventually though, you are going to outgrow the existing Shared Documents library. To prepare for that eventuality, let's create our own document library so we can customize the library's template and explore content types.
Creating a Document Library
Because document libraries are so useful and so versatile, chances are good that you are going to need to create more than one. Keep in mind that although you can upload any allowed file type to a library, libraries can be created to focus on a particular type of file, custom template, or group of content types. Libraries have also evolved to be used to focus on a particular part of the document management process. Because copies of files can be sent from one library to another, a document can start in a library focused on writing and editing, and a copy can then be sent to a library focused on content approval by the legal department and then on to the library used for preparing documents for publication. Finally, a copy can be sent to an archive for backup, while the originals are all removed from the libraries earlier in the process. Regardless of how libraries fit into the scheme of your collaborative needs, it's likely you'll need to know how to create more than one.
Creating a library is just like creating any other list:
- Click the Site Action menu, and select More Options… from the drop-down menu (or you can click one of the headings in the Quick Launch bar and then click Create in the All Site Content page).
- On the Create page, in the Library category, select Document Library.
SO MUCH FOR IMPROVING THE CREATION EXPERIENCE
For creating lists and libraries, I am using a machine with Silverlight not installed.
The problem is that if you have Silverlight installed and you want to create a new library, it will not display the option to enable incoming email in the New Library interface. That setting is simply missing. If you want to enable that feature easily while creating the library (or list), do it from the server or a non-Silverlight workstation.
If you have Silverlight installed, the New page is a box rather than a page (and the Create page is different as well, as discussed in Chapter 6). After selecting Document Library from the Library category in the Create box, you must click the More Options button below the library name field in order to get the necessary settings displayed here (otherwise you won't have the option to set anything but the name, not even a description):

I am not really a fan of the Silverlight version of the New page for that reason. Be prepared for identifying Silverlight-influenced interfaces, because what might be considered an “improved experience” by Microsoft may actually be less useful.
- On the New page, in the Name And Description section, give the new library a name and description. I've entered CompanyLibrary as the name and Official company documents and materials as the description for my example (Figure 8.42).
FIGURE 8.42 The new document library settings
SHORT NAMES ARE BEST
Keep in mind that you should keep a list or library name short if you can, because the library name (like any list) will be part of its URL. URLs for SharePoint can have a maximum of 260 characters. You'll be amazed how quickly that maximum can be reached. Avoid spaces if you can. Remember, if you create any views, keep their names short as well. You can go back later and add spaces to the name for readability.
- In the Navigation section, you will be offered the choice of whether to display a link for this library on the Quick Launch bar; keep the default setting of Yes.
- In the Incoming E-mail section, you have the option to enable incoming email for this library. Most libraries can receive files attached to email and translate them into document library items. (Note that incoming email cannot be enabled for any list or library on a site if it is not first configured at Central Administration.)
This library should be email-enabled, so select Yes to allow this document library to receive email. This setting is useful for those busy employees who may have their email up but may not want to browse, log in, and navigate to the library to upload a file. They can simply email to the library with the document attached, and it will be added to the library automatically.
- My example uses the email alias companylib for the library.
You can also conveniently enable Document Versioning while creating a document library so it is ready to start versioning before the first document is added.
- In the Document Version History section, select Yes to create a new version each time a document is edited in the library.
The Document Template section contains powerful and sometimes overlooked settings for a document library. For one thing, it is unfortunately named. It isn't just for documents. In Figure 8.43, you can see that there are more templates to base a document library on than one that just makes documents. Yes, you can choose a Word document (either 97/2003 compatible or 2007/2010 compatible), but you can also choose a PowerPoint presentation, an Excel spreadsheet, OneNote sections, and even SharePoint Designer web pages. You can also use libraries for basic web pages and web part pages. (The library's ability to have a template for web pages helps make wiki libraries possible.)
- Choose Microsoft Word Document in the Document Templates drop-down list. This will apply a Word 2007/2010 .dotx template to the library.
- Click Create to finish. You should end up on the content page of your new document library. In the Quick Launch bar in Figure 8.43, you can see that CompanyLibrary is listed. The address bar indicates that you are on the CompanyLibrary/Forms/AllItems.aspx page (there may be some extra URL query string characters after it, but the page is AllItems.aspx). This is the default view for the library.
FIGURE 8.43 The new CompanyLibrary content page
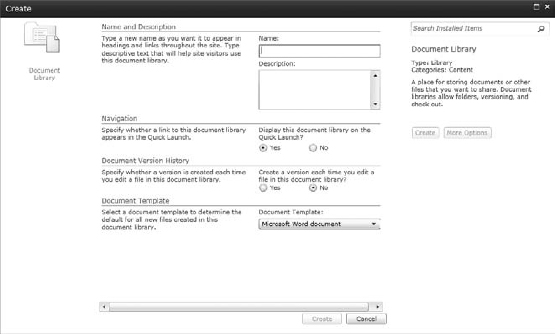


Replacing a Library's Template with an Existing Template
Before you create any documents in this library, let's replace that blank Word template with one of your own. In this example, you are going to replace it with an existing company letterhead template that was made elsewhere. Two easy phases are involved in using your own template for a library. The first phase adds the template to the Forms folder in the library. The second phase configures the template setting for the library to point to the new template.
- Make sure you have the template file you want to use. Then go to the Library ribbon in the content page of the library, and click the Open With Windows Explorer button to use Windows Explorer to display your library's contents.
- Because you are an administrator, you are able to see the Forms folder in the library. Open this folder, which is the default location for the library's template.
- Drag and drop (or copy and paste) your existing template into the Forms folder. If you can't see the Forms folder, try setting your Windows Explorer folder options to show hidden folders. The new template should appear in the Forms folder (see Figure 8.44). My example uses a template called dem0tek_red.
FIGURE 8.44 A new template in the Forms folder
- Now that the template is in the library's Forms folder, you can configure the library to use it. Click the Library Settings button in the Library ribbon.
- On the Document Library Settings page, select Advanced Settings in the General Settings category.
Although we are only going to change the document template at this time, take a quick look at the advanced settings for a document library:
Content Types By default, content types are not enabled on document libraries. This means the library by default is associated with one kind of library item and one particular template file, such as PowerPoint presentations, Excel workbooks, or Word documents. When you click the New button in a library associated with one template, it tries to open a file based on its associated template.
If you want a library to be able to create, edit, and store different kinds of library items and/or files, enable content types. When you do this, you can choose to have several kinds of library items, each associated with its own template and using its own fields. This means the library stops being associated with one template (and the Document Template settings gray out) and leaves the template association to the content types instead.
OFFICE FILES ARE A MUST
Unless you've configured SharePoint to support Office Web Apps, if you don't have the necessary Office program installed on your computer, SharePoint will fail to open that file (or if it can open it, say in WordPad, it will have problems editing and saving it as a version of the original file). You cannot edit a file from a library without the appropriate program running locally. You can save the file, open it in a program that will work (but is not recognized by SharePoint as a Microsoft Office product) to edit it, save the file, and then upload it to the library again. However, SharePoint, being a Microsoft product, is specifically designed to work with other Microsoft products.
Document Template This is the section with which you are going to be working. Here you can specify the path to the template you would like to use for this library. Make sure the path is accessible to all users (and in our case it is, because we put the template in the Forms folder of the library).
Opening Documents In The Browser Because some files can be displayed in either the browser or the client application, this setting lets you specify whether you want the item to always display in the browser or open its appropriate application when applicable. For this version of SharePoint, there is an added reason to open documents in the browser—Office Web Apps. This feature can open documents in the browser with a subset of the Office ribbon bar buttons for limited use. It is available only at the server level and requires Office 2010 client licenses (depending on the version). The default is to open documents in the browser. But if Office Web Apps is not installed on the server, it will default to opening documents in the client application.
Custom Send To Destination Because you can send a copy of a file from one library to another, you can specify a default library to send to; users will be able to select this easily in the item selection menu. If the library they are working in has an archive library or a legal department library that the document needs to be passed to when it's done, it will be displayed on the document's Send To menu. Send To keeps tabs on copied documents and gives you the option to update the copy in a new library when the document is checked in with changes in the original library. The destination name is what will appear in the drop-down, and the URL is actually the web address of the other library.
Folders Some users feel more comfortable if they can find their files in folders. Some companies need to have more structure than a mere flat list or library to store their data. When you have huge libraries and lists (around 10,000 items), it helps to break up the view of the data by storing some of it in folders within the list or library. Libraries have folders enabled by default. They can be created (if you have the permissions to) by clicking the down arrow of the New button and selecting New Folder from the drop-down menu. You can disable this feature if you'd like and enable it later if necessary.
Search This option is set to Yes by default. It lets you specify whether the library should be searchable or whether it should be exempt from being indexed by Search and available for searching. Keep in mind that if someone does not have the right to view the library, they cannot search that library's contents. Search is aware of access control, and it will not display results to a user that they are not allowed to see.
Offline Client Availability This option specifies whether this library allows users to download items for offline use. This particularly relates to the new SharePoint Workspace available with certain versions of Office 2010. The default is Yes.
Site Assets Library One of the interesting offshoots of this version of SharePoint's use of wiki pages is that it comes with the option to specifically distinguish libraries on the site as site asset libraries, to be used to store things uploaded to wiki pages such as the home page. There is already a Site Assets library for the site, so it stands to reason that the default for this is No.
Datasheet This option is used to disable Datasheet view if you don't want users doing bulk data entry in the library. It is enabled by default.
Dialogs Most forms used by libraries and lists can open either in dialog boxes or as classic SharePoint form pages. This option is enabled by default, and when it is, forms such as View, Edit, and New open in those boxes that black out the page behind them. If you would rather the forms did not open in those boxes, disable this setting.
Now that you have a good idea of the settings available on this page, let's finish setting up the new template for this library.
- To do that, go to the Document Template section of the Advanced Settings page. In the Document Template field, change the filename for the template from Template.dotx to the filename of the template you put in the Forms folder. My example is dem0tek_red.dotx (Figure 8.45) so the field should have the path CompanyLibrary/Forms/dem0tek_red.dotx. Keep all other default settings as they are, and click OK. That will take you back to the Document Library Settings page.
- To test your new template for the library, click the library's name in the title breadcrumb for this page to get back to the content page.
- On the library's content page, click the New Document button in the Documents ribbon to create a new document based on your template. If it prompts you about opening a file, it is referring to your template file. Click OK.
- My example uses Dem0tek letterhead as the template (Figure 8.46). Enter some text into your new document. Save the document, naming it as you want (my example is Congratulations). Close Word. Remember that you enabled versioning when you created the library. Also keep in mind that you didn't specify major or minor versions, require checkout, or require content approval.
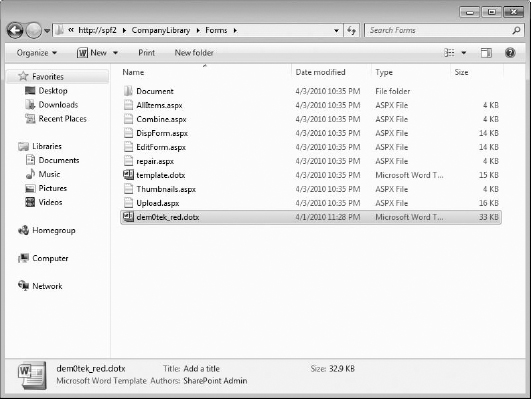
On the library's content page, you'll see your new document based on the custom template you assigned to the library.
Now you have a library dedicated to creating Word documents using a custom template. It is useful to have a library that a user can simply go to, click the New Document button, and create a document using a particular template.
FIGURE 8.45 Assigning a custom document template
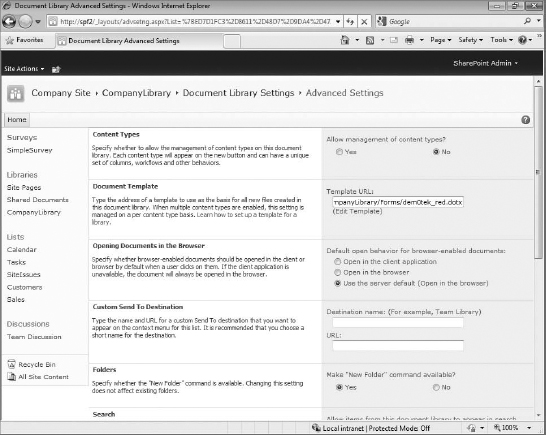
FIGURE 8.46 Creating a new document using a custom library template

However, what if you needed a document library that supported more than one kind of document template? Sure, you can upload multiple different types of documents, but I am talking about having multiple types of New Document options under the button so users will have the option to choose between a set of templates you control for that library. What I'm talking about here is content types, and libraries can easily have more than one.
CUSTOMIZE THE DEFAULT TEMPLATE
What do you do if you don't have an existing template but would like to customize the blank template for the library? Click the Edit Template link under the Document Template field in the Advanced Settings page of a library. This will open the template in its corresponding Office product, where you can customize it to your heart's content. When you are done, save it. The changes will be saved to the template file for the library in the library's Forms folder. This means when you next use the New button in the library, it will create a document from your new and improved template.
Using Content Types
Content types are basically templates for standard list or library items. The item properties you can specify in a content type include the fields of the item, the template that might be associated with it, and even what kind of workflow works with that item.
Content types are stored in a gallery for the entire site collection. So if you create a content type to be used for a particular library, it's actually available to be used in a different list or library elsewhere in the collection.
Because content types are general item templates available to the whole site collection, the fields they use must be available to the whole site collection as well. Therefore, if you want to add a field to a content type, it must be available, or created, as a site column (which you worked with in Chapter 7, “Creating Lists”). Site columns are available from their own gallery and can be used anywhere in the site collection.
Earlier, I mentioned that you can define a library by its template. This means that when you click the New button, a library will always create new documents that use its associated template. However, content types allow a library (or list) to have more than one template or list item type available under the New button.
A good example of this would be a library that contained documents for a project and also presentations for that project. Because the library would be focused on the materials necessary for the project overall, it would need to contain templates for both the written project documentation (Word 2010) and the project slides (PowerPoint 2010).
To create this scenario, you enable content types in the library's properties, which will disable the single template association. Then add the content types appropriate for your library. Many of the content types for existing default list and library items are already in the content types gallery. So, it is easy to use an existing content type as a base and customize it a little to work in your new list or library.
First, you should create a new document library that will hold your project work. Next, you will enable content types on that library and then choose among the existing content types to make available two kinds of templates for the library.
- To create a new document library, go to Site Actions at the top left of the page, and select New Document Library from the drop-down menu.
- On the New page, fill in the fields necessary to create the new library. My example uses the library name Projects. Add a description, enable incoming email (the alias in my case will be projects), and enable versioning. It doesn't matter which template you select during the library setup, because it will be disabled when you enable content types. Click Create when configuration is done.
Enabling Content Types
To have more than one item type for a library and therefore have the opportunity to associate more than one template with the library, you must enable content types. To do so, follow these steps:
- Go to the Library ribbon, and click Library Settings.
- On the Document Library Settings page, click Advanced Settings. On the Advanced Settings page, select Yes in the Content Types section. Click OK to finish.
- On the Document Library Settings page, you can see that the Content Types section already has one item: Document. This is the default library item, which in this case is a library item with a Word 2007/2010 template associated with it. We will be, conveniently, keeping this library item.
Also notice in Figure 8.47 that there is a brief description of content types under the section title. Basically, the library can now contain different list item types complete with their own associated file templates, fields, workflows, and more. This example is a simple way to introduce you to the concept in case it is something you might need. All lists and libraries have items (or more precisely, records), but with content types, they can have more than one kind of item if necessary.
FOLDERS AS CONTENT TYPES
To make things more complicated, folders are considered items in a list or library, which means their properties can be modified and they can be used as content types. This is how they work in discussion and task lists. There are online articles and books dedicated to working with lists and libraries and integrating them with Office. They go into more detail about content types and folders than we can here.
Although you already have a nice, default, blank template for your documentation files, you need to add a template for project-specific slides. You should use a customized template for the project's PowerPoint presentations so users can get started with the correct slide layout when they are working with this project library.
FIGURE 8.47 The Content Types section
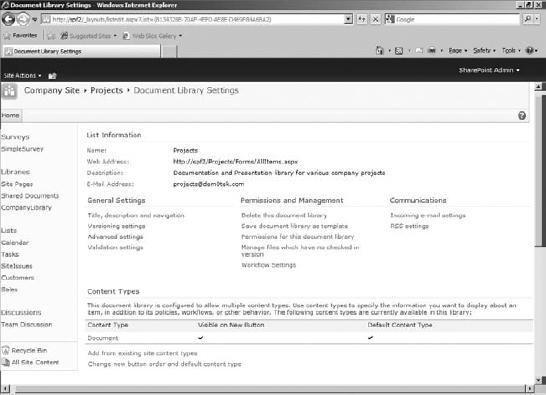
Creating a New Content Type
When you create a new content type, it needs to have a parent content type to be based upon. So when you create a new content type, say for a document library, you can use the default document item content type as the base. Then you can configure it, for example by specifying particular fields or the template that will be associated with it to make it unique. Once a content type is created, it can become a base for other new content types if necessary.
Parent content types available by default in SharePoint fall under certain headings:
Custom Content Types This is the content type group where content types that you create are listed, unless you specify otherwise.
Document Content Types These content types are what are likely to be stored in a document library, such as a document (the default content type for a library, which contains default fields and is associated with the template assigned to the library), web page, picture, and even master page. There is also the Link to a Document content type, which is used to link to a file in a different location, a la Send To linking.
Folder Content Types This list of content types is short. There is the content type associated with discussions, the default for simply creating a new folder, and now also a Summary Task folder type.
Group Work Content Types The Group Work site template, new in this version of SharePoint, has its own unique lists, calendars, libraries, and, correspondingly, its own content types. They are not necessarily meant to be used outside of that site.
List Content Types The content types in this group are the standard items applied to most default lists, such as Contacts, Announcement, Issues, and Tasks. Included is the option Item, which is used in custom lists as the default for list items and enforces the Title field requirement.
Special Content Types There is only one content type listed in this group by default, Unknown. This content type allows libraries to accept any file that is uploaded to the library regardless of file type (unless it is blocked administratively). If you can't upload files to the library, but you were able to before, make certain that this content type was not removed from the library's settings.
In this case, you are going to need to create a content type, based on the standard document library item, but associate it with a custom PowerPoint template. To do this, you'll need to go to the site collection's content type gallery.
To create a new content type, follow these steps:
- Go to the top of any site page, click Site Actions, and then select Site Settings.
- On the Site Settings page, select Site Content Types from the Galleries category (Figure 8.48). As with the Site Columns page, you can see that the site content types are organized in groups.
FIGURE 8.48 The Site Content Types Gallery
- You can look through this list and see that there doesn't seem to be a content type available for creating PowerPoint presentations. Therefore, you are going to have to create one yourself. To create the new content type, click Create at the top of the content area of the page.
When you create a content type, you generally base it on a parent or an existing content type to save time. In this case, you just need a standard document library item but with a different template.
- To that end, on the New Site Content Type page (which opened when you clicked Create), in the Name and Description section, name the new content type (ProjectSlides in my example) and enter a description, such as Document content type to be associated with a PowerPoint template.
- Under Parent Content Type, you can see that, in the Select Parent Content Type From field, there are several groups of base content types listed. Because you are working with a document library, you should choose Document Content Types. Because you chose that group, in the Parent Content Type field below you can choose Document. This creates an association with the preferred template, with the same fields as the content type that is the default for the library.
- You can decide whether you want to list your new content type under the general Group heading Custom Content Types or create one yourself. My example uses the default. If all the settings are good, click OK to create your new content type.
This will take you to the new content type's settings page (Figure 8.49). There you can change the name and description, set up workflows you want to use with this content type, delete the content type, or configure its advanced settings, which is what you are going to modify.
FIGURE 8.49 The content type's settings page
- Click Advanced Settings. The content type's Advanced Settings page has three sections: Document Template, Read Only, and Update Sites And Lists (see Figure 8.50 for my example).
Document Template This section is where you specify the template that will be associated with this content type. This is a convenient place for you to upload the template to SharePoint that will be used for this content type. Alternatively, if the document template already exists in another library, you can specify its URL in this section.
FIGURE 8.50 The content type's Advanced Settings page
Read Only This section allows you to restrict the editing of the content type's settings. If you do want the content type to be read-only and unmodifiable, keep in mind that this setting can be changed by someone with the right to edit content types.
SOME TIPS ABOUT THAT READ ONLY SETTING
If a content type is set to Read Only, on the content type's settings page all configuration settings you might have wanted to use disappear except for the Advanced Settings page (the page you need to be able to access to disable Read Only). In addition, if you do set a content type to Read Only and change your mind, disabling Read Only might disconnect any workflows that might be associated with that content type. Be sure to specify the workflow association again after disabling Read Only.
Update Sites And Lists Settings in this section can be particularly useful. As you know, you create new content types by basing them on existing content types. What you might not have considered is that SharePoint remembers the connection. And if you change a parent content type, those changes can trickle down to all content types based on that parent. It is in this section that you can choose to allow changes made to this content type to be inherited by all content types based on it (the default), or not.
- For the Document Template section, I am going to upload a PowerPoint template, dem0tek.potx, from my local drive. Keep the defaults for the Read Only and Update Sites And Lists sections, and click OK to finish the advanced settings for this content type.
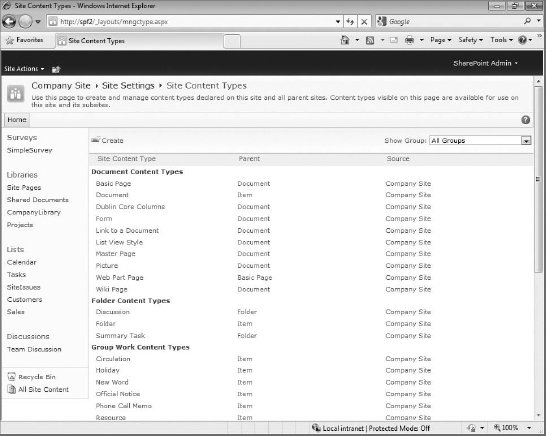

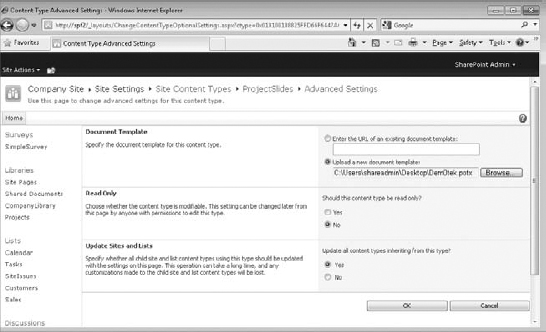
The advanced settings are the only thing changing at this time for this content type; however, keep in mind that you can make changes at any time, including adding more fields if you'd like from either existing site columns or site columns that you create yourself.
Now that you have created a new content type, you can apply it to your library:
- Go to the new library you created and enabled content types for (my example is Projects) by clicking the library name in the Quick Launch bar.
- In the library, click Library Settings in the Library ribbon.
- On the Document Library Settings page, in the Content Types section, click Add From Existing Content Types.
- In the Add Content Types page, in the Select Content Types From field, choose the Custom Content Types group—because that's where we put the new content type. If yours is in a different group, choose that one.
- In the Available Site Content Types box, select the new content type (my example is ProjectSlides, as you can see in Figure 8.51), and add it to the Content Types To Add box. Then click OK.
FIGURE 8.51 Adding the new content type to the library
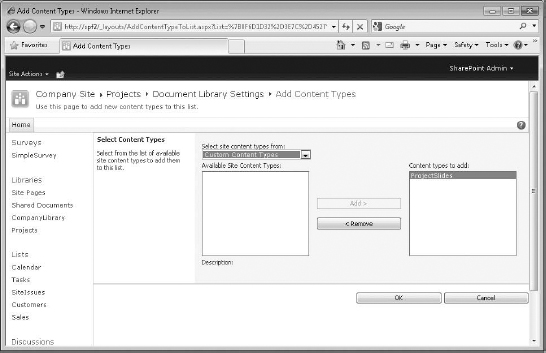
You should now be back on the Customize page for the library. In Figure 8.52, you can see two content types for the library. The default is the document type, and they are both visible under the New button. You could change the order of the content types under the button, making the new one the default. However, I am fine with the document being the default, because that will probably be the template users will use most often.
Now that the library has its two different templates associated with it, you can use your content types for the library:
- Go to the library's content page by clicking its name in the title breadcrumb or in the Quick Launch bar.
- Back on the content page of the library, click the down arrow next to the New Document button in the Documents ribbon. In Figure 8.53, you can see that two items are now listed. The first item, Document, will be the default if you click New without going to the down arrow.
FIGURE 8.52 Two content types for the new library
FIGURE 8.53 Two template options under the New Document button
- To see this for yourself, click away from the drop-down menu, and then click the New Document button. SharePoint will use the default blank document template for Word.
- Add some text, save, and close. Name the document (my example is Firstproject). That should put your new document in the library.
- To use the PowerPoint template, click the down arrow next to the New Document button, and select the new content type (my example is called ProjectSlides) in the drop-down menu. This will open a presentation in PowerPoint using the template you uploaded.
- Create some slides, and enter whatever text you'd like. Then save the file (my example is Firstpresentation), and close PowerPoint.


On the content page of the library, you can see that two documents are stored there (Figure 8.54). In the Type column, notice that the two file types are different. Firstproject is a Word document, and firstpresentation is a PowerPoint file.
FIGURE 8.54 Two different content type items in the library
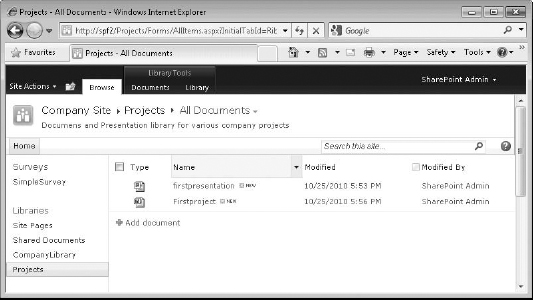
Because these content types are based on the same parent (Document), they have the same fields. If you want to add fields to the library, they can be added to both content types as if they were one kind of library item. While you are creating the field, simply select Add To All Content Types at the bottom of the Create Column page, as you can see in my example of a new field for Projects in Figure 8.55. Keep in mind that this will affect only the content types applied to this library. The change will not propagate up to the content types stored in the content types gallery.
FIGURE 8.55 Adding a new field to all content types on the Create Column page
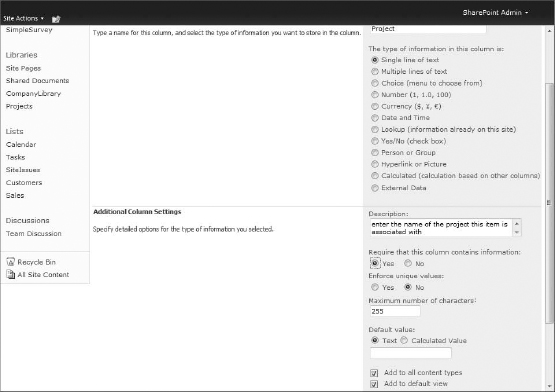
If you change the template used by a content type in a library, you may have to relink documents that were using the template to reflect the change. Otherwise, they may not open properly when users try to read or edit the document. If you have changed a template and are now having problems opening files in a library, there is a repair page available to relink the file to its template.
You can see the page, in the Forms folder, in Explorer view. To open it, just append the filename to the end of the URL for the library. In other words, instead of AllItems.aspx, the path should end in repair.aspx. In my case, that would be http://spf2/Projects/Forms/repair.aspx.
This will open the Repair page for that library, in which you can select the file that needs to be relinked to its template. The library will check the file for its content type and then check that content type's template. If the URL pointer for that file's template doesn't match the updated one for the content type, the file's pointer will be changed to match. That should fix the problem. Remember, repair.aspx is your friend.
Now you have a library dedicated to creating Word documents using a custom template, as well as a library used to store custom documents and presentations. After you've worked on the documents in these libraries, you might want to send a copy to another library to be archived or viewed by a larger group of people. So, let's take a look at what Send To can offer to make managing files between libraries easier.
REPORT BUILDER CONTENT TYPES
Those of you who have Reporting Services configured for SharePoint in your environment may have heard that you can create a Reporting Services library to generate and store reports that pull data from databases on the SQL 2008 R2 server.
You might have looked for a Reporting Services library template. Sadly, there isn't one. That is because, when Reporting Services is configured, all it does is add three content types to the site collection (if the Reporting Services feature is activated).
To create a library that will generate reports, you first create a document library. Then you enable content types for that library. Then, select Add From Existing Content Types on the library's settings page, and select the Report Builder Report content type, as well as the additional Report Data Source and Report Builder Model content types (they allow you to create new data sources and report builder models in the library, as well as just reports).
Remember that Report Builder 3.0 is the product needed to create Reporting Services reports. This product is to Report Server what SharePoint Designer is to SharePoint. Report Builder 3.0 is free and creates reports very much like Crystal Reports does. When the user clicks to create a new Report Builder report (data source or model, or to edit an existing one), Report Builder 3.0 should be the tool that opens. If the user doesn't have Report Builder 3.0 installed locally, when they use the New Document button to create a new Report Builder report, data source, or model, it will trigger a prompt to install the software. This is because it is part of SQL Server 2008 R2's Report Server implementation as a ClickOnce application, so it will install automatically if the product isn't already available. This is convenient, because you don't need to worry about preinstalling the software so users can use the library. If they have Report Builder 3.0 already on their computer, when they choose to create a new report, data source, or model, it will open Report Builder 3.0.
Using Send To
Earlier in this chapter, you saw that SharePoint has a Send To feature that makes it convenient to copy a file from one library to another. When you're working with a great many documents, using one library to store everything might not be a good idea. The number of finished documents can far exceed the number of documents in progress. Because of this, people often have archive libraries, where finished projects can be moved to simplify the organization of the primary library. From that idea also spring things such as a legal library, where documents can be copied to after editing to be checked by the legal department. Sending documents from one library to another in some environments is a natural part of the process. Send To was designed to address this process.
SEND TO CAPABILITIES
Send To can send documents to other libraries on a site, to a different library somewhere in the site collection, or to a library in a different web application if you are using Office 2007 or newer (other Office products aren't web application-aware).
In a document item's drop-down menu, Send To has options that correspond to the buttons in the Copies section of the Documents ribbon:
Other Location This option allows you to send a copy of a document from one library to another. You can specify a default location for this option to encourage users to send finished copies to a particular library as part of a document management process.
Email A Link You can email a link to the document to someone if you'd like them to read or edit the document.
Create Document Workspace Like its predecessors, SharePoint Foundation offers the option to create a workspace subsite to work on a particular document. Creating a document workspace will be covered in Chapter 9, “Sites, Subsites, and Workspaces.”
Download A Copy This option simply lets you quickly download a copy of a document to your machine in case you may be going offline.
The most useful and most frequently used option when you're using Send To is sending a copy of a document to another library (Other Location).
You can send a copy of a document from one library to another using two different methods: linked or unlinked. A linked copy can be updated with whatever changes were checked in from the originating document. That way, the archived copy does not become obsolete or out of sync with the original. An unlinked copy is completely independent from the original and will not be changed when the original changes.
SharePoint lets you specify whether a copy should be linked or unlinked by choosing, oddly enough, whether you can prompt for updates. This option is unfortunately worded. SharePoint doesn't actually prompt you to update copies of a document after you check it in. This inconsistency makes the feature seem unfinished somehow. For now, if you want a document to send its changes to a copy that might be stored in a different library, you need to remember to force it yourself.
Microsoft intends this option to be used to send a finished copy of a document to a different library to be archived. That means the destination library should not be actively editing the document. To this end, the destination or target library for the document copy must not require check out, or updating from the original document will not work.
As an example, let's send a copy of a document from the Shared Documents library to the CompanyLibrary as a reference for future documents and keep it linked. That way, when you change the document in the originating library (Shared Documents), you can update the copy in the destination library (CompanyLibrary).
ELUSIVE “UPDATE COPIES”
SharePoint will offer to let you update copies if major and minor versioning are enabled and you are publishing a document to a major version. At that point, it will display a section in the dialog box offering to update copies.
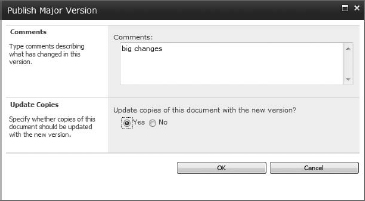
You will not be prompted to update copies when you save and check in a document, but it will offer to update copies if you manually check the document in after the document changes have been saved to the library.

But that's the closest it gets to a prompt for updates. If the library does not have major and minor versioning enabled and you aren't working with a minor version, even this option isn't available. There is no way, just looking at the library or checking in a document, to tell whether it needs to update its copies, until you go to the Manage Copies page.
Sending a Copy of a Document to a Library
To send a copy of a document in the Shared Documents library to the CompanyLibrary (or whatever you named your library), follow these steps:
- Go to the Shared Documents library. Find the document you'd like to send to the other library. My example uses the newdoc we created earlier in the chapter.
- Select Send To in the item's drop-down menu. The Send To options will pop out.
- In the Send To pop-out menu, select Other Location (Figure 8.56).
FIGURE 8.56 Preparing to send a copy of a document to a different library
The Copy box will open. It has two sections: Destination and Update (see Figure 8.57).
FIGURE 8.57 Sending a copy of the document to a different library
The Destination section is where you specify the location of the library where you'd like to put the document copy. My example is sending a copy from the Shared Documents library to the CompanyLibrary you made earlier. Because you can send documents to libraries outside this site (such as a different subsite, site collection, or even a different web application), you need to specify the correct URL for the destination library's location.
- In the Destination section, enter the URL for the destination library. My example specifies http://sp2/companylibrary, because that is the URL of the site where the library is located and the library name. You don't need to copy and paste the library's URL here; you can use the library's real name, even if it has spaces in it. Just keep in mind that SharePoint specifies sites by their URL, not their title. So, it's best to get in the habit of using a URL.
CONFIRMING THE URL
If you're not sure of the URL or library name, click the Click Here To Test link to open a window to the location. If an incorrect library comes up, correct the address and try again.
- The Update section is where you decide whether the copy should keep a link with its original. To make this a linked copy, choose Prompt The Author To Send Out Updates When The Document Is Checked In. That option implies that a prompt will pop up when you are updating an original, but it won't. It is really just meant to link the copy. The only sort of prompt you will get appears when you are publishing a minor version to a major version; there is a radio button to select to update copies. Otherwise, you'll need to remember to update copies yourself.
IF YOU DON'T NEED A LINK
If you don't want a copy to be linked, choose No for The Author To Send Out Updates When The Document Is Checked In. Also keep in mind you can unlink a copy from its original at any time.
The Update section also has the option to create an alert for the original document's library, so you can get an email to let you know that the document has been changed. This will let you make sure that, if you need to keep the copy updated, you know when to force the update.
- Choose Yes to prompt the author to send out updates. You can always unlink the copy later. You can also enable an alert on the original so you will be aware when changes are made (although this doesn't always work I've found, so check your user alerts to see whether it really sets; then set it yourself if it doesn't).
- Once you've entered the correct location for the document copy and other settings, click OK to continue the copy process.
- A Copy Progress dialog box will appear to confirm your selection. Check the path, and make sure it is the correct document (it may look like a Copy box and have a status of waiting for user confirmation; it's the same thing). If you are sure the path is correct, click OK to complete the copy. The dialog box will process for a few moments, add a copy of the original document to the other library, and then announce its success.
- To confirm that the Send To worked, open the library where the copy was sent (CompanyLibrary in my example). The copied document should be there. You may notice that, looking at the document, it doesn't indicate it is a copy. One easy way to tell whether a document is a copy is if the Go To Source Item option appears in the item drop-down menu (Figure 8.58).
FIGURE 8.58 The copied document is in the new library.
- Click Go To Source Item. It will take you to a View Properties page for the original document. In this page, the ribbon bar has the option Manage Copies (pay attention to that “hand holding paper” icon, because the button for Manage Copies in the ribbon bar looks like that but doesn't have a label). This is one place you can check to see what copies of a document you have made, and you can manually update copies from here. When you update a copy of a document, you are overwriting the copy with the changes from the original. If versioning is enabled in the copy's library, the changes will be saved as the most current version.
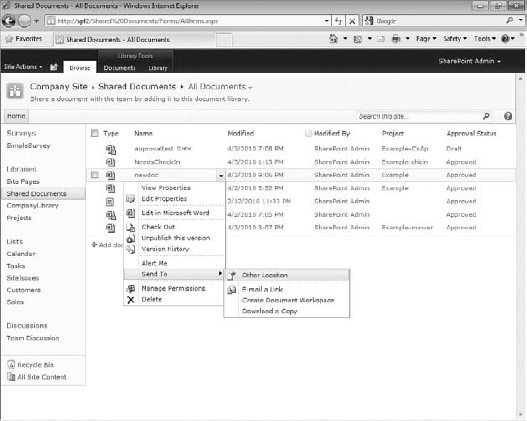

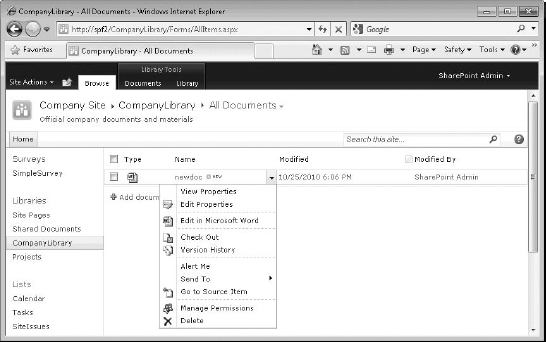
DON'T CHECK OUT COPIES
Never enable Require Check Out on a destination library for copies. If you do, the updates will not work.
Now that you're on the original document in the originating library, let's check it out, make changes, and then check the document back in.
- You can open a document for editing from within a document's View Properties page by clicking the document's filename. The link is the same as if you clicked the filename in the library's content page. However, it may not prompt you to check out the document to edit it. It may open the file as a read-only copy until you click the Check Out button in the information panel or link in the task pane.
- Open and edit the document by clicking its name (make certain it is checked out first)—perhaps add a sentence to the end of the text, as I do in my example—save, close, and check the document back in. It does not matter if the change is a major or minor version.
- After you close Word, you should be taken back the original View Properties page. If you click Manage Copies on the ribbon bar, it will take you to a Manage Copies page (Figure 8.59). You will see the copies of this document either that prompt for updates (those that are linked) or that do not prompt for updates (those that are unlinked). You should have a document listed in the linked documents section.
UNLINKING AND RELINKING DOCUMENTS
If you are in the Manage Copies box and need to unlink a document copy or relink it by prompting for updates, you can edit its properties using its Edit button. Notice that it suggests you set an alert yourself on the source document if you want to be notified of changes, instead of offering to do it for you.

- To force an update to the copy of the changes made to the original document, click Update Copies at the top of the box. This will take you to the Update Copies page, where you can select to update particular linked copies or update all at once (Figure 8.60). Simply select the copy you want to update, and then click OK. The Copy Progress dialog box will appear again, proving that it will overwrite a newer copy of the original over the first copy. Click OK in the Copy Progress dialog box to continue the process.
FIGURE 8.59 The Manage Copies page
FIGURE 8.60 Update Copies page
- Click Done when the copy is successful to close the dialog box. This will take you back to the original document's View Properties page.
- To see whether the copied document was indeed updated, go to the destination library (CompanyLibrary), and open the copied document. You can open the document as readonly because that's all you need to do with it. The most recent changes you made to the original document should be there.
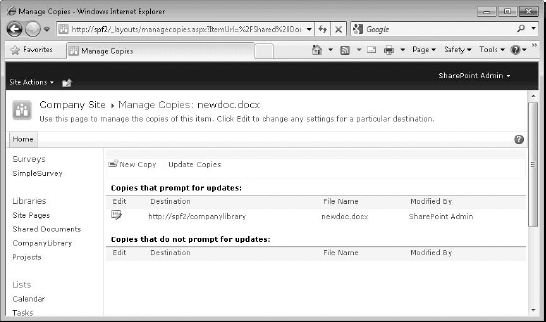
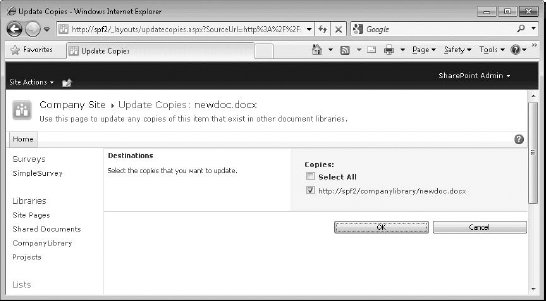
TEMPLATE? WHAT TEMPLATE?
Because the copied document was not created using the New button, it doesn't use the nifty custom template that documents use in the CompanyLibrary. This demonstrates that new documents in the library use the template, and those created elsewhere do not.
There is an additional, and easier, way to update copies from an original in the content page of a library. Just follow these steps:
- Go back to the original library (Shared Documents).
- In the drop-down menu for the document you copied (my example is newdoc), select Send To.
- In the Send To pop out menu, you'll see the Existing Copies option (Figure 8.61). If you click that, it will take you to the same Update Copies page that you used earlier from the Manage Copies page. Feel free to update any copies you'd like. In our case, it's not really necessary, but it's nice to know the option is here.
FIGURE 8.61 Existing Copies option on original document

A FEW MORE SEND TO DETAILS
If you only want to make a copy of a document in another library without being able to update that copy, simply send that copy to the other location, but choose No to the prompt for updates.
Then, if you check the item selection menu, there will be no Send To ![]() Existing Copies option because you chose No for the prompt for updates action. If you go to the Manage Copies box for that document, you will see that the document is listed under Copies that do not prompt for updates.
Existing Copies option because you chose No for the prompt for updates action. If you go to the Manage Copies box for that document, you will see that the document is listed under Copies that do not prompt for updates.
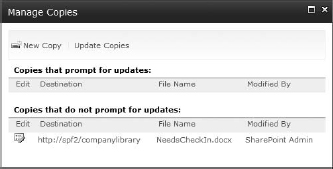
This means that the copy is not set to be updated. To link the original with the copy, just click the edit icon for the copy and change the Update setting to Yes on the Edit Copy page.
Keep in mind that if you are going to change the update options of a copy, you must change them at the original document's properties, not the copy's properties.
Configuring a Library with a Default Send To Location
Now that you know how Send To works, you can see how useful it can be. But, wouldn't it be nice if you could specify a particular default library that the users could just select to Send To instead of having to specify the URL themselves?
- To configure the Send To destination for the Shared Documents library, go to the Library ribbon, and click the Library Settings button.
- On the Document Library Settings page, click the Advanced Settings link.
- In the Custom Send To Destination section, enter a destination name (keep it short because it will be listed in small pop-out menus) and the URL to the library (notice that there is no link to test the URL). In my example, I am going to use companyLib as the name and the Company Library URL (Figure 8.62).
FIGURE 8.62 Advanced Settings page, with custom Send To destination
- Once you've finished entering your destination name and URL, scroll to the bottom of the page, and click OK.
- This will take you back out to the Document Library Settings page. Click the name of the library in the title breadcrumb (or the link in the Quick Launch bar) to return to the Shared Documents library.
- To see whether it works, select a document that doesn't already have a copy sent to a library (in my case, I am using NeedsCheckIn), let's try sending a copy to the new Send To destination.
- In the drop-down menu on your selected document item, choose Send To, and in the pop-out menu you'll see your new destination listed (Figure 8.63).
FIGURE 8.63 Library's custom Send To destination in menu
- If you click it, you'll see the familiar Copy page for the document (but with the destination already filled in). Just decide whether you want the copy linked, and click OK.
- This will bring up a confirmation page; just click OK. Then, when the copy operation is done, click Done at the top of the content area. Feel free to check the Manage Copies page for the document to see whether the process worked, or go to the destination library.
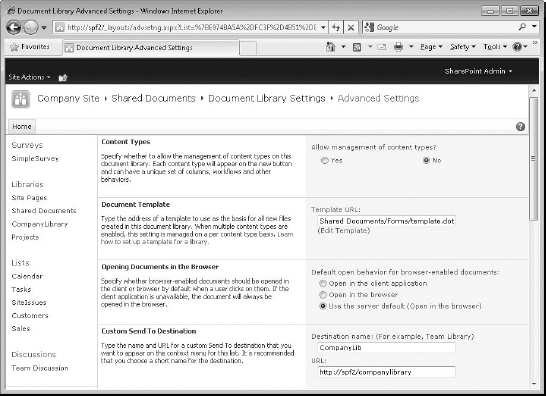
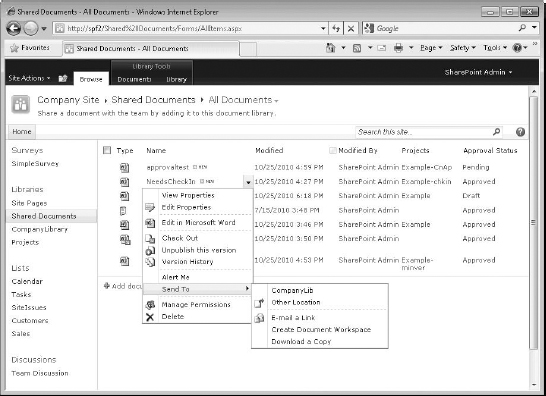
That's about it for using Send To to send linked copies of documents to other libraries in SharePoint.
DOES IT WORK IN THE RIBBON?
Up until this point you've done a lot of Send To work in the item menu, but if you were to click the Send To button in the Library ribbon, its drop-down menu would also display the destination configured for the library. It's all the same to SharePoint.
So far, you've added documents and fields to libraries and configured versioning, required checkout, content approval, and Send To. You've created content types, configured library templates, and even created other document libraries. That's about all there is to document libraries. However, a few other kinds of libraries are available in SharePoint. They are very similar to document libraries; they simply were meant to store and manage different file types.
Picture Library
Picture libraries are intended to store all the pictures a site or site collection might require (with thumbnail views, download options, and slide shows). Each image file stored in a picture library will have a URL so you can use it elsewhere. This comes in handy if you have, for example, a contact list of employees. You can then enter the URL of the employee's photograph into a field (that uses the hyperlink or picture column type) in the contact list.
Picture libraries are not listed under Libraries on the Quick Launch bar; instead, the heading is generated when the first picture library is created and set to appear on the Quick Launch bar. Then, even if the library is deleted, the heading will remain.
To see how a picture library works, let's create one:
- Click Site Actions, and then click More Options from the drop-down menu. On the Create page, click Picture Library in the Libraries category.
- As you can see in Figure 8.64, the settings for a new picture library are similar to those of any other library. You can enable incoming email and versioning, and you can determine whether the link for the library will be on the Quick Launch bar. Name the library (mine will be CompanyPictures for this example), give it a description, and enable incoming email (my example's alias is pictures). Keep the defaults for navigation and versioning. When the settings are complete, click Create.
FIGURE 8.64 Creating new picture library settings

This will take you to the new picture library. You might notice, right off, a bit of a difference in the interface for this library. It doesn't use ribbon bars. That's right. Everywhere else, ribbons are all over the place, but not for the picture library. It uses old-style Action bar buttons (all of which have menus beneath them). You might notice in the address bar of the browser that the URL doesn't have the ribbon query string appended to it, just a nice, clean, and simple URL. Also, there is the classic View menu on the right of the Action bar, in addition to the View menu in the title breadcrumb. Here's a quick summary of the Action bar buttons:
- The New button can only create a new folder because the library is intended for uploading pictures. You can't create pictures here.
- The Upload button will offer to upload only single files if no Office product is installed, and will add the option to upload multiple files if an Office product is installed.
- The Settings button drops down to display options to create a column, create a view, or go to the library settings.
- And finally, the Actions button is where practically all the, well, action is. It offers some tasks specific to picture libraries.
Edit This will open your operating system's default application to edit image files. SharePoint prefers the Microsoft Office Picture Manager.
Delete This will delete a selected picture.
Download This is the opposite of upload, of course. It will copy the selected picture to your local computer.
Send To This is not the Send To you were expecting. It inserts a selected picture in an email or document you select.
View Slideshow This uses the Slideshow view to cycle through the pictures in the library.
Connect To Client This option may also be called Connect To Outlook. It, obviously, integrates with Microsoft Outlook. When selected, it opens Outlook and displays the library's contents in the Outlook window.
Sync To Computer This requires SharePoint Workspace to be installed on the local computer you are using to access the site. It will make a synchronized copy of the library in the workspace so the user can access it locally while offline.
Of course, View RSS Feed and Alert Me, standard in all lists and libraries, are on the menu as well.
Once images are added to the library, you can view them in All Pictures view, which shows each picture as a thumbnail with a check box so you can select it. You can also select particular images to view together. If you click the View menu and select All Pictures view, an alternate menu will appear. In it, you can choose Details, Thumbnails, or Filmstrip (see Figure 8.65 for an example).
When you upload pictures one by one, you are afforded the chance to fill in the fields for each picture, such as the title, date the picture was taken, description, and tags to search for the picture by. If you choose to upload multiple files, that should trigger the Office Picture Manager (this works best with Office 2010). However, that type of upload doesn't let you edit each picture's fields (its properties or metadata).
To access a picture's fields (to edit them after upload for example), use the All Pictures page's Details view. That's the standard “all items” view of the picture files, letting you access the item's drop-down menu (Figure 8.66).
FIGURE 8.65 The Filmstrip view and the All Pictures View menu

FIGURE 8.66 All Pictures page's Details view
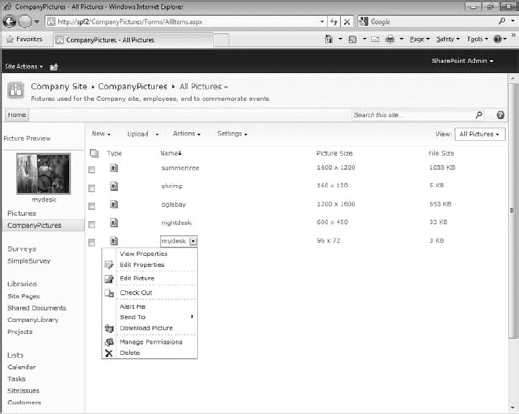
The Wiki Page Library
The wiki page library is just a library of web pages. You actually have considerable experience with the new wiki pages for this version of SharePoint if you've done any work with the home page (as you did exploring the SharePoint interface in Chapter 4). For the Team Site template, Microsoft has chosen to use a wiki page as the home page.
Wiki pages support rich content and can have pictures, tables, and even web parts inserted into them. Text can also be significantly formatted. Also, like any web part page, any wiki page can be made into the home page with a click of a button in the ribbon bar.
There is already a modified wiki page library on the team site called Site Pages. It contains the home page for the site. However, you'll create a new wiki library here so you can really see how it works:
- To create a wiki library, go to More Options in the Site Action menu, and then select Wiki Page Library from the Libraries category on the Create page.
- On the New page for your new library, simply specify the name and description of the library and allow it to display the library on the Quick Launch bar. Wiki libraries don't support incoming email and, like the picture library, can't be assigned a template because all wiki pages are going to be HTML pages. For wiki libraries, versioning is enabled by default, so the option isn't available during creation. Wiki libraries are very simple libraries meant to do one thing: contain web pages that link to one another. Then click Create.
As you can see in Figure 8.67, the wiki library in my example is called CompanyWiki. In the Quick Launch bar, it is listed under Libraries.
FIGURE 8.67 The new wiki library
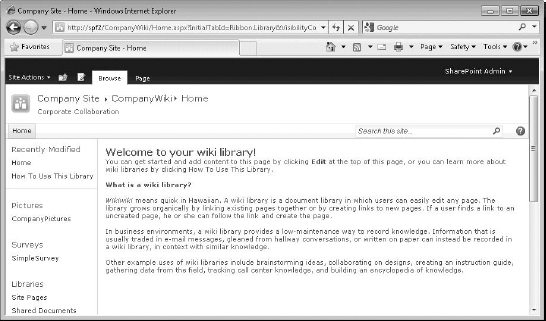
One of the more unusual things about a wiki library is its default view. A wiki library opens with a view that displays a default file in the library named Home. The title of the text in the page might be “Welcome to your wiki library!” but the filename is Home. As a matter of fact, there are only two pages in this library so far, by default—Home (the page you're looking at now) and How To Use This Library.
SITE PAGES DOESN'T SEEM LIKE A WIKI LIBRARY
The Home page for the Site Pages library has been modified to be the actual home page for the site (if the wiki home page feature is enabled). Because of that, its default view is the All Pages view, not the Home page for the library.
You might notice that there is no ribbon toolset in the top ribbon bar for this library, unlike Shared Documents or any lists. This may be because the Page tab on the top ribbon bar was meant for the wiki page. The menu there is very much like the Documents and Library ribbons rolled into one for wiki pages. There is a standard Library Tools toolset for this library, but you can't get to it from here.
When you reach the wiki library for the first time, there is the ever-present top ribbon bar, as well as the title area, top link bar (with the search field and help icon), and the Quick Launch bar on the left of the page. A new section has been added above the Quick Launch bar just for the wiki library displaying the most recently modified pages.
WHERE'S THE DESCRIPTION?
Because of the shenanigans needed to make a wiki the site's home page, this library's description does not actually show up in the title area as it does for all other lists and libraries. Instead, the site's description is displayed. This is the only place, other than the home page, to do so.
Mind you, you might consider disabling the site feature that makes wiki home pages possible and therefore maybe getting your description back for the wiki library. And that may work, but the description you gave the site will also stop displaying on the home page.
To get to the library's actual content page (and the Library Tools), you need to activate the Page ribbon. Click the Page tab in the top ribbon bar (Figure 8.68).
In the Page ribbon are some buttons you've seen before and some that are unique to wiki pages:
- Edit and Check Out (it is a library after all) in the Edit section.
- Edit Properties, Page History, Page Permission, and Delete Page, as well as a Rename Page button in the Manage section.
- E-mail A Link and Alert Me ! in the Share & Track section.
- The Page Actions section contains Make Homepage and an Incoming Links button. The Make Homepage button, available on the Page ribbon for content pages also, will make the page you are on the home page, replacing the home page you currently have. This has no “undo” feature, so be careful about using it. To undo, you can either reapply the original wiki page or delete the page (if you are using a web part home page). The Incoming Links button helps manage the links in the library by showing what pages have links to the page you are on.
- The Page Library section of the ribbon is unique to the wiki library. It contains the buttons to manage the library while on a wiki page. The Library Settings button gives you access to the library's settings, and Library Permissions has an equivalent function. The last button, View All Pages, takes you under the wiki page you are on to see the content page for the library itself. At that point, you'll see the list of pages in the library in a standard view, with the normal Library Tools toolset to work with.
To get to the Content page for the wiki library, click the View All Pages button on the Page ribbon. Here you can see that there are two wiki documents by default, Home and How To Use This Library (Figure 8.69).
FIGURE 8.68 Page ribbon in wiki library

FIGURE 8.69 The All Pages view of the wiki library
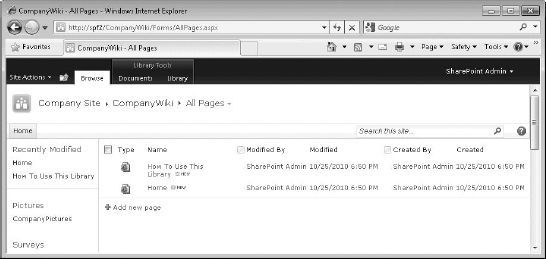
The library items have the standard drop-down menus. In addition, the Library Tools tabs are available in the top ribbon bar, with the standard Documents and Library ribbon buttons.
Adding a Wiki Page
To add a wiki page to the library, take the following simple steps:
- Click New Document in the Documents ribbon of the wiki library or by using the Site Actions menu. This will pop up a simple New Page box (Figure 8.70).
- All it needs is a name. I am going to use firstpage for my example. Then click Create.
A new wiki page will appear, with a blank area (a lot like an empty web part zone) to start working in. Because wiki pages are rich content pages, just like the home page, you can edit the heck out of them; change their layout; and insert pictures, links, web parts, tables, and even entire files if you'd like. In addition, you can use the wiki syntax to easily make a link to another page in the library.
- To follow my example, just enter some text and a link to the other library pages for more info. The syntax for wiki links is two square brackets around the page name (for example, [[home]]). When you start typing the link, the page will try to help suggest the page name for other pages in the library. This is useful both for avoiding typos and in case the names are long (Figure 8.71).
FIGURE 8.71 Editing a new wiki page
Begin the syntax with two open brackets, and a drop-down listing the other pages in the library will appear. Just highlight the page name you want and hit Enter, and the link will complete itself.
- Once you are done working on the page, click the Save & Close button in the Documents ribbon.
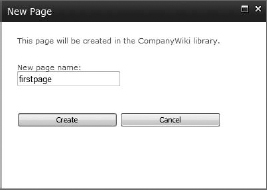

The finished page will show the links as the page names in a different color than the rest of the text, indicating to the reader that they should click them.
If you create a wiki link to a page that doesn't exist, the library will indicate the link is empty by putting a dotted line under it. When you click it, it will try to get you to create the page and its content.
Editing a Wiki Page
Editing an existing wiki page isn't as intuitive. No matter how you select a page in the View All Items page, the Edit Documents button on the Documents ribbon will remain grayed out.
To edit a wiki document, you first have to open it (you are already on the page you just created); then click the Edit button (the paper and pencil to the left of the Browse tab), or click the Page tab in the top ribbon bar and then click the Edit button on the ribbon.
That will put the page back into edit mode so you can do more work there.
Wiki pages can also be edited in SharePoint Designer if you want by clicking the down arrow on the Edit button in the Documents ribbon and selecting Edit In SharePoint Designer from the menu.
For this version of SharePoint, there is no explicit wiki site template, but you can use the Team Site template and just replace the home page with a Welcome To The Wiki Library Home page. That will focus the users' attention on that library and its documents.
The Form Library
This library doesn't get a lot of press because it requires Microsoft, more specifically InfoPath Filler, to be installed locally on the user's computer (unless you have an InfoPath Forms Server on your network). However, if you are using InfoPath extensively at your company, you might want to take a look at it.
This library is created like any other:
- Get to the Create page (go Site Actions, go More Options, or go to the All Site Content page and click Create).
- From the Create page, click the Form Library link.
The New page has your standard fields for library creation (including incoming email, oddly enough). It even has a Document Template field, but the only option is to use an InfoPath form template. That is because the template is just a holder, and you will need to use InfoPath to publish a form template up to the library. Forms are usually considered templates, and when people fill out a form, it is considered a form instance.
After you create your library (my example is CompanyForm), it will look like any other. All the settings are generally the same, but there is also a Relink Documents To This Library setting on the library's Settings page, because it is not uncommon for forms to become unlinked from their parent template.
To use the library, you must first publish a form template to the library. If you are using InfoPath 2010, it comes in two flavors: Designer and Filler. Designer is used to create InfoPath forms, and Filler is used to, well, fill them out. Users would only need InfoPath Filler to use the library.
Publishing an InfoPath Template to a Form Library
To create a form, save it, and publish it to a SharePoint InfoPath library, you have to use InfoPath Designer.
In my example, I opened InfoPath and used a sample template (see the Travel Request form in Figure 8.72). It was saved as companytravel.xsn locally.
FIGURE 8.72 The Travel Report template in InfoPath Designer
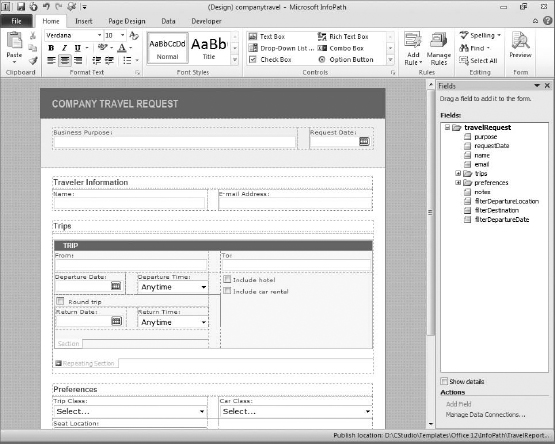
Once the form template is designed the way you like it and you've saved it locally, the form is ready to be published to the library:
- In InfoPath, click the File tab, select Publish, and then click the SharePoint Server button (Figure 8.73). (Alternatively, if you haven't used this template elsewhere, you can click Quick Publish in the Quick Access toolbar and then specify in the wizard that you want to publish to SharePoint.)
- This opens a Publishing Wizard dialog box for you to choose where you want the template to be published. Specify a URL for the site containing the form library (Figure 8.74). My example uses http://spf2. Enter the URL, and click Next.
The next screen (Figure 8.75) wants to know whether the form will be associated with a form library or a content type. It also warns that, because there is no enterprise-level InfoPath services on the SharePoint server or an InfoPath server on the network, the InfoPath forms will not be browser-enabled. The user must use InfoPath Filler to fill out forms in a form library.
FIGURE 8.73 InfoPath Designer backstage, Publish page
FIGURE 8.74 Enter the path for the site.
- Make sure Form Library is selected, and click Next.
- On the next screen of the Publishing Wizard, you can see that InfoPath has found all the possible libraries that might need a form template (Figure 8.76). Choose Update The Form Template In An Existing Document Library, and select your form library (my example is CompanyForm). Then click Next.
FIGURE 8.75 Choose what should be associated with the template.
FIGURE 8.76 Choose the form library to which to publish the form template.
- The next screen shows the fields that will be available for the library list item itself (the form's metadata if you will). You can add or remove fields here. Doing so does not affect the form template's fields. For this example, let's leave them as is, and click Next.
- The last screen is to verify whether the settings are correct. If they are correct (Figure 8.77), click Publish to publish the form to the form library.
- After the form template publishes to the library, you will get a screen that says “Your form template was successfully published.” You can open the form library from there if you'd like, or you can click Close to finish. Check the box to Open This Form Library, and click Close to return to the form library.


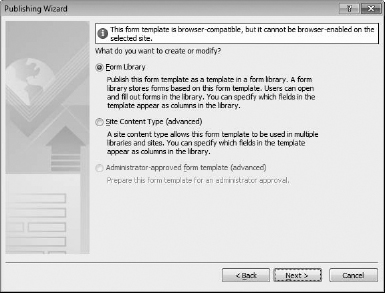
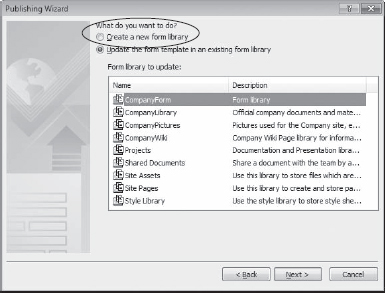
Back on the form library, it will look no different. The template in the library's Advanced Settings page will appear as simply Template.xsn, and you can't view this kind of library in Explorer to see whether the template is in the Forms folder. The easiest way to tell whether the template published correctly is to try to create a new instance of the form.
FIGURE 8.77 Verify the publishing settings.
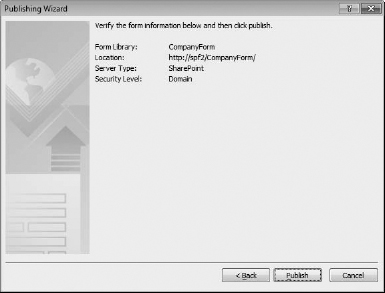
Filling Out a New Form in the Form Library
So, from a workstation that has InfoPath Filler installed, click New Document from the Documents ribbon. That will create a form instance of the template (Figure 8.78). Feel free to fill some of the fields with data, save it (my example is called myrequest), and close out of InfoPath Filler.
FIGURE 8.78 InfoPath form instance being filled out
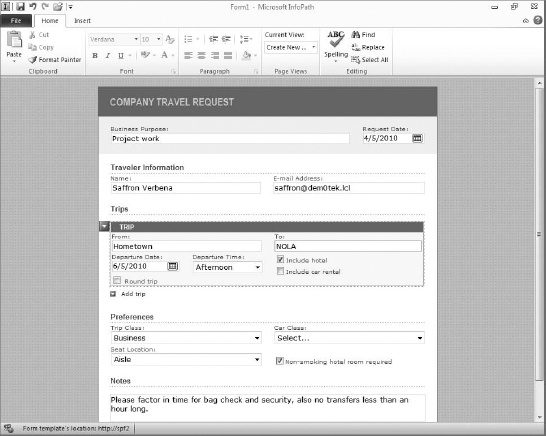
Back on the library, you can now see a saved instance of the form (Figure 8.79).
FIGURE 8.79 The Travel Request form made from the form template
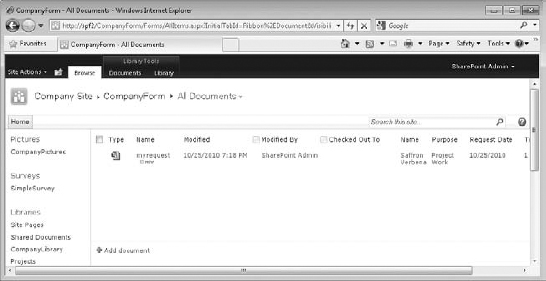
If you open it on a computer with InfoPath Filler installed, you can edit the form. If you open it on a machine that doesn't have InfoPath installed, it will still open but as an XML file in the browser. In that fashion, you can at least see all the data in the fields, but you can't edit it. It's a little crunchy but, in a pinch, useful (Figure 8.80).
FIGURE 8.80 InfoPath form instance open in browser

That's it for libraries in general. I hope this chapter has given you a basic understanding about how to use libraries, what they are, what they are meant to do, and what they actually do.
The Bottom Line
Create a library. A library is a kind of list that focuses primarily on the files that are attached to the list items. There are several different types of libraries, depending on the type of file they are intended to store. Creating a library is as easy as opening the Create page, selecting the type of library, and configuring it. There are several different types of libraries.
Master It If you do not have any Microsoft Office products installed on your machine, what two main features of document libraries are not available?
Use the different kinds of libraries. Document libraries can be created for any type of file, but SharePoint has four main kinds of libraries with different features and views. These four libraries are the document library, form library, wiki page library, and picture library.
Master It You're restructuring the content of some of your libraries and are planning on moving content from one library to another. What key facts do you need to keep in mind regarding wiki libraries when it comes to moving or uploading files?
Set checkout, content approval, and versioning. Require Check Out forces users of a document library to check out a document if they intend to edit it. This helps enforce version management by allowing only one person to edit a document at a time. When a document is checked out, it can be only be read by other users, but they cannot edit the document until the person with it checked out checks it back in.
Content approval can allow items to remain invisible to most list or library viewers until someone with approval rights approves the item. In a library with content approval and major and minor versions enabled, only major versions of a document can be approved.
Versioning means that whenever a list or library item (or its attached document) is changed, that change is saved as a different version. That means that if an edit was a mistake, you can restore a previous version of the item.
Master It Brian has left the company, but some of the documents in your Shared Documents library are still checked out by him. Several of the documents have multiple versions stored, but one was a new document that Brian uploaded to the server recently. What three methods are available to check these documents back in?
Manage content types. By default each library (like most lists) has one content type. The content type of a library item is one that can have a single template associated with it such as Word documents, PowerPoint presentations, or Excel spreadsheets. However, it is possible to have a document library with multiple content types, allowing the library to create a mix of documents and multiple templates.
Master It You have a general document library for the public relations department. They want to use the library to manage a large number of different file types—from Word to pictures to movie clips to more obscure things. Many of them were created in products other than Office. More importantly, the type of files they're going to use is likely to change over time. How should you configure the content types for this library?