
Chapter 12
Users and Permissions
Controlling user access is a fundamental concern to SharePoint administrators, and it is where we earn a lot of our bread and butter. I mean, really, what good is SharePoint if no one can use it? But the only thing worse than having users unable to access the information they need is having users able to access information they should not have. Access management is a prime area of focus in the administrator's life, and if you plan and implement user access correctly, life goes much more smoothly. In this chapter, you'll learn to
- Define users and groups in SharePoint
- Add users and groups in SharePoint
- Define permissions and permission levels in SharePoint
- Set permissions on a site/list/list item for a user or a group
What Are Users, Groups, and Permissions?
When you start looking at security, chances are good that you start with the basics: who is allowed to access SharePoint resources, what resources are they allowed to see, what resources are they allowed to use, and how are they allowed to use them.
The people who are allowed access to SharePoint are commonly referred to as users. To add user accounts, SharePoint utilizes the services of an authentication provider, such as Windows integrated authentication (which on a domain uses Active Directory; on a non-domain server, it is that server's security account manager database). Active Directory (AD) stores its own user accounts, and people use it to log into their workstations to access network resources all the time. SharePoint uses that authentication source for user accounts when setting up users in its own environment, which allows administrators to use accounts already available in AD to populate its users and group. And when a user logs into SharePoint, SharePoint passes the authentication information to the authentication provider. From that point, SharePoint authorizes user access to its resources based on its membership on the site. Once the user is there, SharePoint uses groups, permission levels, permissions, and other security to authorize their access to the resources that were meant for them and block their access to other resources.
This is why the term user account is used in two ways with Windows authentication:
Domain user accounts refers directly to the accounts in AD. If the server is a standalone server and not on a domain, then the user accounts would be local server accounts. They would, however, work the same way, because SharePoint would use the local servers users and groups for authentication by default instead of a domain's users and groups.
SharePoint user accounts refers to the user accounts added to SharePoint from AD (or other authentication source).
SharePoint manages what a user account can do with permissions. There is a large list of set permissions that are available at the web application level. These permissions, when applied to a user account, govern what it can do. Permissions are generally grouped together in what are called permission levels, to be applied to users based on the type of role they will play or tasks they will perform in SharePoint. There are a few default permission levels, such as Full Control (which usually is applied to administrators who require all permissions to be enabled) or Contribute (which is usually applied to users who will be viewing content, adding content, editing content, and so on). Individual permissions can't be applied to users directly, but permission levels can. For the convenience of administrators, in addition to permission levels putting together useful permissions into role-based combinations, SharePoint uses another convention: the SharePoint group (sometimes known as a site group). SharePoint groups are useful because they are associated with particular permission levels (or even combinations of permission levels if necessary), so when the users are added to the group, they are all given the same permissions. Changing a group's permissions changes them for all users contained therein. Groups are an excellent organizational device (which is why Microsoft keeps using them), allowing users to be grouped together by applied permissions so they can all be added to a resource's access list in one go (and removed that way as well). In addition, SharePoint has a People And Groups page that displays the users in a particular group. Members of the group can go to that page and see the other members and access their user information (if they have permission). If Directory Management Service is enabled, the group can have a distribution list associated with it in AD, allowing someone to email all members of the group at once.
You can add users individually to SharePoint groups, or you can take advantage of Active Directory by adding entire security groups (such as adding the Managers security group as members of the human resources site collection). This is a good thing from a SharePoint administrative point of view, because SharePoint can handle only so many security objects (otherwise known as security principals). As far as SharePoint is concerned, both a single user account and a security group are security objects, even though the security group can contain many user accounts. Using security groups to add users to SharePoint groups adds an extra layer of administration, because any change to that security group in AD (such as removing a user) could have an obvious effect on whether that user can access SharePoint. However, if you focus on managing users in groups at the AD level, then it's a snap to simply add their security groups to SharePoint and not really worry about the individual users and whether they've been demoted, promoted, or fired at that level. The changes occur in AD and then are reflected in SharePoint. All this talk of groups leaves you with two kinds of groups to consider:
Domain security groups are created and controlled by the AD administrators. A domain security group contains users and is a method for applying security uniformly to all domain users it contains. For a standalone server not on a domain, the local server's security groups would be used instead.
SharePoint groups are created and controlled by administrators in SharePoint. They are intended to apply permissions more easily to groups of users at once and manage their access to resources in SharePoint. Secondarily, they can be used to identify contained users by the role they play in SharePoint.
AD IS NOT STRICTLY REQUIRED
If you have installed SharePoint on a single server, it doesn't need to be in a domain. In that case, instead of using Active Directory, SharePoint will use the local users and security groups for its Windows Authentication.
SharePoint groups are created at the site collection level and are available to any subsite in the site collection. However, you can choose to create a SharePoint group that has permissions only to a particular subsite, if you don't want it to inherit permissions from the parent site. Even groups specifically made for a subsite are listed at the site collection level, because they are a group in the collection of sites.
Although sites that are built on SharePoint can, of course, have additional SharePoint groups, SharePoint Foundation provides three default SharePoint groups for site collections:
- Site name Owners, such as Company Site Owners (default permission level: Full Control)
- Site name Members (default permission level : Contribute)
- Site name Visitors (default permission level: Read)
Each of these SharePoint groups is associated with a default permission level, but you can change the permission level for any SharePoint group as needed. Anyone who is assigned a permission level that includes the Create Groups permission can create custom SharePoint groups.
Users and groups are used at every level of SharePoint, from managing the entire farm to managing web applications, site collections, subsites, lists and libraries, and even individual items.
Before you start working with permissions or creating, editing, and changing groups, it helps to understand the difference between authentication and authorization. Both concepts are critical to a good fundamental understanding of how to secure SharePoint content. Authentication is the process of establishing identity, and in a security context this is assessing the credentials of a user seeking access to resources under the control of the authentication provider. You can compare this to matching up someone's face with the picture on their passport to make sure they are the same. Authentication verifies that they are who they claim to be so you can proceed to the next stage, which is authorization. People frequently talk about authentication and authorization as if they were the same thing, but they most definitely are not. Authorization allows a user to do something with or to the resources their authentication gave them access to. It is the permission to do a particular task in a system, such as opening a page, reading a document, or managing permissions. All permissions make up the level of authorization for a user. That level of authorization can be considered a permission level inside SharePoint. Simply put, SharePoint requires an authentication provider to do authentication and then gives authorization to users for resources after they have been authenticated.
AUTHENTICATION VARIES
Keep in mind that although my example uses Windows Authentication with Active Directory, SharePoint is easily meant to support other forms of authentication. As a matter of fact, SharePoint was built to be authentication-independent so it can take advantage of multiple kinds of authentication providers. One of the most useful is forms-based authentication, which takes advantage of a SQL database for its authentication source. It's a convenient, alternate form of authentication if Windows authentication is not a viable option for you. It takes a little work to configure, but once done, it works like any other authentication provider.
Permissions are the authorization to perform specific actions, such as viewing pages, opening items, and creating subsites. SharePoint Foundation provides 33 predefined permissions that you can use to allow users to perform specific actions. For example, users assigned the View Items permission can view items in a list. Each permission belongs to one of the following categories: List, Site, or Personal. Permissions are not assigned directly to users or SharePoint groups. Instead, permissions are enabled in one or more permission levels, which are in turn assigned to users and SharePoint groups. Permissions can be included in multiple permission levels, and it is possible to apply multiple permission levels to a single SharePoint group, user, or security group. Permission levels are covered in the “Permission Levels” section.
Individual Permissions
Permissions are rights to do something—to view, create, delete, or edit something. Permissions are allowed or disallowed at the web application level using the User Permissions For Web Applications setting on the Application Management page in Central Administration.
SharePoint breaks these permissions down into categories for assignment to users and groups. There are 33 separate permissions divided across three categories (Site, List, and Personal). The following sections will describe them all (based on the standard tables for permissions available in the SharePoint help files and on www.technet.com).
Individual permissions are listed at the web application level to be made available to the site collections that web application contains. To see those permissions (so you can allow or disallow them), go to Central Administration and click Manage Web Applications on the home page. On the Web Applications Management page, select a web application and click the User Permissions button. It will display the permissions in three sections: List, Site, and Personal. Permissions that are unchecked will not be available to be used by the site collections within the web application.
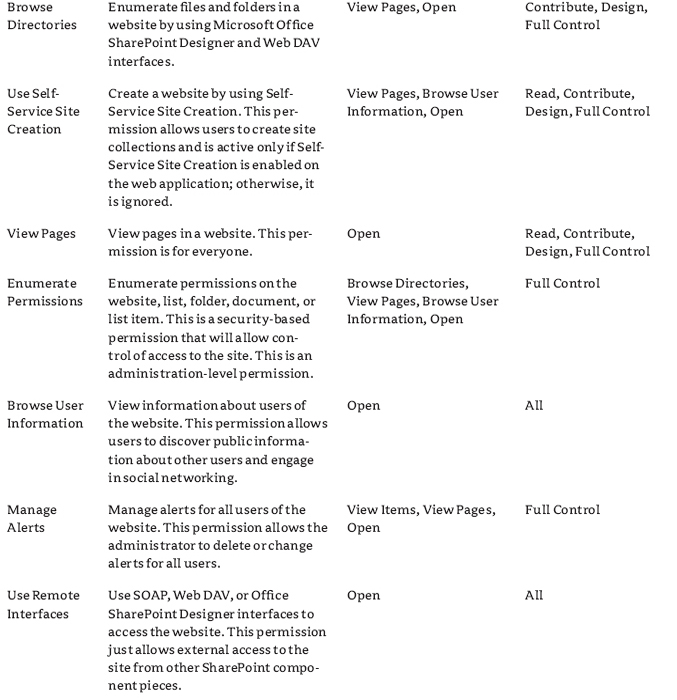
The tables that follow are divided into four columns. The permission name is what appears on the pages where you select the permissions. The description explains what the permission allows you to do. The required permissions are additional permissions that the permission needs to have also enabled to function. The last column lists the default permission levels that contain this permission. This is also a useful guide to selecting or creating permission levels.
The list permissions are shown in Figure 12.1 and described in Table 12.1.
FIGURE 12.1 User permissions, List permissions

TABLE 12.1: User Permissions, List Permissions
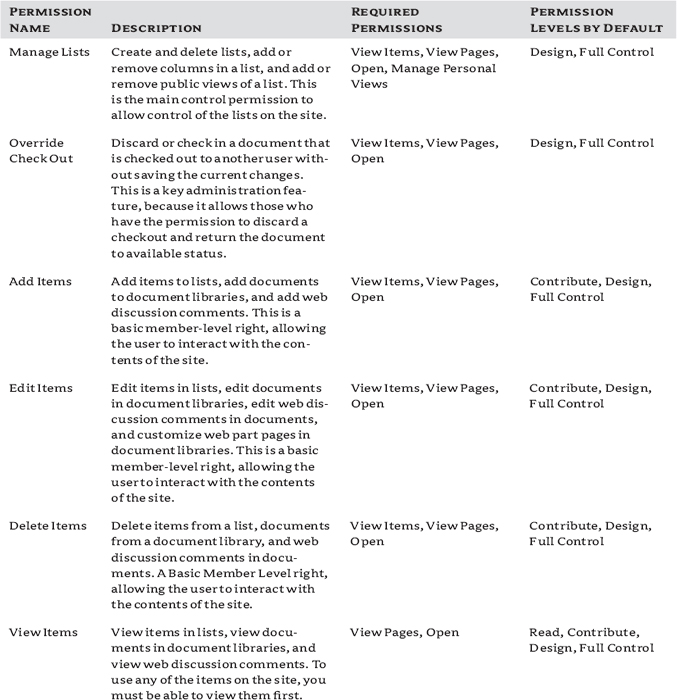
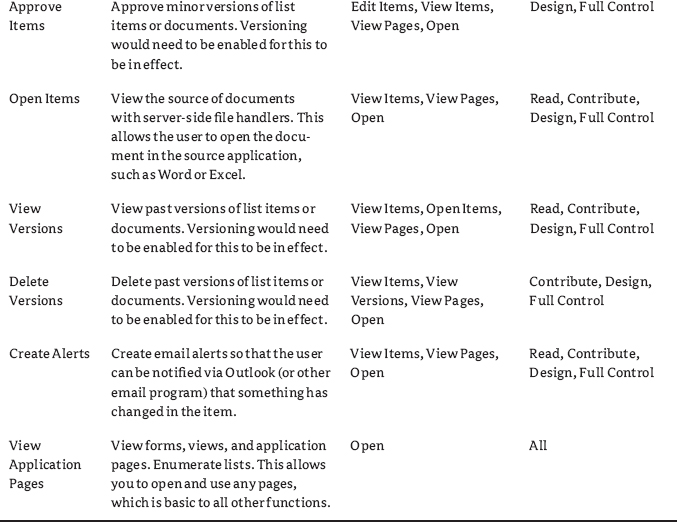
The list permissions govern the actions available to users in lists and on list items. You can combine them to reach your particular goals, but be careful about being overly gracious with what they are allowed to do, such as assuming that someone who needs to manage versioning and approve items should also manage lists. Also, keep in mind that when you look at list permissions, they will be dependent on the choices made for the lists. For instance, View Versions will work only if you have versioning turned on for the list; you could have permission to view versions but no ability to view them if versioning is turned off. Another interesting thing about the list permissions is that what you can do to a list item is broken out explicitly, but there are no explicit create list, delete list, or change list permissions; they are all lumped under the Manage List permission. Therefore, if you want someone to just be able to edit an existing list's settings or add columns, they also have to be allowed to create more lists. Currently permissions are not quite as granular as they could be, and that alone is useful to know.
The second category of permissions is site permissions. These permissions govern the user's access at the site and subsite level and what they can do concerning sites there. Most of the permissions for the SharePoint site are shown in Figure 12.2 and all of them are described in Table 12.2.
FIGURE 12.2 User permissions, Site permissions

TABLE 12.2: User Permissions, Site Permissions
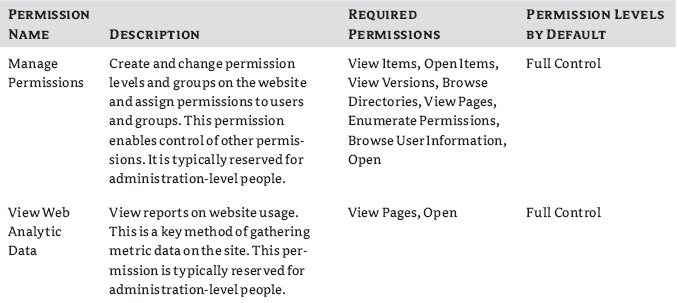
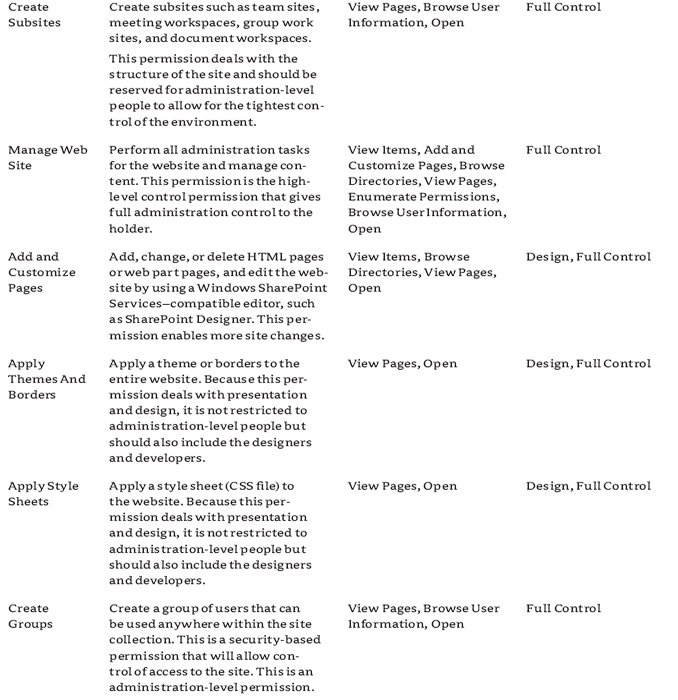
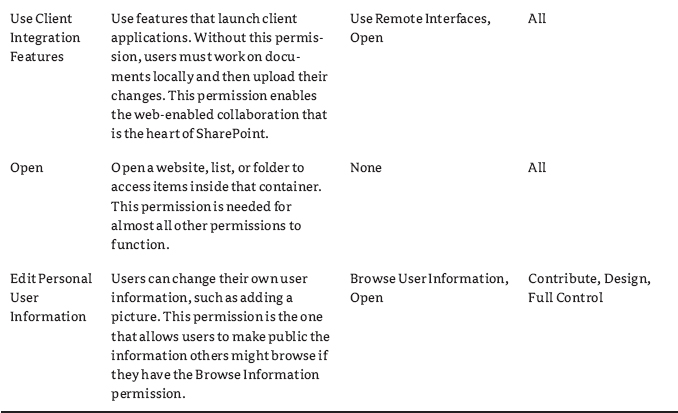
Site permissions are the basis of control at the site level. Combinations of these permissions are what define a user's effective control of their environment. This category of permissions contains powerful administrative capabilities, such as managing permissions and seeing site usage information, as well as the ability to simply open documents using the correct client or see document libraries using WebDAV (Open With Explorer) for users. As a matter of fact, if a user is having a problem using Open With Explorer, make certain they have the Use Remote Interfaces permission. Despite the fact that the permission also makes it possible for them to open the page in SharePoint Designer, it's needed for all browsing of libraries with Explorer.
SELF-SERVICE SITE CREATION BLOCKING
If you want to block the possibility of Self-Service Site Creation ever being used in a particular web application, deny its permission here. Then, even if it is enabled in Central Administration, no user will be able to use it. It will make people angry when they try, but it is a fail-safe way of avoiding an “accidental” onslaught of new site collections. Another thing you can do is disable the permission in particular permission levels, allowing Self-Service Site Creation only to the permission levels you choose, not all of them.
The third category of permissions is Personal. The Personal permissions from the SharePoint site are shown in Figure 12.3 and described in Table 12.3.
FIGURE 12.3 User Permissions, Personal Permissions

TABLE 12.3: User Permissions, Personal Permissions
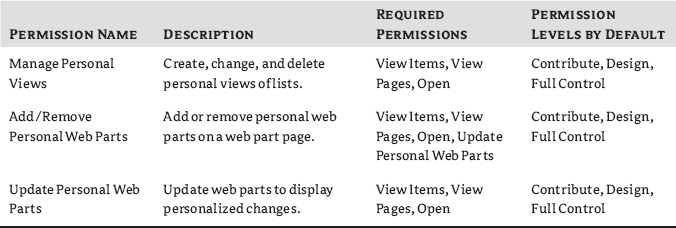
Personal permissions deal with an individual user's view of certain aspects of the website, including being able to manage their own personal view of lists, libraries, and web part pages (it does not affect wiki pages). Unfortunately, if you grant users the permission to change web parts, maybe intending to let them add related lists to a list view, they can also modify web parts on any other list and library pages as well. So, consider carefully the ramifications of what personalizations you allow. Permissions, individually, are never applied to users or groups. Instead, permission levels are created by making combinations of these permissions, and those permission levels are applied to users and groups in site collections. Therefore, it is only fitting that we take a look at permission levels next.
Permission Levels
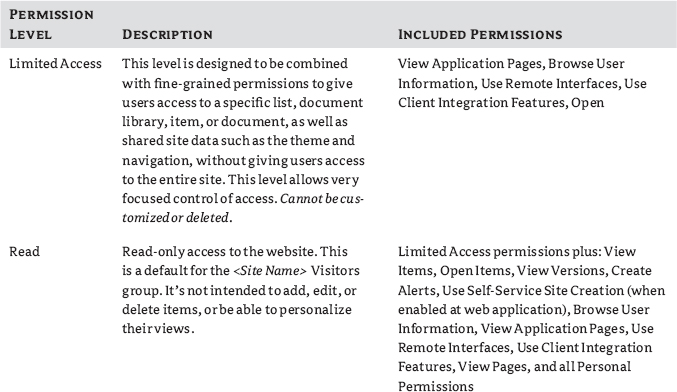
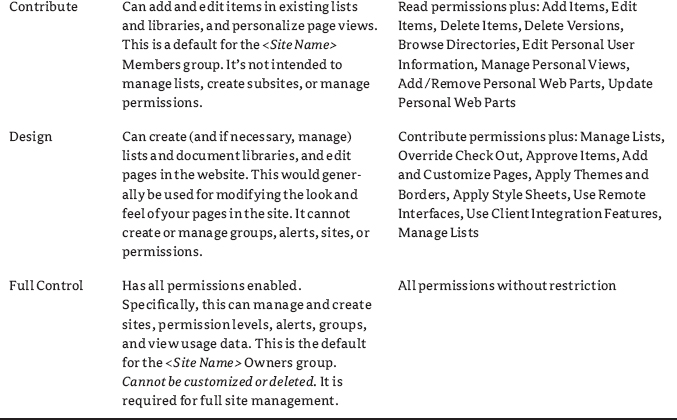
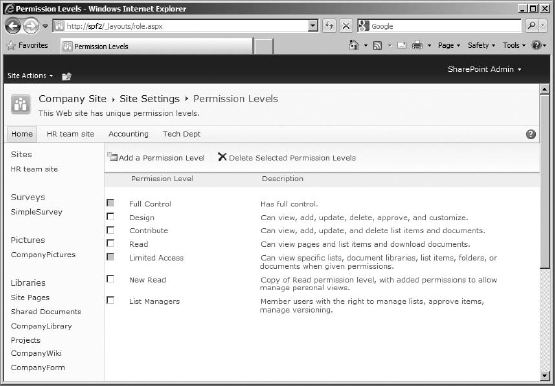
Permission levels enable you to assign a set of permissions to users and SharePoint groups so that they can perform specific actions or tasks on your site. Most permission levels (and SharePoint groups for that matter) are role-related, aligning the set of permissions with a task that must be performed. With permission levels, you can control which permissions are granted to users and SharePoint groups on your site. For example, by default, the Read permission level includes the View Items, Open Items, View Pages, and View Versions permissions (among others), all of which are needed to read documents, items, and pages on a SharePoint site. The following permission levels are provided by default: Full Control, Design, Contribute, Read, and Limited Access. Anyone assigned a permission level that includes the Manage Permissions permission can customize permission levels (except for the Full Control and Limited Access) or create new ones. Site owners are assigned the Manage Permissions permission, by default. The defaults each have their own uses and purposes, which are described in Table 12.4. As you look at the levels and try to decide what to do with them, remember you always want to give the minimum permission to do a task that the user will need. You can see in the table that each succeeding level has all the permissions of the level before it and then adds more. You cannot directly edit either the Full Control or Limited Access permission levels, the two far ends of the spectrum.
TABLE 12.4: SharePoint Foundation Default Permission Levels for Site Collections
Managing Permission Levels
Now that you've seen the out-of-the-box permission levels for site collections, you might need to do some customization. The Read, Design, and Contribute permission levels can be copied or modified, and otherwise, new permission levels can be created for a site. In other words, you can use the premade permission levels as they are, you can use those levels but modify them, you can copy those levels and then modify the copy (which is considered a better idea than modifying the originals), or you can apply your own and ignore the default levels (with the exception of Limited Access). For example, if you have a SharePoint server with a large number of users and groups assigned the Read permission level and you decide you want to restrict these users further (or give them more control), you can edit the Read permission level to provide the precise combination of permissions desired, without having to give all these users a new permission level. On the other hand, if you create a new site or want to add a lot of new users with unique permission needs to an existing site, you can create a new permission level with the correct permissions—either by using an existing level as a template or by creating one from scratch. Permission levels were meant to be easy to manage; as long as you know what the individual permissions actually do (particularly in combination), you can have a lot of control over your SharePoint resources and therefore over your users.
Permission levels are most often added, modified, or copied at the site collection's top-level site and then inherited by the subsites below it. So, most of the exercises concerning permissions and groups will be done at the top-level site of a site collection (which in my case is Company Site). Be aware that you can break inheritance at any subsite, where they then can do as they wish with their SharePoint groups at that point, but all permission levels are actually managed at the site collection level.
VIEWING SITE PERMISSIONS
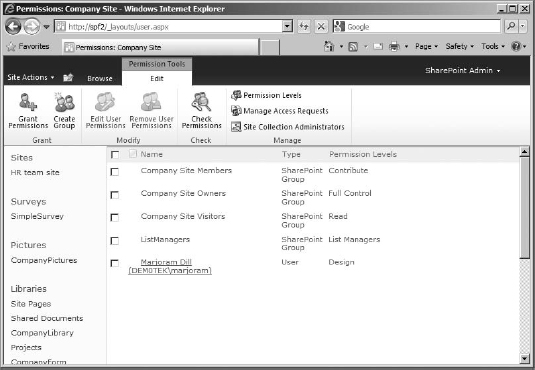
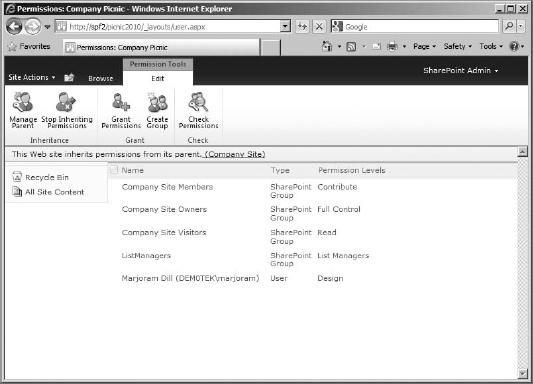
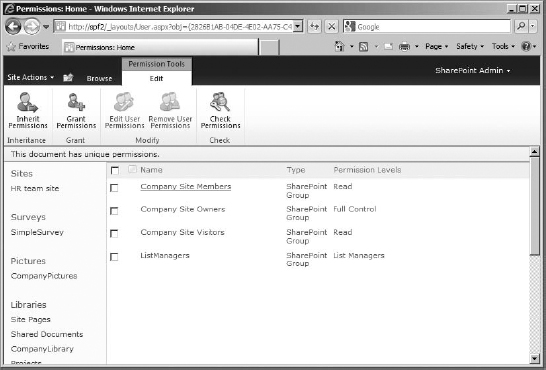
To work with permission levels, you need to get to the Permissions page for the site collection. The quickest way to do so is to click Site Actions in the top ribbon bar and select Site Permissions in the drop-down menu. The Permissions page (Figure 12.4) will allow you to see all the groups and security principals on your site to which permission levels have been assigned directly, what those permissions are, and the type of object they are (user, SharePoint group, and so on). In most cases, permission levels will not be applied directly to a user or security group, so this list will generally contain only site groups (although there are exceptions).
FIGURE 12.4 The Permissions page
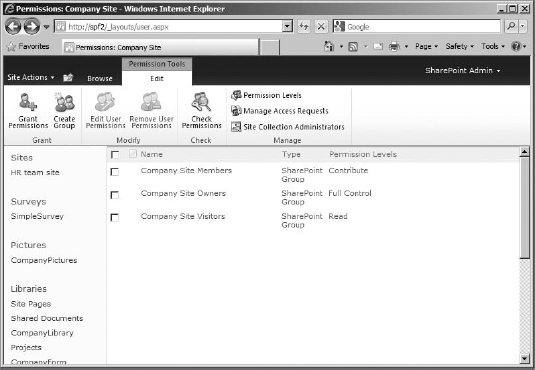
The Permissions page uses a Permissions tools ![]() Edit ribbon for its settings:
Edit ribbon for its settings:
Grant Permissions Basically an Add Users button, this opens a Grant Permissions box, where you can add users or security groups to SharePoint. You can add a user to a group (and inherit that group's permission level) or add a user or security group and then apply a permission level directly (this is good for permission levels not currently used by an existing group, such as Design). A user added with a permission directly applied will appear individually on the permissions page with the groups.
Create Group This button opens a Create Group page, so you can add a new group to the site collection.
Edit User Permissions If a user or group is selected, this button can be used to check the permission level (or levels) being applied.
Remove User Permissions This button removes the permission level applied to the selected group or user, which makes them disappear from the page because it removes their access to the site collection. If they have no permission applied to them, they can't show up on the page (or in People And Groups)—but they still exist in the site collection as a security object. If you aren't just messing with the permissions applied to a group or user you plan to keep on the site, delete the user or group from the site collection instead.
DELETE FROM SITE COLLECTION
If you do want to delete a user or group from a site collection (rather than just remove permissions from them), click the name of the user or group in the Permissions page. In the User Information page that comes up, click Delete From Site Collection. That will not only remove permissions but will also remove the security object from the site collection. This is good housekeeping.

Check Permissions This button doesn't need a user or group to be selected to work. It opens a box that lets you check the existing permission levels applied to a user or group. If you enter a username (as shown in Figure 12.5, I used the user Saffron I added in the installation chapters) and click Check Now, it will return information about the SharePoint group the user belongs to or permission level applied (if it was applied directly to the user).
FIGURE 12.5 The Check Permissions box

Permission Levels This button opens a page that lists existing permissions levels, so you can select one to see the individual permissions it contains (in order to edit it) or select one (or several) to delete. Also on this page is the option to create new permission levels.
Manage Access Requests Generally enabled by default, Access Request is a site-level option. When users are faced with a denial of access, such as a missing menu item or a blocked list item, it allows them to click Request Access in the Account menu. But if a user is completely denied access to a list, library, or subsite, an Access Denied page will display a link to request access. If this option is not allowed, it will not be available on the Account menu or Access Denied page.
If the user clicks to request access, they will be given the opportunity to explain what they need access to and why they need that access (Figure 12.6).
FIGURE 12.6 The Request Access prompt

According to the menu option, the request will be sent to the site administrator, but it will actually be sent to the address in the Access Request Settings section of the Manage Access Requests box. (Figure 12.7). This address is by default the original site collection administrator's email address, but it can be changed.
FIGURE 12.7 The Manage Access Requests box
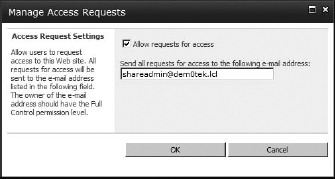
This feature is a double-edged sword. It lets you know what lists, libraries, or subsites users would like to use, but it is also frustrating if they are denied access for a good reason that will not change. Obviously those requests for access can be disabled at the site level by going to the Permissions page and, on the ribbon, clicking Manage Access Requests.
Site Collection Administrators This button opens the Site Collection Administrators box (which is also available from the Site Settings page), where you can see the current site collection administrators, add more, or remove some. Site collection administrators have to be added individually. This is the only place adding security groups instead of individual user accounts is discouraged.
COPYING AN EXISTING PERMISSION LEVEL
As I mentioned, the preferred method of modifying a permission level is to copy and modify an existing one. This leaves the original permission level intact but gives you its settings to work with. However, if the custom permission level that you want is similar to an existing default permission level, you could just select to edit the existing permission level, make your changes, and be done. All groups or users that have that permission level applied to them will be affected by the change immediately. But if you need to keep the default permission level, you can copy the default permission level, modify the copy, and save it as a new permission level. The second option is a real time-saver and is standard practice.
To copy an existing permission level, make sure you are on the Permissions page and follow these steps:
- Click Permission Levels on the ribbon.
This will open a Permission Levels page (Figure 12.8). This page lists the permission levels for the site collection. Here, when you click on the name of a permission level, it opens a page to edit the permission level (or copy it). Also available on the Permission Levels page is a link to add a new permission level or delete selected permission levels.
FIGURE 12.8 The Permission Levels page
- In the list of permission levels, click the name of the permission level you want to copy. For my example, I need to copy the Read permission level.
This will open a page to edit the permission level. You could edit the permission level's settings, from name and description, to the permissions included (Figure 12.9).
FIGURE 12.9 The Read permission level, Edit Permission Level page
- You will need to scroll to the bottom of the Edit Permission Level page to click the Copy Permission Level button (see Figure 12.10). This will open the Copy Permission Level page.
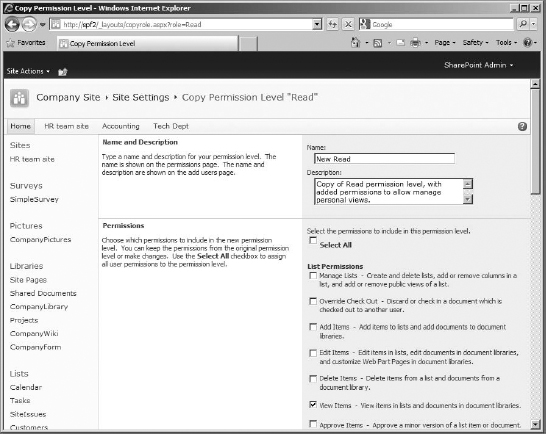
- On the Copy Permission Level page (Figure 12.11), enter a name in the Name box for the new permission level. My example uses New Read.
- In the Description box, enter a description for the new permission level.
- From the list of permissions, select or clear the check boxes to add permissions to or remove permissions from the permission level. As you may remember, some permissions have prerequisites, so pay attention to what you enable.
- To create your new custom, copied permission level, click Create at the bottom of the page.
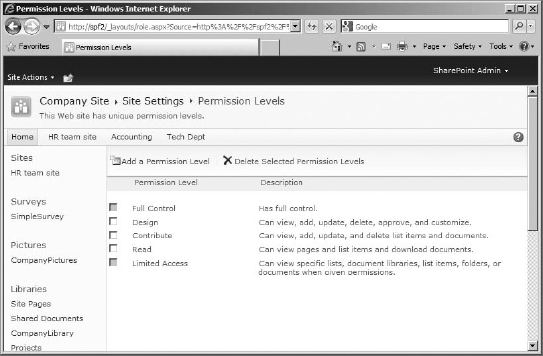
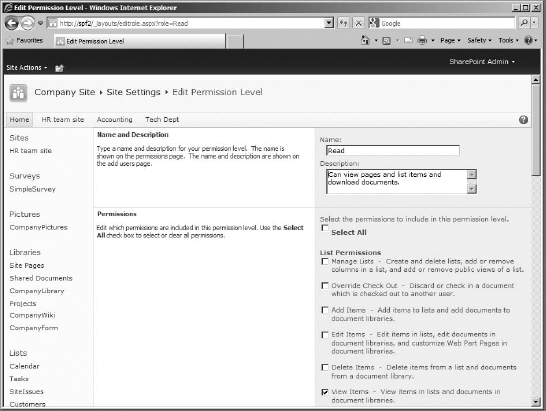
FIGURE 12.10 The Edit Permission Level page, Copy Permission level button
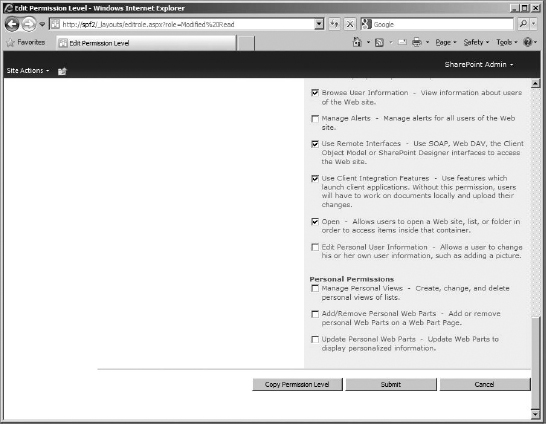
FIGURE 12.11 The Copy Permission Level page
By using this method, you have created a new permission level while keeping the existing one in place, allowing you to use both permission levels in the site collection.
CREATING A NEW PERMISSION LEVEL
Creating a permission level from scratch is a good idea when none of the existing permission levels are close to what you need. You can create a permission level that will include exactly what you require. To create a new level, follow these steps:
- Make sure you are on the Permissions page. In the ribbon, click Permission Levels.
- On the Permission Levels page, click Add A Permission Level.
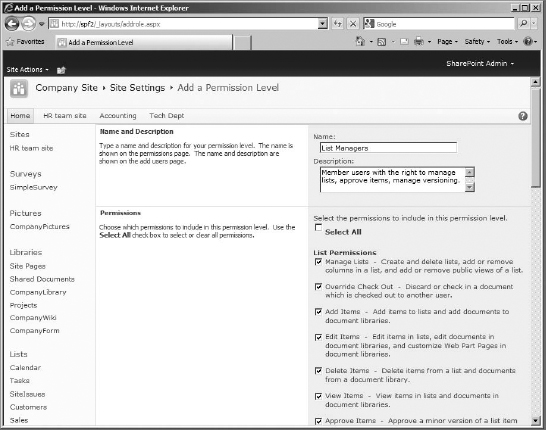
- In the Name box on the Add A Permission Level page, enter a name for the new permission level (see Figure 12.12). My example will be a new permission level for List Managers.
FIGURE 12.12 The Add A Permission Level page
- In the Description box, type a description for the new permission level.
- In the list of permissions, select the check boxes to add permissions to the permission level. If you want to create a level with almost Full Control, click Select All and then uncheck the permissions you want to remove. You can make a permission level complete, so it can be applied to a group of users as is and they can do everything they need to do, or you can create a limited permission level with only the exact permissions you want them to have and then add it as well as a standard permission level to a group, giving the users standard permissions (such as Contribute) plus the custom ones. In my case, I am enabling all of the list permissions to allow the list managers to work freely on lists in whatever capacity they require (especially to manage list settings, approvals, and versioning) as well as the standard Contribute permissions. This allows the level to be complete by itself.
- Click the Create button at the bottom of the page to create your custom level.
In Figure 12.13, you can see the new permission level listed (as well as the one we modified and copied).
FIGURE 12.13 Permission Levels page with new and copied permission levels listed
At this point, you know how to check the current permission levels of your sites to see what permissions they actually have, how to modify existing permission levels (and which you can't), how to create copies of existing permission levels for customization; and finally, you know how to create your own permission levels to combine exactly the permissions you want into a permission level.
Users and Groups
Now that you understand the foundation of permissions in SharePoint, it's time to start looking at applying them inside a SharePoint site collection.
When adding users to SharePoint, Microsoft recommends you add Active Directory security groups (usually just referred to as security groups) to SharePoint groups rather than individual users as much as possible. SharePoint has a limit of 5,000 security principals (users and security groups) for a site collection. According to Microsoft, going beyond this limit has been tested and could cause performance issues. However, adding Active Directory security groups, each of which can contain many users, allows the number of supported users (assuming they are all in no more than 5,000 AD security groups) to scale to 2 million.
Adding security groups rather than individual users provides another distinct advantage: ease of administration. Rather than having to manage users in two places, you only need to manage Active Directory group membership.
For example, you can add all the managers in your organization to a Managers security group in Active Directory and then add that security group to a Managers SharePoint group that you created. You want these managers to have read and write access on the Sales Events subsite, read-only access on the Accounting subsite, and full control access on the Management subsite. You can accomplish this by adding the Managers AD security group to a Managers group on the top-level site and then assigning the permissions you want for the Managers SharePoint group separately on each subsite.
As managers join the team, you add them to the Managers Active Directory security group, the way you normally would without SharePoint on the network. This automatically makes them part of the Managers SharePoint group, without having to add them manually to SharePoint as individual users. There is also no need to specify the permissions they have on different sites, because you have already assigned the permissions you want to the Managers SharePoint group for all three sites. If a manager leaves or gets transferred, you just remove the user account from the Managers Active Directory security group. And they will no longer be a member of the Managers SharePoint group. On the other hand, if you choose to add each manager directly to a site instead of using a security group and a SharePoint group, you must assign each manager the appropriate permissions on each of the three sites. If they then change job roles in the company, you need to change their permissions for each site manually.
Viewing People and Groups
Now that you are familiar with permissions and permission levels, let's take a look at how to manage user accounts and groups and how permissions are applied to them.
You can add groups and users using the Permission page. But when you want to look at the contents and settings of a group itself, you usually need to go to the People And Groups page. This page is where you end up if you click a SharePoint site group name. For this reason and because you already know about the Permission page, we'll work from within the People And Groups page to give you some experience with it.
Either make certain you are on the Site Settings page and click the People And Groups link, or click the Site Actions menu, select Site Permissions, and click the site group you want to view; they will both open the group's members list in the People And Groups page. Either way, find your way to the People And Groups page (see Figure 12.14).
FIGURE 12.14 The People And Groups - Company Site Members page
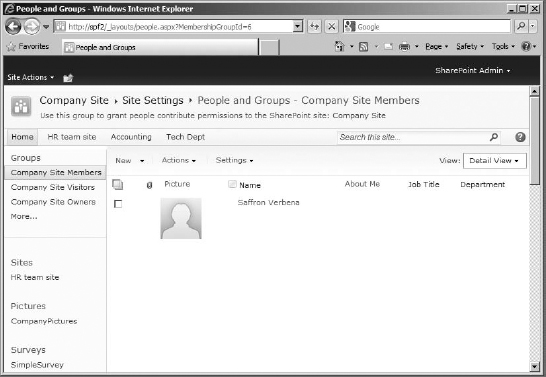
This page is essentially a list of the people and groups for the current site and generally defaults to displaying the users in the Members group (in my example Saffron is there because she was added in the installation chapters, Chapters 2 and 3). It allows you to manage the users in the groups as well as manage the groups themselves. On the Group Quick Launch bar, you can see the three default groups that SharePoint added to the site: Company Site Members, Company Site Visitors, and Company Site Owners. The Company Site Owners site group has the Full Control permission level assigned, the Company Site Members site group has been assigned the Contribute permission level, and the Company Site Visitors site group has the Read permission level assigned.
LOCATION, LOCATION, LOCATION
Note that members of the Company Site Owners group for a top-level website can control more options than site owners of a subsite. For example, they can perform actions such as specifying settings for web document discussions or alerts and viewing usage and quota data for the top-level site and all subsites.
In Chapters 2 and 3, as one of the post-configuration tasks, we added a user to the Company Site Members group, as an example. It's easy to add users to existing SharePoint groups. So, what we're going to do is create a new group to add users to.
When you create new permission levels, you can apply more than one to a group (you're not limited to one permission level per group); however, it's considered good practice to have one permission level associated with a group. The People And Groups page uses the old-style Action bar, with drop-down buttons for New, Actions, and Settings. New lets you create a new user. Actions requires that something be selected to act on; the options are to email, call or message, or remove (from the group) the selected user. Settings manages the group or the list itself, with options to view group settings, view group permissions, or make the group the default group (the group that shows up by default whenever someone goes to the People And Groups page), and go to list settings.
Keep in mind that a top-level site shows all groups for all sites in the collection. This includes unique groups specifically made for subsites that have broken inheritance. Even though those groups can't necessarily access or use any other site in the collection, they will still be listed at the top-level site. They are, after all, still groups applied somewhere in the site collection, and the top-level site is the one that contains the site collection settings. In the Groups page for the top-level site, the groups listed will indicate what sites they impact (although the groups for the top-level site, Company Site in my example, are also the default groups for the entire site collection). So, those top-level site groups impact the top-level site and all sites that inherit permissions.
Creating a New SharePoint Group
To manage and add groups to the site collection from People And Groups, you need to be on the All Groups page (from the Permissions page, just click Create Group).
To get to the All Groups page from the People And Groups page, you can click the Groups heading in the Groups Quick Launch, or you can click More... also in the Groups Quick Launch. On the All Groups page, there are New and Settings buttons. New only creates new groups, and Settings has one option, Edit Group Quick Launch.
- While you are on the Groups page, click the New button (see Figure 12.15). You may notice, in my example, that there are groups for the Tech Dept subsite created in Chapter 10. The groups listed for your site collection may also vary, but you should at least have the site groups for the top-level site.
FIGURE 12.15 All Groups page
That will open the Create Group page (Figure 12.16), allowing you to add a new group to the site. If you clicked the down arrow next to the New button, click New Group from the menu to get to the page.
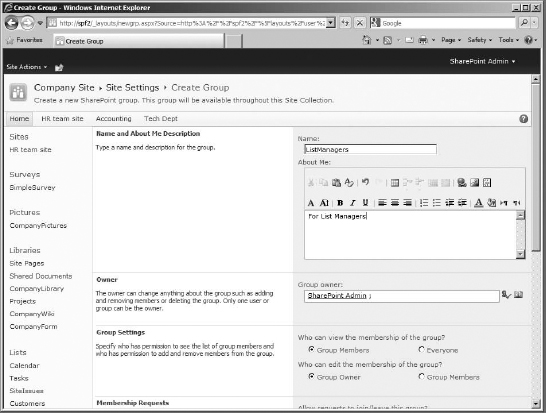
FIGURE 12.16 The top of the Create Group page
The top half of the page has several options that you can fill out:
- The first option is Group Name. Always enter a unique name for the group. My example uses ListManagers.
- Directly under Group Name is About Me, which is the description. My example uses For List Managers.
- The next section for the group is Owner. The owner can be any user, SharePoint group, or security group. But keep in mind that “owner” is not plural; there can be only one item in that field, even if it is actually a group of users. The owner will have full control of the group by default. My example uses my SharePoint Admin account (shareadmin). The field will default to the username of the person creating the group. Also keep in mind that the Owner of the group is the only one who is allowed to manage the group (other than the site collection administrator of course), so even if an account has full control permissions to a site, they won't be allowed to add users to a group they don't own.
- The following section is about the group members' settings, specifically who can view the group members (only that group or everyone) and who can edit the group members (only the owners or all members). The defaults are as shown, with the group members being able to view group membership and the group owner being able to edit the group members. Those defaults are fine for this example.
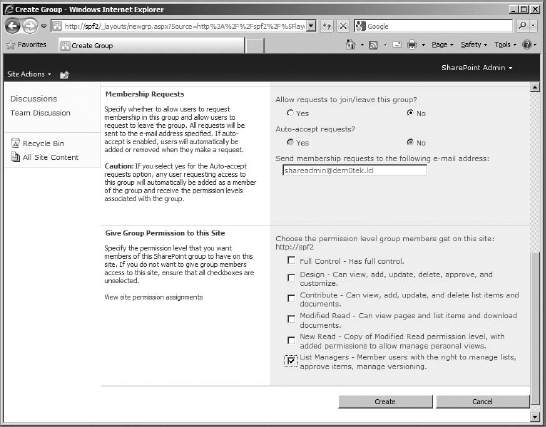
The bottom half of the page deals with the final options for the group, as shown in Figure 12.17.
FIGURE 12.17 The bottom of the Create Group page
- The Membership Requests section is where you indicate whether to allow requests to join or leave the group and whether to automatically accept requests if they are allowed. The email address box is typically filled with the group owner or site administrator's email address, although the request can be sent to anyone who has authorization to edit the group. The defaults are fine for our example also.
- The Give Group Permission to this Site section is where you specify the permission levels for the group being added. My example assigns the new List Managers permission level I created earlier for this group.
MORE THAN ONE PERMISSION LEVEL CAN BE APPLIED
Notice that the option to select a permission level is a check box, which means you can select more than one. You certainly can apply more than one permission level to a group if necessary. This is useful if you create a permission level that is limited to some precise permissions but don't also cover those used for accessing, navigating, or contributing to the site. You can then combine that limited permission level with one that is more broad, such as the existing Contribute level, so the group members can use both.
- Once you have made all your entries, click Create, and the group will be created and displayed (see Figure 12.18). By default, because a group cannot be empty of users, the owner/creator of the group is always the first member.
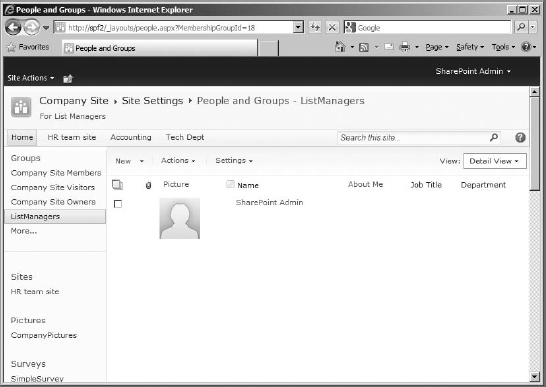
FIGURE 12.18 The ListManagers members page

Adding a Security Group or User to a SharePoint Group
The People And Groups - ListManagers page indicates, in my case, that the group has one member, my SharePoint admin. To add new users, follow these steps:
- You can add new members by clicking the New button on the People And Groups page for the group (if you were on the Permissions page, you would click the Grant Permissions button).
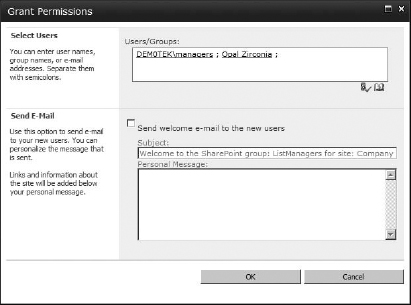
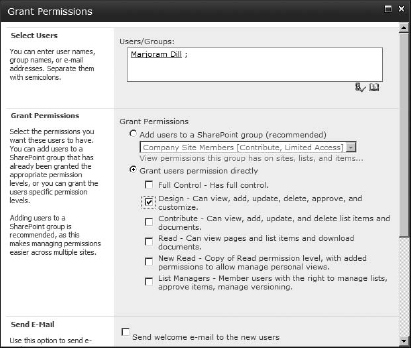
- The Grant Permissions box shown in Figure 12.19 allows you to add a new user or security group to the SharePoint group. The first entry box is the People Picker into which you can add usernames. The username can be any existing SharePoint user, domain (or server) user, or security group in the system. In this box, you can enter multiple users and security groups separated by semicolons. You can enter the names in the format of DomainUserName or DomainGroupName, or you can just use the friendly name for the user or group and have the People Picker resolve it to the username in AD (you can do the same with accounts on a single server, using the server's name instead of the domain, it will also resolve to using the Check Name button). You could even use the email address listed for the user or group in Active Directory. My example adds my Active Directory security group dem0tekmanagers and the individual user Opal.
FIGURE 12.19 Adding new users
- Below the Select Users section is Send E-mail. If the users and security groups have email addresses associated with their accounts in Active Directory (or if you used the email address for the accounts), you can choose to send them a welcome email letting them know that they've been added to the site. I don't want to send out the welcome email, so I am going to clear that check mark.
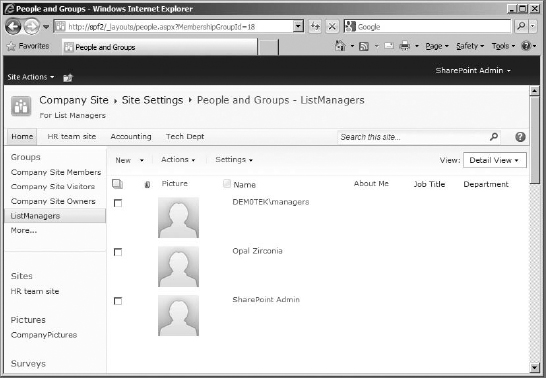
- Once you click OK, you will be taken to the Group page (see Figure 12.20). My example has three members in the group: sharepoint admin (the owner of the group), Opal, and the dem0tekmanagers security group.
FIGURE 12.20 The new ListManagers group has three members.
REMOVING A USER FROM A GROUP DOESN'T DELETE THEM FROM THE SITE
On the Permissions page there was a button to remove the permissions from a user account, and removing a user from a group is basically the same thing. You simply select the user or group you want to remove, click the Action button, and select Remove Users From Group (we'll do this later in the chapter). Keep in mind that if that was the only site group the user was a member of, this action just strips the account from being able to access the site; it does not actually remove the security principal from the site. So if the account is never going to be used in that site collection, delete it from the site collection (click the account in People And Groups, and choose Delete From Site Collection).
Now that we have covered a good bit of ground, it is time to look at how permissions work on the stuff inside SharePoint. Most objects can be secured in SharePoint. A securable object is an object upon which permissions can be configured (for example, a site, list, library, folder within a list or library, list item, or document). Permissions for users and SharePoint groups can be assigned to any securable object. The SharePoint system defaults to assigning permissions at the site collection level, and those permissions filter down through permission inheritance to the contained objects such as sites, lists, list items, and the like. A user with the Manage Permissions permission can edit the permissions for any of the contained objects, breaking the hierarchy of inheritance if they wish. This permission is assigned to the Site Owners group by default.
YOU CAN ADD A USER WITHOUT A GROUP
You might have noticed that there are only three default site collection groups (Members, Owners, Visitors) but four useful permission levels (Full Control, Contribute, Read, and Design). Thus, there is a fourth set of permissions that a user can't use if they are added to the existing groups. This is a good example of why you might want to add a user individually and apply permission level(s) to them directly.
- To do that, in the Grant Permission box from the Permission page, enter a username (or users, if you'd like), and click the Grant Permission Directly radio button.
This will propagate a list of the available permission levels for the site collection. You can then select the level (or levels) you want to apply to the user account.
- After clicking OK, you can go back to the Permissions page and see that the user is now listed, outside of the existing groups.
Inheritance
Now that you have a basic understanding of permissions, permission levels, groups, and users, it's time to explore inheritance.
Inheritance fundamentally means that a site and its contents inherit their permissions from their parent object. So, subsites get their groups, users, and permission levels from their parent site; the subsite's lists and libraries get their permissions from the subsite, and list and library items get their permissions from the list or library in which they reside. This chain of inheritance makes it possible to administer permissions for an entire site collection from one place and have those changes trickle down to all other objects contained therein.
The complicated part of this concept is when inheritance is broken.
Why would you want to break inheritance? Well, if inheritance (in this context) means that all users, groups, and permission levels are inherited by all subsites (and therefore their pages, lists, and libraries), then breaking inheritance should mean you select to break the object (be it a subsite, list/library, or item) from inheriting those users, groups, and permission levels with the intention of having its own, unique permission levels and groups.
But it doesn't quite mean that, especially not in this version of SharePoint.
To break inheritance on a subsite, you go to the Permissions page, and click the Stop Inheriting Permissions button. This button name is something of a misnomer, as you'll see in a moment.
When you click that button, nothing actually changes. The site collection groups that were there before are still there and function in the same way. But what really happens at this level, if you break inheritance, is that now the subsite owners (or a site collection administrator) can change the permissions allowed for those site collection groups within that site. If necessary, you can remove the site collection groups from the subsite, giving the site collection's users no access to the subsite at all (of course you'll make more groups at that level to add users to). Or you can change the permission level(s) on the site collection groups at that subsite, giving them different access to the subsite specifically (but not removing the groups entirely).
When you break inheritance of permissions and groups from the site collection, that subsite is saying, “I need to allow users other than those allowed throughout the rest of the site collection access to this subsite. Further, I need to give users different permission levels than those allowed throughout the site collection.” But unfortunately, for this version of SharePoint, you cannot go so far as to create new permission levels for the subsite. However, you can apply existing permission levels in different ways to the users and groups in the subsite than the way the site collection does.
The fact that you can't break completely from the site collection and make your own permission levels for your unique subsite is a disappointment. All permission levels are held at the site collection level (much like site collection solutions are). However, you can create a permission level at the top of the site collection and apply it only at the subsite of your choosing. But you can't make a permission level specifically and only at the unique subsite that broke inheritance.
Further, because lists and libraries, even individual items, might need special security access configured on them, any one can be configured to break inheritance from its parent object, and then new permissions can be applied. Keep in mind that, if you break inheritance on a list and apply different permissions to that list, all items in that list will inherit those permissions. An individual item can even have unique permissions, if necessary (although going that granular with permissions can confuse the Search service, so use sparingly), by breaking its inheritance and applying new permissions to it.
If you break inheritance on a subsite and change the groups it uses, then everything on that subsite—its lists, libraries, and pages—inherits the new permissions from the subsite that contains them.
If you create a subsite beneath that unique subsite, then that sub-subsite inherits the permissions (meaning the groups and users and the permission levels applied to them) of that unique subsite above it, which is considered its parent (unless, of course, you set it not to inherit permissions).
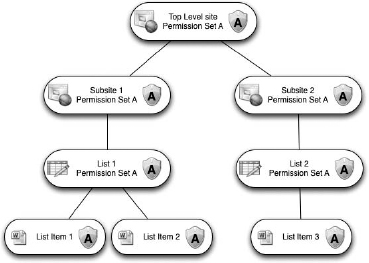
To help you visualize how permissions are inherited, Figure 12.21 shows a top-level site with a set of permissions called Permission Set A. I'm considering a permission set to be a combination of groups, users, and the permission levels applied to them. The two subsites underneath that top-level site also have Permission Set A, as do the lists (I consider libraries to be included) and list items within the sites. All of the objects in my example are shown inheriting permissions from the top-level site.
FIGURE 12.21 Inherited permissions
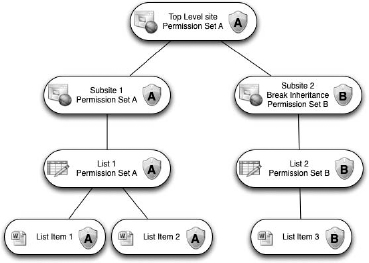
If you break inheritance on Subsite 2 and change permissions, such as the groups available for that subsite, as well as the permission levels applied to them (let's call those changes Permission Set B), the permissions for the list (and its list items) contained there will also change so that they both will have Permission Set B. See Figure 12.22.
FIGURE 12.22 Subsite 2 permissions changed
The same thing happens in lists or libraries. If you give them unique permissions by breaking inheritance, the new permissions will flow to every item in the list or library.
You could also break inheritance on an individual list item, like List Item 2, and give it a different set of permissions, Permission Set C in this example (see Figure 12.23).
FIGURE 12.23 List Item 2 permissions changed

And on a larger scale, because inheritance goes from a parent object to its child objects, you can break inheritance on a site, and all subsites you create below it can inherit its unique settings (and by definition, all those sub-subsites' lists, libraries, items, and pages).
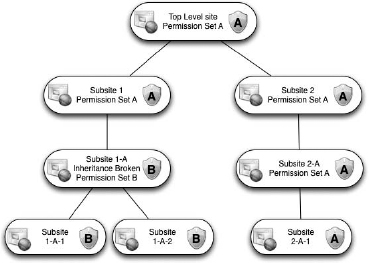
Figure 12.24 shows a top-level site with the same sort of permissions as our first example, which we'll call Permission Set A. Subsite 2 and all subsites beneath it are configured to inherit permissions and therefore also use Permission Set A throughout their pages, lists, and libraries.
However, in this diagram, one of the subsites two levels below the top-level site, Subsite 1-A, has broken inheritance to use its own groups and permissions. For the sake of discussion, we'll call its permissions Permission Set B. That means all lists and libraries on that site will be affected by Permission Set B (unless set to do otherwise). If any subsites are created beneath subsite 1-A and are set to inherit permissions, they will inherit Permission Set B. This gives subsite 1-A permission capabilities akin to a top-level site. Changes to the permissions at that level trickle to the other two subsites beneath it (Subsite 1-A-1 and Subsite 1-A-2).
FIGURE 12.24 Subsites with different inherited permissions
Breaking Inheritance on a Subsite
Occasionally a subsite in a site collection requires unique permissions, such as an event subsite that the site collection's Members group should only have Read access to. In that case, inheritance must be broken so those changes can be made.
To change a subsite's permissions if it is already inheriting permissions, go to the subsite's permissions page (in my example I created a meeting workspace for a Company Site picnic), and in the ribbon click Stop Inheriting Permissions (Figure 12.25). Notice that the page, until inheritance is broken, shows which site it is inheriting permissions from.
FIGURE 12.25 Choosing Stop Inheriting Permissions on the sub-site's Permissions page
Choosing to stop inheriting permissions will trigger a warning dialog box reminding you that you will be breaking inherited permissions with the parent site (Figure 12.26).
FIGURE 12.26 The Breaking Inheritance warning
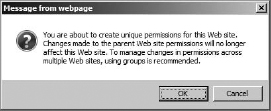
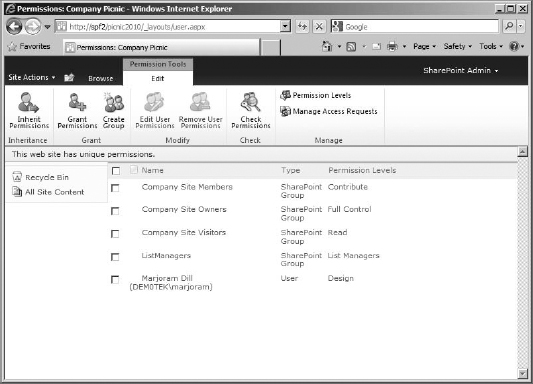
This warning is a little misleading. What it means is the groups that this site had originally inherited from the site collection, or parent site, will still be there, but the permissions applied to the groups are now broken from the parent, and if they are changed outside the site, the change won't propagate to this site. This also means that permissions applied to the groups at this site (now that it's broken inheritance) won't affect the parent sites permission on the same groups. Click OK. As you can see in Figure 12.27, inheritance has been broken with the parent on this site.
FIGURE 12.27 This website has unique permissions.
IF YOU CHANGE YOUR MIND
One of the nice things about SharePoint Foundation is that it allows you to reestablish the inheritance relationship. Anywhere inheritance can be applied, from the site level to the item level, inheritance can always be restored. This means these decisions are not unchangeable. On the Permissions page, after breaking permissions, the Manage Parent button (as in manage permissions from the parent site if you are inheriting them) turns into the Inherit Permissions button (you can see the change between Figures 12.27 and 12.29).
Once you choose to inherit permissions again, you will lose any and all customizations you have made to the current object (be it a site, list, or item), and you will revert to inheriting permissions from the parent object. Should you decide to return to custom permissions from inherited permissions, you would need to break inheritance again and redo the unique permissions for the object.
Once you've broken inheritance, you will see that the site collection groups are still there (as well as the group we created earlier and, in my case, the user I added to the parent site directly). They are still connected to the site collection, and if you add users to those groups, they will be added wherever those groups are applied. They still are the site collection groups. However, what makes it different at this level is that you can change not the users of the group uniquely but what permissions are applied to the group at this level. Or you can just remove those groups from having access to the site altogether.
APPLYING UNIQUE PERMISSIONS TO A GROUP AFTER INHERITANCE IS BROKEN
In this example, the site collection's members should only have the right to read content on this site but not the right to contribute. For that reason, you need to change the permission level on this group from Contribute to New Read (the permission level we copied and modified earlier).
- On the Permissions page, select the group in which you want to change permissions (in my example I am going to select the Company Site Members group). Then click Edit User Permissions.
- In the Edit Permissions box, clear the check box for the permission levels you don't want the group to have, and select the permission levels you do want. In my case, I am removing Contribute and selecting New Read (Figure 12.28).
FIGURE 12.28 Editing the permission level applied to the Company Site Members group for the unique subsite
- When your selection is complete, click OK to make the change and return to the Permissions page.
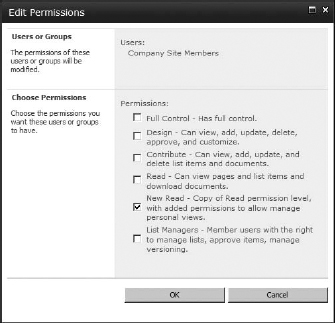
On the Permissions page, the group will now be listed with the New Read permission.
NOT AS INDEPENDENT AS YOU THINK
You might think that, if you broke inheritance from a parent site, even if their groups still show in the Permissions page, if you make changes, it won't propagate back up to the parent. If so, you are wrong.
If you were to add a user to one of the site collection groups while in the unique site, it would show up as a member of the site collection group at the top-level site.
The site collection groups didn't change their name when inheritance was broken, and that's because those are still the site collection groups. This way, if you still plan to let those users access your unique site but you want them to have different permissions, you can easily just keep the site collection groups where they are. But if you don't, remove the groups and just create ones specifically for your unique site (and any subsites beneath it, if you wish).
CREATING A UNIQUE GROUP FOR A SUBSITE
So, the site collection's Members group has had its permission level changed. It's now time to add a unique group to the site, so you can add users who can contribute to the site (now that the Members group cannot).
You know how to create a group using the Groups page in People And Groups, so this time we're going to use the Create Groups button, conveniently located on the ribbon bar in the Permissions page.
- To create a unique group for this subsite, make sure you are on the Permissions page, and click the Create Group button.
The Create Group page that opens is the same one you used to create a group earlier in the chapter.
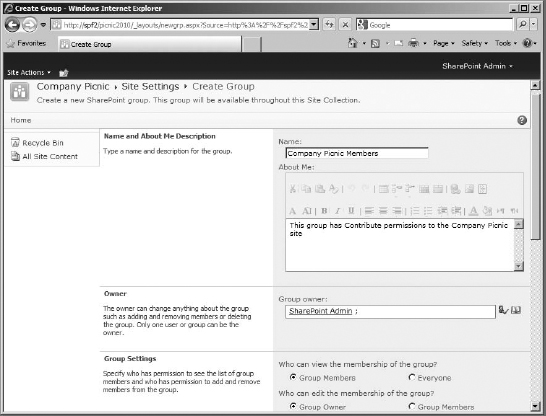
- Fill in the fields to create this group for the site. The name for the group should indicate what site it belongs to (since it will show up in the groups list for all groups in the site collection, it's good form to show where the group is applied). My example will use Company Picnic Members (Figure 12.29). Feel free to enter a description for the group.
- Keep the account you are logged in as the owner of the group, and keep the defaults for group member settings and request.
- For the Permissions section, let's choose to give the group the Contribute permission level so the users you add to it can contribute to the site (Figure 12.29). These will be people who will be organizing the picnic.
- To finish creating the group, click Create.
FIGURE 12.29 Creating a new group for the unique subsite
You will be taken to the People And Groups page for the new group, where you can add users. To follow my example, add one user. However, feel free to add other users or security groups to the new group for the site if you wish.
Once you've added a user (in my case, a user named Rosemary Leek, who is organizing the picnic this year), feel free to go to the home page of the site and log in with that user. You'll see that you can log in to the unique site with that user.
However, if you try to log in with that same user to the top-level site of the collection or any other subsite, you will get an Access Denied page because that group is used only by the site where it was created.
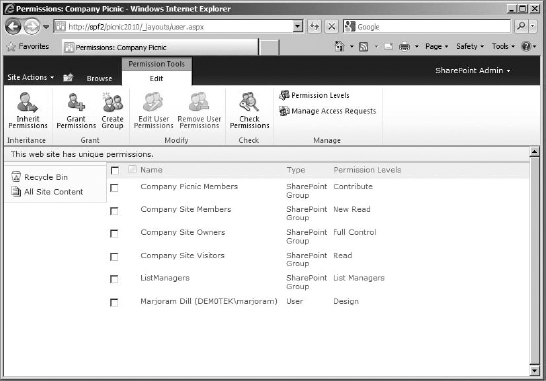
If you were to go back to the Permissions page for the site, you'd see the new group listed, with the correct permission level (Figure 12.30). Again, this group can be applied only to this site.
FIGURE 12.30 The new group listed in the Permissions page
And if you were to go to the top-level site of the site collection, you would see that the group is not listed in that site's Permissions page (Figure 12.31). This means the group for the subsite is not applicable for that site (and therefore the whole site collection). The Permissions page at the top of the site collection shows you the groups that will be applied throughout the collection, if the subsites are inheriting permissions.
FIGURE 12.31 The site collection's Permissions page does not show the subsite group.

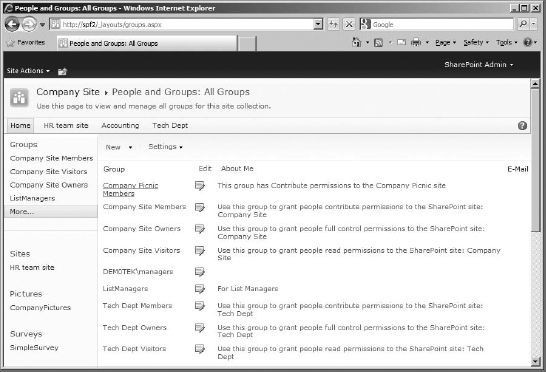
However, if you were to go to the All Groups page (using the Groups heading or More link in the Quick Launch of the People And Groups page) at the top-level site, you would see the group for the subsite that broke inheritance listed there (Figure 12.32). The group isn't being used by the top-level site (or the rest of the site collection), but it is listed on this page as a central location for all the site collection administrators to see what groups are used where throughout the collection.
FIGURE 12.32 The subsite group is listed for all groups in the site collection.
This should give you some insight into how to use the existing groups from a site collection to your advantage in a subsite that has broken inheritance (changing the permission levels). You've also seen how to create a group for the unique subsite, what that actually does, and why it is still listed (but not applied) at the top-level site.
CREATED WITHOUT INHERITANCE
You can choose to create a subsite that doesn't inherit permissions from the start. When you do that, the site doesn't end up with the parent's groups but instead prompts you to set up groups for the site right during site creation.
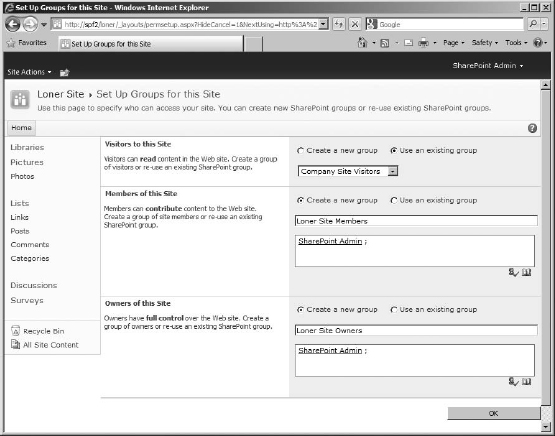
You can choose to use existing groups (like the site collection's visitors group), or you can create new ones. It will suggest group names based on its standards and suggest you use the naming convention of starting the group names with the site's name. You can add users to the groups here, although the account being used to create the site is automatically added. It only gives you the chance to set up three groups by default; you'll have to go to the site itself to add more.
REMOVING INHERITED GROUPS
At this point, you've been working with what you've got; you've changed the permission level on the site collection groups that can access the unique site, and you've created a new group to give specific people, specific access to the site. However, you may need to break completely with the site collection in terms of user access, meaning you need to completely remove at least some of site collection groups (and users) and simply use your own.
In my case, I only want the Company Site Members to be able to read content on the site and the Company Picnic Members to be able to contribute. This means I need to remove the other groups (and the user) the subsite originally inherited from the site collection.
A convenient way to stop groups (or users) from the parent site from accessing the site is to go to the Permissions page, check the box next to the groups (and/or users) to select them, and click Remove User Permissions. This will remove permission to the site from the groups (and users), not delete them from the site collection altogether (that is very important). A dialog box will pop up to warn you that you are removing groups from the site (which can reassure you that you are not deleting them from the site collection).
After you have clicked OK in the warning dialog box, it may take a few moments, but all the objects you removed from the Permissions page will go away and leave you with only the groups you want (Figure 12.33).
FIGURE 12.33 Permissions on the site after removing groups

REMOVED GROUPS STILL SHOW UP ON THE SUBSITE'S GROUPS QUICK LAUNCH BAR
Now, the groups from the parent site, even though they've been removed from the site itself, will still show up in the subsite's Groups Quick Launch bar (and the All Groups page). To get rid of them from the Quick Launch bar, simply edit the Groups Quick Launch bar from the Settings menu on any Group page. However, even if those groups do show up on the Groups Quick Launch bar, they are truly no longer able to access the site.
I hope this discussion has given you an idea of how to break inheritance at the subsite level. You've seen what really happens; why the site collection groups remain there; and how to add new groups, change permission levels applied to groups, and remove the inherited site collection groups.
Changing List or Library Permissions
Sometimes the need to customize occurs not at the subsite level but at the list or library level (there was an example of that in Chapter 10 concerning blog comments). Often a document library needs to be created to hold secure documents that the users who otherwise populate the site should not see. Because of this, it needs to have custom permissions.
To change permissions on a list or library, you need to break inheritance from the parent site before you can set custom permissions. It's basically the same process to break inheritance for a subsite, list, library, document, or list item because each one of them has its own Permissions page.
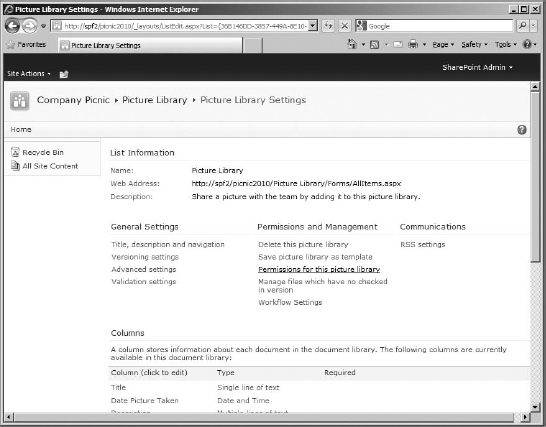
- To break inheritance on a list or library so you can change permissions, go to that list or library. My example uses the Picture Library for the unique subsite. Go to the list or library's settings page (in my case, I would click Settings in the Action bar since this library doesn't use a ribbon and then click Picture Library Settings).
- When the Settings page opens, click the Permissions link for that list or library (my example is Permissions for this picture library) under the Permissions And Management category (see Figure 12.34).
FIGURE 12.34 The Picture Library Settings page
- The Permissions: Picture Library page will open. This page contains the permissions currently inherited from the parent site and looks like your standard permissions page. Click the Stop Inheriting Permissions button. A dialog box will then warn you that you are about to create unique permissions for this library.
- After you click OK on the dialog box, you'll be taken back to the Permissions page. You can then select any of the entries and modify their permissions, remove the groups, or add users (or security groups) directly to the list or library permissions. For example, in Figure 12.35, you can see that I've added a user and given them list manager permissions to the library.
FIGURE 12.35 The Permissions page for the library, with a unique user added after breaking inheritance

INTERESTING PERMISSIONS ISSUE WITH PICTURE LIBRARIES
If you use unique permissions for a picture library, there is something to consider. Users with permission to access the library must have permissions to the subsite containing the picture library in order to be able to use a picture editor to edit, download, or share pictures. For some reason, having unique, limited-access permissions to the Picture library only, and not to the subsite itself, will limit some of the things you can do with the library. The other library types don't have this issue.
Once you have broken inheritance, you'll have the following capabilities and restrictions:
- You can add new users or security groups to the library. To do this, simply click Grant Permissions on the permissions page of the library, and add the user or security group via the new user page.
- You can remove a SharePoint group allowed to access the library (or user if they were added with permission levels instead of a group), by selecting the group or user, going to ribbon bar, and selecting Remove User Permissions. The person or the people in the group will summarily be unable to access that library from that point (but can still easily access the rest of the site, unharmed).
- You can edit the permission levels applied to the SharePoint groups for the list. When you do this on a list or library that has broken inheritance, it does not change the true permission levels applied anywhere else on the site.
- You cannot simply create a new SharePoint group for the library.
- You cannot create anew or modify the permission levels applicable for the library.
The same thing applies to list or library items, in terms of breaking inheritance, and what you can do with permissions in terms of groups and permission levels. Keep in mind that you can always change your mind and restore inheritance by choosing Inherit Permissions at any time from the ribbon bar on the list or library's Permissions page. All changes you made during the noninheriting time will be undone.
Changing Individual List or Library Item Permissions
There are times when a single item in a list or library needs to have unique permissions, such as an announcement that should never be edited or deleted or the Home page in the Site Pages library. The rest of the library needs to have normal site permissions applied so users can contribute, edit, and so on. So, it stands to reason that if a single item needs to be locked down, its permissions should be changed. Keep in mind that this is considered “granular security,” and too many items set with their own permissions can make it hard for the search service to security filter results properly. Therefore, securing individual items should be done only if absolutely necessary.
The procedure to give an individual item unique permissions is exactly like giving a list or library unique permissions. First you need to get to the item's permissions page and break inheritance, and then you need to apply the new permissions.
In this example, we are going to block the Home page wiki document (Home.aspx) from being able to be edited or deleted by users who are in the Members group. This will finally keep the users from being able to change, delete, or otherwise ruin the home page of the Company Site (since it is using the Home.aspx wiki page).
To do that, go to the Site Pages library. Select the Home document. Then, in either its drop-down menu, select Manage Permissions, or on the ribbon bar, click the Item Permissions button (in a library it would be Document Permissions). In Figure 12.36, I used the drop-down menu.
Once on the item's permissions page, click Stop Inheriting Permissions. Then, as you did with the list or library, you can add a user or security group to the item's permissions, edit the permissions of a selected group, and/or remove permissions from a selected group (effectively removing the group from accessing the item).
In this case, I want to change the access the Company Site Members get to the item from Contribute to Read. To do so, select the Company Site Members group, click Edit User Permissions in the ribbon bar, and change its permission level from Contribute to Read (and then click OK to commit the change).
FIGURE 12.36 Selecting to manage permissions on a library item

As you can see in Figure 12.37, the group is now listed with Read permissions for the item. This allows the users to see the home page (and open it in Site Pages) but not delete or edit it. Of course, be sure to test the home page as a user with only Read permissions to make sure all web parts work properly. Keep in mind that wiki pages are more like web part pages than the old text pages with special links of the past. And because of that, the permission of the library dictates if you can view and edit files that have been added to the wiki page itself. Those added files may well be editable.
FIGURE 12.37 The document has a changed permission level for Members.
Generally, as administrators, we will rarely log into a SharePoint site with less than administrative privileges. But because of security filtering, when a user with deprecated privileges such as Visitors (with the Read permission level) or Members (with the Contribute permission level) logs in, features that we take for granted are missing.
When a user logs on with only the permissions available with the Read permission level, they cannot personalize any pages or change any site settings, so most of the settings in the Site Actions menu are missing, except to view all the site content. The Account menu does not offer the user the chance to personalize the page. On lists and libraries, most of the buttons on ribbon bars are inactive, except those that allow the visitor to change the view, set an alert, open with Explorer (for libraries), export to a spreadsheet, or set an RSS feed.
When a user logs in with the Contribute permission level (Members have this by default), they can personalize their view of the home page but not change the site settings or create new pages, so there is an option on the Site Actions menu to edit the page. On a list or library, they are not allowed to change the settings, so that menu is completely missing for them, but both the New and Actions menus are available.
Just keep in mind when using and applying permission levels that the user experience will vary considerably, depending on the permissions they have.
Editing Site Collection Administrator Members
When a site collection is created, you are given the option to enter primary and secondary user accounts for site collection administration. However, once the site collection is up and running, you can add more site collection administrators.
Site collection administrators not only have Full Control permissions to the site collection, but they are considered responsible for the site collection in Central Administration and are the primary contacts for notification about the site collection. Ironically, however, site collection administrators are not members of the Owners SharePoint group by default (except for the account assigned at the creation of the site collection), despite their having full control of the site. They stand apart from the real members of the site collection. A good reason for this is that if a subsite breaks inheritance, it can remove access for the site collection Owners group. But there is no mechanism for a subsite to block site collection administrators from accessing their site.
In this book, I've casually added site collection administrators in Chapters 2 and 3, as well as in Chapter 10, but I didn't really go into the details of why to create a site collection administrator. It's also true that you can create only two administrators initially, but once the site collection is operational, you can add more. Further, keep in mind that site collection administrators have to be added as individual users, security groups are not accepted.
Take the following steps to get a look at the existing site collection administrators and make changes to the list, if necessary, at the site collection level:
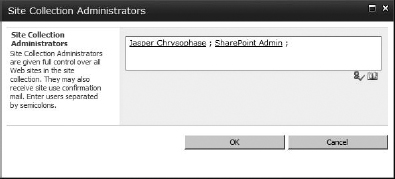
- Make sure you're on the Permission page. Click the Site Collection Administrators button in the ribbon. This will open the Site Collection Administrators box (Figure 12.38).
FIGURE 12.38 The Site Collection Administrators box
The box will show you the account (or accounts if you have a secondary) that are the current administrators. My example shows my default user, SharePoint admin (shareadmin), and an additional user added during the postinstallation tasks during the installation chapters (Chapters 2 and 3).
- If you wanted to add another administrator or more, you could type in their AD user account names (separated by semicolons) in the People Picker field. Once the account is added to the People Picker field on the Site Collection Administrator's page, click OK to add the new site collection administrator.
Keep in mind that you can see and change the primary and secondary site collection administrators (only) from the SharePoint Central Administration site. The Applications Management page has a link to the Site Collection Administrators page, where you can change or remove those administrators if necessary.
User Policies and Permission Policies at the Web Application Level
Web applications have users and permission levels applied to them at the web application level, which then apply to all site collections contained in that web application. Now that you really understand about permission levels and users at the site collection level, web application user policies and permission policies can make more sense.
Site collections are managed at the site collection level. Site collection administrators can manage any site within the collection, even if they break inheritance. So, even if a subsite owner removes all the site collection groups and just makes their own, they cannot override the site collection administrator if those administrators want to browse to the subsite and make changes.
This can also be true at the web application level. Web applications are managed at the farm level, either at the command line (or shell) or in Central Administration. Farm administrators create and manage the web applications that contain the site collections. This allows them to override the site collection administrators by assigning permission levels to users (or security groups) in the form of permission policies and user policies.
Using these policies, farm administrators can explicitly allow or deny permissions to user accounts that apply to all site collections within a web application. This means they can explicitly allow someone to log into and work in a site collection without that person actually being added as a member (they can even be set to show up as a system account, obscuring their user-name). It also means they can be explicitly denied the right to permissions in the site collection, even if the site collection administrator adds the user specifically.
User and permission policies are also discussed in Chapter 10 in the context of managing web applications and again in Chapter 11. User and permission policies (as well as anonymous access, covered in Chapter 10) are managed either from the Web Applications page under Application Management in Central Administration or by going to the Security page and clicking Specify Web Application User Policy.
On the Manage Web Applications page, there is a User Policy button, which (if the site is configured for it) will pop up a form box for you to see what user policies are applied to a selected web application, as well as add, delete, or edit a user policy.
The User Policy setting under the Security heading in Central Administration does about the same thing, except it takes you to a page reminiscent of the Policy For Web Applications page from the previous version of SharePoint (Figure 12.39). Also in the Manage Web Applications page are Permission and Anonymous Policy buttons; here they are listed in an addition to the Quick Launch bar on the left.
FIGURE 12.39 The Policy For Web Application page
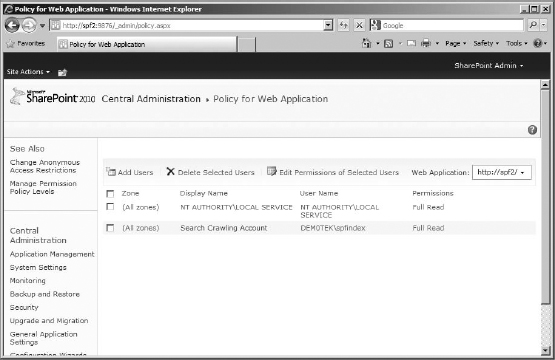
The page lists the user policies contained in the web application displayed in the drop-down list on the right. Add Users, Delete Selected Users (since you can select more than one), and Edit Permissions of Selected Users are links available above the list of user policies. In the list of user policies are columns for the web application zone that the user policy is applied to, the display and username of the accounts, and the applicable permissions for the policies.
On the left side of the page, above the Quick Launch bar, are Change Anonymous Access Restrictions and Manage Permission Policy Levels links. Although these were separate buttons on the Manage Web Applications page, they were all in the Policies section of the ribbon, so it makes sense that they are available on the same page.
Adding a User Policy
Unlike adding users to a group, at the web application level you simply add a user account or security group and apply permissions to them directly. However, as you'll see, it is very much like what you would do if you were adding a user directly to a site.
- To add a user or security group (and therefore a user policy), just click the Add User link.
As you can see in Figure 12.40, adding a user is a two-step process. On the first Add Users page, confirm the web application and the zone the user policy is going to apply to (or choose to have it apply to all zones of a web application, so the policy will apply no matter what URL the user uses to access the content).
FIGURE 12.40 Selecting a web application and zone in the first Add Users page
- Once you've selected your web application and zone, click Next. The next step in the process (Figure 12.41) confirms the web application and zone you selected on the previous page. It also has sections for specifying the user account (accounts, or security groups), the permissions (you use Permission policy to remove, customize, or add Permission levels to be applied here), and whether the user(s) will operate as a system account (so when they access the site collections, their contributions will be listed as “system account” and not as their account name).
The really interesting part of this page is the default permission levels that can be given to the accounts:
Full Control This is exactly like giving ownership or administrator permission. It is basically a site collection administrator setting, enabling all permissions.
Full Read When this setting says Full Read, it means it. This permission level allows users to read everything—every setting, list, library, and document—but they cannot change a darn thing anywhere. It's basically an auditor setting.
Deny Write This is not what you probably think it is. You might think that the Deny Write permission-level policy gives someone the equivalent of a visitor's status on a site collection, but it doesn't. This setting is an “explicit deny,” and it does not grant access to anything. Instead, it waits for a site or site collection to add the user (users, or group, whatever is added to the People Picker) as a contributor, full control, or some other permission level that allows viewing, editing, deleting, or adding of items, and then it forcibly and invisibly blocks those permissions and allows that user(s) to read-only. It is an absolute deny from the web-application level, regardless of the settings on the enclosed site collections.
Deny All This permission level, if chosen, trumps anything done at the site collection. In other words, it blacklists whomever it is applied to; even if a site collection owner or administrator adds them explicitly to their site, they will not be able to log in.
FIGURE 12.41 Selecting an account and applying permission levels on the second Add Users page
Once you have configured the username or security group, permission level, and whether it will be a system account, you can click Finish to add it to the list of user policies.
If you were to log in with that account (or account from the security group, if that's what you added) to a site collection within the web application to which the user policy applies, the user would not need to show up in the list of all accounts allowed to access the site collection. They don't need to be given permission at the site collection level; they already have it at the web application level.
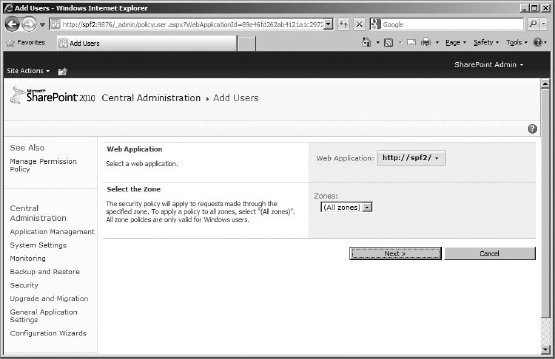
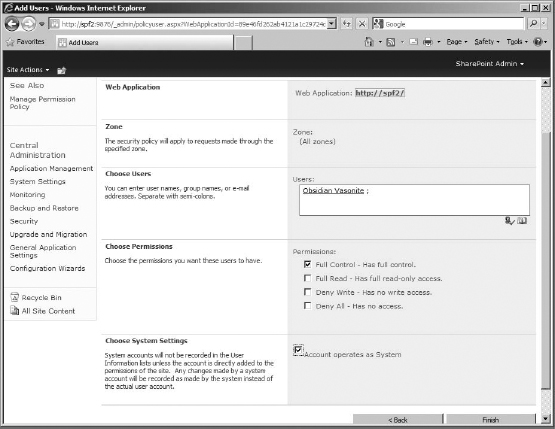
The previous version of SharePoint offered an All People page in People And Groups, quickly showing all accounts that had access to the site collection (or wherever permission inheritance starts). But with this version of SharePoint, that page is no longer available. Now to quickly see all user accounts that have access to the site collection in one way or another (barring user policy), you need to use the PowerShell Get-SPuser cmdlet.
Adding a Permission Policy
You can change the permissions allowed (or denied) of a permission policy (sometimes considered permission policy levels) for a web application just as you can for a permission level in a site collection.
- To see what permissions are available to allow or deny, and to create a custom permission policy level to apply to users, simply click Manage Permission Policy Levels in the See Also bar on the left side of the Policy for Web Application page (see Figure 12.40 for a look at the page) in the Quick Launch bar. Or if you are on the Manage Web Applications page, select a web application, and click the Permission Policy button.
On the Manage Permission Policy Levels page is, as you'd expect, a list of what permission policy levels already exist (the page looks almost identical to the permission level page for managing site collection permission levels). There are links for Add Permission Policy Level and Delete Selected Permission Policy Levels (levels is plural because you can check more than one at a time). If you click a particular existing level in the list, it will open a page displaying what permissions it is explicitly allowing or denying.
- To continue creating a new policy level, simply click the Add Permission Policy Level link on the Manage Permission Policy Levels page.
The page that opens looks a lot like the User Permission page used to specify the permissions to be admissible for a web application (a setting that would have been well located in this sub-category), except for two things:
- Each permission has two columns to check: an explicit Grant (or allow) and an explicit Deny.
- There is a section called Site Collection Permissions, which conveniently lets you just choose an existing Administrator (Full Control) or Auditor (Full Read) permission with which to begin.
You could create something like a List Manager permission policy level so you can force site collections to allow the users to whom you assign this permission policy level to manage lists (and read content on the site), even if they are not explicitly added as site members. On the flip side, if you wanted, you could explicitly deny an account or security group ever having certain permissions.
- In this case, as you can guess from Figure 12.42, it's easy to grant the auditor settings and all the list permissions to the level and then click OK, creating the new permission policy.
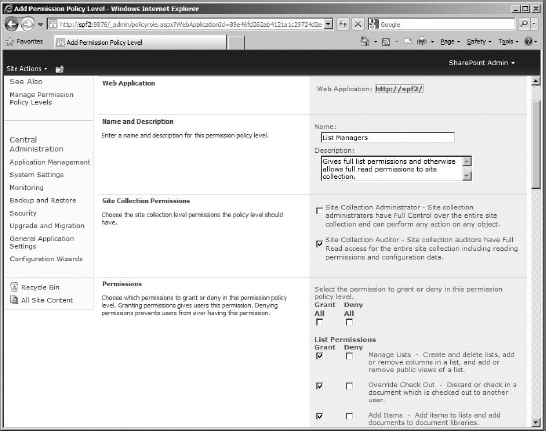
PERMISSIONS CAN OVERLAP
You can have a permission policy level that gives a user rights to a site collection. However, if that person is also added to the site as a user with a different permission level, those two levels can merge, giving them more permissions than you might have expected.
Use Deny if you need to ensure that certain permissions are never attainable by the users to whom the permission policy levels are assigned.
Back on the Manage Permission Policy Levels page, there would be a new permission policy level. And if you add a user policy to the web application, you can apply the new permission policy level (Figure 12.43). This grants the user access to the web application (and the site collections it contains) in the selected zone, so if the user logs in to a contained site collection that does not have them as an explicit member, they can still manage lists using their account.
The Policy for Web Application page also manages (and overrides) the default anonymous access behavior for site collections in a selected web application or its individual zones. For this setting to be applied, the web application must have anonymous access enabled (otherwise, it's not applicable). For more information on anonymous access, see Chapter 10.
FIGURE 12.43 A new user policy with the new permission policy level
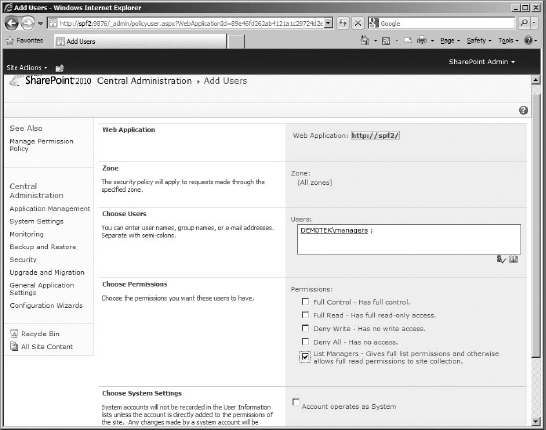
Farm-Level Users and Groups
Central Administration has its own web application, on its own custom port. In that web application is one site collection, for which the Central Administration site is the top-level site. It uses its own, special site definition, which is why it looks a lot different than your standard SharePoint site. This site was meant to be used only to manage the SharePoint server (or farm, depending on how you installed it). It is focused on the organization and display of settings and settings pages. The changes you make to the settings in Central Administration are saved to the configuration database for the server (or farm).
ADMINISTRATIVE CONTENT
The Central Administration site itself also has its own content database in case you want to populate it with lists and other data. If you do that, however, be aware that the site cannot normally be restored from backup should there be a catastrophe. It might be a better idea to create a different site collection for that kind of data and back it up separately.
Central Administration has two groups meant specifically for managing SharePoint itself: Farm Administrators and Delegated Administrators. They fall outside the standard site collection groups or permissions. A farm administrator, added in Central Administration (or with an STSADM or PowerShell command), essentially has full control of the farm settings and can take control of any site collection in the farm. There are some quirks to farm administrator accounts, though. The first is that the farm account must be farm administrator, even though you shouldn't log in as that account to manage the farm. (The farm account is used by SharePoint as the identity running SharePoint timer jobs and is the application pool identity used to access the configuration database for SharePoint.) Do not remove that account from the group. Second, farm administrators should be able to add, remove configure all web applications and databases, start and stop services, and more. This requires that the account have administrative rights on the local server itself (either by being a local admin or by being a domain admin). If you add a user account to the Farm Administrators group that does not have administrative rights to the server, it will therefore not be allowed to stop or start services on the server or add or remove things in IIS, for example. That account will be able to log into Central Administration, and it will be able to administer existing web applications, content databases, services, and settings, but it will be limited to only doing things that do not require local administrative access. This is a quirk in Central Administration and can be used to create junior farm administrators, who can work on existing web applications, site collections, farm settings, and service applications.
FARM ADMINISTRATORS ARE NOT MEMBERS OF THE SITE COLLECTION ADMINISTRATORS GROUP
Interestingly, Central Administration is also just the top-level site of the site collection in the Central Administration web application. Site collections must have site collection administrators, and because of that, the account you used to install SharePoint is the default site collection administrator (and is also automatically a farm administrator). This fact is not particularly useful in the administration of the farm, but it is useful if you are going to be doing anything on the site itself that only a site collection administrator could do.
Delegated administrators are new with this version of SharePoint and are intended to let you assign administrators to specific service applications or application connections. They essentially have very, very limited access to Central Administration and can only see and manage the service application they are assigned to.
To be able to do anything in SharePoint, there need to be farm administrators. At the beginning of the book, in Chapters 2 and 3, adding an additional user account to the Farm Administrators group was covered as a post-installation task. But as a reminder, you can do so by going to Central Administration. On the home page is a link, under the Security heading, for managing the Farm Administrators group.
Clicking it opens the People And Groups page for Central Administration, displaying the members of the Farm Administrators group.
As you can see in Figure 12.44, the members I have currently are the SharePoint farm account (in my case, dem0tekspffarm), the setup account, and the account I added after installation—my SharePoint utility account, shareadmin. Since being a farm administrator generally requires that the account also have administrative rights to the SharePoint servers (or server in a standalone implementation), during installation (despite the potential security risk), all members of the server's BUILTINAdministrators group for the initial server are added as farm administrators by default. This ensures that accounts with administrative rights to the server will be able to log in, in case of emergency.
FIGURE 12.44 The Farm Administrators group
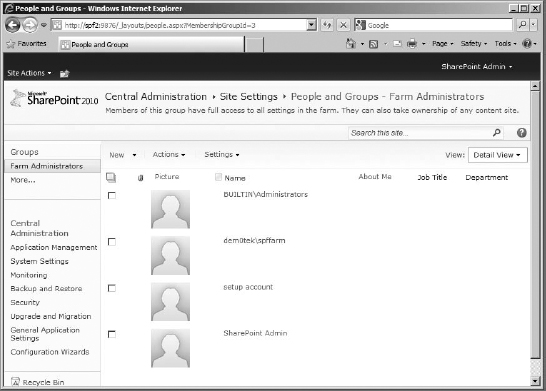
For this example, I have created a security group in Active Directory called farmadmins and have added some users (in particular, the user account Beryl Malachite, who I will be logging in as later). As I said earlier, you can add AD (or local) security groups to groups in SharePoint (except for site collection administrators; for some reason, they must be added individually). This is particularly useful for two reasons. First, SharePoint can handle only so many security objects, and security groups and users are considered objects. So, why not add a bunch of users to a group and then add the group to SharePoint (considered one object instead of many)? Second, because it's easy. Because most user accounts in a domain are being managed in Active Directory, it's more efficient to manage the users in those AD groups used by SharePoint than to manage the users in AD and also have to go into SharePoint and add or remove people there as well.
My farmadmins group has been added to the domain admins group for my domain, so all members of the farmadmins group will have administrative rights to the SharePoint server (if it is in the domain).
Adding Farm Administrators
To add an AD security group to the Farm Administrators group in Central Administration, take the following steps:
- On the Farm Administrators People And Groups page, click the New button in the Action bar (what I call the old SharePoint interface that has links that act like drop-down buttons for actions in the content area of a page).
- In the Grant Permissions box, enter the account or security group you want to add to the Farm Administrators group. For the added account(s) to be able to do full farm administration, make sure that they are members of the Domain Admins or local Administrators group.
- In my example, I am adding the AD security group farmadmins that I created in Active Directory for this task (Figure 12.45). The security group doesn't have an email address, so I am going to deselect sending a welcome email. To Finish, click OK.
FIGURE 12.45 Adding the farmadmins group to the Farm Administrators group
Once you've added the group, it will show up in the People And Groups list just like the BUILTINAdministrators group does (Figure 12.46).
FIGURE 12.46 New AD group added to farm administrators
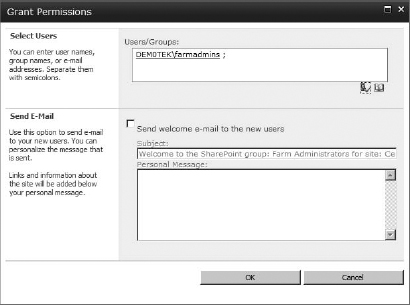
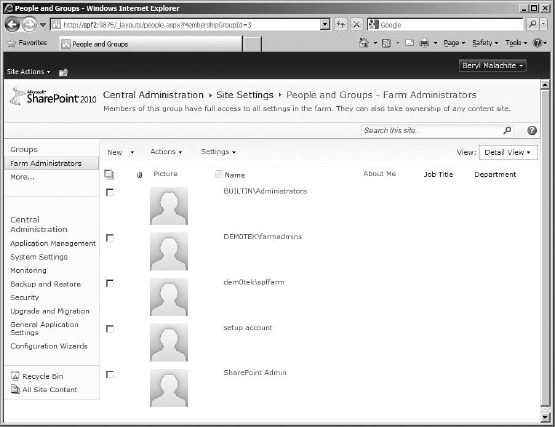
When you add users by security group to SharePoint, it doesn't create user information for the individual accounts the group contains until the users log in for the first time. In addition, the user will not show up in People And Groups as an individual user like individually added accounts will (see Figure 12.47, where I am logged in as one of the users in the added security group). This is one of the shortcomings of adding users via AD security group; it makes it harder to find the individual account to check their email address or see what group they are a member of.
FIGURE 12.47 Logged in with a new farm administrator, despite their account not being listed individually in Farm Administrators group
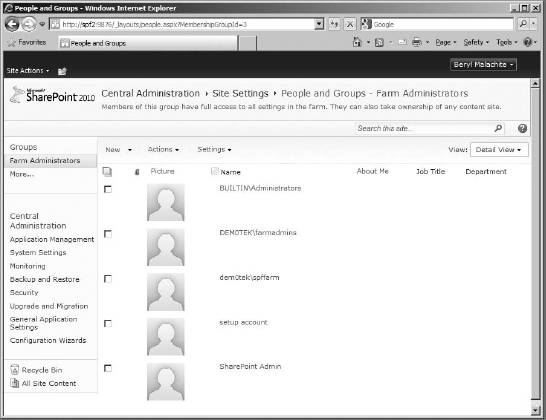
JUNIOR ADMINISTRATORS: ADDING FARM ADMINISTRATORS THAT DON'T HAVE ADMINISTRATIVE RIGHTS TO THE SERVER
As you know, if you log into Central Administration using a farm account that also has administrative rights to the server, you can use all the buttons and settings on the site—this is what we've been doing throughout the book, using either the setup account or a SharePoint utility account added during the installation chapters. However, you may not be familiar with what it looks like if you log in with a Farm Administrators account that does not have administrative rights to the server.
In this example, I've added a user account (Citrine) with no particular administrative privileges to the Farm Administrators group in Central Administration. If I log in with that account, I will find that certain settings will be missing. The most obvious example of that is when the Web Application Management page is open and a web application selected; the New, Extend, Delete, and Authentication Providers buttons are grayed out.
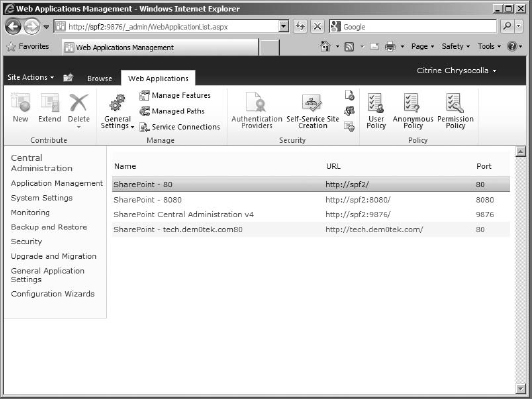
The reason for this is that the account, in addition to being a farm administrator, must have local administrative rights, which the account I am logged in with doesn't have.
The following settings pages are missing for a junior administrator:
- Manage Services On Server
- Configure Incoming Email Settings
- Configure Usage and Health Data Collection
- Perform A Backup Or Restore, Or Configure Backup Settings
- Launch The Configuration Wizard
Removing a User or Group from Farm Administrators
Now that we've added users to the Farm Administrators group, we have plenty of people who can log into Central Administration.
In most environments, after making sure you've added accounts to the Farm Administrators group, you quickly remove the builtinadministrators from the group. Generally those administrators are not necessarily SharePoint administrators and therefore shouldn't have farm administrator rights to the farm. To remove a user or security group from the Farm Administrators group, make sure you are in People And Groups, Farm Administrators group.
- Put a check mark next to the security group or user you want to remove (in my case that would be BUILTINAdministrators, the first member in the list). Keep in mind that, because there are check boxes, more than one user or security group can be removed at a time.
- Then click Actions in the Action bar. It will drop down a menu. Select Remove Users From Group (Figure 12.48).
FIGURE 12.48 Removing selected group from farm administrators
- You will get a warning dialog box asking whether you are sure you want to delete the selected members. Check to make sure you are removing the correct member, and then click OK. That will take you back to the Farm Administrators group page, with one less item listed.
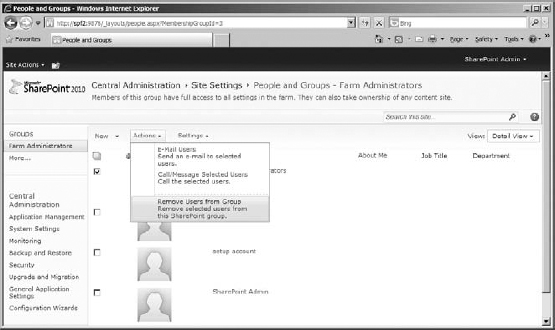
And that's it. The BUILTINAdministrators security group is removed from Farm Administrators group. And that means that only the accounts listed on the page (and those in the group we added earlier) will be able to log into Central Administration.
So, that introduces you to the Farm Administrators group, the only group available from the Central Administration's home page. However, there is another group available for Central Administration, and that is Delegated Administrators.
Adding Delegated Administrators
Because SharePoint Foundation now supports several service applications, particularly Business Data Connectivity, it is possible that there could be a user account needed to access that specific service application to set up external connections without needing to have real administrative power over SharePoint.
So, you can add a user to the permissions of a service application, and the account will be added to the Delegated Administrators group.
- To see this in action, while in Central Administration, go to the home page, and under the Application Management heading, click Manage Service Applications.
- On the Manage Service Applications page, select the service you want to add an administrator to; in my case I am selecting Business Data Connectivity. Once it is highlighted, you can click the Administrators button on the ribbon (Figure 12.49).
FIGURE 12.49 Business Data Connectivity selected, Administrators button, Manage Service Applications page
In the Administrators For Business Data Connectivity form box, you can see that there are two fields and a box—one for entering accounts or security groups with an Add button, one to display the accounts added, and the box containing the permission levels that can be applied to the account.
- Enter the account or security group you want to give administrator rights to this service application, and click Add. In my case, I am going to add a user account (see Figure 12.50 for my example).
FIGURE 12.50 Adding user to manage BDC service
- In the Permissions box is only one permission that can be given to administrators for this service application, Full Control. Click the check box to select it. To finish, click OK.
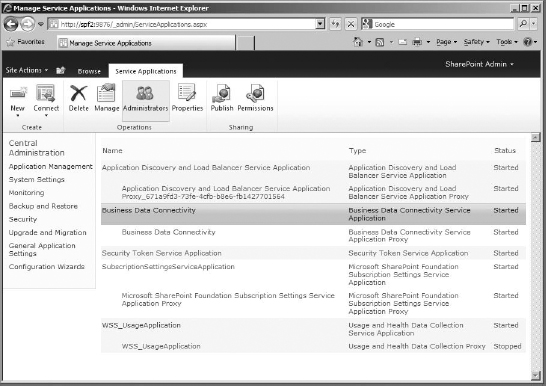
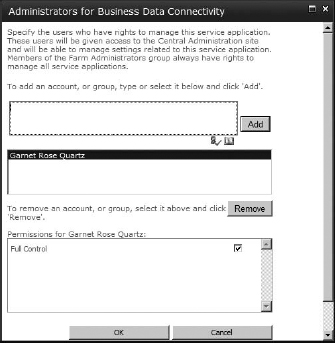
Now that you have an administrator delegated to managing a single service application but not part of the Farm Administrators group, if you log in as that account, you will see a very different Central Administration home page. This is because all settings have been stripped but the one that the administrator to the service application is allowed to manage (Figure 12.51).
FIGURE 12.51 Logged in as a delegated administrator
If you click the Manage Service Applications link, it will take you to the only service application the account is allowed to access. To see the account in the Delegated Administrator's group, do the following:
- Go back to the People And Groups page (the easiest way is to make sure you are logged in as a farm administrator, and on the home page, click Manage The Farm Administrators group, under Security).
- On the People And Groups page, in the top area of the Quick Launch bar, click either the Groups heading or More… It will take you to a page listing all groups that were ever added to Central Administration (even if they were removed from their site group, such as the BUILTINAdministrators), and existing site groups, such as Farm Administrators or Delegated Administrators. This is just like the All Groups page for a site collection.
- If you click Delegated Administrators in the All Groups page, it will open a page displaying the accounts the group contains (Figure 12.52). In this case, that would be the account that has administrative rights to the service application (and the account that you used to install SharePoint).
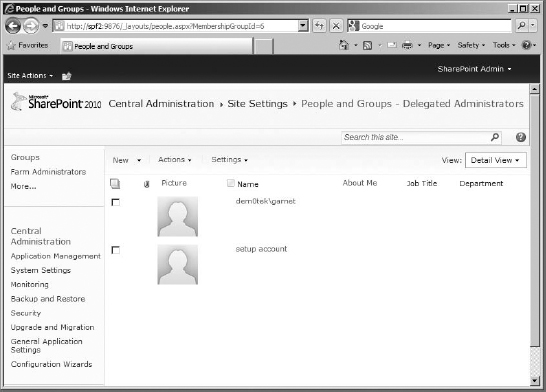
You now have some idea what groups are available to manage SharePoint at the farm level, what they can do, and how to add users to them.
Overall, you have learned about users and groups from the farm level to the individual items. You know what individual permissions are, where they can be allowed (and disallowed) at the web application level, and applied as permission levels for site collections and subsites. You now know how to create, remove, modify, and copy permission levels, as well as how to break inheritance.
The Bottom Line
Define users and groups in SharePoint. SharePoint users are individuals with user accounts that can be authorized to use SharePoint resources. Users can be stored in one or more groups. SharePoint understands two types of groups: SharePoint groups and security groups.
Master It Differentiate between a SharePoint group and a security group. Determine the preferred method for adding users to SharePoint.
Add users and groups in SharePoint. New SharePoint groups can be created to organize user access to websites. User accounts and security groups from Active Directory (or whatever authentication provider you are using) can be added to the SharePoint site directly or by being placed into a SharePoint group.
Master It If you add a security group to a SharePoint group and then later delete that SharePoint group, how do you apply a permission level to the security group directly?
Define permissions and permission levels in SharePoint. Authorization in SharePoint is handled by 33 distinct permissions. These permissions provide user access to lists, sites, and personal settings. They also determine whether the user's access is restricted to simply reading or browsing, can allow editing of objects, or can even permit creation of new objects.
Permission levels are simply groups of permissions. A permission level can contain any or all of the 33 permissions and can depend on prerequisite permissions. The permission level is then applied to SharePoint groups to provide authorization to members of that group. They can also be applied directly to users and security groups.
Master It Describe what the Manage Permissions permission does and what dependent permissions it requires. What permission level contains manage permissions by default?
Set permissions on a site/list/list item for a user or a group. Permission levels are assigned to SharePoint groups, security groups, or individual users starting at the top-level site of the site collection. By default, these users and groups (along with their assigned permission levels) propagate throughout the site collection using permission inheritance. You can go to any object (site, list, library, or item) in the site collection and break inheritance, adding users and groups to the object manually, and then give them different permission levels.
Master It If you break inheritance on a subsite of the main Company Site and start using custom permissions for that subsite, do the lists on the subsite retain their original permission settings from Company Site, or do they also gain the custom permissions set on the subsite?