
Chapter 10
Site Collections and Web Applications
Until this point, you've done all your work in the first site collection that you created when you installed SharePoint. You've explored web parts, lists, and libraries, and you've even built some subsites. You've done all that in a single site collection within its web application. Now it's time to branch out and learn how and why to create additional site collections and additional web applications.
In this chapter, you'll learn how to
- Create and customize a new site collection
- Create a new web application
- Use managed paths
- Configure anonymous access
- Set specific zones for different access methods
Creating a Site Collection
We've mentioned site collections before; a separate top-level site and corresponding subsites from the SharePoint site collection are used throughout this book. A separate site collection is obviously very different from a subsite. But from a user perspective, it looks the same. A site is a site; it's all just different URLs. Otherwise, a top-level site looks like a subsite. It is possible to create all-new site collections, each with its own top-level site and subsites, but why would you want to do such a thing?
Unlike a new site or subsite, a new site collection does not inherit anything from the previous sites—although they all share global settings and web application settings, which will be discussed later. This lack of inheritance can be very useful when you want to separate a batch of SharePoint sites from your main site collection.
Having multiple site collections allows you to apply different settings than those of your main site collection. A separate site collection lets you do the following:
- Allow an entirely different group of people to be administrators for the site collection
- Use separate, unique users, groups, and permissions
- Back up just that site collection
- Have unique workflows, site templates, list templates, activated features, site collection solutions, content types, and site columns
- Specify different storage quotas
For example, say you have a branch office—a different location with its own group of people, unique needs, and documents. At first, you might be tempted to give that location its own subsite off your main top-level site. However, there will be times when this arrangement is less than optimal. For example, you'd have to give those subsite users permissions in the site collection and handle the increased administration required to restrict their account groups to their subsite.
With a new site collection, you have a whole new top-level site, with new users and groups. You could then give the branch office's IT department administrative rights to that site collection. The branch office administrator could then manage that office's own sites, permissions, and subsites—without having access to your main SharePoint site. They could have their own templates, navigation, permissions, logo, and whatever they like, and you wouldn't have to worry about them.
New site collections can be created using PowerShell or STSADM or using Central Administration. For this example, we'll be using Central Administration's interface so you can get an idea of what settings are required (because the GUI will have descriptions that the command line and shell tools won't). To create a site collection, follow these steps:
- Open Central Administration. You can do so using the SharePoint 2010 Central Administration link in the Start menu, or you can enter the URL for the server and the port for Central Administration. In my example, that would be http://spf2:9876.
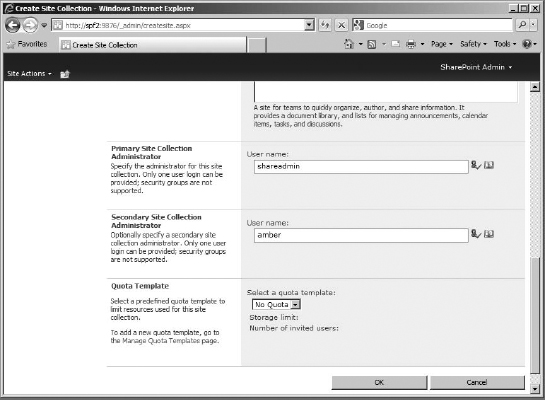
- The Create Site Collections link is under the Application Management category in Central Administration. Click this link to go to the Create Site Collection page, as shown in Figure 10.1.
Here you'll configure your new site collection and the required top-level site that will start this collection.
FIGURE 10.1 The Create Site Collection page
- The first step is to choose the web application in which you want the site collection to be created. We'll discuss web applications later in the chapter, so for now leave the web application set to the default web application, which for my example is SharePoint-80, that was created during installation.
- The Title and Description fields are treated the same way as when you create a site. They apply to the top-level site in the new site collection. Enter a title for your new top-level site (and a description if you require). My example creates a new site collection for the London office, so it uses Dem0tek London, with the description Main site for the Dem0tek London Office.
- The Web Site Address field is where you enter the URL for the new top-level site. Unlike the URL for a subsite (which is placed in the path of the parent site), this URL starts at the top of the web application and uses a managed path as the location for the new site. The default managed path is /sites/; we'll discuss how and why you might want to create and use other paths later. For our purposes, this path is fine; just enter your desired URL. My example uses london.
- The templates in the Template Selection section are identical to those available when you create a new subsite, but this time we are choosing the template for the site collection's top-level site. Any custom site templates you installed in the first site collection will not be available here, because this is a new site collection and not part of the first one.
So, in the Template Selection section, for a top-level site you'd typically want to choose the Team Site template, which is what I am going to use in my example.
WAITING TO APPLY A SITE TEMPLATE
You'll notice the Custom tab has a Select Template Later option. This lets you create the site collection without actually creating the top-level site (or applying a template to it). You won't be able to visit the site until you pick a template, but it will create the background galleries and site collection settings. So, what's the point?
Once the site collection is created, it has a working Solution Gallery. This gallery contains solutions, which can include custom site templates (remember from the previous chapter that whenever you save a site as a template, it becomes a solution and during site creation shows up as an option on the Custom tab for templates). So when you create a new site collection, you can then add a custom template to the Solution Gallery before creating the top-level site. Then, you apply that template to the top-level site. So, during the Site Collection creation, you choose Select Template Later.
Then, the first time you visit the site, it prompts you to select a template. At the bottom, you'll notice an option to instead visit the new site collection's Solution Gallery.
In the gallery you can upload a new solution—for example, the site template you created in the previous chapter from the HR team site. Once it's uploaded, you need to activate it in order for it to be usable.
Then, back at the new top-level site's URL where you are asked to choose a site template, the HRteam template shows up as an option. Choosing it will create the new top-level site using your custom template.
It will then prompt you to choose people and groups for the new site; leave the defaults (since it's a fresh top-level site), and click OK. You now have a customized top-level site.
- The Primary Site Collection administrator is the owner of this new site collection. New site collections do not inherit any permissions from any other collections; therefore, unless you enter someone's username in this box, no one will be able to log on to the new top-level site or administer it. For my example, shareadmin is the primary administrator (Figure 10.2). The Secondary Site Collection administrator is a second administrative account, and it's a good idea to have a second account in case something happens to the primary account or administrator. My example adds Amber, the London office's network administrator.
The Quota Template field lets you choose which quota template to apply to the site collection. This quota will determine how large the site collection can get (in megabytes) and is needed for storage reports on the individual sites within the collection. My example uses No Quota because we haven't created one yet. You can always apply a quota later.
- Once you're done, click OK. The new site will be created in the managed path (for my example, http://spf2/sites/).

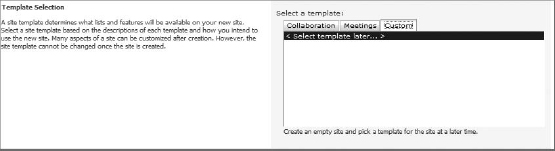
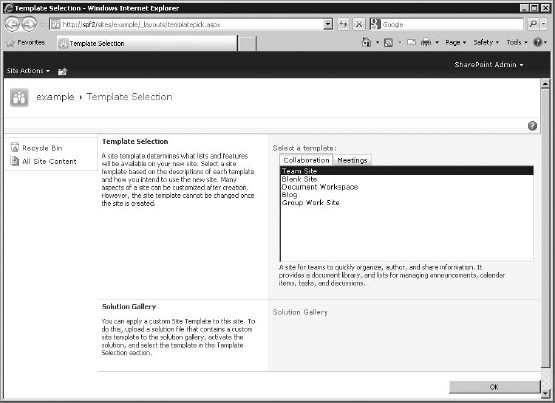
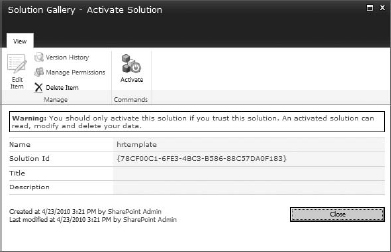
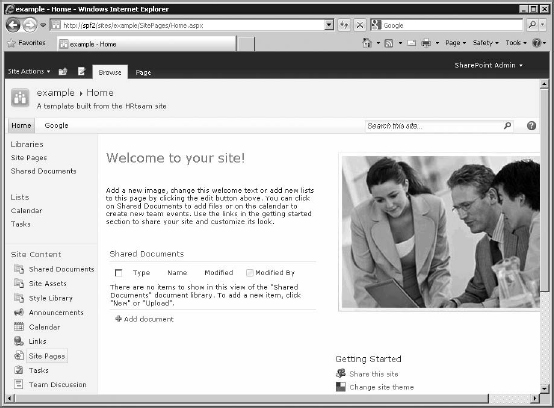
FIGURE 10.2 The Create Site Collection page
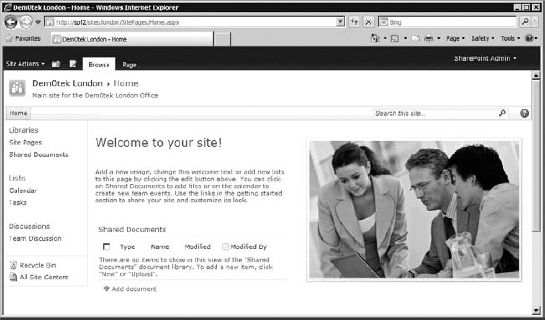
Going to the root of the server (http://spf2/) will take you to the main site collection, where there is no hint that the new site collection even exists. Even under View All Site Content, you won't see the new London site. It's completely separate, and the only way to get there is to use the new URL (http://spf2/sites/1ondon). See Figure 10.3.
You should have a fresh, new top-level site ready to configure and build on.
FIGURE 10.3 The new top-level site
WHAT IF THE SITE COLLECTION ADMINISTRATOR HAS BEGUN TO RUN AMOK?
If the fact that only site collection administrators can access a site collection makes you uneasy, take heart. There are things you can do, of course, to gain access to any site collection in case of emergency. Truly, the only user accounts that will be listed and available to log into the site collection just after creation will be the site collection administrators, but there are always ways around that if necessary. The hope is that you'll never need them, but here are some alternate ways to access site collections even if you aren't the site collection administrator:
- Any farm administrator can take over ownership of a site collection by using the Change Site Collection Administrators link on the Application Management page of Central Administration. On that page, the Farm Administrator can select the site collection and then see (and change) who the primary and secondary administrators are.
- The User Policy ribbon button on the Web Application Management page allows you to add an account to the web application with administrative control over all site collections therein. This page is used to apply user policies to web applications, affecting everything they contain. On the Web Application page, you can select the web application that contains the site collection(s) you want to be able to access (regardless of who the assigned administrators are) and then add the account you are going to use, assigning it Full Control (the permission level administrators have). That will give it administrative rights over all site collections in the selected web application. (For more about Policy For Web Application, see Chapter 12 “Users and Permissions”.)
- As a last resort (otherwise you should never, ever log in with these), you can use the following:
- The web application's application pool account (accesses the web application's content database)
- The farm account (the account that accesses the configuration database, owns all the databases in the farm, and runs the SharePoint timer jobs)
- Search-related accounts: search service and the indexing for search (called the Content Access account)
All of these service accounts, by default, must have access to all sites, although the search-related accounts only have read access. They are not listed in People And Groups anywhere (as a matter of fact, the web application pool and farm accounts are considered system accounts), but you can still use them to access a site collection. Do not use any of them to log into SharePoint except in an extreme emergency.
Site Settings for Site Collections
Before we go to town on the new site collection—customizing the theme, adding subsites, and installing new templates—let's take a look at the settings that distinguish site collections. These are settings that will apply to the entire site collection, from the top-level site down. You'll recognize a lot of the options from previous chapters, so let's focus on those settings that apply to site collections rather than simply sites. To view the site settings, click the Site Actions menu and choose Site Settings. You'll notice a lot of the links on this page are familiar—they are site settings that simply apply to the site, and not the site collection. These are covered in the previous chapter. For site collections, we're going to focus on those settings that appear only on the top-level site's Site Settings page; these are settings in each category that affect the entire site collection.
Users and Permissions
First and foremost, you need to add users to the new site. Right now only two people have access to the site: the two site collection administrators. Just as you configured your first site, you'll need to go through the initial setup of this new site collection, and that includes adding users and giving them the appropriate permission levels. You do this in the same relative location as on any site: Site Settings ![]() Users And Permissions
Users And Permissions ![]() People And Groups. At a minimum, you should make sure anyone who needs to view or contribute to the site has access. At a maximum, you might want to consider what users you want for the entire site collection. This is where inheriting permissions comes into its own. You can add users to the top-level site, and they will be able to access any other site in the collection if that site inherits permissions. In addition, you can create your own permission levels and modify the defaults that can affect all inheriting subsites but no other site collection. This is why a site collection can be considered a permissions boundary.
People And Groups. At a minimum, you should make sure anyone who needs to view or contribute to the site has access. At a maximum, you might want to consider what users you want for the entire site collection. This is where inheriting permissions comes into its own. You can add users to the top-level site, and they will be able to access any other site in the collection if that site inherits permissions. In addition, you can create your own permission levels and modify the defaults that can affect all inheriting subsites but no other site collection. This is why a site collection can be considered a permissions boundary.
You can find more information about permissions in Chapter 12.
SITE COLLECTION ADMINISTRATORS
The final link in this section is Site Collection Administrators. This lets you add, edit, or delete people from the site collection administrators group for the current site collection. See Figure 10.4
FIGURE 10.4 The Site Collection Administrators page

Look and Feel
This entire section is for customizing the current site (or subsite) and is not applicable to the entire site collection. All of these links are the same as for any other site or subsite and are covered in Chapter 9, “Sites, Subsites, and Workspaces.” They include changing the title, description and icon for the site, Quick Launch and top link bar settings, Tree view, and site theme.
Galleries
The previous chapter explained the difference between site galleries and top-level site (or site collection) galleries. The galleries that appear only on the top-level site apply to all sites in a site collection.
While individual sites can have unique master pages, content types, and columns, the top-level galleries apply to every site in the collection and contain the same items regardless of the site they are accessed from.
The galleries that are available only at the site collection's top-level site are discussed next. The rest are for the site and are covered in Chapter 9.
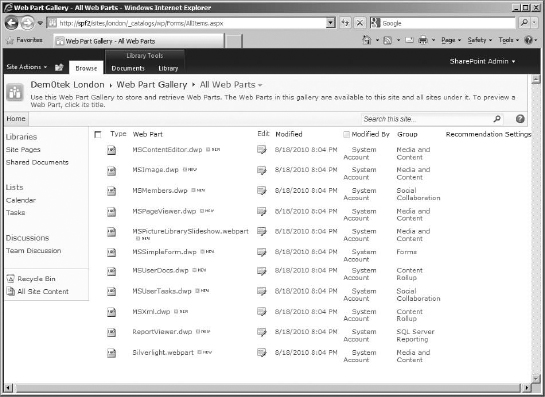
WEB PARTS
The Web Part Gallery (see Figure 10.5) holds all the web parts available to the site collection (except for the List View web parts, of course; those are unique to the lists for the site and not available in the gallery). You can add, edit, and delete the web parts from it. Anything in this gallery is available for use in the entire site collection, which means this top-level site and all subsites. You can find more information about web parts in Chapter 5, “Introduction to Web Parts.”
FIGURE 10.5 The Web Part Gallery
LIST TEMPLATES
You can save customized lists as templates. They are stored in the List Templates Gallery for use when creating a new list. The gallery will show you the name, date, title, language, and version of the list template. Any list that is saved as a template is saved to the list gallery. Like any library content, list templates can be uploaded to the gallery, and you can edit their title and description properties (but you cannot actually edit the list template from the gallery). You can also download list templates from the gallery. This is good for backing up the template in case of emergency. If you create a new list template, it will appear on the Create page, just like the original template it was based on (and in the correct category as well). However, unlike the prebuilt lists, the list templates you create may need to be deleted or renamed so they have their own gallery. Chapter 7, “Creating Lists,” shows how to create lists and list templates.
THEME
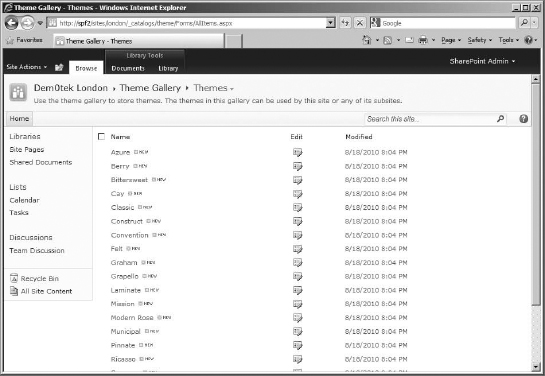
This gallery (Figure 10.6) holds all the available site themes for use in the site collection. Themes are a quick and easy way to change the look and feel of a site. A theme consists of Office Open XML files packed in a *.thmx file (which is actually a compressed folder; if you change the extension to *.zip, you can unzip it). If this sounds familiar, it's because this is the same way themes are built and deployed in PowerPoint.
FIGURE 10.6 The Theme Gallery
A theme changes two things: color and font. If you recall, you applied one to a new subsite in the previous chapter. The color changes are based on a palette that showcases exactly what colors are going to be used. You can see the colors and fonts used in each theme under the Look And Feel section of Sites Settings. A theme does not change the fundamental layout of the site or affect the contents (web parts, libraries, lists, and so on) in any way—it just changes color and font.
The theme's files are stored in the gallery (which is simply a document library), but copies of the default themes are also available in the file structure of the server in the following directory: C:Program Fi1esCommon Fi1esMicrosoft SharedWeb Server Extensions14TEMPLATEGLOBALLists hemes.
When a new site collection is created, the server copies the default themes from this location in the file system to the newly created Theme Gallery. All sites within the collection share this gallery (which is why it's visible only in the top site's Site Settings).
Custom themes can be created in SharePoint Designer or PowerPoint and uploaded to the gallery, at which point you can apply them to any site in the site collection.
When a theme is selected for a site, SharePoint reads the *.thmx file's enclosed XML files for the desired colors and fonts. It then creates a new batch of Cascading Style Sheets (CSS) files that apply these colors and fonts to the layout and design of the site. These CSS files are created on the fly and stored in the site's _themes folder. (In my example, that would be http://spf2/sites/1ondon/_themes/.) The first time you apply a theme to a site, it places the generated CSS files in a numerical subfolder, such as http://spf2/sites/1ondon/_themes/1/. The number used the first time you set a theme is 1, then the second time it is 2, and so on. When you change themes, SharePoint does not retain the old theme's folder, so if you change the theme ten times, you'll see a _themes/10/ folder, but the previous (1–9) folders will be destroyed.
THEMES: WSS VS. SPF
Back in WSS 3.0, site themes were the actual CSS files. These files were stored on the SharePoint server in the file system, and whenever they were applied to a site, SharePoint read the CSS files and applied the settings to the web page on creation. This meant that creating new themes was a matter of editing CSS files and the corresponding XML reference file (spthemes.xml). Now, in SharePoint Foundation (SPF), themes are Office themes (typically made in PowerPoint) that are then used to create the CSS files by the server. This makes it easier to create new themes but harder to edit the CSS files to provide more customizations beyond color and font.
The old WSS 3.0 themes are still here, just not selectable. You can see the old themes on the SharePoint server, located in C:Program Fi1esCommon Fi1esMicrosoft SharedWeb Server Extensions14TEMPLATETHEMES.
They're hiding here in case you have migrated an existing WSS 3.0 site to SPF and have chosen not to upgrade the visuals. (For more information on migration, see Chapter 15, “Migrating from WSS 3.0 to Windows SharePoint Foundation 2010.”) You can't select these themes for native SPF sites. The structure of the CSS files are different from the ones SharePoint generates from the new XML themes, and although it's possible to crack them open in SharePoint Designer and rewrite them for SPF, that's beyond the scope of this book.
SOLUTIONS
Solutions are custom modifications for your SharePoint site. A solution could be a custom site template, a site feature, a group of features, a web part, or pretty much anything that modifies SharePoint. These are placed in the Solution Gallery and activated, so they will be available for any site in the site collection and for the new subsites you are creating. When you create a site template from an existing site as discussed in Chapter 9, this is where that template is stored.
Recall that while working in the original site collection (the company site), we created a template for the HR team site in Chapter 9 (Figure 10.7) and used it to create a new subsite. If you want to use that template on this new site collection, you can access the original site collection's Solution Gallery and download the template.
FIGURE 10.7 The company site's Solution Gallery
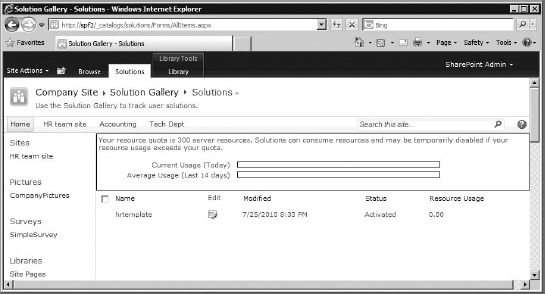
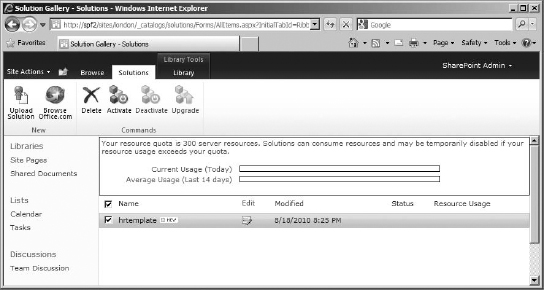
Then you can upload the .wsp file to the new site collection's Solution Gallery by opening the Solutions tab and, in the ribbon, clicking Upload Solution. The solution has to be activated before you can use it. You can activate the file during upload (using that option in the form box confirming the upload) or, once it's in the gallery, click the Activate button. This template will then be available whenever you create a new site within the Dem0tek London site collection (see Figure 10.8).
FIGURE 10.8 The Dem0tek London site's Solution Gallery
The Site Template solution actually installs a site collection feature, which it then activates. This feature, when activated, makes the template a selectable option when creating a new site.
You might have noticed that box referring to a resource quota in the Solution Gallery window. Some solutions can be uploaded to a site collection Solution Gallery (it's not just for site templates) by a site collection administrator or user with the correct permissions. Those solutions are scoped to affect only that one site collection; they can't access remote resources, connect to databases, write to disk, or access or affect the rest of the farm. Solutions designed to be uploaded and used per site collection this way, with these limitations, are called sandboxed solutions.
SharePoint administrators were worried about letting site collection administrators upload and use their own solutions without real farm management, which could result in these nearly unmanaged solutions sucking up resources and bringing servers down.
That's why sandboxed solutions can have a quota applied to them per site collection. That is, each site collection is allowed a certain number of resources to be used by its activated solutions. If a solution exceeds those numbers, it is disabled. That's why the box appears in the Solution Gallery, showing how much of the quota the gallery's solutions are using currently or have used in the last 14 days.
Site Actions
The majority of the links in this section apply to the individual site and are covered in Chapter 9. There is one action that applies to the entire site collection, however.
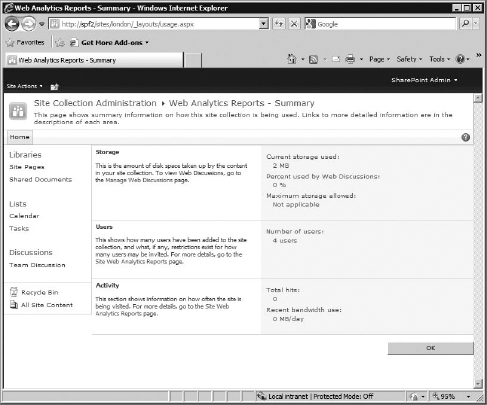
SITE COLLECTION WEB ANALYTICS REPORTS
The Summary page for web analytics reports, shown in Figure 10.9, provides you with a brief overview of the entire site collection's storage, users, and activity.
Storage Shows you how much space (in megabytes) the entire site collection is consuming and what percentage of that space is being consumed by web discussions. If there is a storage quota on the site collection, that is also shown.
WHAT THE HECK IS A WEB DISCUSSION?
Web discussions are a legacy feature from the Office 2003 and WSS 2.0 days. They permitted you to use the SharePoint server to have discussions and comments on any browser-readable document, and they stored those discussions on the SharePoint site. Office 2003 had a handy Web Discussions toolbar you could use to start a discussion on any document you had open. This feature was removed in Office 2007 (and Office 2010). There was also a Discuss button in Internet Explorer 4.0 through 6.0, which let you have discussions on any web page at all. This was removed in IE7. But the legacy code for web discussions is still residing inside SharePoint Foundation.
Users Shows the total number of users on the site collection and whether there is a restriction on the total permitted users for the site collection. It also provides a link to the site's Web Analytics Reports page (for the site, not the site collection).
Activity Gives you the total number of page hits for the entire site collection and how much bandwidth has been used (on average) per day. It also provides a link to the Web Analytics Reports page for the individual site.
FIGURE 10.9 The site collection web analytics reports Summary page
ALAS, POOR STORAGE SPACE ALLOCATION, WE KNEW YOU WELL
Back in WSS 3.0 there was an additional report you could run at the site collection level called Storage Space Allocation. This single report would show you the storage consumed by each individual site, library, or list so you could see which portion of the site collection was consuming your storage.
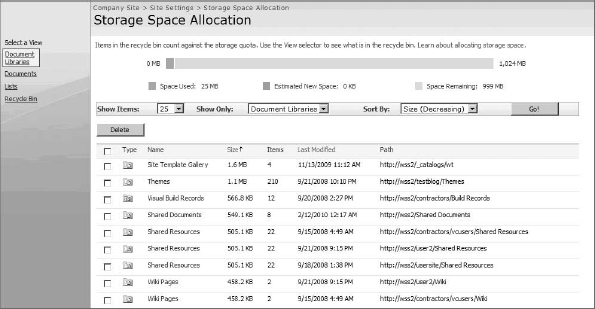
Unfortunately, this report is no longer available in SharePoint Foundation. According to Microsoft, the report was known to cause issues with SQL Server. So, rather than fix it, Microsoft simply removed the feature. So, to see the space usage of individual items in the site collection, you'll need to manually check each one.
Site Administration
This entire section is devoted to the administration of the individual site, and not the site collection, which is covered in Chapter 9. There is one small difference for the RSS page, however.
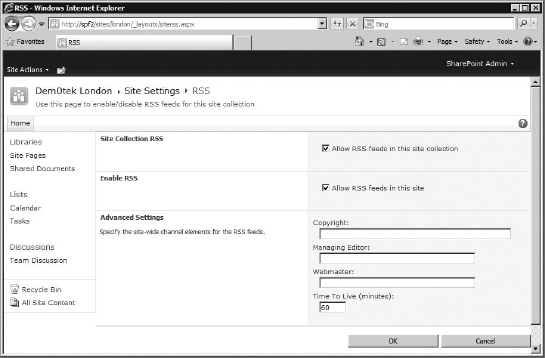
RSS
At the top-level site, the RSS page contains one additional check box not available on a subsite: Enable RSS. This option, shown in Figure 10.10, lets you enable or disable RSS for the entire site collection. When RSS is disabled at the site collection level, the RSS settings are no longer available as a link on any subsite's Site Settings page.
FIGURE 10.10 The site collection RSS page
Site Collection Administration
Site collections can be administered only from the top-level site in the site collection. Any sub-site has a category called Site Collection Administration that provides one link, Go To Top Level Site Settings. Clicking this link takes you to the Site Settings page for the top-level site. Here, this section contains administrative features and options explicitly for the site collection.
RECYCLE BIN
The Site Collection Recycle Bin shows everything deleted from the site collection—except sites. When your users delete a document or list item and then suddenly realize they made a mistake, you can easily recover the document or list item from the Recycle Bin rather than having to restore from a backup.
Each user has a personal Recycle Bin per site, which is why it is often called the end-user Recycle Bin. The personal bin shows the user only the contents of the site Recycle Bin that they deleted. There are only a few things that can be deleted that don't go to the Recycle Bin, such as sites, web parts, workflows, columns, content types, and users.
Site administrators have their own end-user Recycle Bin if they delete something on the site, but they can also access the overall Recycle Bin at the site collection level, which shows everything deleted by all users in the site collection. See Figure 10.11. The site collection–level Recycle Bin is particularly useful if a user deleted something from somewhere in the site collection but they can't remember which site. They can ask the site collection administrator to check the site collection Recycle Bin, which lists all things deleted in the site collection, regardless of which site it originally came from.
FIGURE 10.11 The site collection Recycle Bin
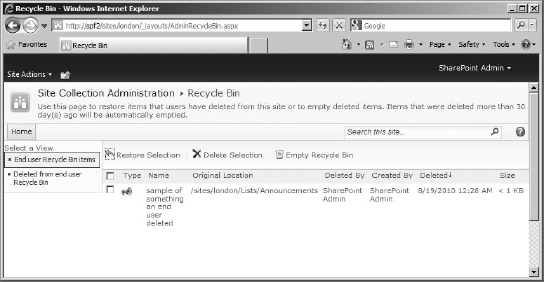
When an item is deleted, it goes to the end-user Recycle Bin, where it will sit happily for 30 days before being permanently destroyed. If a user goes to their Recycle Bin and deletes an item, it is not completely gone; instead, it is moved to the real second-stage, site collection–level Recycle Bin. This Recycle Bin contains only items deleted from the end-user Recycle Bins at the site level. As you can see in Figure 10.12, the elusive second-stage, site collection–level Recycle Bin is under the Deleted From End User Recycle Bin view, tucked in the Quick Launch area for the Recycle Bin.
FIGURE 10.12 Second-stage Recycle Bin

If an item is deleted from this second Recycle Bin, it's gone for good. Basically, you can restore practically anything that was deleted less than 30 days ago (or whatever the Recycle Bin default is, it can be changed per web application in Central Administration), even if the user also emptied their individual Recycle Bin.
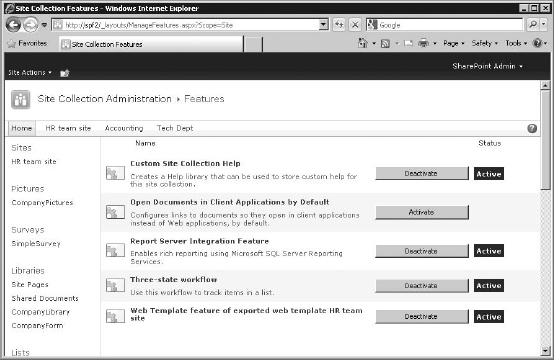
SITE COLLECTION FEATURES
Site collection features are just like site features, except they're designed to be available for the entire site collection (see Figure 10.13). Some common features include the Three-State workflow and of course the site template we uploaded (considered an “exported” template).
FIGURE 10.13 The site collection Features page
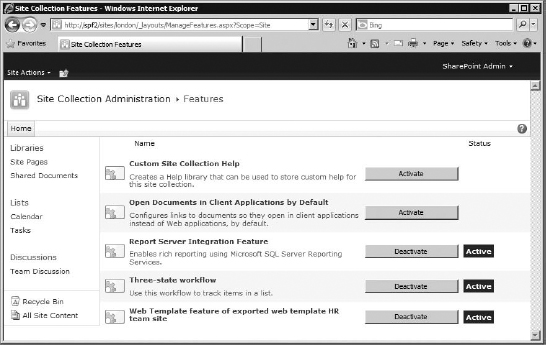
Any feature that's active is available throughout the site collection. If you click the Deactivate button, that feature turns off—it's still there, just not running. So, deactivating the Web Template feature of the exported web template HR team site will remove that template from the Custom tab during site creation. To remove the feature completely, you need to deactivate the solution that created the feature (in our example, the HR team site template solution). Features are often deployed at the farm level, as part of a solution (although features can be deployed individually at the farm level as well; it just doesn't happen that often). If a feature was made available to a site collection from that level, to completely remove a site collection feature, rather than deactivating the solution available at the site collection level, it would have to be retracted (and can be removed) at the farm level. It's a little extreme, but it can happen. At that point, the feature made available by that solution would be unavailable at the site collection level.
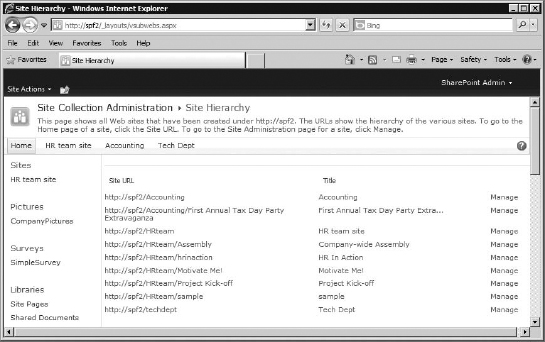
SITE HIERARCHY
The Site Hierarchy page provides a list of all the subsites that have been created in the site collection. From this page, you can go to a subsite's home page (by clicking its URL) or to the subsite's Site Settings page (by clicking its Manage link). Because the London site is still new, Figure 10.14 shows this page from the original Company Site site collection we've worked on in previous chapters. You'll notice all the subsites listed, but not the London site (since this is a separate site collection).
FIGURE 10.14 The company site's Site Hierarchy page
PORTAL SITE CONNECTION
Technically, connecting to a portal site is applicable only if you have a SharePoint Server 2010 server farm on your network. In that case, you can attach this SharePoint Foundation site collection to the portal (see Figure 10.15). Interestingly, this setting can be used to add a link, any link, to the beginning of a site collection's Navigate Up button. It will precede the site collection's own top-level site's home page as the first link there. Any link can be used, but usually it should be a central site that needs to be accessed from anywhere in the site collection (and that site should have a link back to the site collection that refers to it).
FIGURE 10.15 The Portal Site Connection page

SHAREPOINT DESIGNER SETTINGS
As you've probably noticed, Microsoft has decided to really push SharePoint Designer as a fun and exciting way to extend the powers of your SharePoint sites. One of the new features is letting site owners and designers (rather than just site administrators) use Designer to modify, edit, and change the sites. On the SharePoint Designer Settings page, you can control how much power and control SharePoint Designer users will have over the sites within this site collection. See Figure 10.16.
FIGURE 10.16 The SharePoint Designer Settings page
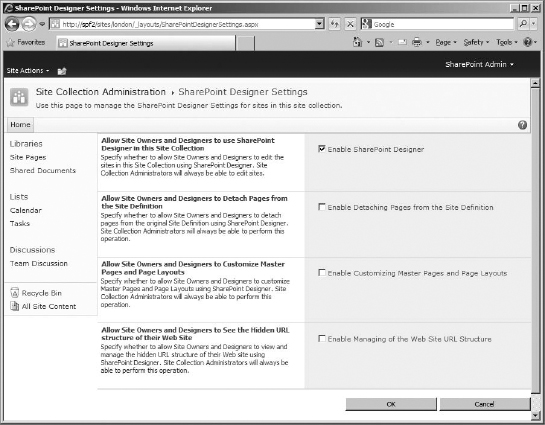
Allow Owners and Designers to use SharePoint Designer in this site collection Unless you want to encourage your more advanced users to use SharePoint Designer, you'll want to deselect the first box (which is enabled by default). This prevents site owners and designers from editing the sites via SharePoint Designer at all.
If you do want to let them customize the sites, you can go further by also granting them the following permissions:
Allow Owners and Designers to Detach Pages from the Site Definition Allowing owners and designers to detach pages from the site definition does two important things. In SharePoint Designer, it enables the Edit In Advanced Mode option for any pages. This lets owners and designers completely edit the page, and not be restricted to just editing the Web Parts sections. It also detaches that page from the underlying site definition, so if the definition is ever updated, upgraded, or changed, none of that will apply to this now-custom page. So, unlike other pages in the site collection, this page will have no site definition at all.
Allow Owners and Designers to Customize Master Pages and Page Layouts This grants owners and designers the ability to change the master page for a site, making sweeping changes to the look and layout of pages in the site. This runs the risk of causing the site's appearance to break from organizational standards for sites (particularly if this is done differently for numerous sites in a site collection). Pages can also be broken if content regions or other important page structures are deleted. This setting, if disabled, causes master page and page layout to not display in the navigation pane in SharePoint Designer.
Allow Owners and Designers to See Hidden URL Structure of Their Web Site Allowing users to view and edit all the files in the URL structure is also really powerful. This lets them see and edit all the files in the site, including the critical “background” files (such as templates, support files, and so on)—these can then be edited or deleted, potentially breaking the site completely. If this option is disabled, owners and designers will not see the All Files option in the navigation pane of SharePoint Designer.
Obviously, just letting designers and site owners edit the site in SharePoint Designer is a powerful tool. The additional three check boxes extend that power to profound levels and should be checked only with extreme caution. By default, site administrators have these powers, even if the boxes are unchecked. To prevent site administrators from using SharePoint Designer, you need to make changes at the web application level, as discussed later in this chapter.
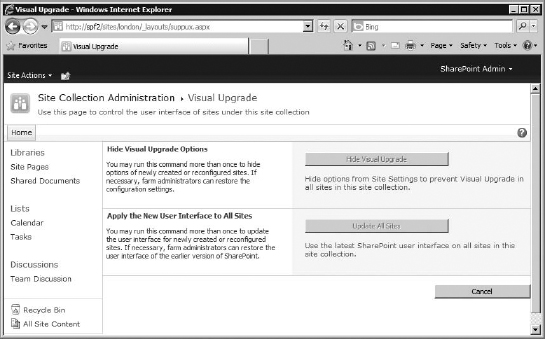
VISUAL UPGRADE
This page applies only when you're working on a server that was upgraded from WSS 3.0. During the upgrade process, if you choose an “in-place” upgrade, you have the option to either apply the visual update to WSS 3.0 sites (change their appearance to the new SPF user interface) or leave the sites alone (and still running the WSS 3.0 interface). For a database-attach upgrade, leaving the sites alone with the option to visually upgrade is the default.
When you leave the interface alone, any site still running a WSS 3.0 interface will have an option to run the visual-upgrade process on that site, from its Site Settings. In addition, when the visual upgrade has not permanently been applied, you can choose to view a site with the visual upgrade on but not apply it. This is good to test templates, web parts, and features to be sure they work with the upgraded interface. So, you can go between working in the old interface, then take a look at the new one, and back again, before committing to applying the new interface. The Visual Upgrade page (Figure 10.17) allows you to do two things to all the sites in the site collection that have not received the Visual Upgrade yet:
Hide Visual Upgrade Option This will turn off the option in Site Settings to upgrade to the new SharePoint Foundation user interface. So, individual sites will not be able to see the site with the upgraded changes.
Apply the New User Interface to All Sites This will run the visual upgrade on all sites in the site collection, giving them all the new SharePoint Foundation look and feel.
You can find more information about visual upgrades and migration from WSS 3.0 in Chapter 15.
FIGURE 10.17 The Visual Upgrade page
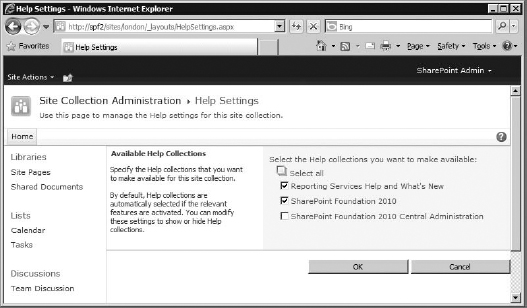
HELP SETTINGS
Ever felt that the help files for a product just weren't up to snuff? Well, with this version of SharePoint, you can write and provide your own help files. Or you can install help files from third-party providers. Help files are stored in help collections, and you can enable and disable them on the Help Settings page. See Figure 10.18.
FIGURE 10.18 The Help Settings page
![]() Real World Scenario
Real World Scenario
MAKE YOUR OWN CUSTOM HELP COLLECTION
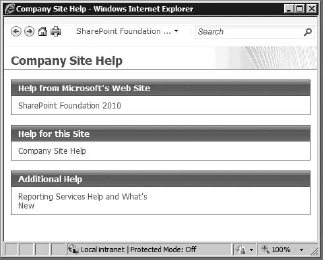
This version of SharePoint makes it possible to create your own custom help collection from within the site collection (although the help pages are just simple HTML). For example, in Chapter 8, we created a custom Travel Request form and library in our original http://spf2 site collection. This was intended to be an easy and effective way for users to submit travel requests to HR for approval, but let's assume that some users are having a hard time figuring out how to fill out and submit the form correctly. Creating a help topic called “Travel Requests” would allow them to click the Help button and easily find the step-by-step information they need.
So, how do you go about creating help files? First, you need to make sure you're in the site collection where the help files are needed, which in our case would be the original Company Site, located at http://spf2/. Custom help is set at the site collection level, so be sure to be on the top-level site.
Then, once you're in the right site collection, you need to enable the Custom Site Collection Help feature. This feature is installed by default but not activated. To activate it, simply go to Site Settings ![]() Site Collection Administration
Site Collection Administration ![]() Features.
Features.
- Click Activate to turn the Custom Site Collection Help feature on.
The moment you turn on the feature, it creates a new library called Site Collection Help, found under All Site Content. This custom library holds four content types:
Help Topic Essentially a help page, or a single question in a FAQ. It is usually an HTML file and is uploaded to the library.
Help Media File Any supportive media files for a help topic to be uploaded.
Help Category A category used to organize help files within a collection.
Help Collection The overarching name for the entire custom collection. It is what will show up in the Help Settings page and is what you enable or disable for the site collection.
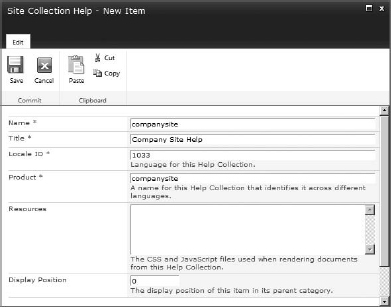
- When creating your own help collection, the first piece is the collection itself. So go to the site collection help library, click the New Document button's down arrow, and choose Help Collection from the drop-down menu. In the form, you need to fill out the following:
Name This must be unique, and it's basically the name of the folder all the parts of the collection will be placed inside. In the example, I'm using Companysite.
Title This is what the users will see in the Help menu, in this case Company Site Help.
Locale ID This is the ID for the language the collection will be written in. For English, it's 1033.
Product This is the identifier for the entire help collection, regardless of language (so you can have multiple help files, each written in a different language but all “assigned” to the same product). In the example, I'm sticking with companysite.
Resources If your help files need custom JavaScript for CSS files to work, you should enter them here. The example won't use anything that fancy.
Display Position This controls where the item is displayed in its enclosing category; for our example, just leave it at 0.
- Once you click Save, the new help collection will be in the library; you'll see it as a folder.
- Click the folder to go into the new help collection.
- In the help collection, you can create help categories and help topics. Let's start with a category. Go to New Document
 Help Category.
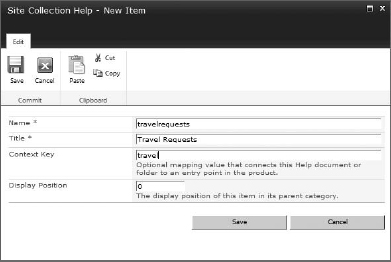
A help collection is another folder, with the following fields to enter:
Name The name of the folder, for example travelrequests.
Title The title of the category that users will actually see in help, for example Travel Requests.
Context Key An optional mapping value to connect to the category or topic from a particular page on the site. I'll use travel.
Display Position Controls where the item is displayed within the collection.

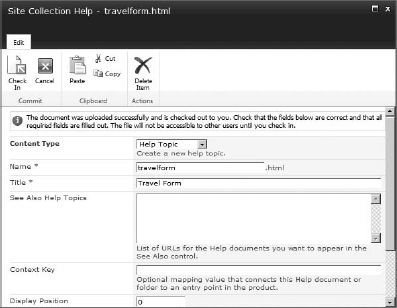
You can also upload individual help topics. These need to be HTML files, encoded in UTF-8. If they need to contain any kind of media, for example a picture, you need to upload that file separately and make sure the link in the HTML file references the correct URL for that file. Otherwise, help files are like any other HTML file. When you upload a help file, you'll notice that it's checked out to you automatically, and there are required fields you'll need to fill in before you can complete the upload process. I've uploaded a simple HTML file for testing purposes.
Anything placed in the help collection in this library is immediately available to the entire site collection as part of the normal Help menu. It starts out approved back on the Site Settings ![]() Site Collection Administration
Site Collection Administration ![]() Help Settings page. If you go there, you'll now see that the new company site help collection is enabled for the site collection.
Help Settings page. If you go there, you'll now see that the new company site help collection is enabled for the site collection.
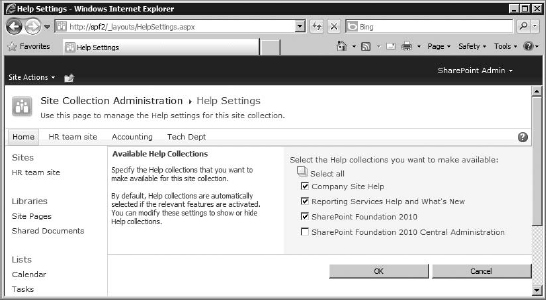
Also, when you click the help icon (the blue question mark), you will now see the new help collection listed, and you can browse by the help categories and view any of the help topics you uploaded.
While we're on the subject, ever wonder why when you click the help icon on a particular page in SharePoint, it always takes you to the help table of contents, and not to that page's relevant help category? It's not that hard to create contextual help. Using SharePoint Designer, in advanced mode, you open the ASPX page itself that you want to have open the relevant help topic when the help icon is hit and edit a single variable, navBarHelpOverrideKey. This variable uses a key, WSSEndUser, which points to the generic SharePoint Foundation help collection. You can replace it with your custom category by using your category as the key. The syntax is simply helpcollection_category, for example companysite_trave1. Once you save the page, the help icon on that page will go to the category you want rather than the general help page (if you have that collection available for the site collection).
At this point, you're probably wondering why SharePoint doesn't use this feature by default. If it's that easy, how come all the default pages don't use it?
The answer is simple: making this change to the code on the page detaches the page from the site definition. As with other advanced editing done by SharePoint Designer (see the section “SharePoint Designer Settings”), this means the page is now unique and is no longer using the site definition. It would therefore be untouched if you made any upgrades, updates, or overall site changes. Because contextual help requires pages to be detached from the site definitions, it's usually not a good idea unless you're already planning on doing major customization (despite being really tempting). And that is why even Microsoft doesn't use contextual help on SharePoint's pages.
Configuring Site Collections
You can make several changes to a site collection to customize how it behaves and what is permitted. These configuration changes can all be done through Central Administration, under Application Management. Just as with the site collection settings, these changes affect the entire site collection and can vary between site collections. As is the case with most of what you do in Central Administration, you can use PowerShell or STSADM to do them instead. However, for a convenient idea of how something is done and what settings are required, Central Administration is a great place to start. For more about PowerShell and STSADM, see Chapter 14.
Keep in mind that if you create a site collection and log into it with the site collection administrator's account, then you have the power to administer the site collection. However, to administer site collections (and more) in Central Administration, you will need to log in with a farm administrator's account.
Configuring a site collection (such as creating storage quotas or managing paths) is a server-level administrative task, and it is not something you'd expect the site collection administrator to handle. Site collection administrators do not necessarily have access to Central Administration. In the example, Amber (the London office network administrator) does not have access to these settings, because she is just a site collection administrator. These settings should be configured during or immediately after the initial creation of a new site collection by a qualified farm administrator. The site collection administrator's responsibilities should occur in the site collection interface itself and focus on managing users, permissions, settings, and content of the sites and subsites in her care. A farm administrator should configure Central Administration-based settings. Central Administration can be accessed from SharePoint Server by going to Administrative Tools ![]() SharePoint 2010 Central Administration. Then navigate to the Application Management page.
SharePoint 2010 Central Administration. Then navigate to the Application Management page.
Site Use Confirmation and Deletion
For each web application on the server, you can enable Site Use Confirmation notification and Automatic Deletion. These settings are found in Central Administration, under Application Management. In the Site Collections category, click the Confirm Site Use And Deletion link. This will take you to the page shown in Figure 10.19.
FIGURE 10.19 The Site Use Confirmation And Deletion page
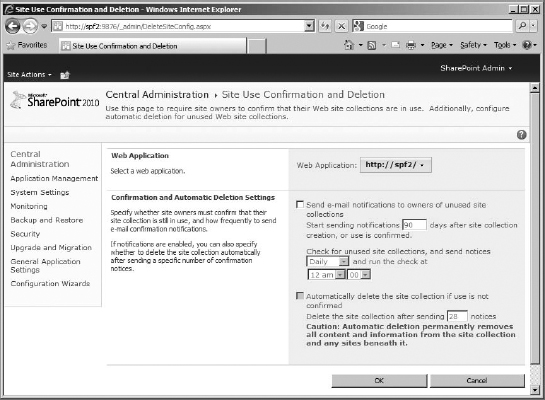
Site Use Confirmation And Deletion is focused on enabling usage confirmation first and sending a notification email to the site collection administrators for confirmation about the site. Once confirmation is enabled, however, you can also enable automatic deletion of site collections that don't get confirmation of activity over a certain number of notifications. Turning on email notifications will send the emails on a set schedule, prompting the site collection administrator either to confirm that the site collection is in use or to delete the site collection.
This page is a bit misleading because it implies that it will send notifications to only those site collections that it senses, somehow, are not active. This is not the case. When email notifications are enabled, every single site collection, regardless of popularity, will be subjected to notification emails.
The emails are sent after the number of days you specify have passed since the site collection was created—or since the last time the administrator confirmed use. This specified time can be anywhere between 30 and 365 days. The server can scan for, and send email to, site collections that are due for an email notification on a daily, weekly, or monthly basis.
If the server sends email notifications on a daily basis and a site administrator does not respond to the first email notification, the server will send another one the next day. The server won't wait another 30+ days; the site is considered “stale” until it's confirmed in use or deleted.
You can also turn on automatic deletion (deletion isn't required, but to delete, notification is required first). After a set number of email notifications have been sent with no response, the server will automatically delete the site collection. This set number of notifications can be between 28 and 168 email notifications.
Enabling automatic deletion is a wise decision if you're going to enable self-service site creation (which we'll discuss later). However, there is a risk to turning on automatic deletion: it affects all the site collections in a web application, including your main site (Company Site in my example). Because of this, it is strongly recommended you do not enable automatic deletion on the web application that hosts your main site collection or any other mission-critical permanent site collections. Instead, if you need it for self-service sites or other reasons, such as hosting temporary public site collections, you should create a separate web application, put those temporary site collections there, and then enable automatic deletion for them.
Quota Templates
Because SharePoint is meant for users to store data and documents, it can take up more space than expected very quickly. The two main ways to prevent site collections from consuming too much storage space are quotas and locks. Both can be configured on site collections, so you can have different disk quotas for different collections, and you can lock specific collections without locking others.
You can manually set site quotas on a particular site collection, or you can create quota templates to use for quick assignment (or to have a quota automatically assigned during self-service site creation). It's a good idea to create site quota templates so you have some consistency and don't need to keep entering quota settings manually for each site collection.
To create a new quota template, go to Central Administration's Application Management page, and in the Site Collections category, click Specify Quota Templates. This will take you to the page shown in Figure 10.20.
Using this page, you can create a new template or edit an existing one. Each template needs a name and a storage size limit. You can also set the server to email the site administrators when the site collection reaches a certain size to warn them that they are approaching that limit.
FIGURE 10.20 Creating a quota template
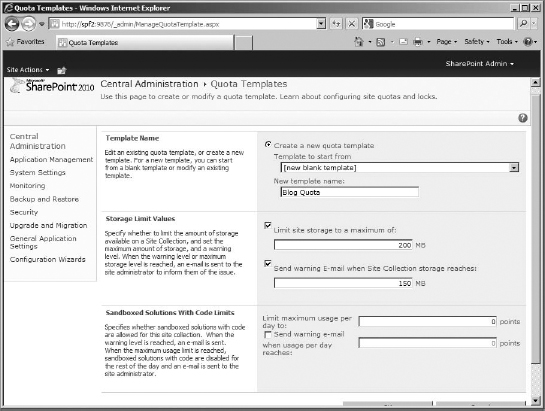
For my example, I am going to create a quota for site collections meant to contain blogs. Later in the chapter, I will provide a web application for blogging site collections, and it would be nice to have a storage quota for them.
Name the quota by entering it in the New Template Name field; mine uses Blog Quota. For the quota limits, set the limit to 200 MB, with a warning at 150 MB.
The third section on this page lets you set a quota for any sandboxed solutions that might be installed in the site collection. Sandboxed solutions are custom code solutions that can be installed into a site collection directly, without farm access, and are restricted from making any changes or accessing the rest of the farm. Typically, these are provided by third-party developers, and what kind of quota (if any) they need varies dramatically (the default is 300 points, and points are a combination of server resources like CPU cycles, or memory consumed). For this example, we're not dealing with any sandboxed solutions.
You can edit existing quota templates on this page, delete a template, and create a new template based on an existing one (keep in mind that those edit and delete options won't be available if you don't have an existing template in the farm yet). Although quota templates are meant to be applied to site collections, they are actually available farm-wide.
Site Quotas and Locks
To assign a quota to an existing site collection, to check the current storage used, or to lock the site collection, click Configure Quotas And Locks in the Site Collections section of the Application Management page. This will take you to the page shown in Figure 10.21. In my example, I am setting an individual quota on the London office site collection of 1024 MBs with a notification email to be sent out when the site collection reaches 800 MBs, with a quota on the sandboxed solutions of 300 points with a notification at 100.
FIGURE 10.21 The Site Collection Quotas And Locks page
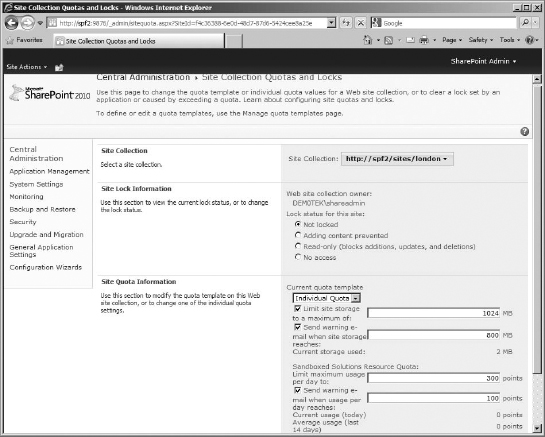
Check the Site Collection section to make sure you're editing the correct site collection before you apply a quota or lock (and change it if necessary by clicking the Site Collection drop-down menu, selecting Change Site Collection, and in the Select A Site Collection dialog box, selecting your site collection and click OK ).
To apply a quota or quota template to the selected site collection, go to the Site Quota Information section at the bottom of the page. You can either select a quota template that you've previously created on the Quota Template page or choose the Individual Quota option. This option lets you set the storage quota limits on the current individual site collection (as I have for http://spf2/sites/1ondon). This is useful if the site collection requires quota settings that don't fit with current quota templates.
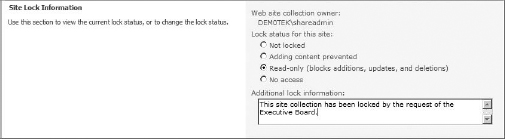
On this page, you can also set a site lock on the site collection or check its lock status. (Tip: When troubleshooting why a particular site collection cannot be accessed when others can, always check here to eliminate the chance that the site collection has gone over quota or has been manually locked.)
Site locks are a quick way to prevent access to a site collection without having to go into the Site Settings page for that site collection and edit everyone's permission level. By default, site collections are unlocked. Access to the site collection, in that case, is determined by the permission level the user has on the Site Settings page for that site. Other Site Lock settings are as follows:
Adding Content Prevented No new content (even a new field for a list item) can be added to the site collection. The site collection can still be viewed, and existing content can be updated or deleted. This is the lock setting that is automatically triggered when a Site Quota limit is reached.
Read-Only The site collection can be viewed, but no additions, edits, or deletions are permitted.
No Access The site is completely locked and cannot even be viewed.
When you change a site lock to any of these three options (anything but Unlocked), the Additional Lock Information text box will appear on the page, shown in Figure 10.22. This box is required for any lock to be placed on a site collection. The text in this box is shown to users when they try to access the locked site (or perform a locked action). Always enter some information explaining to your users why you've locked the site, as I have in my example.
FIGURE 10.22 The Additional Lock Information box
SITE QUOTA TIPS
Let's say you create a quota template for a particular type of site collection (for example, personal blogging sites for users) and set it to 300 MB. Then you create a bunch of site collections using that quota. Later you decide to upgrade everyone's disk space to 500 MB, so you edit the template to reflect the change. Any new site collections created with this template will be set to 500 MB. This will not, however, change the settings for any existing site collection that has already had the template applied. Those collections will stay at a 300 MB limit until you manually reapply the quota to the site collections on the Site Quotas and Locks page. It is possible to update quotas on a large number of existing site collections by using the PowerShell command Set-SPSite -Identity “<Site>” −QuotaTemplate “<Template>” and writing a script that runs this command on all the desired sites.
A site collection's quota is for everything in that site collection, including the end-user Recycle Bin. Therefore, having people delete stuff won't free up any space unless the deleted items are also emptied from the Recycle Bin. The second-stage site collection Recycle Bin, which only administrators can see, does not count toward the quota; instead, it's limited to a configurable percentage of the quota (above and beyond the collection's quota). The exact percentage is configured at the web application level, as discussed later in the chapter.
If you add a quota limit to a site collection that is already bigger than the quota limit allows, the site collection will immediately be locked. Therefore, if you're not sure, check the size of an existing site collection before applying a quota.
The next three settings for site collections are pretty self-explanatory, although very useful (and are also covered in Chapters 11 and 12). Change Site Collection Administrators lets you change who the primary and secondary administrators are for a selected site collection, and View All Site Collections lets you see a list of all the site collections contained in a selected web application. You'll learn more about self-service site creation later in this chapter.
Creating a New Web Application
Let's move another layer up the chain and look at web applications. Suppose you want to have more user-controlled sites with automatic deletion enabled but don't want automatic deletion enabled on all your other site collections or to be forced to respond to usage notifications on your main site collections. In this case, you'll need a new web application because site use confirmation and deletion is applied per web application.
Web applications are what SharePoint uses to hold site collections. Every site collection has to reside in a web application, although a web application can contain many site collections. When SharePoint was installed earlier in the book, two web applications were created: the first site (in my example that's http://spf2/) and Central Administration (in this case, http://spf2:9876/). A web application essentially consists of two items that reside in IIS: an IIS Web Site and an Application Pool. The default http://spf2 web application uses the IIS Web Site SharePoint-80, while Central Administration (http://spf2:9876) uses the IIS Web Site SharePoint Central Administration v4.
Any settings you configure in IIS on these websites affect every site collection in the corresponding web application. IIS Web Sites host security settings such as SSL, authentication, and anonymous access, making web applications security boundaries in the sense that their security settings affect all the site collections they contain, while not affecting the security of other web applications. In addition to IIS settings, SharePoint offers a lot of additional configuration that can be done at the web application level.
DID YOU REMEMBER YOUR MANAGED ACCOUNT?
Web applications make use of their IIS Web Site application pool identity to access resources such as their database in SQL. So if you want to give your web application its own, unique application pool identity (good for troubleshooting because you know exactly what account is being used by the web application but bad because each application pool does use some RAM to do its work), set it up in SharePoint as a managed account before you create the web application. You can register an account directly from the web page used to create the web application, but moving away from the settings page will wipe all the changes you made, and you'll have to start over. To set up a managed account, just go to Configure Managed Accounts under the Security heading, and then register a managed account. For more details, see Chapter 3.
Almost all web application administration and customization is done in Central Administration under Application Management. Click the Manage Web Applications link, which will take you to the Web Applications Management page, as shown in Figure 10.23.
Let's create a new web application for user blogs—one with a main site collection for the administration blogs and other information.
- To create a new web application, make sure you are on the Web Applications Management page, and click the New button.
This will open the Create New Web Application form. See Figure 10.24.
FIGURE 10.23 The Web Applications Management page
FIGURE 10.24 The Create New Web Application form
You need to work with a lot of settings to create a new web application, so let's go through them all with the new blogging web application in mind.
Authentication This enables access to a new feature of SharePoint Foundation 2010, claim-based authentication. Choosing Classic Mode Authentication provides you with the same authentication methods that were available with WSS 3.0 (the standard IIS-supported authentication methods). Choosing Claims Based Authentication allows these as well as forms-based authentication (FBA) and SAML token-based authentication. FBA is typically used by SQL databases and LDAP, while SAML tokens are used by Active Directory Federation Services, Windows Live, and other claims-based authentication providers.
- Because it rarely hurts to have options, let's choose Claims Based Authentication.
A BRIEF LOOK AT CLAIMS-BASED AUTHENTICATION
Claims-based authentication is a newer approach to authentication that is actually pretty dramatic. Instead of having an application (such as SharePoint) build multiple connections for user authentication, claims-based authentication handles things differently. The user authenticates to an issuer, who verifies their identity and provides them with a signed security token that contains their claims (credentials). Then, when connecting to the application, the user hands it the signed token. This saves having to log in again or having the application reverify the user's account with the issuer. It's been compared to an airport boarding pass. The issuer (front desk) handles the validation, confirms that the user has permission to get on the plane, and then hands them the token (boarding pass)—all SharePoint needs to do is make sure everyone has a boarding pass, without having to worry about how it was issued (NTLM, FBA, Kerberos, LDAP, Basic with a username and password login page, or the like). This is done via Security Assertion Markup Language (SAML)—basically, using XML and SSL to wrap up a nice boarding pass for use with websites.
Microsoft has been deploying claims-based authentication with its Active Directory Federation Services (the chunk of AD that issues the token to the user after they log in via normal means to AD) and Windows Identity Foundation (for writing ASP.NET code to support claims-based authentication in custom code).
Although a detailed discussion of claims-based authentication is beyond the scope of this book, there are a couple of things you should know:
- If you ever intend to use claims-based authentication, you need to apply it to the web application on creation. You can't create a classic mode web application and then later extend the web application to use claims-based authentication on a different zone (for more about extended web applications see the “Creating a New Public URL (by Extending a Web Application)” section later in the chapter).
- If you're using claims-based authentication, make sure the Default zone uses Windows NTLM authentication to ensure that the search indexer (also known as a gatherer or crawler) can log in and index the site. Otherwise, Search may not function. This is especially true if the web application is using a custom port.
And if your network ever deploys Active Directory Federated Services, rest assured that SharePoint Foundation is ready to go.
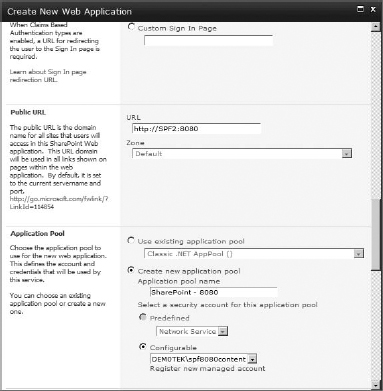
IIS Web Site We need to specify which IIS Web Site the new web application will use. On the off chance you already created a Web Site in IIS for this web application, you could choose it from the list. In this case, we have not, so we need to create a new one.
To create a new web application, you need to enter the following information:
Description A descriptive name for the IIS Web Site, usually something such as SharePoint-portnumber.
- The Description field will change to reflect your port or host header selections later in the settings. You can choose to manually enter a description as well. My example uses SharePoint-8080 for this web application. (I didn't type that in; if you change the port or host header, it changes for you.)
Port The port on which the new web application will listen. IIS Web Sites must be unique in some way in order to receive traffic. Websites can be unique either by port number or by host header (you can't mess with unique IPs in this interface). Using a port number to make a Web Site is adequate for demonstration purposes but does require that users type a port number next to the server name in their browser to access the top-level site.
- The port suggested by default is certain not to be already in use by the server. However, you can specify a port if you know it is available. Because port 80 is taken by the first web application, SharePoint-80, my example is specifying port 8080.
Host Header A host header is a way to change the expected URL of the web application. Normally, because port 80 is already taken by the SharePoint-80 Web Site (which is our first web application for this SharePoint server), you would not be able to have any more websites on that port. But host headers allow you to specify a unique URL for the website that listens on port 80. As long as the host header is unique in IIS, IIS can capture user requests on port 80 for it and redirect the correct traffic to that site. This will be covered later in the chapter.
- For this web application, my example leaves the host header blank because we are using a unique port instead.
Path This is where the SharePoint configuration files are to be kept. My example uses the default settings. By default, IIS places the files in a folder that is named, by default, whatever the port or host header is for the web application. Here's an example: C:InetubwwwrootwssVirtual Directories8080.
- Although you can specify a different path for your web application's data, for this example, keep the default.
Security Configuration There are several ways you can configure security on the new web application, as shown in Figure 10.25.
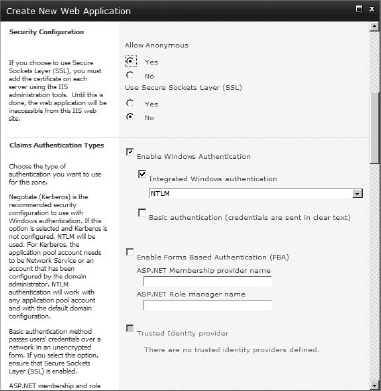
Allow Anonymous This setting turns anonymous access on or off in the IIS Web Site for the web application. Enabling anonymous access adjusts IIS settings to allow the web application to offer anonymous access as an option to the site collections, the subsites, or even individual lists and libraries. If there is a site collection or subsite (that doesn't inherit permissions) in the web application that wants to take advantage of this, the administrator has to choose to enable anonymous access at that level. Lists and libraries can be explicitly given anonymous access, but that option (to give particular lists or libraries unique anonymous access) must be enabled at the site collection or subsite where the list or library is located as well as at the web application level.
- In this example, allow anonymous access by selecting Yes (the default is No) so the user blogs will have the option to be read by everyone on the network without logging in.
Use Secure Sockets Layer (SSL) If you want to use SSL to encrypt all the sites in the web application, you can turn on SSL (changing the path from http://spf2:8080 to https://spf2:8080). We discuss more details about SSL in Chapter 16, “Advanced Installation and Configuration.”
- For this example, SSL is unnecessary, so keep No selected for this setting.
Claims Authentication Types This section changed when we selected Claims Based Authentication earlier. Now it allows us to configure Windows authentication, forms-based authentication, and SAML-based trusted identity partners (this option is grayed out because our network does not have any configured). Under Windows Authentication, you have the normal choices: Integrated (NTLM or Kerberos) and Basic (clear-text passwords). In this case, we'll be using Windows authentication and keeping the default, NTLM.
- Keep the authentication types set to the default of NTLM.
Sign In Page URL Also with claims-based authentication is the need for a login page—either default or custom. This is triggered only if the user doesn't already have a claims token.
- Leave the default sign-in page.
SHAREPOINT DOESN'T AUTHENTICATE
Remember that SharePoint does not do authentication, only authorization. SharePoint uses outside processes, such as Active Directory, to store user accounts and authenticate those accounts. Then SharePoint authorizes those authenticated users to access its resources.
Public URL This shows the URL for the site—by default, this is set to the URL of the web application (either the port or a host header, if one is used).
- Using the default URL is fine for this example, so leave this setting at its default.
Application Pool You need to establish which application pool in IIS is going to be used by the IIS Web Site. Application pools in IIS access resources on behalf of the Web Site using an account identity that you specify. This application pool will be used by the web application to access its content database. Generally, you'll want to create a new one to keep it separate from the existing application pools. If you do create a new application pool, you will also have to provide the security account it will use to access its content database. On a single-server install, this can be the Network Service account. However, on a server farm, you'll probably want to create a new domain user just for this web application, or you could use the account you created for the original web application after installing SharePoint. Remember that the configurable application pool account must be a managed account to be available to be selected.
- For this demonstration, I am going to keep the suggested application pool name (it usually matches the description of the web application) and use the domain account I registered earlier, dem0tekspf8080content; feel free to use a managed account you have registered. See Figure 10.26.
FIGURE 10.26 The Application Pool section
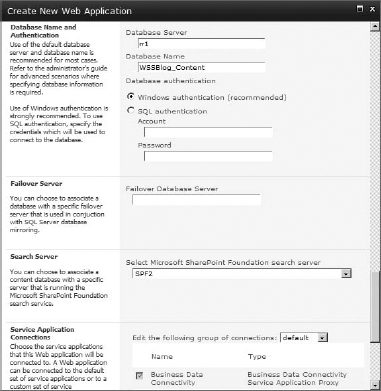
Database Name and Authentication The web application needs a content database to store everything in—just as the SharePoint-80 web application did during the initial installation of SharePoint (as discussed in Chapter 3). You need to choose which SQL Server instance you want the database to be stored on; of course, with a Standalone server install, you'll need to use the default provided as it points to the SQL Server Express Database on the server. You can leave the database name as the default or rename it something more intuitive if you want (the default creates a unique GUID for the database, which is hard to remember). You'll also need to decide how the web application will authenticate to the database. Again, you'll most likely want to use the default Windows authentication, but if your SQL Server instance does not use Windows authentication, you'll need to supply a username and password.
- Make certain that the correct database server is specified, the database name is acceptable, and your web application can authenticate to access the database. My example uses WSSBlog_Content for the database name; otherwise, the default database server and authentication method are fine, as shown in Figure 10.27.
FIGURE 10.27 The Database Name And Authentication section
Failover Server If your SQL server is running database mirroring, you can specify the failover server here.
- Leave the failover server field blank if your SQL Server instance is not mirroring, which mine isn't. If your SQL Server instance is doing database mirroring, feel free to enter that server name here.
Search Server For the search service to index the content database for this new web application, a search server must be assigned. The drop-down list shows only those servers running the Windows SharePoint Services search service.
- Select a search server for the content database. For this example, there is only one choice (SPF2), but it is possible to move search to another server (or have search on more than one server for that matter), as discussed in Chapter 16.
Service Application Connections If your SharePoint server has some application connectors installed, you can set up which ones the new web application enables. By default, the server comes with two (Business Data Connectivity Service and Usage and Health data collection), although they both do need configuration.
- Leave the default connections in place (both checked).
Customer Experience Improvement Program And you thought CEIP was just for Office! Enabling this will have the SharePoint Server instance collect data on usage, access, and behavior. The theory is that this information will assist Microsoft in making the product even better in the future, similar to the way it has updated the GUI between WSS and SPF.
- Let's leave CEIP turned off.
- Once you've set everything to your satisfaction, click OK, and wait while the new web application is built. Once the operation completes, you'll need to take some more steps to finish the creation.
- To complete the web application creation process, you may need to manually restart IIS on the server so it finishes building the new IIS Web Site (it's not required, but can speed up the process). Open a command prompt, and enter iisreset /noforce. (The /noforce switch lets services gracefully reset but doesn't force them, which is good if you have other IIS applications running.)


If you chose to restart IIS manually, if there are other SharePoint servers in the farm, you may need to run the iisreset command for each of them as well. If you didn't, their IIS may not realize that they should also have a copy of the new web application.
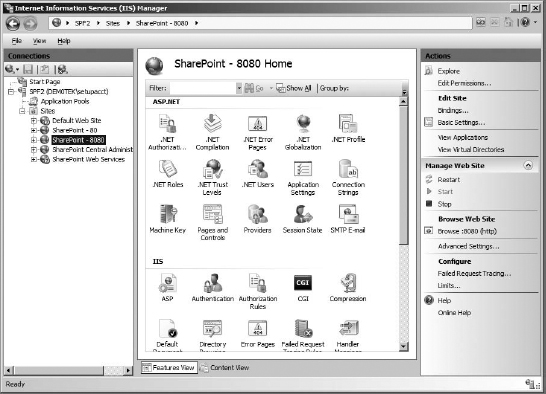
When IIS restarts, go ahead and open Internet Information Services (IIS) Manager, which is found in Administrative Tools on the Start menu. You'll see your new IIS website and application pool, as shown in Figure 10.28.
Your new web application is up and running in IIS and available to SharePoint. Of course, it's completely empty. Going to the URL won't show anything—after all, you have no actual site there. The next step is to create a new site collection for the web application and fill it with the top-level site.
- To create the first site collection for the new web application, go back to Central Administration Application Management, and under the Site Collections category, click Create Site Collections. Otherwise, if you still have open the Application Created box, you can click Create Site Collection.
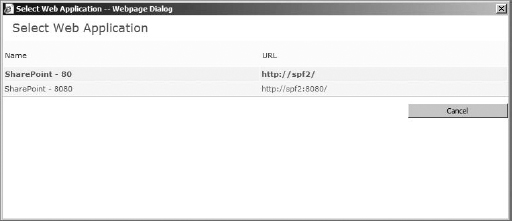
- On the Create Site Collection page, you may need to change the web application to your new one (SharePoint-8080), so the new site collection will go in this new web application. So, in the first section of the page, click the web application's name, and choose Change Web Application. This will take you to the Select Web Application page shown in Figure 10.29.
FIGURE 10.28 IIS shows the new website.
FIGURE 10.29 The Select Web Application page.
- Choose your new web application, and click OK. You will be taken back to the familiar Create Site Collection page, but now the page shows the new web application. See Figure 10.30.
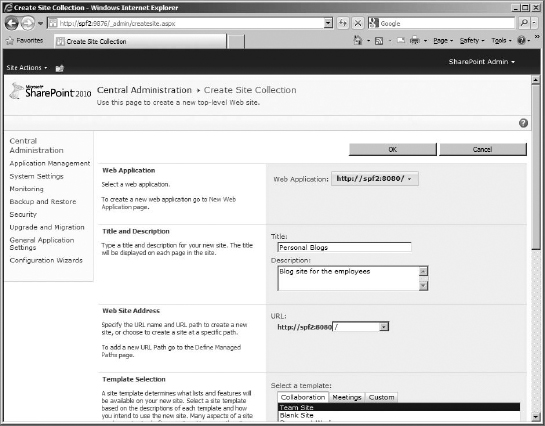
- For the title, my example uses Personal Blogs and gives a brief description. You'll notice the Web Site Address field is showing the new URL for the web application. We're going to make this site collection the root of the web application, so the complete URL is http://spf2:8080/.
- Create a new top-level site using the Team Site template (it makes a good portal for the user blog site collections that will be created from there), use your account (mine is shareadmin) as the primary administrator, and apply a quota template. (My example uses the Blog Quota we created earlier.) Then click OK. When you're done, browse to your new site collection, as shown in Figure 10.31.
FIGURE 10.30 The Create Site Collection page
FIGURE 10.31 The new site on http://spf2:8080
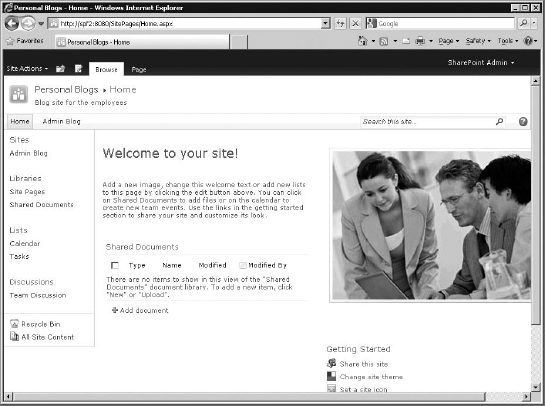
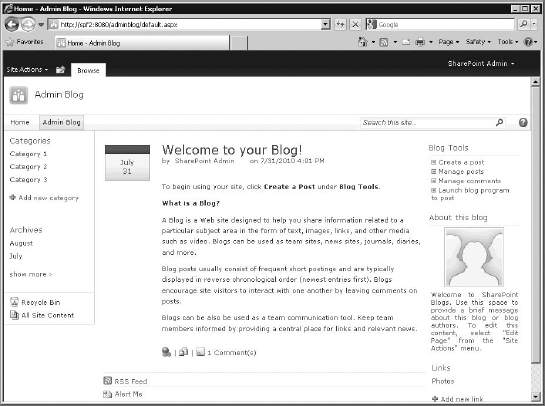
Now let's fill up the site collection. (After all, is it really a collection if there is only a top-level site?) Let's create a subsite of the top-level site. This subsite will actually be a blog for the administrators of the site collection for this example. It is intended to teach users what a blog is and how to use one before they create their own.
Use the Site Actions menu to choose New Site. On the New SharePoint Site page, name the site (I'm using Admin Blog), and use the Blog template. For the URL, you can add adminblog to the path. In my example, that would look like http://spf2:8080/adminblog. Be sure to place it on the Quick Launch and top link bars of the parent site. Set it to inherit the top link bar from the parent site. When you are finished, click OK. When it's done, you should have a nice blog site to display to users in addition to the main Personal Blogs top-level site, as shown in Figure 10.32. For more details on creating a subsite, see Chapter 9.
FIGURE 10.32 The Admin Blog site
Web Application Management
Now you have a new web application holding a new site collection with a basic top-level site and one subsite. As we did with site collections, let's take a look at the unique things you can do with a web application. For all of these settings, in Central Administration go to Application Management and click the Manage Web Applications link.
New and Extend
You've already created a new web application, but you may also notice an Extend button in the Contribute section of the ribbon. Extending a web application allows you to create a new IIS Web Site (with its own custom authentication, port, host header, and so on) for an existing web application—essentially providing multiple access methods to the web application. This will be covered in much more detail in the section “Alternate Access Mapping.”.
Delete Web Application
If you need to delete a web application, select it in the list, and click the Delete button. This will take you to the page shown in Figure 10.33.
FIGURE 10.33 The Delete Web Application page
Make sure you're set to delete the right web application. If not, click Cancel. If you do accidentally delete the wrong application, check Chapter 13, “Maintenance and Monitoring,” to see how to restore from backup (that is assuming you made a backup).
When deleting the web application, you can choose to delete the associated Web Site in IIS and/or delete the content database. Deleting the IIS Web Site will remove both the IIS Web Site and the corresponding application pool from IIS—even if they are being used by another IIS Web Site. Deleting the content database will truly delete the database in SQL. If you choose to not delete the database, it will be detached from the web application, but not deleted in SQL, so you can create a new web application and reattach it later. Content databases will be covered in more detail later in this chapter.
If you click the Delete button's drop-down menu, you'll also see an option to simply remove SharePoint from the IIS Web Site. This is used to “delete” any extensions you made for the web application (also discussed in “Alternate Access Mapping”).
Let's not delete anything here.
Web Application General Settings
The Web Application General Settings button has a drop-down menu that covers a lot of options—just clicking the button will take you to the page shown in Figure 10.34. Other settings pages available via this drop-down are Resource Throttling, Workflow, Outgoing E-Mail, Mobile Account, and SharePoint Designer. This section will explore each of these pages and their settings. These settings pages often have many options listed, more than can reasonably fit in one window without scrolling. The figures for these long pages may not display every setting available because of this; however, all settings will be described regardless.
GENERAL SETTINGS
This page contains a large number of sections for configuration. Everything you see here will apply to all the site collections and sites within the web application. Some of these settings are defaults for the sites, which means they apply to site creation but can be changed on individual site collections post creation. Most of these settings, however, are applied to the web application and cannot be changed later for individual site collections. Let's adjust the general settings for our SharePoint-8080 web application.
Default Time Zone Set the default time zone for newly created sites. This is only a default setting; individual sites can be edited to change the time zone from the default to reflect local time.
- Select the default time zone for all sites in the web application. My example uses the main office's time zone: EST.
FIGURE 10.34 The Web Application General Settings page
Default Quota Template Set the default quota template for newly created site collections. This setting is also a default. You can still change the quota template assigned to a site collection manually, as discussed in the “Site Collections” section of this chapter.
- My example uses the Blog quota template that we created earlier in this chapter, so any site collections that are created on this web application automatically get this quota.
Person Name Smart Tag and Presence Settings This option requires MSN Messenger or Windows Messenger (or Windows Communications server and Office Communicator). Person name smart tags are small pop-ups that appear when a user hovers their cursor over a name in the SharePoint site. The tags indicate whether the person is online currently and, if so, whether they're available for chat. This feature is covered in Chapter 11.
- This option is on by default, which is fine in this case.
Alerts User alerts are discussed in Chapter 6, “Introduction to Lists.” They can be very useful, but you really don't want to let a user set thousands of alerts (your email server might complain). Here is where you can limit the number of alerts a user can set, or you can disable user alerts altogether.
- My example changes the default of 500 to a mere 50, so users can't go crazy with alerts. Feel free to set the limit to fit your environment.
RSS Settings Disabling RSS feeds means that there will be no RSS for any of the site collections on that web application. In fact, when RSS is disabled at the web application level, the RSS link on the Site Settings page for enclosed site collections won't even appear.
- For this example, leave RSS turned on.
Blog API Settings With the rise of blogging, a large number of third-party blog-writing applications have been developed. In an effort to allow this software to connect seamlessly with actual blog servers, an RFC has been written for two application programming interfaces (APIs): Blogger API and MetaWeblog API. Blogger API, an older standard, dealt only with accessing the text on a blog. The newer standard, MetaWeblog API, also handles extra data such as common RSS-built metadata like Author, Title, Comment, and so on.
SharePoint supports the MetaWeblog API; when it's enabled on the web application, users can update, edit, or create blog posts via third-party software. If you accept usernames and passwords via the MetaWeblog API, these programs can also log in to perform the updates. Otherwise, the default authentication for the site is used.
If you do enable the API and allow the username and password to be accepted, note that these credentials are sent in clear text. Enabling SSL on the web application can reduce this security risk, as will be discussed later in the chapter.
- Leave the Blog API enabled, and turn on username and password acceptance.
 Real World Scenario
USING WINDOWS LIVE WRITER WITH SHAREPOINT BLOGS
Windows Live Writer from Microsoft is an excellent example of a MetaWeblog API-compatible program. You can download it from Microsoft's http://get.live.com website.
To set up Live Writer for use with a SharePoint blog, you'll need to configure a new blogging profile as follows:
- When you open Live Writer for the first time, it will prompt you to create a Windows Live Spaces blog. If you click Next (because you already have a blog, thank you), it will ask you for the blog type you are writing to. If the account you use to log into the local machine is the one you use to access your SharePoint blog, choose SharePoint Blog. At that point, Live Writer will ask for your blog address, will access your blog, and then will be ready to begin.
- Name the profile, and click Finish.
You can now create a blog post in Live Writer easily.
From that point on, it is easy to create blog entries in SharePoint using this (or many other) MetaWeblog API-compatible program; the configuration should be the hardest part.
Remember that MetaWeblog API is a web application setting; therefore, enabling it will provide this kind of integration for all blogs on all sites in all site collections residing in that web application.
Here are some other notes on using LiveWriter:
- If you log into SharePoint using a different account, you may want to choose Other Blog Service instead of SharePoint Blog. It will take you to a screen to enter the URL for your blog (for example, http://spf2:8080/adminblog) where you provide your username and password (assuming authentication via the API is enabled on the SharePoint server, it will be sent as clear text). When you're finished, click Next. Live Writer will check to see whether there is a web page at that address; when you are prompted for a service provider, choose MetaWeblog API.
- For the remote posting URL, you'll need to tack /_layouts/metaweblog.aspx onto the end of your blog's URL (for example, http://server/myb1og/_1ayouts/metaweb1og.aspx).
- If you chose SharePoint Blog as the blog type and your blog is in a web application using claims-based authentication, you may need to log in to the blog via a web browser to pull a claims token—at that point, LiveWriter can automatically connect to the blog. Otherwise, LiveWriter might fail to authenticate.
Browser File Handling This setting has two options. Permissive doesn't make any noticeable changes to the user's browser experience (the browser will behave the way it does on any other site). Strict attaches headers to particular file types—overriding the browser's normal behavior and instead requiring the browser to download the file (rather than attempt to render it). If you are using a page viewer web part to display a file and whenever the page opens it prompts you to download that file instead, consider changing this setting to permissive.
- Leave the default of Strict in place.
Web Page Security Validation This setting determines how long a user can remain idle before having to log in again. If you have a lot of users who tend to sit idle with a form half-filled out on their screen and you're not concerned with desktop security, you may want to extend the timeout period or disable it.
- For this example, leave the default setting.
Send User Name And Password In E-mail This setting is relevant only if Active Directory Account Creation mode (ADAC) is enabled.
When this setting is enabled, and when an account is created for a user, they will receive a notification email detailing their username and password. Without this setting enabled, the user will require an administrator to reset the password in Active Directory.
- For my example, leave the default in place.
Master Page Setting for Application _Layouts Pages When enabled (the default), the _Layouts page reference queries the master pages for the site. This applies to every site and site collection in the web application, so disabling this setting will radically change the appearance of these sites (assuming they had customized master pages). But if you have a problem with corrupt or badly modified master pages, this is a quick way to disable them all, preventing site administrators from using master pages.
- For the example, leave the default in place.
Recycle Bin You can customize the Recycle Bin for the entire web application. These changes apply to every site collection and site in the web application. You can adjust how long items sit in the end-user Recycle Bin and the second-stage Recycle Bin before deletion, set the Recycle Bins to never delete anything automatically, or disable the Recycle Bins completely.
- My example leaves the defaults in place. Items can be left in the Recycle Bin for 30 days before they are deleted, and the second-stage Recycle Bin is set at 50 percent of the site quota. This means the second-stage Recycle Bin adds 50 percent of the site collection's quota to the space taken in the content database.
Maximum Upload Size This is the maximum amount that can be uploaded in a single process to the web application. This limit applies to any single file upload or any group of files being uploaded together. For example, if you're using the Explorer view to copy and paste 50 documents to a document library in one go, you'll need to make sure the combined size of the files is less than this limit. If you're planning to transfer a large amount of data to a SharePoint site, you should first increase this limit and then decrease it when you're done.
- My example leaves the default of 50 MB in place. Apply the maximum upload size that is appropriate for your environment.
Customer Experience Improvement Program If you decide you want SharePoint to collect analytical data for the CEIP program, here is where you turn it on. It is the same setting that you see during the creation of a new web application.
- I'm going to leave it turned off.
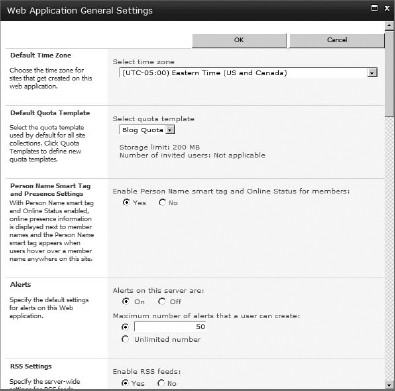
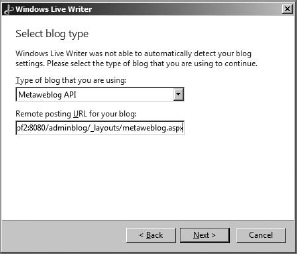
When you're done configuring the general settings, click OK. You will be taken back to the Web Applications Management page.
RESOURCE THROTTLING
This version of SharePoint has some nice features for controlling performance, one of which is resource throttling. With SharePoint, one of the biggest bottlenecks is with large lists—both lists with a large number of items and those with a large number of fields. Whenever a large list is queried, it slows the entire content database down for everyone else. And that content database could be hosting every site collection in the web application. Resource throttling ensures that such large queries don't get out of hand. Resource Throttling is an option in the drop-down menu for the General Settings, and clicking it opens the page shown in Figure 10.35.
FIGURE 10.35 The Resource Throttling page
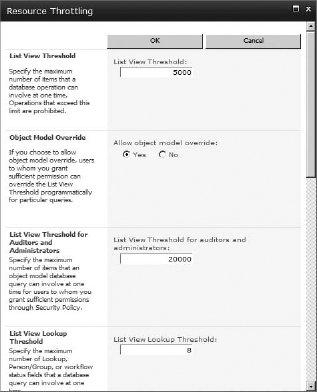
List View Threshold This limits how many items in a list can be accessed in a single database operation. For example, this limits how many items can be shown in a list view web part. The default is 5000. (The minimum threshold is 2000.) When a database query to a large list is made that exceeds the threshold, an “Expensive Query” exception error is displayed, explaining that the query has hit the threshold.
Object Model Override When enabled, this allows the previous threshold to be overridden (ignored) by custom-built queries. So if you need to run custom, large-count queries on the SQL database, you can do so. Running a command to use the override requires the command be run as an administrator (or another account with explicit permission on the web application).
List View Threshold For Auditors And Administrators This is the same threshold, but for administrators and auditors (people who have been granted either Full Control or Full Read permission via a permission policy at the web application level). The default is 20,000. This threshold is applied only when one of those accounts queries the list via an object model (so Object Model Override must also be enabled). When viewing lists normally, the standard List View Threshold setting still applies.
List View Lookup Threshold This limits how many lookup fields (fields that need to pull data from other lists) a list can contain.
Daily Time Windows For Large Queries This allows you to set a time period when the thresholds are not observed, so large list queries can be run (by anyone) without triggering an exception.
List Unique Permissions Threshold This threshold sets how many unique permission changes a list can have, including custom permissions on list items or on the list itself.
Backward-Compatible Event Handlers Event handlers are custom code written and triggered by events in document libraries. They can be applied to components, such as lists, files, and even sites. This feature allows you to use older event handlers while you rewrite them for this version of SharePoint. My example leaves the default in place, because we don't have any custom event handlers at this point.
HTTP Request Monitoring And Throttling Turning this on causes the web front-end server to run a monitoring job—and when HTTP traffic becomes overburdened (requests are slowing from a DDOS attack or just a really busy day), the server rejects low-priority requests, like the search indexer. It's recommended you keep this off, and if your web front-end servers slow to a crawl, address the cause/issue rather than throttling. This is meant to be a temporary fix (or as a response to a DDOS attack). By default it is enabled.
Change Log The change log is part of the search feature set. The server keeps a log of any recent changes to the site in the change log. This allows search services to quickly provide up-to-date search results without having to reindex the entire site. You can specify how long entries should be kept in the log, or you can disable the log completely. My example leaves the default of 60 days in place.
WORKFLOW
Workflows is the next option under the General Settings button. The Workflow Settings page (see Figure 10.36) controls whether your users can build their own workflows on the sites within this web application. When user-defined workflows are enabled, they can build custom workflows from the existing (administrator-installed) workflows.
FIGURE 10.36 The Workflow Settings page
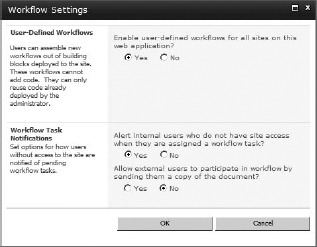
In addition, you can enable Workflow Task Notifications. There are two settings:
- Alert internal users who do not have site access when they are assigned a workflow task. This applies to users who are known to the authentication server (for example, they're members of Active Directory) who don't have explicit permission to the site. They receive an email prompting them to go to the Request Permissions page.
- Allow external users to participate in the workflow by sending them a copy of the document. For people with no permission to the document, this will email the notification and a copy of the document. If the workflow task is not a document but a list, the list item properties are displayed in a table within the email Although this workflow setting is not suggested for working with confidential or otherwise secure information, it is useful for those web applications intended for work with external users (such as company clients or customers).
OUTGOING E-MAIL SETTINGS
Next under the General Settings drop-down menu is Outgoing E-mail Settings. By default, a web application uses the same email settings you created during installation for the whole farm, but it is possible to give a web application unique email settings. See Figure 10.37. You'll probably want to keep the same mail server, but you might find it useful to change the sender address to be unique for this web application. My example uses [email protected]. (Make certain, of course, that the email address exists on your email server.) Should your region or system require it, you can also change the character set. I'm leaving it set to UTF-8.
FIGURE 10.37 The web application email settings
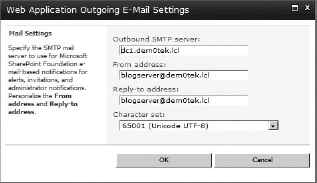
MOBILE ACCOUNT
This version of SharePoint supports SMS notifications (sending alerts and messages directly to cell phones). For the server to do this, you need to enter the URL of an SMS service with which you have an account for the server, along with your username and password for the account. See Figure 10.38.
SMS service can be provided by many third-party companies that integrate text messaging with SharePoint (and Outlook). Microsoft provides a link here to its Office Online website, which lists available third-party companies, based on your region and cell phone provider.
FIGURE 10.38 The mobile account settings
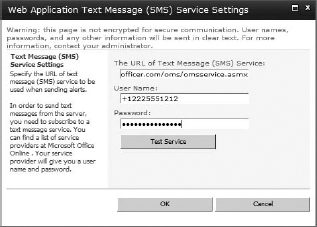
SHAREPOINT DESIGNER
This page (see Figure 10.39) provides the same settings as on the SharePoint Designer page for site collections (as shown in Figure 10.16)—except they apply to the entire web application and override whatever settings were configured on individual site collections within that web application.
FIGURE 10.39 The SharePoint Designer Settings page
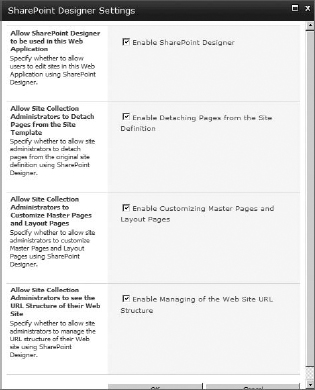
Managing Web Application Features
Like sites and site collections, web applications have features that apply to the entire web application (and the site collections therein). These can be provided by third-party companies to integrate their products into SharePoint or as part of an overall solution to customize SharePoint functionality. To view web application features, go to the Manage Web Application page and click the Manage Features button, which will take you to the page shown in Figure 10.40. If there are features installed that were scoped to apply to a web application, they would be manageable here. Currently, we have no web application features.
FIGURE 10.40 The Manage Web Application Features page
Managed Paths
As discussed in Chapter 1, “Windows SharePoint Foundation 2010 Under the Hood,” uses Internet Information Server (IIS) to host and publish all of its websites. This means that everything you see through the web browser is being hosted on or accessed by IIS and is, therefore, bound by the rules of IIS.
IIS usually stores all websites in the file system. If you have a normal web page with the URL http://www.mycompany.com/sales/default.html, a sales folder containing the file default.html will reside somewhere on the IIS server (by default in the WWWroot folder). All your website content—images, pages, scripts, and so on—will reside somewhere in the file system, nested within the root path assigned in the IIS Web Site settings.
SharePoint, on the other hand, compiles its web pages on the fly based on the content in the content database. This means there is no need for separate files to be stored in the local file system for each and every page. If you create new content, such as a list named Order, or upload a document to a library, everything will be stored in the database, not in the file system. In other words, the Order list's Allitems.aspx page is compiled from the master page and other components that exist in the file system by default (depending on the site template or definition), but the unique data and settings for that list are all stored in the content database for the site. SharePoint web applications do have a virtual directory that contains necessary components to display web content, but most of it is information for compiling pages on the fly.
The new London site collection (in our original http://spf2 web application) is located at http://spf2/sites/1ondon because the path for the URL defaulted to /sites/ when the site collection was created.
No matter where you look in the local file system, you'll never find a London folder with HTML (or ASPX) files in it. Instead, all that data will be in the content database, and all other pages for the site will be compiled when requested from shared components in the file system.
IIS and SharePoint distinguish between paths that are normal IIS websites (and exist in the file system) and paths that are SharePoint sites (and exist in the database) by using managed paths. A managed path is a path for which SharePoint tells IIS, “I'll handle this request.”
With this version of SharePoint, all unspecified paths are by default excluded—they are not managed. For a path to be used by SharePoint (and available as a path for new site collections within the web application), it needs to be set as a managed path. SharePoint creates two managed paths for new web applications, such as the SharePoint-80 web application created earlier in the book. They can be viewed in Central Administration, under Application Management ![]() Manage Web Applications.
Manage Web Applications.
To see what managed paths are available for our new web application (SharePoint-8080), make sure it is selected, and click the Managed Paths button in the ribbon. See Figure 10.41. As you can see, there are two managed paths by default, the root and sites.
FIGURE 10.41 The Define Managed Paths page
There are two types of managed paths, explicit and wildcard.
Explicit Managed Path An explicit managed path is a path that is itself a SharePoint site. Root is an explicit path because if you enter the root of the server into a browser (for example, http://spf2:8080/ or http://spf2/), you'd get to the top-level site of a SharePoint site collection. It's the end of the path; it goes no further.
Wildcard Managed Path A wildcard managed path is a URL that can contain multiple site collections. Sites, in our case, is a wildcard managed path because the path can have any number of site collections starting from there, such as http://spf2/sites/london, http://spf2/sites/toronto, and http://spf2/sites/cleveland.
When you create a new managed path and you want that path to host a single SharePoint site collection, it needs to be explicit (think of it as an explicit address, “Your top-level site address is http://spf2/”). If you want to host multiple site collections within the managed path, you need to make it a wildcard managed path. Making it a more general address, as in “Your site is somewhere under /sites/.”
To create a new managed path, simply specify the path (such as blogs) in the Add New Path section of the page. Specify whether the path is explicit or wildcard, and then click Add Path (Figure 10.42). When you create a managed path, it doesn't close the page, assuming that you are going to create more. The page closes only if you click OK.
You can also test the URL to make certain it works and isn't already in use somewhere by clicking the Check URL button. If a page comes up for that path, it's obviously already being used, so having the URL fail to display a page when you check it is good.
TO SLASH OR NOT TO SLASH
The Define Managed Paths page says you have to precede paths that start at the root address of the web application with a forward slash. In my experience, this isn't necessary.
To specify a managed path, you have to type in each path from the web application address forward. For example, it is possible that you might want to provision some longer managed paths for members of a presales presentation team for when they use self-service site creation to create their blogs. (Self-service site creation lets users make their own site collections; we'll be covering it later in this chapter.)
In that case, instead of just adding blogs to the managed paths list as a wildcard path, you'd need to add blogs/sales. Then the presales team users could use their names to specify their sales blog addresses, such as http://spf2:8080/blogs/sales/BasilMullien. This also lets you organize the paths, so other teams can have blogs, such as blogs/HR, blogs/mgmt, and so on.
DON'T NEGLECT THE ROOT
Keep in mind when planning your URL namespace that SharePoint requires a site collection at the root path first before you add site collections to any other managed path. If you decide to use the /sites/ path for all your site collections for some reason, Search may not work. Weird but true.
There is no short way to specify a long managed path, which should be useful discouragement in and of itself. Remember the 260-character limit for URLs when creating paths (255 characters if you are going to do Send To for libraries or otherwise link to the path in the site).
FIGURE 10.42 Creating a new managed path
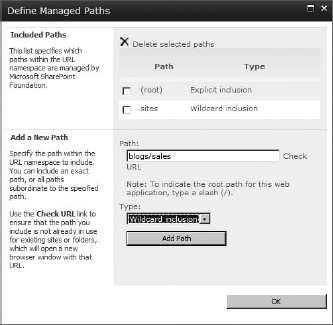
DON'T GO MANAGED PATH CRAZY
Keep in mind that these paths are for site collections in this web application, and are available for anyone creating a site collection, in Central Administration or via self-service. Subsite addresses within site collections are appended to site collection addresses. This means that if you had a site collection at http://spf2/1ondon/sa1es and you wanted to create a subsite for presales projects, you wouldn't need to create a managed path for sales/presales to put that subsite at that address. If you add a presales subsite to the site collection at http://spf2/1ondon/sa1es, its address will be http://spf2/1ondon/sa1es/presa1es without additional effort.
A managed path is more than just the URL you use for site collections; it's a critical piece of the relationship between SharePoint and IIS; it lets IIS know what addresses to expect SharePoint to take care of.
USING EXCLUDED PATHS
If you'd like to place a traditional website in an excluded path on the IIS server while keeping the default port 80, you need to do a couple of things to make IIS display the site outside of SharePoint.
For example (and I am intentionally keeping this simple), say you want the URL http://spf2/sales/ to go to a standard website, rather than to a SharePoint site. First make certain that the site's path is not a managed path. The next thing to do is place the website files in the correct location—the root of whatever IIS Web Site is hosting port 80. As you may remember from Chapter 2, the default site was disabled, and port 80 is used by the Web Site SharePoint-80 instead.
Launch Internet Information Services (IIS) Manager, and expand the Web Sites folder. You'll see the SharePoint-80 Web Site. Click the Basic Settings action (on the right pane) to see the directory for the site. Mine is as follows:
C:InetpubwwwrootwssVirtua1Directories80
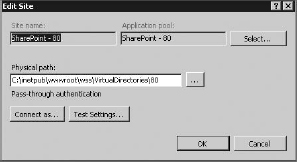
Copy your website to this location. Keep it in its own folder (my example uses Sales for the folder).
In this case, you'll have a Sales folder containing your website files (HTML, images, and so on). This example has only one file, default.htm.
For IIS to know that the new path is there, you may need to restart it. From the command prompt, enter the following:
iisreset /noforce
This will restart IIS, and http://spf2/sa1es/ will lead to the static default.htm file. It will not go to SharePoint.

Keep in mind that everything that is hosted this way uses the same IIS Web Site, which is called SharePoint-80 in this case and is used by SharePoint. Therefore, any IIS settings you have for the web application, such as Authentication (allowing or disallowing anonymous access) will also apply to this excluded path. If you want to change these settings just for the excluded path, you'll need to create a new IIS website for the path and not use one of SharePoint's.
Service Connections
This button takes you to a simple page (see Figure 10.43) that gives you the option to enable or disable access to any available service application. These are the same settings you saw during the creation process. You can find more information on service applications in Chapter 11.
Authentication Providers
Authentication providers are set by zone—which will be covered in the “Alternate Access Mapping” section. For each zone, you can quickly see what kind of authentication mode you have configured (see Figure 10.44).
This is also a good way to double-check what mode of authentication you selected for a new web application if you have forgotten—if you chose claims-based, it will say so here. If you chose classic mode, it will be shown here as “Windows.”
FIGURE 10.43 Service connections
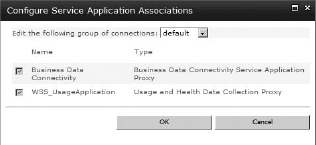
FIGURE 10.44 Authentication providers by zone
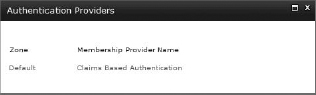
Then, for each zone, if you click its name, you can edit the settings (the same ones you saw during creation—enabling anonymous, setting up Windows authentication to use NTLM, and so on. See Figure 10.45.
FIGURE 10.45 Authentication settings for the default zone
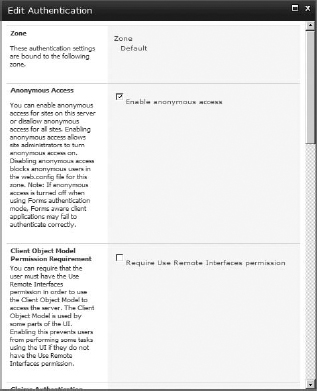
Self-Service Site Creation
With all these different sites and all the possible templates and site definitions, you could easily find yourself doing nothing all day but creating the following new subsites: new meetings, new blogs, new document workspaces, and so on. You might be tempted to give more users Create Subsites permissions so they can create their own subsites. Of course, then you'll have the nightmare of all these subsites popping up with no organization, and you'll need to deal with them (keep in mind that each subsite eats into the site collection's storage quota, if there is one).
As an alternative to letting your users create subsites on your main site collection, you can enable self-service site creation. Self-service site creation allows users (and not just farm administrators) to create their own site collections. Then you can more easily apply a storage quota to each of their site collections (they'll probably only ever use the top-level site) and apply the automated deletion feature (under Site Use Confirmation And Deletion) that can be used to delete unused site collections.
DOES ALLOWING USERS TO CREATE SITE COLLECTIONS GIVE YOU CHILLS?
Of course, giving users the right to create their own site collections (instead of creating subsites) presents its own problems. Site collections are easier to manage from Central Administration, but they are fully functional site collections, with a top-level site, the capacity to have many subsites of all kinds, and their own users and permissions. So, there is a trade-off: ease of management versus giving users carte blanche over their own collection of sites.
ENABLING SELF-SERVICE SITE CREATION
The web application in this case was created so that users could have their own blogs, complete with a root site collection (this site collection becomes important when self-service site creation is enabled). There are basically two ways of going about allowing users to create their own blog site: allow them to create subsites in one site collection or enable self-service site creation. They both have their pros and cons.
If you allow users to create subsites in a site collection, they can create as many as they want there. That's because when you enable the permission, there is no inherent limit to how many they can create. But they at least can only overload one site collection.
On the plus side, that one site collection with all the subsites is pretty easy to back up and restore. Also, users don't need to know how to manage their own security if they simply inherit the settings from the parent site. They also can use any custom templates you may have added to the site collection. On the other hand, if you have users abusing the permission to create subsites, you will have to track down the subsites they create and delete them manually. Also, the site collection quota will affect all the subsites in the collection, meaning that one person's overloaded subsite can lock the site collection for everyone.
If you enable self-service site creation, yes, the users can create their own site collections (with their own users and security). In fact, they can create as many as they want (once enabled, there is no way to limit how many site collections the users can create), and that's pretty powerful. But you can also set up usage notification and automatic deletion, which will automate the deletion process, freeing you from having to hunt down and delete unused site collections yourself. Also, each site collection will have its own storage quota, so no one will be locking anyone else's sites with their data overload (they will be limited by the quota as well). And keep in mind that they will have to set up their own users and security for this site collection as well (which gets tiresome after a while).
Because users are permitted to have considerable independence in what they add to their blogs in this scenario, we are going to enable self-service site creation for this web application. But in addition, we will make the users responsible for regularly indicating that their site is being used. If they don't respond quickly enough, the site collection triggering the confirmation notice will be deleted.
Self-service site creation is a web application-wide setting configured in Central Administration under Application Management ![]() Site Collections. Once there, click the Configure Self-Service Site Creation link to go to the page shown in Figure 10.46. Here you can enable self-service site creation for a particular web application. (It is also possible to see these settings under Application Management
Site Collections. Once there, click the Configure Self-Service Site Creation link to go to the page shown in Figure 10.46. Here you can enable self-service site creation for a particular web application. (It is also possible to see these settings under Application Management ![]() Manage Web Applications. Simply click the web application and click the Self Service Site Creation button in the ribbon.) When it is enabled, all permission levels with the Self-Service Site Creation permission set (by default, everyone but Site Visitor members) allow users to create their own site collections. There is also an option to require a secondary contact for the site collections created in this fashion. Generally, this is a good idea if you're planning on enabling site use notifications, in case the primary administrator is unavailable to receive notifications for some reason.
Manage Web Applications. Simply click the web application and click the Self Service Site Creation button in the ribbon.) When it is enabled, all permission levels with the Self-Service Site Creation permission set (by default, everyone but Site Visitor members) allow users to create their own site collections. There is also an option to require a secondary contact for the site collections created in this fashion. Generally, this is a good idea if you're planning on enabling site use notifications, in case the primary administrator is unavailable to receive notifications for some reason.
Go ahead and enable self-service site creation, making sure to check the box for a secondary contact. Click OK.
Creating a self-service site creation site collection is a little different from creating a site collection from Central Administration. With self-service site creation enabled, users without access to Central Administration can create site collections. In addition, during the creation process, the users will not get to choose their path or their storage quota. The default managed path and storage quota set at the Central Administration level will be applied for them.
FIGURE 10.46 Self-Service Site Collection Management page
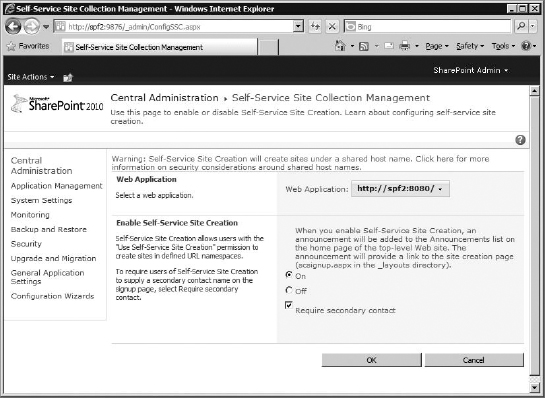
Whoever creates a self-service site collection is by default the owner of the site collection, and they can add, edit, and remove other people, groups, permissions, permission levels, subsites, and all site content. However, they still do not have any administrative rights to the original, main parent site or access to Central Administration. They're only a big fish in their own small pond. But they are still big enough to impact storage as they add to their site collections and then build up activity as the people they add join them there. It is important to regularly monitor usage to see where growth is happening. Keep in mind that self-service site creation gives users the opportunity to create a site collection of their very own, but it doesn't limit them to just one.
When enabling self-service site creation, you will want to consider setting some limits in order to manage the possible storage load that all of those user site collections could pose on whatever server is hosting the web application's data. The first thing is to place a default storage quota on your web application for all newly created site collections. We just created a new web application (http://spf2:8080) and set the storage quota on creation, so that's done. If you need to add a default storage quota to an existing site, the setting is found under General Settings.
The other key settings to consider are for automatic deletion and usage notifications under Site Use Confirmation And Deletion. These settings are shown in Figure 10.47. A lot of users will create new site collections, use them once, and leave them to linger forever. You can prevent this by enabling automatic deletion, as covered earlier in the chapter.
If you enable autodeletion, you are strongly encouraged to require a secondary administrative contact for site collection creation. The last thing you want is to have a site collection deleted because the one person getting the email notifications is on vacation. In my example, I'm going to force notification but not enable auto-delete at this point. If it looks like the self-service site creation is being abused, I will come back and enable it.
FIGURE 10.47 Enabling site use confirmation and deletion
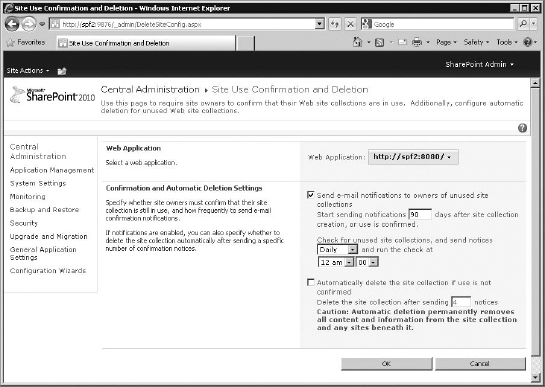
CREATING A SELF-SERVICE SITE COLLECTION
When self-service site creation is enabled, a new announcement will appear in the Announcements list on the top-level site of your root site collection. This announcement contains a link to create a new site collection (see Figure 10.48), starting with the top-level site. This is the only way users can use self-service site creation, so don't delete this announcement! In fact, it's recommended you add the Announcements List Web part to the home page of the top-level site. (You can find details on adding a List View web part in Chapter 5.)
If needed, you can also add the link provided in the announcement to the Links web part, top link bar, or Quick Launch bar (detailed in Chapter 9).
FIGURE 10.48 The self-service announcement

Clicking this link takes the user to a modified New SharePoint Site page. Ironically, it does not take the user to the Create Site Collection page. If you notice, in the address bar, the page is scsignup.aspx, which means it is in fact the site collection sign-up page and not going to just create a new subsite.
However, the page is almost exactly like any other Create Site Collection page, except there is no option to choose a site quota or specify the owner (because the person creating it is by definition the owner).
You'll also notice that you have the option to pick in which managed path to place the new site collection. In my example, Basil is going to create his blog in the blogs/sales managed path we created earlier.
Because it's creating a new site collection (not just a SharePoint site as the page title suggests), there is no option to inherit permissions or navigation; instead, there is a new section to assign any additional site administrators. If you configured self-service site creation to require a secondary contact, this field must have at least one person listed in order to be able to create the site collection (as shown in Figure 10.49).
FIGURE 10.49 Second administrative contact

Once the site is created, it will take the user to the Set Up Groups For This Site page, where they can quickly add users to the default SharePoint groups for their site (Figure 10.50). Keep in mind that they can add other users later under Site Permissions or People And Groups in Site Settings, if they don't do so here. Once that's done, the site is fully created and can be accessed from the main URL. No link to it is created on the first site collection site; if you want a link there, you'll need to add one manually.
As a matter of fact, remember that site collections are islands; they don't have convenient links to other sites or site collections outside of themselves. You may want to consider configuring the Portal Connection setting in the top-level site of any new site collection to link to the Personal Blogs site collection so the users can get back to the site collection they started from.
Once you've finished setting up the groups, click OK to go to the top-level site of the new site collection (Figure 10.51).
FIGURE 10.50 Set Up Groups For This Site page
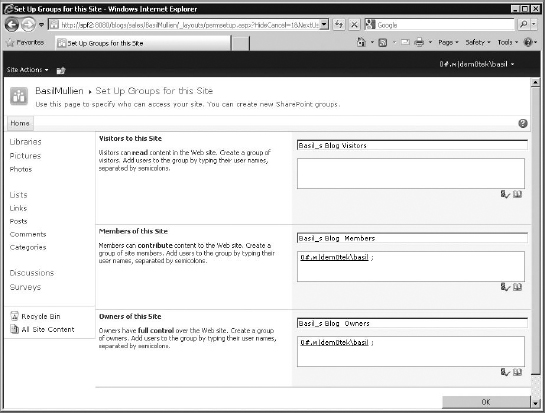
FIGURE 10.51 The new self-service site collection
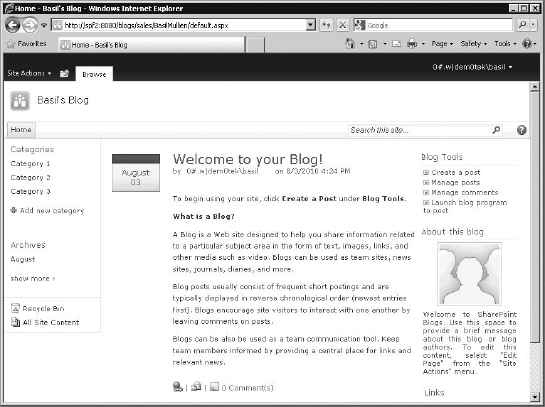
Keep in mind that the user will be the owner of the site collection, where there are a lot of configuration settings available. Some training might be in order.
Blocked File Types
By default, SharePoint blocks the upload of several file types based on the file extension. The list of blocked file types is set at the web application level. You can block all *.exe files for all site collections in the web application. Then create a different, private “IT tech team” web application, where having a library of common executable tools would be handy, so you permit .exe files. You can also restrict a web application so that it doesn't permit media files (such as .mpg, .mov, or.wmv files) to be uploaded. The sky is the limit as far as restricting file types. This is another reason web applications are security boundaries.
Blocked file types are set in Central Administration on the Manage Web Applications page under Application Management. Clicking the Blocked File Types button on the ribbon will take you to the page shown in Figure 10.52.
FIGURE 10.52 The Blocked File Types page

On the Blocked File Types page, you can edit the list of file extensions to block. First make sure you're editing the correct web application. If you need to make changes to all the web applications, you'll need to edit the list for each one. You can permit previously blocked file extensions by simply removing them from the list, and you can block new file extensions by adding them to the list (note that you add only the characters for the extension, not the period).
SharePoint doesn't check a file beyond the extension; therefore, if a user changes a blocked extension to a permitted extension, they'll be able to upload the file. For example, someone could take evilhack.exe, rename it evilhack.doc, and successfully upload it to a document library.
User Permissions
As you know, permissions in SharePoint are applied to a site or site collection using permission levels—typically Read, Contribute, Design, and Full Control. Then individual users or groups are assigned these permission levels.
A permission level is actually a collection of separate permissions, discussed in detail in Chapter 12. There are times when you don't want a particular permission to be available to any permission level for the web application. (For example, you may want to remove the permission Add and Customize Pages from the web application so that even site owners, designers, or other contributors can't get this permission—it's just not available for any permission level in any site collection within the web application.)
When you do need to disable individual user permissions for the web application, select the web application on the Manage Web Applications page, and click the User Permissions button. You'll see the page shown in Figure 10.53.
FIGURE 10.53 The User Permissions page
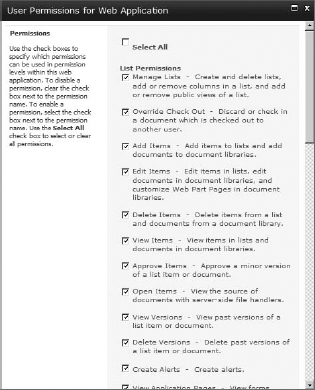
When you uncheck a permission, it is removed from the web application and no longer shows up as part of any permission level, not even Full Control.
Web Part Security
Another way you can lock down individual web applications is by using the Web Application Web Part Security button on the ribbon. It displays the Security For Web Part Pages page, shown in Figure 10.54.
This has three settings, each with two options: Allow or Prevent.
Web Part Connection Controls the ability to have web parts connect to other web parts. As discussed in Chapter 5, this is a powerful and useful ability. It is enabled (Allow) by default. Web part connections can cause security filtering issues with search (when you connect a secure list to one that isn't so secure, secure items can show up in search results where they shouldn't), so in some situations it might be important not to allow them.
Online Web Part Gallery Backward-compatible with custom online galleries. It once permitted users to access Microsoft's online web part gallery when they have a web part page in edit mode, so they can download and add web parts to their pages. That Microsoft online web gallery no longer exists, but there are some companies that require this setting. This is enabled (Allow) by default.
Scriptable Web Parts Can be added or edited by contributors (users with contribute permissions) when this is enabled, so web parts with scripts can be applied and modified on web part pages. This is disabled (Prevent) by default. If you want your contributors to be able to work with content editor web parts, this setting must be enabled.
FIGURE 10.54 The Security For Web Part Pages page

User Policy
If you want to give particular user(s) explicit rights to the entire web application (and all the site collections inside), you can apply them here. No matter what the permissions are on an individual site collection, site, or even list item, this user would have certain rights applied at the web application level. Typically this is used for service accounts (such as the search indexer), but it can be used for any other account (for example, to allow the user to bypass the List View Threshold discussed earlier).
- To give a user access to the entire web application, in the Manage Web Applications page, select the web application (for example, http://spf2:8080), and click the User Policy button in the ribbon. This takes you to the page shown in Figure 10.55.
FIGURE 10.55 he Policy For Web Application page
Here you can see the current user policies configured for the web application. Let's create a new policy giving saffron the policy Full Control to the web application, so no matter what happens to the site collections (such as users with self-service site collections refusing to add that account to any of their groups), the saffron user can always log in and make changes anyway.
- First click Add Users to add a new user. This opens the first of the Add Users pages. You can apply the policy to an individual zone (more on zones to come) or to all zones (which is the most common use). Once you've picked the zone(s), click Next. To follow my example, leave it applied to all zones.
This takes you to the second Add Users page (Figure 10.56), where you can choose the user(s) you want to add (saffron in my example) and assign one or more of the following permission policy levels to the user:
Full Control Access to all permissions
Full Read Can read everything but cannot edit/delete/add anything
Deny Write Cannot write anything
Deny All No access at all
WHAT'S WITH THE I:0#.W|?
You may notice that some of your usernames are displayed as i:0#.W | domainnameusername. This weird string appears to be appended by SharePoint whenever claims-based authentication is used, presumably to identify that authentication method. So if you see “i: 0#.W |” as a prefix to your domain name, you can assume claims-based authentication is in use. I hope Microsoft will remove or hide this code in a future update to SharePoint Foundation.
FIGURE 10.56 The Add Users page
- You can apply more than one permission policy level to the same user—Full Control will overwrite Full Read (if both are selected), but the Deny options will overwrite both Full Control and Full Read. So, giving someone Full Control and Deny Write will give them all the permissions except anything blocked by Deny Write. Typically you'll pick only one of these permission policy levels. I'm giving Saffron the Full Control policy.
- The final option is to set this account to operate as System—this places the user in “stealth” mode—they won't show up as themselves if they post anything, and any changes or modifications are recorded as coming from a system account. Typically reserved for the service accounts, this can also be applied to actual user accounts, but in this case I'm going to leave it unchecked.
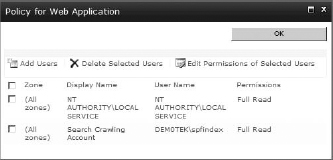
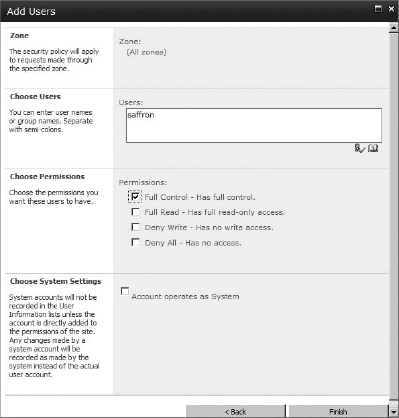
Now, with a user policy for the entire web application in place, Saffron can access any site collections in that web application, like the self-service site creation one used by Basil, even if he chose not to add her account to one of his site groups. As you can see in Figure 10.57, Saffron is logged into Basil's blog site and on the site permissions page, without being added to the site.
FIGURE 10.57 User policy user account accessing a site collection
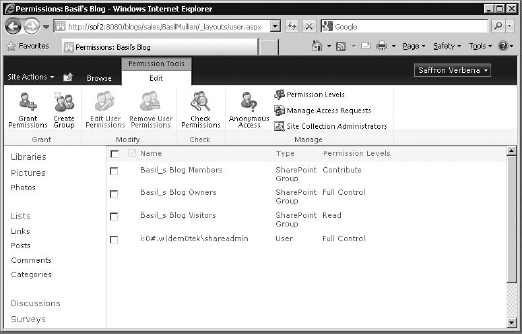
ANONYMOUS POLICY
One feature you can control at the web application level is anonymous access. When creating a new web application (or extending one, as detailed in “Alternate Access Mapping”), you can choose Allow Anonymous for the new web application. This selection does not turn anonymous access for the site collections on or off; it merely permits that option for each site collection. If a web application does not allow anonymous access, no enclosed site collection can have it. If anonymous access is allowed on the web application, then the enclosed site collections have the option to allow it. However, it's still turned off by default.
ADDING ANONYMOUS ACCESS TO AN EXISTING WEB APPLICATION
If you don't select the Allow Anonymous Access option while creating a web application, you can enable it later. Go to Central Administration ![]() Application Management
Application Management ![]() Manage Web Applications. Choose the web application, and click the Authentication Providers button.
Manage Web Applications. Choose the web application, and click the Authentication Providers button.
Then click the zone (based on the URL the users use to get to the web application's contents) on which you want to allow anonymous access. (Zones are discussed in the “Alternate Access Mapping” section. For now, we have only the Default zone.) When you click the zone, you will be taken to the Edit Authentication page.
Select the Enable Anonymous Access box and click Save to permit anonymous access for this web application.
ANONYMOUS ACCESS RESTRICTIONS
When you are in the Manage Web Applications page, if you select a web application, you can click the Anonymous Policy button to display the Anonymous Access Restrictions page (Figure 10.58) and apply restrictions to anonymous access.
FIGURE 10.58 The Anonymous Access Restrictions page
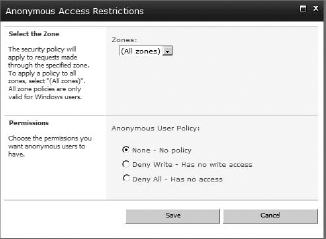
These settings override any settings for anonymous access applied at the site collection (or lower) level. So, you can force any anonymous access for the entire web application to Deny Write or Deny All, regardless of what the site administrator of the enclosed site collection does (none means no restrictions are set from this level). Deny All is the equivalent of disabling anonymous access completely on the Authentication Providers page, except that it leaves anonymous access as a configurable option in the site collections—so the individual site collections can have anonymous access permissions configured, but they're all disabled when this restriction is in place.
This approach is handy if you need to disable all anonymous access on a web application temporarily (without having to redo all the permissions on each site collection).
ENABLING ANONYMOUS ACCESS ON A SITE COLLECTION
As you may recall, you allowed anonymous access when you created the blogging web application. Now it's time to turn it on at the site collection level. Browse to your new web application, and log in as the site administrator (my example uses http://spf2:8080, and the login is dem0tekshareadmin) to reach the top-level site. If you go to Site Permissions (under the Site Actions menu), you will be taken back to the familiar Permissions page. On the ribbon you will see a new option, Anonymous Access (Figure 10.59, top). Compare this to the Settings menu for a site collection in a web application that does not permit anonymous access, such as the main, Company Site on http://spf2 (Figure 10.59, bottom).
FIGURE 10.59 Site Permissions on (top) a web application that allows anonymous access; (bottom) a web application that does not allow anonymous access
Go ahead and look at the Anonymous Access settings for the site collection. Click the button in the ribbon to go to the Anonymous Access page (shown in Figure 10.60).
FIGURE 10.60 The Anonymous Access page
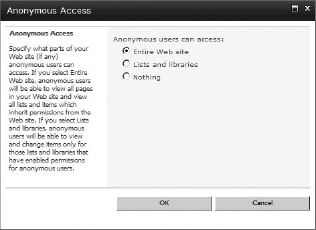
You have three options for how you want this site collection (remember, this is at the site collection level) to treat anonymous users. You can grant anonymous users access to the following:
Entire Web Site Anonymous users have access to the entire site collection (because this is being applied at the top-level site). They can browse and read all pages, lists, and libraries.
My example grants this anonymous access level for the Personal Blogs top-level site. So, in this demonstration, anyone can view the entire site collection without having to first provide a username and password.
Lists and Libraries With this setting, anonymous access is available to be enabled per list or library but is not set to allow access to any pages. You must manually edit the permissions on whatever list or library you want to grant anonymous access. And even then anonymous users will have to browse directly to the list or library to see it because they will not be allowed elsewhere in the site.
Nothing No anonymous access is permitted. This is the default.
When anonymous access is granted by using the Entire Web Site setting, the anonymous user is given the Limited Access permission level by default (meaning they can only read and not write). Therefore, choosing Entire Web Site will not give them full control but will merely allow anonymous users to have limited access to view the entire site collection. You can find more information about permission levels in Chapter 12.
If you set anonymous access to allow access to the entire site, a visiting user does not need to log in to see the site (Figure 10.61). The Account menu (that usually indicates the logged-in user's name) is replaced with a Sign In link. This allows users to opt to log in if they want to contribute to the site. Of course, people who do not have a valid user account to the site will not be able to log in. Notice that for the Team Site template, a Publish ribbon tab appears for anonymous users. This is triggered because of the wiki home page but is not useful for the anonymous user because all settings are grayed out. The Site Actions menu is available, but the only option available is to see All Site Content.
FIGURE 10.61 A site with anonymous access enabled
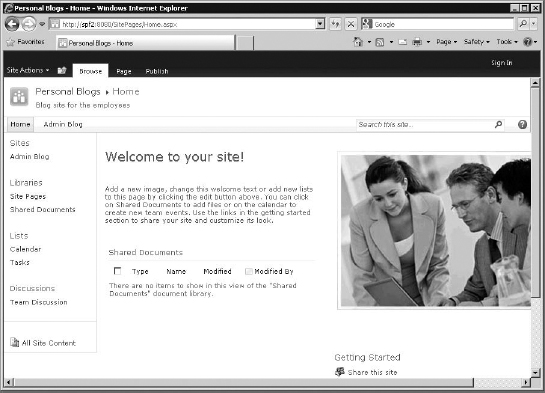
NO THEME FOR ANONYMOUS
SharePoint Foundation has a known issue with anonymous access and site themes. For some reason, site themes cannot be rendered for nonauthenticated users. So if you have a theme applied to a site, an authenticated user (like your account) can see the theme, but the site will display the default (no theme) if an anonymous user accesses it.
EDITING ANONYMOUS USER PERMISSIONS ON A LIST OR LIBRARY
To enable anonymous access on a site collection, you have two options: List And Libraries or Entire Site. As soon as you select Entire Site, anonymous users can view (and only view) the entire site. But if you choose the Lists And Libraries option, they are not given limited access to the entire site; their access is to the entire site by default still None, but you can go to the individual lists or libraries and explicitly set permissions for anonymous users there. They would have to browse directly to those lists or libraries to access them, but it would work and not violate the security of the rest of the site.
At this point, all visitors can view all content on the site, but they cannot contribute. That's basically good; we don't want visitors adding posts, but we do want them to be able to comment. So, let's give the anonymous users the right to add comments to the admin blog. All comments will be stored in the Comments list.
- Browse to your admin blog (at http://spf2:8080/adminb1og/ in my example), and navigate to the Comments list, which can be found under All Site Content on the Quick Launch bar. (If you are not using a blog template for your site, any list will do.)
- Once on the list, click the List Settings button on the ribbon (under the List Tools toolset, List tab). On the List Settings page, click Permissions for this list. (List settings are fully covered in Chapter 6, and permissions are covered in more detail in Chapter 12.)
- Because the list inherits permissions from the parent site (so that everyone can read but anonymous can't contribute), you need to break that inheritance so you can set custom permissions for the list. Click the Stop Inheriting Permissions button in the ribbon.
- A dialog box will remind you that this breaks inheritance. Click OK.
The Permissions: Comments page will now show the unique permissions for this list. (See Figure 10.62.)
- Click Anonymous Access on the ribbon bar.
FIGURE 10.62 List permissions
On this page (shown in Figure 10.63), you can adjust the rights of an anonymous user on the selected particular list. The following permissions are available:
Add Items The ability to add a new item to the list or to add a new document to a library (in this example, the ability to add a new comment)
Edit Items The ability to edit an existing item, such as an existing comment, in the list or library
Delete Items The ability to delete an existing item
View Items The ability to view items in the list
FIGURE 10.63 Changing anonymous access
When you selected Entire Web Site for the Anonymous Access settings at the site collection level, the server gave anonymous users the View Item permission, so it will be already checked here. If you set the anonymous access for the site collection to Lists And Libraries, none of these will be checked.
- For the comments, you'll want to give anonymous users rights Add Items and View Items (which they currently already have), but not Edit or Delete, because you don't want people to edit or delete other people's comments. Since they are all anonymous, SharePoint can't keep track of which anonymous user wrote what, so it's best they don't edit anything. Check the Add Items box, and click OK.
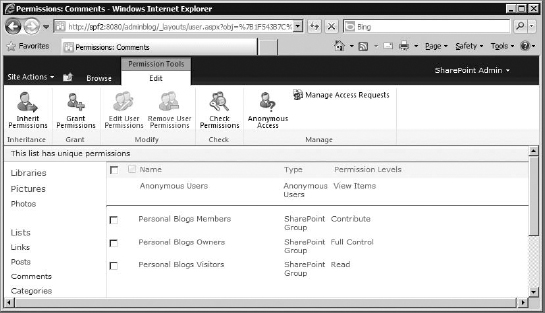
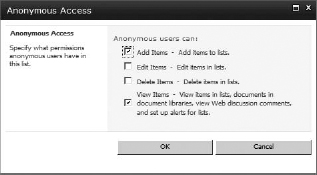
You should now have a personal blogs site, with an admin blogs subsite, that allows anonymous access. Open a new browser window and go to http://spf2:8080. You should be able to see the site without having to log in. As you saw earlier, the button at the top right no longer shows your name, but it provides you with the Sign In option.
For this example, let's see whether we can add a comment to the blog. Browse to the admin blog (or whatever you named your subsite) and see whether you can add a list item to the Comments list. In my case, I am going to add a comment to the default post “Welcome to your Blog.” To do that, click the Admin Blog link, and click the Comments link at the bottom of the post. You'll be taken to the Comments list for that post. See Figure 10.64.
You can immediately tell whether anonymous users are permitted to create comments. The Add Comment fields will be available at the bottom of the page. That link does not appear if you don't have permission to add a comment. Go ahead and add a comment, and click Submit Comment. The new comment will be posted with no username listed (as you can see with my sample mystery comment in Figure 10.65).
FIGURE 10.64 The Comments list
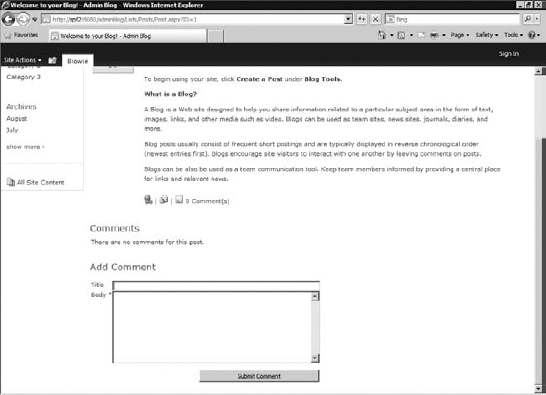
FIGURE 10.65 An anonymous comment is posted.
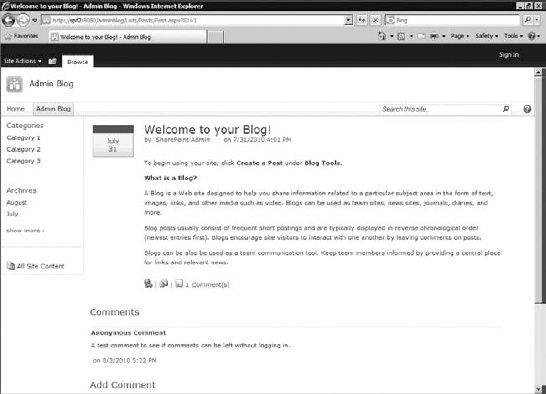
As always, think carefully before enabling anonymous access. Even though this web application isn't currently accessible from outside your network, someone could still add inappropriate comments.
Permission Policy
Web applications can also have custom permission policies. These are essentially permission levels created to be applied at the web application level and affect all site collections contained therein. We applied a permission policy in the “User Policies” section, giving Saffron the Full Control policy to access all site collections in the web application with Full Control permissions. Keep in mind that a permission policy (or permission level for site collections) is a combination of individual permissions, such as View, Delete, and Edit Items. Permission policies are different from permission levels because they have the option to explicitly allow or deny a permission, and they have two default policies premade.
Going back to Central Administration, navigate to the Manage Web Applications page again (under Application Management). Select the SharePoint-8080 web application, and click the Permission Policy button in the ribbon to display the window shown in Figure 10.66.
FIGURE 10.66 Manage Permission Policy Levels page
Here you can manage permission policy levels—by adding, editing, and deleting them. Let's take a closer look at the Full Control policy level. Click the name of the policy to edit it.
This opens the Edit Permission Policy Level window (see Figure 10.67), which is an actual browser window (basically using the old interface from WSS 3.0), not a form box. Editing a permission policy level gives you a couple of options.
Web Application This section cannot be changed; it's just here to remind you of what web application is being edited (and is left over from the WSS 3.0 interface).
Name and Description Here you can edit the name and description for the policy level.
Site Collection Permissions You can have the permission policy level grant either Site Collection Administrator rights or Site Collection Auditor rights. As you know, site collection administrators have complete control over the site collection. Site auditors have full Read access to the entire site collection. So, these grant one or both of the settings to the permission policy level, granting that permission to every site collection in the web application.
Permissions Figure 10.67 shows this page, where you can set the individual permissions for this policy level. Unlike customizing permission levels, when you set up a permission policy level, you also have the option to explicitly deny a permission—so even if a site collection administrator grants the user that permission explicitly, it's still blocked by the permission policy level.
For example, you can explicitly deny the Create Alerts permission for a particular user or group. So even if a site collection administrator grants them the Create Alerts permission, they will still be unable to create alerts. Make sure you document any changes made to the policies, particularly when denying a permission to aid future troubleshooting.
FIGURE 10.67 Permission policy levels: permissions
BEWARE THE DENY
Keep in mind that if you deny the Create Alert permission, nothing at the user level indicates that they have been denied until creating an alert just doesn't work. Whenever you explicitly deny any permissions, you may want to log into a site collection in the affected web application with a standard user account and see what it breaks before committing to the change.
Host Headers
Once you've started building multiple web applications on your server, you'll quickly realize that having the same URL, but different port numbers for all those web applications can be confusing. You also might be thinking about how great it would be if you could host websites with completely different URLs, especially if you want your server to be referred to by something other than its internal network server name. Host headers, an IIS feature that SharePoint is more than happy to take advantage of, can help organize the confusion.
Host headers allow you to map a web application to a custom URL. For example, rather than creating a web application with the URL http://spf2:27445/, you could set it to the URL http://tech/ or the live, external DNS name http://tech.dem0tek.com/. The really nice thing is that both of these URLs can run on port 80 rather than a custom port, which simplifies browser use. Because 80 is the default port for HTTP, the user won't need to specify a port in their browser's address bar, just the URL.
UNIQUE IS BETTER THAN GOOD; IT'S NECESSARY
Keep in mind that each IIS Web Site (and therefore each web application) must be completely unique in the way it identifies itself so IIS can pass it the correct user requests. Thus, the Web Site must have a unique URL or a custom port. Above all, the Web Site must be uniquely identifiable by IIS in order to work.
And, if you are working with host headers, the IIS server will never get the request for that URL if DNS does not have a record for it that resolves to that server's address. If the URL is used on the Internet, that domain should be registered to your company and listed on a DNS or name server on the Internet (in addition to having a record in the internal DNS).
Host headers should be set when a web application is created or extended. Take the following steps to try out this feature:
- Create a new web application (Central Administration Application Management Manage Web Applications New).
- For the New IIS Web Site, SharePoint will suggest a random port, so change the suggested port back to 80 and enter the URL to which you want the web application to respond in the Host Header field. See Figure 10.68 for my example.
- Configure the other sections as you would any new web application: Security, Application Pool, Database, Search, and so on. Then click OK.
FIGURE 10.68 Setting a host header in the Create New Web Application page
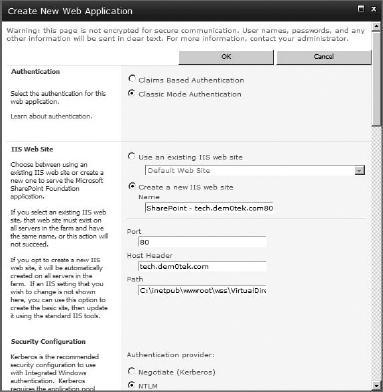
After the web application is generated, you'll need to create the initial site collection (my example is techsite to keep with the tech theme) just as we did earlier in this chapter. Keep in mind that in order for users to successfully browse to this URL, they'll need to be able to resolve it in DNS to the IP address of your SharePoint server (so make certain that there is a record in DNS that resolves to the server's IP). Once everything is created and IIS has been reset, you'll be able to see the host header information in IIS.
Open Internet Information Services (IIS) Manager, and browse to Web Sites in the tree pane. Then in the Actions pane, click the Bindings link. The default port of 80 will be listed for the site, and it will show the host header URL, as shown in Figure 10.69.
FIGURE 10.69 The host header of the new Web Site in IIS

Of course, browsing to the new URL (in my case http://tech.dem0tek.com) will take you to the new site.
SITE COLLECTIONS AND HOST HEADERS
Officially, you need to create a new web application to use a host header; however, STSADM (and PowerShell) has an undocumented feature (or should we say, underdocumented) that lets you create a new site collection using a host header.
Remember, site collections reside in web applications, and adding a new site collection to the web application usually means you have to place the new site collection in one of the managed paths for that web application (by default, the /sites/path). However, you can add a site collection to a web application and have that site collection use its own host header, instead of using the managed path. You cannot create a site collection that uses a host header address (which Microsoft calls a host-named site collection) in Central Administration; it can be done only at the command line or in PowerShell. To start, we'll see how it works in STSADM.
Note that in order to use the STSADM command, you need to be logged in as a user with permission to access and edit the content databases in SQL Server.
Using STSADM, the command to create a new site collection normally is as follows:
STSADM -o createsite -url http://server/sites/newsite -owneremail name@domain
.com-ownerlogin DOMAINusername
Other switches, such as -sitetemplate to prespecify the top-level site's template, are covered in Chapter 14.
Therefore, if I wanted to create a new site called http://spf2/sites/camper without using a host header and using the http://spf2 web application with shareadmin as the owner, I would use the following command:
STSADM -o createsite -url http://spf2/sites/camper -owneremail shareadmin@
dem0tek.com -ownerlogin dem0tekshareadmin
If you go to that site in your browser, you'll be asked to choose the template you want to use and enter some users and groups (just as you did with self-service site creation). After you enter the users and groups, you'll be taken to the new site, where you'll see the normal, expected URL in the address bar.
You can create the same site using a host header for the site collection itself (instead of for the web application). It's still in the http://spf2 web application and must abide by that web application's settings; however, the URL would be different, such as http://camper.demOtek.lcl in my example, rather than http://sp2/sites/camper. Think of it as essentially masking the real normal web application-based address of the site collection with the host header.
The command for this would be the following:
STSADM -o createsite -url http://camper.demOtek.lcl -owneremail shareadmin@
dem0tek.com -ownerlogin dem0tekshareadmin −hhurl http://spf2
You'll notice two changes. The −url switch displays the desired host header URL (rather than the web application's managed path), and the −hhurl switch points to the web application in which you want to create the site collection.
Once again, if you browse to http://camper.demotek.lcl, you'll be prompted to choose a site template and add users and groups. Then you'll be taken to the new site, displayed with the nice host header URL in the address bar.

You can do the same thing in the SharePoint Management shell (or PowerShell console).
First make sure the account you are logged in with has the correct permissions to use PowerShell (you need to be a farm administrator, as well as owner of both the configuration database for the farm and the content database where the site collection is located). See Chapter 14 for details.
Then, to create the site collection, you can use the following command:
New-SPSite http://camper.demOtek.lcl -OwnerAlias “dem0tekshareadmin”
-HostHeaderWebApplication http://spf2
Keep in mind that this new site collection is in an existing web application, so you want to do this only if you want the site collection to be constrained by the web application settings (such as anonymous access, user permissions, custom port number, and so on). As a last caveat, also note that SSL will not work for a host header site collection unless it is using a wildcard certificate and the host header is in the same domain. Because site collection host headers are not listed in Alternate Access Mapping, searches may also return unexpected links in query results. Despite these shortcomings, the option to use site collections with their own host headers is here if you need it.
Alternate Access Mapping
With the creation of multiple web applications, multiple sites, host headers, and a complex SharePoint deployment, there will come a time when you want to start providing access to SharePoint sites from multiple places and for multiple people. At the very least, you might want to open your server to outside access, opening a port in your firewall and forwarding it to the SharePoint server. Of course, no one in the outside world is going to browse to your server using the URL http://spf2/ or http://spf2.dem0tek.lcl. They're going to use a real address, such as http://blogs.dem0tek.com. You know how to make a new web application with this URL, but what about adding the URL to an existing web application? This is done through alternate access mapping.
Alternate access mapping lets you do the following:
- Map a new URL to an existing web application
- Send a URL other than the one received back to the client browser
- Allow different security policies, based on the URL, for a single web application's content (with zones and extended web applications)
- Provide access to a web application's content on a second port
To understand how alternate access mapping works, you first need to consider how SharePoint treats URLs. Fundamentally, a URL is how a user gets to a SharePoint site. The URL is also used by SharePoint to generate links on the page. A good example of this is with search results. The links in SharePoint aren't hard-coded in an HTML file somewhere; they're generated on the fly, just as SharePoint pages are. When you perform a search request on a SharePoint site and you get back some possible results, each result shows you a clickable link to that result's location. The links need to have the correct path to work. See Figure 10.70.
Notice that the result link has the site's path (http://spf2:8080/pathtoresu7t) in it. This link works great if the user can resolve the URL http://spf2:8080/, but it would be pretty useless if the user were connecting to the server from outside your firewall and couldn't resolve http://spf2:8080/. In that case, all those search result links would be dead.
SharePoint resolves this issue by using alternate access mapping, allowing each web application to have up to five different public URLs. That means that the same web application, with all the enclosed site collections, can be accessed from multiple URLs, and SharePoint is smart enough to use the corresponding public URL in all its internal links and paths, making them useful again. For example, the web application http://spf2:8080 could also respond to the URL http://blogs.dem0tek.com. As such, you would have two different URLs, both pointing at the same web application content.
To work with alternate access mapping, you need to be familiar with some terms:
Public URL This is the URL that SharePoint displays in the address bar of the browser and in all the paths and links generated on the page.
Internal URL This the URL that is presented to SharePoint during the request for a page. This is often, but not always, the same as the public URL that SharePoint sends back.
Zone Each public URL for a web application is associated with a zone. Zones are just an easy way to keep track of which public URLs go to which internal URL. When you first create a web application, the URL used becomes the public URL for the Default zone. The other four zones are named Intranet, Internet, Custom, and Extranet. The different zones don't have any intrinsic differences. The names are just for clarity, and the zones can be used for whatever you like. Zones are also used to address extended web applications (actually, they're primarily used to address extended web applications). In other words, you can take an existing web application's content databases and make a new web application (essentially a new IIS Web Site) that points to those databases; this allows two different URLs to access the same data.
FIGURE 10.70 Search results with links
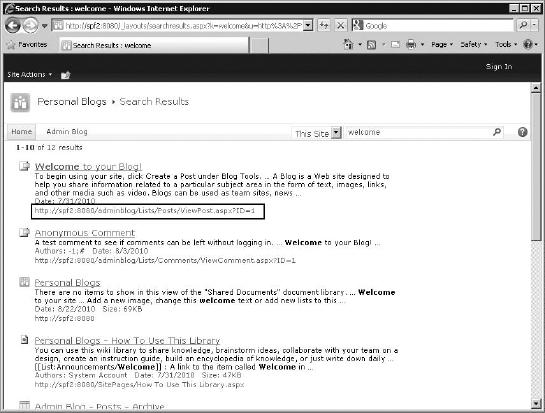
CREATING A NEW PUBLIC URL (BY EXTENDING A WEB APPLICATION)
You can create a new public URL by going to the Alternate Access Mappings page and typing one in order to associate it with an existing web application (and we will do that later). But that's not really the point. Public URLs are associated with zones because it is possible that you might want to offer a web application's contents to users who require different kinds of security, such as SSL or anonymous access. These kinds of users can be thought of as being in different zones.
The default zone users are those in the local office. Their web application doesn't need SSL, they may be allowed anonymous access (to read their co-workers' blogs), and using the server's computer name as the URL is fine. The intranet users could be the ones in adjoining buildings, maybe part of the campus, but not in the office; they should authenticate to access the site collections they are members of, and they need to use a URL that resolves outside of the office. The extranet could be the commuting users, accessing content over the Internet; they too need to use an external URL and authenticate to access their content, but they also need SSL to protect their transactions. Finally, Internet users could be customers or partners also accessing the web application's content over the Internet, while requiring anonymous access and SSL. To access the same data by a different URL but apply different security and access settings, you need to use different IIS Web Sites pointing to the same content databases. Then the users can access the same information but use different URLs, with different security applied. Zones can be used just to use different URLs to resolve to the same web application, but what they're really used for is extended web applications, whose addresses are zones and are used to access the same web application's content but use different URLs and other IIS Web Site settings (such as requiring SSL or allowing anonymous).
ANONYMOUS?
Notice that anonymous access is being offered to certain kinds of users depending on the zone they are using to access the same web application. That is why, even though anonymous access can be enabled at the web application level, it is additionally allowed or disallowed at the site collection level. Those site collections meant to contain private company data would never enable anonymous on any site, list, or library therein, despite the option being available depending on what URL accesses the site collections.
To create a new, public URL for accessing a web application using different security settings than the original, that web application needs to be extended to a different IIS Web Site. As you know from creating a new web application, the IIS Web Site determines the URL for the web application, either by setting a custom port for the main URL (such as http://spf2:8080) or by using a host header to give the web application a custom URL (such as http://tech.dem0tek.com). The IIS Web Site also determines which kind of authentication is to be used (NTLM, Kerberos, allowing anonymous access) and if SSL is going to be used.
Extending a web application creates a new IIS Web Site based on an existing web application's content. This new IIS Web Site uses the same application pool and the same content database as the existing web application. But extending a web application lets you add another URL and other IIS Web Site-based settings to access that content. This allows you to create a new public URL for the web application and adjust the security settings for that public URL without changing the existing security settings for your web application's default public URL.
For the example, we can take the blogging site collection, running in the web application http://spf2:8080, and extend it to the public URL of blogs.dem0tek.com, which, in this example, is accessible from the outside world through the firewall. While we're at it, we can set the new URL so that it doesn't permit anonymous access. This way, only people with login accounts (the company's employees) will be able to access the blogs from outside the firewall. The default, internal URL settings (for http://spf2:8080) will stay the same, and anonymous access will be permitted there.
We're going to be doing a lot of work with new URLs, both public and internal. All of these URLs are still dependent on DNS to function. Make sure your DNS server can resolve any URL you create and it points the client to the SharePoint server. Remember that all URLs need to map to an IP address eventually, and they need DNS to do that.
To extend a web application, follow these steps:
- To extend a web application in Central Administration, click the Manage Web Applications link in the Application Management category.
- Choose the web application you want to extend (my example is http://spf2:8080), and click the Extend button in the ribbon. This will take you to the Extend Web Application To Another IIS Web Site page. See Figure 10.71.
FIGURE 10.71 The Extend Web Application To Another IIS Web Site page
- Under IIS Web Site, create a new IIS Web Site; mine is called Blogs Outside in the description. Assign it to port 80, and enter the URL you'd like it to have; my example is b1ogs.dem0tek.com, in the Host Header field.
- Under Security Configuration, leave Allow Anonymous Access disabled, leave SSL disabled, and leave NTLM selected.
- Leave the Sign In Page URL at the default.
- Under Public URL, leave the new default (mine is http://b1ogs.dem0tek.com:80), and set the zone to Internet. You can set the zone to any of the four zones that have not already been used. The default zone is being used by the main URL (http://spf2:8080 in my example), so it's not an available choice. After you're done creating this extended web application, the Internet zone is no longer available should you ever choose to extend the existing web application again. Keep in mind that this means you can only have four extended web applications per web application.
- Once you've configured the extended web application the way you like, click OK. SharePoint will extend the web application to the new IIS Web Site (no need to add any site collections). If you have DNS set up to point the URL to the server, browsing to it will show the same site, but with a new URL in the address bar and the corrected links and paths displayed on the page. So, performing the same search will provide the same results with the new URL. See Figure 10.72.
FIGURE 10.72 The same search with a new URL
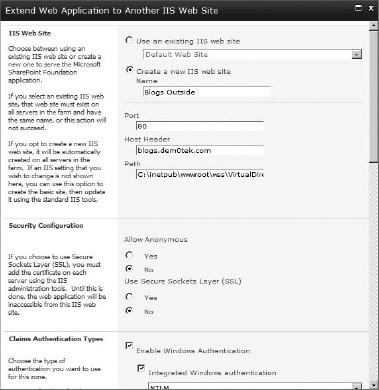
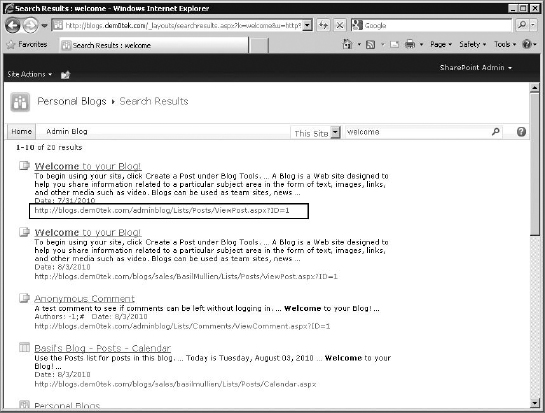
Unlike browsing to http://spf2:8080, using this new URL will require authentication because anonymous access was disabled for the new IIS Web Site.
CHANGES TO IIS
You can see what changes occurred in IIS from extending a website by going into Internet Information Services (IIS) Manager and checking out the newly created Blogs Outside IIS Web Site.
Select the new IIS Web Site, and click Bindings in the Actions pane to verify that it is listening on port 80. This will also show the expected host header. Click Basic Settings to see that it is using the same application pool as the original IIS Web Site (SharePoint-8080). This means all traffic bound for this new IIS Web Site will be directed to the same content database as traffic bound for the original SharePoint-8080 Web Site. Clicking application pools on the left side of the IIS console, then selecting the SharePoint-8080 Application Pool, and clicking the View Applications link under Actions in the Actions pane will list the new Web Site's root and layout paths, as shown in Figure 10.73.
FIGURE 10.73 Application pool changes
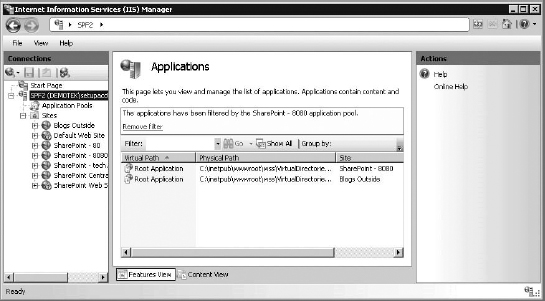
CHANGES TO ALTERNATE ACCESS MAPPINGS
Let's take a look at what SharePoint shows with this new public URL. Go to Central Administration's Application Management page, and under the Web Applications category, click Configure Alternate Access Mappings. This will take you to the page shown in Figure 10.74.
FIGURE 10.74 The Alternate Access Mappings page
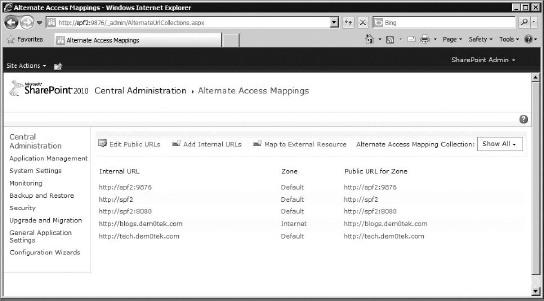
This page lists all the current internal URLs and public URLs in the SharePoint farm. Any incoming request is examined to see whether it matches one of the internal URLs. If it does, the server responds with the path shown in the corresponding public URL. If the request doesn't match an internal URL, the server responds with the public URL of the default zone on whatever port the request was received on.
If you click the Alternate Access Mapping Collection view menu (default view of this list is Show All), you can filter the view to display the mappings for a particular web application. Let's look at the original web application we extended (mine is http://spf2:8080), as shown in Figure 10.75.
FIGURE 10.75 The http://spf2:8080 URLs
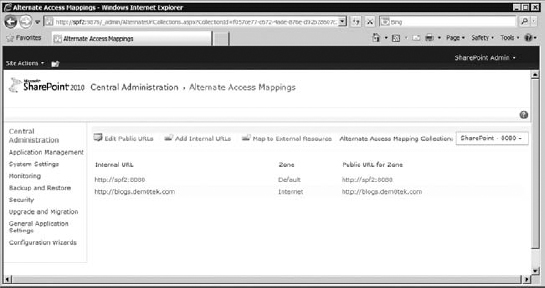
The original web application now has two internal URLs, one for the default zone and one for the Internet zone. Both mappings have an internal URL and a public URL. Therefore, any request sent to the server as http://b1ogs.dem0tek.com in my example will come back to the requester's browser showing http://b1ogs.dem0tek.com in the address bar and for all the paths and links on the page, which means they'll work fine through the firewall.
CREATING A NEW INTERNAL URL
Although you can have only five public URLs for a web application (one for each zone), it's possible to have several internal URLs for each public URL. Remember that internal URLs are the addresses that SharePoint responds to for a particular web application, and public URLs are what are returned to populate the address bar of the client's browser. To create a new internal URL for a public URL, click the Add Internal URLs link on the Action bar. This will take you to the page shown in Figure 10.76.
Make sure you've chosen the correct Alternate Access Mapping Collection option, which is the same thing as the web application, and then enter the new internal URL and choose the zone for this URL. The zone you choose needs to have a corresponding public URL (if you don't specify one, the new internal URL will be used to fill it).
My example uses a new internal URL called blogs for the default zone. As such, internal users who previously had to enter http://spf2:8080 will only need to enter blogs (which is easier for them to remember) into their web browser to go to the Personal Blogs site collection. When they get there, it'll kick back the default zone's public URL of http://sp2:8080, which is fine because they can resolve that URL (if they were outside the firewall, this would be a problem). The new internal URL is displayed on the Alternate Access Mappings page (see Figure 10.77).
FIGURE 10.76 Creating a new internal URL
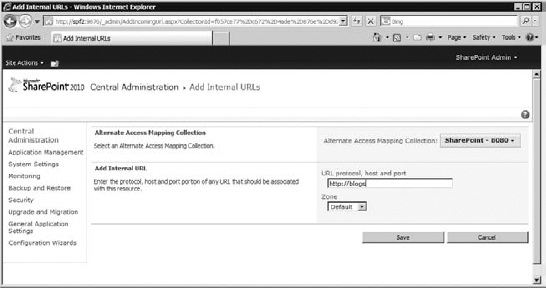
FIGURE 10.77 The new internal URL mappings
IIS BINDINGS AND AAM
In some cases, creating the new internal URL isn't sufficient; you also need to manually create the associated binding in IIS. In my example, that would mean editing the Sharepoint-8o8o IIS Web Site and adding a binding for http://b1ogs on port 80. So if the internal URL you create doesn't work for you, that might be the fix you need.
Just as you do with all URLs, you need to make sure new internal URLs exist in DNS and point to the server.
MANUALLY ADDING A PUBLIC URL
You can also edit public URLs from the Alternate Access Mapping page. For example, you can quickly add a new public URL for an unused zone (or change the URL for an existing zone) and save the changes. The public URL will be added to the web application and automatically generate a new internal URL to match. For example, you could use the URL http://b1ogserver as the Extranet zone for the web application http://spf2:8080. See Figure 10.78.
FIGURE 10.78 Adding a public URL this way is a bad idea.
Although this method will work for browsing the web application, it has one key difference from the full Extend A Web Application process: it doesn't create a new IIS Web Site for the new public URL. This means that there are no new security settings available for the URL, and no host header exists in IIS to direct traffic to the correct web application (SharePoint does the redirect on the backend). Although editing existing public URLs is fine if they are extended web applications, you really shouldn't create new public URLs this way. It simply doesn't allow you the flexibility of being able to apply unique authentication or policy settings for the URL, because it doesn't have a corresponding Web Site in IIS.
REMOVING A PUBLIC URL (BY REMOVING AN EXTENDED WEB APPLICATION)
You could conceivably just delete the entry for a public URL, regardless of whether it is associated with an extended web application. But the correct way to remove an extended web application's public URL from a web application's mapping is to use the Remove SharePoint From IIS Web Site link on the Manage Web Applications page (on the Delete button's drop-down menu) This essentially removes the extended web application itself.
In the resulting Remove SharePoint From IIS Web Site window (Figure 10.79), you have the option of removing only the association of the web application with the IIS Web Site in SharePoint or removing the IIS Web Site altogether. Whether you choose to delete the IIS Web Site, this will remove the public URL from the list in Alternate Access Mapping.
Make sure you select the correct IIS Web Site and zone to remove from the extended web application.
FIGURE 10.79 The Remove SharePoint From IIS Web Site window

Deleting the IIS Web Site deletes, unsurprisingly, the IIS Web Site which removes any custom settings you might have—but it also keeps IIS nice and clean. If you choose not to delete the IIS Web Site, the IIS server places the Web Site into the stopped state. So, it's still there; it's just not running.
Again, it is possible to delete the public URL from within the Alternate Access Mapping page by editing the public URLs and simply clearing the field. However, doing so is not recommended because it makes no change to IIS. This leaves the Web Site running, so it accepts connections for the URL (via the host header) and points them at the web application. In this case, because the public URL has been deleted, SharePoint serves the web pages with the default URL (for example, http://spf2:8080), but it doesn't stop service; it just doesn't return the former public URL.
Content Databases
During the install process in Chapter 3, you worked with content databases, and you even created a new one while creating a new web application earlier in this chapter. Now let's take a closer look at what you can do with content databases and web applications. Web applications need at least one content database to put everything in, but they can support additional content databases. As mentioned in Chapter 2, content databases on a standalone install reside here:
%SharePointRoot%DataMSSQL10.SHAREP0INTMSSQL.DATA
(As a reminder, the SharePoint root is C:Program Fi1esCommon Fi1esMicrosoft SharedWeb Server Extensions14. This is sometimes referred to as the SharePoint Root or 14 hive.)
With a complete install, content databases are located on the SQL Server you specified during installation.
EDITING CONTENT DATABASE SETTINGS
To manage content databases, go to Central Administration's Application Management page and click Manage Content Databases. This will take you to the Manage Content Databases page, shown in Figure 10.80.
On this page, you can see the content databases for a particular web application. As always, clicking the web application's name will let you change to a different one. Clicking a content database's name will let you edit its settings (see Figure 10.81).
FIGURE 10.80 The Manage Content Databases page
FIGURE 10.81 The Manage Content Database Settings page
Database Information A content database can be in two states: Ready and Offline.
The default setting is Ready, which allows new sites to be created in the content database. Obviously, you'll want this if you plan to add site collections to the web application, and this is the only content database for that web application.
The other setting is Offline. This prevents any new site collections from being created in the content database. Existing site collections can still be used, and new subsites can be created within that collection, but the limit has been reached, and no more new site collections can be added.
Database Versioning And Upgrade This provides a quick way to see the database versions in use in case the content database is running an older version and should be upgraded.
Failover Server If you have SQL Server set up for failover services, the failover server would be listed here.
Database Capacity Settings To prevent a database from growing too much and getting out of hand, you can limit the number of site collections that are created in a single content database. The default number is 15,000, but it can be set to whatever you like. There is also an option to send out a notification if a certain number of site collections are reached. You obviously want this to be lower than the actual limit, and the default is 9,000.
Note that on this page, the word site is used when describing the limit and warning level. This is a misnomer; the settings apply to site collections, not to individual sites.
When the database hits its capacity, it will go Offline—no new site collections will be permitted.
Search Server When you created the web application, you were prompted to choose a search server for the content database. This setting is where you can change that choice if you want to transfer the search process to another search server.
Remove Content Database Removing a content database from a web application does not delete that database; it just disassociates it from the web application. The database still exists, just as when you delete a web application and elect to not delete the content database. A removed content database can be added to a web application later or used when you create a new web application.
Preferred Server For Timer Jobs If you have multiple timer job servers, you can have the content database use a preferred one. No Selection does not mean there is no timer job server; it just means the content database has no preference and will use whatever server is available.
ADDING A NEW CONTENT DATABASE
When the content database gets too large or hits its capacity limit, you may want to add a second content database to the web application. In this case, additional site collections can be added to the new database while still being part of the web application. A web application can have numerous databases to accommodate increases in data storage.
To add a new content database, go to Central Administration's Application Management page, and click Manage Content Databases. Make sure you're working with the web application you intend to add the database to, and click the Add A Content Database. This will take you to the Add Content Database page, as shown in Figure 10.82.
This page asks you to fill out the same information the content database required during the creation of a new web application; in addition, it lets you specify the capacity site limit and warning event level. Once you provide the needed information, click OK. You'll see the new content database listed on the Manage Content Databases page, as shown in Figure 10.83.
At this point, any new site collection created inside the web application will go to whichever database has the most available space for site collections. The available space isn't calculated by storage capacity but by subtracting the existing number of sites in the database from the database's site limit.
FIGURE 10.82 The Add Content Database page
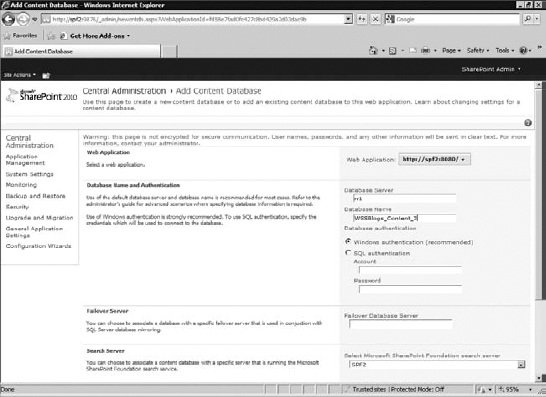
FIGURE 10.83 The Manage Content Databases page
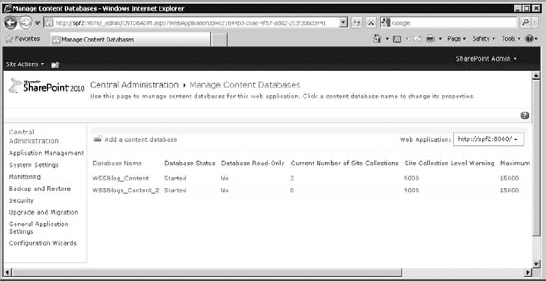
USING AN EXISTING CONTENT DATABASE
It's possible to use an existing content database. It could be one that was previously removed from a web application, or it could simply have not been deleted when its web application was deleted.
In some cases, when the web application becomes horribly corrupt and unusable, you could be forced to remove it—but, of course, that would never happen.
If you want to bring a preexisting content database back online and resurrect the sites contained in the database, you can do so by creating a new web application and entering the content database in the Database Name And Authentication section.
Of course, you'll need to know the name of the existing database and the SQL Server instance on which it's located.
When the web application is created, you do not want to create a new site collection to complete the install; after all, the content database already has the site collections and enclosed sites. Instead, just reset IIS by running this:
iisreset /noforce
Then go to your new web application URL, where you'll see the old sites from the content database. If, on the odd occasion it doesn't work, you can run the attach database command in STSADM or PowerShell. This will force SharePoint to realize the content database should be accessible from the web application.
The Bottom Line
Create and customize a new site collection. A new site collection has separate permissions, its own Recycle Bins, its own storage quota, and its own site collection galleries. You can change the regional settings and grant someone site administrator rights on a new site collection without compromising your existing sites.
Master It You created a new site collection with a storage quota of100 MB. Since then, it has hit capacity, and no one can add new documents or list items. You asked quite a few users to delete data to free up space, but it didn't appear to help. Short of increasing the quota, what can you do?
Create a new web application. A new web application is fundamentally a new IIS Web Site with a new content database on the back end. Using a new IIS Web Site allows you to change the port for accessing the web application, use a host header, and adjust the IIS-level authentication such as anonymous access. Web applications, in addition to being a security boundary, are also a boundary for settings such as RSS, sending alerts, upload size limits, and blocked file types that affect all contained site collections. All SharePoint site collections must reside in a web application. At this level, serious changes can affect the way the site collections are accessed and controlled.
Master It You want to create a new web application but don't want to use a custom port, so you set up a host header instead. But although it appears to have been created correctly and you created a site collection, you cannot seem to access the site. What is the most likely problem?
Use managed paths. SharePoint uses managed paths to tell IIS which paths in a URL are handled by SharePoint and are, therefore, managed. All other paths are considered excluded, and IIS is free to use them with traditional websites. You can add your own managed paths, adjusting the URL of site collections.
By default, SharePoint site collections have two managed paths: the path (root), which is explicit, and the path /sites/, which is a wildcard path.
Master It You create a new wildcard managed path at http://myserver/sa1es but cannot seem to place a site collection in this URL without adding another piece to the path. What is wrong?
Configure anonymous access. One of the main features of web applications is the ability to allow anonymous access to the site collections they contain. Anonymous access can allow the site to be viewed without requiring a login while retaining all the needed permissions for authenticated users to add, edit, modify, or delete site content. Anonymous access is enabled in two core steps: first by permitting anonymous access at the web-application level and then by enabling anonymous access at the site collection level.
Master It Someone else has allowed anonymous access on the web application, and you're configuring your site collection. You want anonymous users to view only the Status list and nothing else. How do you configure the site?
Set different zones for different access methods. Each web application can support up to five public URLs that it displays in the address bar and on the page in links and paths. Four of the public URLs can be used for manually entered alternate web addresses or used by extending the web application to a new IIS Web Site, providing a new URL (including a new port if desired), and applying different authentication policies to the same site. For example, one web application within the local network can permit anonymous access, but authentication can be required for anyone accessing the site through the Internet public URL. The five public URLs are identified by their zone, and additional internal URLs can be mapped to each zone.
Master It Your web application has three zones configured with extended web applications, each with their own public URL. Because of a company policy change, you need to remove the Internet zone from the web application. What is the recommended method for doing this?