
Chapter 2: Getting Started with ABP Framework
ABP Framework is distributed as a large set of NuGet and Node Package Manager (NPM) packages. It has a modular design so that you can add and use the packages you need to. However, there are also some pre-built solution templates, and you typically want to start with them.
We will see how to prepare our development environment and create solutions using ABP's startup templates. By the end of this chapter, you will have a running solution built with ABP Framework.
This chapter consists of the following topics:
- Installing the ABP CLI
- Creating a new solution
- Running the solution
- Exploring the pre-built modules
Technical requirements
There are a few tools you need to have installed on your computer before starting with ABP Framework.
IDE/Editor
This book assumes that you are using Visual Studio 2022 (v10.0 with .NET 6.0 support) or later. If you haven't installed it, the Community Edition is freely available on https://visualstudio.microsoft.com. However, you can use your favorite integrated development environment (IDE) or editor, as long as it supports .NET application development with C#.
.NET 6 SDK
If you've installed Visual Studio, you will already have installed the .NET software development kit (SDK). Otherwise, please install .NET 6.0 or later from https://dotnet.microsoft.com/download.
Database management system
ABP Framework can work with any data source. However, two main providers are pre-integrated: Entity Framework Core (EF Core) and MongoDB. For EF Core, all database management systems (DBMS) can be used, such as SQL Server, MySQL, PostgreSQL, Oracle, and so on.
I will use SQL Server as the DBMS in this chapter. The startup solution uses LocalDB, a simple SQL Server instance for developers installed with Visual Studio. However, you may want to use the full version of SQL Server. In this case, you can download SQL Server Developer Edition from https://www.microsoft.com/sql-server/sql-server-downloads.
Installing the ABP CLI
Many modern frameworks provide a CLI, and ABP Framework is no exception. ABP CLI is a command-line utility to perform some common tasks for ABP applications. It is used to create a new solution with ABP Framework as a fundamental functionality.
Install it using a terminal with the following command:
dotnet tool install -g Volo.Abp.Cli
If you've already installed it, you can update it to the latest version using the following command:
dotnet tool update -g Volo.Abp.Cli
We are now ready to create new ABP solutions.
Creating a new solution
ABP Framework provides a pre-built application startup template. There are two ways to create a new solution (project) using this template, which we will explore now.
Downloading the startup solution
You can directly create and download a solution from https://abp.io/get-started. On this page, as shown in the following screenshot, you can easily select the user interface (UI) framework, database provider, and other available options:

Figure 2.1 – Downloading a new solution
It is worth mentioning the options on this page because they directly affect your solution's architecture, structure, and tooling.
In the Project name field is the name of your Visual Studio solution (the .sln file) and the root namespace of your code base.
For Project type, there are two options, as follows:
- The Module template is used to create reusable application modules.
- The Application template is used to build web applications using ABP Framework.
Working with the Module template will be covered in Chapter 15, Working with Modularity. Here, I chose the Application template since I want to create a new web application that we will use in the next chapter.
There are four UI Framework options available at the time of writing this book, as follows:
- MVC/Razor Page
- Angular
- Blazor WebAssembly
- Blazor Server
You can select the option that best fits your application requirements and personal or team skills. We will cover the MVC/Razor Page and Blazor options in Part 4, User Interface and API Development, of this book. You can learn more about the Angular UI in ABP's documentation. Here, I select the MVC/Razor Page option since we will use it in the next chapter.
There are two database provider options available at the time of writing this book, as follows:
- Entity Framework Core
- MongoDB
If you select the Entity Framework Core option, you can use any DBMS supported by EF Core. I've selected EF Core with the SQLServer option here.
ABP also provides a mobile startup template based on React Native, a popular single-page application (SPA) framework provided by Facebook. It provides a good starting point for your mobile application integrated with the same backend if you select it. This book doesn't cover mobile development, so I left that as None.
Finally, the Tiered option can be checked if you want to separate your UI application from the HTTP API physically. In this case, the UI application won't have a direct database connection and perform all operations through the HTTP API. You can deploy the UI and HTTP API applications to separate servers. I haven't checked it to keep it simpler and focus on the ABP features rather than the complexities of distributed systems. However, ABP supports such distributed scenarios as well. You can learn more from ABP's documentation.
When you select the options, ABP creates a fully working, production-ready solution, on top of which you can start to build your application. If you later want to change the options (for example, if you want to use MongoDB instead of EF Core), you should recreate your solution or manually change and configure the NuGet packages. There is no auto-magic way of changing these options after creating and customizing your solution.
Downloading your solution from the website makes it easy to see and select the options. However, there is an alternative way for users who like command-line tools.
Using the ABP CLI
Alternatively, you can use the new command in the ABP CLI to create new solutions. Open a command-line terminal and type the following command into an empty directory:
abp new ProductManagement
ProductManagement is the solution name here. This command creates a new web application using EF Core with SQL Server LocalDB and the MVC/Razor Pages UI because these options are default. If I want to specify all, I can rewrite the same command, like this:
abp new ProductManagement -t app -u mvc -d ef -dbms SqlServer --mobile none
If you want to specify the database connection string, you can also pass the --connection-string parameter, as shown in the following example:
abp new ProductManagement -t app -u mvc -d ef -dbms SqlServer --mobile none --connection-string "Server=(LocalDb)\MSSQLLocalDB;Database=ProductManagement;Trusted_Connection=True"
The connection string in this example is already the default connection string value and uses LocalDb. See The connection string section in this chapter, if you need to change the connection string later.
Please refer to the ABP CLI documentation for all possible options and values: https://docs.abp.io/en/abp/latest/CLI.
About the Example Application
In the next chapter, we will build an example application named ProductManagement. You can use the solution you are currently creating as the starting point for the next chapter.
We now have a well-architected, production-ready solution. The next section shows how to run this solution.
Running the solution
We can use an IDE or code editor to open the solution, create a database, and run the web application. Open the ProductManagement.sln solution in Visual Studio or your favorite IDE. You will see a solution structure like the one depicted here:

Figure 2.2 – ProductManagement solution in Visual Studio
The solution is layered and contains multiple projects. The test folder has projects to test these layers. Most of these projects are class libraries, while a few of them are executable applications. These are described here:
- ProductManagement.Web is the main web application of the solution.
- ProductManagement.DbMigrator is used to apply database migrations and seeds the initial data.
The solution uses a database. Before creating a database, you may want to check and change the database connection string.
The connection string
A connection string is used to connect to the database and typically includes the server, database name, and credentials. The connection string is defined in the appsettings.json file in the ProductManagement.Web and ProductManagement.DbMigrator projects, as illustrated in the following code snippet:
"ConnectionStrings": {
"Default": "Server=(LocalDb)\MSSQLLocalDB;Database=ProductManagement;Trusted_Connection=True"
}
The default connection string uses LocalDb, a lightweight, SQL Server-compatible database for development purposes. It is installed within Visual Studio. If you want to connect to another SQL Server instance, you can change it. If you change it, change it in both places.
This connection string will be used when you create a database in the next section.
Creating a database
The solution uses EF Core code first database migrations. So, we can manage database schema changes with code, using the standard Add-Migration and Update-Database commands.
ProductManagement.DbMigrator is a console application that simplifies creating and migrating a database in development and production. It also seeds the initial data, creating an admin role and user to log in to the application.
Right-click the ProductManagement.DbMigrator project and select the Set as Startup Project command. Then, run the project using Ctrl + F5 to run it without debugging.
About the Initial Migration
If you are using an IDE other than Visual Studio (for example, JetBrains Rider), you may have problems for the first run since it adds the initial migration and compiles the project. In this case, open a command-line terminal in the directory of the ProductManagement.DbMigrator project and execute the dotnet run command. For the next time, you can just run it in your IDE as you normally do.
The database is ready, so we can finally run the application to explore the UI.
Running the web application
Set ProductManagement.Web as the startup project and run it using Ctrl + F5 (start without debugging).
Tip: Start Without Debugging
It is strongly suggested to run applications without debugging unless you need to debug them, as this will be much faster.
This will open a landing page where you can delete the content and build your own home page of the application. When you click on the Login button, you are redirected to the login page, as illustrated in the following screenshot:

Figure 2.3 – Login page of the application
The default username is admin, and the default password is 1q2w3E*. You can change it after logging in to the application.
ABP is a modular framework, and the startup solution has installed the fundamental modules. Before starting to build your application, it is good to explore the pre-built module functionalities.
Exploring the pre-built modules
This section will explore the fundamental modules pre-installed in the startup solution: Account, Identity, and Tenant Management.
The source code of these modules is not included in the download solution by default, but they are freely available on GitHub. They are used as NuGet packages and easily upgraded when a new ABP version is published. They are designed as highly customizable, without touching their code. However, if you need, you can include their source code in your solution to freely change them based on your unique requirements.
Let's start with the Account module, which provides user authentication features.
Account module
The login page shown in Figure 2.3 comes from the Account module. This module implements login, registering, a forgot password functionality, social logins, and some other common requirements. It also shows a tenant selection area to switch between tenants in the development environment for a multi-tenant application. Multi-tenancy will be covered in Chapter 16, Implementing Multi-Tenancy, so we will return to this screen again.
When you log in, you will see an Administration menu item with a few submenu items. These menu items come with ABP's pre-built Identity and Tenant Management modules.
Identity module
The Identity module is used to manage users, roles, and their permissions in your application. It adds an Identity management menu item under the Administration menu, with Roles and Users as its submenu items, as illustrated in the following screenshot:
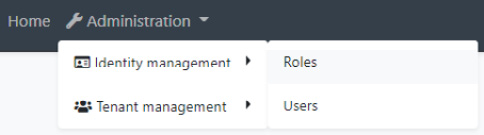
Figure 2.4 – Identity management menu
If you click on the Roles menu item, the role management page is opened, as illustrated in the following screenshot:
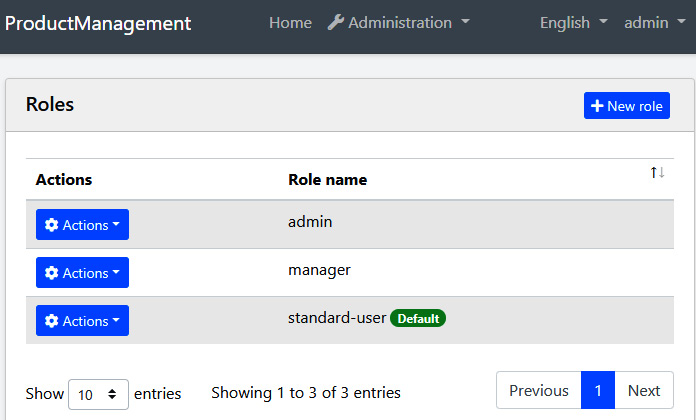
Figure 2.5 – The role management page
On this page, you can manage roles and their permissions in your application. In ABP, a role is a group of privileges. Roles are assigned to users to authorize them. The Default badge in Figure 2.5 indicates the default role. Default roles are automatically assigned to new users when they are registered with the system. We will return to the Roles page in the Working with authorization and permission systems section of Chapter 7, Exploring Cross-Cutting Concerns.
The Users page, on the other hand, is used to manage the users in your application. A user can have zero or more roles.
Roles and users are pretty standard almost in all business applications, while the Tenant Management page module is only used in multi-tenancy systems.
Tenant Management module
The Tenant Management module is where you create and manage your tenants in a multi-tenant system. In a multi-tenant application, a tenant is a customer that has its own data—including roles, users, and permissions—isolated from the other tenants. It is an efficient and common way of building Software as a Service (SaaS) solutions. If your application is not multi-tenant, you can just remove this module from your solution.
The Tenant Management module and multi-tenancy will be covered in Chapter 16, Implementing Multi-Tenancy.
Summary
In this chapter, we've installed some required tools to prepare our development environment. Then, we saw how to create a new solution using the direct download and CLI options. Finally, we configured and run the application to explore the pre-built functionalities.
In the next chapter, we will learn how to add our own functionalities to this startup solution by understanding the solution structure.