
Chapter 7: Exploring Cross-Cutting Concerns
Cross-cutting concerns such as authorization, validation, exception handling, and logging are fundamental parts of any serious system. They are essential to make your system secure and operate well.
One problem with implementing cross-cutting concerns is that you should implement these concerns everywhere in your application, which leads to a repetitive code base. Also, one missing authorization or validation check may explode your entire system.
One of ABP Framework's main goals is to help you apply the Don't Repeat Yourself (DRY) principle! ASP.NET Core already provides a good infrastructure for some cross-cutting concerns, but ABP takes it further to automate or make them much easier for you.
This chapter explores ABP's infrastructure for the following cross-cutting concerns:
- Working with authorization and permission systems
- Validating user inputs
- Exception handling
Technical requirements
If you want to follow along and try the examples, you need to install an integrated development environment (IDE)/editor (for example, Visual Studio) to build the ASP.NET Core projects.
You can download the code examples from the following GitHub repository: https://github.com/PacktPublishing/Mastering-ABP-Framework.
This chapter also references the EventHub project for some code examples. That project was introduced in Chapter 4, Understanding the Reference Solution, and you can access its source code from the following GitHub repository: https://github.com/volosoft/eventhub.
Working with authorization and permission systems
Authentication and authorization are two major concepts in software security. Authentication is the process of identifying the current user. On the other hand, authorization is used to allow or prohibit a user from performing a specific action in the application.
ASP.NET Core's authorization system provides an advanced and flexible way to authorize the current user. ABP Framework's authorization infrastructure is 100% compatible with ASP.NET Core's authorization system and extends it by introducing the permission system. ABP allows permissions to be easily granted to roles and users. It allows the same permissions to be checked on the client side too.
I will explain the authorization system as a mix of ASP.NET Core's and ABP's infrastructure by indicating which part is added by ABP Framework. Let's begin with the simplest authorization check.
Simple authorization
In the simplest case, you may want to allow a certain operation only for those logged in to the application. The [Authorize] attribute, without any parameters, only checks whether the current user has been authenticated (logged in).
See the following model-view-controller (MVC) example:
public class ProductController : Controller
{
public async Task<List<ProductDto>> GetListAsync()
{
}
[Authorize]
public async Task CreateAsync(ProductCreationDto input)
{
}
[Authorize]
public async Task DeleteAsync(Guid id)
{
}
}
In this example, the CreateAsync and DeleteAsync actions are only usable by authenticated users. Suppose an anonymous user (a user that has not logged in to the application, so we couldn't identify them) tries to execute these actions. In that case, ASP.NET Core returns an authorization error response to the client. However, the GetListAsync method is available to everyone, even to anonymous users.
The [Authorize] attribute can be used at the controller class level to authorize all the actions inside that controller. In that case, we can use the [AllowAnonymous] attribute to allow a specific action to anonymous users. So, we could rewrite the same example, as shown in the following code block:
[Authorize]
public class ProductController : Controller
{
[AllowAnonymous]
public async Task<List<ProductDto>> GetListAsync()
{
}
public async Task CreateAsync(ProductCreationDto input)
{
}
public async Task DeleteAsync(Guid id)
{
}
}
Here, I used the [Authorize] attribute on top of the class and added [AllowAnonymous] to the GetListAsync method. This makes it possible to also consume that particular action for users who haven't logged in to the application.
While the parameterless [Authorize] attribute has some use cases, you generally want to define specific permissions (or policies) in your application so that all authenticated users don't have the same privileges.
Using the permission system
The most important authorization extension of ABP Framework for ASP.NET Core is the permission system. A permission is a simple policy that is granted or prohibited for a particular user or role. It is then associated with a particular functionality of your application and is checked when users try to use that functionality. If the current user has the related permission granted, then the user can use the application functionality. Otherwise, the user cannot use that functionality.
ABP provides all the functionality to define, grant, and check permissions in your application.
Defining permissions
We should define permissions before using them. To define permissions, create a class that inherits from the PermissionDefinitionProvider class. When you create a new ABP solution, an empty permission definition provider class comes in the Application.Contracts project of the solution. See the following example:
public class ProductManagementPermissionDefinitionProvider
: PermissionDefinitionProvider
{
public override void Define(
IPermissionDefinitionContext context)
{
var myGroup = context.AddGroup(
"ProductManagement");
myGroup.AddPermission(
"ProductManagement.ProductCreation");
myGroup.AddPermission(
"ProductManagement.ProductDeletion");
}
}
ABP Framework calls the Define method on application startup. In this example, I've created a permission group, named ProductManagement, and defined two permissions inside it. Groups are used to group permissions on the user interface (UI), and generally, every module defines its permission group. Group and permission names are arbitrary string values (it is suggested to define const fields instead of using magic strings).
That was a minimal configuration. You can also specify display names as localizable strings for the group, and permission names to show them in a user-friendly way on the UI. The following code block uses the localization system to specify the display names while defining the group and the permissions:
public class ProductManagementPermissionDefinitionProvider
: PermissionDefinitionProvider
{
public override void Define(
IPermissionDefinitionContext context)
{
var myGroup = context.AddGroup(
«ProductManagement»,
L("ProductManagement"));
myGroup.AddPermission(
"ProductManagement.ProductCreation",
L("ProductCreation"));
myGroup.AddPermission(
"ProductManagement.ProductDeletion",
L("ProductDeletion"));
}
private static LocalizableString L(string name)
{
return LocalizableString
.Create<ProductManagementResource>(name);
}
}
I've defined an L method to simplify the localization. The localization system will be covered in Chapter 8, Using the Features and Services of ABP.
Permission Definitions in Multi-Tenant Applications
For multi-tenant applications, you can specify the multiTenancySide parameter for the AddPermission method, to define host-only or tenant-only permissions. We will return to this topic in Chapter 16, Implementing Multi-Tenancy.
Once you define a permission, it becomes available on the permission management dialog after the next application startup.
Managing permissions
A permission can be granted for a user or role by default. For example, assume that you have created a manager role and want to grant the product permissions for that role. When you run the application, navigate to the Administration | Identity Management | Roles page. Then create the manager role if you haven't created it before; to do so, click on the Actions button and select the Permissions action, as shown in Figure 7.1:

Figure 7.1 – Selecting the Permissions action on the Role Management page
Clicking on the Permissions action opens a modal dialog to manage the permissions of the selected role, as shown here:

Figure 7.2 – Permission Management modal
In Figure 7.2, you see the permission groups on the left-hand side, while the permissions in this group are available on the right-hand side. The permission group and the permissions we've defined are available in this dialog box without any additional effort.
All users with the manager role inherit the permissions of that role. Users can have multiple roles, and they inherit a union of all permissions of all the assigned roles. You can also grant permissions directly to the users on the user management page for more flexibility.
We've defined permissions and assigned them to roles. The next step is to check whether the current user has the requested permissions.
Checking permissions
You can check a permission either declaratively, using the [Authorize] attribute, or programmatically, using IAuthorizationService.
We can rewrite the ProductController class (which was introduced in the Simple authorization section) to request the product creation and deletion permissions on specific actions, as follows:
public class ProductController : Controller
{
public async Task<List<ProductDto>> GetListAsync()
{
}
[Authorize("ProductManagement.ProductCreation")]
public async Task CreateAsync(ProductCreationDto input)
{
}
[Authorize("ProductManagement.ProductDeletion")]
public async Task DeleteAsync(Guid id)
{
}
}
The [Authorize] attribute, with this usage, takes a string parameter as a policy name. ABP defines permissions as automatic policies, so you can use a permission name wherever you need to specify a policy name.
Declarative authorization is simple to use and recommended wherever possible. However, it is limited when you want to check permissions or perform logic for unauthorized cases conditionally. For such cases, you can inject and use IAuthorizationService, as shown in the following example:
public class ProductController : Controller
{
private readonly IAuthorizationService
_authorizationService;
public ProductController(
IAuthorizationService authorizationService)
{
_authorizationService = authorizationService;
}
public async Task CreateAsync(ProductCreationDto input)
{
if (await _authorizationService.IsGrantedAsync(
"ProductManagement.ProductCreation"))
{
// TODO: Create the product
}
else
{
// TODO: Handle unauthorized case
}
}
}
The IsGrantedAsync method checks the given permission and returns true if the current user (or a role of the user) has been granted the current permission. This is useful if you have custom logic for an unauthorized case. However, if you want to simply check the permission and throw an exception for unauthorized cases, the CheckAsync method is more practical:
public async Task CreateAsync(ProductCreationDto input)
{
await _authorizationService
.CheckAsync("ProductManagement.ProductCreation");
//TODO: Create the product
}
The CheckAsync method throws an AbpAuthorizationException exception if the user doesn't have permission to carry out that operation, which is handled by ABP Framework to return a proper HyperText Transfer Protocol (HTTP) response to the client (this will be discussed in the Exception handling section of this chapter). The IsGrantedAsync and CheckAsync methods are useful extension methods defined by ABP Framework.
Tip: Inherit from AbpController
It is suggested to derive your controller classes from the AbpController class instead of the standard Controller class. This extends the standard Controller class and defines some useful base properties. For example, it has the AuthorizationService property (of the IAuthorizationService type), which you can directly use instead of manually injecting the IAuthorizationService interface.
Checking permissions on the server is a common approach. However, you may also need to check permissions on the client side.
Using permissions on the client side
ABP exposes a standard HTTP API with a URL of /api/abp/application-configuration, which returns JSON data containing localization texts, settings, permissions, and more. Then, the client application can consume that API to check permissions or perform localization on the client side.
Different client types may provide different services to check permissions. For example, in an MVC/Razor Pages application, you can use the abp.auth JavaScript API to check a permission, as illustrated here:
abp.auth.isGranted('ProductManagement.ProductCreation');
This is a global function that returns true if the current user has the given permission. Otherwise, it returns false.
In a Blazor application, you can reuse the same [Authorize] attribute and IAuthorizationService.
We will return to client-side permission checking in Part 4, User Interface and API Development.
Child permissions
In a complex application, you may need to create some child permissions that depend on their parent permissions. The child permissions are meaningful only if the parent permission has been granted. See Figure 7.3:

Figure 7.3 – Parent-child permissions
In Figure 7.3, the Role management permission has some child permissions such as Create, Edit, and Delete. The Role management permission is used to allow a user to enter the Role Management page. If the user cannot enter the page, then there is no point in granting the role creation permission, since it is practically impossible to create a new role without entering that page.
In the permission definition class, the AddPermission method returns the created permission so that you can assign it to a variable and use the AddChild method to create a child permission, as shown in the following code block:
public override void Define(IpermissionDefinitionContext
context)
{
var myGroup = context.AddGroup(
"ProductManagement",
L("ProductManagement"));
var parent = myGroup.AddPermission(
"MyParentPermission");
parent.AddChild("MyChildPermission");
}
In this example, we've created a permission named MyParentPermission, then created another permission named MyChildPermission as a child permission.
Child permissions can also have child permissions. You can assign the return value of the parent.AddChild method to a variable and call its AddChild method.
Defining and using permissions is an easy yet powerful way to authorize an application via simple on/off-style policies. However, ASP.NET Core allows the creation of complete custom logic to define policies.
Policy-based authorization
The ASP.NET Core policy-based authorization system allows you to authorize certain operations in your application, just as with permissions, but this time, with your custom logic expressed with code. Actually, a permission is a simplified and automated policy provided by ABP Framework.
Assume that you want to authorize a product creation operation with your custom code. You first need to define a requirement that you will check later (we can define these classes in the application layer of the solution, while there is no strict rule). The code is illustrated in the following snippet:
public class ProductCreationRequirement :
IAuthorizationRequirement
{ }
ProductCreationRequirement is an empty class that just implements the IAuthorizationRequirement marker interface. Then, you should define an authorization handler for that requirement, as follows:
public class ProductCreationRequirementHandler
: AuthorizationHandler<ProductCreationRequirement>
{
protected override Task HandleRequirementAsync(
AuthorizationHandlerContext context,
ProductCreationRequirement requirement)
{
if (context.User.HasClaim(c => c.Type ==
"productManager"))
{
context.Succeed(requirement);
}
return Task.CompletedTask;
}
}
The handler class must be derived from AuthorizationHandler<T>, where T is the type of your requirement class. In this example, I simply checked whether the current user has the productManager claim, which is my custom claim (a claim is a simple named value stored in the authentication ticket). You can build your custom logic. All you're going to do is call context.Succeed if you want to allow the current user to have the requirement.
Once you define a requirement and handler, you need to register them in the ConfigureServices method of your module class, like this:
public override void ConfigureServices(
ServiceConfigurationContext context)
{
Configure<AuthorizationOptions>(options =>
{
options.AddPolicy(
"ProductManagement.ProductCreation",
policy => policy.Requirements.Add(
new ProductCreationRequirement()
)
);
});
context.Services.AddSingleton<IAuthorizationHandler,
ProductCreationRequirementHandler>();
}
I've used AuthorizationOptions to define a policy named ProductManagement.ProductCreation with the ProductCreationRequirement requirement. Then, I've registered ProductCreationRequirementHandler as a singleton service.
Now, suppose I use the [Authorize("ProductManagement.ProductCreation")] attribute on a controller or action or use IAuthorizationService to check the policy. In that case, my custom authorization handler logic works to allow me to take complete control of the policy-check logic.
Permissions versus Custom Policies
Once you implement a custom policy, you cannot use the permission management dialog to grant permission to users and roles because it is not a simple on/off permission that you can enable/disable. However, a client-side policy check still works, since ABP is well integrated into ASP.NET Core's policy system.
As you can see, ABP's permission system is much easier and more powerful if you just need on/off-style policies, while custom policies allow you to dynamically check policies with your custom logic.
Resource-Based Authorization
ASP.NET Core's authorization system has more features than covered here. Resource-based authorization is one feature that allows you to control policies based on objects (such as entities). For example, you can control access to delete a specific product, rather than having a common deleting permission for all products. ABP is 100% compatible with the ASP.NET Core authorization system, so I suggest you check ASP.NET Core's documentation to learn more about authorization: https://docs.microsoft.com/en-us/aspnet/core/security/authorization.
Up to now, we've seen the usage of the [Authorize] attribute on MVC controllers. However, this attribute and IAuthorizationService are not limited to controllers.
Authorizations outside of controllers
ASP.NET Core allows you to use the [Authorize] attribute and IAuthorizationService for Razor Pages, Razor components, and some other points in the web layer. You can refer to ASP.NET Core's documentation to learn about these standard usages: https://docs.microsoft.com/en-us/aspnet/core/security/authorization.
ABP Framework takes it one step further and allows using the [Authorize] attribute for the application service classes and methods without depending on the web layer, even in a non-web application. So, this usage is completely valid, as illustrated here:
public class ProductAppService
: ApplicationService, IProductAppService
{
[Authorize("ProductManagement.ProductCreation")]
public Task CreateAsync(ProductCreationDto input)
{
// TODO
}
}
The CreateAsync method can only be executed if the current user has the ProductManagement.ProductCreation permission/policy. Actually, [Authorize] is usable in any class that is registered for dependency injection (DI). However, since authorization is considered an application layer aspect, it is recommended that authorization be used at the application layer and not at the domain layer.
Dynamic Proxying/Interceptors
ABP uses dynamic proxying using interceptors to accomplish the authorization check on method calls. If you inject a service via a class reference (rather than an interface reference), the dynamic proxying system uses the dynamic inheritance technique. In this case, your method must be defined with the virtual keyword to allow the dynamic proxying system to override it and perform the authorization check.
The authorization system guarantees that only authorized users consume your services. It is one of the systems that you need to use to secure your application, while the other one is input validation.
Validating user inputs
Validation ensures your data security and consistency and helps your application to operate properly. Validation is a wide topic, and there are some common levels of validation, as outlined here:
- Client-side validation is used to pre-validate the user input before sending data to the server. It is important for the user experience (UX), and you should always implement it wherever possible. However, it cannot guarantee security—even an inexperienced hacker can bypass it. For example, checking whether a required textbox field is empty is a type of client-side validation. We will cover client-side validation in Part 4, User Interface and API Development.
- Server-side validation is performed by the server to prevent incomplete, badly formatted, or malicious requests. It provides some level of security for your application and is generally performed when you first touch the data sent by the client. For example, checking a required input field is empty on the server side is an example of this type of validation.
- Business validation is also performed in the server; it implements your business rules and keeps your business data consistent. It is done at every level of your business code. For example, checking a user's balance before a money transfer is a kind of business validation. We will cover business validation in Chapter 10, DDD – The Domain Layer.
About the ASP.NET Core Validation System
ASP.NET Core provides many options for input validation. This book covers the basics by focusing on the features added by ABP Framework. See ASP.NET Core's documentation for all the validation possibilities: https://docs.microsoft.com/en-us/aspnet/core/mvc/models/validation.
This section focuses on server-side validation and shows how to perform input validation in different ways. It also explores ways to control the validation process and deal with validation exceptions.
Let's start with the easiest way to perform validation—using data annotation attributes.
Using data annotation attributes
Using data annotation attributes is the simplest way to perform a formal validation for the user input. See the following application service method:
public class ProductAppService
: ApplicationService, IProductAppService
{
public Task CreateAsync(ProductCreationDto input)
{
// TODO
}
}
ProductAppService is an application service, and the application service inputs are automatically validated in ABP Framework, just as with controllers in the ASP.NET Core MVC framework. The ProductAppService service takes an input parameter, as shown in the following code block:
public class ProductCreationDto
{
[Required]
[StringLength(100)]
public string Name { get; set; }
[Range(0, 999.99)]
public decimal Price { get; set; }
[Url]
public string PictureUrl { get; set; }
public bool IsDraft { get; set; }
}
ProductCreationDto has three properties decorated with validation attributes. There are many built-in validation attributes of ASP.NET Core, including the following:
- [Required]: Validates that the property is not null
- [StringLength]: Validates a maximum (and optionally minimum) length for a string property
- [Range]: Validates that the property value is in the specified range
- [Url]: Validates that the property value has a proper URL format
- [RegularExpression]: Allows the specifying of a custom regular expression (regex) to validate the property value
- [EmailAddress]: Validates that the property has a properly formatted email address value
ASP.NET Core also allows you to define custom validation attributes by inheriting them from the ValidationAttribute class and overriding the IsValid method.
Data annotation attributes are very easy to use and are suggested to perform formal validation for your data transfer objects (DTOs) and models. However, they are limited when you need to perform custom code logic to validate the input.
Custom validation with the IValidatableObject interface
A model or DTO object can implement the IValidatableObject interface to perform validation using a custom code block. See the following example:
public class ProductCreationDto : IValidatableObject
{
...
[Url]
public string PictureUrl { get; set; }
public bool IsDraft { get; set; }
public IEnumerable<ValidationResult> Validate(
ValidationContext context)
{
if (IsDraft == false &&
string.IsNullOrEmpty(PictureUrl))
{
yield return new ValidationResult(
"Picture must be provided to publish a
product",
new []{ nameof(PictureUrl) }
);
}
}
}
In this example, ProductCreationDto has a custom rule: a profile picture is required if IsDraft is false. So, we are checking the condition and adding a validation error in this case.
If you need to resolve a service from the DI system, you can use the context.GetRequiredService method. For example, if we want to localize the error message, we can rewrite the Validate method, as shown in the following code block:
public IEnumerable<ValidationResult> Validate(
ValidationContext context)
{
if (IsDraft == false &&
string.IsNullOrEmpty(PictureUrl))
{
var localizer = context.GetRequiredService
<IStringLocalizer<ProductManagementResource>
>();
yield return new ValidationResult(
localizer["PictureIsMissingErrorMessage"],
new []{ nameof(PictureUrl) }
);
}
}
Here, we resolve an IStringLocalizer<ProductManagementResource> instance from the DI and use it to return a localized error message to the client. We will cover the localization system in Chapter 8, Using the Features and Services of ABP.
Formal Validation versus Business Validation
As a best practice, implement only formal validation (such as if a DTO property was not filled or not formatted as expected) in the DTO/model classes and use only the data already available on the DTO/model class. Implement your business validation logic inside application or domain layer services. For example, if you want to check whether a given product name already exists in the database, do not try to implement this logic in the Validate method.
Using either the validation attributes or custom validation logic, ABP Framework handles the validation result and throws an exception prior to the execution of your method.
Understanding the validation exception
If the user input is not valid, ABP Framework automatically throws an exception of the AbpValidationException type. The exception is thrown in the following situations:
- The input object is null, so you don't need to check whether it is null.
- The input object is invalid in any way, so you don't have to check Model.IsValid in your API controllers.
ABP doesn't call your service method (or controller action) in these cases. If your method is being executed, you can be sure that the input is not null and is valid.
If you perform additional validation inside your services and want to throw a validation-related exception, you can also throw AbpValidationException, as illustrated in the following code snippet:
public async Task CreateAsync(ProductCreationDto input)
{
if (await HasExistingProductAsync(input.Name))
{
throw new AbpValidationException(
new List<ValidationResult>
{
new ValidationResult(
"Product name is already in use!",
new[] {nameof(input.Name)}
)
}
);
}
}
Here, we are assuming that HasExistingProductAsync returns true if there is a product with the given name. In this case, we are throwing AbpValidationException by specifying the validation error(s). ValidationResult represents a validation error; its first constructor parameter is the validation error message, and the second parameter (optional) is the name of the DTO properties that caused the validation error.
Once you or the ABP validation system throws an AbpValidationException exception, the ABP exception-handling system catches and handles it properly, as we will see in the next section.
The ABP validation system works just as you want most of the time, but sometimes, you may need to bypass it and apply your custom logic.
Disabling the validation
It is possible to bypass the ABP validation system at a method or class level using the [DisableValidation] attribute, as in the following example:
[DisableValidation]
public async Task CreateAsync(ProductCreationDto input)
{
}
In this example, the CreateAsync method is decorated with the [DisableValidation] attribute, so ABP doesn't perform any automatic validation for the input object.
If you use the [DisableValidation] attribute for a class, then the validation is disabled for all the methods. In this case, you can use the [EnableValidation] attribute for a method to enable validation only for that particular method.
When you disable auto-validation for a method, you can still perform your custom validation logic and throw AbpValidationException, as explained in the previous section.
Validation in other types
ASP.NET Core performs validation for controller actions and Razor Page handlers. ABP, in addition to ASP.NET Core, performs validation for application service methods by default.
Beyond the default behavior, ABP allows you to enable the auto-validation feature for any kind of class in your application. All you need to do is to implement the IValidationEnabled marker interface, as shown in the following example:
public class SomeServiceWithValidation
: IValidationEnabled, ITransientDependency
{
...
}
Then, ABP auto-validates all the inputs for this class, using the validation system explained in this chapter.
Dynamic Proxying/Interceptors
ABP uses dynamic proxying using interceptors to accomplish validation on method calls. If you inject a service via a class reference (rather than an interface reference), the dynamic proxying system uses the dynamic inheritance technique. In this case, your method must be defined with the virtual keyword to allow the dynamic proxying system to override it and perform the validation.
Up to now, we've explained the ABP validation system that is directly compatible with ASP.NET Core's validation infrastructure. The next section introduces FluentValidation library integration, which allows you to separate the validation logic from the validated object.
Integrating the FluentValidation library
The built-in validation system is enough for most cases, and it is easy to use to define formal validation rules. I personally don't see any problem with it and find it practical to embed the data validation logic inside DTO/model classes. However, some developers think that the validation logic inside DTO/model classes is a bad practice, even when it is only a formal validation. In this case, ABP provides an integration package with the popular FluentValidation library, which decouples the validation logic from the DTO/model class and provides more powerful features compared to the standard data annotation approach.
If you want to use the FluentValidation library, you first need to install it into your project. You can use the add-package command of the ABP Command-Line Interface (ABP CLI) to install it for a project easily, as follows:
abp add-package Volo.Abp.FluentValidation
Once you install the package, you can create your validator classes and set your validation rules, as shown in the following code block:
public class ProductCreationDtoValidator
: AbstractValidator<ProductCreationDto>
{
public ProductCreationDtoValidator()
{
RuleFor(x => x.Name).NotEmpty().MaximumLength(100);
RuleFor(x => x.Price).ExclusiveBetween(0, 1000);
//...
}
}
Please refer to the FluentValidation documentation to learn how to define advanced validation rules: https://fluentvalidation.net.
ABP automatically discovers the validator classes and integrates them into the validation process. That means you can even mix the standard validation logic with the FluentValidation validator classes.
Authorization and validation exceptions are well-defined exception types, and ABP automatically handles them. The next section explores the ABP exception-handling system and explains how to deal with different kinds of exceptions.
Exception handling
One of the most important quality indicators of an application is how it responds to errors and exceptional cases. A good application should handle errors, return a proper response to the client, and gracefully inform the user about the problem.
In a typical web application, we should care about exceptions in every client request, which makes it a repetitive and tedious task for developers.
ABP Framework completely automates error handling in every aspect of your application. Most of the time, you don't need to write any try-catch statement in your application code, as it does the following:
- Handles all exceptions, logs them, and returns a standard-formatted error response to the client for an API request or shows a standard error page for a server-rendered page
- Hides internal infrastructure errors while allowing you to return user-friendly, localized error messages when you need them
- Understands standard exceptions such as validation and authorization exceptions and sends a proper HTTP status code to the client
- Handles all errors on the client and shows a meaningful message to the end user
While ABP takes care of exceptions, you can throw exceptions to return user-friendly messages or business-specific error codes to the client.
User-friendly exceptions
ABP provides some predefined exception classes to customize the error-handling behavior. One of these is the UserFriendlyException class.
First, to understand the need for the UserFriendlyException class, see what happens if an arbitrary exception is thrown from a server-side API. The following method throws an exception with a custom message:
Public async Task ExampleAsync()
{
throw new Exception("my error message...");
}
Assume that a browser client calls that method via an AJAX request. It will show the following error message to the end user:
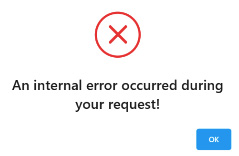
Figure 7.4 – The default error message
As you see in Figure 7.4, ABP shows a standard error message about an internal problem. The actual error message is written to the logging system. The server returns an HTTP 500 status code to the client for such generic errors.
That is good behavior because it is not useful to show a raw exception message to an end user. It can even be dangerous, since it may include some sensitive information about your internal systems, such as database table names and fields.
However, you may want to return a user-friendly, informative message to the end user for some specific cases. For such cases, you can throw a UserFriendlyException exception, as shown in the following code block:
public async Task ExampleAsync()
{
throw new UserFriendlyException(
"This message is available to the user!");
}
ABP, at this time, doesn't hide the error message, as we can see here:

Figure 7.5 – Custom error message
The UserFriendlyException class is not unique. Any exception class that inherits from the UserFriendlyException class or directly implements the IUserFriendlyException interface can be used to return user-friendly exception messages. ABP returns an HTTP 403 (forbidden) status code to the client when you throw a user-friendly exception. See the Controlling the HTTP status code section of this chapter for all HTTP status code mappings.
In a multilingual application, you will probably want to return a localized message. Use the localization system in this case, which will be introduced in Chapter 8, Using the Features and Services of ABP.
UserFriendlyException is a special type of business exception where you directly return a message to the user.
Business exceptions
You will have some business rules in a business application, and you need to throw exceptions when the requested operation is not appropriate to execute in the current conditions based on these rules. Business exceptions in ABP are special kinds of exceptions recognized and handled by ABP Framework.
In the simplest case, you can directly use the BusinessException class to throw a business exception. See the following example from the EventHub project:
public class EventRegistrationManager : DomainService
{
public async Task RegisterAsync(
Event @event,
AppUser user)
{
if (Clock.Now > @event.EndTime)
{
throw new BusinessException(EventHubErrorCodes
.CantRegisterOrUnregisterForAPastEvent);
}
...
}
}
EventRegistrationManager is a domain service that is used to perform business rules for event registrations. The RegisterAsync method checks the event time and prevents registering to events in the past by throwing a business exception in that case.
The constructor of BusinessException takes a few parameters, and all are optional. These are listed here:
- code: A string value that is used as a custom error code for the exception. Client applications can check it while handling the exception and track the error type easily. You typically use different error codes for different exceptions. The error code can also be used to localize the exception, as we will see in the Localizing a business exception section.
- message: A string exception message, if needed.
- details: A detailed explanation message string, if needed.
- innerException: An inner exception, if available. You can pass here if you have cached an exception and throw a business exception based on that exception.
- logLevel: The logging level for this exception. It is an enum of the LogLevel type, and the default value is LogLevel.Warning.
You generally only pass code, which is easier to find in logs. It is also used for localizing the error message returned to the client.
Localizing a business exception
If you use UserFriendlyException, you have to localize the message yourself since the exception message is shown directly to the end user. If you throw BusinessException, ABP doesn't show the exception message to the end user unless you explicitly localize it. It uses error code namespaces for that purpose.
Assume that you've used EventHub:CantRegisterOrUnregisterForAPastEvent as the error code. EventHub, here, becomes the error code namespace through the usage of the colon. We must map the error code namespace to a localization resource so that ABP can know which localization resource to use for these error messages. The code is illustrated in the following snippet:
Configure<AbpExceptionLocalizationOptions>(options =>
{
options.MapCodeNamespace(
"EventHub", typeof(EventHubResource));
});
In this code snippet, we map the EventHub error code namespace to the EventHubResource localization resource. Now, you can define the error code as a key in your localization file, including the namespace, as follows:
{
"culture": "en",
"texts": {
"EventHub:CantRegisterOrUnregisterForAPastEvent":
"You can not register to or unregister from an
event in the past, sorry!"
}
}
After that configuration, ABP shows the localized message to the user whenever you throw a BusinessException exception with that error code.
In some cases, you may want to include some additional data in the error message. See the following code snippet:
throw new BusinessException(
EventHubErrorCodes.OrganizationNameAlreadyExists
).WithData("Name", name);
Here, we include the organization name in the error message, using the WithData extension method. Then, we can define the localization string, as shown in the following code snippet:
"EventHub:OrganizationNameAlreadyExists": "The organization {Name} already exists. Please use another name."
In this example, {Name} is a placeholder for the organization name. ABP automatically replaces it with the given name.
We will cover the localization system in Chapter 8, Using the Features and Services of ABP.
We've seen how to throw a BusinessException exception. What if you want to create specialized exception classes?
Custom business exception classes
It is also possible to create custom exception classes instead of directly throwing a BusinessException exception. In this case, you can create a new class inheriting from the BusinessException class, as shown in the following code block:
public class OrganizationNameAlreadyExistsException
: BusinessException
{
public string Name { get; private set; }
public OrganizationNameAlreadyExistsException(
string name) : base(EventHubErrorCodes
.OrganizationNameAlreadyExists)
{
Name = name;
WithData("Name", name);
}
}
In this example, OrganizationNameAlreadyExistsException is a custom business exception class. It takes the organization's name in its constructor. It sets the "Name" data so that ABP can use the organization name in the localization process. Throwing this exception is pretty straightforward, as we can see here:
throw new OrganizationNameAlreadyExistsException(name);
This usage is simpler than throwing a BusinessException exception with custom data, which the developer can forget to set. It also reduces duplication when you throw the same exception in multiple places in your code base.
Controlling exception logging
As mentioned at the beginning of the Exception handling section, ABP automatically logs all exceptions. Business exceptions, authorization, and validation exceptions are logged with the Warning level, while other errors are logged with the Error level by default.
You can implement the IHasLogLevel interface to set a different log level for an exception class. See the following example:
public class MyException : Exception, IHasLogLevel
{
public LogLevel LogLevel { get; set; } =
LogLevel.Warning;
//...
}
The MyException class implements the IHasLogLevel interface with the Warning level. ABP will write warning logs if you throw exceptions of the MyException type.
It is also possible to write additional logs for an exception. You can implement the IExceptionWithSelfLogging interface to write additional logs, as shown in the following example:
public class MyException
: Exception, IExceptionWithSelfLogging
{
public void Log(ILogger logger)
{
//...log additional info
}
}
In this example, the MyException class implements the IExceptionWithSelfLogging interface, which defines a Log method. ABP passes the logger here to allow you to write additional logs if you need them.
Controlling the HTTP status code
ABP does its best to return a proper HTTP status code for known exception types, as follows:
- Returns 401 (unauthorized) if the user has not logged in, for AbpAuthorizationException
- Returns 403 (forbidden) if the user has logged in, for AbpAuthorizationException
- Returns 400 (bad request) for AbpValidationException
- Returns 404 (not found) for EntityNotFoundException
- Returns 403 (forbidden) for business and user-friendly exceptions
- Returns 501 (not implemented) for NotImplementedException
- Returns 500 (internal server error) for other exceptions (those are assumed to be infrastructure errors)
If you want to return another HTTP status code for your custom exceptions, you can map your error code to an HTTP status code, as shown in the following configuration:
services.Configure<AbpExceptionHttpStatusCodeOptions>(
options =>
{
options.Map(
EventHubErrorCodes.OrganizationNameAlreadyExists,
HttpStatusCode.Conflict);
});
It is suggested to make that configuration in the web or HTTP API layer of your solution.
Summary
In this chapter, we've explored three fundamental cross-cutting concerns that we should implement in every serious business application.
Authorization is a key concern for system security. You should carefully control the authorization rules in every operation of your application. ABP simplifies the use of ASP.NET Core's authorization infrastructure and adds a flexible permission system that is a very common pattern for enterprise applications.
Validation, on the other hand, supports system security and improves the UX by gracefully preventing badly formatted or malicious requests. ABP enhances the standard ASP.NET Core validation by allowing you to implement the validation in any service of your application and integrating it into the FluentValidation library for advanced usage.
Finally, ABP's exception-handling system works seamlessly and automates exception handling on the server side and client side. It also allows you to decouple localizing error messages and map them to HTTP status codes from your code that throws an exception.
The next chapter will continue to explore ABP Framework services by introducing some fancy ABP features such as automatic audit logging and data filtering.