
4
Public Key Cryptography
In this chapter, you will be introduced to the concepts and practical aspects of public key cryptography, also called asymmetric cryptography or asymmetric key cryptography. We will continue to use OpenSSL, as we did in the previous chapter, to experiment with some applications of cryptographic algorithms so that you can gain hands-on experience. We will start with the theoretical foundations of public key cryptography and will gradually build on the concepts with relevant practical exercises. After this, we will introduce some new and advanced cryptography constructs.
Before discussing cryptography further, some mathematical terms and concepts need to be explained in order to build a foundation for fully understanding the material provided later in this chapter. The next section serves as a basic introduction to these concepts. An explanation with proofs and relevant background for all of these terms would require somewhat complex mathematics, which is beyond the scope of this book. More details on these topics can be found in any standard number theory, algebra, or cryptography book.
Mathematics
As the subject of cryptography is based on mathematics, this section will introduce some basic concepts that will help you understand the concepts presented later.
Modular arithmetic
Also known as clock arithmetic, numbers in modular arithmetic wrap around when they reach a certain fixed number. This fixed number is a positive number called modulus (sometimes abbreviated to mod), and all operations are performed concerning this fixed number.
Modular arithmetic is analogous to a 12-hour clock; there are numbers from 1 to 12. When 12 is reached, the numbers start from 1 again. Imagine that the time is 9:00 now; 4 hours from now, it will be 1:00 because the numbers wrap around at 12 and start from 1 again. In normal addition, this would be 9 + 4 = 13, but that is not the case on a 12-hour clock; it is 1:00.
In other words, this type of arithmetic deals with the remainders after the division operation. For example, 50 mod 11 is 6 because 50 / 11 leaves a remainder of 6.
Sets
These are collections of distinct objects, for example, X = {1, 2, 3, 4, 5}.
Fields
A field is a set in which all its elements form an additive and multiplicative group. It satisfies specific axioms for addition and multiplication. For all group operations, the distributive law is also applied.
The law dictates that the same sum or product will be produced, even if any of the terms or factors are reordered.
Finite fields
A finite field is one with a finite set of elements. Also known as Galois fields, these structures are of particular importance in cryptography as they can be used to produce accurate and error-free results of arithmetic operations. For example, prime finite fields are used in Elliptic Curve Cryptography (ECC) to construct discrete logarithm problems.
Prime fields
A prime field is a finite one with a prime number of elements. It has specific rules for addition and multiplication, and each non-zero element in the field has an inverse. Addition and multiplication operations are performed modulo p, that is, modulo a prime number.
Groups
A group is a commutative set with an operation that combines two elements of the set. The group operation is closed and associated with a defined identity element. Additionally, each element in the set has an inverse. Closure (closed) means that if, for example, elements A and B are in the set, then the resultant element after performing an operation on the elements is also in the set. Associative means that the grouping of elements does not affect the result of the operation.
Four group axioms must be satisfied for a set to qualify as a group. These group axioms include closure, associativity, an identity element, and an inverse element.
Abelian groups
An abelian group is formed when the operation on the elements of a set is commutative. The commutative law means that changing the order of the elements does not affect the result of the operation, for example, A X B = B X A.
The key difference is that in an abelian group, closure, associativity, identity element, inverse element, and commutativity abelian group axioms are satisfied, whereas in a group, only the first four axioms are required to be satisfied; that is, closure, associativity, an identity element, and an inverse element.
Rings
If more than one operation can be defined over an abelian group, that group becomes a ring. There are also specific properties that need to be satisfied. A ring must have closure and associative and distributive properties.
Cyclic groups
A cyclic group is a type of group that can be generated by a single element called the group generator.
Order
This is the number of elements in a field. It is also known as the cardinality of the field.
This completes a basic introduction to some mathematical concepts involved in cryptography. In the next section, you will be introduced to cryptography concepts.
Asymmetric cryptography
Asymmetric cryptography refers to a type of cryptography where the key that is used to encrypt the data is different from the key that is used to decrypt the data. These keys are called private and public keys, respectively, which why asymmetric cryptography is also known as public key cryptography. It uses both public and private keys to encrypt and decrypt data, respectively. Various asymmetric cryptography schemes are in use, including RSA (named after its founders, Rivest, Shamir, and Adelman), DSA (Digital Signature Algorithm), and ElGamal encryption.
An overview of public-key cryptography is shown in the following diagram:

Figure 4.1: Encryption/decryption using public/private keys
The preceding diagram illustrates how a sender encrypts data P using the recipient's public key and encryption function E, and produces an output encrypted data C, which is then transmitted over the network to the receiver. Once it reaches the receiver, it can be decrypted using the receiver's private key by feeding the C encrypted data into function D, which will output plaintext P. This way, the private key remains on the receiver's side, and there is no need to share keys in order to perform encryption and decryption, which is the case with symmetric encryption.
The following diagram shows how the receiver uses public key cryptography to verify the integrity of the received message. In this model, the sender signs the data using their private key and transmits the message across to the receiver. Once the message is received, it is verified for integrity by the sender's public key.
It's worth noting that there is no encryption being performed in this model. It is simply presented here to help you thoroughly understand the material covering message authentication and validation that will be provided later in this chapter:

Figure 4.2: Model of a public-key cryptography signature scheme
The preceding diagram shows that the sender digitally signs the plaintext P with their private key using signing function S, and produces data C, which is sent to the receiver, who verifies C using the sender's public key and function V to ensure the message has indeed come from the sender.
Security mechanisms offered by public key cryptosystems include key establishment, digital signatures, identification, encryption, and decryption.
Key establishment mechanisms are concerned with the design of protocols that allow the setting up of keys over an insecure channel. Non-repudiation (defined in Chapter 3, Symmetric Cryptography, as the assurance that an action, once taken by someone, cannot be denied later) services, a very desirable property in many scenarios, can be provided using digital signatures. Sometimes, it is important not only to authenticate a user but also to identify the entity involved in a transaction. This can also be achieved by a combination of digital signatures and challenge-response protocols. Finally, the encryption mechanism to provide confidentiality can also be obtained using public key cryptosystems, such as RSA, ECC, and ElGamal.
Public key algorithms are slower in terms of computation than symmetric key algorithms. Therefore, they are not commonly used in the encryption of large files or the actual data that requires encryption. They are usually used to exchange keys for symmetric algorithms. Once the keys are established securely, symmetric key algorithms can be used to encrypt the data.
Public key cryptography algorithms are based on various underlying mathematical functions. The three main categories of asymmetric algorithms are described here.
Integer factorization
Integer factorization schemes are based on the fact that large integers are very hard to factor. RSA is a prime example of this type of algorithm.
Discrete logarithm
A discrete logarithm scheme is based on a problem in modular arithmetic. It is easy to calculate the result of a modulo function, but it is computationally impractical to find the exponent of the generator. In other words, it is extremely difficult to find the input from the result (output). This is called a one-way function.
For example, consider the following equation:
32 mod 10 = 9
Now, given 9, the result of the preceding equation, finding 2, which is the exponent of the generator 3 in the equation, is extremely hard to determine. This difficult problem is commonly used in the Diffie-Hellman key exchange and digital signature algorithms.
Elliptic curves
The elliptic curves algorithm is based on the discrete logarithm problem discussed previously, but in the context of elliptic curves. An elliptic curve is an algebraic cubic curve over a field, which can be defined by an equation, as shown here. The curve is non-singular, which means that it has no cusps or self-intersections. It has two variables a and b, as well as a point of infinity:

Here, a and b are integers whose values are elements of the field on which the elliptic curve is defined. Elliptic curves can be defined over reals, rational numbers, complex numbers, or finite fields. For cryptographic purposes, an elliptic curve over prime finite fields is used instead of real numbers. Additionally, the prime should be greater than 3. Different curves can be generated by varying the values of a and/or b.
The most prominently used cryptosystems based on elliptic curves are the Elliptic Curve Digital Signatures Algorithm (ECDSA) and the Elliptic Curve Diffie-Hellman (ECDH) key exchange.
In this section, we discovered the basic principle of public key cryptography and relevant categories of asymmetric algorithms. This understanding will serve as a foundation for the concepts introduced next in this chapter. One of the key concepts in asymmetric cryptography is of public and private keys, which we'll describe next.
Public and private keys
A private key, as the name suggests, is a randomly generated number that is kept secret and held privately by its users. Private keys need to be protected and no unauthorized access should be granted to that key; otherwise, the whole scheme of public key cryptography is jeopardized, as this is the key that is used to decrypt messages. Private keys can be of various lengths, depending on the type and class of algorithms used. For example, in RSA, typically, a key of 1,024 bits or 2,048 bits is used. The 1,024-bit key size is no longer considered secure, and at least a 2,048-bit key size is recommended.
A public key is freely available and published by the private key owner. Anyone who would then like to send the publisher of the public key an encrypted message can do so, by encrypting the message using the published public key and sending it to the holder of the private key. No one else is able to decrypt the message because the corresponding private key is held securely by the intended recipient. Once the public key-encrypted message is received, the recipient can decrypt the message using the private key. There are a few concerns, however, regarding public keys. These include authenticity and identification of the publisher of the public keys.
In the following section, we will introduce two examples of asymmetric key cryptography: RSA and ECC. RSA is the first implementation of public key cryptography where ECC is used extensively in blockchain technology.
RSA
RSA was invented in 1977 by Ron Rivest, Adi Shamir, and Leonard Adelman, hence the name RSA. This type of public key cryptography is based on the integer factorization problem, where the multiplication of two large prime numbers is easy, but it is difficult to factor the product (the result of the multiplication) back to the two original numbers.
The crux of the work involved with the RSA algorithm happens during the key generation process. An RSA key pair is generated by performing the following steps:
- Modulus generation:
- Select p and q , which are very large prime numbers
- Multiply p and q, n=p.q to generate modulus n
- Generate the co-prime:
- Assume a number called e.
- e should satisfy a certain condition; that is, it should be greater than 1 and less than (p-1) (q-1). In other words, e must be a number such that no number other than 1 can be divided into e and (p-1) (q-1). This is called a co-prime, that is, e is the co-prime of (p-1)(q-1).
- Generate the public key:
- The modulus generated in step 1 and co-prime e generated in step 2 is a pair that is a public key. This part is the public part that can be shared with anyone; however, p and q need to be kept secret.
- Generate the private key:
- The private key is called d here and is calculated from p, q, and e. The private key is basically the inverse of e modulo (p-1)(q-1). As an equation, it is as follows:
ed = 1 mod(p-1)(q-1)
Usually, an extended Euclidean algorithm is used to calculate d. This algorithm takes p, q, and e and calculates d. The key idea in this scheme is that anyone who knows p and q can easily calculate private key d by applying the extended Euclidean algorithm. However, someone who does not know the value of p and q cannot generate d. This also implies that p and q should be large enough for the modulus n to become extremely difficult (computationally impractical) to factor.
The original RSA paper is available here:
http://web.mit.edu/6.857/OldStuff/Fall03/ref/rivest78method.pdf.
Rivest, R.L., Shamir, A. and Adleman, L., 1978. A method for obtaining digital signatures and public-key cryptosystems. Communications of the ACM, 21(2), pp.120-126.
Now, let's see how encryption and decryption operations are performed using RSA. RSA uses the following equation to produce ciphertext:
C = Pe mod n
This means that plaintext P is raised to the power of e and then reduced to modulo n. Decryption in RSA is provided in the following equation:
P = Cd mod n
This means that the receiver who has a public key pair (n, e) can decipher the data by raising C to the value of the private key d, and then reducing to modulo n.
We'll look at a practical example of encryption and decryption with RSA later in the chapter. For now, let's explore the fundamentals of ECC.
Elliptic curve cryptography
ECC is based on the discrete logarithm problem founded upon elliptic curves over finite fields (Galois fields). The main benefit of ECC over other types of public key algorithms is that it requires a smaller key size, while providing the same level of security as, for example, RSA. Two notable schemes that originate from ECC are ECDH for key exchange and ECDSA for digital signatures.
ECC can also be used for encryption, but it is not usually used for this purpose in practice. Instead, key exchange and digital signatures are used more commonly. As ECC needs less space to operate, it is becoming very popular on embedded platforms and in systems where storage resources are limited. By comparison, the same level of security can be achieved with ECC when only using 256-bit operands as compared to 3,072 bits in RSA.
Mathematics behind ECC
To understand ECC, a basic introduction to the underlying mathematics is necessary. An elliptic curve is basically a type of polynomial equation known as the Weierstrass equation, which generates a curve over a finite field. The most commonly used field is where all arithmetic operations are performed modulo a prime number p. Elliptic curve groups consist of points on the curve over a finite field.
An elliptic curve is defined in the following equation:

Here, A and B belong to a finite field Zp or Fp (prime finite field), along with a special value called the point of infinity. The point of infinity ![]() is used to provide identity operations for points on the curve.
is used to provide identity operations for points on the curve.
Furthermore, a condition also needs to be met that ensures that the equation mentioned earlier has no repeated roots. This means that the curve is non-singular.
The condition is described in the following equation, which is a standard requirement that needs to be met. More precisely, this ensures that the curve is non-singular:

To construct the discrete logarithm problem based on elliptic curves, a large enough cyclic group is required. First, the group elements are identified as a set of points that satisfy the previous equation. After this, group operations need to be defined on these points.
Basic group operations on elliptic curves are point addition and point doubling. Point addition is a process where two different points are added, and point doubling means that the same point is added to itself.
Point addition
Point addition is shown in the following diagram. This is a geometric representation of point addition on elliptic curves. In this method, a diagonal line is drawn through the curve that intersects the curve at two points shown below P and Q, which yields a third point between the curve and the line.
This point is mirrored as P+Q, which represents the result of the addition as R. This is shown as P+Q in the following diagram:

Figure 4.3: Point addition over R
The group operation denoted by the + sign for addition yields the following equation:
P + Q = R
In this case, two points are added to compute the coordinates of the third point on the curve:
P + Q = R
More precisely, this means that coordinates are added, as shown in the following equation:
(x1, y1) + (x2, y2) = (x3, y3)
The equation of point addition is as follows:
X3 = s2 – x1 – x2 mod p
y3 = s (x1 – x3) -y1 mod p
Here, we can see the result of the preceding equation:

S in the preceding equation depicts the line going through P and Q.
An example of point addition is shown here. It was produced using Certicom's online calculator. This example shows the addition and solutions for the equation over finite field F23. This is in contrast to the example shown earlier, which is over real numbers and only shows the curve but provides no solutions to the equation:

Figure 4.4: Example of point addition
In the preceding example, the graph on the left-hand side shows the points that satisfy this equation:

There are 27 solutions to the equation shown earlier over finite field F23. P and Q are chosen to be added to produce point R. Calculations are shown on the right-hand side, which calculates the third point R. Note that in the preceding graph, in the calculation shown on the right-hand side, l is used to depict the line going through P and Q.
As an example, to show how the equation is satisfied by the points shown in the graph, a point (x, y) is picked up where x = 3 and y = 6. This point can be visualized in the graph shown here. Notice the point at coordinate (3, 6), indicated by an arrow:

Figure 4.5: Point (3, 6) shown with an arrow (this graph was generated using sagemath)
Using these values shows that the equation is indeed satisfied:


The next section introduces the concept of point doubling, which is another operation that can be performed on elliptic curves.
Point doubling
The other group operation on elliptic curves is called point doubling. This is a process where P is added to itself. This is the case when P and Q are at the same point, so effectively the operation becomes adding the point to itself, and is therefore called point doubling. In this method, a tangent line is drawn through the curve, as shown in the following graph. The second point is obtained, which is at the intersection of the tangent line drawn and the curve. This point is then mirrored to yield the result, which is shown as 2P = P + P:

Figure 4.6: Graph representing point doubling
In the case of point doubling, the equation becomes:


Here, S is the slope of the tangent line going through P, which is the line shown at the top in the preceding graph. In the preceding example, the curve is plotted as a simple example, and no solution to the equation is shown.
The following example shows the solutions and point doubling of elliptic curves over finite field F23. The graph on the left-hand side shows the points that satisfy the equation:


Figure 4.7: Example of point doubling over real numbers
As shown on the right-hand side of the preceding graph, the calculation that finds R after P is added to itself (point doubling). There is no Q shown here because the same point P is used for doubling. Note that in the calculation shown previously on the right-hand side of the graph, l is used to depict the tangent line going through P.
With this, we have covered basics of ECC. In the next section, an introduction to the discrete logarithm problem based on ECC will be presented. The discrete log problem was introduced earlier in this chapter and can be depicted with a simple equation; that is, given y, find x such that gx = y. Fundamentally, it is a one-way function, which is easy to evaluate but extremely hard (computationally) to invert.
Using addition and doubling we can construct another operation, called point multiplication, which we introduce next.
Point multiplication
This operation is also called scalar point multiplication. It is used to multiply points on elliptic curves by a given integer. Let's call this integer d and the point P. We get dP by repeatedly adding P, d times. This operation can be described as follows:
P + P + … + P = dP, where P is added d times.
Any point on the curve can be added multiple times to itself. The result of this operation is always another point on the curve.
The addition operation is not efficient for large values of d. However, point multiplication operation can be made efficient by utilizing double and add algorithm, which combine point addition and doubling operations to achieve exponential performance gain.
For example, if using addition only, to get 9P we have to do P + P + P + P + P + P + P + P + P,which can become infeasible pretty quickly if the number of Ps increases. To address this we can use the double and add mechanism where we first convert nine into binary, then starting from the most significant bit, for each bit that is 1 (high) perform double and addition operation and for each 0 perform only the double operation. We do not perform any operation on the most significant bit. As nine is 1001 in binary, we get for each bit, starting from left to right, P, 2P, 4P, 8P+P. This process produces 9P only with three double operations and one addition operation, instead of 9 addition operations.
Further discussion on double and add algorithm is not in the scope of this book. More details on double and add algorithm is available here https://en.wikipedia.org/wiki/Elliptic_curve_point_multiplication.
In this example, point doubling and addition has been used to construct an efficient operation of scalar multiplication.
Now consider that dP results in producing another point on the curve; let's call that point T. We can say that with all these doublings and additions we have computed a point called T. We multiplied a point P on the curve with a number d to compute another point T.
Here's the key idea now: even if we know points P and T, it is computationally infeasible to reconstruct the sequence of all the double and addition operations that we did to figure out the number d. In other words, even if someone knows P and T, it is almost impossible for them to find d. This means that it is a one-way function, and it is the basis of the Elliptic Curve Discrete Logarithm Problem (ECDLP). We describe the discrete logarithm problem in more detail next.
The discrete logarithm problem in ECC
The discrete logarithm problem in ECC is based on the idea that, under certain conditions, all points on an elliptic curve form a cyclic group.
On an elliptic curve, the public key is a random multiple of the generator point, whereas the private key is a randomly chosen integer used to generate the multiple. In other words, a private key is a randomly selected integer, whereas the public key is a point on the curve. The discrete logarithm problem is used to find the private key (an integer) where that integer falls within all points on the elliptic curve. The following equation shows this concept more precisely.
Consider an elliptic curve E, with two elements P and T. The discrete logarithmic problem is to find the integer d, where 1 <= d <= #E, such that:
P + P + … + P = dP = T
Here, T is the public key (a point on the curve, (x, y)), and d is the private key. In other words, the public key is a random multiple of the generator P, whereas the private key is the integer that is used to generate the multiple. #E represents the order of the elliptic curve, which means the number of points that are present in the cyclic group of the elliptic curve. A cyclic group is formed by a combination of points on the elliptic curve and the point of infinity.
The initial starting point P is a public parameter, and the public key T is also published, whereas d, the private key, is kept secret. If d is not known, it is impractical to calculate it by only having the knowledge of T and P, thus creating the hard problem on which ECDLP is built.
A key pair is linked with the specific domain parameters of an elliptic curve. Domain parameters include field size, field representation, two elements from the field a and b, two field elements Xg and Yg, order n of point G, which is calculated as G = (Xg, Yg), and the cofactor h = #E(Fq)/n. A practical example using OpenSSL will be described later in this section.
Various parameters are recommended and standardized so they can be used as curves with ECC. An example of the SECP256K1 specification is shown here. The following figure is the specification that is used in Bitcoin, which can be accessed here: http://www.secg.org/sec2-v2.pdf.

Figure 4.8: Specification of SECP256K1
An explanation of all of these values in the sextuple follows:
- P is the prime p that specifies the size of the finite field.
- a and b are the coefficients of the elliptic curve equation.
- G is the base point that generates the required subgroup, also known as the generator. The base point can be represented in either compressed or uncompressed form. There is no need to store all points on the curve in a practical implementation. The compressed generator works because the points on the curve can be identified using only the x coordinate and the least significant bit of the y coordinate.
- n is the order of the subgroup.
- h is the cofactor of the subgroup.
We can also use the OpenSSL command line to view these parameters of SECP256K1. This can be seen here:
$ openssl ecparam -param_enc explicit -text -noout -name secp256k1
This command will show the output as follows:
Field Type: prime-field
Prime:
  00:ff:ff:ff:ff:ff:ff:ff:ff:ff:ff:ff:ff:ff:ff:
  ff:ff:ff:ff:ff:ff:ff:ff:ff:ff:ff:ff:ff:fe:ff:
  ff:fc:2f
A:  0
B:  7 (0x7)
Generator (uncompressed):
  04:79:be:66:7e:f9:dc:bb:ac:55:a0:62:95:ce:87:
  0b:07:02:9b:fc:db:2d:ce:28:d9:59:f2:81:5b:16:
  f8:17:98:48:3a:da:77:26:a3:c4:65:5d:a4:fb:fc:
  0e:11:08:a8:fd:17:b4:48:a6:85:54:19:9c:47:d0:
  8f:fb:10:d4:b8
Order:
  00:ff:ff:ff:ff:ff:ff:ff:ff:ff:ff:ff:ff:ff:ff:
  ff:fe:ba:ae:dc:e6:af:48:a0:3b:bf:d2:5e:8c:d0:
  36:41:41
Cofactor: 1 (0x1)
This output can be readily compared and verified using the SECP256K1 specification shown earlier.
Note that there are different types of curves and they must be chosen carefully in order to ensure cryptographic security guarantees. There are also curves that have been standardized by NIST in the US and published in the FIPS 186 document.
You can find more about safe curves and their selection criteria at https://safecurves.cr.yp.to.
In the following section, two examples of using OpenSSL will be shown to help you understand the practical aspects of RSA and ECC.
RSA using OpenSSL
The following example illustrates how RSA public and private key pairs can be generated using the OpenSSL command line.
First, the RSA private key can be generated using OpenSSL as follows:
Private key
$ openssl genpkey -algorithm RSA -out privatekey.pem -pkeyopt rsa_keygen_bits:1024
...............................++++++
....................++++++
After executing the command, a file named privatekey.pem is produced, which contains the generated private key, as follows:
$ cat privatekey.pem
-----BEGIN PRIVATE KEY-----
MIICdgIBADANBgkqhkiG9w0BAQEFAASCAmAwggJcAgEAAoGBAKJOFBzPy2vOd6em Bk/UGrzDy7TvgDYnYxBfiEJId/r+EyMt/F14k2fDTOVwxXaXTxiQgD+BKuiey/69 9itnrqW/xy/pocDMvobj8QCngEntOdNoVSaN+t0f9nRM3iVM94mz3/C/v4vXvoac PyPkr/0jhIV0woCurXGTghgqIbHRAgMBAAECgYEAlB3s/N4lJh0l1TkOSYunWtzT 6isnNkR7g1WrY9H+rG9xx4kP5b1DyE3SvxBLJA6xgBle8JVQMzm3sKJrJPFZzzT5 NNNnugCxairxcF1mPzJAP3aqpcSjxKpTv4qgqYevwgW1A0R3xKQZzBKU+bTO2hXV D1oHxu75mDY3xCwqSAECQQDUYV04wNSEjEy9tYJ0zaryDAcvd/VG2/U/6qiQGajB eSpSqoEESigbusKku+wVtRYgWWEomL/X58t+K01eMMZZAkEAw6PUR9YLebsm/Sji iOShV4AKuFdi7t7DYWE5Ulb1uqP/i28zN/ytt4BXKIs/KcFykQGeAC6LDHZyycyc ntDIOQJAVqrE1/wYvV5jkqcXbYLgV5YA+KYDOb9Y/ZRM5UETVKCVXNanf5CjfW1h MMhfNxyGwvy2YVK0Nu8oY3xYPi+5QQJAUGcmORe4w6Cs12JUJ5p+zG0s+rG/URhw B7djTXm7p6b6wR1EWYAZDM9MArenj8uXAA1AGCcIsmiDqHfU7lgz0QJAe9mOdNGW 7qRppgmOE5nuEbxkDSQI7OqHYbOLuwfCjHzJBrSgqyi6pj9/9CbXJrZPgNDwdLEb GgpDKtZs9gLv3A==
-----END PRIVATE KEY-----
It is OK to reveal the private key here, because we are simply using it for our example. However, in production systems, safeguarding the private key is of utmost importance. Make sure that the private key is kept secret. Also, remember that the preceding key is just being used here as an example; do not reuse it.
Public key
As the private key is mathematically linked to the public key, it is also possible to generate or derive the public key from the private key. Using the example of the preceding private key, the public key can be generated as follows:
$ openssl rsa -pubout -in privatekey.pem -out publickey.pem

 writing RSA key
The public key can be viewed using a file reader or any text viewer:
$ cat publickey.pem
-----BEGIN PUBLIC KEY-----
MIGfMA0GCSqGSIb3DQEBAQUAA4GNADCBiQKBgQCiThQcz8trznenpgZP1Bq8w8u0 74A2J2MQX4hCSHf6/hMjLfxdeJNnw0zlcMV2l08YkIA/gSronsv+vfYrZ66lv8cv 6aHAzL6G4/EAp4BJ7TnTaFUmjfrdH/Z0TN4lTPeJs9/wv7+L176GnD8j5K/9I4SF dMKArq1xk4IYKiGx0QIDAQAB
-----END PUBLIC KEY-----
In order to see more details of the various components, such as the modulus, prime numbers that are used in the encryption process, or exponents and coefficients of the generated private key, the following command can be used (only part of the output is shown here as the actual output is very long):
$ openssl rsa -text -in privatekey.pem
Private-Key: (1024 bit)
modulus:
00:a2:4e:14:1c:cf:cb:6b:ce:77:a7:a6:06:4f:d4:
1a:bc:c3:cb:b4:ef:80:36:27:63:10:5f:88:42:48:
77:fa:fe:13:23:2d:fc:5d:78:93:67:c3:4c:e5:70:
c5:76:97:4f:18:90:80:3f:81:2a:e8:9e:cb:fe:bd:
f6:2b:67:ae:a5:bf:c7:2f:e9:a1:c0:cc:be:86:e3:
f1:00:a7:80:49:ed:39:d3:68:55:26:8d:fa:dd:1f:
f6:74:4c:de:25:4c:f7:89:b3:df:f0:bf:bf:8b:d7:
be:86:9c:3f:23:e4:af:fd:23:84:85:74:c2:80:ae:
ad:71:93:82:18:2a:21:b1:d1
publicExponent: 65537 (0x10001) privateExponent:
00:94:1d:ec:fc:de:25:26:1d:25:d5:39:0e:49:8b:
a7:5a:dc:d3:ea:2b:27:36:44:7b:83:55:ab:63:d1:
fe:ac:6f:71:c7:89:0f:e5:bd:43:c8:4d:d2:bf:10:
4b:24:0e:b1:80:19:5e:f0:95:50:33:39:b7:b0:a2:
6b:24:f1:59:cf:34:f9:34:d3:67:ba:00:b1:6a:2a:
f1:70:5d:66:3f:32:40:3f:76:aa:a5:c4:a3:c4:aa:
53:bf:8a:a0:a9:87:af:c2:05:b5:03:44:77:c4:a4:
19:cc:12:94:f9:b4:ce:da:15:d5:0f:5a:07:c6:ee:
f9:98:36:37:c4:2c:2a:48:01
prime1:
00:d4:61:5d:38:c0:d4:84:8c:4c:bd:b5:82:74:cd:
aa:f2:0c:07:2f:77:f5:46:db:f5:3f:ea:a8:90:19:
a8:c1:79:2a:52:aa:81:04:4a:28:1b:ba:c2:a4:bb:
ec:15:b5:16:20:59:61:28:98:bf:d7:e7:cb:7e:2b:
4d:5e:30:c6:59
prime2:
00:c3:a3:d4:47:d6:0b:79:bb:26:fd:28:e2:88:e4:
a1:57:80:0a:b8:57:62:ee:de:c3:61:61:39:52:56:
f5:ba:a3:ff:8b:6f:33:37:fc:ad:b7:80:57:28:8b:
3f:29:c1:72:91:01:9e:00:2e:8b:0c:76:72:c9:cc:
9c:9e:d0:c8:39
Exploring the public key
Similarly, the public key can be explored using the following commands. Public and private keys are base64-encoded:
$ openssl pkey -in publickey.pem -pubin -text
-----BEGIN PUBLIC KEY-----
MIGfMA0GCSqGSIb3DQEBAQUAA4GNADCBiQKBgQCiThQcz8trznenpgZP1Bq8w8u0 74A2J2MQX4hCSHf6/hMjLfxdeJNnw0zlcMV2l08YkIA/gSronsv+vfYrZ66lv8cv 6aHAzL6G4/EAp4BJ7TnTaFUmjfrdH/Z0TN4lTPeJs9/wv7+L176GnD8j5K/9I4SF dMKArq1xk4IYKiGx0QIDAQAB
-----END PUBLIC KEY-----
Public-Key: (1024 bit) Modulus:
00:a2:4e:14:1c:cf:cb:6b:ce:77:a7:a6:06:4f:d4:
1a:bc:c3:cb:b4:ef:80:36:27:63:10:5f:88:42:48:
77:fa:fe:13:23:2d:fc:5d:78:93:67:c3:4c:e5:70:
c5:76:97:4f:18:90:80:3f:81:2a:e8:9e:cb:fe:bd:
f6:2b:67:ae:a5:bf:c7:2f:e9:a1:c0:cc:be:86:e3:
f1:00:a7:80:49:ed:39:d3:68:55:26:8d:fa:dd:1f:
f6:74:4c:de:25:4c:f7:89:b3:df:f0:bf:bf:8b:d7:
be:86:9c:3f:23:e4:af:fd:23:84:85:74:c2:80:ae:
ad:71:93:82:18:2a:21:b1:d1
Exponent: 65537 (0x10001)
Now, the public key can be shared openly, and anyone who wants to send you a message can use the public key to encrypt the message and send it to you. You can then use the corresponding private key to decrypt the file.
Encryption and decryption using RSA
In this section, an example will be presented that demonstrates how encryption and decryption operations can be performed using RSA with OpenSSL.
Encryption
Taking the private key we generated in the previous example, the command to encrypt a text file message.txt can be constructed, as shown here:
$ echo datatoencrypt > message.txt

$ openssl rsautl -encrypt -inkey publickey.pem -pubin -in message.txt -out message.rsa
This will produce a file named message.rsa, which is in binary format. If you open message.rsa in the nano editor or any other text editor of your choice, it will show some scrambled data, as shown in the following screenshot:

Figure 4.9: message.rsa showing scrambled data
Decryption
In order to decrypt the RSA-encrypted file, the following command can be used:
$ openssl rsautl -decrypt -inkey privatekey.pem -in message.rsa -out message.dec
Now, if the file is read using cat, decrypted plaintext can be seen, as shown here:
$ cat message.dec
datatoencrypt
ECC using OpenSSL
OpenSSL provides a very rich library of functions to perform ECC. The following section shows how to use ECC functions in a practical manner in OpenSSL.
ECC private and public key pairs
In this section, first, an example will be presented that demonstrates the creation of a private key using the ECC functions available in the OpenSSL library.
Private key
ECC is based on domain parameters defined by various standards. You can see the list of all available standards defined and the recommended curves available in OpenSSL using the following command (once again, only part of the output is shown here, and it is truncated in the middle):
$ openssl ecparam -list_curves
secp112r1 : SECG/WTLS curve over a 112 bit prime field secp112r2 : SECG curve over a 112 bit prime field secp128r1 : SECG curve over a 128 bit prime field secp128r2 : SECG curve over a 128 bit prime field secp160k1 : SECG curve over a 160 bit prime field secp160r1 : SECG curve over a 160 bit prime field secp160r2 : SECG/WTLS curve over a 160 bit prime field secp192k1 : SECG curve over a 192 bit prime field secp224k1 : SECG curve over a 224 bit prime field secp224r1 : NIST/SECG curve over a 224 bit prime field secp256k1 : SECG curve over a 256 bit prime field secp384r1 : NIST/SECG curve over a 384 bit prime field secp521r1 : NIST/SECG curve over a 521 bit prime field
prime192v1: NIST/X9.62/SECG curve over a 192 bit prime field
.
.
.
.
brainpoolP384r1: RFC 5639 curve over a 384 bit prime field brainpoolP384t1: RFC 5639 curve over a 384 bit prime field brainpoolP512r1: RFC 5639 curve over a 512 bit prime field brainpoolP512t1: RFC 5639 curve over a 512 bit prime field
In the following example, SECP256k1 is used to demonstrate ECC usage.
Private key generation
In this section, a private key based on SECP256k1 will be generated using the OpenSSL command-line tool.
$ openssl ecparam -name secp256k1 -genkey -noout -out ec-privatekey.pem
This command will produce a file named ec-privatekey.pem, which we can view using the command shown here:
$ cat ec-privatekey.pem
-----BEGIN EC PRIVATE KEY-----
MHQCAQEEIJHUIm9NZAgfpUrSxUk/iINq1ghM/ewn/RLNreuR52h/oAcGBSuBBAAK oUQDQgAE0G33mCZ4PKbg5EtwQjk6ucv9Qc9DTr8JdcGXYGxHdzr0Jt1NInaYE0GG ChFMT5pK+wfvSLkYl5ul0oczwWKjng==
-----END EC PRIVATE KEY-----
The file named ec-privatekey.pem now contains the elliptic curve private key that is generated based on the SECP256K1 curve. In order to generate a public key from a private key, issue the following command:
$ openssl ec -in ec-privatekey.pem -pubout -out ec-pubkey.pem

read EC key
writing EC key
Reading the file produces the following output, displaying the generated public key:
$ cat ec-pubkey.pem
-----BEGIN PUBLIC KEY----- MFYwEAYHKoZIzj0CAQYFK4EEAAoDQgAE0G33mCZ4PKbg5EtwQjk6ucv9Qc9DTr8J
dcGXYGxHdzr0Jt1NInaYE0GGChFMT5pK+wfvSLkYl5ul0oczwWKjng==
-----END PUBLIC KEY-----
Now, the ec-pubkey.pem file contains the public key derived from ec-privatekey.pem. The private key can be further explored using the following command:
$ openssl ec -in ec-privatekey.pem -text -noout
read EC key
Private-Key: (256 bit) priv:
00:91:d4:22:6f:4d:64:08:1f:a5:4a:d2:c5:49:3f:
88:83:6a:d6:08:4c:fd:ec:27:fd:12:cd:ad:eb:91: e7:68:7f
pub:

04:d0:6d:f7:98:26:78:3c:a6:e0:e4:4b:70:42:39:
3a:b9:cb:fd:41:cf:43:4e:bf:09:75:c1:97:60:6c:
47:77:3a:f4:26:dd:4d:22:76:98:13:41:86:0a:11:
4c:4f:9a:4a:fb:07:ef:48:b9:18:97:9b:a5:d2:87:
33:c1:62:a3:9e
ASN1 OID: secp256k1
Similarly, the public key can be further explored with the following command:
$ openssl ec -in ec-pubkey.pem -pubin - text -noout
read EC key
Private-Key: (256 bit) pub:
04:d0:6d:f7:98:26:78:3c:a6:e0:e4:4b:70:42:39:
3a:b9:cb:fd:41:cf:43:4e:bf:09:75:c1:97:60:6c:
47:77:3a:f4:26:dd:4d:22:76:98:13:41:86:0a:11:
4c:4f:9a:4a:fb:07:ef:48:b9:18:97:9b:a5:d2:87:
33:c1:62:a3:9e
ASN1 OID: secp256k1
It is also possible to generate a file with the required parameters—in this case, SECP256K1—and then explore it further to understand the underlying parameters:
$ openssl ecparam -name secp256k1 -out secp256k1.pem
$ cat secp256k1.pem
-----BEGIN EC PARAMETERS-----
BgUrgQQACg==
-----END EC PARAMETERS-----
The file now contains all the SECP256K1 parameters, and it can be analyzed using the following command:
$ openssl ecparam -in secp256k1.pem -text -param_enc explicit -noout
This command will produce output similar to the one shown here:
Field Type: prime-field Prime:
00:ff:ff:ff:ff:ff:ff:ff:ff:ff:ff:ff:ff:ff:ff:
ff:ff:ff:ff:ff:ff:ff:ff:ff:ff:ff:ff:ff:fe:ff: ff:fc:2f
A: 0
B: 7 (0x7)
Generator (uncompressed): 04:79:be:66:7e:f9:dc:bb:ac:55:a0:62:95:ce:87:
0b:07:02:9b:fc:db:2d:ce:28:d9:59:f2:81:5b:16:
f8:17:98:48:3a:da:77:26:a3:c4:65:5d:a4:fb:fc:
0e:11:08:a8:fd:17:b4:48:a6:85:54:19:9c:47:d0:
8f:fb:10:d4:b8 Order:
00:ff:ff:ff:ff:ff:ff:ff:ff:ff:ff:ff:ff:ff:ff:
ff:fe:ba:ae:dc:e6:af:48:a0:3b:bf:d2:5e:8c:d0:
36:41:41
Cofactor: 1 (0x1)
The preceding example shows the prime number used and the values of A and B, along with the generator, order, and cofactor of the SECP256K1 curve domain parameters.
With the preceding example, our introduction to public key cryptography from an encryption and decryption perspective is complete.
Another application of hash functions is in digital signatures, where they can be used in combination with asymmetric cryptography. This concept will be explored in detail in the following section.
Digital signatures
Digital signatures provide a means of associating a message with an entity from which the message has originated. Digital signatures are used to provide data origin authentication and non-repudiation.
Digital signatures are used in blockchains, where transactions are digitally signed by senders using their private key, before the sender broadcasts the transaction to the network. This digital signing proves that the sender is the rightful owner of the asset; for example, bitcoins. These transactions are verified again by other nodes on the network to ensure that the funds indeed belong to the node (user) who claims to be the owner. We will discuss these concepts in more detail in the chapters dedicated to Bitcoin and Ethereum in this book.
Digital signatures are calculated in two steps. As an example, the high-level steps of the RSA digital signature scheme are as follows.
RSA digital signature algorithms
RSA-based digital signature algorithms are calculated using the two steps listed here. Fundamentally, the idea is to first compute the hash of the data and then sign it with the private key:
- Calculate the hash value of the data packet. This will provide the data integrity guarantee, as the hash can be computed at the receiver's end again and matched with the original hash to check whether the data has been modified in transit. Technically, message signing can work without hashing the data first, but that is not considered secure.
- Sign the hash value with the signer's private key. As only the signer has the private key, the authenticity of the signature and the signed data is ensured.
Digital signatures have some important properties, such as authenticity, unforgeability, and non-reusability:
- Authenticity means that the digital signatures are verifiable by a receiving party.
- The unforgeability property ensures that only the sender of the message can use the signing functionality using the private key. Digital signatures must provide protection against forgery. Forgery means an adversary fabricating a valid signature for a message without any access to the legitimate signer's private key. In other words, unforgeability means that no one else can produce the signed message produced by a legitimate sender. This is also called the property of non-repudiation.
- Non-reusability means that the digital signature cannot be separated from a message and used again for another message. In other words, the digital signature is firmly bound to the corresponding message and cannot be simply cut from its original message and attached to another.
The operation of a generic digital signature function is shown in the following diagram:

Figure 4.10: Digital signing (left) and verification process (right) (example of RSA digital signatures)
If a sender wants to send an authenticated message to a receiver, there are two methods that can be used: sign then encrypt and encrypt then sign. These two approaches of using digital signatures with encryption are as follows.
Sign then encrypt
With this approach, the sender digitally signs the data using the private key, appends the signature to the data, and then encrypts the data and the digital signature using the receiver's public key. This is considered a more secure scheme compared to the encrypt then sign scheme described next.
Encrypt then sign
With this method, the sender encrypts the data using the receiver's public key and then digitally signs the encrypted data.
In practice, a digital certificate that contains the digital signature is issued by a Certificate Authority (CA) that associates a public key with an identity.
Various schemes, such as RSA-, DSA-, and ECDSA-based digital signature schemes, are used in practice. RSA is the most commonly used; however, with the traction of ECC, ECDSA-based schemes are also becoming quite popular. This is beneficial in blockchains because ECC provides the same level of security that RSA does, but it uses less space. Also, the generation of keys is much faster in ECC compared to RSA, so it helps with the overall performance of the system. The following table shows that ECC is able to provide the same level of cryptographic strength as an RSA-based system with smaller key sizes:
|
RSA key size (bits) |
Elliptic curve key size (bits) |
|
1,024 |
160 |
|
2,048 |
224 |
|
3,072 |
256 |
|
7,680 |
384 |
|
15,360 |
521 |
Now that we understand how the RSA digital signature scheme works, in the next section, we'll introduce ECDSA, which is another popular digital signature scheme.
The elliptic curve digital signature algorithm
ECDSA is a DSA based on elliptic curves. The DSA is a standard for digital signatures. It is based on modular exponentiation and the discrete logarithm problem. It is used on the Bitcoin and Ethereum blockchain platforms to validate messages and provide data integrity services. Now, we'll describe how ECDSA works.
In order to sign and verify using the ECDSA scheme, the first key pair needs to be generated:
- First, define an elliptic curve E with the following:
- Modulus P
- Coefficients a and b
- Generator point A that forms a cyclic group of prime order q
- An integer d is chosen randomly so that 0 < d < q.
- Calculate public key B so that B = d A.
- The public key is a sextuple in the form shown here:
Kpb = (p,a,b,q,A,B)
- The private key is a randomly chosen integer d in step 2:
Kpr = d
Now, the signature can be generated using the private and public key.
- The public key is a sextuple in the form shown here:
- An ephemeral key Ke is chosen, where 0 < Ke < q. It should be ensured that Ke is truly random and that no two signatures have the same key; otherwise, the private key can be calculated.
- Another value R is calculated using R = Ke A; that is, by multiplying A (the generator point) and the random ephemeral key.
- Initialize a variable r with the x coordinate value of point R so that r = xR.
- The signature can be calculated as follows:

Here, m is the message for which the signature is being computed, and h(m) is the hash of the message m.
- Signature verification is carried out by following this process:
- Auxiliary value w is calculated as w = s-1mod q
- Auxiliary value u1 = w. h(m) mod q
- Auxiliary value u2 = w. r mod q
- Calculate point P, P = u1A + u2B
- Verification is carried out as follows:
- r, s is accepted as a valid signature if the x-coordinate of point P calculated in Step 4 has the same value as the signature parameter r mod q; that is:
Xp = r mod q means valid signature
Xp != r mod q means invalid signature
Various practical examples will now be shown that demonstrate how the RSA digital signature can be generated, used, and verified using OpenSSL.
How to generate a digital signature using OpenSSL
The first step is to generate a hash of the message file:
$ openssl dgst -sha256 message.txt
SHA256(message.txt)=
eb96d1f89812bf4967d9fb4ead128c3b787272b7be21dd2529278db1128d559c
Both hash generation and signing can be done in a single step, as shown here. Note that privatekey.pem was generated in the steps provided previously:
$ openssl dgst -sha256 -sign privatekey.pem -out signature.bin message.txt
Now, let's display the directory showing the relevant files:
$ cat signature.bin
In order to verify the signature, the following operation can be performed:
$ openssl dgst -sha256 -verify publickey.pem -signature signature.bin  message.txt
Verified OK
Similarly, if some other signature file that is not valid is used, the verification will fail, as shown here:
$ openssl dgst -sha256 -verify publickey.pem –signature someothersignature.bin message.txt
Verification Failure
Next, an example will be presented that shows how OpenSSL can be used to perform ECDSA-related operations.
ECDSA using OpenSSL
First, the private key is generated using the following commands:
$ openssl ecparam -genkey -name secp256k1 -noout -out eccprivatekey.pem
$ cat eccprivatekey.pem
-----BEGIN EC PRIVATE KEY-----
MHQCAQEEIMVmyrnEDOs7SYxS/AbXoIwqZqJ+gND9Z2/nQyzcpaPBoAcGBSuBBAAK oUQDQgAEEKKS4E4+TATIeBX8o2J6PxKkjcoWrXPwNRo/k4Y/CZA4pXvlyTgH5LYm QbU0qUtPM7dAEzOsaoXmetqB+6cM+Q==
-----END EC PRIVATE KEY-----
Next, the public key is generated from the private key:
$ openssl ec -in eccprivatekey.pem -pubout -out eccpublickey.pem
read EC key
writing EC key
$ cat eccpublickey.pem
-----BEGIN PUBLIC KEY----- MFYwEAYHKoZIzj0CAQYFK4EEAAoDQgAEEKKS4E4+TATIeBX8o2J6PxKkjcoWrXPw
NRo/k4Y/CZA4pXvlyTgH5LYmQbU0qUtPM7dAEzOsaoXmetqB+6cM+Q==
-----END PUBLIC KEY-----
Now, suppose a file named testsign.txt needs to be signed and verified. This can be achieved as follows:
- Create a test file:
$ echo testing > testsign.txt $ cat testsign.txt testing - Run the following command to generate a signature using a private key for the
testsign.txtfile:$ openssl dgst -ecdsa-with-SHA1 -sign eccprivatekey.pem testsign.txt > ecsign.bin - Finally, the command for verification can be run, as shown here:
$ openssl dgst -ecdsa-with-SHA1 -verify eccpublickey.pem -signature ecsign.bin testsign.txt
Verified OK
A certificate can also be produced by using the private key generated earlier by using the command shown here:
$ openssl req -new -key eccprivatekey.pem -x509 -nodes -days 365 - out ecccertificate.pem
This command will produce an output similar to the one shown here. Enter the appropriate parameters to generate the certificate:
You are about to be asked to enter information that will be incorporated into your certificate request.
What you are about to enter is what is called a Distinguished Name or a DN. There are quite a few fields but you can leave some blank
For some fields there will be a default value, If you enter '.', the field will be left blank.
-----
Country Name (2 letter code) [AU]:GB
State or Province Name (full name) [Some-State]:Cambridge Locality Name (eg, city) []:Cambridge
Organization Name (eg, company) [Internet Widgits Pty Ltd]:Dr.Equinox! Organizational Unit Name (eg, section) []:NA
Common Name (e.g. server FQDN or YOUR name) []:drequinox Email Address []:[email protected]
The certificate can be explored using the following command:
$ openssl x509 -in ecccertificate.pem -text –noout

Figure 4.11: An X509 certificate that uses the ECDSA algorithm with SHA-256
In this section, we covered digital signature schemes and some practical examples. Next, we'll present some more advanced cryptography topics.
Cryptographic constructs and blockchain technology
Now, we'll present some advanced topics in cryptography that not only are important on their own, but are also relevant to blockchain technology due to their various applications in this space.
Homomorphic encryption
Usually, public key cryptosystems, such as RSA, are multiplicative homomorphic or additive homomorphic, such as the Paillier cryptosystem, and are called partially homomorphic systems. Additive Partially Homomorphic Encryptions (PHEs) are suitable for e-voting and banking applications.
Until recently, there has been no system that supported both operations, but in 2009, a fully homomorphic system was discovered by Craig Gentry. As these schemes enable the processing of encrypted data without the need for decryption, they have many different potential applications, especially in scenarios where maintaining privacy is required, but data is also mandated to be processed by potentially untrusted parties, for example, cloud computing and online search engines.
Recent development in homomorphic encryption have been very promising, and researchers are actively working to make it efficient and more practical. This is of particular interest in blockchain technology, as described later in this book, as it can solve the problem of confidentiality and privacy in the blockchain.
Signcryption
Signcryption is a public key cryptography primitive that provides all of the functions of a digital signature and encryption. Yuliang Zheng invented signcryption, and it is now an ISO standard, ISO/IEC 29150:2011. Traditionally, sign then encrypt or encrypt then sign schemes are used to provide unforgeability, authentication, and non-repudiation, but with signcryption, all the services of digital signatures and encryption such as confidentiality are provided at a cost that is less than that of the sign then encrypt scheme.
Signcryption enables Cost (signature & encryption) << Cost (signature) + Cost (Encryption) in a single logical step. This means that the cost of applying a digital signature and encrypting a message in the same logical step is lower, compared to a scheme where a message is first signed and then encrypted in two independent steps. This property makes signcryption an efficient scheme.
Secret sharing
Secret sharing is the mechanism of distributing a secret among a set of entities. All entities within a set get a unique part of the secret after it is split into multiple parts. The secret can be reconstructed by combining all or some parts (a certain number or threshold) of the secret. The individual secret shares/parts, on their own, do not reveal anything about the secret.
This concept can be visualized through the following diagram:

Figure 4.12: Secret sharing scheme
Commitment schemes
Commitment schemes are usually described as a digital cryptographic equivalent of a sealed envelope. A commitment itself does not reveal any information about the actual value inside it. This scheme runs in two phases, namely:
- Commit phase
- Open phase
The commit phase provides two security features; that is, hiding and binding:
- The hiding property is required to ensure that the recipient party cannot find any information or reveal the committed value before the open phase.
- The binding property ensures that once the sender has committed to a value, that value or message cannot be changed.
The open phase (also called the unveil phase) is where the receiver receives some additional information from the sender. This allows the receiver to establish the value hidden (concealed) by the commitment with a proof that the sender has not modified the value after the commitment, that is, that the sender has not deceived during the commit phase.
Commitment schemes are used for building zero-knowledge protocols and range proof protocols. The key idea behind commitment schemes is that they allow someone to secretly commit to a value with the ability to reveal it later. These schemes prevent parties from changing their committed value later, after they've committed to a value.
A prime example of a commitment scheme is the Pedersen commitment scheme.
The original paper on the Pedersen commitment scheme is available here:
https://link.springer.com/content/pdf/10.1007/3-540-46766-1_9.pdf.
Pedersen, T.P., 1991, August. Non-interactive and information-theoretic secure verifiable secret sharing. In Annual international cryptology conference (pp. 129-140). Springer, Berlin, Heidelberg.
In the next section, we'll introduce zero-knowledge proofs, which is an exciting subject and a very ripe area for research. Already, various major blockchains and cryptocurrencies makes use of zero-knowledge proofs to provide privacy. A prime example is Zcash (https://z.cash).
Zero-knowledge proofs
Zero-Knowledge Proofs (ZKPs) were introduced by Goldwasser, Micali, and Rackoff in 1985. These proofs are used to prove the validity of an assertion without revealing any information whatsoever about the assertion. There are three properties of ZKPs that are required: completeness, soundness, and the zero-knowledge property.
Completeness ensures that if a certain assertion is true, then the verifier will be convinced of this claim by the prover.
The soundness property makes sure that if an assertion is false, then no dishonest prover can convince the verifier otherwise.
The zero-knowledge property, as the name implies, is the key property of ZKPs, whereby it is ensured that absolutely nothing is revealed about the assertion except whether it is true or false.
Zero-knowledge proofs are probabilistic instead of deterministic. The probabilistic nature of ZKPs is because these protocols require several rounds to achieve a higher level of assurance gradually, with each round, which allows the verifier to accept that the prover indeed knows the secret.
In literature, usually, an analogy known as "Ali Baba's Cave" is used to explain zero-knowledge proofs.
This analogy was first introduced by Jean-Jacques Quisquater et al. in their paper, which is available at:
https://link.springer.com/content/pdf/10.1007/0-387-34805-0_60.pdf
Quisquater, J.J., Quisquater, M., Quisquater, M., Quisquater, M., Guillou, L., Guillou, M.A., Guillou, G., Guillou, A., Guillou, G. and Guillou, S., 1989, August. How to explain zero-knowledge protocols to your children. In Conference on the Theory and Application of Cryptology (pp. 628-631). Springer, New York, NY.
The following diagram shows a variant of this analogy of how the zero-knowledge protocol works. It shows two characters called Peggy and Victor whose roles are Prover and Verifier, respectively. Peggy knows a secret magic word to open the door in a cave, which is shaped like a ring. It has a split entrance and has a magic door in the middle of the ring that blocks the other side. We have also labeled the left and right entrances as A and B. Victor wants to know the secret, but Peggy does not want to reveal it. However, she would like to prove to Victor that she does know the secret:

Figure 4.13: Analogy of the zero-knowledge mechanism
Now, there are several steps that are taken by both Peggy and Victor to reach a conclusion regarding whether Peggy knows the secret or not:
- First, Victor waits outside the main cave entrance and Peggy goes in the cave.
- Peggy randomly chooses either the A or B entrance to the cave.
- Now, Victor enters the cave and shouts either A or B randomly, asking Peggy to come out of the exit he named.
- Victor records which exit Peggy comes out from.
Now, suppose Victor asked Peggy to come out from exit A and she came out from exit B. Victor then knows that Peggy does not know the secret. If Peggy comes out of exit A, then there is a 50% chance that she does know the secret, but this also means that she may have got lucky and chose A to enter in the first place, and now has just returned without needing to go through the magic door at all. Now, if this routine is performed several times, and given that Victor is choosing A or B at random, with each run (round) of this routine (protocol), the chances of Peggy getting lucky diminish. If Peggy repeatedly manages to emerge from the entrance that Victor has named, then it is highly probable that Peggy does know the secret to open the magic door.
Remember, we said earlier that zero-knowledge protocols are probabilistic. Peggy and Victor repeatedly performing this routine proves knowledge of the secret with high probability, as the probability of guessing or getting lucky reduces to the point of being negligible after n number of rounds.
Note that during this process, Peggy has not revealed the secret at all, but still managed to convince Victor with high probability that she does know the secret.
A ZKP comprises the following phases:
- Witness phase: In this phase, the prover sends proof of the statement and sends it to the verifier.
- Challenge phase: In this phase, the verifier chooses a question (challenge) and sends it to the prover.
- Response phase: In this phase, the prover generates an answer and sends it as a response to the verifier. The verifier then checks the answer to ascertain whether the prover really knows the statement.
This scheme can also be visualized using the following diagram, which shows how the zero-knowledge protocol generally works and what steps the prover and verifier take in order to successfully run the protocol:

Figure 4.14: A zero-knowledge proof scheme
Even though zero-knowledge is not a new concept, these protocols have sparked a special interest among researchers in the blockchain space due to their privacy properties, which are very much desirable in finance and many other fields, including law and medicine. A prime example of the successful implementation of a zero-knowledge proof mechanism is the Zcash cryptocurrency. In Zcash, the zero-knowledge Succinct Non-interactive ARgument of Knowledge (zk-SNARK) is implemented to provide anonymity and confidentiality.
Applications of ZKP include proof of ownership, that is, proof that the prover is the owner of some secret or a private key without revealing the nature of it. ZKPs can also be used to prove that the prover is a member of some organization or group, without revealing their identity. Another use case could be proof of age, where the prover proves that they are, for example, older than 25 years, but do not want to reveal their exact age. Another application could be where citizens can pay taxes without revealing their income.
Zero-knowledge protocols are usually interactive as they require repeated interactions between the prover and the verifier, but there are protocols that do not require any interaction between a prover and a verifier. These type of ZKPs are called non-interactive types of proofs. A prominent example is the zk-SNARK. Before the introduction of zk-SNARKs, ZKPs were considered not very practical because of the complexity that arises from the requirements of repeated interaction between the prover and the verifier and a large proof size.
zk-SNARKs
The zk-SNARK is a variant of ZKPs that is more efficient and simpler to use and implement.
There has been some influential work published on non-interactive zero-knowledge proofs over the years. The most prominent of these, and the one that proposed the first universal design, is provided by the paper by Eli Ben-Sasson et al., which is available at:
https://www.usenix.org/system/files/conference/usenixsecurity14/sec14-paper-ben-sasson.pdf
Ben-Sasson, E., Chiesa, A., Tromer, E. and Virza, M., 2014. Succinct non-interactive zero knowledge for a von Neumann architecture. In 23rd {USENIX} Security Symposium ({USENIX} Security 14) (pp. 781-796).
Other previous notable works that contributed to the development of zk-SNARKs include:
Gennaro, R., Gentry, C., Parno, B. and Raykova, M., 2013, May. Quadratic span programs and succinct NIZKs without PCPs. In Annual International Conference on the Theory and Applications of Cryptographic Techniques (pp. 626-645). Springer, Berlin, Heidelberg.
https://link.springer.com/content/pdf/10.1007/978-3-642-38348-9_37.pdf
and:
Groth, J. and Sahai, A., 2008, April. Efficient non-interactive proof systems for bilinear groups. In Annual International Conference on the Theory and Applications of Cryptographic Techniques (pp. 415-432). Springer, Berlin, Heidelberg.
https://link.springer.com/content/pdf/10.1007/978-3-540-78967-3_24.pdf
Zk-SNARKs have several properties, which are described here:
- Zero knowledge (zk): This property allows a prover to convince a verifier that an assertion (statement) is true without revealing any information about it.
A statement in this context is any computer program that terminates and does not take too long to run, that is, not too many cycles.
- Succinct (S): This property allows for a small proof that is very quick to verify and is succinct.
- Non-interactive (N): This property allows the prover to prove a statement without any interaction with the verifier.
- ARguments of Knowledge (ARKs): These are the arguments to convince the verifier that the prover's assertion is true. Remember that we discussed soundness and completeness earlier. In the case of ARKs, the prover has a computational soundness property, meaning that the prover is computationally bounded, and it is computationally infeasible for it to cheat the verifier.
Zk-SNARKs have been implemented in different blockchains. The most prominent example is Zcash, which uses it for its shielded transactions feature to provide confidentiality and anonymity. Support for cryptographic primitives required for zk-SNARKs has also been introduced in the Ethereum blockchain with the Byzantium release.
Zk-SNARK proofs are generated by following a number of different steps. Generating SNARKs for a program (statement) is not a simple process as it requires the program to be converted into a circuit with a very specific format. This specific form is called the Quadratic Arithmetic Program (QAP). The process of proof generation is as follows:

Figure 4.15: zk-SNARK construction
- Arithmetic circuit: The first step in zk-SNARK construction is to convert a logical step of a computation into the smallest possible units comprised of basic arithmetic operations. Arithmetic operations include addition, subtraction, multiplication, and division. In the arithmetic circuit, the computation is presented as wires and gates, representing the flow of inputs and arithmetic operation performed on the inputs.
- R1CS: R1CS is the abbreviation of Rank 1 Constraint System (R1CS). Basically, this system is a set of constraints that allows all the steps in the arithmetic circuit to be verified, and also confirms that, at the end of the process, the output is as expected.
- QAP: The prover makes use of QAPs to construct proof for the statement. In R1CS, the verifier has to check many different constraints, but with a QAP representation of the circuit, all the different constraints can be bundled into only a single constraint. Finally, QAP is used in the zk-SNARK protocol to prove the assertion through the prover and verifier.
Zk-SNARKs are not a silver bullet to privacy problems. Instead, like many other technologies, there are pros and cons.
The biggest criticism of zk-SNARKs is the initial trusted setup. This trusted setup can be influenced and compromised. However, if done correctly, it does work, but there is, however, always a chance that the initial setup was compromised and no one will ever be able to find out. This is the issue that has been addressed in zk-STARKs.
zk-STARKs
Zero-knowledge Scalable Transparent ARguments of Knowledge (zk-STARKs) are a new type of ZKP that has addressed several limitations in zk-SNARKs.
This scheme was designed by Eli-Ben Sasson et al.
The original paper on the subject is available here:
https://eprint.iacr.org/2018/046.pdf
Ben-Sasson, E., Bentov, I., Horesh, Y. and Riabzev, M., 2018. Scalable, transparent, and post-quantum secure computational integrity. IACR Cryptology ePrint Archive, 2018, p.46.
The key differences between the zk-STARK and zk-SNARK schemes are listed in the following table:
|
Properties |
zk-SNARKs |
zk-STARKs |
|
Scalability |
Less scalable. |
More scalable. |
|
Initial trusted setup |
Required. |
Not required, has a publicly verifiable mechanism. |
|
Post-quantum resistant |
Not resistant to attacks from quantum computers. |
Yes, resistant to attacks from quantum computers. |
|
Construction techniques |
Zk-SNARKs rely on elliptic curves and pairings. |
Zk-STARKs are based on hash functions and concepts from information theory. |
What is "post-quantum resistant"?
Quantum computing is a concept that uses quantum mechanics to solve problems that take an extremely long time to solve on conventional computers. When large-scale quantum computers are built they can easily compromise the security of most existing cryptosystems. Post-quantum resistance refers to the idea of building cryptographic algorithms that are resistant to attacks by powerful quantum computers.
Further discussion on this topic is not in the scope of this book, and more information on the subject can be found at the following Wikipedia page:
https://en.wikipedia.org/wiki/Quantum_computing#Cryptography
Even though this scheme is more efficient, post-quantum resistant, scalable, and transparent, the biggest limitation is its size of proof, which is a few hundred kilobytes compared to zk-SNARKs' 288 bytes. This is seen as a problem in public blockchains where large proofs may pose a problem to scalability and performance.
Zero-knowledge range proofs—ZKRPs
ZKRPs are used to prove that a number is between a certain range. This can be useful when, for example, someone does not want to reveal their salary but is willing to only reveal the range between which their salary lies. Range proofs can also be used for age checks without requiring the prover to reveal their exact age.
In this section, we have covered the very interesting topic of ZKPs and their relevant techniques and developments. ZKPs is a very active area of research, especially in the context of blockchains, where this technology can provide much needed privacy and confidentiality services on public blockchain networks. Next, we'll introduce different types of digital signatures.
Different types of digital signatures
We previously covered digital signatures, but that was an introduction to standard digital signatures. Now, we'll provide an overview of different types of digital signatures and their relevance and applications in blockchain technology.
Blind signatures
Blind signatures were introduced by David Chaum in 1982. They are based on public key digital signature schemes, such as RSA. The key idea behind blind signatures is to get the message signed by the signer, without actually revealing the message. This is achieved by disguising or blinding the message before signing it, hence the name blind signatures.
This blind signature can then be verified against the original message, just like a normal digital signature. Blind signatures were introduced as a mechanism to allow the development of digital cash schemes. Specifically, a blind signature can provide unlinkability and anonymity services in a distributed system, such as a blockchain.
The original paper from David Chaum on blind signatures is available at http://blog.koehntopp.de/uploads/Chaum.BlindSigForPayment.1982.PDF.
Chaum, David. "Blind signatures for untraceable payments." In Advances in cryptology, pp. 199-203. Springer, Boston, MA, 1983.
The blind signature scheme is also used in building Blindcoin, which is used in the Mixcoin protocol for Bitcoin to hide user addresses from the mixing service. Mixcoin protocol allows anonymous payments in the Bitcoin network, but the user addresses are still visible to the mixing service. Blindcoin is a protocol that addresses this limitation.
More information on this scheme is available in the following paper:
Valenta, L. and Rowan, B., 2015, January. Blindcoin: Blinded, accountable mixes for bitcoin. In International Conference on Financial Cryptography and Data Security (pp. 112-126). Springer, Berlin, Heidelberg.
Multisignatures
In this scheme, a group of entities signs a single message. In other words, multiple unique keys held by their respective owners are used to sign a single message. This scheme was introduced in 1983 by Itakura et al. in their paper A Public-key Cryptosystem Suitable for Digital Multisignatures, vol. 71, Nec Research & Development (1983), pp. 474-480. Multisignatures are also sometimes called multiparty signatures in literature.
In blockchain implementations, multisignatures provide the ability to allow transactions to be signed by multiple users, which results in increased security. This is also called multi-sig and has been implemented in Bitcoin. These schemes can be used in such a way that the requirement of a number of signatures can be set in order to authorize transactions. For example, a 1-of-2 multisignature can represent a joint account where either one of the joint account holders is required to authorize a transaction by signing it. As another variation, for example, a 2-of-2 multisignature can be used in a scenario where both joint account holders' signatures are required to sign the transaction. This concept is also generalized as m of n signatures, where m is the minimum number of required signatures and n is the total number of signatures. This concept can be visualized with the following diagram:

Figure 4.16: Multi signature scheme
The preceding diagram shows the signing process on the left-hand side, where m is the number of different users, and holding m unique signatures signs a single transaction. When the validator or verifier receives it, all the signatures in it need to be individually verified.
The Openchain and Multichain blockchains make use of multisignature schemes.
More information on Openchain is available at https://docs.openchain.org/en/latest/general/overview.html.
More information regarding Multichain's multisignature scheme is available at:
https://www.multichain.com/developers/multisignature-transactions/.
Threshold signatures
This scheme does not rely on users to sign the message with their own unique keys; instead, it requires only one public key and one private key, and results in only one digital signature. In multisignature, the resultant message contains digital signatures from all signers and requires verification individually by the verification party, but in threshold signatures, the verifier has to verify only one digital signature. The key idea in the scheme is to split the private key into multiple parts, and each signer keeps their own share of the private key. The signing process requires each user to use their respective share of the private key to sign the message. The communication between signers is governed by a specific communication protocol. In contrast with multisignatures, the threshold signatures result in a smaller transaction and are quicker to verify. A disadvantage, however, is that in order for threshold signatures to work, all signers must remain online, whereas in multisignatures, the signature can be provided asynchronously; that is, users can provide signatures whenever they are available. From another angle, there could be a scenario in multisignatures where a user can withhold their signature maliciously, which could be disadvantageous. Threshold signatures can also be used to provide anonymity services in a blockchain network:
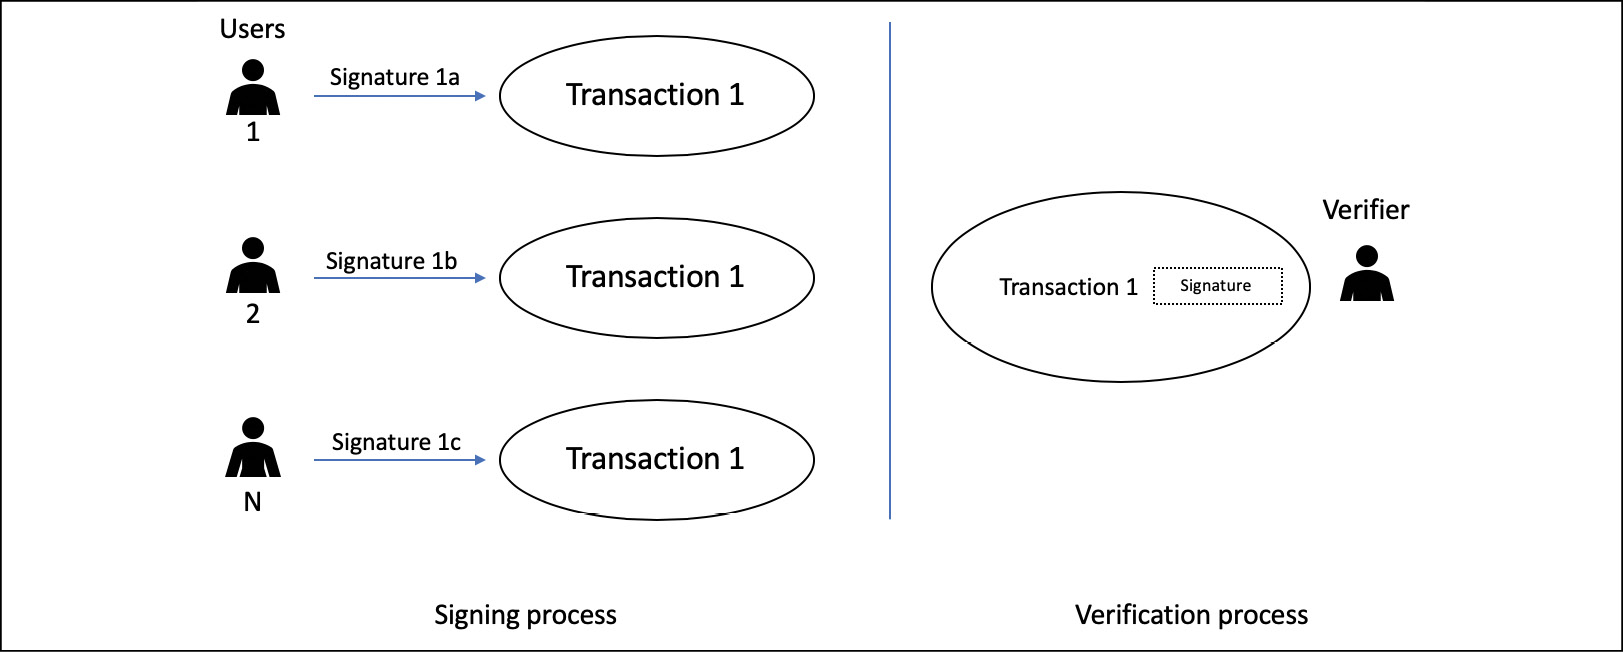
Figure 4.17: Threshold signature scheme
The preceding diagram shows the signing process on the left-hand side, where m number of different users, holding different parts (shares) of a digital signature, sign a single transaction. When the validator or verifier receives it, only one signature needs to be verified.
Aggregate signatures
Aggregate signatures are used to reduce the size of digital signatures. This scheme is particularly useful in scenarios where multiple digital signatures are in use. The core idea is to aggregate multiple signatures into a single signature, without increasing the size of the signature of a single message. It is simply a type of digital signature that supports aggregation. The small aggregate signature is enough to provide verification to the verifier that all users did sign their original messages. Aggregate signatures are commonly used to reduce the size of messages in network and security protocols. For example, the size of digital certificate chains in Public Key Infrastructure (PKI) can be reduced significantly by compressing all signatures in the chain into a single signature. Boneh–Lynn–Shacham (BLS) aggregate signatures is a popular example of the aggregate signature. BLS has also been used in various blockchains, and especially in Ethereum 2.0.
More information regarding aggregate BLS signatures is available in the paper here: https://crypto.stanford.edu/~dabo/papers/aggreg.pdf.
Boneh, D., Gentry, C., Lynn, B. and Shacham, H., Aggregate and Verifiably Encrypted Signatures from Bilinear Maps.
More information on BLS and specifically its usage in blockchains to reduce the size of the blockchain is available in an excellent paper here: https://eprint.iacr.org/2018/483.pdf.
Boneh, D., Drijvers, M. and Neven, G., 2018, December. Compact multi-signatures for smaller blockchains. In International Conference on the Theory and Application of Cryptology and Information Security (pp. 435-464). Springer, Cham.
Ring signatures
Ring signatures were introduced in 2001 by Ron Rivest, Adi Shamir, and Yael Tauman.
The original paper is available at:
https://link.springer.com/content/pdf/10.1007/3-540-45682-1_32.pdf
Rivest, R.L., Shamir, A. and Tauman, Y., 2001, December. How to leak a secret. In International Conference on the Theory and Application of Cryptology and Information Security (pp. 552-565). Springer, Berlin, Heidelberg.
Ring signature schemes allow a mechanism where any member of a group of signers can sign a message on behalf of the entire group. The key requirement here is that the identity of the actual signer who signed the message must remain unknown (computationally infeasible to determine) to an outside observer. It looks equally likely that anyone of the trusted group of signers could have signed the message, but it is not possible to figure out who actually signed the message. Each member of the ring group keeps a public key and a private key. Ring signatures can be used to provide anonymity services. This scheme is used in CryptoNote and Monero.
In this section, we covered different types of digital signatures, their operation, and their relevance to blockchains. In the next section, we will introduce encoding schemes and some relevant examples.
Encoding schemes
Other than cryptographic primitives, binary-to-text encoding schemes are also used in various scenarios. The most common use is to convert binary data into text so that it can either be processed, saved, or transmitted via a protocol that does not support the processing of binary data. For example, images can be stored in a database encoded in base64, which allows a text field to be able to store a picture. Another encoding, named base58, was popularized by its use in Bitcoin and is addressed in detail in Chapter 6, Introducing Bitcoin.
Base64
The base64 encoding scheme is used to encode binary data into printable characters.
We can do a quick experiment using the OpenSSL command line:
$ openssl rand 16 -base64

4ULD5sJtGeoSnogIniHp7g==
The preceding command has generated a random sequence of 16 bits and then, using the -base64 switch, it has converted that into a base64 text string. Base64 converts from 8 bits to a 6-bit ASCII representation. This is useful for storage and transmission, especially in cases where binary data handling could lead to incompatibility between systems. This mechanism is a flexible way to represent binary data as ASCII, which can be easily and universally stored and transmitted.
Base58
The base58 scheme was first introduced with Bitcoin and is used to encode integers into alphanumeric strings. The key idea behind this encoding scheme is to avoid non-alphanumeric characters and also those characters that look similar and could lead to ambiguity; for example, a lower-case L (l) may look like the number one (1). This feature is especially useful because Bitcoin addresses must not have any confusion about the character representation; otherwise, it could lead to wrongly sending bitcoins to some non-existent or incorrect address, which is clearly a financial loss. This ingenious encoding scheme avoids this type of situation by ignoring similar looking characters.
We will explore base58 and its role in generating Bitcoin addresses in detail in Chapter 6, Introducing Bitcoin.
Cryptography is a vast field, and this section has introduced some of the main concepts that are essential to understanding cryptography in general, and specifically from a blockchain and cryptocurrency point of view.
In the next section, we'll introduce some applications of hash functions, which we introduced in Chapter 3, Symmetric Cryptography. Hash functions are extremely important and we will explore how these constructs are used, in blockchains and generally, to build useful constructs that provide the foundation for building blockchain networks.
Applications of cryptographic hash functions
There are various constructs that have been built using basic cryptographic parameters to solve different problems in computing. These constructs are also used in blockchains to provide various protocol-specific services. For example, hash functions are used to build Merkle trees, which are used to efficiently and securely verify large amounts of data in distributed systems. Some other applications of hash functions in blockchains are to provide a number of security services.
These services are listed here:
- Hash functions are used in cryptographic puzzles such as the Proof of Work (PoW) mechanism in Bitcoin. Bitcoin's PoW makes use of the SHA-256 cryptographic hash function.
- The generation of addresses in blockchains. For example, in Ethereum, blockchain accounts are represented as addresses. These addresses are obtained by hashing the public key with the Keccak-256 hash algorithm and then using the last 20 bytes of this hashed value.
- Message digests in digital signatures.
- The creation of Merkle trees to guarantee the integrity of transaction structure in the blockchain. Specifically, this structure is used to quickly verify whether a transaction is included in a block or not. However, note that Merkle trees on their own is not a new idea; it has just been made more popular with the advent of blockchain technology.
Merkle trees are the core building blocks of all blockchains; for example, Bitcoin and Ethereum. We will explore Merkle trees in detail now.
Merkle trees
The concept of Merkle trees was introduced by Ralph Merkle. A diagram of a Merkle tree is shown here. Merkle trees enable the secure and efficient verification of large datasets:

Figure 4.18: A Merkle tree
A Merkle tree is a binary tree in which the inputs are first placed at the leaves (nodes with no children), and then the values of pairs of child nodes are hashed together to produce a value for the parent node (internal node), until a single hash value known as a Merkle root is achieved. This structure helps to quickly verify the integrity of the entire tree (entire dataset), but just by verifying the Merkle root on top of the Merkle tree, because if any change occurs in any of the hashes in the tree, the Merkle root will also change. This is the reason why the integrity of the system can be verified quickly by just looking at the Merkle root. Another advantage of Merkle trees is that there is no requirement of storing large amounts of data, only the hashes of the data, which are fixed-length digests of the large dataset. Due to this property, the storage and management of Merkle trees is easy and efficient as it takes a very small amount of space for storage. Also, due to the fact that the tree is storage efficient, the relevant proofs for integrity are also smaller in size and quick to transmit over the network, thus making them bandwidth efficient over the network.
We will explain in detail how Merkle trees are fundamental for the consistency and integrity of a blockchain and its transactions in the chapters on Ethereum and Bitcoin.
Patricia trees
To understand Patricia trees, you will need to be introduced to the concept of a trie.
A trie, or a digital tree, is an ordered tree data structure used to store a dataset.
The Practical Algorithm to Retrieve Information Coded in Alphanumeric (Patricia) tree, also known as a Radix tree, is a compact representation of a trie in which a node that is the only child of a parent is merged with its parent.
A Merkle-Patricia tree, based on the definitions of Patricia and Merkle, is a tree that has a root node that contains the hash value of the entire data structure. Merkle-Patricia trees are used in the Ethereum blockchain.
Distributed hash tables
A hash table is a data structure that is used to map keys to values. Internally, a hash function is used to calculate an index into an array of buckets from which the required value can be found. Buckets have records stored in them using a hash key and are organized into a particular order.
With the definition provided earlier in mind, we can think of a Distributed Hash Table (DHT) as a data structure where data is spread across various nodes, and nodes are equivalent to buckets in a peer-to-peer network.
The following diagram shows how a DHT works:

Figure 4.19: DHT
In the preceding diagram, data is passed through a hash function, which then generates a compact key. This key is then linked with the data (values) on the peer-to-peer network. When users on the network request the data (via the filename), the filename can be hashed again to produce the same key, and any node on the network can then be requested to find the corresponding data. A DHT provides decentralization, fault tolerance, and scalability.
In this section, we covered various applications of cryptographic hash functions. Hash functions are of particular importance in blockchains, as they are key to constructing Merkle trees, which are used in blockchains for the efficient and fast verification of large datasets. With this section, we have completed our introduction to the applications of hash functions.
Summary
This chapter started with an introduction to some basic mathematics concepts and asymmetric key cryptography. We discussed various constructs such as RSA and ECC. We also performed some experiments using OpenSSL to see how theoretical concepts can be implemented practically. After this, hash functions were discussed in detail, along with their properties and usage. Next, we covered concepts, such as Merkle trees, that are used extensively in blockchains and in fact are at its core. Other concepts such as Patricia trees and hash tables were also introduced. We also looked at some advanced and modern concepts such as zero-knowledge proofs and relevant constructions, along with different types of digital signatures.
In the next chapter, we will explore the captivating world of distributed consensus, which is central to the integrity of any blockchain and is a very hot area of research.