
13 Studio Flash
Steampunk. With a sharp twist of his cane, Dr. Lymington-Ffyfe prised open the ancient Gladstone bag whence the mysterious ethereal energy emanated. In utter silence, a brilliant yet insubstantial luminous globe burst forth, to hover unassisted and resplendent above the table, coldly indifferent to the astonishment of the assembled Guild. Light of a purity rarely seen by mortal man pierced the Stygian gloom. “By Jove!” cried the Aviator in unalloyed wonder. “Who could have known that the evil Captain Synge possessed so formidable a source of power?”
Elinchrom Ranger Quadra inside a foam sphere on a boom over the table, triggered by an EL-Skyport. Matt black gaffer tape was used to conceal any reflections from the light stand and boom. Two Speedlite 580EX IIs inside the bag, firing at manual full power and triggered by one Elinchrom EL-Skyport Universal and one Sonia optical slave. Photographed at the Shunt Lounge and Theatre Company, deep in the dank Victorian tunnels beneath London Bridge railway station. London, England. EOS 5D Mark II, 1/60 sec at f/4, ISO 100, 24mm.
Automated TTL or E-TTL metering cannot be used with most studio flash equipment. Manual metering is the order of the day.
While any kind of flash equipment can, of course, be used in a studio setting, “studio flash” usually refers to large, non-portable flash equipment that’s powered by AC current. Large, expensive, and daunting, studio gear has always represented something of a tall barrier between amateur and professional. The jump from battery-powered flash to studio flash has traditionally been fraught with mystery and governed by apprenticeships. Equipment was expensive, difficult to use, and hard to learn.
Aside from the cost, the biggest stumbling block to studio flash has been manual metering. But, as discussed in section 10.2.1, digital cameras have made manual metering much easier to learn and master. With many companies introducing affordable, low-end studio flash units for the advanced amateur market, there’s never been an easier time to make the transition to studio lighting. ![]() 13.1
13.1

13.1 A flash tube: the heart of any studio flash system.
So, why studio lighting? Despite the lack of automatic metering, there are a number of reasons studio flash is widely used by professionals.
- Power: Small flash units powered by AA cells don’t have anywhere near the light output of the typical studio unit. This matters when photographing larger scenes and when stopping down lens apertures. Big studio gear can light entire automobiles or even larger objects.
- Speed: The best studio lighting recharges very rapidly between shots, especially if it isn’t being used at full power. By contrast, small lights powered by AAs can take a few seconds to recharge between each take, which is a huge problem for professional shoots.
- Reliability: With no batteries to drain, quality studio units can be used day in, day out. Better units are engineered for very accurate power output levels and flash color.
- Versatility: The range of light-modifying devices and tools for studio equipment is endless.
This chapter describes common flash-based lighting equipment found in studio settings. Obviously, the specific type of gear will vary depending on the job at hand. A small portrait studio will be arranged differently from a huge space used for photographing cars, or a studio used for photographing commercial packaging or food. But this chapter covers the basics you’ll find in most studio setups.

13.2 This Elinchrom Rotalux light modifier looks pretty big, but it’s actually mid-sized compared to the monstrous reflectors and softboxes used in professional studios. Shown here without the front diffuser fabric.

13.3 A digital chip and circuit board from the interior of a Speedlite 580EX flash unit. A pair of monolights in studio soft-boxes was used to provide bright, even illumination.
EOS 5D Mark II, 1/50 sec at f/11, ISO 100, 100 mm macro with 20 mm extension tube.
13.1 Types of studio lights
Canon and other camera makers don’t make studio gear: the field is the purview of a number of specialized makers such as Bowens, Broncolor, Paul C. Buff (AlienBees/White Lightning), Dyna-lite, Elinca/Elinchrom, Hensel, Interfit, Norman, Novatron, Paterson, Photoflex, Photogenic, Phottix, Profoto, Speedotron . . . Regardless of the maker, studio flash units are mostly of two types: monolight, and pack and head.
13.1.1Monolights
Monolights are self-contained units that include both the flash tube and the bulky power circuitry to drive it. They tend to be long cylinders or boxes, with a tube and reflector mounted on one end and a small control panel on the other end. They plug directly into AC power and are known in the UK as “monoblocs.” Most have built-in fans for internal cooling. ![]() 13.4
13.4

13.4
Pros:
Monolights come in a wide range of sizes and power outputs. The have their own power supplies, so failure of one unit won’t take down an entire setup. They also tend to be affordable, allowing beginners to buy their way gradually into a system, component by component. Monolights from different manufacturers can be used together if necessary, though they may differ in terms of performance, head adapters, subtleties of color output, and so on.![]() 13.5
13.5
Cons:
Since the transformers and capacitors are inside the monolight’s body, the units can be a little top heavy and might be easily knocked over. In a complex studio setup with multiple flash units, they can be inconvenient since each unit must have its output adjusted manually, one by one (except for advanced models with remote computer interfaces).

13.5 This simple portrait was taken using two low-cost monolights. One was inside a softbox, positioned close to the model, camera right. The other was on the other side of the room. It had no modifiers and was set to provide subtle outlining to the model’s left shoulder and hair.
Traditional monolights contain analog electronics to control the power output, using a dial or a slider like a household dimmer switch. The back-panel controls on a monolight vary, but typically look something like this classic Elinchrom studio unit.![]() 13.6
13.6
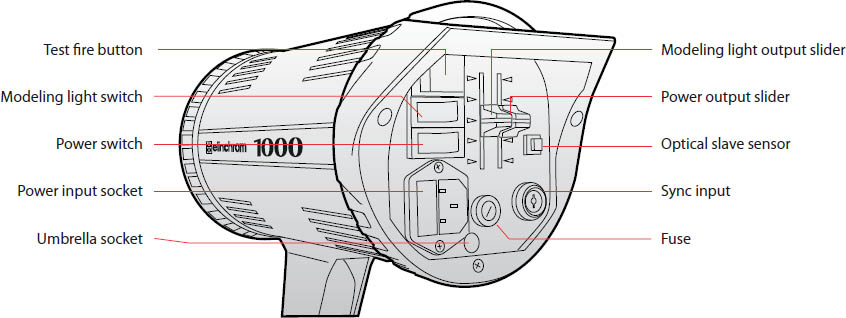
13.6
Power input socket. Usually a standard female IEC connector so the cable can be detached for travel and storage.
Power switch. The power rating may be listed here. Most studio units are localized to the region of sale (e.g., 110 VAC for North America, 100 VAC for Japan, and 240 VAC for most of the rest of the world), though modern units often have universal power supplies.
Modeling light switch. Enable or disable the tungsten modeling lamp.
Test fire button. This may illuminate to indicate that the unit is fully charged and ready to go.
Fuse. Some units contain a circuit breaker.
Modeling light output slider. The brightness of the tungsten modeling light.
Power output slider. The output of the flash tube itself.
Optical slave sensor. This unit has a combined sensor for the optical slave and a push button switch to enable or disable the slave. Some units have white half-dome covers over the light sensors.
Sync input. A socket for an external sync cable. This model has an unusual manufacturer- proprietary plug, but other makers use 3.5 mm audio plugs and the like.
Digital monolight controls
Newer monolights contain digital electronics. This doesn’t necessarily mean they can interface with a personal computer or have output levels controlled automatically, though some do. Instead, it means a specific numeric value can be punched in, making output levels easily repeatable. Some digital monolights use up/down pushbuttons, and others use dials or sliders resembling analog units. Others include interfaces to personal computers or smartphones. Either way, there’s usually a small panel showing the current output setting in stops, fractions of full power, or an arbitrary numbered scale. It won’t display the power output in an absolute form, so you’re rarely able to compare the output of different units.
Figure 13.7 shows the key controls of a modern digital unit from Bowens:

13.7
Power input socket. The usual IEC connector.
Power switch. This unit has a three-position switch: off, on using AC power, and on using battery power.
Modeling light switch. For the tungsten modeling lamp.
Flash ready. This controls the way the the modeling lamp indicates that the flash tube is ready to fire.
Audible beeper switch. An audible signal for flash ready.
Slave sensor (“cell”) switch. Turns on the slave sensor.
Sync input. A 1/4″ plug for sync input.
Proprietary battery input. A proprietary jack for power from an external battery pack.
Power setting dials. This unit has an unusual system. The left hand dial controls the power level in stops. The right-hand dial controls the level in tenths of a stop.
Power setting display LED. The power setting in stops.
Test fire button. The green light indicates the unit is ready to fire.
Status lights. Various LEDs show the status of different functions.
Speedring release button. Used to unlock the unit’s accessory attachment ring (see 13.2.1)

13.8 A traditional pack and head combination commonly seen in professional studio environments.
13.1.2Pack and head lights
The alternative to monolights are pack and head lights, where a single hefty power pack is linked by cables to multiple flash heads. The packs, sometimes called generators in the UK, vary in size and capacity, but are uniformly fairly expensive. They can be symmetrical units that supply equal amounts of power to each head, or assymetrical units that give preferential amounts of power to one head or another.![]() 13.8
13.8
Pack and head lights are the workhorses of many professional studios, though monolights are often used as supplementary lighting. Recent digital pack and head units have USB and Wi-Fi interfaces and can be controlled remotely using a computer or smartphone. These products have on-screen interfaces for configuring complex lighting setups, which can be saved to disk and restored later. Of course, the physical equipment has to be moved and positioned on the set by hand, but at least power settings are easily set.

13.9 This head has an interesting feature: the flash tube can be moved in or out by turning a dial providing a zoom effect like that of a Speedlite.
A single pack can power multiple heads, so it’s simple to quickly adjust the output of each head without a lot of walking around. The heavy and bulky transformers and capacitors all sit on the floor, which keeps the heads relatively lightweight and small.![]() 13.10
13.10

13.10 Compact and rugged, Swedish-built Profoto units are popular with pro rental companies.
Cons:
The systems are quite costly. Cables to the heads can be fairly heavy and usually involve proprietary connectors, making it expensive to have long cable runs (a 15-foot cable for one proprietary system might cost as much as an entire entry-level monolight). Failure of a pack will take down the whole system. One generally can’t mix and match heads and packs made by different manufacturers.![]() 13.11
13.11

13.11
13.1.3Ringflash
Ringflash units are specialized heads that employ large ring-shaped flash tubes. Like smaller macro rings, studio ringlights fit around the end of a lens, but pump out a lot more power than battery devices. The result is flat and even lighting with essentially no shadows on the foreground subject. However, if the subject is close to a wall, there will be a characteristic “dark halo” shadow.
Studio ringlights are a popular tool for fashion photography because of the punchy look they produce. Used more subtly, they can also provide shadowless fill.
Studio ringflashes are usually pack and head because a full power source built around the tube itself would be heavy. Ring attachments often have optional reflectors or diffusers on the front to control the quality of the light, and they usually include a bracket assembly to which a camera can be attached by its tripod mount socket.![]() 13.12 and 13.13
13.12 and 13.13

13.12

13.13 The dark halo betrays the light source: a ring flash.
13.1.4Battery packs
Professional location work, outdoors or in remote settings, often calls for portable high-power solutions. Consequently, many makers sell portable packs containing large rechargeable batteries. In the past, lead-acid gel batteries like those used in electric wheelchairs were common, but lithium packs are now popular. The packs mostly follow a pack and head model, and some can be recharged using a car adapter. A recent innovation is the portable monolight with integral battery pack.
These specialized professional tools are great for documentary and fashion photography, as they give you full studio power basically anywhere without the inconvenience, noise, and expense of gas-powered generators. Of course, generators are still used for lavish expedition-type photo shoots, where there’s a budget for a dozen assistants and an air-conditioned trailer for the talent, but battery packs are suitable for more modest shoots.

13.14 Elinchrom Ranger Quadra, Bowens Explorer 1500, and Bowens Travelpak battery packs.
The packs range in size. The Elinchrom Ranger Quadra, for example, is extremely light and portable as this type of equipment goes. At seven pounds, it wouldn’t be fun to wear on one’s shoulder for extended periods, but it is doable. It uses tiny flash heads that can be adapted to standard Elinchrom accessories if necessary. In the photograph that opens this chapter, the small size of the Quadra flash head was ideal for concealing inside a hollow Styrofoam ball to create a mysterious hovering sphere of energy.
In contrast, the Bowens Travelpak is the size of a small car battery and isn’t wearable, but it can power a pair of full-sized Bowens Gemini monolights that support any traditional Bowens S-type accessory rings. Two capacities of interchangeable, rechargeable batteries are available. Additionally, the Bowens Explorer 1500 can deliver 1500 watt-seconds of power, but it’s more like a large car battery.![]() 13.14
13.14

13.15 This photo was taken in a condemned warehouse with no AC power. It was lit mostly by a Bowens Gemini R flash unit powered by a Travelpak battery. An on-camera flash unit served as an optical trigger and added a subtle catchlight to the model’s eyes.
13.1.5Inexpensive gear
Professional studio equipment can be very expensive; prohibitively so for a beginner. Even renting the gear adds up quickly, so the rock-bottom lights sold on Internet auction sites are very attractive. The question is, are they worth it?
Well, like anything, it depends on your priorities. The drawbacks of cheap gear are obvious. The products tend to be low-powered, have long recycle times, produce inconsistent light output or color, are less rugged than name-brand gear, have non-replaceable tubes with short lifespans, may be difficult or prohibitively expensive to repair if they go wrong, and, finally, have the unknown factor that they may not have had proper safety approvals.
Some products are fairly useless, such as these screw-in flash units. These are the size and shape of regular light bulbs, housing instead a tiny flash unit and an optical slave trigger. They might be useful on location for adding a bit more light from existing light fixtures (just replace the bulb with the flash), especially if flash color temperature is needed. But they’re weak, slow, and aren’t adjustable in any way.![]() 13.16
13.16

13.16 Low-output screw-in flash unit.
On the plus side, rock-bottom gear is cheap! And since any collection of monolights can be mixed and matched as long as precise color temperature isn’t a concern, cheap lights can be a good way for a casual amateur or a student on a tight budget to get started.
The key is not to start too low-powered for most applications. A flash unit billed at, say, 150 watt/seconds (see 7.16.1) is very low powered. There’s no point in getting something so weak it can’t be used for portraiture in a medium-sized room, so don’t buy a unit advertised as under 200 or 300 w/s. Note that these units are often sold in kits with a load of cheap accessories and they’re listed by their combined light output. For example, 450 w/s might sound great, but not if it’s a box set containing three lousy 150 w/s units.![]() 13.18
13.18

13.17
Having said this, it’s also impossible to compare the power output of flash devices across various manufacturers. Many studio units are marketed on the amount of power they consume (watt/seconds), not the amount of light they pump out. Others refer to light output, but there are many ways to measure that: does that include the effect of light modifiers? Sometimes the only way to make an adequate comparison is to do a test yourself.
It’s also worth thinking about future growth. Does it make sense to invest in something of disposable quality? Or does it make more sense to invest in a product with higher build quality and more growth potential? After all, quality gear tends to hold its value in the used market fairly well.

13.18
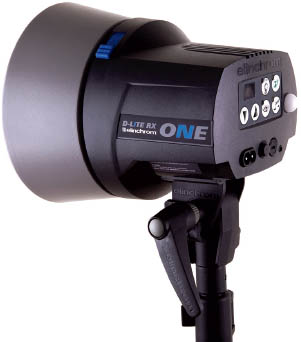
Some brand-name manufacturers also sell introductory gear at lower prices, such as this Elinchrom D-Lite unit (see figure 13.18). This equipment isn’t up to the build or power standards of their professional equipment, but it’s largely compatible with the rest of their product line.
Another recent change is the development of Chinese manufacturers: Until the past decade, most high-end studio equipment was made in Europe or North America, with Asian makers relegated to producing low-end gear. But now it’s not that simple. For example, this is a Phottix Indra head, which comes with a matching portable battery pack. It’s notable for high output (advertised as 500 w/s) and advanced electronics that support TTL flash metering over a radio connection.![]() 13.19
13.19

13.19
13.2Basic flash unit features
These days most studio units have a fairly standardized shopping list of features.
13.2.1Flash heads and speedrings
The head is the business end of the flash unit. The most common flash tube design is an omega loop, or near-circle. The tube may be tinted a very pale yellow color to slightly warm its light. Positioned at the center of the tube is an incandescent light bulb or LED lamp, used for modeling as described in the next section.![]() 13.20
13.20

13.20
The tube and bulb are mounted in front of a metal reflector. The end of the head usually has a circular mount known as a “speedring,” to which various light-modifying attachments can be fastened. Speedrings are manufacturer-specific and conform to no particular universal standard, though sometimes a smaller maker will adopt the speedring system used by a major manufacturer. ![]() 13.21
13.21

13.21 Elinchrom (left) and Bowens (right) speedrings.

13.22 This studio unit is equipped with a heat-resistant Pyrex glass dome.

13.23
Optionally, the tube and bulb can be covered by a heavy glass dome, mainly to protect the delicate lamps but also to minimize the risk of injury. Some Pyrex domes have a clear UV-block coating for improved color accuracy, since ultraviolet energy shows up blue on film and sensors. ![]() 13.22
13.22
13.2.2Modeling lights
Studio lights traditionally have tungsten or tungsten halogen bulbs—or, increasingly, white LEDs—with the flash tube. These continuous lights are used to preview the effect of the light on the scene. They make it easier for you to predict how multiple-light setups will work and to see where shadows are cast. Another useful function is to light the room during setup: handy for avoiding the problem of models with gigantic pupils from sitting in the dark. ![]() 13.23
13.23

13.24
Some flash units shut off the modeling lights when firing the flash (to prevent them from contributing light to the scene) and others don’t. Better units have proportional modeling lights, where the brightness of the tungsten lamp matches the relative brightness of the flash output setting for a more accurate preview.
The primary issue with tungsten modeling lights is their heat output. Some smaller enclosed light modifiers, such as softboxes, can cause a flash unit with a modeling light to overheat. In such cases, it’s best to use the lights only sparingly. There’s also serious fire risk from high-wattage bulbs (section 7.22.1). This is an area where the low heat of LEDs is very advantageous. LEDs, such as the ones used as modeling lights by this Elinchrom Quadra unit, can also serve as a continuous light source for video. ![]() 13.24
13.24
Incandescents are a problem for battery units due to their heavy current draw. Some battery systems omit modeling lights, whereas others, such as this Profoto pack, put them on brief countdown timers. ![]() 13.25
13.25

13.25
13.2.3Optical slaves
As discussed in the off-camera flash section, it’s very common for studio flash units to contain simple optical slave sensors or “photocells,” which trigger the flash unit in response to a pulse of light from another flash unit or from an infrared trigger (section 11.7). This is a low-cost yet effective way of synchronizing multiple units with the camera.
Since optical slave sensors can be a liability in public settings, where someone else’s camera flash can set off a slave inadvertently, so they can usually be turned off (switches are often marked “CELL”). Sensors are typically positioned on the back panel of a monolight, which is sometimes a bit inconvenient, as the sensor may not always face the triggering flash unit. ![]() 13.26
13.26

13.26 The hemispherical white dome covers the light sensor used by an optical slave.
Another issue is that optical slaves can be set off prematurely by automated flash units with prefire, such as that used by E-TTL. Some digital monolights have the ability to ignore preflashes and only trigger when the final flash goes off.
13.2.4Trigger voltage
The issue of high trigger voltages has been discussed earlier (section 10.5), but it’s worth bringing it up again. Many older units use high trigger voltages that can damage a camera. Always confirm that the camera can withstand high trigger voltages before using a direct cable. Alternatively, it’s usually safer and more convenient to use optical or radio triggering instead.
13.2.5Duration versus output
Speedlite-type, battery-powered flash units vary the light output by varying the duration of the pulse. The longer the pulse, the more light hits the film or sensor. Conversely, for lower power outputs, the flash duration is shortened.
Most studio flash units, however, maintain more or less constant flash durations but alter the amount of power being delivered to the flash tube. In other words, a studio unit usually “dumps” its entire capacitor charge in one go. If a partial output is set, the unit simply doesn’t charge up its capacitor fully before dumping.
The pulse lengths also tend to be longer than those on small hotshoe units, making the majority of studio flash units less effective at freezing motion. One exception is when studio flash units are billed specifically as being high-speed capable, which often use the duration-altering technique.

13.27 This flash unit has a confirmation beeper marked, somewhat incongruously, by a musical note icon.
13.2.6Audio confirmation (beepers)
Many flash units contain small beepers or “sounders” that emit a tone when a flash is fired, making it easier to know if a given unit is working or not. Some have different tones or numbers of beeps, so it’s possible to tell if a flash in a specific group has fired. ![]() 13.27
13.27
13.3General studio gear
The well-equipped photographic studio is overflowing with all kinds of specialized tools and equipment. Some common items are described here.
13.3.1Light stands
Since most scenes don’t call for flash units resting on the floor, light stands are an essential part of any studio setup. They’re similar to tripods in that most have three-legged bases, but they differ in that most of the vertical height is a single tube (i.e., the legs join the vertical tube lower down, rather than higher up, as is the case with tripods). This is because rock-steady stability is less of an issue with light stands than with tripods. As long as the stand is fairly sturdy, it doesn’t matter if it wobbles a bit when bumped, which would be unacceptable for a camera tripod. ![]() 13.28
13.28
Most light stands are made of aluminum tubing, painted black to minimize unwanted reflections. They generally have telescoping segments and foldout legs at the base. A particularly sturdy design with rotating legs is known as a “C-stand,” or “Century stand,” and is common on movie sets.
Better quality studio light stands have internal baffles or air pistons known as air cushioning, which slows the speed at which the collapsing tubes descend. These can prevent delicate flash equipment from being severely jolted if a clamp on a light stand’s tube is released unexpectedly. It’s worth investing in solid light stands rather than going for lightweight versions. Very inexpensive stands are not stable enough, which puts heavier studio gear at risk of toppling.

13.28
Unlike tripods, light stands generally aren’t designed to stand flat on uneven ground. A few stands have a “lazy leg,” which is a leg of adjustable length to compensate for uneven surfaces.
13.3.2Booms
Booms are cantilevered or counterbalanced extension arms fastened to heavier duty light stands. They’re useful for holding lights above a subject’s head as a hair light, for example, or for positioning small light heads or monolights in tight quarters. Booms often have clips on the end for attaching sandbag weights so that they don’t topple over. ![]() 13.29
13.29

13.29
13.3.3Light stand attachments
Most light stands have turned brass fittings on the top known as “spigots” or “male studs” (yes, really). These are just turned brass rods, 5/8″ in diameter, to which most studio flash units attach. They aren’t threaded, and rely mainly on gravity to hold the unit in place. The flash unit will also have a locking handle or bolt to prevent accidental dislodging.
Some light stands may have 1/4″ or 3/8″ tripod-style threaded bolts for attaching smaller battery-operated Speedlite flash units and other accessories. ![]() 13.30
13.30

13.30 The chrome spigot or stud of a light stand.
13.3.4Ceiling support systems
While light stands are ubiquitous in any studio, they can obviously get in the way, particularly in smaller spaces. For this reason, many full-time studios use ceiling-mounted tracks to hang lighting equipment. The tracks may have pantographs or scissor mechanisms so that the flash units can be moved easily from one vertical position to another.
13.3.5Backdrops
Portraits and product shots often benefit from simple, uncluttered backgrounds. While bare walls can be used, it’s often easier to hang a backdrop behind the subject.
Canvas, muslin, and vinyl
Fabric, sometimes painted or patterned, has been used for studio backdrops since Victorian times. In those days, portraits were usually taken in front of heavy canvas sheets, frequently painted like the stage flats used in theatres. In keeping with the style of the age, these paintings often had neoclassical themes, such as columns and Grecian urns. Today it’s more common to see blotchy, abstract patterns that produce broad washes of color when thrown out of focus by narrow depth of field. But if you want something tackier, like phony-looking clouds or unconvincing forest paths, a quick check of auction sites reveals some pretty remarkable excursions to the Land of Cheese.
The main issue with fabric is that it must be carefully rolled for storage to avoid unsightly creases. Thinner muslin can be steamed and ironed. Alternatively, fabric can be deliberately crumpled so that it yields random patterns when kept out of focus. Vinyl is a popular material as well, since it can easily be printed on using large computer printers, is easy to clean with a wet sponge, and doesn’t crease easily.
Seamless paper
Though painted fabric has its place, creases are difficult to avoid. For that reason, wide rolls of paper are commonly used for studio backdrops. These large rolls of seamless paper, white or black or a solid color, are rolled out from a support crossbar. They hang straight down, meeting the floor in a smooth sweep or scoop that eliminates an ugly seam. Once the paper gets dirtied, it can be torn off and a clean piece unrolled. ![]() 13.31
13.31
Seamless paper must be stored carefully—either vertically or else on a proper rack. If it’s stored horizontally in a box, it can develop flat sections on the bottom of the roll, which results in creases.

13.31 A roll of seamless white paper on a backdrop stand.
Backdrop supports
Stands, racks, and poles are commonly used to support backdrop materials. Stands usually consist of a pair of light stands with a horizontal crossbar and are ideal for portable setups.
Other solutions include permanent wall racks with hand-operated or motorized chain drives to allow the material to be easily adjusted. Vertical poles extend from floor to ceiling, typically with adjustable spring mechanisms to press firmly upwards. Clamps and crossbars are then attached to the poles to hold the rolls of paper or fabric.
13.3.6Radio control
Some flash units contain built-in radio receivers, simplifying their use in a multiple-flash radio setup (section 11.9). They may be radio systems proprietary to the maker of the unit, such as the Elinchrom Skyport or Bowens Pulsar, or they may rely on a third-party radio system such as PocketWizard. Some may support both. Bowens lights, for example, support interchangeable plug-in receivers the size of a matchbook. Receivers compatible with both Bowens Pulsar and PocketWizard are available. ![]() 13.32
13.32
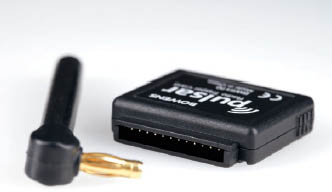
13.32
Such integrated receivers are very handy since they don’t need separate batteries and can’t get lost. Of course, they’re only useful when used with a compatible transmitter. Most radio systems are sync-only, though some companies such as Elinchrom and White Lightning have systems that can specify output power levels.
13.3.7USB / Infrared/Wi-Fi control
The more advanced digital units may have built-in remote control, accessed via USB cables, infrared signals, or computer Wi-Fi networks. These permit the unit to be controlled or adjusted by a remote device or a computer. For example, custom software running on a laptop can let you adjust and save preset output configurations for a group of flash heads. Graphic tablets and phones can also be used to control studio lighting.
In addition to actually controlling the remote flash units, Elinchrom’s EL Skyport software, shown here, can also store equipment inventory and lighting diagrams. You can sketch out the lighting arrangement and then trigger the flash units from the computer.

13.33
13.4Studio light modifiers
In this section we could go on forever. There are countless types of light modifiers for studio gear, though the most common fall into the categories listed here.

13.34 A studio portrait setup. The primary light source is a beauty light with a diffusing fabric “sock” located on a light stand at camera right. The background is a self-illuminating Lastolite HiLite box. To the front is a Lastolite Trilite/Triflector reflector panel, a three-lobed arrangement that bounces light upwards.

13.35
13.4.1Flash head reflectors
These are metal dishes or open cylinders that fit around the flash tube and direct light outward. A flash unit fired without a reflector sprays light in a complete hemisphere, a situation known as “bare bulb” flash. A reflector guides the light forward, narrowing its angle of coverage and improving its efficiency.
Flash head reflectors are usually described in terms of the number of degrees of coverage that they offer, and are sometimes called “spill kill” reflectors since they keep light from spilling out everywhere. ![]() 13.35
13.35
One special type of reflector is the background reflector. This unusual shape directs light from a floor-located flash unit up towards a backdrop, creating an oval-shaped pool of light. These reflectors usually have metal clips for attaching colored plastic gel sheets. ![]() 13.36
13.36

13.36
13.4.2Umbrellas
The unassuming umbrella is one of the oldest photographic light modifying devices. Like an ordinary rain umbrella, it’s a curved round fabric surface supported by metal struts. When not needed, it can be collapsed and put away. Umbrellas are popular because they’re convenient and portable, making them ideal travel solutions. In fact, collapsible umbrellas with telescoping shafts and folding struts can fold up into very small tubes.
Umbrellas come in two basic types: reflective and shoot-through. Regardless of which umbrella type is used, umbrellas have a signature scalloped circle catchlight in the eye. Often the umbrella struts themselves can be seen, though some have fabric-covered struts to reduce this effect. Most studio flash units have spring-loaded holes to accommodate umbrella shafts, which typically have diameters of around 8–9 mm. Elinchrom units have an unusually narrow hole diameter of 7 mm that isn’t compatible with all umbrellas.
While umbrellas are affordable, lightweight, and portable, it’s difficult to control the light they produce, particularly shoot-throughs, which tend to send out light in every direction. They’re great for quick grab-and-go shooters like journalists with limited setup time, for hobbyists on a tight budget, or for relatively uncritical commercial applications such as school photos.

13.37
Reflective umbrellas
Reflective umbrellas have interiors lined with white, silver, or gold fabric, and are designed to serve as a large area from which light can be bounced. In this configuration, the flash unit sits between the subject and the umbrella, pointing away from it. Reflective umbrellas are relatively light efficient, since they are reflectors and not diffusers. They’re often backed with black fabric to reduce the amount of backspill caused by light passing through the umbrella’s fabric. ![]() 13.37
13.37
However, they do have a couple of disadvantages. First, because all the light-producing gear sits between the subject and the umbrella, it’s not possible to get the umbrella very close. The farther the light-emitting surface is from the subject, the harder it is to light the subject. Second, though they increase the light area, they don’t diffuse or soften it that much.

13.38
Shoot-through umbrellas
Shoot-throughs are umbrellas used as diffusers rather than reflectors, made of translucent fabric with no backing material. They are, in effect, foldout diffuser panels. Shoot-through umbrellas can be very soft light sources, since it’s easy to position them extremely close to the subject—the flash unit sits on the opposite side of the fabric from the subject, giving more clearance. However, they do consume a lot of light, reducing the overall flash range. Their output is less even than softboxes, as they tend to produce brighter areas (hotspots) at the center. Despite these drawbacks, they’re cheap, portable, and commonly used. ![]() 13.38
13.38
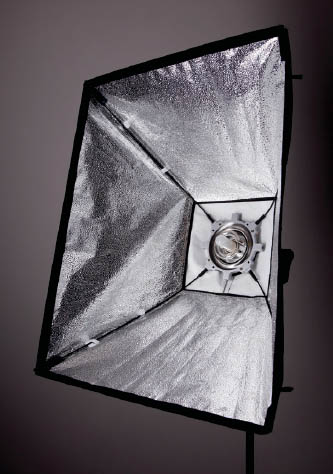
13.39 A typical softbox, with its front diffuser fabric removed to reveal the stippled interior, speedring, and metal support rods.
13.4.3Softboxes
Softboxes are so called for two reasons. First, they’re capable of producing extremely soft “wraparound” light, making them ideal for portraiture. Second, they’re constructed from fabric held together with thin rigid metal rods, like a tent. They are essentially pyramid-shaped constructions. Heavy, black synthetic material prevents light from leaking out the back and sides. The large, flat, face of the box is fronted by at least one, but usually two, layers of translucent white cloth to diffuse and soften the outgoing light. The interior of the softbox is lined with white or stippled metallic silver fabric. The back of the softbox usually has a speedring compatible with the studio flash unit it’s designed for. The light from the flash tube radiates out into the box, bounces around, and leaves via the front diffuser panel. These enclosed fabric boxes can overheat to dangerous levels when used with incandescent modeling lights. ![]() 13.39
13.39
Softboxes are collapsible and fairly portable, though most can be time-consuming and inconvenient to reassemble because of the tight-fitting metal support struts. Photojournalists and others who do on-location portraiture use collapsible sprung softboxes, which are considerably easier to open and repack.
Many softboxes have a black fabric lip that extends around the edge, thus blocking some stray light from escaping the sides. Some also have Velcro fasteners that permit the attachment of fabric grids. Fabric grids, similar to the small hard plastic grids for battery units discussed in section 12.6, can direct light outwards with relatively little spill on the sides.
Most softboxes are rectangular, but some have square or octagonal front faces. The shape governs the coverage area of the light as well as the shape of the catchlight in the eye. For example, 3/4 portraits are often best served by rectangular softboxes rather than square ones.

13.40 This portrait was lit with a single softbox, camera right, as the catchlights in the light bulb and wine bottle reveal.
13.4.4Striplights
Striplights are essentially very narrow rectangular softboxes. They are used as sidelighting in portraiture in order to give a glowing outline to a subject. They are also commonly used in product photography to emphasize the shape of objects, such as bottles. Striplights were used extensively for the product photography in this book, providing an outlined look for the black plastic devices. ![]() 13.41 and 13.42
13.41 and 13.42

13.41

13.42 This shot was lit by two striplights, one on each side of the model.
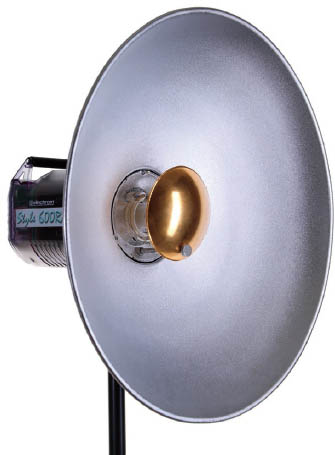
13.4.5Beauty dishes and deflectors
Beauty dishes are shallow, dish-shaped pans. They attach to a flash unit’s speedring and are typically bare, silver-colored metal or painted white. The opening for the flash tube is capped by a small deflector plate that reflects the light back into the dish and out toward the subject. This type of deflector is usually silver or white, but can be gold, as shown here, for warmer light. ![]() 13.42
13.42
Beauty dishes offer very direct lighting and are frequently used for portraits of youthful people with smooth, flawless skin. They don’t always provide the most flattering illumination for other people, though the addition of a fabric diffuser can soften the light slightly. The dishes are often used as an overhead light on a boom. ![]() 13.43 and 13.44
13.43 and 13.44
13.43

13.44
A related accessory is the deflector without the dish. This attaches to the umbrella mount via a rod and prevents direct light from the flash tube hitting the subject. It would normally be used with a regular softbox or similar modifier, transforming it into a beauty dish, but it’s shown here without a modifier for demonstration purposes. These deflectors provide some of the advantages of a beauty dish without the inconvenience of a non-collapsible metal dish. ![]() 13.45
13.45

13.45
13.4.6Self-illuminated panels
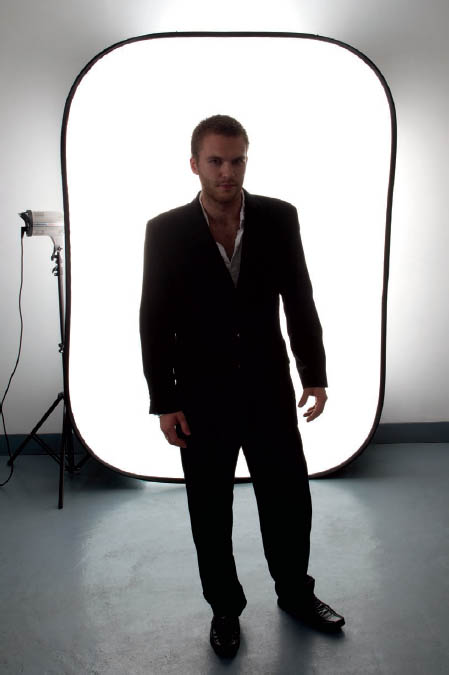
Large, self-supporting fabric panels are available for backdrop purposes. They light up pure white when the head of a flash unit is inserted into a hole in the side. They’re ideal for taking high key portraits (section 14.2.1) and 3/4 body shots, since the self-illuminated design prevents the appearance of shadows behind the subject. This makes them great for small spaces, such as passport photo applications, since the subject can stand quite close to the panel without shadowing. The panels can also serve as huge softboxes.
They aren’t so useful for full-body portraits where the subject’s feet are visible, since there will always be a visible join between the self-illuminated backdrop and the non-glowing floor. Like softboxes, the panels should not be used with an incandescent modeling light because of a serious risk of fire. Most of the product photos in this book were taken using the Lastolite HiLite panel shown here. This provided a pure white background in a small studio with a minimum of post-production cleanup. ![]() 13.46
13.46
13.46
13.4.7Reflecting panels
Simple reflecting panels are bits of fabric stretched over a frame. They come in all shapes and sizes, and mainly serve one function: they bounce light back to fill in shadowed areas. Some, like the Sunbounce described in section 12.5.8, use frames that are slotted together. Others employ sprung metal frames, so they can be stored in a package the size of a plate, yet pop open in moments. ![]() 13.48
13.48
Reflecting fabric may be silver, gold, or alternating gold and silver stripes for cooling or warming the light. Gold panels are often too warm for general use, so the “zebra” stripes are a useful middle ground. Panels may also be black (sometimes jokingly called “negative reflectors”) to absorb light where necessary, creating more shadowed areas. ![]() 13.49
13.49
An unusual product is the Westcott Eyelighter, which is a curved reflector that’s positioned in front of, and below, a model. It’s similar to the triflector shown in 3.4, but results in a seamless curved highlight in the subject’s eyes. ![]() 13.47
13.47

13.47

13.48

13.49
13.4.8Snoots
Snoots are simple metal tubes, often with stepped sides, used to transform the light into a beam for hard lighting effects. They concentrate light in a spotlight-like fashion, though not as sharply and at considerably less expense than an actual spotlight with a lens. ![]() 13.50
13.50

13.50
13.5Hot lights
After talking about flash all the way through this book, what about hot lights? It seems obvious that regular incandescent or fluorescent lighting should make perfectly good light sources for photography.
It’s true that hot lights can be used for most forms of photography. Prior to the invention and widespread use of flash equipment, most studio portraits were done with continuous forms of electric light. Hollywood glamour photos of the 1940s, for example, were shot on huge 8″ × 10″ glass plate negatives, with models lit by the same massive Fresnel lens spotlights that were used for movies of the age.
Most beginning photographers start out using regular home improvement warehouse halogen lamps on telescoping stands. That is, of course, a perfectly reasonable way to go on a tight budget. Another option is blue-coated “photoflood” light bulbs—high-output tungsten bulbs that are deliberately overdriven to produce a whiter light at the cost of a shorter lifespan. ![]() 13.51
13.51
Continuous lighting is considerably cheaper even than inexpensive flash equipment. However, flash offers a number of advantages in key areas of photography.

13.51 This scale model of the Apollo 11 lunar lander was lit using a pair of tungsten photoflood bulbs in reflectors. Note, however, that the bottom of the model is backlit with a subtle bluish light. This was actually a flash, with its higher color temperature, fired manually beneath the model during the exposure. No filtration was put on the flash head in order to highlight the color difference.
13.5.1Heat
Hot lights are, well, hot. A studio full of thousands of watts of continuous tungsten lights can get extremely toasty. This can cause models to sweat, flowers to wilt, and fire risks to increase. Flash units generate heat mainly from their modeling lights; they generate very little warmth when they fire, simply because the light duration is so short.
Fluorescent tubes are one way to avoid the heat issue—though not all fluorescent lamps are suitable for color photography, since many don’t output particularly pure white light. Even fluorescent tubes billed as “full spectrum” can produce slightly greenish light, requiring pale magenta filters to correct.
13.5.2Power consumption
Tungsten light consumes a lot of electricity. It isn’t environmentally friendly, is quite expensive in the long term, and requires reliable power with adequate circuits to handle the load. A studio with permanent continuous light may need to have its wiring upgraded for safety.
13.5.3Fewer light modification options
The heat generated by incandescent bulbs limits the types of light modifiers that can safely be used. Softboxes for constant lights do exist, but they must be much more rugged and heat resistant than ordinary flash-safe softboxes. Plastic gel filters on hot lights must be used with care, as they can melt or catch fire.
13.5.4No freezing of motion
Because flash durations are short, they can be used to effectively freeze motion. At an extreme, they can be used for dramatic motion-freezing shots. The brief exposure duration is useful for ordinary portraits as well. A shot taken with flash is often sharper and crisper than a portrait taken with continuous light.
It takes a surprising amount of continuous light to illuminate a scene, so exposure durations can be quite long when not using flash. This increases the risk of motion blur, particularly if the subject is moving or the camera isn’t on a tripod.
13.5.5Limited filtration requirements
Flash produces light of the same approximate color temperature as daylight. In contrast, tungsten light always has a much lower color temperature and is thus a fairly orange light. When using daylight-balanced film this means that blue filters are needed to match colors. You can buy tungsten-balanced film, but it’s hard to find: most film is daylight-balanced.
This isn’t such an issue with digital photography, since DSLRs can be adjusted to any white balance setting you want; but mixing and matching light sources of different color temperatures can be a problem.
13.5.6Inconsistent color temperature
A flash tube fired repeatedly at precisely the same power output will produce light of the same color temperature over and over. Tungsten lights, however, start to age the moment they’re turned on. As the filaments burn and age, the tube interiors slowly blacken, resulting in a gradual yellowing of the light. In fact many photographers throw out photoflood bulbs the moment the color output starts to shift, which is long before the bulbs actually burn out. Flash photography is a better way to assure consistent color, which is critical for commercial applications.

13.52 This photograph of the Clockwork Quartet was deliberately lit with continuous tungsten lighting to convey a feeling of Victorian gaslight. The drawback is that the long exposure has caused some band members to blur slightly over the long exposure.
13.5.7Easily adjustable power output
It’s easy to adjust the power output from a flash tube by adjusting its power usage or pulse duration. However, tungsten lights radically drop in color temperature when dimmed, becoming quite orange. Fluorescent tubes are difficult to dim, and many can’t be dimmed at all.
13.53 An affordable hobbyist-oriented monolight.
13.6Cheap vs. expensive
Newcomers to photography are often flabbergasted at both the high cost of studio gear and the range of pricing. A pair of monolights, seemingly identical in terms of specifications, might be tremendously different in price. Why are some products so costly?
In photography, as in many things, it’s often a matter of getting what you pay for. The question is whether the price is worth it. Here are some key areas to consider.
13.6.1Reliability and repeatability
For a working professional, reliable and repeatable results are essential. Consider a radio trigger for a flash unit. A professional photographing an expensive model or actor, or covering a one-off event such as a wedding or news story, can’t afford a flash misfire. An amateur, on the other hand, probably won’t mind the occasional blank frame when the flash didn’t go off, because they can simply try again. There may be a tenfold difference in price between an auction site garage door opener special and the best sync-only flash trigger, but that difference is trivial to a professional on a commercial budget, particularly compared to the cost of a missed shot.
Another example is the heat generated by a monolight. A professional doing an assembly-line shoot of children’s school portraits, for example, will need to take thousands of photos a session, day in and day out. The flash must fire uncomplainingly every single time. But someone taking a few casual shots on the weekend probably won’t need this sort of solid reliability. It’s little more than an inconvenience to an amateur if a flash head overheats and shuts down until its thermal safety cutout cools; but such a failure can directly hit a professional’s wallet.

13.54 Specialized units, such as this Elinchrom Quadra HS transmitter and portable flash head, are expensive but often have unique features. HS units are capable of syncing to much higher shutter speeds than most studio flash units.
13.6.2Power and color consistency
Catalogue photos need to be precisely color-matched. Color variance can be extremely costly to a retailer, primarily in the form of lost revenue from customer returns. Someone photographing clothes for a catalogue, therefore, needs extremely accurate and repeatable color results. Not all flash units are capable of pumping the precise amount of electricity repeatedly through a flash tube to guarantee color accuracy, so the color temperature of a tube can vary slightly from shot to shot. Likewise, the brightness of the flash unit must be as consistent as possible for commercial work.
Again, this is an area that is largely irrelevant to the amateur. Color and brightness differences may be difficult to spot on consumer monitors, and can be fixed in software after the fact anyway.
13.6.3Unique features
Pro gear may have other specific features to address professional requirements. For example, some studio flash units have very brief light pulses to freeze motion as much as possible. Others may have expensive computer interfaces to make it easier to adjust power output from a central location. Still others may have massive power output capabilities to light a huge studio set.
There are many reasons why pro gear is so costly. But the point here is not that affordable equipment is necessarily of poor quality. It’s simply a matter of having realistic expectations, and of matching budget to equipment requirements as much as possible.