
12 Flash Accessories
Motorbike. An EOS 5D was attached to Floyd’s motorbike handlebars using a Manfrotto Magic Arm and SuperClamp. He then drove through Oxford Circus, London, England. A 580EX II was mounted on-camera and fired in E-TTL mode with the diffuser panel down. Safety note: the setup was extensively tested on a motionless bike before proceeding, as a blinded motorcyclist is not something anyone would want. 0.4 sec at f/5 to ensure motion blur of the areas not lit by flash, ISO 100, 17 mm.
Both camera shops and the Internet are filled with countless flash accessories vying for your attention. Some of these things are indispensable; others could be charitably described as possessing limited value. This section describes some of the more interesting light-modifying add-ons for small portable flash units.
Most of these accessories do one basic thing: enlarge the surface of the light-producing area relative to the subject. This softens and tames the harsh light of flash, as detailed in the chapter on basic technique. Some of the other accessories restrict the light or alter its color.
So, are these accessories useful? The answer is a qualified yes. They can definitely help in specific situations, and many have a following in the professional market. But they’re not a panacea for all flash problems. There’s no such thing as a universal magic accessory that covers all situations. Simply slapping a plastic tub onto a flash unit won’t automatically yield awesome photos. An on-camera flash unit, with accessories or not, is no substitute for skilled use of off-camera flash.
A key point is that flash compensation normally doesn’t need adjusting when using a diffuser in any automatic flash-metering mode that works through the lens. Your camera will adjust automatically for the stop or two of light that the diffuser soaks up, to the output limits of the flash unit. Of course, when using manual flash metering mode, you’ll need to factor in the reduced light output manually through testing.
Another key point to remember is that diffusers behave differently when used in different spaces. A common trap for beginners is to test out a new diffuser at home in a white-painted living room, then use it in a vast wedding hall. The reflective properties of the room are critical to the way most diffusers work.
This is important when viewing the sample photos in this book. Most were taken in a small studio with light-colored walls. Therefore, they won’t accurately convey the results of taking a photo with a given product in, say, a large hall. This chapter is a guide, but always research these items before buying them yourself.

12.1 The diffuser for a 430EX III.
12.1Flash diffusers
There are all sorts of add-on light-diffusing attachments that clip or tape onto the flash head. They usually cost a stop or two of light, easily halving the range. They come in two basic flavors: small diffusers and small panels.
12.2Small diffusers
Small diffusers don’t really enlarge the size of the light source, and so can’t, in themselves, soften the light very much. What they actually do is redistribute the flash unit’s light output so there’s more light scattering around, bouncing off walls and ceilings and so on. They help to reduce the “black hole” effect of flash photography by distributing light more evenly and thus providing illumination to the background. They also soften the light a little on foreground subjects.
Small diffusers are best suited for modest interior spaces or for macro photography shots without a macro unit. They’re less useful when shooting outdoors or in dark interior spaces, where there’s no way to bounce the light. In such situations they simply cut down usable range, waste power (meaning batteries and money) and increase flash cycle time. They’re also problematic when the walls or ceilings are painted bright colors, as the light bouncing off those surfaces will take on a color cast. Small diffusers also offer less control, as they just basically spray light around. But all this aside, they can be very useful, particularly for fast-moving journalist or wedding situations.
12.2.1 Sto-Fen Omnibounce
Milky white, open-ended plastic boxes that fit snugly over the flash head, Omnibounces approximate the way bare tube studio lights radiate light outwards in a near sphere. For this reason they’re very useful with wide-angle lenses. ![]() 12.2
12.2
Photojournalists often have these accessories permanently fastened onto their flash units, since they can help even out the spread of light when used indoors. Yellow and green versions are available for tungsten and fluorescent lighting. Because of their tight-fitting design, Omnibounces are made specifically for each flash unit model and aren’t available in generic one-size-fits-all versions.
Recognizing the popularity of these accessories, Canon now includes very similar diffusers with the 430EX III/430EX III-RT and 600EX/600EX-RT flash units.

12.2 Sto-Fen Omnibounce
12.2.2 Gary Fong Lightsphere
The Lightsphere is a heavier and larger diffuser that is popular with wedding photographers. Because a big device such as this puts out more light, and because its significant bulk and weight can be a problem for the hinges on smaller flash units, it works best with larger hotshoe flash units. The model shown here is of cloudy white plastic, though more specular versions made of clear plastic are also available. These accessories attach onto the end of a flash unit using fabric straps. ![]() 12.3
12.3

12.3
12.2.3 Demb Flash Diffuser
This product consists of two layers of translucent plastic attached via rivets to a strap, which allows the diffuser to be tilted forward or back to govern the amount of light hitting it directly from the flash head. It’s designed to be used in conjunction with the Flip-It! reflector in the next section, though it can also be used alone. ![]() 12.4
12.4

12.4
12.2.4 Speedlight Pro Kit Flexi Bounce
This fold-out diffuser, from Speedlight Pro Kit, combines a translucent diffuser made of flat polypropylene sheeting with three stippled reflective silver reflectors. The result is a device that reflects some light forward and causes the rest to bounce outwards. When used in a small to average-sized room with neutral-colored walls and ceiling, the light will bounce around and will reduce the black hole effect. It isn’t particularly sturdy when in use. ![]() 12.5
12.5

12.5
12.2.5Harbor Digital Design Ultimate Light Box
This modestly named translucent plastic box fastens to the end of a flash unit’s head, so it must be bought with the correct attachment mount for a given unit. It’s like a large Omnibounce with detachable components such as a color filters and a black plastic box to restrict side bounce and direct more light forward. It’s reasonably flexible, but the main box is bulky and awkward to pack when traveling. ![]() 12.6
12.6

12.6
12.3Small reflectors
Reflectors enlarge the surface area of the flash a small amount, but also reflect light towards any nearby wall or ceiling. They’re adjustable on small hinges, which allows a good deal of control. The reflectors can also be mounted on the long edge or the short edge of the flash head, depending on the orientation of the unit relative to the subject and the desired reflected direction. They don’t work so well outdoors or in a large dark room, where they soften the light on the foreground somewhat but do little to affect the background.
12.3.1Demb Flip-It!
The Flip-It! is one of the oldest products in this market, dating back to the 1990s. This panel, white on one side and black on the other, straps onto the top of a flash head with Velcro and is on a movable hinge. This allows more or less light to be reflected forward at any arbitrary angle. It easily attaches to either the long side or the short side of a flash head. A Flip-It! is shown here with the optional Demb Flash Diffuser. ![]() 12.7
12.7

12.7
12.3.2PRESSlite VerteX
This accessory ships as a small bag of components that must be assembled before use. It differs from the other two reflectors in that it has two separate halves that can be tilted independently. One side can reflect light forward, for example, while the other reflects light upward. One half can have a white matte card installed, and the other a mirror-like silver sheet.
It’s versatile, but at a cost: it takes some practice and fiddling to understand the ways in which the device reflects light, both directly and off nearby surfaces. When shooting, you have to stop and think about how light will reflect off the current surroundings. ![]() 12.8
12.8

12.8
12.3.3Hanson Fong Skin Glow
This accessory (unrelated to Gary Fong products) is a double-sided reflector. It’s similar to the Flip-It!, but one side is pure white and the other is colored a subtle warm tint. It has a slightly wider hinge, which is sturdy but also difficult to fasten to curved flash heads like the 580EX II. It is shown here attached with a Honl Speed Strap in both long side and short side positions. ![]() 12.9
12.9

12.9
12.4Medium-sized reflectors and diffusers
These mid-sized reflector panels essentially enlarge the light output area of the flash, softening the edges of shadows. Unlike small devices, these larger accessories are less reliant on white surfaces to bounce light and so are of more value outdoors or in dark churches, large banquet halls, and so on. However, they’re meant for close-range shooting—they won’t help much when taking pictures at a distance and indeed will hinder the process, as they cut the range of a flash unit by at least half. After all, a mid-sized panel some distance away becomes a small light source relative to the subject. ![]() 12.10
12.10

12.10 A classic difficult situation for a photographer: an aisle shot taken in a large abbey with a high, dark ceiling. There were no surfaces for bounce flash, and it was too dark to rely entirely on ambient light. Since things were moving rapidly, and a large reflector on a stand wouldn’t work, a flash unit with a Lumi-Quest Quik Bounce was used.
12.4.1LumiQuest Quik Bounce
This scoop-shaped vinyl device is angled forward slightly to catch most of the light thrown upwards by the flash head. It thus increases the area of the light-producing surface. It attaches to a camera’s flash head with the usual Velcro strips, or as shown here with a Honl Photo Speed Strap.
For a portable reflector, the Quik Bounce is reasonably large and offers a decent surface area for portrait shots, though it does tend to stick out vertically quite a bit. It has a pair of flaps that can be held open with Velcro, and which allow more light to escape upward for situations where you can use bounce flash; though the flaps can tear easily. ![]() 12.11
12.11

12.11
12.4.2LumiQuest Softbox III
This is a collapsible, vinyl, pyramid-shaped accessory that fastens onto the flash head with double-sided Velcro tape. It has a double-thickness oval patch in the center to reduce the hotspot effect caused by proximity to the flash head. The Softbox III is shown here attached to a Honl Photo Speed Strap, to avoid the messiness of Velcro tape. It’s effective for close-range work, though a little heavy for its size. It also blocks a flash unit’s autofocus assist light when directed forward, as it normally would be used. It flattens to a thin square for easy transportation. ![]() 12.12
12.12

12.12
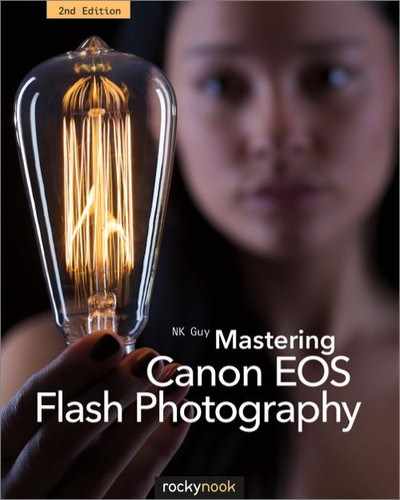
12.4.3Westcott Micro Apollo
This diffuser is essentially a fabric bag with a folding metal frame. It has a white fabric front and silver-lined black sides to reduce spill. The frame has Velcro attachments so it can fasten to the sides of a flash head. It’s fairly lightweight, sturdy, and folds flat for easy transport. It expands the size of the light-producing area, but only to about the size of a paperback book. Since it directs all its light forward, it’s intended for close-range use in portraiture. It’s awkward to use compared to similar add-on panel devices. ![]() 12.13
12.13
12.13
12.4.4Speedlight Pro Kit Reflectors
This is pair of reflectors (the 4 model and the 6 model) that ship as flat-pack kits containing numerous wedge-shaped panels. Their flat sides clip together to form pyramid-shaped flash diffusers. Notably, the reflectors can be accessorized with corrugated plastic grids and the like as they direct all their light forward. They break down easily for packing, but can easily come apart as the adhesive ages. ![]() 12.14
12.14

12.14
12.4.5Generic vinyl diffuser
This cheap, semi-transparent bag, bought from an Internet auction site, is frankly useless and makes no difference whatsoever in the quality of light. It does, however, amuse onlookers who may ask what the inflatable pillow is for. ![]() 12.15
12.15

12.15
12.5Large portable diffusers
Large diffusers offer softer light solutions but generally with less portability than small modifiers. Many are smaller or stripped-down versions of the light modifiers used in studios.

12.16 This picture was taken in direct sunlight with a California Sunbounce reflector positioned camera left. Note that a gold and silver striped surface faces the model for a slightly warmer color of light.
12.5.1Umbrellas
Umbrellas, the classic solution for increasing light-producing surface area in order to soften the light, come in a variety of sizes. They can be reflectors (silver umbrellas that reflect the light from a backward-facing flash unit onto the subject) or diffusers (translucent “shoot-through” umbrellas that spread the light from a forward-facing flash unit). Most are intended for studio use, but some collapsible models are particularly useful for location work. Collapsibles have struts that fold in half, making them quite small and portable.
Consider the photograph of ancient Noh theatre masks at the start of chapter 9. These masks were lit with a Speedlite bouncing off a collapsible silver umbrella. They would have been better lit by a softbox, as light hotspots are visible in shiny areas, but the portability of the umbrella meant it was possible to take these images on location at a private Noh theatre in Tokyo. ![]() 12.17
12.17
There is an important point about using a portable flash unit with an umbrella. In the photo below, the flash head has not been set to cover the entire surface area of the umbrella, which can lead to a hotspot, or brighter area in the center. This may be intentional, or it may be better to zoom the flash head out to provide more even coverage.
For more details on umbrellas, please consult section 13.4.2.

12.17

12.18

12.19
12.5.2Umbrella brackets
Umbrella brackets are simple metal or plastic brackets for attaching a Speedlite-type flash unit and an umbrella to a light stand. These tilting brackets have small holes with thumbscrews to fasten the shaft of the umbrella, and a cold shoe on the top for the flash unit. ![]() 12.18
12.18
There are also more flexible ballhead brackets made entirely of metal, which let the flash point in any direction but which can’t accommodate as much weight. ![]() 12.19
12.19
12.5.3Lastolite Ezybox
This portable fabric softbox pops open from a flat disc form, somewhat like a self-standing tent. It has a metal ring at the back to which a portable flash unit can be attached, though there’s no light seal around the edges of the opening. This softbox is ideal for positioning a soft light source close to a person’s face for on-site portraits. It’s somewhat larger and heavier than most of the previous accessories, but its larger surface area means it can provide a much softer form of light. ![]() 12.20
12.20
It has an optional extending handle for handheld use, though this is awkward without an assistant and a light stand may be easier when shooting solo. The hotshoe attachment takes a little practice to use effectively, though it has the advantage of leaving the flash unit’s controls fully accessible.

12.20
12.5.4Westcott Mini-Apollo
The 16-inch Mini-Apollo is a sort of hybrid between a softbox and an umbrella. It has a flat fabric diffuser front like a softbox (only one layer of white fabric), but collapses like an umbrella for easy transportation. It’s a lightweight and portable solution for improving flash quality. ![]() 12.21
12.21
Unfortunately, the Mini-Apollo is a little awkward to set up and use. It has a loose-fitting metal rod between the umbrella shaft and the flash unit that tends to wobble. The flash unit controls are not accessible without removing the diffuser fabric, so it’s vital to disable auto power-off. Oddly, the instructions show the flash unit facing forward, which defeats much of the purpose of a softbox. Facing backward loses power but increases the softness of the light.

12.21
12.5.5Westcott Recessed Front Apollo
The 28-inch Apollo is the Mini-Apollo’s much bigger brother. It’s also a square softbox design with an umbrella frame, so it takes up very little space when collapsed. ![]() 12.22
12.22
Unlike its smaller sibling the 28-inch Apollo relies on a fairly standard umbrella bracket to support a flash unit, avoiding the loose support system of the Mini-Apollo. This design is fairly sturdy, though it has the drawback of positioning the flash head high and off-center. ![]() 12.23
12.23

12.22 A pair of Apollo softboxes in their collapsed form: the Mini-Apollo is on the left, and the 28-inch Apollo is on the right.

12.23 A Westcott Recessed Front Apollo with the diffuser cloth rolled up in order to show the interior.
Given its size, this modifier really needs a high-powered flash unit to work effectively. In fact, it’s roomy enough to accommodate up to four battery-powered Speedlite-type units, given proper mounting brackets such as those from Denis Reggie (two-way) and Lastolite (three-way). This allows for highly portable softbox lighting with full support for high-speed sync.
12.5.6Westcott Rapid Box Octa and Strip
These collapsible softboxes offer an interesting design, partway between an umbrella and a softbox. They have sturdy frames and open instantly, and they provide a large area like a softbox. They come with heavy duty brackets. Note that since the flash shines inside the softbox from the back, it isn’t compatible with an Off-Camera Shoe Cord or anything that moves the flash unit up off the shoe. ![]() 12.24 and 12.25
12.24 and 12.25

12.24

12.25
12.5.7Roundflash Dish
This is a large flat cloth cone that attaches to the end of a Speedlite, turning it into a beauty dish with a fabric front. It has a fairly large area at the center with a black panel, so I’d say it has a smaller illuminated area than most beauty dishes I’ve seen. Folding up neatly as it does, it’s considerably more convenient and is a lot more portable than a large metal dish. ![]() 12.26
12.26

12.26
12.5.8California Sunbounce Micro Mini
The Micro Mini, from German maker California Sunbounce, consists of a lightweight H-shaped metal frame over which reflective fabric is stretched. An adjustable arm holds the flash unit, which bounces light off the fabric onto the subject. A sturdy and well-engineered reflector, it rolls up into a reasonably compact, though somewhat long, bundle.
The primary advantage of the reflector is that light is bounced back off a relatively large surface area, making the light very soft for portraiture. Its primary drawback is its size and its propensity to catch the wind like a kite when outdoors. It’s shown here attached to a light stand with a Manfrotto Superclamp, but it’s also designed to be held by an assistant—or by you singlehandedly, if you can operate the camera with the other hand. ![]() 12.27
12.27
The name “Micro Mini” might seem a little strange for one of the largest products in this section, but that’s because Sunbounce specializes in large professional products for commercial photography and TV and film production. By comparison, this reflector is small in their line of products. The model shown here has a silver-white surface on one side for neutral lighting and a gold-silver zigzag stripe (“zebra” pattern) on the other for warmer light.

12.27 The California Sunbounce Micro Mini
12.6Other flash accessories
In addition to devices for softening light output, there are various accessories available that can modify or shape light in different ways. These tools perform very different functions.

12.28
12.6.1Honl Photo Speed Strap
Most add-on flash accessories require Velcro adhesive strips to be added to the sides of the flash head, which look messy and leave a sticky residue. The Speed Strap is a way around the problem. It’s a pressure/friction fit rubber and Velcro strap that can be put on and off without any sticky mess. One minor drawback is that it has a rubber tag with the manufacturer’s label that can get in the way of some flash attachments. Nonetheless, it’s a flexible solution that’s compatible with most of the add-on accessories in this section. ![]() 12.28
12.28
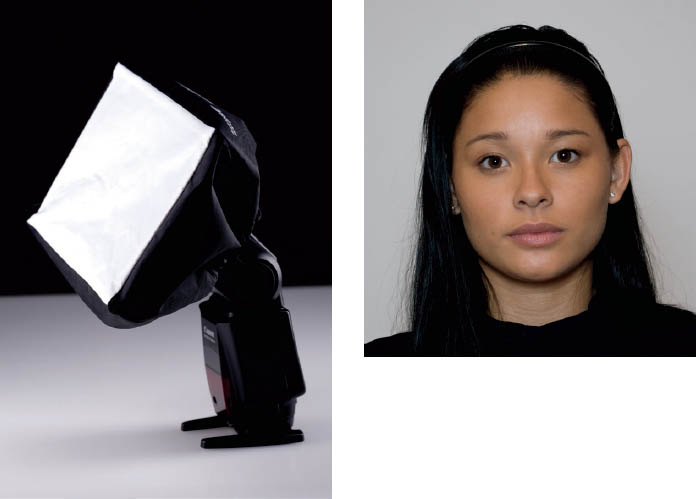
12.6.2HonlPhoto Speed Grid
This plastic grid fastens onto the end of a flash unit with a required Speed Strap and restricts the output of a flash unit to a narrow pool. Two versions are available: one with a 1/4" grid and one with a 1/8" grid. The latter offers a smaller area. While a useful accessory, the grid is larger than most portable flash units and thus doesn’t fit neatly over the head. ![]() 12.29
12.29

12.29
12.30

12.31
Note how grids work. They essentially direct a beam into a straight line by blocking sideways reflection. Figure 12.30 shows a pair of grids straight on and at a slight angle, showing how effectively they block off-axis light.
12.6.3Speedlight Pro Kit snoot with honeycomb
This unassuming grid is made of layers of corrugated plastic inside a rectangular sleeve. While rather low-tech and reliant on tape, it’s lightweight and convenient to use—a bit less crush-resistant than the Speed Grid, but quicker to attach. The grid section can also be moved within the sleeve for limited adjustment. ![]() 12.31
12.31

12.32
12.6.4Honl Photo snoot
A snoot is just a cone or cylinder that attaches to a flash unit and restricts light to a narrow area. Studio flash snoots tend to be metal cones, but Honl-Photo products are fabric panels. They attach to the flash head using Velcro and can be shaped into cylinders or cones as required. Simple, but versatile and useful for keeping light away from areas it shouldn’t be illuminating. ![]() 12.32
12.32
12.6.5Rogue FlashBender
This accessory is conceptually simple—it’s a rectangle of reflective fabric with some internal wires for bracing. The result is a flexible panel that can be bent and shaped, reflecting light as you require it (section 7.22.2). It straps to the side of the flash unit, has various optional accessories such as a fabric grid, and can fold up for travel. ![]() 12.33
12.33

12.33
12.6.6Walt Anderson Better Beamer flash extender, from Arthur Morris / Birds as Art
Very few flash units are able to zoom farther than 105 mm, so they scatter and waste a lot of light when used with very long focal length lenses. This can be a problem for nature photographers and others who habitually use telephoto lenses. At the distances they shoot, every drop in flash power is important.

12.34
The Better Beamer is a Fresnel lens mounted on a lightweight folding frame that attaches to a flash head with Velcro. The extender concentrates the light from the flash tube, giving more reach when using telephoto lenses 300 mm or longer. They’re invaluable for nature photographers who want a little fill flash for wildlife located a considerable distance away. The Better Beamer packs down to flat components for easy portability. ![]() 12.34
12.34
12.7Ringflash adapters
Ringflashes are ring-shaped flash units that fit around the end of a camera lens. They can be fairly small and low-powered, such as those used for macro photography (the Canon MR-14EX II is a typical example), or they can be large studio units (section 13.1.3).
Studio ringflash is commonly used in fashion photography, yielding a characteristic flat look, with no shadows on the foreground subject. Subjects lit with ringflash also tend to cast a signature dark halo shadow onto background surfaces. Ringflashes are expensive, large units. Macro flash units are portable but don’t offer much light output.
A number of companies have introduced light-guiding adapters that transform an ordinary shoe-mount flash unit into a ringflash. These adapters fit around the lens and contain various reflectors and baffles to provide a reasonably even light output. Neither is a full substitute for a true ringflash, but they do offer relatively flat and shadow-free on-axis lighting for portable situations. They’re just somewhat awkward to use. ![]() 12.35
12.35
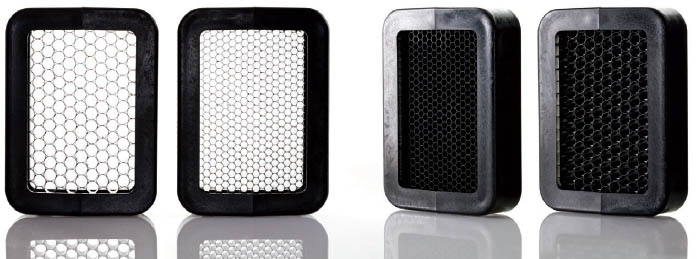
12.7.1Ray Flash
The first ringflash add-on commercially available, this unit requires a 500/600 series flash unit attached to the camera’s hotshoe. The adapter fits onto the end of the flash head and angles downwards 90° to the ring itself. ![]() 12.36
12.36
12.36
There are no supporting structures to keep the ring parallel to the image plane, so it tends to sag a little inwards from the weight. The adapter must be matched to a specific flash model—a single adapter won’t fit all flash units. The unit costs a bit over a stop of light.
It works reasonably well, though the weight of the device does seem to put some strain on the flash unit’s hinge. It also blocks the AF assist light on the front of the flash unit, making it very difficult to use in low-light situations.

12.35 This photo was taken using an orbis ringflash adapter. Note the flat lighting and the characteristic dark halo around the model. Color was desaturated for a vampiric look.
12.7.2orbis
The orbis adapter is similar in concept but different in execution. The adapter slides directly into the flash unit, which does not sit on the flash shoe. Instead, the adapter has to be held by hand around the lens, though the company does sell an optional bracket. ![]() 12.37
12.37

12.37
The primary advantages of the orbis are that less light is lost down a vertical tube of plastic, and the adapter does not block the flash unit’s AF assist light. However, these advantages may be somewhat theoretical, as the orbis doesn’t seem that much brighter than the Ray Flash. Also, the latter point is fairly moot since the whole rig must be held at a very specific angle for the AF light to line up properly with the focus points.
The orbis is a bit trickier to use off-tripod, since both hands are busily occupied holding things. If necessary, the flash unit could be attached to a light stand and mounted vertically, which would make things a little less cumbersome. Its light also has a notch cut out of the end where the flash unit attaches, so it doesn’t project a perfect circle, and this can be seen in the catchlight of an eye.
12.7.3Roundflash
The Roundflash takes a completely different approach from the other two, as it doesn’t have a hard plastic shell. It’s basically a fabric softbox ringflash, which means it’s much larger than the other devices in operation, at about 45 cm or 18 inches in diameter. This makes it fairly awkward and bulky once it’s set up, so it’s less suited for roaming around parties and so on, but it packs down to a tiny fabric bag for transportation. ![]() 12.38
12.38

12.38
It actually opens up very quickly due to its popup design assisted by ingenious magnetic rods. It can also be used as a flash modifier without a camera inside, sort of like a round softbox or diffused beauty dish.
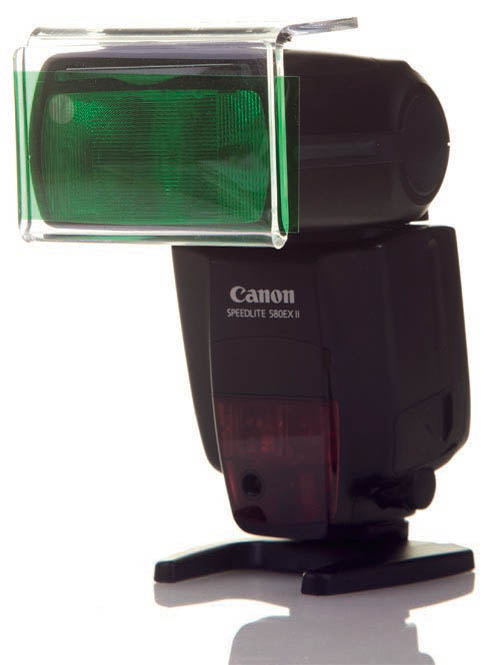
12.8Filter gels
The most common and affordable filters for light sources are paper-thin flexible plastic sheets known as “gels.” In years gone by, gel filters were made from animal gelatin, hence the name. Today, gels are made from sheets of polyester or polycarbonate, and they come in a dizzying variety of colors. They aren’t optically perfect like filters intended for lenses, because they’re tools for modifying light output.
Gels are usually sold in rather large sheets. They’re commonly used for theatrical and cinematic lighting, where the sheets are placed in front of large hot lamps. Gels have a pretty short lifespan when used in this way, since continuous lighting will fade or even melt gels quite rapidly. Flash is usually less stressful to the filter dyes and material, as flash bursts are so short, but gels still need to be replaced from time to time in situations where precise color accuracy is needed.
Larger flash units, such as studio flash, require big gel sheets cut to size. Since portable flash units are much smaller, huge gel sheets are kind of overkill. A great way to alter the light color from a small flash unit on the cheap is to go to a theatrical lighting store and pick up a gel swatch booklet, such as these from Lee Filters and Rosco Laboratories.
Swatch booklets are bound collections of gel filter samples—each coincidentally just large enough to cover the lens of a typical small flash unit—with paper slips describing the exact lighting properties of each gel. The booklets were once available for free, but usually cost money these days. Shops and filter-makers got kind of tired of subsidizing their use on small flash units. ![]() 12.39
12.39

12.39
12.8.1Gel holders
Only the Speedlite 600EX/600EX-RT has a built-in filter holder. On other models you need either strips of Velcro, bits of gaffer tape, or some sort of holder to hold the gels in place. Here are three filter holders for small battery-powered flash units.
LumiQuest FXtra
The LumiQuest FXtra is a vinyl filter-holding pouch that attaches to a flash head using adhesive hook and loop tape. It includes a small storage flap that can hold additional rectangular filters, and the product ships with a useful basic selection.
The holder is a great way to change the color of the flash in moments. The primary drawback is that it isn’t wide enough to fit larger flash heads. The diffuser panel bulge on the top of the 580EX II, for example, prevents the FXtra from fitting properly. It’s also easy to crease the filters, as it’s tricky to slide them into the tight clear filter holder. ![]() 12.40
12.40

12.40
HonlPhoto Filter Kit
The Honl filter system takes a different approach in that it doesn’t use rectangular, sample-sized filters. Instead, it’s a collection of Lee gel filters cut down to size and equipped with hook and loop strips. These strips are intended to fasten onto a Honl Photo Speed Strap, which is not included.
The filters curve over the head, as shown here. They don’t look great, but they offer full coverage of the flash head and easily fit any common portable flash unit. No carrying pack is supplied. ![]() 12.41
12.41

12.41
The Gel Holder is a piece of clear acrylic plastic, folded permanently into an L shape. It attaches to a flashhead using hook and loop fasteners, and can also attach to other products such as the Honl Photo Speed Strap.
The Gel Holder is designed to contain a sample-sized gel sheet. Its hard surface nicely protects the gel, and it’s easy to slide the gels in and out. It is a simple design, though one that lacks storage options for carrying gels around. Sadly, it doesn’t fit flash heads with curved tops, such as the 600EX, very well at all. ![]() 12.42
12.42
12.42
600EX/600EX-RT
As noted above, the 600EX/600EX-RT is the first Canon Speedlite to ship with an optional add-on filter holder (section 7.19). It’s designed to accept only custom-shaped Canon filters, unless you make your own with some gel material and a pair of scissors. Note that if you add your own filters you’ll want to disable the flash unit’s filter-detection feature, which is designed to work solely with Canon color filters.
12.9Flash projector
People have long used projectors of various kinds to shine photographic images onto backgrounds. A common technique for special effects photography in the days of film, it can also be done with static photography. However, it requires a lot of light—even a normal slide projector can require fairly long exposures. The Light Blaster is an attachment that lets you project images from slides using a flash unit, avoiding the long exposure problem. You can easily hack together something like this yourself, as it’s just a lens mount and bracket so you can use an ordinary 35mm camera lens to project the image, but the Light Blaster is much more convenient.

12.43

12.44 This experiment in cheesy 1990s hacker imagery, with its absurd projected text that never happens in real life, was surprisingly complex to light.
A 430EX III-RT, on a long shoe cord, was camera left and gelled green. It served as a radio master for a 600EX-RT camera right, which projected green text using a Light Blaster. To the right was a sheet of black card stock with holes. Clear push pins and red and yellow gels, backlit by a gridded flash, simulated an LED-covered panel. Two other studio units, one gelled blue, lit the background. The reflection of the screen in the mirrored shades took an additional 1/4 sec exposure once the flashes had fired.
The two main uses are projecting a picture or pattern onto a subject, or projecting an image on a wall or screen behind the subject (see example on page 322). If you don’t have any appropriate slides, there are companies that can make 35mm film slides from your computer files.
12.10 Do it yourself!
Many of the products listed are used by professional photographers. For pros, time is money. They need convenient and reliable solutions that work the first time, and a photojournalist might be a bit self-conscious gaffer-taping a cereal box to a flash head in front of a paying client. A lot of effort goes into designing a solid product, but most hobbyists have the luxury of time for experimentation, and they have less money to burn. There’s no need to impress anyone, so experiment and be resourceful!
A box lined with foil for a reflector. Black straws stacked together to make a grid. Plastic pipes and white nylon fabric for a diffusion panel. A salad bowl for a beauty dish. A translucent milk jug for a small diffuser. Cardboard and black gaffer tape for a flag. A Fresnel reading magnifier to extend a flash unit’s reach. And the classic white index card rubberbanded to a flash head for a bounce card. These homebrewed light-modifying solutions may not be terribly rugged, but they may produce results similar or equal to expensive commercial products. ![]() 12.45
12.45

12.45
Most traveling photographers also have their own favorite solutions for mounting flash units on location. Some screw coldshoes to sturdy painter’s clips. Some use thin-bladed palette knives or trowels and slide the metal piece in a doorframe or a shelf. And then there’s the infinitely flexible human (voice-activated) light stand . . . ask an assistant or a passerby to hold the flash for you.
12.11 Supports
There are countless ways to mount and attach battery-powered flash units. Here are some common accessories to do the job.
12.11.1 Plastic foot stand
Inexpensive plastic stands are included with all slave-capable Speedlites. They’re nothing more than a plastic base with a slide-in bracket, but they are effective for resting a remote flash on a flat surface. They can be stored in the flash unit’s carrying case. Extra stands are readily available from Internet auction sites at very low cost. ![]() 12.46
12.46

12.46 A Sigma flash unit on its stand
12.11.2 Light stand
Light stands are telescoping metal supports for lighting equipment. They come in a variety of heights and sizes, usually consisting of a central column with three folding legs located some distance down. This design makes them less sturdy and more prone to wobbling than camera tripods, but also makes them more portable. It’s easy to attach a cold shoe to the top of a small stand for a convenient, portable solution. ![]() 12.47
12.47
Most light stands are fairly large and heavy affairs, but Manfrotto Nanos have legs that fold upwards into the main shaft, resulting in a very small and portable unit. They’re only 19" long when folded, yet can reach six feet when fully extended. Stands like this are a mainstay of photojournalists who need lightweight, portable equipment.

12.47 A pair of Manfrotto Nano light stands
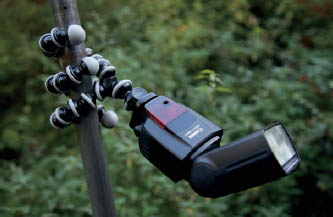
12.11.3 Joby Gorillapod
The Joby Gorillapod is engineered with an ingenious set of three flexible jointed plastic arms. The plastic “tentacles” can be wrapped around any convenient object, allowing cameras and flash units to cling to all manner of things. Shown here is the Gorillapod SLR model with optional add-on flash shoe, which can support the weight of this Speedlite 580EX II. Smaller versions support pocket cameras, and larger Gorillapods can handle even SLRs.
12.48
They’re particularly useful when working outdoors, where there are often few convenient flat or even surfaces. With a Gorillapod, a camera or flash unit can grip onto a tree branch quite easily, though they can’t reliably support the weight of a flash unit with a heavy modifier, like a softbox. ![]() 12.48
12.48
12.11.4 Justin Clamp
Figure 12.49 shows a Manfrotto “Justin” clamp (named after Justin Stailey, who designed it for photographer Joe McNally). It’s a metal clamp with rubber pads along its jaws and a tiny ballhead topped with a coldshoe. The clamp also has a 5/8" stud on the side.
The clamp allows a flash unit to be attached to all kinds of surfaces—tables, doors, shelves—and the ballhead lets it point in any direction required. Very versatile, especially for indoor shoots, though the awkward size and shape means it’s a little bulky for traveling. ![]() 12.40
12.40

12.49
12.11.5 Magic Arm
A Manfrotto Magic Arm is an indispensable piece of equipment for location photographers and filmmakers. It’s a sturdy articulated metal arm with screw-in points for clamps and brackets. It may be overkill for the typical flash unit, but it can be used in countless ways. The motorcycle shot at the start of this section, for example, was taken using a camera fastened to a MagicArm. ![]() 12.50
12.50

12.50 A Magic Arm with optional flash hotshoe attachment.
12.11.6 Kacey pole adapter
Painters and window washers use very long, sturdy, telescoping metal poles in their line of work. On the end of these poles is a standard tapered broom handle thread, onto which they attach paint rollers, squeegees, and other tools.
These poles haven’t gone unnoticed by photographers, who are always looking for ways to put cameras and light sources into new and interesting places. Such poles can serve as a high-vantage-point camera mount and can yield some interesting shots. They aren’t perfect, as the poles may flex; therefore, high shutter speeds are needed.
Cameras aside, they’re often used for attaching flash units so you or an assistant can carry around a portable light source up high. The Kacey pole adapter was designed for this. It’s simply a turned piece of aluminum with a broom handle compatible socket on one end and a 5/8" stud for a flash unit umbrella mount on the other. (Unfortunately, it lacks a 1/4" thread.) ![]() 12.51
12.51

12.51 A Magic Arm with optional flash hotshoe attachment.
12.11.7 Flash brackets
Large metal brackets for attaching flash units to a camera are popular with wedding photographers and the press for reducing the redeye effect. However, they serve other purposes as well. ![]() 12.52
12.52
By raising the flash above the lens, ugly flash shadows cast onto walls behind a subject are less visible. The shadows are still there; they’re simply below the subject and so may not appear in the final picture. Many flash brackets also have rotating attachments that keep the flash centered above the lens at all times—rather than having it on the side when taking photos in portrait orientation rather than landscape. This can involve flipping or rotating the camera rather than the flash unit.
The primary drawbacks of flash brackets are that they’re very large and cumbersome. They transform a camera into a gigantic rig, which can frighten human subjects or make them feel much more self-conscious than they would normally. Another drawback involves AF assist lights. A flash unit raised off the camera may have an assist light that, due to simple geometry, no longer lines up correctly with the camera’s focus points.
Canon makes the Speedlite Brackets SB-E1 and SB-E2 for use with 430EX/II, 580EX/II, and 600EX/600EX-RT flash units only. This simple horizontal bracket attaches to the mounting socket on the side of those flash units, providing sturdy and secure two-point mounting. The SB-E2 includes a weatherproof off-camera shoe cord. The SB units have no rotating function and position the flash unit to the side of the camera, not above it, making them more suitable for portrait use than landscape.

12.52 The 600EX is one of the few flash units with a special socket for attaching Canon’s Speedlite Brackets.

12.53 From left to right, a Stroboframe Quick Flip 350, a Custom Brackets Digital Pro-M, and a Canon Speedlite Bracket SB-E2. The Quick Flip allows the flash unit to be rotated above the camera. The Digital Pro-M takes a different approach; the flash remains stationary and the camera turns on a rotating bracket. The Canon Speedlite Bracket is compact but has no provision for flash unit or camera movement. It also requires a special mounting socket, which many Speedlites lack.
12.12Batteries
While not really an accessory as such, the humble battery is a vital consideration with any electronic device. After all, dead batteries transform a working tool into a useless paperweight. Most Canon flash units use four standard AA (variously known as penlight, R6, and most bizarrely, mignon; French for “cute”) cells.
Of the various battery chemistries available, NiMH and NiMH hybrids are by far the best choice. Disposable batteries are costly over time, and more importantly, are unnecessarily wasteful and harmful to the environment. A set of NiMHs with a good charger has a higher initial investment that will pay for itself over time, and the lowest environmental impact of current battery technology. Higher capacity batteries (NiMH capacities range from about 1600 to over 2850 mAh, or milliamp hours) are most convenient.

12.54
Another important factor is electrical resistance. Regular alkaline cells have a high resistance, which effectively means they’re reluctant to release power rapidly. NiMHs, however, have low resistance, which means they enthusiastically transfer a lot of power in a short period of time. This reduces recharge times when used in a flash unit.
Note that AAs consist of a single electrical unit and thus are technically cells and not batteries. However, I admit “cell” does sound a bit pedantic. ![]() 12.54
12.54
12.12.1 Standard AA (zinc carbon / zinc chloride / manganese oxide)
Pros: Generic, cheapest batteries sold, based on chemical designs over a century old. Ubiquitous—readily available at a drugstore or corner shop in an emergency.
Cons: Don’t provide much power. Can’t be recharged; wasteful. Slow to recharge between shots. Very vulnerable to leaking and corrosion when dead.
12.12.2 Standard AA alkaline (LR6)
Pros: Alkalines are cheaply and readily available anywhere. Store a lot of power and go a reasonably long time between replacements.
Cons: Last much longer than carbon zincs but otherwise have the same disadvantages. Can’t be recharged; poor choice environmentally and long-term economically. Slow to recharge: the time ranges from 6–20 seconds, depending on how new the batteries are. Not as effective as NiMHs in high-drain devices.
12.12.3 Rechargeable nickel-cadmium (NiCad/NiCd)
Pros: Relatively inexpensive, rechargeable hundreds of times. Low internal resistance and so can easily decrease a flash recharge time to 4 to 6 seconds.
Cons: NiCad cells contain cadmium: a toxic heavy metal. They must never be thrown into the garbage, and have to be disposed of as hazardous household waste. Limited capacity and thus short run time between charges. NiCad cells can drain dead (“self-discharge”) within a few weeks after charging. Some have non-standard casings that don’t maintain reliable electrical contact. Can’t maintain a full charge if recharged before being fully discharged, a voltage depression phenomenon sometimes called the “memory effect.”
12.12.4 Lithium AA (FR6)
Pros: AA cells using lithium chemistry. Store a lot of power, have long shelf lives, and recharge the flash at roughly the same rate as alkalines. Noticeably lighter in weight than other AA types.
Cons: Officially not recommended for use with Canon products as of 2014, because of their tendency to become very hot when used heavily. Expensive and not rechargeable (unlike the lithium ion and lithium polymer batteries used in cameras and computers). Steep death curves: will work fine and then suddenly run out of power. Cannot be mixed with other battery types.
12.12.5 Rechargeable nickel metal hydride (NiMH/HR6)
Pros: Affordable and rechargeable hundreds of times. Higher capacity NiMHs (2000–2500 mAH/milliamp hours) approach the runtime of alkalines. Less hazardous to the environment than NiCads. Rapid flash recycle time like NiCads: around 4 to 6 seconds. Not affected by the so-called memory effect.
Cons: Must be charged before first use, because they self-discharge quite rapidly, especially at warmer temperatures. Incompatible with NiCad chargers. Heavier than other AA batteries. Deliver consistent output during use, but drop rapidly when empty.
12.12.6 Hybrid / low self-discharge NiMH
Pros: All the advantages of NiMH, since they’re just a refinement of the NiMH design (“hybrid” is a bit of a marketing misnomer in this respect). Arrive from the factory conveniently pre-charged, and their low self-discharge rate also makes them more useful for occasional use. Most are billed as being able to be recharged 1,000 times. Rapid flash recycle time is similar to regular NiMHs.
Cons: Same as regular NiMHs. Slightly lower maximum capacities than regular NiMHs.
Summary? Most experienced photographers stick with hybrid NiMHs. They self-discharge slowly, charge up a flash quickly, can be recharged many times, and hold a lot of power. Sanyo/Panasonic Eneloop batteries in particular are very popular with pros. I’ve used them myself for many years and they’re sturdy and reliable.
12.12.7 NiMH Chargers
Chargers for NiMH batteries come in three basic varieties.

12.55
Cheap chargers (left) are not computer controlled and simply pump power into the cell. They usually have safety cutoff circuits to prevent overcharging, but tend to shorten battery lifespan because they can’t supply power at levels appropriate for the condition of the cell. Not recommended, especially older model chargers designed for NiCad cells, which can damage NiMH cells.
Smart chargers (center) contain computers and charge at different rates depending on the state of the cells (e.g., ramping up a charge versus topping up a charged cell). Unfortunately, the unit shown can only charge cells in pairs, which means that charge rates can’t be optimized for each individual cell. However, it’s ideal for traveling, since it doesn’t require a separate power brick.
Advanced smart charger / conditioners (right) also contain small computers, but the unit shown here can optimize the charge for each cell individually, something most chargers can’t do. Each charge rate can be manually adjusted, from slow (better for improved longevity of the cell) to fast (better when in a hurry). Larger models are available that can charge more than four cells at once.
It’s definitely worthwhile getting an advanced charger if you do anything more than the occasional round of flash photography. They help you get the most life out of each AA cell, and some units can even drain and condition a cell, which can rejuvenate (to a point) a failing one.
12.12.8 Other battery tips
Batteries can leak corrosive liquid when they’re fully discharged. It’s wise to remove any cells from a device that won’t be used for a length of time.
Some flash units can behave erratically when battery power is low. Weak batteries will produce long recycle times, but can also make the flash trigger randomly or the zoom motor buzz at odd intervals. Similar symptoms occur if the flash unit isn’t firmly seated in the hotshoe, or if the battery contacts are dirty or corroded.
Batteries are nothing more than chemical reactions contained in metal cans, and their power is reduced when they become cold. They resume normal performance when warmed up again.
12.13External battery packs
While portable and convenient, AA batteries are quite small and don’t have much capacity. This can be a real problem for working professionals who need to take large numbers of photos in a day. Cycle time also matters, and anything that can reduce the time between flash shots can be very essential for many pros.
Most of Canon’s high-end flash units have sockets on the side for external high-voltage (270 volts) battery packs. All Canon packs use the same proprietary connectors, which fit any Canon high-voltage compatible flash unit. Canon does not sell AC adapters for its flash units. ![]() 12.56
12.56

12.56
The packs have two basic functions: they speed up the flash’s recycle time between shots to a second or two (critical for news or wedding photography) and extend the run time between changing batteries. They can also be useful in cold weather, since the pack can be stuffed inside your jacket to keep the cells warm.
12.13.1 Battery pack types
The largest and oldest Canon pack is the Transistor Pack E, which takes six C batteries with the battery magazine. It can also take the optional NiCad Pack, which has its own special charger. This large bulky pack was the usual power supply for the old Speedlite 480G back in the 80s.
Far more convenient is the Compact Battery Pack E, which takes six regular AA alkaline, NiCad, or NIMH batteries. The Compact Battery Pack CP-E2 can also accept lithium AA cells. Either compact pack can be attached to the camera base using the tripod mount.
The slightly larger Compact Battery Pack CP-E3 uses eight AA cells. The Compact Battery Pack CP-E4 is similar as well as weatherproof when used with a weather-sealed unit such as the Speedlite 580EX II.
These packs have plastic battery holders called magazines. Additional magazines can be bought and preloaded with sets of batteries, allowing rapid reloads when on a shoot. The TP-E, CP-E, and CP-E2 have different sized magazines. The CP-E3 and CP-E4 have incompatible magazines because of the latter’s weatherproofing. ![]() 12.57
12.57

12.57
A number of other companies sell high-power battery packs compatible with the Canon high-voltage connector, usually via adapter cables. These include Quantum Instruments’ Turbo (lead-acid) and Turbo Z (NiCad), Lumedyne’s Cycler, and Dynalite’s Jackrabbit. These high capacity packs are fairly large and heavy. They don’t use standard batteries and must be recharged each time. ![]() 12.58
12.58

12.58 A Canon CP-E4, A Quantum Turbo 2×2, and a Quantum Turbo SC. The Canon pack contains AA cells, whereas the Quantum packs are sealed, rechargeable units with no user-replaceable cells.
While a necessary evil in many circumstances, packs are heavy, bulky, and inconvenient (especially larger third-party products); they also have to tether the flash unit to the pack via a coiled cord. Note that flash units will not work with a high-voltage external pack and can’t power its control circuitry.
Some manufacturers also sell low-power battery packs (such as the Quantum Bantam), which can be connected to most AA-powered flash units, even those that lack high-power sockets. They work by replacing the AA batteries with a dummy plastic shell and running a cord to the power pack. Such packs require small notches to be cut out of the battery door to run the wire. (A notched door on a used flash unit is a sign that it was used by a professional photographer, who may not have been very gentle with his or her gear!) These packs aren’t high-power and therefore can’t speed up the recycle time as dramatically—they’re more useful for increasing the number of shots between battery changes.
Keep in mind that portable flash units were not designed for continuous high-power use. It’s easy to damage a flash unit if too many high-power bursts are fired in a short period of time, something an external battery pack may make possible. Try not to fire flash bursts for longer than a few seconds, especially at full power manual or small aperture TTL firing. Smoke emerging from a flash unit is universal shorthand for “stop immediately!” Recent models like the 580EX II, 600EX/600EX-RT, and 430EX III/430EX III-RT have limiters or thermometers to reduce the risk of this happening.