Chapter 4: Taking Control of Sessions
In this chapter, you will see how you can ensure critical applications do not run out of bandwidth and less important applications are prevented from consuming too much bandwidth. You will learn how to bypass the routing table and make exceptions for certain sessions, as well as how to decrypt encrypted sessions and look within them to determine actual applications and stop threats.
In this chapter, we're going to cover the following main topics:
- Controlling the bandwidth with quality of service policies
- Leveraging SSL decryption to break open encrypted sessions
- Redirecting sessions over different paths using policy-based forwarding
Technical requirements
This chapter requires a working knowledge of measuring network bandwidth and available resources. You should understand the implications of sending packets over different interfaces, rather than where routes are pointing to, and you should have a good understanding of certificate chains.
Controlling the bandwidth with quality of service policies
Quality of Service (QoS) is the collective name for several technologies that can help improve the quality of applications and the data flows that they are applied to by prioritizing them over other flows or reserving bandwidth to ensure adequate throughput and acceptable latency. In this section, you will learn how QoS marking can be applied to a firewall to interact with network devices downstream.
There are two ways for a firewall to participate in applying QoS to network traffic:
- Differentiated Services Code Point (DSCP) and Type of Service (ToS) headers
- QoS enforcement through built-in capabilities
Let's review external headers first.
DSCP and ToS headers
DSCP headers allow the firewall to let upstream and downstream devices know that certain sessions have a certain priority. These headers can be set in the security policies under the Actions tab, as in the following screenshot:

Figure 4.1 – IP DSCP headers in a security policy
In DSCP, you can set Assured Forwarding (AF), Expedited Forwarding (EF), or Class Selector (CS) code points. The IP Precedence ToS can be used when communicating with legacy network devices and Follow Client-to-Server Flow can be used to apply inbound DSCP marking to a returning outbound flow.
In the next section, we will cover controlling flows directly in the firewall.
QoS enforcement in the firewall
The firewall can also enforce bandwidth restrictions or guarantees, and that's what we will focus on here. The Palo Alto Networks firewall uses a system of eight classes combined with policies.
Each interface is set up with a QoS profile that mandates how each class is treated, and then policies are created to identify sessions as belonging to a certain class. The default class is class4, so anything that is not caught by a QoS rule will automatically become class4 and be subject to the restrictions for that class.
We'll use the following topology to build an example QoS policy:
- An internet link on eth1/1 with a download bandwidth of 200 Mbps per second and an upload bandwidth of 50 Mbps.
- A DMZ network containing some servers on eth1/2 connected to a 1 Gbps interface.
- A LAN where the users sit on eth1/3 connected to a 1 Gbps interface.
- Users need 20 Mbps of guaranteed upload and download bandwidth for their enterprise Voice over Internet Protocol (VoIP), but some internet downloads need to be limited to 50 Mbps.
- File share traffic between users and servers needs to be limited to 300 Mbps.
- Site-to-site VPN connections need a 20 Mbps guarantee for business-critical applications.
This topology is illustrated as follows:
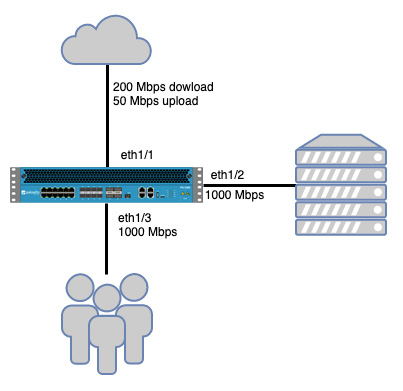
Figure 4.2 – Example topology
Next, we will start laying down the groundwork for what will eventually become QoS enforcement.
Creating QoS profiles
Go to Network | Network Profiles | QoS Profile; you need to create at least one new profile to get started. The classes themselves do not carry any weight, so class1 could be your most important class, but also your lowest, depending on how you configure its parameters.
The priority setting does require special consideration; the real-time priority has its own queue in packet processing, making sure that any packets that end up in the queue (due to bandwidth congestion) go out first. All the lower priorities (high to low) share the main queue, with the lowest priority packets being discarded first if packets need to be let go in favor of higher priority sessions.
Egress Max at the top of the profile is the total of the maximum and reserved bandwidths for the whole profile, while Egress Max next to the class indicates how much bandwidth all of the sessions in that class get to share.
Let's build a few profiles first:
- Create a profile called internet-upload.
- Set the profile's Egress Max value to 50 Mbps to limit the total bandwidth usable by the profile to 50 Mbps. This tells the QoS engine that it needs to use its queuing mechanism and prioritize packets once it reaches the maximum limit.
- Create class1, set it to real-time, and set a guarantee of 20 Mbps.
This profile can also be created with the following commands in the Command-Line Interface (CLI):
reaper@pa-220# set network qos profile internet-upload aggregate-bandwidth egress-max 50
reaper@pa-220# set network qos profile internet-upload class-bandwidth-type mbps class class1 priority real-time class-bandwidth egress-guaranteed 20
- Create a profile called internet-download.
- Set the profile's Egress Max value to 200 Mbps.
- Create class1, set Priority to real-time, and set its guarantee to 20 Mbps.
- Create class5 and set the Egress Max value to 50.
This profile can also be created with the following commands:
reaper@pa-220# set network qos profile internet-download aggregate-bandwidth egress-max 200
reaper@pa-220# set network qos profile internet-download class-bandwidth-type mbps class class5 priority medium class-bandwidth egress-max 50
reaper@pa-220# set network qos profile internet-download class-bandwidth-type mbps class class1 priority real-time class-bandwidth egress-guaranteed 20
- Create a profile called internal.
- Do not set this profile's Egress Max value; we will be mixing this profile with the internet one, so we will let the interface maximum egress determine the maximum for this profile.
- Create class8, set it to low priority, and set Egress Max to 300.
internal can also be created in the CLI, as follows:
reaper@pa-220# set network qos profile internal class-bandwidth-type mbps class class8 priority low class-bandwidth egress-max 300
- Create a profile called vpn.
- Create class4 and set it to guarantee 20 Mbps and to real-time priority; for this profile, we will let IPSec connections default to class4.
vpn can be created in the CLI, as follows:
reaper@pa-220# set network qos profile vpn class-bandwidth-type mbps class class4 priority medium class-bandwidth egress-guaranteed 20
The QoS profiles should look as follows:
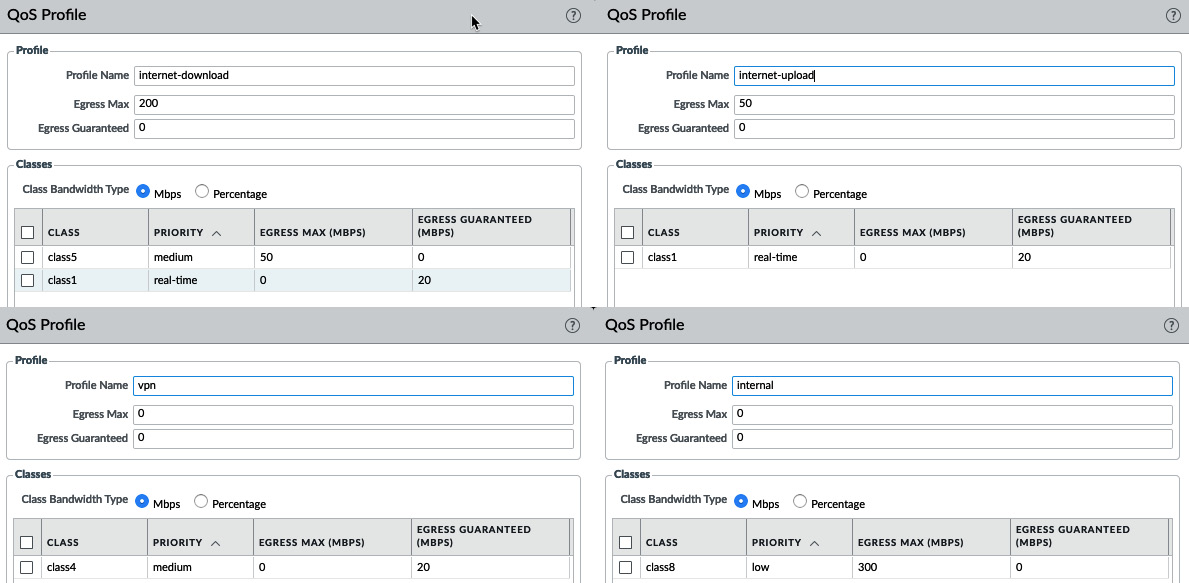
Figure 4.3 – QoS profiles
Next, the interfaces need to be set to enforce QoS. In Network | QoS, add all the interfaces. Then, for ethernet1/1, the internet-facing interface, do the following:
- Check the Turn on QoS feature on this interface box as illustrated in the following screenshot, or execute the following CLI command:
reaper@pa-220# set network qos interface ethernet1/1 enabled yes
- Set the interface Egress Max value to 50 Mbps to limit uploads to the internet:
reaper@pa-220# set network qos interface ethernet1/1 interface-bandwidth egress-max 50
- Set the internet-upload profile as a Clear Text profile so that classes can be applied:
reaper@pa-220# set network qos interface ethernet1/1 regular-traffic default-group qos-profile internet-upload
- Set the vpn profile as the Tunnel Interface profile (as in the following screenshot):
reaper@pa-220# set network qos interface ethernet1/1 tunnel-traffic default-group per-tunnel-qos-profile vpn
This applies QoS to any site-to-site VPN connections sourced from the firewall to a remote peer (on a local tunnel interface):

Figure 4.4 – eth1/1 QoS configuration
For ethernet1/2, the DMZ-facing interface, do the following:
- Check the Turn on QoS feature on this interface box as illustrated in the following screenshot, or use the following CLI command:
reaper@pa-220# set network qos interface ethernet1/2 enabled yes
- Set the interface Egress Max value to 1000 Mbps, but leave Clear Text as default and Tunnel Interface as none:
reaper@pa-220# set network qos interface ethernet1/2 interface-bandwidth egress-max 1000
reaper@pa-220# set network qos interface ethernet1/2 regular-traffic default-group qos-profile default
- In the Clear Text tab, set the Egress Max value to 1000 Mbps:
reaper@pa-220# set network qos interface ethernet1/2 regular-traffic bandwidth egress-max 1000
- Add a new profile line:
--Call it userupload.
--Assign the internal QoS profile.
--Set the source interface to ethernet1/3:
reaper@pa-220# set network qos interface ethernet1/2 regular-traffic groups regular-traffic-group members userupload match local-address address any
reaper@pa-220# set network qos interface ethernet1/2 regular-traffic groups regular-traffic-group members userupload match local-address interface ethernet1/3
reaper@pa-220# set network qos interface ethernet1/2 regular-traffic groups regular-traffic-group members userupload qos-profile internal
- Add a second profile line:
--Call it internet.
--Assign the internet-download profile.
--Set the source interface to ethernet1/1:
reaper@pa-220# set network qos interface ethernet1/2 regular-traffic groups regular-traffic-group members internet match local-address address any
reaper@pa-220# set network qos interface ethernet1/2 regular-traffic groups regular-traffic-group members internet match local-address interface ethernet1/1
reaper@pa-220# set network qos interface ethernet1/2 regular-traffic groups regular-traffic-group members internet qos-profile internet-download
These settings allow different profiles to be applied, as you can see in the following screenshot, depending on where the packets originate from. Downloads from the internet will be limited to 200 Mbps in total, and class5 can be applied to limit sessions to 50 Mbps as needed, while sessions from the user's LAN can use up to 1000 Mbps and limit the bandwidth to 300 Mbps uploads for the class8 sessions:
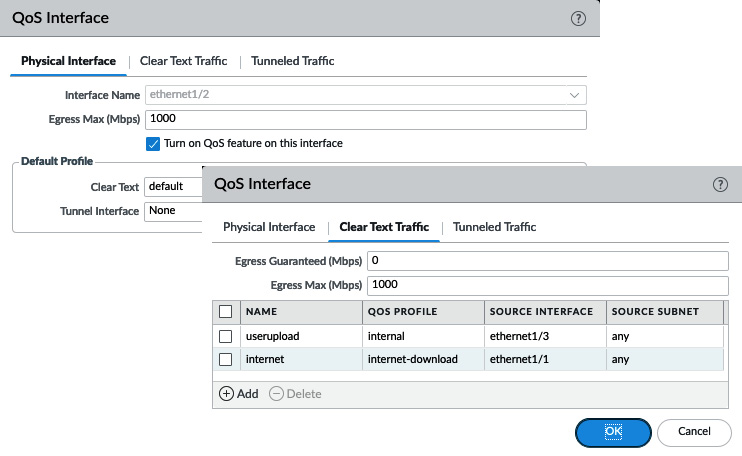
Figure 4.5 – eth1/2 QoS configuration
For ethernet1/3, the user-facing interface, do the following:
- Check the Turn on QoS feature on this interface box as illustrated in the following screenshot, or execute the following CLI command:
reaper@pa-220# set network qos interface ethernet1/3 enabled yes
- Set the interface's Egress Max value to 1000 Mbps, but leave Clear Text as default and Tunnel Interface as none:
reaper@pa-220# set network qos interface ethernet1/3 interface-bandwidth egress-max 1000
- In the Clear Text tab, set Egress Max to 1000 Mbps:
reaper@pa-220# set network qos interface ethernet1/3 regular-traffic bandwidth egress-max 1000
- Add a new profile line:
--Call it userdownload.
--Assign the internal QoS profile.
--Set the source interface to ethernet1/2:
reaper@pa-220# set network qos interface ethernet1/3 regular-traffic groups regular-traffic-group members userdownload match local-address address any
reaper@pa-220# set network qos interface ethernet1/3 regular-traffic groups regular-traffic-group members userdownload match local-address interface ethernet1/2
reaper@pa-220# set network qos interface ethernet1/3 regular-traffic groups regular-traffic-group members userdownload qos-profile internal
- Add a second profile line:
--Call it internetdownload.
--Assign the internet-download profile.
--Set the source interface to ethernet1/1:
reaper@pa-220# set network qos interface ethernet1/3 regular-traffic groups regular-traffic-group members internetdownload match local-address address any
reaper@pa-220# set network qos interface ethernet1/3 regular-traffic groups regular-traffic-group members internetdownload match local-address interface ethernet1/1
reaper@pa-220# set network qos interface ethernet1/3 regular-traffic groups regular-traffic-group members internetdownload qos-profile internet-download
These settings will limit the maximum Mbps when downloading (or streaming) things from the internet while guaranteeing that the class1 sessions are not deprived of bandwidth and that the bandwidth from the DMZ server is also maximized for all of the sessions to 1 Gbps, except class8, which is limited to 300 Mbps downloads. This should look as follows:

Figure 4.6 – eth1/3 QoS configuration
We have now created a framework that can apply traffic shaping to sessions. Next, we will define which applications are classified and how that is done.
Creating QoS policies
Without any QoS rules, only class4 will be enforced, which in the previous case will only set Egress Max to the maximum internet speed, but with no guarantees. The first policy we need to set will define enterprise VoIP as class1 so that we can guarantee 20 Mbps downloads over the internet link:
- Create a new rule by going to Policies | QoS.
- Call the rule enterprise voip.
- Set the zone(s) to the trust-L3 and dmz-L3 zones so that outbound calls are classified as class1.
- Set the destination zone where the sessions will egress the firewall.
- Set the class to class1:
reaper@pa-220# set rulebase qos rules "enterprise voip" from [ dmz-L3 trust-L3 ] to Untrust-L3 source any destination any category any application any action class 1
Your policy should look similar to the following:
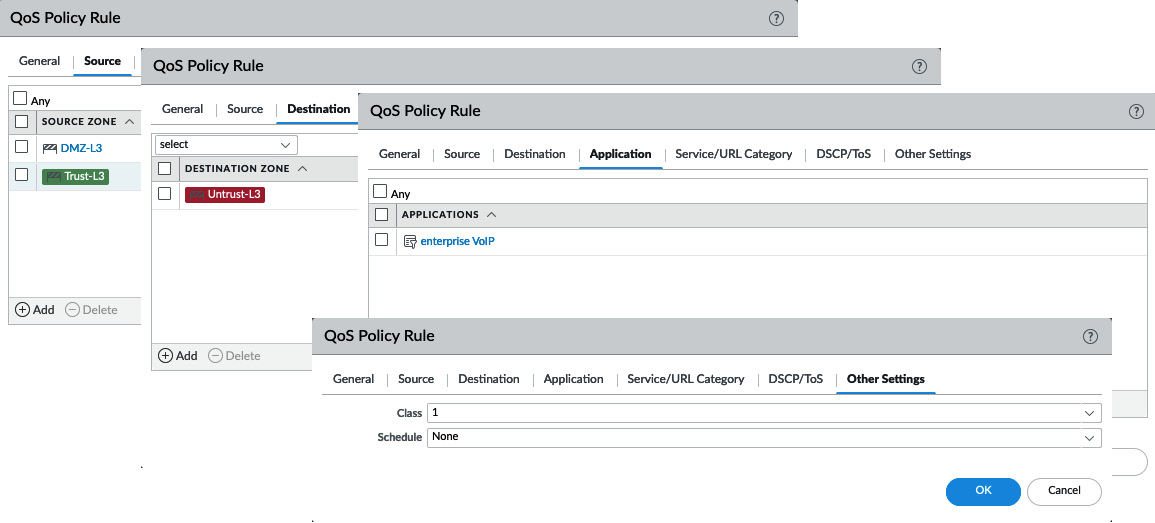
Figure 4.7 – Setting VoIP to class1 outbound
The second rule sets the same guarantee, but for sessions that are started from the internet (such as an inbound SIP call). Follow these steps to create an inbound rule (if inbound sessions are not allowed by the security policy, you can skip this rule):
- Create a rule and call it enterprise voip in.
- Set the source zone to the Untrust-L3 zone.
- Set the destination zone to the internal zones where calls can be accepted (the internal client or DMZ gateway).
- Set the class to class1:
reaper@pa-220# set rulebase qos rules "enterprise voip" to [ dmz-L3 trust-L3 ] from Untrust-L3 source any destination any category any application any action class 1
The inbound rule will look as follows:

Figure 4.8 – Setting VoIP to class1 inbound
We will also need to limit certain sessions between the user's LAN and DMZ networks. Assuming the security policy only allows users to connect to the DMZ and no sessions to be allowed from the DMZ to the user network, only one QoS rule will be needed as QoS classes are assigned to all packets in a session, regardless of their direction (so, class8 will be applied in both directions even if you only have your QoS rule set in one direction). Follow these steps to create an internal QoS rule:
- Create a new QoS rule and call it fileshares.
- Set the source zone to the Trust-L3 network.
- Set the destination zone to the DMZ network.
- Add the appropriate filesharing applications.
- Set the class to class8:
reaper@pa-220# set rulebase qos rules fileshares from trust-L3 to dmz-L3 source any destination any application [ ftp ms-ds-smb scps ] service application-default action class 8
- Save the changes.
Your internal rule will look as follows:
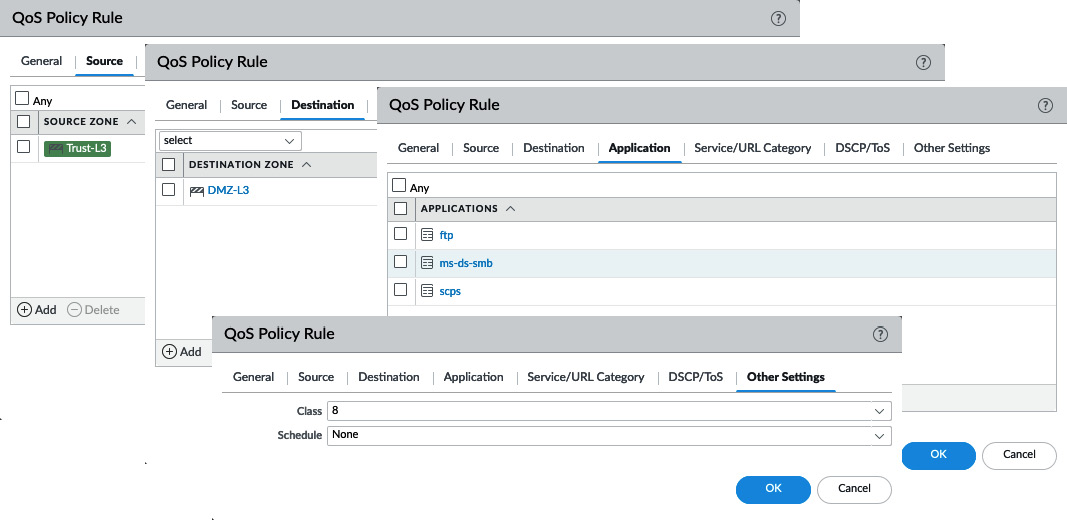
Figure 4.9 – Setting file transfer applications to class8
To quickly check whether the limitations and guarantees are being enforced properly, you can access a live graph next to each enabled interface from Network | QoS | Statistics:

Figure 4.10 – class 5 is limited to 50 Mbps
To recap, we have learned the following:
- QoS is applied to the egress interface.
- Bandwidth restrictions and guarantees are shared within a class, not per session.
- Real-time priority has its own queue; the others share a queue.
- Egress Guaranteed or Egress Max cannot exceed the interface maximum.
- Class4 is the default class.
- Classes may have different guarantees or limitations, depending on the direction of the packet.
- If a guarantee in a class is not filled, other classes may consume more bandwidth (without exceeding their max) until the guarantee is required.
You can now create QoS profiles and understand the implications of priorities, guarantees, and the egress maximum. You can apply these profiles to interfaces and define different profiles depending on the source interface. You can also create rule sets that classify applications so that they can be shaped according to your profiles.
In the next section, we will see how encrypted sessions can be decrypted and inspected and how applications within an SSL session can be determined and threats stopped.
Leveraging SSL decryption to break open encrypted sessions
SSL/TLS and SSH decryption perform a man-in-the-middle attack but for good instead of evil—an encrypted session is intercepted, then through the use of trusted certificates, the session is deciphered and the payload is made visible for content inspection and App-ID to take a look at. There are three modes of SSL decryption currently available:
- SSH proxy
- SSL forward proxy
- SSL inbound inspection
Let's look at each of them in detail.
SSH proxy
SSH proxy allows the interception of SSH sessions. It requires a decryption profile that contains a trusted root signing certificate, a Certificate Authority (CA), and allows you to control tunneling over an SSH session by setting a security policy for ssh-tunnel.
SSL forward proxy
SSL forward proxy is used for all outbound sessions. There are two distinct directions, and the outbound option is proxied because of how certificates are used to sign a website's SSL/TLS certificate. In the world of certificates, a handful of trusted organizations hold "trusted root signing certificates," which are regarded with the same authority as a notary with regard to signing documents. They sign off on a subset of subordinate or intermediary certificates, which are then used to sign off on server certificates, which represent domain names such as google.com or packtpub.com. This chain of trust needs to be resistant to attack so that "bad actors" can't set up a fake website and dupe visitors into trusting them, which makes legitimate interception difficult. For more details, refer to https://en.wikipedia.org/wiki/Public_key_certificate.
When accessing a website on the internet, the root and intermediary certificates can be any of the dozens of available options, so the only way to get the internal client to trust an intercepted connection is to replace the entire chain and make the client trust the root signing certificate. This can be accomplished in several ways, the most straightforward method being a manual import, but this may be more difficult to accomplish in a large environment. You can also leverage Microsoft Group Policy Objects (GPOs) and several other deployment methods, toolkits, scripts, and software packages; but whatever you do, don't let your users get used to ignoring a browser certificate warning—that is a dangerous habit to get into! Put in the time to install your organization's root signing authority and intermediary, or your self-signed root certificate and intermediary into the trusted root signing certificate store of all your clients' computers (and Firefox, as it uses its own certificate store). It will pay off in the long run, I promise.
If your organization already has a CA set up, you can simply have it create a new, easily identifiable intermediary that can be used for decryption. Export it with its private key and export the root certificate without a private key. Go to Device | Certificate Management | Certificates and import both, starting with the root.
If you do not have a CA available or you want to test the waters before you take a dive, we'll set SSL decryption up with a self-signed certificate for you to play with.
Go to Device | Certificate Management | Certificates and generate a root signing certificate by checking the Certificate Authority box and calling it root signing certificate. Then, create a subordinate certificate by setting Signed By as the root signing certificate and checking the Certificate Authority box and calling it decryption subordinate. Finally, make a third certificate that is not signed by the root signing certificate, set it as a CA, and name it untrusted cert.
You will need one certificate that your users will trust to decrypt websites. You also need an untrusted certificate because during decryption, the entire certificate structure is replaced with your own. If the real certificate has any problems, the firewall will keep decrypting but will use the untrusted certificate instead, so the user gets a certificate warning in their browser, making them halt and think about continuing.
These are the steps to create all the certificates you need:
- Create a new certificate and call it root signing cert.
- Set the CA flag.
- Fill out the attributes and click Generate.
- Create a new certificate and call it decryption.
- Set the CA flag.
- Set the Signed By field to the root certificate.
- Fill out the attributes and click Generate.
- Create a third certificate and name it untrusted cert.
- Set the CA flag.
- Make sure you do not set this one as signed by the root.
- As a minimum, set the Email attribute. This will help savvy users that investigate why they received a certificate warning find the relevant contact details.
Your certificates should look similar to the following:
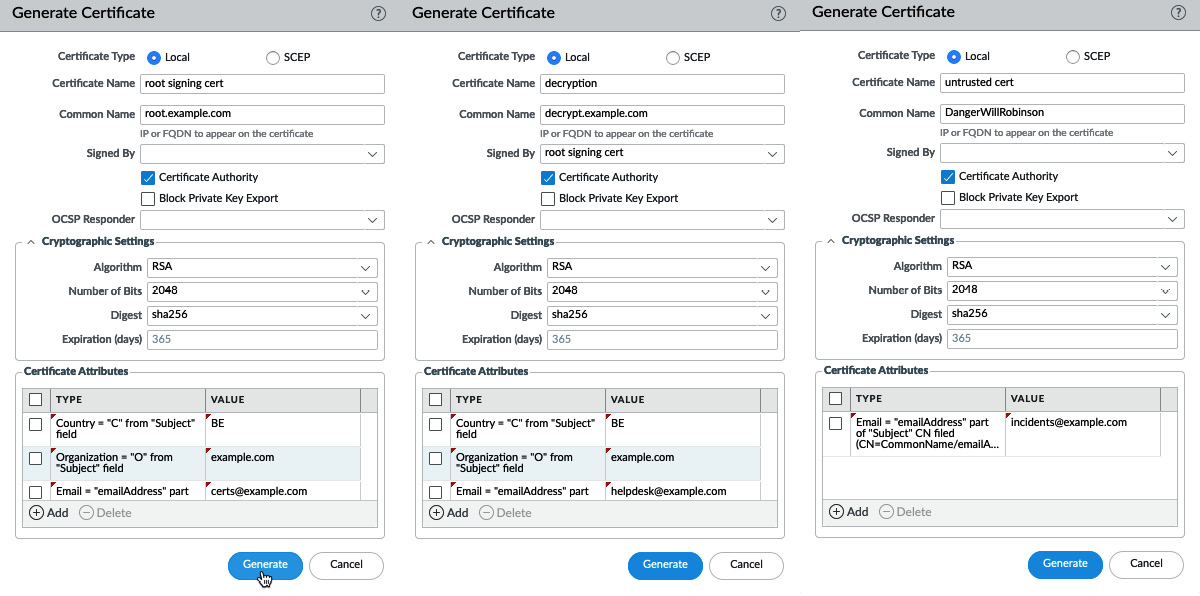
Figure 4.11 – The root, decryption, and untrusted certificates
When you click on the certificates, you can select three different options:
- Forward Trust Certificate
- Forward Untrust Certificate
- Trusted Root CA
Forward Trust Certificate is used for decryption and Forward Untrust Certificate is used if there is a problem with the upstream certificate and a warning should go out to users (if an upstream certificate is problematic or suspicious, using a trusted certificate would not prompt the user that there is something up as the firewall takes the responsibility of interacting with the endpoint). Trusted Root CA can be set so that the firewall itself trusts the root CA, which comes in handy if the dynamic update sessions go through the firewall and are decrypted.
Set each of the three certificates to their appropriate roles:
- Set the root signing certificate as Trusted Root CA.
- Set the decryption subordinate certificate as Forward Trust Certificate.
- Set the untrusted certificate as Forward Untrust Certificate.
You will now need to select the root signing certificate and export it to your computer. When asked whether you want to include the key, select No as you do not need it on your endpoints.
As the following screenshot shows, check the box in front of the certificate and click Export Certificate at the bottom:
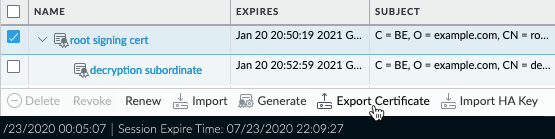
Figure 4.12 – Exporting the root signing certificate
Once exported, you need to import the certificate onto your test machine's trusted root certificate store. If you intend to use Firefox, remember to add it to Firefox separately as Firefox doesn't use the machine certificate store (Internet Explorer, Edge, Chrome, and Safari do use the machine store).
Next, you need to create a decryption profile by going to Objects | Decryption | Decryption profiles. The default one is a bit weak and we want to ensure that certificate enforcement is a bit more robust:
- Create a new SSL decryption profile and give it a useful name.
- In the SSL forward proxy and SSL inbound inspection tabs, enable all of the options unless you want to allow exceptions (maybe you need to allow unsupported versions because a partner has not updated their infrastructure just yet).
- In SSL Protocol sessions, disable 3DES, RC4, and SHA and set the minimum version to TLS1.2.
- In the No Decryption tab, set the flags to block expired and untrusted certificates.
- Finally, set all the flags on the SSH Proxy tab.
- Click OK.
Now that the certificates are loaded and the decryption profile is created, you can go ahead and create the decryption rules by going to Policy | Decryption.
Building a decryption rule is pretty much the same as building a security rule. There's a source zone and network, a destination zone and network, and a service or URL category (no applications here). However, the options are a little different here. You can choose to perform No Decrypt, which comes in handy if you need to account for privacy-sensitive topics, such as online banking or religion.
Important note
You will need to build a policy where you need to carefully balance work and private life, which is usually a mixture of local law and company policy. Consider whether your organization will allow certain URL categories to be accessed from company equipment or on the company's network. Also, consider whether decryption should be applied to some personal categories as it may be prohibited by law to inspect certain sessions.
Commonly, some categories are allowed to be accessed but are not decrypted for privacy reasons. These categories should be added to a No Decrypt rule and placed at the top of the decrypt rule base.
For everything else, create an SSL Forward Proxy rule.
These are the steps to set up your basic decryption policy:
- Create a new rule and call it no-decrypt.
- Set the source zone to Trust-L3.
- Set the destination zone to Untrust-L3.
- Set the URL categories to financial-services or any category that is accessible but should be treated as private.
- For the options, set the action to no-decrypt, type SSL Forward Proxy, and set the decryption profile:
reaper@pa-220# set rulebase decryption rules no-decrypt from trust-L3 to Untrust-L3 category financial-services profile "decryption profile" action no-decrypt type ssl-forward-proxy
- Create a second rule and call it decryption.
- Set the source zone to the Trust-L3 zone.
- Set the destination to the Untrust-L3 zone.
- Leave the URL categories as any.
- Set the action to decrypt, type SSL Forward Proxy, and set the decryption profile:
reaper@pa-220# set rulebase decryption rules decrypt from trust-L3 to Untrust-L3 category any profile "decryption profile" action decrypt type ssl-forward-proxy
- Save the changes.
When you open a web page now, you should see that the root signing certificate has replaced the original CA:

Figure 4.13 – Decryption certificate chain versus the original certificate chain
You're now able to set up the certificates needed for SSL decryption and build a decryption policy. In the next section, we'll set up inbound decryption for sites hosted in your environment.
SSL Inbound Inspection
SSL Inbound Inspection is used when the website is hosted locally and you have access to the server certificate and its private key.
You will need to import the server certificate, including its private key, the provider's intermediary, and the root certificate (you don't need the private keys of these last two; they simply serve to complete the chain). As the following screenshot shows, you need to import the certificate and the private key files:

Figure 4.14 – Importing a server certificate with a private key
When the chain has been imported, your certificate page should look something similar to this:

Figure 4.15 – Full certificate chain for your server certificate
Once you have imported the certificate chain, you can create the following policy:
- Create a new decrypt rule and name it after your domain name or server.
- Set the source zone to Untrust-L3.
- Set the destination zone to Dmz-L3 and the destination IP to your server public (pre-NAT) IP.
- If you run multiple sites, you can create a custom URL category containing your website. Leave this as any for now.
- Set the action to decrypt, type in SSL Inbound Inspection, set the certificate to your server certificate, and enable the decryption profile:
reaper@pa-220# set rulebase decryption rules examplecom from Untrust-L3 to dmz-L3 destination 198.51.100.5 category any profile "decryption profile" action decrypt type ssl-inbound-inspection exampledotcom
Because the firewall has the server certificate, it can decrypt in real time; no proxying is required.
You can now set up SSL decryption for both your users and your hosted environment and choose which categories to exclude or include. In the next section, we'll learn about changing how sessions are sent from the firewall.
Redirecting sessions over different paths using policy-based forwarding
Policy-Based Forwarding (PBF) allows you to set up rules that let certain sessions bypass routing entirely. In the first stage of packet processing, a session can be sent over a different interface than what the routing table would normally dictate. This could be handy if you want to send certain sessions over a secondary ISP link (or leased line) or if you need to ensure packets go out on a specific VLAN, tunnel, or SD-WAN interface.
Redirecting critical traffic
A common scenario is a small office with a cheap but unreliable DSL or cable uplink with high bandwidth for internet traffic and a reliable but expensive link for business-critical applications. While the default route in the virtual router directs all traffic out of the DSL or cable model, a PBF rule could redirect critical protocols, such as SAP, SQL, and so on, over your leased line:
- Go to Policies | Policy Based Forwarding to create a new rule, and call it redirect critical apps to ISP2.
- For the source, set your Trust-L3 network and subnet.
- For the destination, set the destination address/subnet or the FQDN that hosts critical applications. Don't set applications if you don't have to; use service ports if appropriate.
- From Forwarding, select the new egress interface and the next hop. The next hop could be a router IP, or none if you simply want to put traffic onto a VLAN or into a tunnel interface. If you are adding a next hop, add a monitoring profile and set it to failover, then check disable this rule if nexthop/monitor IP is unreachable so that your critical applications are routed over the regular link if your dedicated line goes down.
- The resulting rule will look like the following screenshot:

Figure 4.16 Policy Based Forwarding Rule
The rule can also be created using the following CLI commands:
reaper@pa-220# set network profiles monitor-profile failover action fail-over interval 2 threshold 3
reaper@pa-220# set rulebase pbf rules "redirect critical apps to ISP2" from zone Trust-L3
reaper@pa-220# set rulebase pbf rules "redirect critical apps to ISP2" source 192.168.27.0/24 destination any service service-https action forward monitor profile failover disable-if-unreachable yes ip-address 198.51.100.2
reaper@pa-220# set rulebase pbf rules "redirect critical apps to ISP2" action forward egress-interface ethernet1/8 nexthop ip-address 198.51.100.2
Important note
It is preferable to not set an application in the Destination/Application/Service tabs for uncommon sessions (for example, web browsing to different destinations). Stick to service ports and destination IPs instead as identifying an application takes a few packets; the first few packets cannot go through an app-based PBF rule and will take the routing table route. Recurring connections will be stored in the app's cache and can hit the PBF on the first packet. The caveat here is that the first session must be able to go through regular routing before the App-ID and associated tuples can be cached in app-cache.
You can now redirect important outbound sessions out of a different interface than the default route. In the next section, we will learn how to leverage multiple uplinks for inbound connections.
Load balancing
Another common scenario is when there are two or more uplinks and both are used to provide services (such as an internally hosted website or email server) to internet users. The default route could cause return packets to leave out of a different interface than the packets that they came in through, causing asymmetric routing and failed sessions for the client. PBF can be used to enforce symmetric return, redirecting reply packets to the original interface they came in through, even if the routing table would have sent them elsewhere. These are the steps to set this up:
- Set the source zone to the ISP sessions that they come in from.
- Set the destination IP to your server and the appropriate application and service port.
- The Forward Action sends packets out of the DMZ interface directly to the mail server, which is what regular routing would achieve. However, Enforce Symmetric Return sends reply packets out to the secondary ISP's router instead of using the default route (to ISP1):

Figure 4.17 – PBF rule set for Enforce Symmetric Return
Important note
Since the app's cache creates entries based on the destination IP address, destination port, and protocol ID, inbound PBF sessions to the same server are easily identified by their application in app-cache.
A common use case is to set up two virtual routers and connect a different ISP to each one. Then, configure a VPN tunnel on each virtual router so that there are two simultaneous uplinks to the remote site. PBF can then be used to route user sessions to the remote end over the primary link, and if this ISP were to fail, you can revert to the default route and use the backup link, as illustrated in the following diagram:

Figure 4.18 – VPN redundancy using PBF
You can now receive inbound connections on an interface that does not have (the dominant) default route and ensure return packets flow back through the original interface. In some cases, the fancy way is not always the best way. We will take a look at simplified link balancing in the next section.
Equal-cost multipath as an alternative
As an alternative to the previous scenario, Equal Cost Multi-Path (ECMP) routing can be enabled on the virtual router where the ISPs are connected. ECMP enables link balancing over multiple paths so that you can combine several smaller-bandwidth ISP connections for increased performance. Where PBF requires rules to direct specific sessions, ECMP simply spreads sessions over multiple links.
ECMP supports up to four paths:
- Enable ECMP by going to Network | Virtual Routers | VR, which holds your ISP uplinks.
- Set Symmetric return if you want packets to go back out through the same interface that they came in through. This is useful if you host services on one or both ISP subnets.
- Enabling Strict Source Path ensures firewall-sourced traffic (IKE/IPSec) is not subject to ECMP and will use regular routing to determine the route path. This setting should only be enabled if you require sticky VPN connections.
- Max Path tells ECMP how many interfaces can participate. This number should correspond to the number of uplinks you intend to balance over.
- As you can see in the following screenshot, there are several methods that you can choose from. Pick a method that best suits your needs:
-- IP Modulo uses a hash of the source and destination IP to determine which ECMP route to take.
-- IP Hash uses the source IP or source IP destination port to calculate which ECMP route to take.
-- Weighted Round Robin lets you decide which interface gets more or fewer sessions assigned to it based on a weight; a higher weight assigns a higher preference, as shown.
--Balanced Round Robin balances ECMP sessions equally across all uplinks:

Figure 4.19 – ECMP routing
In this section, you learned how to use PBF and symmetric return to manipulate how sessions are egressed out of the firewall, as well as how ECMP can help bundle ISP uplinks.
Summary
In this chapter, you learned how to shape sessions to prevent your internet uplink from getting flooded while guaranteeing business-critical applications always have bandwidth available. You can now implement decryption so that TLS sessions can be inspected for App-ID and threats, and you can leverage PBF and ECMP to control how sessions flow, regardless of routing.
In the next chapter, we will enable services on the firewall that are traditionally hosted on servers in the network and we will learn about setting the firewall in high-availability mode and adding virtual systems.