
Chapter 6: Identifying Users and Controlling Access
In this chapter, we will be learning about User Identification (User-ID) and the various ways in which we can intercept credentials or have users identify themselves. Once they're identified, their user-to-IP mapping can be leveraged to control which resources they can access. User-based reports can also be generated to keep track of users' habits or review incidents. In addition, we will link user-to-IP mappings to group membership so we can apply role-/group-based access control. This will help us to identify groups of users so they can access only the resources they need while roaming without the need for network segmentation or static IP addresses.
In this chapter, we're going to cover the following topics:
- User-ID basics
- Configuring group mapping
- Captive portals and authentication
- Using APIs for User-ID
- User credential phishing prevention
Technical requirements
This chapter requires a working knowledge of Active Directory and LDAP (Lightweight Directory Access Protocol), as we will be collecting information from, and making changes in, Active Directory and setting up an LDAP connection to collect user group membership information.
User-ID basics
In this section, we will learn how to set up the basics needed to identify users by preparing Active Directory and configuring the agent/agentless configuration to collect user-to-IP mappings. One universal truth is that for User-ID to work, the interface that receives connections from the users that need to be identified needs to have User-ID enabled in its zone, as you can see in the following screenshot. This setting needs to be active in local zones, or remote zones (such as VPNs) that receive user sessions, but should not be enabled for untrusted zones such as internet uplinks. In the include list, you can limit subnets to which User-ID is applied or exclude specific subnets by adding them to the exclude list:
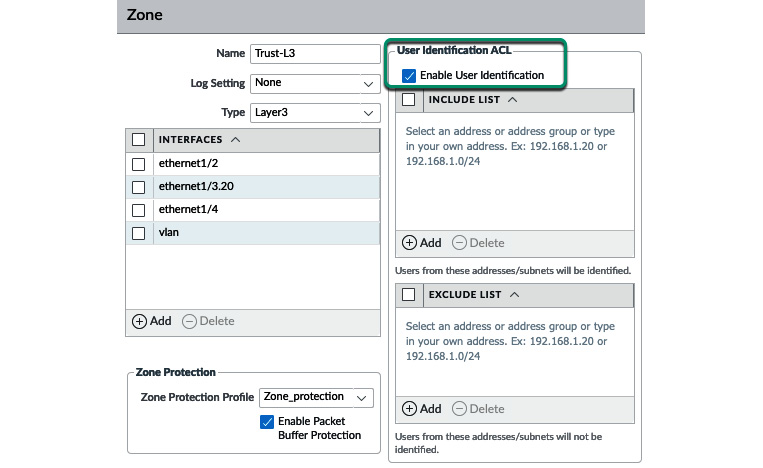
Figure 6.1 – User-ID in a zone
We first need to prepare Active Directory before we can start the firewall configuration.
Preparing Active Directory and setting up the agents
One of the first steps we need to take is to enable audit logging in the Active Directory (AD) local security policy, as, by default, the logging we want to see is disabled. The User-ID agent (or the agentless deployment) needs to be able to capture at least one of four possible event IDs from AD: 4768 (Authentication Ticket Granted), 4769 (Service Ticket Granted), 4770 (Ticket Granted Renewed), and 4624 (Logon Success).
You will need to navigate to Start > Windows Administrative Tools > Local Security Policy. Then, in Security Settings > Local Policy > Audit Policy, set Audit Logon Events to Success, which will start logging all successful logon events that the User-ID agent can use to map the user to their workstation's IP.
You will also need to create a service account, which will be used to do the following:
- Run the service if an agent is being used
- Connect remotely if an agentless deployment is being used
- Be able to perform WMI (Windows Management Instrumentation) probing
If using an agent, do the following:
- Create a new user in Active Directory Users and Computers | Managed Service Accounts. In the Member Of tab, add Event Log Reader. In the Dial In tab, set Deny access.
- Then, in Local Security Policy | Security Settings | Local Policy | User Rights Assignment, add the service account to Log on as a service.
- For security, you'll also want to add the service to Deny log on as a batch job, Deny log on locally, and Deny log on through Remote Desktop Services.
- To add the user via Group Policy Objects (GPO), if you intend to install multiple agents, do so via Group Policy Management | <domain> | Default Domain Policy and then right-click Edit. Then, select Computer Configuration | Policies | Windows Settings | Security Settings | Local Policies | User Rights Assignment and add the service account to Log on as a service, and the three Deny log on policies mentioned in step 3.
If you're going agentless, just follow the same steps as those listed previously, but also add the role of Server Operator to the Member Of tab in the service account.
With these settings, you will be able to reactively map user logon events to the source IP that initiated the logon, but there is also a way to actively poll who is logged on to a system, which we'll look at next.
WMI probes
One alternative method of collecting user information, or ensuring that a user is still logged on to their device, is having the agent send out periodical probes in the form of NetBIOS queries or WMI probes. NetBIOS does not require authentication and is a bit dated, making it less preferable than WMI. WMI uses authentication and is more secure (you may still need to allow it in the client firewall by adding Windows Management Instrumentation to Windows Firewall Exceptions). Let's look at what you need to do:
- To enable WMI probing, add the Distributed COM Users role to the Member Of tab in the User-ID service account.
- Next, you will need to set permissions for the service account to remotely probe systems: launch smimgmt.msc and right-click WMI Control (local) and open Properties.
- In the Security tab, select CIMV2, click the Security button, add the User-ID service account, and check the Allow box next to Enable Account and Remote Enable.
Important note
If User-ID is not set up properly, probing could generate a large amount of network traffic, so be sure to enable probing only when everything else is set up and operational.
User-ID agent
The next step is to download the agent from https://support.paloaltonetworks.com > Updates | Software Updates and install it on AD. Make sure to get UaInstall*.msi (UaCredInstall.msi is used for user credential detection, which we will cover in the final section, User credential detection).
Important note
If your AD is not an ideal location to run the agent, you can run it from a different server in the same domain and read the logs remotely. This will require the service account to be added to the Server Operator role. Reading event logs remotely will generate some load on the network, so make sure the server is close to your AD.
You will need to run the installer as administrator. If your Windows installer won't let you use the Run as option directly from right-clicking the file, a handy trick is to execute command.exe as administrator and execute the installer from the command line.
Once the agent is installed, you will first need to make two more adjustments:
- Right-click and open the properties of C:Program Files (x86)Palo Alto Networks, select Security, click Edit, and then add the User-ID service account and grant it full access to the directory.
- Open regedit and add the service account with full control permissions to the Palo Alto Networks key:
HKEY_LOCAL_MACHINESOFTWAREWOW6432Node (for 64-bit systems)
HKEY_LOCAL_MACHINESOFTWAREPalo Alto Networks (for 32-bit systems)
- From the Start menu (or from the install folder), run UaController.exe as administrator.
In User Identification | Setup, you can configure the agent. The access control list at the bottom lets you control which systems have access to the agent. You can restrict access to your management network or individual firewall IP addresses.
The configuration section at the top lets you set all the parameters in individual tabs:
- Authentication is where you need to fill in the service account used by the service and its password.
- In the Server Monitor tab, Enable Security Log Monitor is enabled by default and set to 1 second. This is the process that reads the AD event logs. In the following case, it connects each second and reads the logs that have been created since the last read. You can optionally enable Server Session Read, which is a process that keeps track of users who have mapped a drive or directory on the local system:

Figure 6.2 – The Server Monitor tab
- In the Client Probing tab, you can select whether you want to use WMI and/or NetBIOS probing, and the frequency of the probes. Mind the caveats mentioned in the WMI probing section.
- In the Cache tab, you can control how long user credentials are cached. By default, this is enabled and set to 45 minutes. This timer is a hard timer, which means the user mapping is removed after the amount of time indicated and needs to be refreshed by a new logon or authentication event.
In a fairly static office environment, my recommendation is to set this timeout to 9 or 10 hours, which is the length of a normal workday (and the default length of a kerberos ticket is 600 minutes), as users tend to come in, log in, and then sit at their desk most of the day, possibly not generating any more logon or authentication events. Adjust the timeout to how dynamic you anticipate your environment will be.
- In the Agent Service tab, you can set the port that will be used by firewalls to connect; the default is 5007. You can also enable User-ID XML API (default port 5006) if you want to use the API to inject user mappings directly into the agent.
- In the eDirectory tab, you can poll a Novell eDirectory server for user information.
- In the Syslog tab, you can decide to receive syslogs from an external system, such as a Cisco ISE. You'll need to define filters using regexes to scrape the logs for relevant information. These filters will vary depending on your syslog forwarder:

Figure 6.3 – User-ID Agent syslog service
Here's an example for Cisco ISE 2.2; your instance may vary, so some tuning may be required:
Event Regex
([A-Za-z0-9].*CISE_Guest.*NADAddress=.*)|([A-Za-z0-9].*CISE_Guest.*GuestUserName=.*)
Username Regex
User-Name=([a-zA-Z0-9@-\/\._]+)|UserName=([a-zA-Z0-9@-\/\._]+)
Address Regex
NADAddresss=([0-9]{1,3}.[0-9]{1,3}.[0-9]{1,3}.[0-9]{1,3})
Here's an example for Cisco ISE 1.3:
Event Regex
([A-Za-z0-9].*CISE_Passed_Authentications.*Framed-IP-Address=.*)|([A-Za-z0-9].*CISE_RADIUS_Accounting.*Framed-IP-Address=.*)
Username Regex
User-Name=([a-zA-Z0-9@-\/\._]+)|UserName=([a-zA-Z0-9@-\/\._]+)
Address Regex
Framed-IP-Address=([0-9]{1,3}.[0-9]{1,3}.[0-9]{1,3}.[0-9]{1,3})
- Once you have completed the configuration, click OK to save the User-ID agent setup.
In the User Identification | Discovery menu, you can add the AD servers you want to poll. If the service account has been set up properly, AutoDiscover will discover and populate all of the AD servers associated with your forest (using the _autodiscover._tcp SRV record in your domain DNS). To remove servers, check the box and click Delete.
The include and exclude lists let you select which IP ranges are expected to contain known users and let you manually add exceptions. Typical exceptions include terminal servers where multiple users are logged on at the same time (see the upcoming Terminal Server Agent section).
Important note
If you add an exclusion, you must also add included subnets.
Add your user subnets and add any excluded servers, and then click Save and Commit. Return to the User-ID main page. If, at the top, it is indicated that the service is stopped, click Start. From this view, you will see which firewalls have made a successful connection to the User-ID agent and which AD servers are being connected to.
Once user events start being collected, new mappings will start appearing in Monitoring.
Now that you have configured the User-ID agent and it is collecting user information, the next step is to connect the firewall to the agent so it can benefit from the collected information and match users to security rules.
Adding the User-ID agent in the firewall
In Device | User Identification | User-ID Agents, you can add a new entry for every User-ID agent you need to connect to.
As seen in the following screenshot, there are a few important settings:
- The Serial Number radio button can be used if you have a Panorama management server that is set up for User-ID redistribution. Panorama can be set up to collect information from individual User-ID agents and then function as a distribution point. Firewalls will connect to Panorama for user-to-IP mappings instead of User-ID agents.
- Host and Port lets you set an IP and port for an agent so the firewall connects directly to User-ID agents to collect user-to-IP mappings.
- The agent can be set up to function as an LDAP proxy, in case the firewall needs to perform LDAP authentication (for VPN users or administrators) but doesn't have direct access to an LDAP server.
- If NTLM authentication is configured in the captive portal, the firewall can proxy authentication requests via the User-ID agent (must also be enabled on the agent). If you can, use Kerberos instead of NTLM.
- User-ID collector information is used if the agent is another firewall configured in redistribution mode.
A normal User-ID agent configuration will look like what you can see in the following screenshot. Add NTLM or LDAP proxy functionality if needed, and add the User-ID collector name and the pre-shared key details if the agent is another firewall:

Figure 6.4 – Adding a User-ID agent on the firewall
Important note
When the User-ID agent is started, it will go and read the last 50,000 log entries in the event log to build a user-to-IP mapping database.
When the User-ID agent is stopped, it will retain its database for 10 minutes, after which the database is purged.
If you need to exclude specific users, such as service accounts, you can create a file in the User-ID agent install directory containing all the usernames, one per line. The file must be named ignore_user_list.txt.
You can use a certificate for authentication: create a certificate on your corporate Certificate Authority (CA), then import it into Server Certificate in the User-ID agent and create a certificate profile, and then add it to Device | User Identification | Connection Security on the firewall.
You are now able to set up a User-ID agent that is able to match a unique source IP to a username. Next, we will learn how we can set up a Terminal Server Agent for multiuser systems that host multiple unique users on the same source IP.
Terminal Server Agent
The Terminal Server (TS) Agent is used to identify users who are all logged on to the same system. This means they will all have the same source IP, so to differentiate them, their source ports are adjusted to an assigned block of ports, so the firewall can identify which user is initiating a session just by looking at the source port of a session.
Important note
Some endpoint protection software will proxy sessions locally and randomize the source port, which interferes with TS Agent. You may need to configure the software to not touch the source port, or disable the proxy functionality altogether, for User-ID to work.
Install TaInstall*.msi as administrator; some environments may not let you open the executable as administrator directly. As a workaround, you can launch a command prompt by right-clicking it and choosing to Run as administrator, and then executing the installer from the command line.
Run TaController.exe as administrator once installation is complete and access the configuration.
On the TS Agent, you will see whether any devices are connected, and you can configure an access control list to limit which devices are allowed to connect.
As seen in the following screenshot, in the Configure menu, you will see System Source Port Allocation Range and System Reserved Source Ports, which show the ranges of ports that are used for non-user sessions. These ranges are called ephemeral ports and are controlled by the host operating system (Windows). You can change this port range if you need to by following this article: https://support.microsoft.com/en-us/help/929851/the-default-dynamic-port-range-for-tcp-ip-has-changed-in-windows-vista:

Figure 6.5 – TS Agent configuration
- Listening Port displays which port the firewall can use to receive source port information and associated usernames.
- The Source Port Allocation Range value determines the block of source ports that can be used by user sessions. This range can be increased as needed, as long as it doesn't overlap with the ephemeral ports.
- Reserved Source Ports lets you add an additional range of reserved source ports that the system can use exclusively.
- Port Allocation Start Size Per User is the range of ports a user can use for outgoing sessions. Once a user requires more source ports, a new block will be made available until the Port Allocation Maximum Size Per User value is reached or the total pool of available source ports is depleted.
- Fail port binding when available ports are used up prevents users from making any more connections once the available source ports are depleted. Disabling this option will allow users to still create sessions, but these sessions may no longer be identified.
- Detach agent driver at shutdown can be enabled in case the TS Agent becomes unresponsive when you try to shut it down.
There are a couple of cool windows registry keys that can be found in ComputerHKEY_LOCAL_MACHINESOFTWAREPalo Alto NetworksTS Agent:
- AdvHonorSrcPortRequest (0 or 1 – 0 by default) is used to allow applications to request a certain source port. This could prevent User-ID because the source port may fall outside of the source port range used by User-ID. This setting is disabled (0) by default.
- ConfEnableTws (0 or 1 – 0 by default) enables polling on ports in TimeWaitState. This can be useful if users use applications that spawn many sessions and then leave open connections, starving new sessions of available source ports.
As you can see in the following screenshot, the Monitor menu keeps track of connected users:

Figure 6.6 – A detected user and the assigned source port range
Now that you have configured the TS Agent, connect it to the firewall so users can start to get matched against security rules.
Adding the TS Agent to the firewall
To add the TS Agent via Device | User Identification | Terminal Server Agents, do the following:
- Set a name.
- Set the main IP address or hostname.
- Change the port if the default port was changed on the agent.
- Add any additional IP addresses the server may have; this is optional of course.
The dialog box should look similar to the following screenshot:

Figure 6.7 – Adding a TS Agent to the firewall
You are now able to configure both agents and connect them to the firewall, but the firewall can also function as an agent, which does not require the installation of a piece of software. In the next section, you'll learn how to set that up.
Agentless User-ID
The firewall also supports a clientless version, where the firewall itself acts as the agent. In Device | User Identification | User Mapping, you can define four types of server that can be contacted to retrieve user information, as illustrated in the following screenshot:
- AD: Reads event logs over WMI, WinRM-HTTP, or WinRM-HTTPS
- Exchange: Monitors exchange connections over WMI, WinRM-HTTP, or WinRM-HTTPS
- Novell eDirectory: Accesses eDirectory user logins
- Syslog sender: Sets the firewall as a syslog receiver and sets a filter (including Aerohive, BlueCoat, Juniper, Cisco, Citrix, and Squid predefined filters over SSL or UDP):
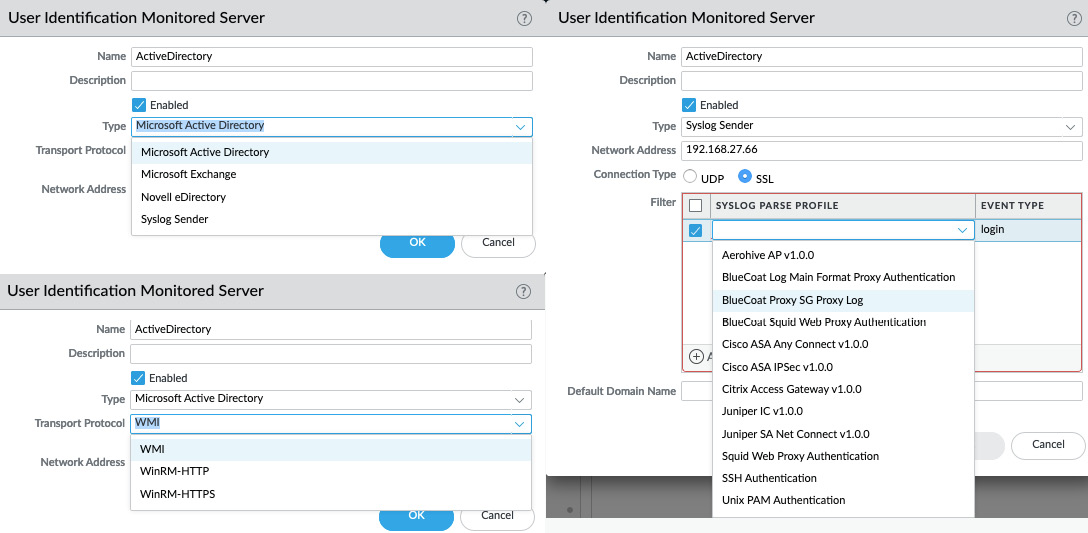
Figure 6.8 – Adding server monitoring servers
You can also autodiscover available servers by clicking Discover below Server Monitoring: make sure the firewall is configured to use the internal DNS servers (to pick up on the _autodiscover._tcp SRV record) and has the domain set in Device | Setup.
Add include/exclude networks to limit the scope to your actual user subnets and exclude servers that may need a TS Agent.
Configure the clientless agent and set the following settings:
- As illustrated in the following screenshot, do the following:
-In Server Monitor Account, add a service account.
-Make sure that on the ActiveDirectory server, the account is set as a member of Distributed COM Users and Event Log Readers.
-Enable the account for WMI probing.
-Set the domain's full DNS name (example.com).
-If you want to use Windows Remote Management (WinRM) to connect to servers, you need to add a Kerberos server profile (make sure that the firewall is set up with internal DNS servers, has the domain in Device | Setup | Management | General Settings, and has the NTP servers set).
-To use WinRM-HTTPS, also add a User-ID certificate profile in Device | User Identification | Connection Security:

Figure 6.9 – The Server Monitor Account tab
- As seen in the following screenshot, in the Server Monitor tab, log reading is enabled by default, and server monitor can be enabled, giving you control over the poll frequency in seconds. If the agent should listen for syslogs, an SSL/TLS profile can be added here if the connection is set to use SSL instead of UDP:

Figure 6.10 – Server Monitor
- In Client Probing, WMI probes can be enabled and their frequency can be set in minutes. Unlike the client installed on a server, the clientless deployment does not support NetBIOS probing. If you intend to enable probing, make sure that the include and exclude networks have been set up so probes are not sent to inappropriate or high-security networks.
- In Cache, you can choose whether user-to-IP mappings will live and how long they will live. Once the timeout expires, the mapping is removed and the user will need to create a new logon event before they can be identified again. For normal office environments, a timeout of 9 to 10 hours is usually appropriate. In a highly dynamic environment, a shorter period may be preferred. (In extremely static environments, a timeout may not be needed, although I would not recommend that.)
If usernames are to be collected without domains, enable Allow matching usernames without domain.
- If the captive portal needs to use NTLM, you can enable an NTLM proxy. Only one NTLM proxy can be set up per system, even if it is a multi-VSYS environment. If more are needed, agents will need to be deployed to serve as NTLM proxies per VSYS. Configure NTLM as follows:

Figure 6.11 – NTLM configuration
Important note
In PAN-OS 10.0, NTLM has been retired in favor of Kerberos.
- Redistribution enables the firewall as a User-ID agent for other firewalls: the firewall can only redistribute locally learned mappings (so not mappings it has learned from other firewalls or agents).
- You can add additional syslog filters or check out the predefined ones for inspiration. As you can see in the following screenshot, many vendors have been preloaded, so you don't need to create regexes to interpret syslogs:

Figure 6.12 – Syslog filters for popular network vendors
- If service accounts or specific user accounts need to be ignored, add them to Ignore User List.
You are now able to set up both the agents and the agentless User-ID to collect information from AD or probe the client for the logged-in user. In the next section, you will learn how to configure group mapping so that users can be identified by their LDAP/AD group memberships.
Configuring group mapping
If you are able to identify users on your network, you are also able to create security rules to allow or limit their access to certain resources. Role-Based Access Control (RBAC) can easily be enforced by binding LDAP groups to security policies, granting members of a certain organization within your company exclusive and reliable access to the resources they need wherever they go.
To get started, we need to create an LDAP profile so we can fetch group information. Go to Device | Server Profiles | LDAP and create a new profile. You will need one LDAP profile per domain in a multidomain or forest configuration.
There needs to be at least one server, but there can be up to four for redundancy. Don't forget to change the port (389 by default) if you're going to use TLS encryption:
- Add at least one server by IP or FQDN and set the appropriate port (389 unencrypted, 636 for TLS).
- Set the type to active-directory unless you have a different deployment (sun, e-directory or 'other').
- If you set the IP and port correctly, the base Distinguished Name (DN) will load automatically once you click the drop-down arrow. You can add Organizational Units (OUs) and Common Names (CNs) if needed.
- Bind DN is the account that's used to read the directory structure and all members. A regular user-level account is sufficient; no special privileges are required unless you have hardened your LDAP environment.
- Click OK and create additional profiles if there are more domains.
If all went well, your LDAP profile should look as follows:

Figure 6.13 – The LDAP Server Profile window
If you have Universal Groups, do the following:
- Create an LDAP server profile that connects to the root domain of the global catalog server on port 3268 or 3269 for SSL.
- Create an LDAP server profile to connect to the root domain controllers on port 389 or 636 for SSL.
This will ensure that you are able to get information from all domains and subdomains.
The next step is to read the available domain tree and select which groups to monitor and keep user information on. Go to Device | User Information | Group Mapping Settings and create a new group mapping object:
- Create a friendly name and set the LDAP profile you just created.
- The update interval for the firewall to recheck user membership is 60 minutes, but it can be configured to be between 60s and 24h.
Important note
This interval means that when adding a new user to a group on AD, it may take up to an hour before the firewall is made aware of this change. Rather than setting the update interval really low, you can manually refresh the group memberships with one of the following commands:
> debug user-id refresh group-mapping group-mapping-name <profilename>
> debug user-id refresh group-mapping all
- In the User Domain field, you can optionally add a domain (NetBIOS, not FQDN) to override all user domains retrieved from the LDAP. This could be handy if User-ID picks up specific domains but LDAP has them listed differently. For a global catalog LDAP profile, leave this field empty as it would override all user domains.
- There are also search filters available for group and user objects. (sAMAccountName or userPrincipalName (UPN) are useful filters for the user object.)
The Server Profile tab should look similar to the following screenshot:

Figure 6.14 – Group mapping server profile
In the User and Group Attributes tab, you can fine-tune which attributes are included in the returned results. By default, sAMAccountName, email , and UPN are all set, with sAMAccountName set as the primary username. It is useful here to review which attribute is returned by your available User-ID sources and set that as the primary username (if the User-ID agent returns UPN usernames, set userPrincipalName as the primary username).
For Sun or e-directory type servers, the attribute will likely be uid.
In the Group Include List tab, you can add the groups you want to use in security rules. You can add all the groups you want to create specific rules for by expanding the base DN on the left-hand side and adding groups of interest to the right side, as shown in the following screenshot. There is no need to add groups that will not be used in security rules, nor the cn=domain users group. For rules that should apply to all users, the known-user user option is available in security rules to indicate any legitimately identified user:

Figure 6.15 – Group Include List
If custom attributes are used within your organization, the Custom Group tab lets you set filters to identify and record usernames in these attributes. Make sure the attributes are indexed on the LDAP to expedite searches.
A useful command to verify which attributes are captured is show user user-attributes user all:
admin@firewall> show user user-attributes user all
Primary: example omfromit
Alt User Names:
1) example omfromit
Primary: examplejimfromhr
Alt User Names:
1) examplejimfromhr
You can also list which users are in each group, to ensure that the data is being retrieved correctly. Retrieve a list for all available groups via show user group list. You can use both the DN and NetBIOS formats for the group via show user group name <groupname>:
admin@firewall> show user group name cn=hr,cn=users,dc=example,dc=lab
short name: examplehr
source type: proxy
source: example.lab
[1 ] examplejimfromhr
Important note
The source type in the preceding code is set as proxy, because one of the User-ID agents is configured as an LDAP proxy. Without the User-ID acting as proxy, the source type would be as follows:
source type: ldap
As you can see in the following screenshot, you can now build security rules where the source (or destination) usergroup can be selected to grant or deny a group of people access to a resource. The little icon next to the user object indicates whether the object is a group or a user. known-users indicates that the firewall will match any user, as long as they are identified:

Figure 6.16 – Source user in security rules
You are now able to use group mapping to apply security rules to sets of users. In the next section, we'll take a look at captive portals, an alternative way to identify users that combines with authentication.
Setting up a captive portal
A captive portal is a service that runs on the firewall and intercepts web sessions to have a user identify themselves. This can be a good addition to your user identification capabilities for unsupported operating systems that do not log on to the network, or guests that come into your network that you want to be able to identify.
It can also help pick up "strays"; for instance, a laptop may be used to roam a campus and hop SSIDs and Access Points, and it may be assigned a new IP address without generating a new logon event on Active Directory. At this moment, the user becomes unknown and a captive portal can be triggered to have the user log in manually.
To set up a captive portal, we will first need to be able to authenticate users, which we will cover in the next section.
Authenticating users
To be able to authenticate users, we need to create an authentication profile that manages which protocol and server will be used. Create a new profile in Device | Authentication Profile:
- In the Authentication tab, set the desired type (LDAP, local, RADIUS, TACACS, SAML, or Kerberos).
- In Server Profile, select a matching server profile. You can create one from the drop-down by clicking the New link if you haven't created a profile yet. In most cases, this is just the IP and port of your server.
- By picking the type, all the common attributes for your preferred authentication method are prepopulated. Make changes if any are needed (for example, LDAP may need userPrincipalName instead of the default sAMAccountName).
- Username Modifier lets you change how the username is passed on to the authentication server. The default is %USERINPUT%, which passes along the user's exact input. %USERDOMAIN%\%USERINPUT% changes the user's input to domainusername and %USERINPUT%@%USERDOMAIN% changes it to [email protected]. This could be helpful if your users log on with all kinds of different usernames and your authentication server prefers a certain flavor.
- If your domain supports Kerberos Single Sign-on, enter the Kerberos domain and import the kerberos keytab so users are able to authenticate transparently. This URL can help you generate a keytab: https://docs.microsoft.com/en-us/windows-server/administration/windows-commands/ktpass.
For an LDAP profile, the Authentication tab should look similar to the following screenshot:

Figure 6.17 – Authentication Profile
- Optionally, you can enable MFA by checking Enable Additional Authentication Factor in the Factors tab and selecting which MFA provider to use.
- In the Advanced tab, you must select which users will be allowed to authenticate. If all users are allowed to authenticate, add an entry and set it to [all].
As per the following example, set Account Lockout to 4 failed attempts and set the lockout time to 30 to discourage brute-force attacks. A lockout time of 0 locks the account permanently until an administrator manually unlocks it. If Failed Attempts is 0, no lockout will occur:

Figure 6.18 – Advanced Authentication Profile settings
We will also need to create an SSL/TLS server profile so that the captive portal landing page uses a trusted certificate.
You will first need to set up an appropriate certificate to use in the server profile:
- In Device | Certificate Management | Certificates, import a server certificate that's signed by your domain CA, or create a new self-signed server certificate that is signed by the self-signed root CA (the one we created for SSL decryption). This will ensure that the clients don't get a certificate error message if the root CA is properly trusted. This certificate CN should be an FQDN (cp.example.com) that can be resolved on your internal DNS, or you should have the CN set to the IP address of the firewall interface that will be used as the redirect destination. The generation page should look similar to the following screenshot:

Figure 6.19 – Generating a server certificate for the captive portal
- In Device | Certificate Management | SSL/TLS Service Profile, create a new profile and name it captiveportal, add the captive portal certificate, and set Min Version to TLSv1.2, as you can see in the following screenshot:

Figure 6.20 – Creating an SSL/TLS service profile
To accommodate a redirect page on the firewall interface, an Interface Management Profile needs to be created that has Response Pages enabled. Create one in Network | Network Profiles | Interface Mgmt:
- Set an identifiable name.
- Enable Response Pages.
- Enable Ping for troubleshooting.
The profile should look as follows:

Figure 6.21 – Interface Management Profile
Attach the profile to the physical or loopback interfaces that will serve the captive portal by going into Network | Interfaces | Interface | Advanced | Other Info | Management Profile and adding the profile.
Lastly, Enable User Identification must be enabled in the zones associated with the interfaces that host user subnets. Go to Network | Zones and check the box in every zone that has users who need to be intercepted. Do not enable this on an external zone.
Now that all the preparations have been made, we can set up the captive portal.
Configuring the captive portal
In Device | User Identification | Captive Portal Settings, edit the settings of the captive portal:
- Make sure Captive portal is Enabled.
- Idle Timer (the default is 15 minutes) indicates how long a user can remain idle before their session is expired, and Timer (with a 60-minute default) indicates how long a user session lasts before the user needs to reauthenticate.
- The GlobalProtect (GP) port is used to help GP pop up an MFA authentication dialog if MFA is configured and the user has GP installed; the default port should not be changed.
- Set the SSL/TLS Service profile.
- Set the Authentication profile.
There are two modes to choose from, with redirect being the preferred one:
- Transparent mode intercepts the outbound session and impersonates the original destination URL while sending the user an HTTP 401 code to request authentication. Because the firewall is impersonating the remote site, the user may receive a certificate error.
- Redirect mode injects an HTTP 302 redirect message, prompting the browser to connect to the redirect host for further instructions. There, the user will be prompted for credentials or get authenticated transparently through NTLM or Kerberos. Redirect mode enhances user experience while roaming by supporting session cookies and enabling a longer session timer as the cookie travels with the user.
Important note
Both modes will also work with HTTPS sessions if you have SSL decryption enabled.
To set redirect mode, follow these steps:
- Select the Redirect radio button to Enable Redirect mode.
- Enable Session Cookie and Roaming.
- The default timeout of the session cookie is 1,440 minutes, which allows the user to roam for a day without needing to reauthenticate. Decrease this value if this is too long.
- Set the redirect host. This needs to match the certificate CN you created in the SSL/TLS service step, being either an FQDN that translates to the data plane interface or the IP of the interface.
Certificate authentication enables you to set a certificate profile with which to authenticate users. User browsers that are not able to present the appropriate client certificate will not be able to authenticate. This is recommended in a high-security network where only known hardware is allowed to authenticate.
NTLM authentication can be used as a fallback transparent authentication mechanism if one of the User-ID agents is set up as an NTLM proxy. It is recommended to use Kerberos as transparent authentication instead (by means of the Kerberos SSO keytab) because Kerberos is a more secure authentication protocol.
Both Kerberos SSO and NTLM depend on the browser supporting either authentication method. If the client browser doesn't support these methods, the user will be presented with a web form to authenticate.
Your captive portal configuration should look as follows:

Figure 6.22 – Captive Portal configuration
The last step is to set up authentication rules in Policies | Authentication.
Rules are always evaluated from top to bottom, so the most specific rules should be at the top. If you want to allow users transparent authentication through NTLM or Kerberos, create the rule for this first:
- Set a friendly name and description.
- In the source, define the zones where users reside that could need captive portal authentication.
- In the User field, you have several options. Select Unknown.
Any includes all traffic to be intercepted, including already known users.
Pre-logon includes remote users who are connected using the GlobalProtect pre-logon and have not logged in to their client system.
Known-users includes traffic for which the firewall already has a user-to-IP mapping (this can add a factor of authorization to accessing a certain resource).
Unknown includes traffic for which no user-to-IP mapping exists. This is the main method to identify users who were not picked up by regular User-ID.
Select will only include traffic from specific users or groups (this could be used to specifically target guests while leaving employees alone).
- In the Service/URL category, only the http service is included by default. Add service-https, if you have SSL decryption enabled, and any other ports that might be useful. The URL category can be added if User-ID is mandatory for only specific URL categories or if explicit authorization is required for a category.
- In Action, set default-browser-challenge, which will use the Kerberos keytab if available in the authentication profile or will use NTLM via a User-ID agent.
If needed, you can also create a new authentication enforcement profile with a different authentication profile. This overrides the authentication profile used in the captive portal.
Your rule should look similar to the following screenshot:

Figure 6.23 – Authentication policy rule
Next, repeat steps 1 through 4 and set the authentication enforcement to default-webform, which will present the user with a landing page to enter credentials.
If any address or subnet does not trigger a captive portal intercept (this could be a remediation server or guest proxy), repeat steps 1 through 4 and set the authentication enforcement to default-no-captive-portal and move it to the top of the rulebase.
Depending on which interface you associated the captive portal to, and which zone the users are connecting from, you may need to configure a security rule to allow these connections. You will find that the captive portal uses one of these ports:
- TCP 6080 is accessed by the client for NTLM authentication.
- TCP 6081, if the captive portal was configured without an SSL/TLS service profile.
- TCP 6082, when the captive portal is configured with a proper profile.
Important note
With a little creativity, the captive portal can be active on several interfaces: the certificate needs to be set to an FQDN, each individual interface has the management profile enabled for response pages, and clients in each subnet are served a different IP (by DNS) for the associated redirect host.
Using an API for User-ID
We saw earlier that you can forward syslogs to the User-ID agent to extract user information, but for those cases where you can't get the desired information from syslogs, you can also use an API to automate user-to-IP mapping, or manually add and delete user mappings.
You will first need to get an authentication key. Make sure the administrator account you are going to use for these operations has API access.
To get a key, you can use this URL in a browser:
https://<YourFirewall>/api/?type=keygen&user=<Username>&password=<Password>
Alternatively, you can use cURL at the command line:
curl -k -X GET 'https://<YourFirewall>/api/?type=keygen&user=<username>&password=<password>
That would give you the following output:
<response status="success">
<result>
<key>
LUFRPT1TWFhUNWUk5N1Fjd3ZnMzh3MXlTOVJyb0kxSG5IWk5QTkdPNw==
</key>
</result>
</response>
You can now use this key in combination with any API command to change things on the firewall or request information. For example, you can request a list of users by using the following URL in your browser:
https://10.0.0.2//api/?type=op&cmd=<show><user><user-ids><all></all></user-ids></user></show>&key= LUFRPT1TWFhUNWUk5N1Fjd3ZnMzh3MXlTOVJyb0kxSG5IWk5QTkdPNw==
Alternatively, you can use cURL at the command line:
curl -k -X GET 'https://10.0.0.2//api/?type=op&cmd=<show><user><user-ids><all></all></user-ids></user></show>&key= LUFRPT1TWFhUNWUk5N1Fjd3ZnMzh3MXlTOVJyb0kxSG5IWk5QTkdPNw=='
<response status="success"><result><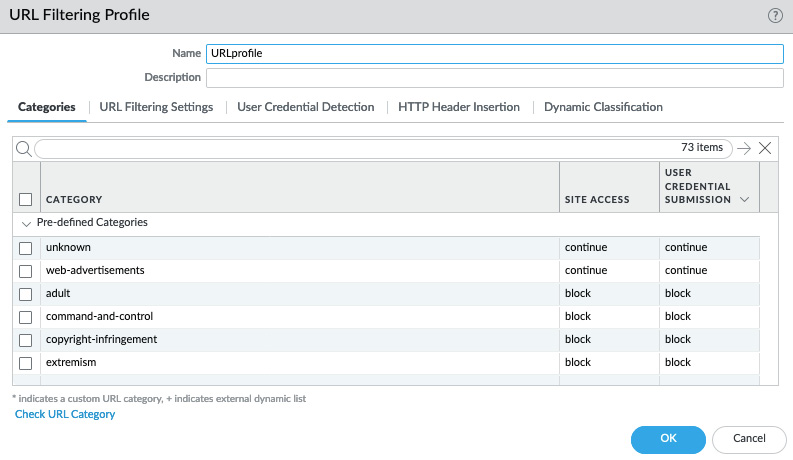
Figure 6.24 – The URL Filtering Profile page
Take this one step further and access the User Credential Detection tab to enable the detection of actual corporate user credentials. This will help distinguish between users logging on to Facebook with their private account and those doing so with their corporate emails, as well as helping to distinguish whether they are using the same password as they do in the corporate environment.
If the submitted credentials do not match the detection method result, the user will be allowed to log on, else the USER CREDENTIAL SUBMISSION action is applied.
There are three options available, and all methods require User-ID to be already set up on the firewall:
Important note
Verify that the user-to-IP mapping uses the same format as the primary username in LDAP (for example, if the primary username is UserPrincipalName, the user-to-IP mapping should also display UPN usernames).
- Use IP User Mapping: This lets the firewall compare the credential submitted to the website to the username in the user-to-IP mapping that it gets from User-ID. If a match is detected, the URL filtering profile will apply action defined in the USER CREDENTIAL SUBMISSION column.
- Use Group Mapping: The firewall uses User-ID group mapping to match the submitted username to a username known in the group mapping profile. This method only matches usernames against LDAP group membership.
- Use Domain Credential Filter: This enables the firewall to verify the username and password of a submitted credential and check whether they belong to the logged-in user. This method is the most thorough as it can also detect password matches, but it does require that a User-ID agent and a User-ID credential service add-on (UaCredInstall64-x.x.x-x.msi from the support portal software updates) are installed on a Read-Only Domain Controller (RODC). Since you must install these agents on a separate domain controller, do not use the User-ID agent to collect user-to-IP mappings. The credential service add-on creates a bloom filter for all the usernames and passwords that the firewall can periodically fetch from the User-ID agent to then match credential submissions. Usernames and passwords are not saved on the firewall.
Each method allows you to set a log severity when a valid credential is detected. By default, URL filtering logs have a severity of informational; set the severity to medium or higher.
As shown in the following screenshot, the Credential Detected column can be enabled in the URL filtering log to reveal whether corporate credentials were matched in browsing sessions:

Figure 6.25 – Enabling the CREDENTIAL DETECTED column
Implementing this feature will ensure your users do not accidentally or deliberately share corporate credential information outside your network, and will discourage the use of corporate credentials for personal sites.
Summary
In this chapter, you learned how to set up the User-ID agent and the TS Agent software agents on a server, and also how to properly configure the agentless configuration on a firewall. You also learned how LDAP groups can be leveraged to categorize users and apply security and which user attributes can be used to tailor the configuration to your needs. You also learned methods to prevent users from accidentally submitting corporate credentials to untrusted website categories
In the next chapter, we will learn how to manage and consolidate configuration for multiple firewalls using Panorama.