3
Company File Setup
Picking up where we left off in Chapter 1, Getting Started with QuickBooks Online, we will show you how to customize your QuickBooks Online (QBO) account through the company preferences. Company preferences allow you to establish how sales and expenses are recorded, how payments are handled, and other advanced settings, such as selecting the start of your fiscal year and which accounting method to use.
Before we dive into company preferences, we will spend some time discussing key information and documents that you need to have handy. This will help you to include as much information as possible; otherwise, you will be missing key details that should appear on customer invoices, documents, and forms that can be produced in QuickBooks. In addition, we will show you how easy it is to edit information in this section whenever you need to.
In this chapter, we’ll cover the following topics:
- Key information and documents required to complete the company file setup in QuickBooks Online
- Setting up company preferences in QuickBooks Online
The US edition of QBO was used to create this book. If you are using a version that is outside of the United States, results may differ.
Key information and documents required to complete the company file setup in QuickBooks Online
Before we get into the mechanics of creating your company file, you will need to gather some key documents and answer a few questions first. This information is necessary so that you can customize QuickBooks for your business. Plus, having this information at your fingertips will help you to complete the company setup a lot faster.
The information you will need to know includes the following:
- Company name: This needs to be the legal name or the business name that should appear on all legal documents and payroll forms.
- Company contact information: This will include the mailing address, business telephone number, business email address, and website address of the company.
- Industry: In QuickBooks, you will select the industry that your business falls into. Using this information, a default chart of accounts list will be created for you.
- Federal tax ID number: A nine-digit number that identifies your business to the IRS. If you don’t have a federal tax ID number, you can use your social security number.
- Company organization type: In QuickBooks, you will need to select from one of the following organization types: sole proprietor, LLC, nonprofit, C-corporation, or S-corporation.
- Fiscal year: In QuickBooks, you will need to enter your company’s fiscal year. For example, if you are on a calendar year, it will be January 1 to December 31.
- List of products you sell: If you have a lot of products and services, you should create an Excel or CSV spreadsheet that includes the product name, product description, cost, price, and quantity on hand. This information can be imported into QuickBooks in just a few minutes.
- List of services you sell: Similar to products, you should create an Excel or CSV spreadsheet that includes the name of the service, a brief description, and the price. You can import this information into QuickBooks.
- List of sales tax rates: A list of each city, state, or jurisdiction for which you are required to collect sales tax, along with the name of the tax authority that you pay, is required to properly set up sales tax in QuickBooks.
- List of customers: Customer contact details, such as an address, email address, telephone number, Facebook address, or other information you have on file can be entered into an Excel or CSV file if you wish to import the information into QuickBooks.
- List of vendor suppliers: Vendor contact details, such as a remit-to address, email address, telephone number, primary contacts, and other information you have on file can be entered into an Excel or CSV file if you wish to import it into QuickBooks.
- Chart of accounts list: Your current list of accounts can be entered into an Excel spreadsheet if you wish to easily import it into QuickBooks.
Pro Tip: Be sure to have a copy of your most recent bank and credit card statements, along with the last bank reconciliations completed.
By taking the time to gather these documents, you will ensure that you are not missing key information when you create forms such as customer invoices. In addition, your financial statements will be more accurate and reliable.
QuickBooks includes default settings that are called preferences. You can edit preferences to customize them to your specific business needs.
Setting up company preferences in QuickBooks Online
QBCU
1.2.1
Before you start entering data into QuickBooks, you should spend some time going through the company preferences, which allow you to activate features that you would like to use and deactivate features that you don’t plan on using. Click on the gear icon and select Account and settings, located below the Your Company column.
Company preferences are made up of seven key areas:
- Company
- Billing and subscription
- Usage
- Sales
- Expenses
- Payments
- Advanced
Let’s look at each one of these in more detail.
Company settings
In your company preferences, you will provide basic information about your business, such as the contact email and telephone number, where customers can reach you, and your mailing address. The contact information that’s included in this section will appear on customer invoices and emails that are sent to them so that they know how to get in contact with you. You will also provide your company name and entity type (sole proprietor, partnership, LLC, C-Corp, or S-Corp). It is also a good idea to enter your employer identification number (EIN) in this section. This information will be used to file payroll tax returns and it can also be used by your tax preparer when filing your taxes.
A brief explanation of the entity types is as follows:
- Sole proprietor: A business that has one owner. Sole proprietors generally file a Schedule C to report their business income and expenses, along with IRS Form 1040.
- Partnership: A business with two or more owners. Partnerships generally file IRS Form 1065 to report their business income and expenses to the IRS.
- Limited Liability Company (LLC): A company with one or more owners who are not personally liable for the LLC’s debts or lawsuits.
- C-Corp: A corporation that is taxed separately from its owners. Corporations typically file IRS Form 1020 to report business income and expenses.
- S-Corp: A closely held corporation that elects to be taxed under IRS Subchapter S. S-Corps typically file IRS Form 1020S to report business income and expenses.
Once you have filled in the Company settings, this page should resemble the one for our fictitious company, Photos by Design, shown in Figure 3.1:

Figure 3.1: Company preferences
The information provided in the Company preferences can impact several areas of QuickBooks, such as customer invoices, tax forms, and documents. Therefore, it’s important to complete this information in its entirety before you begin using QuickBooks to track your business activity. Next, we will explain what information you will find in the Billing & Subscription preferences.
Billing & Subscription settings
The Billing & Subscription settings provide details of the QBO plans and services you have subscribed to. Your screen should resemble the one for our fictitious company, Photos by Design, as shown here:

Figure 3.2: Billing & Subscription settings
A brief description of the information you will find in the billing and subscription settings is as follows:
- QuickBooks subscription: Your subscription status will appear in this section. In our example, we are using QBO Plus. If you are currently using a trial version, it will show you the date the trial expires. After the trial period ends, you can click the Subscribe button to sign up for a paid account. If you are already signed up for QBO, you will see an upgrade and downgrade button should you decide to change your subscription plan.
- QuickBooks Online Payroll: If you have subscribed to Payroll, the details of your payroll plan will be in this section. If you would like to sign up for a payroll subscription, click on the Learn more link and follow the onscreen prompts to select a payroll plan.
- QuickBooks Live Full-Service Bookkeeping: QuickBooks provides bookkeeping services for those small businesses that need it. You can click on this tile to learn more about the plans available.
- QuickBooks Time: This is a time tracking tool that integrates with QBO. If you have employees in the office or out in the field, they can clock in from any mobile device with an internet connection. Click on Learn more for more information.
- QuickBooks Online Payments: If you would like to accept online payments from customers, sign up for QuickBooks Payments services. With this service, your customers can pay their invoices online via ACH bank transfer, debit card, or credit card. Click on the Learn more link to sign up; note that additional fees will apply.
- Checks and supplies: If you write a lot of checks to pay bills, you should consider printing checks directly from QuickBooks. You can order checks from Intuit by clicking on the Shop now button. You can also order checks through your bank.
Now that you know how to review your subscription status and what services you are subscribed to, you need to know what your usage limits are. We will discuss what usage limits are and how they can affect your QBO subscription next.
Usage settings
A few years ago, Intuit implemented usage limits on all QBO plans. What this means is that each plan will have a maximum number of billable users, classes, locations, and accounts that you can add to the chart of accounts. The following is a brief description of these:
- Billable users: The total number of users you can give access to your QBO account. This includes bookkeepers, accountants, employees, and contractors.
- Classes: Depending on your business, a class can represent departments, office locations, or product lines. For example, our photography business could create a class for each type of event (for example, weddings, birthday parties, baby showers, and so on). One of the benefits of using classes is the ability to generate reports you can filter by class.
- Locations: If you have multiple locations, you can turn on location tracking in QuickBooks. One of the benefits of using locations is you can generate reports and filter by location.
- Chart of accounts: We discussed the chart of accounts in the Small business bookkeeping 101 section of Chapter 1, Getting Started with QuickBooks Online. The chart of accounts is used to classify your day-to-day business transactions. For example, office supplies and telephone expenses are two accounts that appear on the chart of accounts.
The following is a summary table that includes the usage limits for each QBO plan:
|
QBO Simple Start |
QBO Essentials |
QBO Plus |
QBO Advanced | |
|---|---|---|---|---|
|
Classes and locations (combined) |
0 |
0 |
40 |
Unlimited |
|
Chart of accounts |
250 |
250 |
250 |
Unlimited |
|
Tag groups |
10 |
20 |
40 |
Unlimited |
|
Billable users |
1 |
3 |
5 |
25 |
Table 3.1: QBO usage limits for each plan
Here is a brief explanation of the usage limits for each QBO plan:
- QuickBooks Online Simple Start: QBO Simple Start does not have the ability to track classes or locations. You can have up to 250 accounts on the chart of accounts list. One billable user and two accountant users are included in this plan.
- QuickBooks Online Essentials: Similar to Simple Start, QBO Essentials does not have the ability to track classes or locations. You can have up to 250 accounts on the chart of accounts list. Three billable users (that is, bookkeepers or employees) and two accountant users are included in this plan.
- QuickBooks Online Plus: QBO Plus allows you to track classes and locations. You can add up to a total of 40 classes and/or locations combined. Five billable users and two accountant users are included with this plan.
- QuickBooks Online Advanced: QBO Advanced allows you to track unlimited classes and locations. In addition, 25 billable users and three accountant users are included with this plan.
Your usage settings should resemble the ones for our fictitious company, Photos by Design, as shown in Figure 3.3:

Figure 3.3: Usage settings
As we mentioned previously, usage limits can impact the number of users you can add to QBO and the classes, locations, and accounts you add to the chart of accounts. This can have a significant effect on how much you pay for your QBO subscription if you hit the maximum usage settings and need to upgrade.
Sales settings
The Sales settings allow you to select and customize invoices, estimates, and sales receipt templates. In this section, payment terms are set for customers. If you have a few customers whose payment terms differ, you can customize payment terms when you add a new customer. If you offer discounts to customers or require upfront deposits, you can turn these features on here.
The following is a screenshot of the settings for Sales:

Figure 3.4: Sales settings
Here is a brief explanation of the information you can update/change in the sales settings:
- Customize (1): This setting allows you to customize the look and feel of the invoices, estimates, and sales receipt forms. By clicking on the Customize look and feel button, you will be able to select a template design, add your company logo, colors, and font, and determine what information you would like to appear on each form.
- Sales form content (2): In this section, you can select the default payment terms for most customers. For example, if the invoice due date for most customers is Net 30 days, you will make that selection in the Preferred invoice terms field (shown in the preceding screenshot). If you have customers that have different payment terms, you can select those terms when you add the customer to QuickBooks.
QBCU
2.3.3If you offer customer discounts, accept deposits, or want to add custom fields, you will also turn these features on in this section. The main reason why you may want to offer customer discounts is to incentivize customers to order more, or use it as a way to reward customers who make frequent purchases. If you decide not to activate discounts now, you can always return to Sales form content settings and turn discounts on later on.
- Products and services (3): The Products and services settings allow you to determine what information you would like to appear on the sales form. You can turn on price rules, which is a feature that allows you to set up automatic discounts for certain customers or on specific products and services. If you want to track inventory, you will need to turn on both the Track quantity and price/rate and Track inventory quantity on hand features.
- Late fees (4): Create a default charge that is automatically applied to delinquent invoices.
- Progress Invoicing (5): Progress invoicing allows you to bill a customer in installments. For example, imagine you have a job that is going to result in $100,000 in revenue but you are required to complete certain milestones before you can submit an invoice. Progress billing allows you to create multiple invoices for one estimate. QuickBooks allows you to run reports that will show you how much you have billed against the estimate and the remaining amount to be billed.
- Messages (6): When you email invoices, sales receipts, or estimates directly from QuickBooks, you can customize the message that is included in the body of the email. You can also select whether you want the invoice to be attached to the email as a PDF document or whether you prefer the invoice details to be included in the body of the email.
QBCU
2.3.2Below is a screenshot of the custom email message options you can choose from:

Figure 3.5: Customizing the email message for invoices, estimates, and sales receipts
To customize emails, you can choose to use a greeting (A), select the type of form (B), customize the email subject line (C), and customize the email message (D) or choose to use the standard message shown. You can have a copy of the email sent to you (E), send a carbon copy to someone else (F), and blind copy (Bcc) new invoices to multiple people (G). You can also customize emails for estimates and sales receipts by choosing the option from the drop-down (H).
After making your selections, be sure to click the Save button (I).
- Reminders (7): QuickBooks allows you to send payment reminder emails to customers. You can customize the message that goes out to your customers in this section.
- Online delivery (8): Online delivery allows you to select the format of all the sales forms that will go out to customers. The options are PDF, HTML, or a link to the online invoice. The selections that are made here will affect all invoices, sales receipts, and estimates that are emailed directly from QuickBooks.
- Statements (9): If you prefer to send statements to customers, you can select from two types of formats. You can have each transaction listed as a single line on the statement or you can list each transaction and the details on the statement.
Now that you know how to customize sales forms, set payment terms for customers, and turn on discounts and deposits, it’s time to learn how to manage expenses. We will discuss Expenses settings next.
Expenses settings
The settings in the Expenses section are centered around preferences for managing bills, expenses, and purchase orders. In this section, you will determine what information you want to appear on expense and purchase forms, whether or not you want to track expenses and items by customer, and default payment terms.
The following is a screenshot of the Expenses settings:

Figure 3.6: Expenses settings
The following is a brief explanation of what you can find in the Expenses preferences:
- Bills and expenses (1): This section includes the following five options for tracking expenses:
- Show Items table on expense and purchase forms: This feature is automatically turned on and it will add a Products and services table to your expense and purchase forms so that you can itemize your products and services.
- Show Tags field on expense and purchase forms: This feature is automatically turned on. If you don’t use tags to track expenses, you can turn this feature off.
QBCU
3.2.1- Track expenses and items by customer: This feature allows you to tag expenses with a specific customer. This is ideal for reporting purposes if you want to keep track of specific items that have been purchased but aren’t billable to customers. For example, we want to track photography supplies such as paper or ink, but they are not billable to the customers of our photography business.
-
Make expenses and items billable: This feature adds a billable column on all expense and purchase forms so that you can bill customers for items you’ve purchased on their behalf. For example, a wedding album can be purchased on a client’s behalf to put photos in as a keepsake.
QBCU
3.2.2QBCU
3.2.3To see a list of unbilled expenses, you can run the Unbilled Charges report, which is located in the Who Owes You report group.
- Default bill payment terms: If most of the bills you receive have similar payment terms (for instance, Net 30), you can set payment terms for all vendors here and then change the vendor profile for those vendors whose payment terms may differ. In Chapter 6, Managing Customer, Vendor, and Products and Services Lists, we cover this in detail.
- Purchase orders (2): If you plan to create purchase orders, be sure to turn this feature on. If you don’t need to create purchase orders, you can leave it turned off.
- Messages (3): You can email purchase orders directly from QuickBooks to vendor suppliers. This section allows you to customize the email message that your vendor supplier will receive along with the purchase orders.
Now that you are familiar with the Expenses settings that affect bills, purchase orders, and expenses, you can set up QuickBooks the way you need to in order to track expenses that are incurred by your business. Next, we will discuss a way for you to get paid faster by your customers by using QuickBooks Payments.
Payment settings
QBCU
2.3.4
QuickBooks Payments allows you to accept online payments from customers in the form of wire transfers, debit cards, and credit cards. Once approved, all the invoices that you email to customers will include a payment link. Your customers can click on the link, enter their payment details, and submit a payment in just a few minutes.
To apply for a QuickBooks Payments account, click on the Learn more button shown in Figure 3.7:

Figure 3.7: Payment settings
If you have an existing Payments account, you can connect it by clicking the Connect button and following the onscreen instructions.
As we mentioned previously, QuickBooks Payments makes it easier to get paid by customers in a timely manner. This will allow you to maintain a positive cash flow, which is important for your business.
Advanced settings
The Advanced settings page includes nine key settings: Accounting, Company type, Chart of accounts, Categories, Automation, Projects, Time tracking, Currency, and Other preferences.
The following is a screenshot of the Advanced settings section:
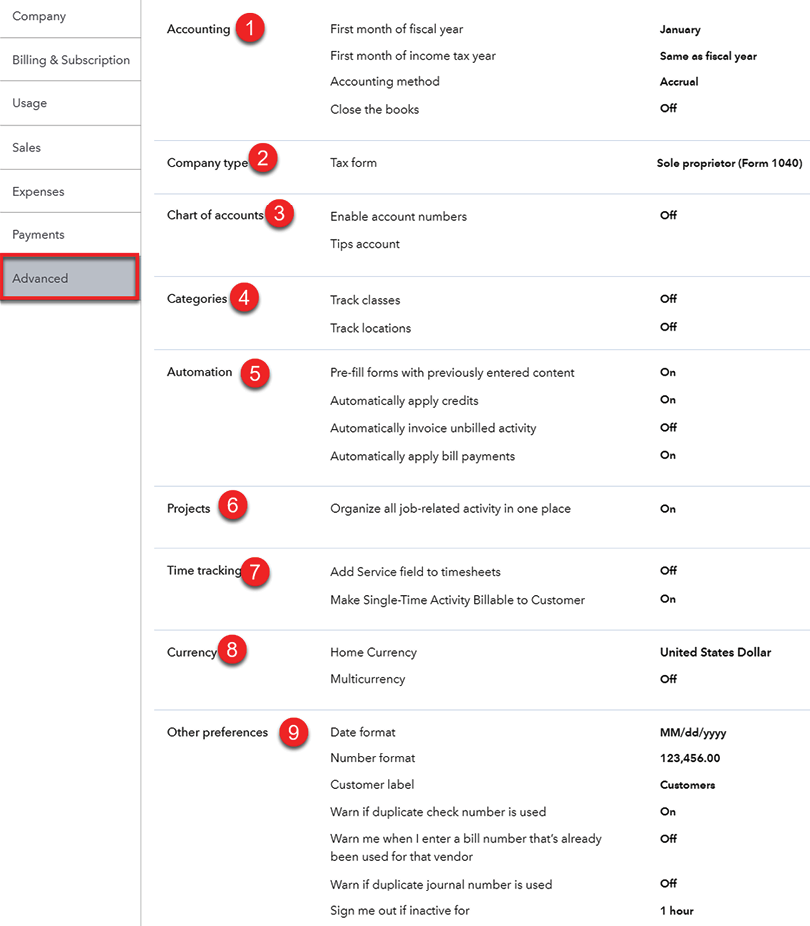
Figure 3.8: Advanced settings
A brief description of what information is included in the Advanced settings section is as follows:
- Accounting (1): In the accounting settings, you will select the first month of your fiscal year and income tax year, which may be the same. You will indicate your accounting method (for example, cash or accrual) and there is an option to close the books. Closing the books allows you to prevent any changes from being made to your financial data after a certain date. For example, once you have filed your tax returns for the year, you should enter the last day of the previous year as your closing date (for example, 12/31/2021). This will ensure that information dated 12/31/2021 and prior cannot be changed.
- Company type (2): In this field, you will select the structure of your business. The common business structures are sole proprietor, partnership, limited liability, C-Corporation, and S-Corporation. Photos by Design is a sole proprietor.
- Chart of accounts (3): As we discussed in Chapter 1, Getting Started with QuickBooks Online, the chart of accounts is a way to categorize your day-to-day business transactions. You have the option to assign account numbers to your chart of accounts list by turning on the Enable account numbers preference. If your business allows customers to leave tips, you can keep track of these tips in a separate account.
QBCU
1.2.4
1.2.5
- Categories (4): There are two types of categories in QuickBooks: classes and locations. Classes are generally used to track income and expenses for departments or product lines. Locations are used to track income and expenses for multiple locations of your business. These preferences must be turned on for you to use them.
- Automation (5): You can save time by automating certain tasks. QuickBooks will automatically pre-fill forms based on the information you have provided in a previous transaction for a customer or vendor. You can also allow QuickBooks to automatically apply credit that’s been received from vendor suppliers and bill payments.
QBCU
1.2.4
1.2.5
- Time tracking (7): If you need to track hours for employees, contractors, or yourself, you can easily do this in QuickBooks. You can also bill customers for hours you’ve worked by transferring the hours to customer invoices.
- Currency (8): QuickBooks allows you to create invoices and pay bills in multiple currencies. You can do business with vendor suppliers and customers across the globe by providing invoices in their native currency. All of your financial reports can be generated in your home currency or any currency that you choose.
Pro Tip: Once you turn on the multi-currency feature, it cannot be turned off. This is because several conversion tables are activated in the background once you turn this feature on and start using it.
- Other preferences (9): The Other preferences section involves general formatting preferences for the dates and numbers that appear throughout the program. You can also select the type of label for your customers. For example, if you are a nonprofit organization, you can select Donors, and if you are a real estate investor, you can select Tenants. This nomenclature will appear throughout the program. This preference also includes a warning if you use a duplicate check number or vendor invoice number. You should turn both of these features on to help prevent duplicate payments. A similar warning is also included when recording journal entries. A journal entry is an adjustment made to the books for transactions that are only recorded prior to closing the books, like depreciation. For security reasons, QBO will automatically sign you out after you have been inactive for 1 hour. However, you can change this setting to a maximum of 3 hours.
You now know that accounting settings affect several areas of QuickBooks. You can determine your chart of accounts structure, turn on time tracking, set your home currency, and turn on the multi-currency feature if you do business in other countries. In addition, you can turn on the projects and categories feature for additional tracking of income and expenses.
Summary
In this chapter, we have covered key information and documents required to set up a QBO account. We have also shown you how to customize the company settings, which includes billing and subscription, usage limits, sales, expenses, payments, and advanced settings. Taking the time to set up your company file will help you save time in the long run because you won’t have to do it later on. Plus, you won’t have to worry about customer invoices or vendor bills missing key information because your company file wasn’t set up properly.
In the next chapter, we will take a look at what information you will need to convert from your existing accounting software to QBO.
This will include choosing your QuickBooks start date, the order you need to follow when bringing over historical data into QuickBooks, and various options when it comes to converting from another system to QBO.
Join our book’s Discord space
Join the book’s Discord workspace for a monthly Ask me Anything session with the author: https://packt.link/QuickBooks
