4
Migrating to QuickBooks Online
QBCU
1.1.3
Whether you are currently using another form of accounting software or spreadsheets to manage the books for your business, you will need to gather a few key documents and information to migrate over to QuickBooks Online (QBO), a list of which we gave you at the start of the previous chapter. In addition, the date on which you decide to start implementing QuickBooks will also determine what information is required for a smooth migration. Providing all of the information required will ensure that QuickBooks is properly set up prior to you using it to track your business income and expenses. Otherwise, you could encounter inaccurate and unreliable financial statements, which will make it hard to know your business’ overall health and make filing taxes difficult.
In this chapter, we will discuss questions you need to be prepared to answer before conversion regarding how you will run your business. Then, we will show you how to convert from another form of accounting software or Excel to QBO. If you are currently using QuickBooks Desktop (QBD), we will show you how to convert from QBD to QBO.
In this chapter, we will cover the following five key concepts:
- Questions to ask yourself in preparation for data conversion
- Choosing your QuickBooks start date
- Converting from another accounting software or Excel to QBO
- Reasons not to convert from QBD to QBO
- Converting from QBD to QBO
The US edition of QBO was used to create this book. If you are using a version that is outside of the United States, results may differ.
Questions to ask yourself in preparation for data conversion
When setting up your QuickBooks company file, you will need to determine whether you want to bring over any data from your existing accounting program. Additionally, you need to know what features you want to use in QuickBooks. Answering the following questions will help determine what type of setup you need to manage your day-to-day business activities:
- How much historical data do you want to bring over to QuickBooks?
If you are converting in the middle of the year, you need to determine whether you will bring over all of the transactions that have occurred thus far, or just start from the current month you are in. The benefit of bringing over transactions that go back to the beginning of the year is that it will allow you to run financial statements in QuickBooks for the entire year, as opposed to only part of the year. Keep in mind that it will be more time-consuming to do this, so you will need to weigh up the cost versus the benefit to determine whether or not it is worth it.
- How much detailed information do you want to bring over to QuickBooks?
If you do decide to bring over the historical information for an entire year, you’ve got two options. First, you can enter each transaction individually into QuickBooks. Depending on how much data you have, this could be quite labor-intensive and expensive if you have to pay someone else to do it. Second, you can create a summary journal that is a lot faster than entering each individual transaction, but you will not have the details of each transaction in QuickBooks. If you have a ton of transactions, then using a summary journal is going to be the best option for you. However, if you don’t have a lot of activity, then enter transactions individually.
- Do you create estimates or proposals for existing or prospective customers?
If you plan to create estimates in QuickBooks, you will need to make that selection during the setup process. Once you do so, a couple of benefits are that you can easily email estimates, as well as track the status of when the estimates are approved, or not approved, by customers.
- Do you plan to create billing statements for customers?
During the QBO setup process, you can select the option to create billing statements. Depending on the type of business you own, you may want to generate billing statements for customers on a weekly, monthly, quarterly, or ad hoc basis. This is common for doctor’s offices and for companies that provide services to customers on a recurring basis (for example, monthly, quarterly, or annually).
- Do you want to use invoices to bill customers?
If you choose to create billing statements for some customers but want to create invoices for others, you can do that in QuickBooks. Invoices are commonly used to bill customers to whom you have extended credit terms. This means that payment is not due when you provide goods and/or services. Instead, you send these customers an invoice that includes a due date, and they are expected to remit payment before or by the due date. For example, Net 30 payment terms means that the bill is due 30 days after the date on the invoice.
- Do you want to keep track of your bills through QuickBooks?
During the QBO account setup process, you will need to choose whether or not you want to track and pay bills in QuickBooks. If you have a lot of bills to keep track of, you should consider entering all bills into QuickBooks. Once you enter a bill into QuickBooks, it will alert you when the bill is getting close to the due date. You can pay the bill through online banking, or you can pay the bill by writing a check directly from QuickBooks. If you don’t receive a lot of paper bills, then it may not be ideal to track unpaid bills through QuickBooks. Instead, you can track bills as they are paid from your bank/credit card account.
- Do you want to keep track of inventory through QuickBooks?
Inventory tracking is another feature that must be activated during the QBO account setup process. If you need to keep track of inventory purchases by tracking quantities and costs, then you need to track the inventory in QuickBooks. However, if you prefer to keep track of sales only, there is no need to turn on the inventory tracking feature in QBO.
- Do you have employees or 1099 contractors?
Payroll is not automatically activated when you set up your QBO account. You will need to activate this feature and complete the setup. If you have employees who you need to track in QuickBooks, see Chapter 15, Managing Payroll in QuickBooks Online, on how to set up and track payroll in QuickBooks. All 1099 contractors should be set up as vendors in QuickBooks. See Chapter 16, Managing 1099 Contractors in QuickBooks Online, to learn how to set up and track payments to 1099 contractors.
Make sure you add them to the list of vendors that you will import into QuickBooks.
- Do you need to track by department or location?
If you need to track income and expenses by department or business segment, you will need to turn on class tracking in the QBO account setup process. You can also turn on location tracking if you have more than one store or office location you need to keep track of.
Similar to the key information and documents discussed in the previous section, it’s important for you to think about how you want to use QuickBooks. Answering a few simple questions can help you determine what features you need to turn on in QBO to manage your books. Another key component to getting your books set up is choosing your QuickBooks start date. We will discuss this in detail in the next section.
Choosing your QuickBooks start date
One of the most important decisions you will make is what your QuickBooks start date will be. The start date is based on how much historical information you decide to bring over from your existing accounting software into QBO. Let’s take a look at a few examples:
- Example 1: Let’s say a web designer decided to start a business in January. The start date in QuickBooks for this brand-new business would be January 1.
- Example 2: Let’s assume it’s January 2022 and you have decided to bring in data from January 1 through December 31, 2021. Your QuickBooks start date will be December 31, 2021. That way, you can bring over all 2021 balances as of this date, and transactions dated January 1, 2022 and after will be directly entered into QBO.
- Example 3: Let’s assume it’s April 16 and your tax professional has informed you that a shoebox of receipts will no longer be accepted next year and that you should start using QuickBooks as soon as possible. Since you’ve already filed your taxes for the previous year, there is no need to enter that information into QuickBooks. Instead, you can go back to January 1 to enter your data, or start with April 1. We recommend starting at the beginning of a month, quarter, or year to keep things simple.
After reviewing these examples, you should have an idea of how to determine your QuickBooks start date. As discussed, this is a critical decision when it comes to deciding how much historical data to bring over from your existing accounting software. If you are converting from another accounting software or Excel, we will discuss in detail how to convert your data over to QBO next.
Converting from another accounting software or Excel to QBO
There are four primary steps for converting from another accounting software or an Excel spreadsheet into QBO:
- Complete the initial company file setup.
- Import all of your list information for customers, vendors, and products and services. Refer to the Importing Data into QuickBooks Online section below for detailed instructions.
- Import your chart of accounts list, or update the default listing in QuickBooks to match your current list.
- Verify the accuracy of the data that has been converted.
In Chapter 3, Company File Setup, we covered in detail how to complete the initial company file setup.
In this chapter, we will cover the other two options you have for entering data into QuickBooks: recording details of historical data, and recording a summary journal entry of historical data. We will look at the correct order in which to enter historical transactions, and how to verify the accuracy of the data.
Recording details of historical data in QBO
As mentioned previously, the ideal method of entering historical data into QBO is to enter individual transactions. While this is more time-consuming than completing a summary journal entry, it includes all the details of each transaction.
Individual transactions must be entered in the correct order to avoid any issues. The order in which to enter historical transactions into QBO is as follows:
- Purchase orders; bills and payments; credits from vendors; credit card charges; checks; inventory on hand
- Employee timesheets, billable hours
- Invoices; sales receipts; credit memos; returns
- Customer payments; bank deposits
- Sales taxes paid; payroll transactions
- All banking transactions (not previously entered); credit card transactions (not previously entered); reconcile all bank and credit card accounts
It’s important that you follow these steps to avoid issues later on. To help save you some time, you can import certain data into QBO.
Importing data into QBO
If you can put your data into an Excel or CSV file, you can easily import that data into QBO. Currently, you are able to import data from your financial institution, customer lists, vendor lists, chart of accounts, products and services, and invoices. Follow the steps below to import this data into QBO:
- Click on the gear icon and select Import data, as shown in Figure 4.1:
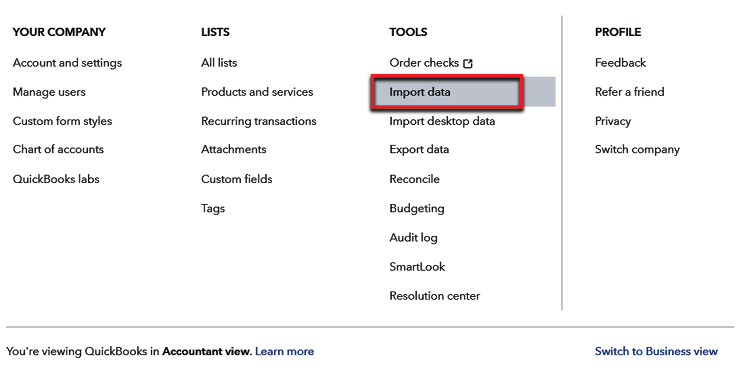
Figure 4.1: The Import data option
- The following screen will appear:

Figure 4.2: The Import Data screen
Click on the icon that represents the type of data you would like to import and follow the onscreen instructions to import the data into QBO.
For step-by-step instructions on importing bank data and a chart of accounts, refer to Chapter 5, Customizing QuickBooks for Your Business. Refer to Chapter 6, Managing Customer, Vendor, and Products and Services Lists, to learn how to import customers, vendors, and products and services data.
If you don’t have the time to enter individual transactions, you can opt for recording a summary journal entry.
Recording a summary journal entry of historical data in QBO
A summary journal entry will only include lump sum total amounts. To enter balances for balance sheet accounts, you should run a balance sheet report in your current accounting system for the last day of the year for which you are bringing over data. If you would like to also bring over income and expense data, you need to print an income statement from your existing accounting system, as of the last day of the year for which you are bringing over data. Enter the totals for each account into QuickBooks.
Pro Tip: Make sure the accounts that appear on both the balance sheet and income statement reports have been created in QuickBooks before you create the journal entry. In Chapter 5, Customizing QuickBooks for Your Business, we show you how to create new accounts.
Follow these steps to create a journal entry in QBO:
- Navigate to the Journal Entry screen by clicking on the + New button on the left navigation bar, as indicated here:

Figure 4.3: The + New button
- In the OTHER column, click on Journal entry, as follows:

Figure 4.4: Navigating to the Journal Entry form
- Complete the fields in the Journal Entry form:

Figure 4.5: The Journal Entry form
You will need to complete eight fields. Here is a brief explanation of what information to include in each field:
- Journal date (1): Enter the effective date of the journal entry. For example, you would enter the last date of the fiscal year for which you are bringing data over (for example, December 31, 20XX).
- Journal no. (2): QuickBooks will automatically assign a journal entry number, beginning with 1. However, you can start with a different number, such as 1000, and QuickBooks will automatically increment each journal number thereafter.
- ACCOUNT (3): From the drop-down menu, select the account(s) that require a debit. After all debits have been entered, you can enter the accounts that will be credited right after.
- DEBITS (4): Enter all debit amounts in this field.
- CREDITS (5): Enter all credit amounts in this field.
- DESCRIPTION (6): Enter a brief description of the purpose of the journal entry (for example, to bring over existing balances as of December 31, 2021).
- NAME (7): If a line item is for a specific customer, you can select the appropriate customer from the drop-down menu.
Pro Tip: The Name field is used in those instances when you are making an adjustment to the accounts receivable balance for a specific customer.
Now that you know the two methods used to enter historical data into QBO, you can decide which method will work best for you. If you are a current QuickBooks Desktop user, there is some additional information you need to know. We will cover converting from QuickBooks Desktop to QuickBooks Online next.
Reasons not to convert from QuickBooks Desktop to QBO
If you are in the process of deciding whether to convert from QuickBooks Desktop to QuickBooks Online, you need to review the list of key features that you may currently use in QBD but that are not available in QBO. Additionally, you need to review the list of data that will not convert from QBD to QBO. This is important because there may be features not available in QBO that you need to run your business. You also need to determine whether you can do without the information that does not convert over to QBO. We will explore these ideas in the next two sections.
Functionality not available in QBO
QBO does not include the ability to create sales orders or manage fixed assets. Therefore, we do not recommend you convert from QBD to QBO if you need the following features:
- Sales orders: A form used to record and track customer orders. A sales order will commit the quantity ordered or trigger a backorder if the product is out of stock.
- Fixed asset tracking with Fixed Asset Manager: Fixed asset tracking includes keeping track of the cost of fixed assets purchased, and calculating depreciation and the current value of assets.
If you currently use these features in QBD, you should either find a workaround in QBO or postpone converting over to QBO if they are critical to your business.
QuickBooks Desktop data that will not convert to QBO
As we mentioned previously, QBD and QBO are two completely different products. QBD is available for Windows and iOS platforms, whereas QBO is cloud-based software. With that said, there are several data points that will not convert to QBO.
The following table provides a summary of the data that will not convert to QBO, along with a workaround in QBO. For the complete list of Desktop features and how they will (or will not) convert to QBO, read What to expect when you switch from QBD to QBO, an article by Intuit: https://quickbooks.intuit.com/learn-support/en-us/convert-data-files/what-to-expect-when-you-switch-from-quickbooks-desktop-to/00/186758.
|
QuickBooks Desktop data that will not convert to QuickBooks Online |
Workaround in QuickBooks Online |
|---|---|
|
Custom sales form templates for estimates, invoices, and sales receipts |
Create new templates using the built-in template layout designer. |
|
Bank and credit card connections, and downloaded bank activity pending review |
Re-establish a connection in QBO for all bank and credit card accounts. Review all transactions prior to proceeding with the conversion. |
|
QuickBooks users and permissions |
Create each user with the appropriate permissions. |
|
Reconciliation reports for all bank and credit card accounts previously reconciled |
Since the reconciled status, R, will convert, do one big reconciliation, or redo them individually to recreate the reports. |
|
Memorized reports |
Re-create reports that you run often, and save them in Favorites. |
|
Audit trail report with historical activity |
Print and save the audit trail report from QBD. Refer to the backup QBD file (covered later in this chapter). |
|
The connection to your QuickBooks Payments merchant services account |
Connect your QuickBooks Payments merchant services account to QBO. |
|
Balance sheet budgets |
QBO Plus does not allow you to create balance sheet budgets. However, you can create profit and loss budgets, which only include income and expense accounts. |
|
Closing date password and accumulated closing date exceptions |
QBO will track new exceptions from the date of the conversion. |
Table 4.1: Workarounds in QBO
You should determine whether the workaround is an ideal solution, or if you can run your business without bringing over certain data. After you have compiled key information, asked yourself a few questions, chosen your start date, and familiarized yourself with the data that will not convert, you are ready to convert your data. We will discuss converting QuickBooks Desktop data to QuickBooks Online next.
Converting QuickBooks Desktop data to QBO
Now that you are familiar with most of the limitations of converting data from QuickBooks Desktop to QuickBooks Online, we will walk through the steps for doing this. There are seven primary steps involved with converting data from QBD to QBO:
- Checking the target count
- Creating a QuickBooks Online account
- Backing up your QuickBooks Desktop file
- Checking for updates
- Running the QuickBooks Desktop conversion to the QuickBooks Online tool
- Logging in to QuickBooks Online
- Verifying that all of your data was converted
Let’s take a look at each of these steps, one by one.
Checking the target count
In order to convert your Desktop data to Online, your data limit must not exceed 350,000.
To check your target count, open your QuickBooks file. From the home page, press F2, which will open the Product Information screen. On this screen, you will find your product license number, the location of your company file, and other key data points, such as the target count.
The following screenshot includes an example of the target count on the Product Information screen. For this company file, the target count is 3,731, which is well below the 350,000 limit:

Figure 4.6: Checking the total targets
After verifying that your QuickBooks file is below the 350,000 limit, you can proceed to create a QBO account.
Pro Tip: If your file exceeds the maximum 350,000 targets, you can try to reduce the targets by condensing your QuickBooks file. Read this article by Intuit, Condense your QBD file for import to QBO (https://quickbooks.intuit.com/learn-support/en-us/migrate-services/condense-your-quickbooks-desktop-file-for-import-to-quickbooks/00/186240), to learn how this works.
Creating a QBO account
Prior to converting your data, you must already have a QBO account. If you don’t have a QBO account, refer back to Chapter 1, Getting Started with QuickBooks Online, to learn how to set one up. If you have an existing account, you must convert your QuickBooks Desktop data within the first 60 days of your QBO subscription date. If you are past the 60 days, you will need to cancel your account and create a new QBO subscription.
To recap, follow these steps to create a QBO account:
- Go to www.intuit.com.
- Click on Products and choose QuickBooks.
- Click on Plans & Pricing.
- Choose one of the following versions of QBO:
- Simple Start
- Essentials
- Plus
- Advanced
- Refer back to Chapter 1 for a detailed guide to setting up your account.
The final step is to log out of your account. As we work through the Logging into QuickBooks Online section below, the system will prompt you to log back in when appropriate.
After creating your QBO account, you are ready to convert your data. Before converting your Desktop data, it’s important to save a backup of your QuickBooks file. If there is an error with converting your data, you can always refer back to the backup file if you need to. Let’s walk through backing up your QuickBooks Desktop file.
Backing up your QuickBooks Desktop file
Converting your data does not change it. However, you should always have a backup copy of your data prior to conversion.
Follow these steps to create a backup copy of your QuickBooks file:
- Click on the File menu.
- Select Create Copy.
- Select Backup copy, as indicated in Figure 4.7:

Figure 4.7: Creating a backup copy
- Follow the onscreen instructions to save your file to a local drive.
Now that you have a backup copy of your QuickBooks Desktop data, you can proceed with the conversion. To avoid errors when converting your data, you need to ensure that you are working with the latest version of QuickBooks Desktop.
Checking for updates
Before using the conversion tool, you need to make sure you have the most recent version of the tool. For QuickBooks Pro, Premier, and Enterprise users, follow these instructions to check for updates:
- From the Help menu at the very top of the home page, select Update QuickBooks Desktop…, as indicated here:
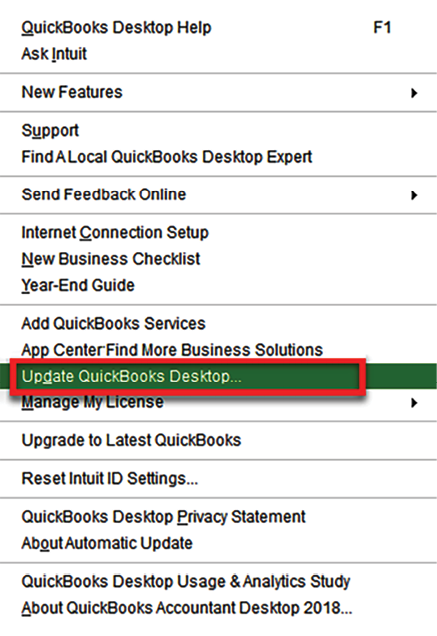
Figure 4.8: The Update QuickBooks Desktop setting
- Next, click on the Update Now tab, select all the updates by putting a checkmark in the first column to select the available updates, and click Get Updates, as indicated in Figure 4.9:

Figure 4.9: Getting all updates
Once your QuickBooks software has been updated to the most recent version, you are ready to run the QBD conversion to QBO tool. We will cover this in detail next.
Running the QuickBooks Desktop conversion to QuickBooks Online tool
There is a QuickBooks Desktop conversion tool within QuickBooks Desktop. To access it, from the Company menu, select Export Company File to QuickBooks Online, as indicated in Figure 4.10:

Figure 4.10: The Export Company File to QuickBooks Online option
The next screen will allow you to log in to your QBO account that you set up in the Creating a QBO account section. To complete the QBD data conversion, log in to your QBO account.
Logging in to QBO
After exporting your QuickBooks data file, the login screen for QBO will appear. Follow the steps outlined here:
- Enter your secure Email or user ID and Password for your QBO account:

Figure 4.11: Signing into QBO
- Follow the onscreen instructions to complete the upload. The length of time this will take will depend on how large your company file is. Once the upload is complete, you will see an onscreen notification that your data has successfully uploaded. When your data is ready, you will receive an email from the Intuit support team. This generally takes place within 1 to 24 hours, at the most.
After completing all the steps to export your QuickBooks data file to QBO, and once you have received an email from the Intuit support team confirming your data has been uploaded, the final step in converting your data is to verify that the data in your QBO file is correct.
Verifying that all of your data was converted
The final step in the conversion process is to verify that all your data was successfully imported into QuickBooks Online. To do this, you need to run a profit and loss report and a balance sheet report in both QuickBooks Online and Desktop. For instructions on how to run these reports in QuickBooks, head over to Chapter 12, Business Overview Reports. Be sure to use the following report parameters:
- All dates
- Accrual accounting method
Compare the reports to see if they match. If they don’t, contact the Intuit support team by clicking on the Help menu in your QBO file and then selecting the option to chat with a support representative, or contact them by telephone. A support representative will assist you with troubleshooting any out-of-balance issues.
Once you have verified that your data was successfully converted to QuickBooks Online, you are ready to start using QBO to manage your bookkeeping. You should keep the backup file created in the previous section, in case you discover an issue later on.
Summary
We have covered the key concepts you need to know when converting your QuickBooks Desktop data to QuickBooks Online. You now know what key documents and information you need, what questions to ask yourself, how to choose your start date in QuickBooks, how to convert historical data in detail and as a summary, and the detailed steps to convert your QuickBooks Desktop data to QBO. Once all of your data has been converted and verified, you are ready for the next step.
In the next chapter, we will show you how to customize QuickBooks Online for your business.
Join our book’s Discord space
Join the book’s Discord workspace for a monthly Ask me Anything session with the author: https://packt.link/QuickBooks
