17
Closing the Books in QuickBooks Online
After you have entered all of your business transactions into QuickBooks for the year, you will need to finalize your financial statements so that you can hand them off to your accountant to file your taxes. To ensure you have recorded all business transactions for the financial period, we have included a checklist that you can follow to close your books. Closing your books will ensure that no additional transactions are entered into QuickBooks once you have finalized your financial statements. If you have a bookkeeper or an accountant who manages your books, they should ensure that all of the steps have been completed. In this chapter, we will cover each item on the checklist. This includes reconciling all bank and credit card accounts, making year-end accrual adjustments (if applicable), recording fixed asset purchases made throughout the year, recording depreciation, taking a physical inventory, adjusting retained earnings, and preparing financial statements.
Pro Tip: Adding your tax preparer or CPA as a user will allow them to access your QuickBooks data. They will be able to run reports and review the items needed to prepare your tax return. Later on in this chapter, we will show you how to give your accoutant access to your data.
The chapter objectives are summarized as follows:
- Reviewing a checklist for closing your books
- Recording journal entries
- Giving your accountant access to your data
By the end of this chapter, you will know all of the tasks you need to complete in order to close your books for the year. While most small businesses close their books annually, if you close your books on a monthly or a quarterly basis, you will still need to follow the steps outlined in this chapter. In the following section, we will cover the details of the checklist.
The US edition of QBO was used to create this book. If you are using a version that is outside the United States, the results may differ.
Reviewing a checklist for closing your books
As discussed, there are several steps you will need to take in order to close your books for the financial period. How often you close your books (for example, monthly, quarterly, or annually) will determine how often you need to complete these steps. Remember the importance of closing your books, as this will ensure that all transactions for the financial period have been recorded and that your financial statements are accurate, which is important because your accountant will use them to file your business tax return.
The following is a checklist of the steps you need to complete in order to close your books. You should complete them in the order presented:
- Reconciling all bank and credit card accounts
- Making year-end accrual adjustments
- Reviewing new fixed asset purchases and adding them to the chart of accounts
- Making depreciation journal entries
- Taking physical inventory and reconciling this with your books
- Adjusting retained earnings for owner/partner distributions
- Setting a closing date and password
- Preparing key financial reports
We will discuss each of these eight steps in detail, starting with reconciling all bank and credit card accounts.
Reconciling all bank and credit card accounts
In Chapter 10, Reconciling Downloaded Bank and Credit Card Transactions, you learned how to reconcile your bank and credit card accounts. It’s important for you to reconcile these accounts before closing the books so that you can ensure that all income and expenses for the period have been recorded in QuickBooks.
This will ensure that your financial statements are accurate and that you don’t miss out on any tax deductions.
Making year-end accrual adjustments
If you are on the accrual basis of accounting, you need to make sure that all income and expenses that have been incurred for the period are recorded. As discussed in Chapter 1, Getting Started with QuickBooks Online, accrual basis accounting means that you recognize income when services have been rendered, regardless of when payment is received. The same concept is applied to expenses. For example, if you made a purchase in December but have not yet received the bill for it, you will need to record an adjusting journal entry before you close the books in order to record the purchase. We will discuss journal entries in more detail later in this chapter.
Pro Tip: Record all accounts receivable for the end of the period, which means invoice all customers for work performed. Similarly, be sure to record all accounts payable (vendor bills) for any expenses incurred in the period.
Reviewing new fixed asset purchases and adding them to the chart of accounts
If you purchased any fixed assets during the year, you should add these to QuickBooks. Fixed assets are subject to depreciation, which is a tax-deductible expense. Tax-deductible expenses can reduce your tax bill, so you want to make sure that you take all of the deductions to which you are entitled. If you have not recorded new fixed asset purchases, then you will not have depreciation expenses recorded, which means you will miss out on what could be a significant tax deduction. It’s also important to conduct a physical check to ensure that all of the assets on the books still exist and have not been disposed of.
To add fixed assets to QuickBooks, you will need to have the following information on hand:
- Date of purchase
- Purchase price
- Type of asset
- Make and model (if applicable)
- Year
Pro Tip: Your tax preparer should have a detailed list of fixed assets that have been reported on previous tax returns. It is a good idea to review this list annually to ensure it includes new purchases and/or disposal of assets.
Follow these steps to add a fixed asset to QuickBooks:
- From the left menu bar, click on Accounting, as indicated in Figure 17.1:

Figure 17.1: Navigating to Accounting
- Select the chart of accounts and then click the New button, as indicated in Figure 17.2:

Figure 17.2: Clicking the New button
- For a new fixed asset, complete the fields as shown in Figure 17.3:

Figure 17.3: Clicking the Save and Close button to save the fixed asset
The following is a brief explanation of the fields that need to be completed for a new fixed asset:
- Account Type: From the drop-down menu, select Fixed Assets.
- Detail Type: From the drop-down menu, select the type of fixed asset account you need to add. The options include the following: buildings, computers, copiers, furniture, tools, equipment, telephone, software, furniture and fixtures, and vehicles.
- Name: Type the name of the fixed asset in this field.
- Description: Type a more detailed description of the fixed asset in this field.
- Track depreciation of this asset: By putting a checkmark in this box, you are indicating that the asset is depreciable. When saving this fixed asset, QuickBooks will automatically create an account to track the cost of the asset, and another account to track depreciation.
If you don’t want a separate depreciation account for each asset, leave this field blank.
- Original cost: Enter the amount that you paid for the asset in this field. This information will be used to calculate depreciation.
- as of: Enter the date of purchase in this field. This information will be used later on to calculate depreciation.
- Click the Save and Close button to add the asset to your chart of accounts list.
Be sure to complete steps 1 through 4 for each fixed asset you have purchased during the accounting period. If you have a large number of fixed assets, it is not recommended to have a separate accumulated depreciation account for each one.
Making depreciation journal entries
Depreciation is the reduction in value of an asset due to wear and tear after it has been in service for a period of time. To reflect the reduced value, you must record the depreciation expense on your books. Depreciation is also a tax-deductible expense, which can help to reduce your overall tax liability. After adding fixed assets to QuickBooks, you need to record depreciation expenses for the period. Unfortunately, QuickBooks does not compute depreciation for you. Therefore, you will need to calculate depreciation manually, or have your accountant do this for you. In the Recording journal entries section of this chapter, we will show you how to record journal entries in QuickBooks.
Taking physical inventory and reconciling this with your books
Reconciling inventory involves making sure that the product you have on your shelf matches what your books reflect as on-hand inventory. You should take a physical inventory count at least once a year, if not more often. After taking a physical count, any discrepancies between the books and the physical count should be recorded in QuickBooks as inventory adjustments. After recording these inventory adjustments, your books and your warehouse will be in sync.
Follow these steps to record inventory adjustments in QuickBooks:
- Click on the + New button and select Inventory qty adjustment in the Other column, as indicated in Figure 17.4:

Figure 17.4: Choosing Inventory qty adjustment
- Complete the fields for the inventory adjustment, as indicated in Figure 17.5:

Figure 17.5: Completing the fields to record the inventory adjustment
The following is a brief explanation of the fields that need to be completed in order to record an inventory adjustment:
- Adjustment date: Enter the effective date of the adjustment. This date should be on or before the last day of the closing period. For example, if you close your books annually, this date should be as of 12/31/xx if you are on a calendar year.
- Inventory adjustment account: Inventory Shrinkage is the default account that will appear in this field. However, you can click the drop-down arrow and select a different account, or add a new one.
- PRODUCT: From the drop-down menu, select the item for which you are making an adjustment.
- DESCRIPTION: This field will automatically be populated based on the description in QuickBooks. You can also enter a description directly in this field.
- QTY ON HAND: This field will automatically be populated with what you currently have recorded in QuickBooks. This field cannot be adjusted.
- NEW QTY: Enter the quantity, based on the physical count that was taken in this field.
- CHANGE IN QTY: QuickBooks automatically computes the adjustment required by taking the difference between the QTY ON HAND and NEW QTY values entered.
- Memo: Enter a brief explanation as to why the adjustment was made.
If you have extensive inventory tracking requirements that go beyond what’s available in QuickBooks Online, visit the Intuit App center, where there are over 700 add-on programs that integrate seamlessly with QBO. In Chapter 18, Handling Special Transactions in QuickBooks Online, we show you how to navigate the QuickBooks app center.
Adjusting retained earnings for owner/partner distributions
Retained earnings are the cumulative amount of your income and expenses for the prior period. This amount will post to the retained earnings account after the end of your fiscal/calendar year has been closed. QuickBooks will automatically make this entry for you. Depending on the type of organization (Corporation, Partnership, LLC, Sole Proprietorship, or Non-Profit), you may need to move this balance to other equity accounts. To distribute profits to the owners, you will need to create a journal entry to an equity account entitled owner’s draw or owner distributions and offset it with retained earnings. We will show you how to create journal entries next.
Recording journal entries
QBCU
1.5
A journal entry is used to adjust your books for transactions that have not been recorded throughout the accounting period. Depreciation expense for fixed assets, income and expense accruals, and adjustments to retained earnings are three examples we have discussed in this chapter.
Follow these steps to record a journal entry in QuickBooks:
- Click the + New button and select Journal entry, as indicated in Figure 17.6:

Figure 17.6: Selecting Journal entry below the Other column
- A screen similar to the one shown in the following screenshot will appear:
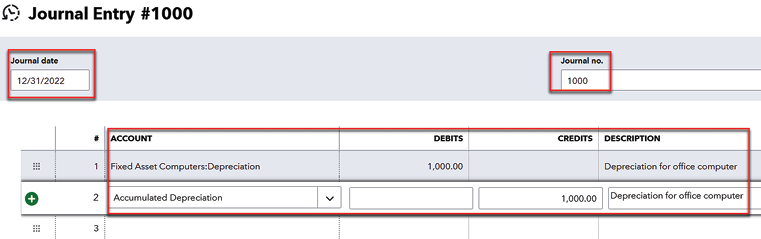
Figure 17.7: Journal Entry template
The following is a brief explanation of the fields that need to be completed in order to record a journal entry:
- Journal date: Enter the effective date of the journal in this field.
- Journal no.: QuickBooks will automatically populate this field with the next available journal number. If this is the first journal entry you have recorded, you can enter a starting number (such as
1000), and QuickBooks will increment each journal entry number thereafter. - ACCOUNT: Select the account from the drop-down menu.
- DEBITS: Enter the debit amount in this field.
- CREDITS: Enter the credit amount in this field.
- DESCRIPTION: Type a detailed description of the purpose of the journal entry in this field. Adding a detailed description is recommended; it is helpful when referring to a journal entry and explaining why the entry was made.
Be sure to record all journal entries prior to generating financial statements. If you give your CPA or accountant access to your data, they can record all of the necessary journal entries and then generate the financial reports required to file your tax returns.
Setting a closing date and password
In an effort to maintain the integrity of your data, you should set a closing date and password after you have entered all transactions for the closing period. By setting a closing date, users will receive a warning message if they attempt to enter transactions that affect the closing period. For example, if you set a closing date of 12/31/22, users will receive a warning message if they attempt to enter any transactions dated 12/31/22 or prior.
Follow these steps to set a closing date and password in QBO:
- Click on the gear icon and then select Account and Settings in the Your Company column, as indicated in Figure 17.8:

Figure 17.8: Selecting Account and Settings in the Your Company column
- Click on the Advanced tab, as indicated in Figure 17.9:

Figure 17.9: Clicking the Advanced option
- The Accounting preferences are located at the very top of the next screen, as indicated in Figure 17.10:
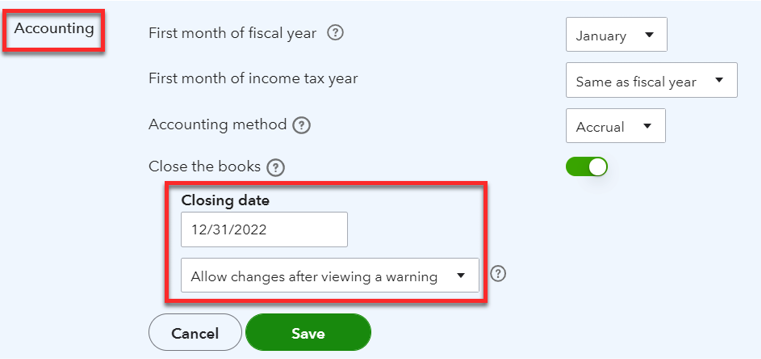
Figure 17.10: Reviewing Accounting preferences
QBCU
1.2.2In the Close the books section, you can enter the closing date (that is, 12/31/22), which will give users a warning if they attempt to enter transactions dated on the closing date or prior to that date. There are two types of warning messages. The first warning message is Allow changes after viewing a warning. This message will allow users to proceed with entering the transaction after they close out of the warning message. The second warning message is Allow changes after viewing a warning and entering a password. This message requires users to enter a password in order to proceed with entering transactions. To choose this option, select it from the drop-down field as shown in Figure 17.10 and enter the password you would like to use.
Pro Tip: Since QuickBooks does not have a formal closing process, this is highly recommended to keep users from making changes to years where tax returns have already been filed. Don’t give the closing password to anyone who is not authorized to enter transactions after the closing date.
Preparing key financial reports
After you have completed the first seven steps in the closing checklist, you are ready to prepare financial statements. There are three primary financial statements you will need to prepare:
- The trial balance
- The balance sheet
- The income statement (profit and loss)
In Chapter 12, Business Overview Reports, you learned what the balance sheet and income statement reports are, how to interpret the data, and how to generate these reports in QuickBooks. Your accountant, or certified public accountant (CPA), will also request a trial balance report. A trial balance report lists all of the debits and credits recorded in QuickBooks for the period. If everything has been recorded properly, debits will always equal credits on this report.
Follow these steps to run a trial balance report in QuickBooks:
- Navigate to Reports, as indicated in Figure 17.11:
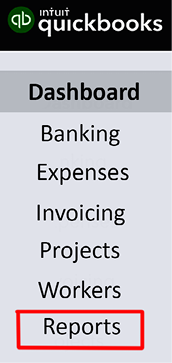
Figure 17.11: Clicking Reports to navigate to the Reports Center
- In the For my accountant section, click on Trial Balance, as indicated in Figure 17.12:

Figure 17.12: Running the Trial Balance report
- The trial balance report will appear. Click the Customize button to see the following options:

Figure 17.13: Reviewing the report customization options
There are a number of options available to customize the trial balance report. The following is a brief description of some of the information that can be customized:
- Report period: You can select a preset report period such as Last Year from the drop-down menu, or type a specific date range in the fields to the right of the preset field.
- Accounting method: As previously introduced in this book, you can choose the accounting method you want to be applied to the report, cash or accrual.
- Number format: There are a variety of options for formatting the numbers on a report. Omitting the cents and excluding accounts with a zero balance are just a couple of the options shown in the preceding screenshot.
- Rows/columns: Choose which rows/columns are visible on the report.
- Header: You can edit the company name and the title of the report in the header section.
- Footer: You can choose to show the date/time when the report was prepared.
- Alignment: You can decide how to best align the information that appears in the header and footer sections of the report.
- When you are done with your customizations, click the Run report button.
- A report similar to the one in the following screenshot will appear:

Figure 17.14: Sample Trial Balance report
As discussed, the total debits column should always equal the total credits column, as it does in the preceding report. If it does not, you will need to look into any discrepancies. The good news is, 99.99% of the time, this report will balance because QuickBooks does not allow you to post one-sided journals, which means that for every debit, there is always an offsetting credit to keep things in balance. If you do have a trial balance that does not balance, you should calculate the difference between the debits and credits, and then look for that amount on the report. Most likely, there is an amount in one of the columns (debit or credit) that does not appear in the other column.
To summarize, you will need to review three key financial reports before closing your books: the balance sheet, the income statement (profit and loss), and the trial balance report. If you have a CPA or an accountant who reviews your financials and prepares your tax return, you can give that person access to your books so that they can run these reports without having to bother you. We will discuss giving your accountant access to your data next.
Pro Tip: Always review the information on your reports one last time before sharing them with any third party outside of your organization. You can set these reports up in memorized groups and send them instead of running them individually. Refer to Chapter 11, Report Center Overview, for more information on this.
Giving your accountant access to your data
If you have an accountant or tax preparer to whom you need to grant access to your data, you can create a secure user ID and password for them. All you need to do is request their email address so that you can send them an invitation to access your data.
Follow these steps to invite an accountant to access your QuickBooks data:
- Click on the gear icon and select Manage Users in the Your Company column, as indicated in Figure 17.15:

Figure 17.15: Selecting Manage Users from the Your Company column
- On the Manage users page, click on Accounting firms, as indicated in Figure 17.16:

Figure 17.16: Clicking on Accounting firms
- Click on the Invite button, as indicated in Figure 17.17, to invite your accountant to access your QuickBooks data:

Figure 17.17: Clicking the Invite button
- Enter the name and email address of your accountant, as indicated in Figure 17.18:

Figure 17.18: Completing the fields for the accountant invite
- Once you have entered your accountant’s contact information, click the Send button. Your accountant will receive an email, inviting them to access your QBO account. They will need to accept the invitation and create a secure password. Their user ID will be the email address that you entered in the form (shown in the preceding screenshot).
Once you have given your accountant access to your books, they can simply log in to QuickBooks in order to get the information they need to prepare your taxes. This is highly recommended if your accountant will be making any year-end adjustments. You can add/remove permissions access as needed if you prefer them only to have access at tax time.
Summary
In this chapter, you have learned about the key tasks that need to be completed to close your books for the accounting period. As discussed, you need to reconcile all bank and credit card accounts, record year-end accrual adjustments (if you are on the accrual basis of accounting), add fixed asset purchases, record depreciation expenses, take a physical inventory and make the necessary adjustments, adjust retained earnings for distributions made to the business owners, set a closing date and password, and prepare key financial statements. You can perform these tasks yourself, or you can give your accountant access to your QuickBooks data to take care of this for you.
This chapter is the last one that covers the QuickBooks features most small businesses will use. In the next chapter, we will cover some additional topics, such as adding apps to QBO, managing credit card payments, and recording bad debt expenses.
Join our book’s Discord space
Join the book’s Discord workspace for a monthly Ask me Anything session with the author: https://packt.link/QuickBooks
