Chapter 9: Monetizing Your Game
In this chapter, you will learn how to implement monetization features in your game. You will learn about different ways of monetizing your game, such as by implementing game passes, developer products, Premium Benefits, and third-party sales. In addition, you will learn how to use best practices when it comes to the previously named implementations. This way, your players can easily enjoy their purchased power-ups.
The following topics will be covered in this chapter:
- Programming game passes
- Implementing developer products
- Giving Premium Benefits
- Third-party sales
- Exercise 9.1 – building a currency system
By the end of this chapter, you will know how to implement game passes in your game to give players a permanent power-up. Besides this, you will learn how to create temporary power-ups or how to let players purchase in-game currency by implementing developer products. In addition, you will learn how to make your game comply with government laws. You will also learn about the Roblox Premium subscription and its benefits. You will know what the common implementations of Premium Benefits are and how to implement them in your own game. Finally, you will learn how to earn commissions through third-party sales.
Technical requirements
To start programming with Luau, you need access to a device with internet access. This can either be a Windows or a Mac device.
You will need to download the following software:
- Roblox Player
- Roblox Studio
All the code examples for this chapter can be found on GitHub at https://github.com/PacktPublishing/Mastering-Roblox-Coding.
The CiA video for this chapter can be found at https://bit.ly/3Jb9t2x.
Programming game passes
Throughout the previous chapters, we learned everything about programming Roblox games. We learned how to secure and optimize our game, build data stores, listen to user input, and work with graphical user interfaces (GUIs). While it is true that all of these categories are essential while creating a game, there also needs to be a monetization aspect of your game.
There are many ways to monetize your game. Throughout this chapter, we will cover the most popular ones. One way to start earning from your game is by creating game passes. Roblox allows developers to sell game passes, which act as permanent power-ups for your game. We are allowed to implement the effects of these game passes ourselves. A few examples of game passes are admin commands, double money, bigger plots, exclusive cars, and anything else that fits your game genre.
Each published Roblox game has a Store section, as shown in the following screenshot. Inside this Store section, we can see all the game passes that a game has:

Figure 9.1 – Pet Store Tycoon game passes
Players can purchase game passes to receive an in-game power-up. For instance, the following screenshot shows a 2x Cash game pass. As the description of this game pass specifies, this game pass provides twice the amount of money for each paycheck that the player gets:

Figure 9.2 – 2x Cash game pass
Players can purchase game passes with a virtual currency called Robux. Instead of directly purchasing something with real-world currency, such as USD or euros, you pay with Robux for everything on the platform. So, whether you purchase a new accessory for your avatar, a game pass, or advertisements for your game, you always pay in Robux.
You can directly purchase Robux with real-world money or get a subscription to Roblox Premium. Roblox Premium gives you Robux every month. In addition, you unlock the ability to trade limited accessories, and you will receive Premium Benefits in various games. Later, in the Giving Premium Benefits section of this chapter, we will learn more about Roblox Premium and Premium Benefits.
Now that we know more about Robux, let us continue with game passes. As previously mentioned, developers can create their own game passes. This includes setting a price for them. When a game pass is purchased, Roblox takes 30% of the revenue; we get 70% of each sale that’s made for our game.
We now know that we can monetize our game using game passes. We have learned that game passes allow players to get a permanent power-up inside our game. Now that we know this, let us try to implement a game pass in our game.
In the next section, we will create a game pass prompt that allows players to easily purchase a game pass while playing our game. Once we have implemented this, we will learn how to reward players that have purchased those game passes.
Prompting game passes
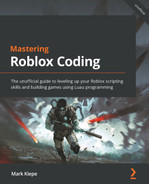
Previously, we learned that players can purchase game passes from the Store section for a particular game. However, most of the time, players will decide that they want to purchase a specific game pass while playing your game. Therefore, it is highly recommended that we create a GUI or SurfaceGui somewhere in our game that allows players to purchase game passes. An example of a GUI that allows you to purchase game passes can be seen in the following screenshot:
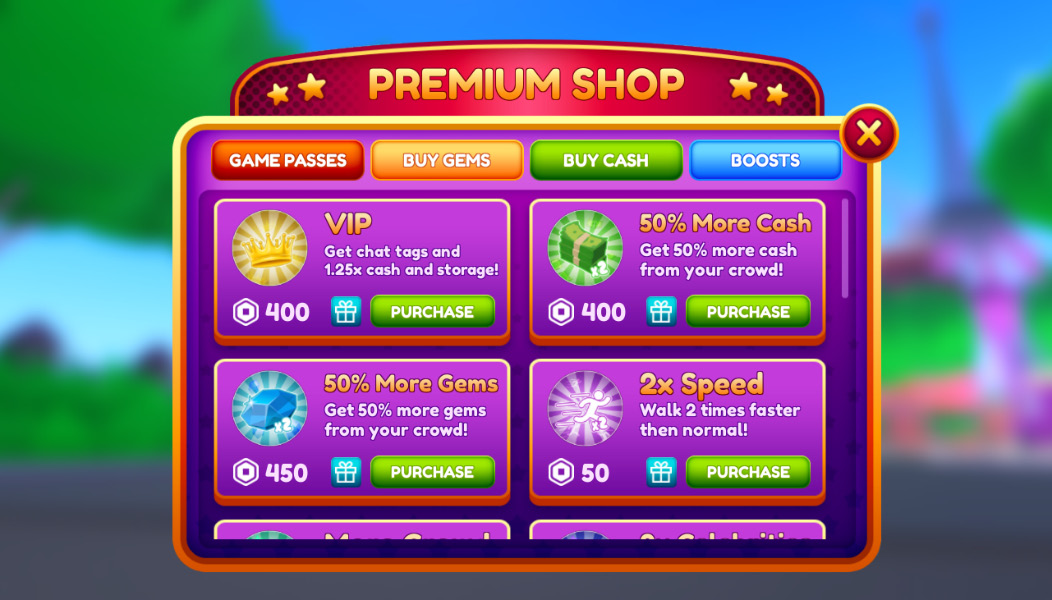
Figure 9.3 – Purchasing in-game game passes
When a player opens the Premium Shop area for this game, they will be presented with all the game passes that this game has. It also includes a Purchase button. When a player presses this button, a game pass prompt will appear that allows the player to purchase this game pass while in-game, as shown in the following screenshot:
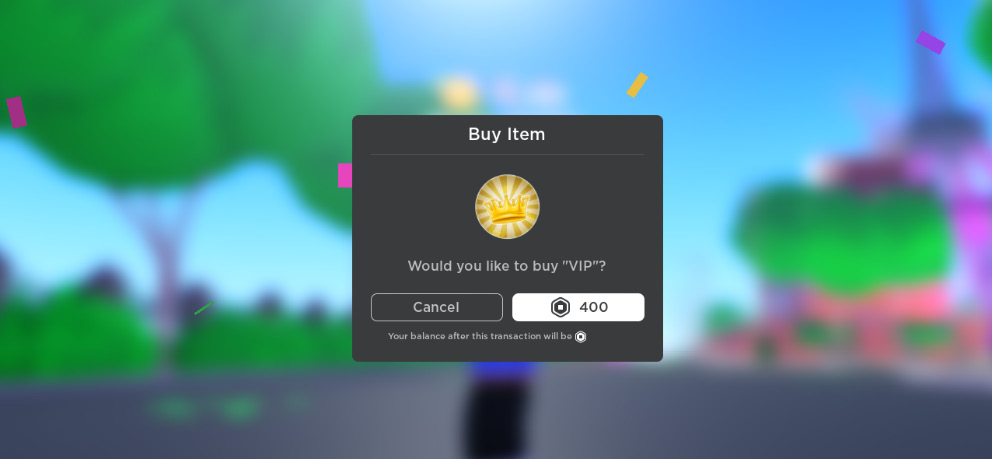
Figure 9.4 – Purchase game pass prompt
We now know the desired outcome: the game pass prompt. However, how do we make it? Similar to all the previous chapters, there is a primary service that we will use throughout this chapter. When monetizing your game, you need the MarketplaceService service. The MarketplaceService service provides every function related to monetizing your game.
If we want to create a game pass prompt, we need to use the :PromptGamePassPurchase() function. We can use this function both on the Server and the Client.
Prompting Game Passes on the Client
Please remember that the Client can only call the function on themselves. This means that Player1 cannot prompt a game pass purchase for Player2.
Let us create a simple GUI that features a button that will prompt a random game pass. Follow these steps:
- Inside StarterGui, create a new ScreenGui.
- Inside ScreenGui, insert TextButton that is positioned somewhere on your screen. Then, change the Text property on TextButton to Purchase. Then, change the Name property to PurchaseButton.
- Create a new LocalScript inside ScreenGui.
Feel free to style your GUI however you like. Your GUI could look something like this:

Figure 9.5 – Created Purchase button
Now that we have our GUI, let us script it so that it starts the game pass prompt. Take a look at the following code snippet:
local Players = game:GetService("Players")local MarketplaceService = game:GetService("MarketplaceService")local screenGui = script.Parent
local purchaseButton = screenGui:WaitForChild("PurchaseButton")function purchaseGamePass()
MarketplaceService:PromptGamePassPurchase(
-- Player that will receive the prompt
Players.LocalPlayer,
-- Game Pass Id
123456789
)
end
purchaseButton.MouseButton1Click:Connect(purchaseGamePass)
In the preceding code snippet, we call the purchaseGamePass() function when the .MouseButton1Click event on PurchaseButton fires. Inside the purchaseGamePass() function, we call the :PromptGamePassPurchase() function. This function requires two arguments. The first argument is player – that is, the player who will receive the prompt. Since this is a LocalScript that runs on the Client, it should always be LocalPlayer. The second argument is game pass id, which is the ID of the game pass that you are trying to tell the player about.
When you click on the TextButton property that we made, you will receive a game pass prompt.
Game Pass Prompt Error
If you try the preceding code snippet and run into an unexpected error, please change the game pass ID inside the script. Regardless, your code will work if this message shows up; you are just using a non-existing game pass ID.
We now know how to create a game pass prompt using the :PromptGamePassPurchase() function on the MarketplaceService service. In addition, we practiced making a simple GUI that features a TextButton that we scripted. While it is great to know how to prompt a game pass in your game, it is also very important to give the players what they paid for. In the next section, we will learn how to reward players who own game passes in our game.
Rewarding game passes
We now know how players can purchase game passes. They can either purchase them via the Store section on the game’s page or via a prompt that we can script ourselves. However, we have not implemented a reward for these game passes yet. After all, it is just as essential to implement the reward as the prompts.
So, how do we detect whether someone owns a certain game pass? In MarketplaceService, there is a function that tells us exactly this. Let us take a look at :UserOwnsGamePassAsync():
if
MarketplaceService:UserOwnsGamePassAsync(
-- User Id
player.UserId,
-- Game Pass Id
123456789
)
then
-- Implement game pass reward
end
In the preceding code snippet, we use the :UserOwnsGamePassAsync() function, along with its arguments, inside an if statement. As mentioned previously, this function only checks whether a player owns a particular game pass, nothing else. Therefore, if we wish to reward a player with something, we must script this ourselves.
Cache
The result of calling the :UserOwnsGamePassAsync() function for the first time gets cached in the function internally. There is nothing you can do to change this behavior. While this is not a big issue, it is important to remember that this function may still return false when the player has just purchased the game pass.
Imagine that we have a game pass that gives a player a certain tool. How would we make this? First, we need to create this tool. Because this example is not about the tool itself, we will create an empty tool without using any parts or scripts. Follow these steps to reward a game pass:
- Inside the ServerStorage service, create a new folder named Tools.
- Inside the previously made folder, create a new tool and name it GamePassTool. You do not have to change anything about the tool.
- Inside the ServerScriptService service, create a new script with the following piece of code:
local Players = game:GetService("Players")
local ServerStorage = game:GetService("ServerStorage")
local MarketplaceService = game:GetService("MarketplaceService")
local tools = ServerStorage.Tools
function playerJoined(player)
if
MarketplaceService:UserOwnsGamePassAsync(
-- User Id
player.UserId,
-- Game Pass Id
123456789
)
then
tools.GamePassTool:Clone().Parent =
player.Backpack
tools.GamePassTool:Clone().Parent =
player.StarterGear
end
end
Players.PlayerAdded:Connect(playerJoined)
With that, we have implemented our game pass reward script. Let us take a look at what it does.
Here, we call the playerJoined() function when a player joins the game. Inside this function, we check whether the players own the game pass by using an ID of 123456789. Once again, this is just a fictitious game pass ID. Please change this number to your game pass ID that was generated when you created a new game pass.
If a player owns this game pass, we can use the :Clone() function on the GamePassTool. To get this GamePassTool, we must use the tools variable that we declared at the beginning of the script. The tools variable references the Tools folder inside the ServerStorage service.
But why do we clone GamePassTool twice? The first time we clone GamePassTool, we parent it to Backpack, which can be found inside the player. The second clone goes into the StarterGear folder. What is the difference between both? As we learned in Chapter 7, Listening to User Input, we use Backpack to store all the tools that a player does not currently use. When a player does use a tool, it gets parented to the character of the player instead.
But what about the StarterGear folder? While learning about the Backpack folder in Chapter 7, Listening to User Input, we saw what the StarterPack service does. When we parent tools to this service, every player gets these tools inside their Backpack by default, even when they reset. The StarterGear folder is very similar to StarterPack. The only difference between them is that the StarterGear folder is unique to a certain player, whereas StarterPack is for all players.
Because we parent our GamePassTool to both Backpack and StarterGear, we can simply reward the game pass once. This means we will never have to worry about it again, not even when a player decides to respawn their character.
With that, we’ve learned how to reward a game pass tool to a certain player using the :UserOwnsGamePassAsync() function on MarketplaceService. However, in our code example, we are listening to the .PlayerAdded event. This event only gets fired when a player joins the game. What should we do when a player decides to purchase a new game pass while playing the game, for instance, by purchasing it through a game pass prompt? In the next section, we will learn how to reward game passes instantly when the player is playing our game.
Instant game pass reward
When a player buys a game pass, you want to ensure the player immediately gets rewarded with whatever that game pass promises. However, when you look away from the front-page games, you will see that many games require users to reset or even rejoin the game. This is a bad practice. Not only is it an inconvenience for your players, but it also lowers the average play time of your game.
So, how do we ensure that players get instantly rewarded when purchasing a game pass in-game? In MarketplaceService, there is an event called .PromptGamePassPurcahseFinished. This event gets fired when the player purchases or cancels a game pass prompt. Let us take a look at this event:
local MarketplaceService = game:GetService("MarketplaceService")function purchaseFinished(player, gamePassId, purchased)
if purchased == true then
-- Getting game pass product info
local productInfo =
MarketplaceService:GetProductInfo(
gamePassId,
Enum.InfoType.GamePass
)
-- Printing message
print(
player.Name .. " just purchased a game pass"
.. " named [" .. productInfo.Name .. "]."
)
end
end
MarketplaceService.PromptGamePassPurchaseFinished:Connect(purchaseFinished)
In the preceding code snippet, we listen to the .PromptGamePassPurchaseFinished event. This event provides us with the following three parameters:
- The player that interacted with the prompt
- The game pass that was prompted
- A Boolean that determines whether the game pass was purchased or not
We can use these parameters to figure out everything that we need. We can use the gamePassId variable to get the name of the game pass by using the :GetProductInfo() function, as shown in the preceding code snippet.
Now, let us take a look at a system that instantly rewards players, even when they purchase a game pass while playing:
local Players = game:GetService("Players")local ServerStorage = game:GetService("ServerStorage")local MarketplaceService = game:GetService("MarketplaceService")local tools = ServerStorage.Tools
local gamePasses = {[123456789] = function(player)
tools.GamePassTool:Clone().Parent = player.Backpack
tools.GamePassTool:Clone().Parent =
player.StarterGear
end
}
function playerJoined(player)
-- Looping through all game passes
for gamePassId, rewardFunction in pairs(gamePasses) do
-- Checking if game pass was purchased
if
MarketplaceService:UserOwnsGamePassAsync(
-- User Id
player.UserId,
-- GamePass Id
gamePassId
)
then
-- Rewarding game pass
rewardFunction(player)
end
end
end
function purchaseFinished(player, gamePassId, purchased)
if purchased == true then
-- Checking if game pass reward was programming
if gamePasses[gamePassId] == nil then
warn("GamePass [" .. gamePassId .. "] reward was not programmed")
return
end
-- Rewarding game pass
gamePasses[gamePassId](player)
end
end
Players.PlayerAdded:Connect(playerJoined)
MarketplaceService.PromptGamePassPurchaseFinished:Connect(purchaseFinished)
In the preceding code snippet, we have a dictionary called gamePasses. This dictionary has the game pass ID as the key and a reward function as the value. The playerJoined() function gets called when a player joins the game. We loop through the gamePasses dictionary in this function and check whether a player owns this game pass. When they do, we execute the rewarding function, which is the value of each key in the dictionary. Because we do this, we automatically reward every game pass that a player owns when they join the game.
We also need to reward the player when they purchase an item in-game. To do this, we must listen to the .PromptGamePassPurchaseFinished event. When this event is fired, we call the purchaseFinished() function. Inside the purchaseFinished() function, we check whether the player purchased the game pass. If they did, we execute the reward function that is inside the gamePasses dictionary. This way, we reward the player instantly after they purchase a game pass.
In the previous sections, we learned a lot about game passes. We learned that implementing game passes allows us to monetize our game. Besides this, we learned that game passes can be used as permanent power-ups for players. They only have to pay once to receive a permanent effect.
After learning what game passes are, we learned how to implement them in our game. We learned how to create a prompt that allows players to purchase game passes while playing the game. In addition, we learned how to instantly reward players that own these game passes using the :UserOwnsGamePassAsync() function and the .PromptGamePassPurchaseFinished event.
Now that we know about game passes, let us try a different way of monetizing our game. As mentioned previously, game passes are a one-time permanent power-up. But what if we want the power-up to be for a limited time only and allow players to purchase it multiple times? In that case, we should use developer products. We will learn what these are and how to program them in the following sections.
Implementing developer products
Throughout the previous sections, we learned how to monetize our games by implementing game passes. Similar to game passes, we have developer products. These, unlike game passes, can be purchased an unlimited number of times, though generally, the effects of developer products are temporary. They can be used to implement money boosts or an adrenaline shot for extra health. However, developer products can have other implementations as well. For example, they can be used to purchase a revival or purchase in-game currency quickly rather than saving up by playing the game.
To create a new developer product, follow these steps:
- Open the Game Settings menu in Roblox Studio.
- From this menu, open the Monetization tab and scroll down to Developer Products, as shown in the following screenshot:
Figure 9.6 – The Developer Products section in the Game Settings menu
Here, we can see the (Developer) Product ID, Product Name, and Price (in Robux) properties for each developer product in this game. This data will be helpful when we start programming our developer product in the next section.
When we create a new developer product by clicking the Create button, a new developer product shows up in the list.
- To edit the product, click on the three dots (…) and click Edit, as shown in the following screenshot:
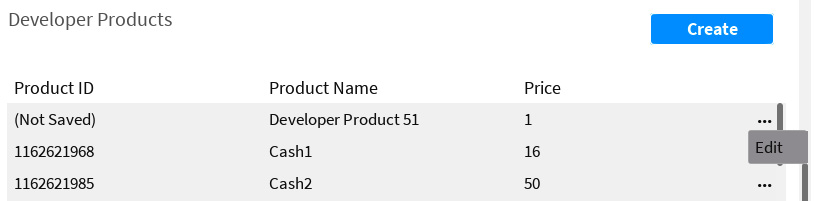
Figure 9.7 – The Edit button for a newly created developer product
- When we press the Edit button, we have the option to set the name and price for our developer product, as shown in the following screenshot. Ensure that the name of your developer product fits its purpose; players will see the name you put here when attempting to purchase it.
- Finally, press the Save button when you are done:
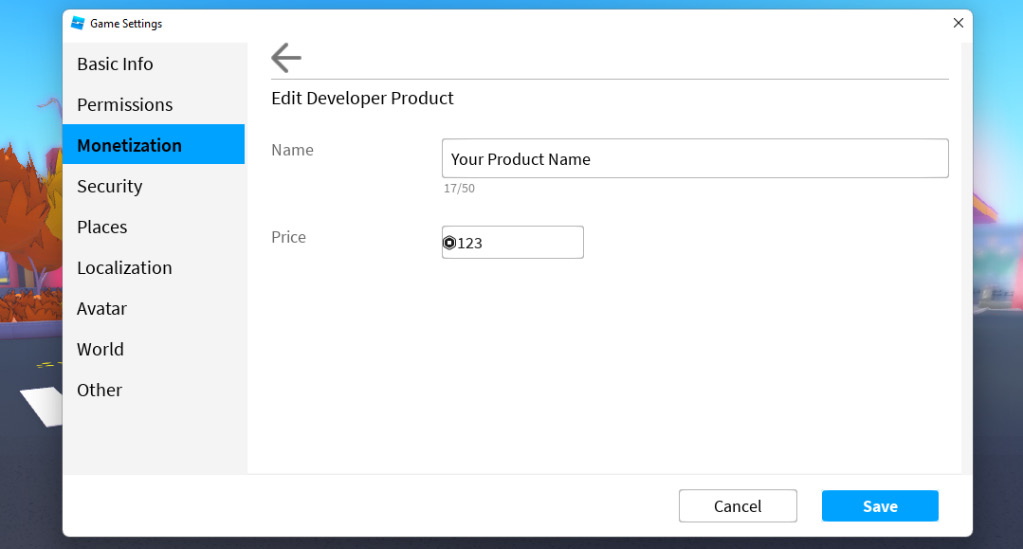
Figure 9.8 – Editing a developer product
We now know how to create a developer product. However, we do not know how to implement it in our game. In the next few sections, we will follow the same path we followed when learning about game passes. First, we will learn how to create a developer product prompt so that players can purchase a developer product. Then, we will learn how to reward players for purchasing this developer product. Rewarding players when they purchase a developer product will be a bit more complex than it is for game passes, but we will get to this later. Finally, we will learn about PolicyService, which will make our game monetization compliant in countries with restrictions.
Prompting developer products
Unlike game passes, developer products cannot be purchased on the Store page of your game. Instead, developer products can only be purchased in-game through prompts. Similar to game passes, we can create these prompts by scripting.
In the Prompting game passes section, we created a GUI with LocalScript that prompted a game pass. We will use the same GUI in this section. However, we will make it prompt a developer product instead. Let us take a look at how to create a prompt for a developer product:
local Players = game:GetService("Players")local MarketplaceService = game:GetService("MarketplaceService")local screenGui = script.Parent
local purchaseButton = screenGui:WaitForChild("PurchaseButton")function purchaseProduct()
MarketplaceService:PromptProductPurchase(
-- Player that will receive the prompt
Players.LocalPlayer,
-- Developer Product ID
123456789
)
end
purchaseButton.MouseButton1Click:Connect(purchaseProduct)
Let us take a look at the preceding code snippet. Near the top of the script, we reference PurchaseButton, which is a TextButton in our GUI. At the bottom of the script, we listen to the .MouseButton1Click event on this button. When this event gets fired, we call the purchaseProduct() function. In this function, we call the :PromptProductPurchase() function on MarketplaceService. This is very similar to how we created a game pass prompt. The only difference compared to prompting a game pass is the function we use; we now use the :PromptProductPurcahse() function instead of the :PromptGamePassPurchase() function.
We now know that players cannot purchase developer products on the Store page of our game. Instead, they have to purchase them via prompts. We covered an example of how to create a developer product prompt. However, we still need to reward the players when they purchase this developer product. In the next section, we will learn how to do this.
Rewarding developer products
In the previous section, we learned that prompting game passes and developer products are similar in terms of how they are coded. The real difference comes when we want to reward them. When we want to reward game passes, we check whether a player owns the game passes. However, you cannot own a developer product. So, how do we do this?
Remember how we instantly rewarded game passes in the Instant game passes reward section? Rewarding developer products is very similar to this. When a developer product is processed, the .ProcessReceipt callback is fired on MarketplaceService. We can use this event to reward developer products.
Before we can take a look at the .ProcessReceipt callback, let us think of a good developer product that we can implement in our game. A widespread implementation of developer products is to purchase in-game currency. If we want to implement this, we need to use the DataManager module we created in Chapter 8, Building Data Stores. DataManager needs to save the money key for each player. This can be done by including the money key inside the DEFAULT_PLAYER_DATA variable.
With that, we have set up everything we need to implement our developer products. Because the .ProcessReceipt callback is usually considered difficult to understand, we will take a look at it next.
Analyzing the ProcessReceipt callback
First, we will listen to the event to see what we have to work with:
local Players = game:GetService("Players")local MarketplaceService = game:GetService("MarketplaceService")local DataManager = require(PATH_TO_DATA_MANAGER)
function processReceipt(receiptInfo)
return Enum.ProductPurchaseDecision.NotProcessedYet
end
MarketplaceService.ProcessReceipt = processReceipt
The preceding code snippet is the start of what we will use to reward players when they purchase a developer product. At the bottom of the script, we listen to the .ProcessReceipt callback. You could compare this to how we used BindableFunctions and RemoteFunctions in Chapter 3, Event-Based Programming, and Chapter 4, Securing Your Game.
Because this is a callback, it is expected that we return something. When using .ProcessReceipt, we are expected to return a ProductPurchaseDecision Enum. This Enum has two options, NotProcessedYet and PurchaseGranted. When anything goes wrong while rewarding the developer product, we return the NotProcessedYet Enum. Only when everything goes correct can we return PurchaseGranted. Never return the PurchaseGranted Enum if something goes wrong.
Callback Limitation
Callbacks can only be set once. This means that we can only have one script that listens to the .ProcessReceipt callback. Because of this, we must program all of our developer products in the same script.
Besides the Enum that we have to return, there is one more noteworthy item that we can find in the preceding code snippet. Our processReceipt() function has a parameter named receiptInfo. This parameter comprises a dictionary that contains data that might be useful. Let us take a look at the following table, which shows what is inside this dictionary:

Table 9.1 – Keys provided in the receiptInfo dictionary
With that, we’ve analyzed how the .ProcessReceipt callback works. We have learned that we must return a ProductPurchaseDecision Enum in our processReceipt() function. Besides this, we learned that callbacks should only be set once per game. This means that no more than one script should listen to the same callback. Finally, we looked at the receiptInfo parameter, which is provided in the processReceipt() function. In the next section, we will set up each developer product’s functions.
Setting up rewards
As mentioned in the previous section, all our developer products must be handled in the same script. To prevent our processReceipt() function from flooding with all the reward codes, we will do something similar to what we did in the Instant game pass reward section. There, we made a variable named gamePasses() that contained a reward function for each game pass.
Let us take a look at the following code snippet:
local developerProducts = {-- 500 money developer product
[123456789] = function(player)
DataManager:Increment(player, "money", 500)
end
}
In the preceding code snippet, there’s a new dictionary named developerProducts. This dictionary should contain a reward function for each developer product in our game. For now, we only have one developer product. This developer product will increment the amount of money a player has by 500 by using the :Increment() function on DataManager, which we set up in the Rewarding developer products section.
For those that remember, the :Increment() function uses the error() function internally. This means we should wrap our function call in pcall(). We will get back to the reason why we did not do this in the Giving developer product rewards section.
With that, we have made a new dictionary containing a reward function for each developer product. Now that we have this, let us continue building the processReceipt() function. In the next section, we will implement checks to verify whether a developer product can be successfully rewarded.
Setting up ProcessReceipt checks
Because the .ProcessReceipt callback only fires once, we must ensure that we can successfully reward the developer product to the player. As we saw in the Analyzing the ProcessReceipt callback section, our processReceipt() only has the receiptInfo parameter. This means we still have to determine which player purchased the developer product. During this process, things can go wrong. When this happens, we must return the NotProcessedYet Enum.
Let us start by looking at some of the checks that we must implement in the processReceipt() function:
function processReceipt(receiptInfo)
-- Getting player
local userId = receiptInfo.PlayerId
local player = Players:GetPlayerByUserId(userId)
--
if player == nil or not player:IsDescendantOf(Players)
then
-- Player is not in-game anymore
return Enum.ProductPurchaseDecision.NotProcessedYet
end
-- Checking if the developer product is programmed
local purchasedDeveloperProduct = receiptInfo.ProductId
--
if developerProducts[purchasedDeveloperProduct] == nil
then
-- Developer product was not programmed
warn("Developer Product [" .. purchasedDeveloperProduct .. "] was not
programmed!")
return Enum.ProductPurchaseDecision.NotProcessedYet
end
-- ... todo ...
end
Let us analyze what we have done here. We get the player at the top of the processReceipt() function. Because one of the keys inside receiptInfo is PlayerId, we can use the :GetPlayerByUserId() function to get a reference to the player that purchased this developer product. If we cannot get this reference, we must return the NotProcessedYet Enum. After all, we could not determine which player purchased this developer product.
We can continue if we can figure out who purchased the developer product. Finally, we reached our second check. First, we get the developer product’s ID and store it in the purchasedDeveloperProduct variable. Then, we have an if statement that checks whether it can find a reward function for this developer product. We use the warn() function to display this in the Developer Console area if it cannot. Besides this, we return the NotProcessedYet Enum. After all, we will be unable to reward this developer product if we have never scripted it.
When we pass all of these checks, we have got everything we need. We know which function we need to call to provide the reward, and we know which player to call this function for. In the next section, we will implement this in our processReceipt() function.
Giving developer product rewards
The only thing left is to call the correct function for the correct player. However, there is one more thing we have to keep in mind: errors. When calling these reward functions, things could go wrong due to a scripting mistake or because the underlying functions use the error() function. When this happens, we need to return the NotProcessedYet Enum.
Let us take a look at the updated processReceipt() function:
function processReceipt(receiptInfo)
-- Getting player
local userId = receiptInfo.PlayerId
local player = Players:GetPlayerByUserId(userId)
if player == nil or not player:IsDescendantOf(Players)
then
-- Player is not in-game anymore
return Enum.ProductPurchaseDecision.NotProcessedYet
end
-- Checking if the developer product is programmed
local purchasedDeveloperProduct = receiptInfo.ProductId
if developerProducts[purchasedDeveloperProduct] == nil
then
-- Developer product was not programmed
warn("Developer Product [" .. purchasedDeveloperProduct .. "] was not
programmed!")
return Enum.ProductPurchaseDecision.NotProcessedYet
end
-- Rewarding developer product
local suc, err = pcall(function()
developerProducts[purchasedDeveloperProduct](
player)
end)
-- Checking if reward was successful
if not suc then
-- An error occurred while trying to reward
warn(err)
return Enum.ProductPurchaseDecision.NotProcessedYet
else
-- Rewarding successful
return Enum.ProductPurchaseDecision.PurchaseGranted
end
end
In the preceding code snippet, we call the reward function inside pcall(). Then, we use the suc and err variables to determine whether an error occurred while calling the reward function. If an error did occur, we use the warn() function to print the error that occurred in the Developer Console area. However, if no errors occur, we return the PurchaseGranted Enum. Once again, it is essential that we only return the PurchaseGranted Enum when we are confident that the developer product was successfully rewarded.
Full Script
You can find the full script we made in the previous sections in this book’s GitHub repository. The link was provided in the Technical requirements section.
In the previous sections, we learned a lot about developer products. We learned that developer products are used to provide limited-time boosts or boosts that can be purchased multiple times, such as purchasing in-game money. We learned how to prompt developer products and compared it to how we made a prompt for game passes; this was very similar. The fundamental difference between both comes when we want to implement the reward. Because developer products can be purchased many times, we have to reward them for using the .ProcessReceipt callback.
Working with PolicyService
Roblox games can be played in many different countries. However, some of these countries have restrictions that impact video games. To make our games comply with the laws of these countries, we must use PolicyService. This helps us figure out what we can and cannot implement for certain players based on their country, device, and age.
So, how does PolicyService work? PolicyService has a function called :GetPolicyInfoForPlayerAsync(). Let us take a look at what this function returns. First, we need to create LocalScript. Once we have this, we must insert the following code inside it:
local Players = game:GetService("Players")local PolicyService = game:GetService("PolicyService")local player = Players.LocalPlayer
print(PolicyService:GetPolicyInfoForPlayerAsync(player))
When we execute this, we get a dictionary with a few keys. The following table explains what each key tells us:

Table 9.2 – PolicyService restrictions
So, how do we implement PolicyService in our game? First, we should just make the game the way we want. Then, we should implement PolicyService in the scripts that we have already made. For instance, if we had a loot box that players can purchase with in-game currency, we would check whether the ArePaidRandomItemsRestricted key equals false. If it happens to be true, we will simply not allow players to interact with this loot box. An example of this can be seen in the following screenshot:
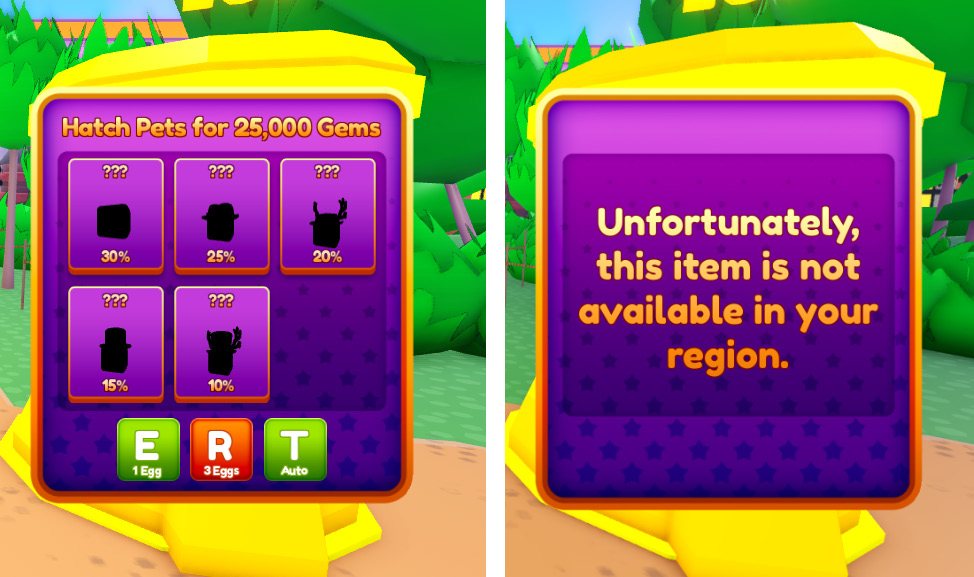
Figure 9.9 – PolicyService implementation
Here, we can see that PolicyService is implemented in a GUI. However, if a player decides to purchase a pet, RemoteEvent gets fired. Exploiters in countries with restrictions could still do this, even when we do not let them interact with the GUI. Therefore, it is required that we implement PolicyService on both the Server and the Client. On the Server, we use the same :GetPolicyInfoForPlayerAsync() function.
Note
If your game is centered around pets, and players can only purchase them through loot boxes, you may have to rethink how players can collect these pets.
In the previous sections, we learned about developer products. In addition, we learned that we could not sell or implement anything in our game. Our game must comply with laws that may vary based on the country a player is in. To do this, we can use the :GetPolicyInfoForPlayerAsync() function on PolicyService. In the next section, we will learn about another way many developers earn money through their games: Premium Benefits.
Giving Premium Benefits
In September 2019, Roblox released a new subscription: Roblox Premium. This subscription gives users a fixed amount of Robux each month. In addition, users unlock the ability to trade, get discounts on catalog items, and access Premium-only items. While these are great, Roblox also promises that users can receive Premium Benefits inside games. These Premium Benefits can be anything. We are allowed to decide this ourselves. We do not even have to implement them if we do not want to.
But what’s in it for us? Are we just supposed to give benefits to Premium members and get nothing in return? Fortunately, Roblox thought of a way to compensate us. Every game, even those that do not implement any Premium Benefits, gets an additional source of income under the Premium Payout category.
Income
Premium Payout is an extra income source that gets paid in Robux. However, this does not reduce the amount of Robux you get for selling game passes or developer products.
Your Premium Payout is based on the engagement of your game. The more Premium users play your game, the higher your Premium Payout will be. In the Creator Dashboard area, you can see how much Robux you will receive and the projected amount that is expected in the future. These statistics are unique for each of your games:

Figure 9.10 – Premium Payout statistics in the Creator Dashboard area
You can find Creator Dashboard here: https://create.roblox.com/.
So, what kind of rewards are we supposed to implement? As mentioned previously, this is totally up to us. A few common practices are an additional daily Premium Reward next to the Daily Reward and Group Reward chests. Something else could be that Premium users get a 10% discount on selected in-game items. Alternatively, there could be entire sections in your game that are Premium only. While these examples are fine, the best benefits are the ones that seamlessly fit into your game.
Now that we know what Premium Benefits and Premium Payouts are, let us try to implement one of these Premium Benefits.
Implementing Premium Benefits
Most games have a Daily Reward system in their games. This system is designed to let players come back every day. After all, they get something for free by simply joining. Games have different implementations of this Daily Reward system; this could be a GUI, a chest, a minigame, or anything else. The following screenshot shows a game with three chests: Daily Reward, Group Reward, and Premium Reward. When players walk up to one of these chests, they get a reward, and a timer starts that tells them they can claim this reward again after 24 hours:
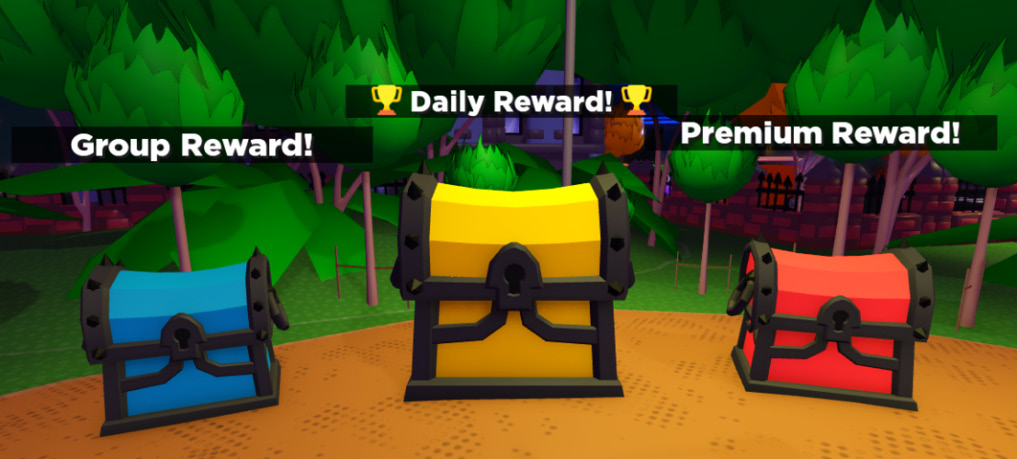
Figure 9.11 – The Daily Reward, Group Reward, and Premium Reward chests
When a player that does not have the Premium membership walks to the Premium Reward chest, the following message will appear:
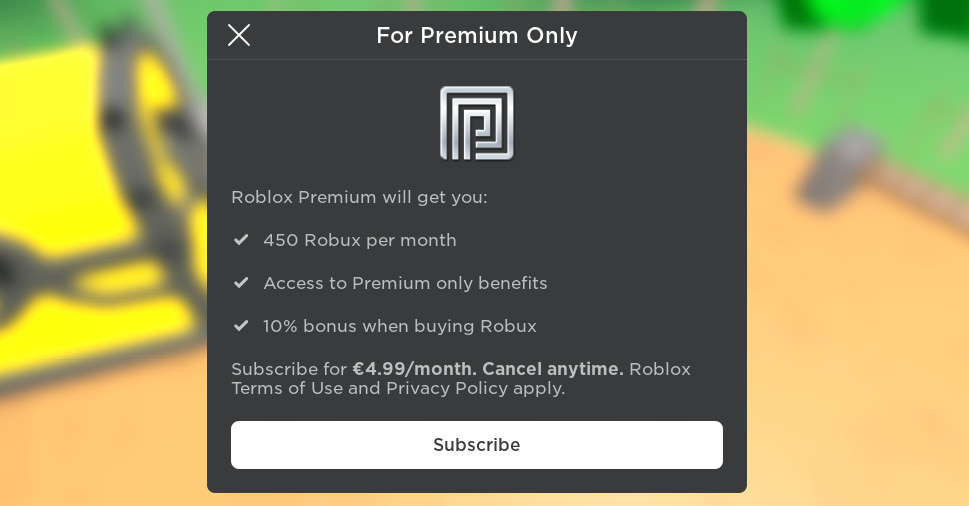
Figure 9.12 – For Premium Only GUI
The For Premium Only GUI is not something we have to make ourselves. There is a function on MarketplaceService named :PromptPremiumPurchase() for this. Let us take a look at this function:
local Players = game:GetService("Players")local MarketplaceService = game:GetService("MarketplaceService")function promptPremium()
-- Getting player
local player = Players.LocalPlayer
-- Checking if player owns Premium
if player.MembershipType ~= Enum.MembershipType.Premium
then
-- Player is not subscribed to Premium
MarketplaceService:PromptPremiumPurchase(player)
else
-- Player is subscribed to Premium
print("You are already subscribed!")end
end
promptPremium()
In the preceding code snippet, there’s a function called promptPremium(). In this function, we check whether the MembershipType property of the player is Premium or not. If it is not, we use the :PromptPremiumPurchase() function. This will enable the For Premium Only GUI that we saw previously. When the player does have Premium, we simply use the print() function to verify that our script works. This print() function is not required in an actual implementation.
In the previous code snippet, we saw a Client-side implementation of our Premium Benefit that prompts unsubscribed users to purchase Premium. We also have to verify that this player is eligible for this Premium Benefit on the Server. To do this, we can use the same if statement that we used on the Client. We simply need to check whether the MembershipType property matches the Premium Enum. When it does, we apply our benefit. That is all there is to it.
In this section, we learned that one of the perks of subscribing to the Roblox Premium subscription is to receive in-game Premium Benefits. These benefits can be anything that we want to implement. We are not required to implement them at all. We learned how to create a prompt that allows players to subscribe to Roblox Premium, and we have learned how to verify that players are subscribed. In the next section, we will learn how to monetize our game using third-party sales.
Third-party sales
Another way you can monetize your game is by selling avatar items. avatar items are sometimes referred to as Catalog Items as well. In the Avatar Shop area, players can purchase new accessories and clothing to customize their avatar:
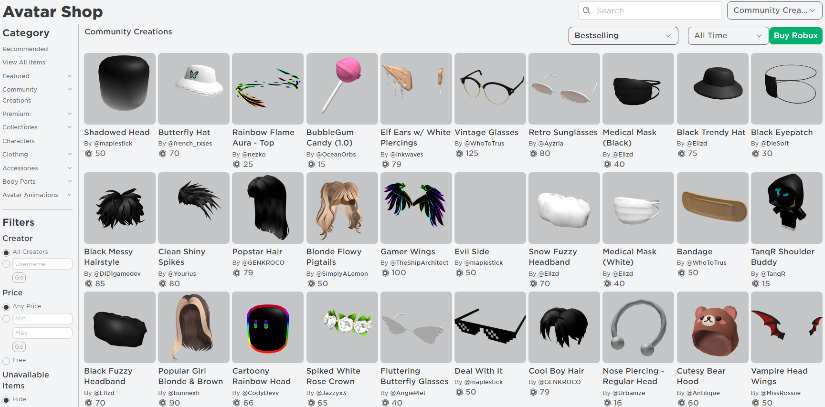
Figure 9.13 – Avatar Shop
But how do we earn money through these avatar items? When we sell these avatar items in our game, we get paid a commission. This commission is our “thank you” for selling someone else their avatar item. Commissions get paid as a percentage. This means that we get a portion of the money the player spent on this avatar item when they buy it in our game. Let us take a look at these percentages:

Table 9.3 – Avatar items
The preceding percentages are when a player purchases an avatar item in your game that you do not own. You get more when this is your own avatar item.
Limited Avatar Items
Roblox has limited avatar items. These avatar items can be bought and sold by players. We do not get a commission when we sell a limited item in our game.
Now that we know how to earn money through selling third-party items, let us try to implement one in our game.
Implementing third-party sales
Before we can start selling third-party items in our game, we need to change a setting in our game. Follow these steps:
- Open the Game Settings menu in Roblox Studio.
- From this menu, open the Security tab and enable the Allow Third Party Sales setting, as shown in the following screenshot:

Figure 9.14 – Enabling the Allow Third-Party Sales setting
- Finally, press the Save button.
Security
When you enable this setting, a message will appear that states Enabling security bypasses may make your experience vulnerable to third-party attacks. This message warns you that you allowed players in your game to purchase items that are not yours. If exploiters gain control over your game, they could start selling their items in your game. If you do not use malicious plugins or free models and follow the best practices taught in Chapter 4, Securing Your Game, this should not be an issue.
Now that we have enabled the setting for our game, let us create a prompt for an avatar item. To do this, we need to use the :PromptPurchase() function on MarketplaceService. In the Prompting game passes section, we created a GUI with a LocalScript that prompted a game pass. We will use the same GUI in this section. However, this time, we will change it so that it uses the :PromptPurchase() function.
Let us take a look at the following script:
local Players = game:GetService("Players")local MarketplaceService = game:GetService("MarketplaceService")local screenGui = script.Parent
local purchaseButton = screenGui:WaitForChild("PurchaseButton")function purchaseAvatarItem()
MarketplaceService:PromptPurchase(
-- Player that will receive the prompt
Players.LocalPlayer,
-- Avatar Item Id
123456789
)
end
purchaseButton.MouseButton1Click:Connect(purchaseAvatarItem)
Let us take a look at the preceding code snippet. Near the top of the script, we reference PurchaseButton, which is a TextButton in our GUI. At the bottom of the script, we listen to the .MouseButton1Click event on this button. When this event gets fired, we call the purchaseAvatarItem() function. In this function, we call the :PromptPurchase() function on MarketplaceService. This is very similar to how we created a game pass and developer product prompt. The only difference is that we now use the :PromptPurchase() function.
Now that we know how to earn money using third-party sales, we know about four different ways we can monetize our game. In the next section, we will practice implementing monetization features.
Exercise 9.1 – building a currency system
In this exercise, we will create a simple currency system that uses the previously learned information. First, we need to make a data store that contains money. Then, players should be able to purchase a 2x Cash game pass. Besides this, players should be able to purchase 500 coins through a developer product. If players purchase this developer product while owning the 2x Cash game pass, they should get 1,000 coins instead of 500. In addition, we must implement a Premium Benefit. For our current game, we will give Premium users 10% more in-game money when they purchase it through a developer product. This means that Premium users without the double money game pass will get 550 coins and that the players with the game pass will receive 1,100 coins.
Now that we know what system we will implement, let us start making it. First, we will create a new game. Follow these steps:
- Open Roblox Studio and create a new Baseplate.
- Publish your Baseplate to Roblox.
- Open the Game Settings menu. Navigate to the Security tab and enable the Enable Studio Access to API services setting.
- Navigate to the Monetization tab in the Game Settings menu and create a new developer product. Make sure you set a proper name for your developer product. Set the price of your developer product to 19 Robux.
- On the Roblox website, go to the game page for the game you just published. Then, open the Store section on your game’s page and create a new game pass. Make sure you put your game pass on sale for 199 Robux after you finish making your game pass.
Next, we will create our DataManager module. Follow these steps:
- Create a new ModuleScript in ServerScriptService or ServerStorage, depending on your liking. Name it DataManager.
- Use the DataManager code we made in Chapter 8, Building Data Stores.
- Make sure we have a data field named money in DataManager for each player. The data type for this should be a number.
Tip for 3: Change the DEFAULT_PLAYER_DATA variable so that it includes the money field.
Next, we will create a simple GUI that allows us to purchase game passes and developer products in-game. Follow these steps:
- Insert a new ScreenGui into the StarterGui service.
- Inside the previously made ScreenGui, insert two TextButton properties. Then, change the Name and Text properties of the TextButtons to DevProduct and GamePass.
- Create a new LocalScript inside ScreenGui with the following functionalities:
- When a player clicks on the GamePass TextButton, create a game pass prompt for the previously made game pass
- When a player clicks on the DevProduct TextButton, create a developer product prompt for the previously made developer product
Next, we will create a script that handles the game passes for our game. Follow these steps:
- Create a new Script in the ServerScriptService service.
- Declare a variable named gamePasses. This variable should contain a dictionary with the 2x Cash game pass ID as the key and a reward function as the value.
- Inside the reward function for the 2x Cash game pass, use the :SetAttribute() function on the player. Use the following code to do this:
player:SetAttribute("2xCash", true)
- When the player joins the game, check whether this player owns the game pass by using the :UserOwnsGamePassAsync() function on MarketplaceService. If the player owns this game pass, execute the reward function for this game pass.
- Listen to the .PromptGamePassPurchaseFinished event on MarketplaceService and call the reward function for the game pass that was just purchased.
Next, we will create a script that processes developer product purchases. Follow these steps:
- Create a new Script in the ServerScriptService service.
- Declare a variable named developerProducts. This variable should contain a dictionary with the 500 cash developer product ID as the key and a reward function as the value.
- Inside this reward function, apply the Premium Benefit and game pass boost to the base 500 cash. The Premium Benefit will increase the amount of money by 10%. When the player owns the game pass, the money should be doubled. Both boosts must stack.
Tip for 3: Use the multiplier operator (*) to apply boosts. To add a 10% increase, use * 1.1. To double the amount of money, use * 2.
- Call the :Increment() function on DataManager and increase the amount of money the player has.
- Listen to the .ProcessReceipt event on MarketplaceService.
- Confirm that the player that just purchased the developer product is in-game and that the developer product ID can be found inside our developerProducts variable. If either of these conditions is not met, return the NotProcessedYet Enum.
- If the previously mentioned conditions are met, execute the reward function in pcall(). If an error occurs while rewarding the player, return the NotProcessedYet Enum. When there are no errors, return the PurchaseGranted Enum.
We have now finished the currency system that we monetized. You can test your system using the GUI we made during this exercise. Optionally, you could include some print() statements to test that your script is working properly. Purchasing game passes and developer products do not cost Robux when done in Roblox Studio. Feel free to include other features or expand the system by adding, for instance, a new premium Gem currency.
If you did not manage to complete this exercise because you ran into an issue, please take a look at the example answer that is provided on GitHub: https://github.com/PacktPublishing/Mastering-Roblox-Coding/tree/main/Exercises.
Summary
In this chapter, we learned how to monetize our game. We started by looking at game passes. We saw that players can purchase game passes in our game for a permanent power-up. These power-ups can be anything. Furthermore, we saw that players can purchase these game passes via the Store section on our game’s page or via an in-game prompt. We can create prompts in our game to sell game passes. This way, players can conveniently purchase them without quitting or tabbing out of the game to go to the Store section.
Once players have purchased a game pass, we need to reward them with this permanent power-up. We learned how to use the :UserOwnsGamePassAsync() function on MarketplaceService to determine whether players own the game pass. Then, we can reward them with a tool or anything else that the game pass offers. Because the :UserOwnsGamePassAsync() function caches its data internally, rewards may not be instant when we use this function. We also do not want our players to rejoin to claim a game pass. Therefore, we have learned to listen to the .PromptGamePassPurchaseFinished event, which allows us to instantly reward players when they purchase a new game pass in-game.
Besides game passes, we learned about developer products. Unlike game passes, developer products are usually temporary. They can be used for short boosts or to purchase items such as in-game currency. After all, players can purchase developer products multiple times through prompts. Because of this, we saw that it is a bit more difficult to reward the benefits of developer products compared to game passes.
To reward players for purchasing developer products, we must listen to the .ProcessReceipt callback. This allows us to see which developer product was just bought and by whom. We learned that it is essential to return a ProductPurchaseDecision Enum in our processReceipt() function. This Enum determines whether we were able to successfully reward the effect of our developer product.
Finally, we learned about the Roblox Premium subscription. We learned that one of the perks of this subscription is receiving in-game Premium Benefits. We have the option to include these benefits in our game. We saw that we get paid a Premium Payout as a reward for attracting Premium users to our game. This is an additional income source for our games where the player doesn’t have to pay for anything. We get paid simply by having Premium users play our games.
Throughout the previous chapters, we have learned so much about Roblox and Luau. We started this book by learning the basics of Luau, such as working with if statements, loops, functions, and tables. After that, we quickly improved our programming skills by securing and optimizing our games. Besides this, we learned how to create and program GUIs, listen to user input, build data stores, and how to script the monetization aspect of our games.
Most of the time, we learned about an individual item, such as a data store, that was not necessarily connected to, for instance, user input. Because of this, we have not looked at any examples where all of these systems work together. This is why we will create a Simulator game in the next chapter. By doing this, we will see how all of the systems we learned about throughout this book work together. This will result in a fully functioning game that you can be proud of.