Chapter 10: Creating Your Own Simulator Game
In this chapter, you will create your very own simulator game. You will use many of the systems that you learned about in previous chapters. Besides this, you will learn how to combine all of these individual systems into one complete game. This way, you will learn, for example, how your GUIs can display data that is stored in your data stores by creating safe RemoteEvents or RemoteFunctions.
The following topics will be covered in this chapter:
- Introduction to the game
- Creating data stores
- Implementing server scripts
- Programming GUIs
- Updating your game
By the end of this chapter, you will have made your own simulator game based on several requirements that your employer could provide you with. You will know how to create proper data stores that will save all the data required for your game. In addition, you will learn how to create the server scripts for all the systems in your game. Besides this, you will know which RemoteEvents and RemoteFunctions to implement to ensure that all the user actions can be performed. Finally, you will also learn how to use these RemoteEvents and RemoteFunctions to make your GUIs work.
Technical requirements
To start programming with Luau, you need access to a device with internet access. This can either be a Windows or a Mac device.
You need to download the following software:
- Roblox Player
- Roblox Studio
This chapter’s code examples can be found on GitHub at https://github.com/PacktPublishing/Mastering-Roblox-Coding.
The CiA video for this chapter can be found at https://bit.ly/3OD2wsp.
Introduction to the game
Because we learned a lot about scripting in Luau throughout the previous chapters, we will create an entire game together in this chapter. Therefore, this chapter is divided into multiple sections. Each section creates a part of our game. However, before we can start creating this, we need to understand the game we will make.
In this chapter, we will create a simulator game. Simulators are a popular genre on Roblox. In essence, players collect some sort of currency in their backpacks. Then, they can sell this currency for in-game money. When they do this, they can purchase upgrades, pets, or even rebirth their character to restart the game with a money boost.
Now that we know what simulators are, let us look at the game we will make ourselves. Because this book is about programming, we will provide a great map that was uniquely made for this book. This map was made by Cole Tucker (1Coai):

Figure 10.1 – Our simulator map
You can download this map and the GUIs from the GitHub page for this book: https://github.com/PacktPublishing/Mastering-Roblox-Coding/tree/main/Games.
Permission
Because we will make a game in this chapter, you might want to release it once you have finished creating it. This is perfectly fine. You are allowed to use the map and the code that was provided in the example answer for your own game.
Now that we know what a simulator game is and in which map we will create our game, let us look at the game’s specifications. In our game, we will have orbs. Orbs are the circles on the map that players must collect. Players can convert these orbs into money at a selling point. With this money, they can upgrade the speed of their character. When players upgrade their speed, they will walk faster and therefore be able to collect more orbs in a shorter amount of time. Besides this, players can purchase an orb multiplier. When players upgrade their orb multiplier, they get more orbs when collecting orbs.
Besides upgrades, players must also have the ability to rebirth. Rebirthing in a simulator resets all the progress that they have made. This includes all the orbs, money, and upgrade progress. When players rebirth, they get more money from the selling point in their “second” life. Rebirths should stack. This means that players can rebirth multiple times. The more they rebirth, the higher the multiplier at the selling point becomes.
Because programmers that make a game usually get a list of requirements that need to be implemented into a game, we will follow one as well. Here is the list of requirements for our game:
General requirements:
- You must use the simulator map made by Cole Tucker (1Coai) with the Orbs, RebirthParts, and SellParts folders. You can change the map to your liking.
- The game must be compatible with FilteringEnabled and StreamingEnabled.
- The game must have a money and orb currency.
- Players must be able to purchase money through developer products.
- Players must be able to purchase a game pass that doubles their money when selling.
- Players must be able to upgrade their walking speed.
- Players must be able to upgrade their orb multiplier.
- Players must be able to rebirth, which increases their orb selling multiplier.
- All player data must be reset when rebirthing except for the rebirth multiplier.
- When rebirthing, the rebirth price and multiplier must increase for the next rebirth.
- When players touch a BasePart inside of the Orbs folder, the number of orbs the player has must be increased by 1. This number can go higher depending on the orb multiplier.
- When players touch a BasePart inside the SellParts folder, all the orbs must be converted into money. The amount of money can be more than the number of orbs, depending on the rebirth multiplier and game passes.
- When players touch a BasePart inside of the RebirthParts folder, a GUI has to pop up, allowing players to rebirth.
- Leader stats in the player list must show each player’s number of orbs, money, and rebirths.
- Players must be able to teleport to the nearest sell point by clicking a button.
- When any player claims an orb, it becomes invisible for five seconds. When the orb is invisible, it cannot be claimed by anyone else either.
The previous General requirements are usually provided by the person that hires you. Since they generally do not know much about programming-related specifications, they are usually not provided. Regardless, we want to create high-quality scripts. Therefore, these will be our additional programming-related requirements:
Data store requirements:
- There must be a DataManager module that handles everything related to data stores. The DataManager needs to be created so that other scripts do not need any knowledge about data stores other than the data keys that they can use, for instance, money, orbs, and so on.
- The DataManager must cache all the data or the frequently updated data.
- The DataManager must use retries when functions fail.
- The DataManager must yield until there is enough budget for the requested action.
- The DataManager must implement auto-saving.
GUI requirements:
- GUIs that are unrelated to each other must be separated into different ScreenGuis.
- GUIs may not overlap with each other.
- When opening GUIs, the current GUI, if there is one open, must be closed before the new GUI can open.
- When opening GUIs, you must use tweens.
Security requirements:
- All RemoteEvents must implement server checks.
- All RemoteEvents and RemoteFunctions must implement cooldowns.
- Everything directly related to data stores must be implemented on the server.
- All prices must be calculated on the server. This means that there must not be any parameters on RemoteEvents or RemoteFunctions that include the prices of items.
Monetization requirements:
- Game pass rewards must be instant.
- When an error occurs while rewarding a developer product, the NotProcessedYet enum must be returned.
All these requirements may seem overwhelming. However, if you followed all the best practices throughout the book, none of the technical requirements would surprise you. The only thing we need to pay much attention to is the general requirements. After all, this is what we must make. So, to assist you in getting a better view of what our final product will be, here is the published Roblox game that we will make:
https://www.roblox.com/games/9917292298/Simulator
We now know what sort of game we are expected to make. Like all the exercises in this book, you can try and make this game without following this chapter’s steps. However, remember that this game is far from easy to implement. In addition, we highly encourage you to improve upon and give your personal touch to the game. Finally, remember that this is a complete game, and it will likely take multiple days for you to finish it. Therefore, do not get frustrated if you cannot do multiple sections of this chapter daily.
Throughout the following sections, we will look at our game’s aspects. We will look at what we are expected to make and implement it. Because we have explained all the systems, such as datastores and GUIs, in other chapters, we will not explain how they work but rather how we can perfect them for our game. We will start by creating the data stores.
Creating data stores
In this section, we will look at how to design our data stores. In Chapter 8, Building Data Stores, we made a base DataManager in the Creating a DataManager section. We will use this base version for our game. However, there are still a few things we have to change. First, we must figure out which data we will save in our data stores.
Getting keys for our data stores
When we look at the requirements for our game, we can conclude that we need to implement a key for the following items:
- Money
- Orbs
- Speed upgrade multiplier
- Orb upgrade multiplier
- Rebirths
For money and orbs, we will obviously use number as the data type. However, what about the others? You might think of storing the multiplier value for the upgrades and rebirths. This could be something like 1.1 for a 10% bonus. While this might be your initial thought, this is a bad practice. Rather than storing the effect, you should store the number of rebirths, for example, that the player has done. This way, you must constantly convert the number of rebirths into a multiplier. As a result, you can change the multiplier for rebirths or upgrades without having to change anything in the data stores.
Just imagine that we would store the multiplier for the speed upgrade in the data stores. The default walking speed for players is 16. Maybe we initially thought it would be a good idea to double the walking speed every time that the player upgraded. This would mean that the new walking speed is 32 when the player upgrades once. But then we figure out that by the fifth upgrade, the walking speed is way too high. Unfortunately, we have already shipped the game and have many players playing. How would we fix this? Do we load their data and divide each player’s walking speed by half? But what if they upgraded with the new multiplier rate?
As you can imagine, this becomes a complete mess. Therefore, we should never store multiplier values in our data stores. Instead, we store the number of upgrades. When the player has upgraded two times, we store the number 2. Then, when we load the data, we might multiply this number by 16. This means that the walking speed is 32 again. But when we want to change our multiplier and change it to 8, we still get the number 2 from the data store and multiply it with the new multiplier, which is 8. This results in a new walking speed of 16 for each player, whether they played before our change or not.
Knowing this, we can conclude that for each key we originally thought of, we must save a number. If we change the DEFAULT_PLAYER_DATA constant in the DataManager, it will look like this:
local DEFAULT_PLAYER_DATA = {-- Currency data
["money"] = 0,
["orbs"] = 0,
-- Upgrade data
["speed_upgrade"] = 0,
["orb_multiplier"] = 0,
-- Rebirth data
["rebirths"] = 0
}
Now that we know which keys and data types to use, let us continue by looking at which functions we need in our DataManager module.
DataManager functions
In the base version of our DataManager, we already have a few functions. These are the :DataLoaded() function, the :Get() function, the :Set() function, and the :Increment() function. While this covers everything that we might need, there is one thing that we might need to take a look at. Most of these functions may throw an error. Therefore, we should wrap our calls in a pcall(). While this is not a big deal, we get a lot of duplicate code when we use the :Get() function in a pcall(). This is because when an error occurs, we might want to set some sort of default value, like this:
local money
local suc, err = pcall(function()
DataManager:Get(player, "money")
end)
if not suc then
warn(err)
money = 0 -- Default value
end
The preceding code snippet is all the code that is required when we use the :Get() function. As you can imagine, this results in a lot of duplicate code fairly quickly. Therefore, we should introduce a new function into our DataManager. This is the :GetWithDefault() function. The :GetWithDefault() function will use the :Get() function and will basically do what we showed in the preceding code snippet.
When we use the :GetWithDefault() function, we try to load the data using the :Get() function. However, when an error occurs, we return the default value. This could be a parameter. Let us take a look at the following code snippet:
function DataManager:GetWithDefault(player, key, default)
-- Declaring variable
local data
-- Default parameter
if default == nil then
default = 0
end
-- Querying data store
local suc, err = pcall(function()
data = DataManager:Get(player, key)
end)
if not suc then
warn(err)
return default
end
-- Returning data
return data
end
We removed many possible duplicate codes by implementing this function into our DataManager but you might be wondering why we do not just replace the :Get() function to have a default. This is because errors are not always a bad thing.
Imagine we are writing code that relies on the :Get() function having an actual result. When the :Get() function fails, we might want to stop changing the data stores completely. When using the :GetWithDefault() function, we will always continue as if an error would never occur.
We have now looked at the functions in the DataManager and updated them so they meet the required criteria for our game. We prevented possible duplicate code by implementing a new :GetWithDefault() function. If you are making the game while reading, please do not forget to implement this function in your own code. In the next section, we will analyze whether the events in our DataManager suffice.
DataManager events
The base version of the DataManager has just one event, the .PlayerAdded event. This event gets fired when the player data gets successfully loaded. We need to use the DataManager.PlayerAdded event in favor of the Players.PlayerAdded event. After all, we cannot let players play our game without their data being loaded. However, are there more events that we might need?
When we look at the requirements for our game, we see that we must make leader stats for our game. The DataManager is the module that knows when this data changes. Therefore, we need to do something in the DataManager so that the leader stats update. Now, we have two methods of doing this:
- Let the DataManager handle everything related to leader stats
- Create an event that fires when data in the DataManager is updated
When we include everything related to leader stats in our DataManager, the module starts doing two things. First, it handles everything related to data stores and leader stats. Generally, module scripts should only have one purpose. This way, the name of the module can contain everything it does. Other developers should instantly know what to expect from this module without looking at the code. This is no longer the case if we decide to include leader stats. Therefore, this is not the best option.
The other option is to create an additional event. This event fires when data for a player is updated. This means that we need to fire our event in both the :Set() function and the :Increment() function. This also means that we would fire this event when keys are not necessarily in the leader stats. This is fine. After all, if we were to prevent this, the DataManager would know which keys are used in the leader stats. This would once again mean that the DataManager knows the leader stats. We do not want this, as we want the DataManager to be a standalone module.
Let us look at what we need to change in our DataManager to add our new event:
local DataLoadedEvent = Instance.new("BindableEvent")local DataUpdatedEvent = Instance.new("BindableEvent")function setupEvents()
DataManager["PlayerAdded"] = DataLoadedEvent.Event
DataManager["DataUpdated"] = DataUpdatedEvent.Event
end
function DataManager:Set(player, key, value)
-- ... Function code ...
-- Firing data updated
DataUpdatedEvent:Fire(player, key, value)
end
function DataManager:Increment(player, key, value)
-- ... Function code ...
-- Firing data updated
DataUpdatedEvent:Fire(player, key, cachedData[key])
end
Please remember that the preceding code snippet is just the updated code in our base DataManager module. Do not forget to include this in your own DataManager.
In the preceding code snippet, we created a new DataUpdatedEvent BindableEvent. In the setupEvents() function, we ensured that other scripts can listen to this new event. Then, in both the :Set() function and the :Increment() function, we fired the event with the following three arguments:
- The player whose data just got updated
- The key of the data that just got updated
- The new value for the previously mentioned key
Now, we have set up all the events that might be useful when making the rest of our game. Throughout the previous sections, we looked at which keys our data store needs and whether we implemented all the functions and events in the DataManager. This means we have now finished with everything related to our data stores. In the following sections, we will build the rest of our game. This will rely heavily on our data stores. After all, we want their progress to be saved. Luckily, we did a standalone module. This means we only have to use the functions and events of this module without having to worry about any of its internal complexities.
Implementing server scripts
Now that our data stores are finished, we can implement the scripts that run on the server. This means we will start thinking of RemoteEvents and RemoteFunctions that the client will need to use. Then, we will implement these.
Implementing this will be a lot of work without seeing any visible results. When making your own game from scratch, you might make systems feature-based. This means that you would make both the client and server sides at the same time, instead of making the entire server side first. However, to improve the readability of this chapter, we have chosen to start with the server side and finish this in its entirety. Then, once our server side is finished, we have finished RemoteEvents and RemoteFunctions that we can call from the client that will instantly work.
In the following sections, we will analyze what has to be programmed together. After that, we will provide steps similar to the way we have done with the exercises in the previous chapters, which will help you script what we just analyzed.
Implementing leader stats
First, we will implement leader stats into our game. According to the requirements that were specified in the Introduction to the game section, we need leader stats for the following data keys:
- Money
- Orbs
- Rebirths
Since all the data types for these keys are numbers, we must create NumberValues inside the leaderstats model. We will create this leaderstats model when the player joins the game. Please keep in mind that you must listen to the DataManager.PlayerAdded event instead of the Players.PlayerAdded event. This is because there is no point in getting leader stats when the data that has to be displayed has not loaded yet.
Of course, we must also listen to the DataManager.DataUpdated event. In the DataManager events section, we made this event so that we could update our leader stats whenever data was updated.
Now that we know this, let us try to implement this script. Follow these steps:
- Create a new script in the ServerScriptService service. Make sure you name this script accordingly.
- Inside this script, create a new function that creates the leaderstats model inside the Player instance. Besides this, ensure all the required NumberValues are made and parented to the leaderstats model.
- Listen to the .PlayerAdded event and call the function mentioned in the previous step when this happens.
- Ensure that the leader stats display the latest information directly after they are created.
- Listen to the .DataUpdated event on the DataManager and ensure the correct data is updated in the leader stats. Use these three parameters that the .DataUpdated event provides:
- player
- key
- newData
When you implement the previous steps, your leader stats should be created and updated accordingly. Then, of course, we need to test whether this works. Because the rest of our game is not completely done yet, we cannot play the game to see whether it works. Therefore, we have to execute a small test. Create a new script in ServerScriptService that includes the following code snippet:
local ServerScriptService = game:GetService("ServerScriptService")local DataManager = require(PATH_TO_DATAMANAGER)
DataManager.PlayerAdded:Connect(function(player)
DataManager:Set(player, "money", 1)
DataManager:Increment(player, "orbs", 1)
DataManager:Set(player, "rebirths", 10)
task.wait(5)
DataManager:Increment(player, "money", 100)
DataManager:Set(player, "orbs", 5)
DataManager:Increment(player, "rebirths", 1)
end)
When you run the preceding code snippet, you should see changes in the leader stats. If this does not happen, look at possible errors in the Developer Console frame or the Output frame and try to solve them. It is highly recommended that you try to figure out what goes wrong. If, for whatever reason, you are unable to understand what is going on, look at the example answer, which can be found on the GitHub page for this chapter. The link for the GitHub page can be found in the Technical requirements section.
Congratulations, you just made your first script for your very own game!
Implementing monetization scripts
Next, we will implement the monetization scripts for our game. Usually, this is something you do last. However, we will implement this first to prevent us from having to implement the monetization aspects of our game while working on different systems.
There are not many complicated things that we must implement into our game to meet the set of requirements regarding monetization. As for game passes, we must create one that doubles the money when selling orbs. This is the only game pass we have to implement. You are free to add more if you’d like. A few example game passes could be Instant Sell, Double Orbs, Double Speed, or anything else that comes to mind. While implementing these is an outstanding practice, it is recommended that you wait until we have finished the game before you implement them.
Besides game passes, we must also implement a few developer products that allow players to purchase in-game money. To create a bit of variation, we will create three developer products. These developer products will give 500, 1,000, or 2,500 coins.
Base scripts
In Chapter 9, Monetizing Your Game, we created a base script for game passes and developer products. We will use these scripts. This way, we do not have to remake something we already made.
We now know which game passes and developer products we have to implement. Follow these steps:
- Ensure your game is published to Roblox so you can create game passes and developer products.
- Create a new game pass named Double Money. You can create a new game pass on the Store page for your game. First, make sure this game pass is put on sale. Then, you can decide the price for the game pass yourself.
- Create a new script in ServerScriptService and ensure it contains the base version of the game pass script we made in Chapter 9, Monetizing Your Game.
- In the gamePasses variable, create a new key with the game pass ID for the previously made game pass. The value of this key should be a reward() function. This reward() function should change the 2xMoney attribute on the Player instance to true. To do this, use the :SetAttribute() function.
Tip for 4: In the exercise of Chapter 9, Monetizing Your Game, we did something similar.
- Next, create three new developer products that will reward players with in-game money. Give these developer products a fitting name and price.
- Create a new script in ServerScriptService and ensure it contains the base version of the developer products scripts we made in Chapter 9, Monetizing Your Game.
- In the developerProducts variable, create three new keys with the developer product IDs you made in Step 5. The value for each key should be a reward() function. In the reward() function, you should use the :Increment() function on the DataManager to increment the player’s money.
Tip for 7: According to the requirements, there are no multipliers through game passes or premium benefits that would reward players with more money. Therefore, you can just increment their money with the same amount as the developer product specifies.
This is everything we need to do to implement monetization features into our game. Obviously, future scripts will still have to look at whether players own this game pass, but this is something for later.
We need to perform two tests to check that our script works. First, to test whether the developer products work, we can simply create a prompt for each developer product to check whether the money increases. Since our leader stats work, we can simply see whether these increase.
Then, to test game passes, we must do something else. If you created the game pass yourself, you should have this in your own inventory. This means you own the game pass. You can check whether you own the game pass by clicking on the game pass from the Store section of your game. Then, you should see a message that says Item Owned. You can see this in Figure 10.2:
Figure 10.2 – Item Owned
If you own this game pass, use the Properties frame in Roblox Studio to verify that the 2xMoney attribute on your Player instance is checked, as seen in Figure 10.3:
Figure 10.3 – The 2xMoney attribute
When both tests work, we can continue to the next section. If either does not work, try to look for errors in the Developer Console frame or the Output frame. If, for whatever reason, you are unable to understand what is going on, look at the example answer, which can be found on the GitHub page for this chapter. The link for the GitHub page can be found in the Technical requirements section.
Implementing character upgrades
Next, we will create the most complex system of the entire game: character upgrades. Even though it is the most complex system, do not worry; we will walk through it step by step. According to the requirements specified in the Introduction to the game section, we need to make two upgrades for characters. Players must be able to upgrade their speed and orb multiplier. In our data stores, we save an upgrade number. We have to convert these upgrade numbers into a multiplier. Because there is no requirement that there should be an infinite number of upgrades, we can just decide ourselves how many upgrades we want to implement.
First, we will create a dictionary that stores the price and multiplier for each upgrade. This dictionary will store all the upgrade data for each individual upgrade. Please keep in mind that this is not the player’s data. The player’s data will refer to one of these indexes. This is what a dictionary that contains all the upgrade data looks like:
local upgrades = { ["speed_upgrade"] = { [0] = { price = 0, multiplier = 1 }, -- Default-- ...
[10] = { price = 25_000, multiplier = 5 }},
["orb_multiplier"] = { [0] = { price = 0, multiplier = 1 }, -- Default-- ...
[10] = { price = 75_000, multiplier = 15 },}
}
In the preceding code snippet, we can see the upgrade data for both the speed upgrade and the orb multiplier upgrade. The data that is on index 0 is the default data. This means that when the player has never upgraded, their multiplier will be 1.
When a player wants to upgrade, we look at the upgrade number that is one higher than the current number. When we want to check how much it costs to upgrade, we add 1 to the current upgrade number, for example, 0 + 1 equals 1. Then, we check if this upgrade number exists. If it does not, the player cannot upgrade any further. However, if this new index does exist, the player can upgrade. When the upgrade does exist, we look at the price key for this upgrade. This way, we know how much it costs to upgrade to this new level.
Now that we know how to implement the data structure for the upgrades, let us implement it into our game. Follow these steps:
- Create a new UpgradeService script in the ServerScriptService service.
- Create a dictionary containing all the upgrade data. Each upgrade should have at least 10 upgrades. For each upgrade, you should determine the multiplier and price.
- Now that we have implemented the data structure for our upgrades, let us create the RemoteEvents and RemoteFunction that we will need for our system. Please keep in mind that you must create these in the Explorer window of Roblox Studio, not in a script. Create an Events folder in ReplicatedStorage. Inside this folder, create the following instances:
- An Upgrade RemoteEvent
- A GetUpgradeData RemoteFunction
- An UpgradeDataUpdated RemoteEvent
Now that we have created our RemoteEvents and RemoteFunction, let us start implementing them. First, we will create our RemoteFunction. This RemoteFunction should return specific data. The client will use this data to update the information that is displayed in the GUI. Because of this, it is recommended that we take a look at the Upgrades GUI to see what information this GUI needs:
Figure 10.4 – Upgrades GUI
GUIs
The GUIs for this game were provided in the same file that the map is in. The GUIs are stored in the StarterGui service. Feel free to style them to your liking.
In Figure 10.4, we see a lot of data that needs to be displayed in the GUI. Here is a list of data that is required if we want to update our GUI accurately:
- Name of the upgrade
- Current progress number
- Maximum progress number
- Price to upgrade
We now know what the RemoteFunction could return. When we put this into a dictionary, it looks like this:
local data = {
["Speed Upgrade"] = {
upgrade_name = "speed_upgrade",
current_progress = 0,
max_progress = 0,
upgrade_cost = 0,
multiplier = 0
}
}
In the preceding code snippet, we see that this is a data dictionary containing all the data for the speed upgrade. The upgrade_name key contains the speed_upgrade value. This is because this is what the key in our DataManager is called. By doing this, we can tell the client which upgrade key to call when the player tries to upgrade without converting Speed Upgrade into speed_upgrade.
You might have noticed that the previous code snippet contains a multiplier key that was not required for our GUI. We added this because we could also use this dictionary on the server. After all, when players have to upgrade, all this data is also required.
Now that we know this, let us implement the RemoteFunction.
- Listen to the GetUpgradeData RemoteFunction in the UpgradeService script. The parameter for this function is the player who is requesting their data. The result of this function should be a dictionary that contains the following data for each upgrade:
- Upgrade name
- Current progress number
- Maximum progress number
- Upgrade cost
- Multiplier
Tip for 4: First, get the current progress using the DataManager. Once you have this, figure out what the multiplier for this progress number is. Then, find out how much it costs to upgrade. Finally, calculate how many indexes there are in the table for the current upgrade. This will be your maximum progress number.
Now that we have implemented our GetUpgradeData RemoteFunction, let us continue with the Upgrade RemoteEvent. This is the RemoteEvent that the client will use to upgrade. However, before we can implement this, there is something we need to take a look at.
When a player upgrades, the information displayed in the GUI should change. Now, there are two options. We could either call our RemoteFunction directly after the RemoteEvent is fired, or create a new RemoteEvent that provides the exact same data as the RemoteFunction. However, the server fires this RemoteEvent to the client this time. This way, the server decides when the information in the GUI is updated.
We have decided to use the additional RemoteEvent. This RemoteEvent is called UpgradeDataUpdated. Follow the next step to implement our Upgrade RemoteEvent and our UpgradeDataUpdated RemoteEvent.
- Listen to the Upgrade RemoteEvent. When this RemoteEvent gets used, perform the following steps:
- Check whether the player has a cooldown or not.
- Check that if the player is on the final upgrade, they cannot exceed the upgrade limit. Current progress cannot be greater or equal to the maximum progress number.
- Check whether the player has enough money to upgrade. Use the DataManager to get the player’s money.
- If all of the previous requirements are met, increment the upgrade number for the requested upgrade. In addition, lower the money with the price of this upgrade.
- Fire the UpgradeDataUpdated RemoteEvent for the same player that called this function. The second argument of this RemoteEvent should be the same data as the function we made in the previous step.
- Apply the new multiplier. Some upgrades have an instantaneous effect once players have upgraded. For instance, the speed after upgrading should be applied instantly. However, not all upgrades have an instantaneous effect.
Tip for 5: Use the function made in the previous step. This function contains a lot of the required data.
We have now implemented all the previously made RemoteEvents and RemoteFunction. If you got stuck somewhere in these steps, please look at the example answer you can find on the GitHub page for this chapter. This is the most complex system in the entire game. Therefore, it is understandable if you run into some issues.
In the following sections, we might need to use some of the multiplier data we made in this script. For instance, when claiming orbs, the amount of orbs the player gets is based on the orb multiplier upgrade that we made here. To transfer this multiplier between scripts, we use BindableFunctions. We learned about BindableFunctions in Chapter 3, Event-Based Programming.
Let’s implement our BindableFunction.
- Create a new ServerEvents folder in the ServerStorage service.
- Create a new BindableFunction in the previously made GetMultiplierUpgrade folder.
- In our UpgradeService, listen to the GetMultiplierUpgrade BindableFunction callback. Return the multiplier for the provided upgrade name. When this function gets called, you can use the following parameters:
- The player whose multiplier is requested.
- The name of the upgrade that is requested. The name of this upgrade matches the keys in the DataManager. An example upgrade name could be speed_upgrade.
Tip for 8: To get the multiplier, use the function that we made two steps ago.
We have now finished implementing our upgrade system. Once again, this is the most complex system in our game. If you did not manage to implement this system, please take a look at the example answer, which can be found on the GitHub page for this chapter.
In the next section, we will implement the system that lets us claim the orbs that spawn inside the map.
Claiming orbs
Inside the map, there are many different circles. These are orbs. You can see an image of these orbs in Figure 10.5:
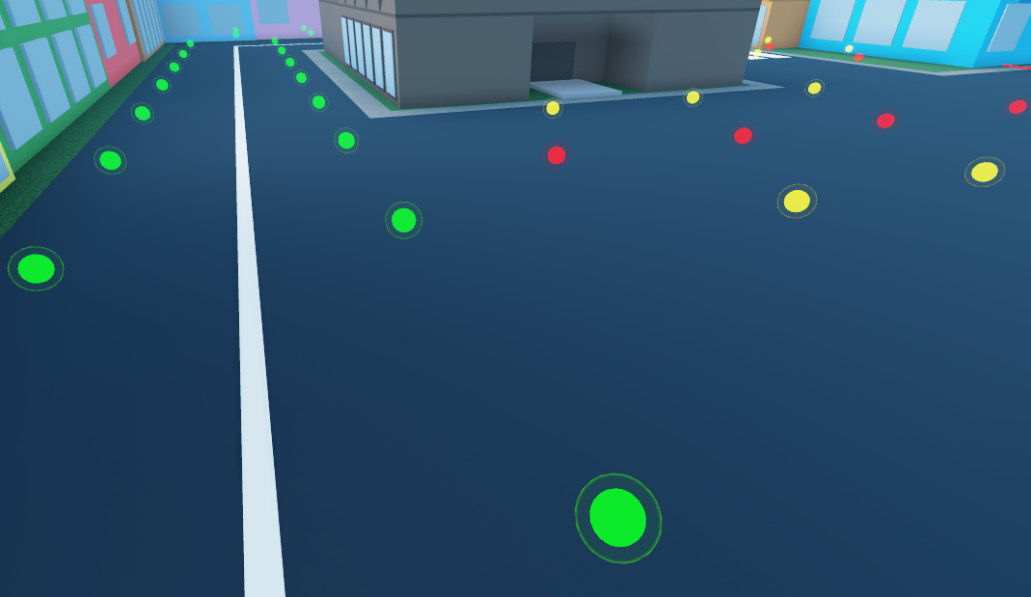
Figure 10.5 – Orbs on the map
All of these orbs are in a folder called Orbs. This folder is a direct descendant of the Workspace service.
When a player touches one of these orbs, the system should check whether this orb is claimable. An orb is considered claimable when players have not touched it for at least five seconds. When an orb is not claimable, it should be invisible. The challenge when implementing this is to ensure that each orb has its own five-second cooldown.
Luckily, we learned about attributes. We can create an attribute on these orbs that specifies the last time they were claimed. This way, we can read the attribute, check whether it was not touched for at least five seconds, reward the player, and reset the countdown.
When an orb is claimed, the orbs key in the DataManager should be incremented by 1. This is our base value. However, we must also check the orb multiplier upgrade. This upgrade multiplier must be multiplied against the base value 1.
Now that we know this, let us implement our system. Follow these steps:
- Create a new OrbsService script in ServerScriptService.
- Create a setup() function. This setup() function should do the following:
- Loop through all of the BasePart in the Orbs folder.
- Set the ClaimTime attribute on each BasePart to 0. We do this to initialize our attributes.
- Listen to the .Touched event on the BasePart. When this event fires, you should check whether the hit parameter that the .Touched event provides meets the following criteria:
- The parent of the hit instance must not be nil
- The parent of the hit instance should be a character
- When using the :GetPlayerFromCharacter(hit.Parent) function on the Players service, the result of this function should be a player
- When all of the previous requirements are met, check whether the orb that was touched does not have a cooldown. To do this, use the ClaimTime attribute and the os.time() function. The value of the os.time() function should be equal to or greater than the ClaimTime attribute plus 5 seconds.
- When the previous requirement is met, update the ClaimTime attribute and set it to the current os.time() value.
- Change the Transparency property of the orb and its children to 1.
- Calculate the number of orbs the player’s data should be incremented with. The base value is 1 orb. However, this has to be multiplied against the upgrade multiplier of the orb multiplier. Once this is calculated, use the :Increment() function on the DataManager to increment the number of orbs this player has.
- Finally, use the task.wait() function and wait five seconds to change back the transparency of the orb and its children. The new transparency should be 0.
We have now finished our orbs system. You can test whether it works by playing the game. Then, walk into the orbs on the map and watch them change transparency. Besides this, ensure the number of orbs in the leader stats increases. If this does not happen, check the Developer Console frame or the Output frame for possible errors. If, for whatever reason, you are unable to understand what is going on, look at the example answer, which can be found on the GitHub page for this chapter. The link for the GitHub page can be found in the Technical requirements section.
We can move on to the next section when you have tested your code. Next, we will create our rebirths system.
Implementing rebirths
While it is weird that we implement rebirths before selling orbs, we will need our rebirthing multiplier before implementing our selling system. We will implement this first to prevent us from having to change the orbs selling system after implementing the rebirthing system.
First, we will start by creating the required RemoteEvents and RemoteFunction for this system:
- Create the following RemoteEvents and RemoteFunction in the Events folder in the ReplicatedStorage service:
- A Rebirth RemoteEvent
- An OpenFrame RemoteEvent
- A GetRebirthData RemoteFunction
- A RebirthDataUpdated RemoteEvent
According to the requirements from the Introduction to the game section, the Rebirthing GUI should open when a player touches a BasePart in the RebirthParts folder in the Workspace service. We can implement this on both the server and the client. However, since our game must be compatible with StreamingEnabled, it is easier to implement it on the server. Therefore, when a player touches one of these BasePart, we should fire our OpenFrame RemoteEvent. That way, we can open the Rebirthing GUI based on this trigger.
Now that we know this, let us implement the code related to opening the Rebirthing GUI.
- Create a new RebirthService script in the ServerScriptService service.
- Create a setup() function. This setup() function should do the following:
- Loop through all of the BasePart inside the RebirthsFolder folder, which can be found in the Workspace service.
- Listen to the .Touched event on the BasePart. When this event fires, you should check whether the hit parameter that the .Touched event provides meets the following criteria:
- The parent of the hit instance must not be nil
- The parent of the hit instance should be a character
- When using the :GetPlayerFromCharacter(hit.Parent) function on the Players service, the result of this function should be a player
- When the previous requirements are met, fire the OpenFrame RemoteEvent for the player that touched the BasePart.
Next, we will implement the functions related to the GetRebirthData RemoteFunction. To figure out which data the client needs, let us take a look at the Rebirthing GUI:

Figure 10.6 – The Rebirthing GUI
In Figure 10.6, we need to display the price of the rebirth. The price of rebirthing should be displayed at x. However, because we can also use this function inside our own script, we might want to add a few keys to our dictionary. Instead of only including the price of rebirth, we also want to know how many times the player has been rebirthed already. In addition, it might be helpful to know the current rebirth multiplier. The dictionary could look like this:
local data = {
current_rebirth = 0,
rebirth_price = 0,
rebirth_multiplier = 1
}
Even though the current GUIs do not need this data, it might be informative to let the players know this anyway. Feel free to change the GUI so that it displays all of the data that is provided in the preceding code snippet.
Besides this, the rebirth multiplier and price should increase every time the player decides to rebirth, according to the requirements in the Introduction to the game section.
Here are example formulae that you could use to do this. Feel free to use different formulae:
- For the rebirth multiplier: ( currentRebirth ^ 2 ) / ( ( currentRebirth * .75 ) + 1 ) + 1
- For the rebirth price: ( currentRebirth ^ 3 ) * 25 + 1_000
Both formulae increase exponentially. This means the multiplier and price increase significantly every time the player decides to rebirth. As previously mentioned, feel free to write a different formula.
Now that we know what this RemoteFunction should do, let us implement it.
- Listen to the GetRebirthData RemoteFunction callback.
- When this event is called, return the dictionary that was previously shown.
Tip for 6: First, get the current_rebirth value using the DataManager. Based on this, use the previously mentioned formulae to calculate the rest.
Next, we will make it so players can actually rebirth. All player data except for the rebirth multiplier should be reset when rebirthing, according to the requirements in the Introduction to the game section. Let us implement this.
- Listen to the Rebirth RemoteEvent.
- When this event gets called, check whether the player has sufficient money to perform this rebirth.
Tip for 8: The function made two steps ago contains the rebirth price.
- If this is the case, execute the following commands on the DataManager in just one pcall():
- Set the money to 0
- Set the orbs to 0
- Set the speed_upgrade to 0
- Set the orb_multiplier to 0
- Increment the rebirths by 1
- Fire the RebirthDataUpdated RemoteEvent for the same player that called this function. The second argument of this RemoteEvent should be the same data as the function we made in Step 6.
We have now implemented all the RemoteEvents and RemoteFunctions. However, as previously mentioned, we had to create our rebirths system before implementing the system allowing us to sell the orbs. This was because the selling orbs system requires the rebirths multiplier. For the selling orbs system to get this multiplier, we must implement a BindableFunction.
- Create a new BindableFunction in the ServerEvents folder inside the ServerStorage service. Name this BindableFunction GetRebirthMultiplier.
- Listen to the GetRebirthMultiplier BindableFunction callback. Return the multiplier for the current rebirth. When this function gets called, you can use the following parameter:
- Player whose multiplier is requested
Tip for 12: The function made in Step 6 contains the multiplier for the current rebirth.
We have now finished our rebirthing system. This was a complex system. If your code does not work instantly, try to fix possible errors that show up in the Developer Console frame or the Output frame. If, for whatever reason, you are unable to understand what is going on, look at the example answer, which can be found on the GitHub page for this chapter.
You can move on to the next section when you have tested your code. Next, we will create a system that allows players to sell their orbs.
Selling orbs
Finally, we will implement our selling orbs system. When a player touches one of the BasePart inside the SellParts folder, the number of orbs should automatically be sold. Each orb is worth one dollar. Please remember that this has to be multiplied against the rebirth multiplier that we made in the previous section. In addition, there is a 2xMoney game pass, which doubles this even more. But, before we worry about this, let us implement the setup() function. Follow these steps:
- Create a new SellService script in ServerScriptService.
- Next, create a setup() function. This setup() function should do the following:
- Loop through all of the BasePart inside the SellParts folder, which can be found in the Workspace service.
- Listen to the .Touched event on the BasePart. When this event fires, you should check whether the hit parameter that the .Touched event provides meets the following criteria:
- The parent of the hit instance must not be nil
- The parent of the hit instance should be a character
- When using the :GetPlayerFromCharacter(hit.Parent) function on the Players service, the result of this function should be a player
- Check whether the player has a cooldown or not. Players can only sell their orbs once every second.
We know that a player wants to sell their orbs. Now, we need to convert all of the orbs into money. First, we need to get the number of orbs. Back in the DataManager functions section, we decided to create a :GetWithDefault() function, instead of updating the :Get() function. This was because sometimes we do not want to continue our script when an error occurs. When selling orbs, we need to get the number of orbs the player has. When the DataManager fails to get this amount of orbs, we do not want to continue our script. After all, we cannot convert something if we get nothing.
Now that we know this, let us implement the system that implements the conversion of orbs into money.
- Create a pcall() function that includes the following game logic:
- Getting the number of orbs a player has using the :Get() function and storing this in a variable named orbs.
- Setting the number of orbs to 0.
- Checking whether the player owns the 2xMoney game pass by checking the 2xMoney attribute on the Player instance. When they own the game pass, double the orbs variable.
- Invoking the GetRebirthMultiplier BindableFunction, which we made in the Implementing rebirths section. Then, multiply the orbs variable with the value that this BindableFunction returns.
- Incrementing the amount of money that the player has with the value that is stored in the orbs variable.
We have now implemented the system that sells your orbs and converts them into money. While this is done, the requirements in the Introduction to the game section contain one more thing that we need to do. The requirements specify that players must be able to teleport to the nearest sell location.
Since our GUIs have a Sell button that allows players to do this, we must implement a RemoteEvent to teleport players in this direction. Since our game uses StreamingEnabled, we must call the :RequestStreamAroundAsync() function on the player before we can teleport them there. We learned about this function in Chapter 5, Optimizing Your Game.
Now that we know this, let us implement this into our game.
- Create a new TeleportClosestSellPoint RemoteEvent in the Events folder.
- When this event gets fired, check whether the player has a cooldown or not. Players may only use this RemoteEvent once every five seconds.
- Loop through all of the BasePart in the SellParts folder. Use the .Magnitude property on two BasePart, your character’s primary part and sell part, to calculate the distance between both parts. Use this data to figure out which BasePart has the least distance. This is the selling part that the player should be teleported to.
The following is an example code for the previous step:
local distance = ( sellPoint.Position - player.Character.PrimaryPart.Position ).Magnitude
- When you know which sell point is closest to the player, use the :RequestStreamAroundAsync() function to preload the area around this selling point.
- Finally, teleport the player to this point using the :SetPrimaryPartCFrame() function on the player’s character.
Tip for 9: To convert a Vector3 data type into a CFrame, use the following code:
CFrame.new(Vector3.new(0, 0, 0))
We have now finished our selling system. You can test whether the selling system works by walking up to a selling point. You should see the number of orbs and money changes in the leader stats. If this does not happen, check the Developer Console frame or the Output frame for possible errors. If, for whatever reason, you are unable to understand what is going on, look at the example answer, which can be found on the GitHub page for this chapter. The link for the GitHub page can be found in the Technical requirements section.
We have now finished all of our server scripts. Throughout the past sections, we made our leader stats, created scripts to reward game passes and developer products, and made it so that players can upgrade their character, rebirth, and claim and sell orbs. Most of these scripts use RemoteEvents and RemoteFunctions. We will need to use these when programming our GUIs. Now, let us continue programming our game’s GUIs.
Programming GUIs
Now that we have finished all of the RemoteEvents and RemoteFunctions, we can start programming our GUIs. The primary thing that we need to do is use the RemoteEvents and RemoteFunctions at the correct times. This way, our GUIs will be updated correctly, and buttons will do what they are supposed to do.
Before we start implementing each GUI, we need to create a system that allows each GUI to open and close. In the Exercise 6.1 – Creating a Shop GUI section of Chapter 6, Creating User Interfaces for All Devices, we made this system already. At the time, there were two example answers for this exercise: a default and an advanced version. For our game, we will use the advanced version. Since it is not required to rescript these modules completely, we can copy and paste them into our new GUIs.
Tip
It is recommended that you read through all of the code for these modules. If you cannot figure out what specific modules do or how they work, redo Exercise 6.1.
When you copy the UIHandler module and the FrameHandler module from Exercise 6.1, your StarterGui should look like this:
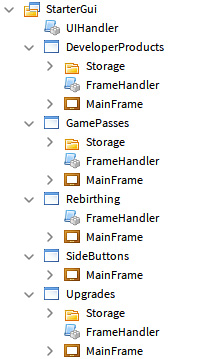
Figure 10.7 – Implemented UIHandler and FrameHandler modules
As shown in Figure 10.7, you should not paste the FrameHandler module in the SideButtons ScreenGui.
Now that we have implemented the modules that will help us change between frames, let us start programming each separate GUI. First, we will start with the SideButtons GUI.
Programming the SideButtons GUI
We will start by creating simple GUIs and slowly move on to the more difficult ones. Therefore, we will start with the SideButtons GUI. The SideButtons GUI are the buttons on the left side of your screen:

Figure 10.8 – Side buttons
Here is a list of what should happen when each button is pressed:
- When the UPGRADE button is pressed, the Upgrade GUI should open.
- When the SELL button is pressed, the TeleportClosestSellPoint RemoteEvent should be fired. We made this RemoteEvent in the Selling orbs section.
- When the CURRENCY button is pressed, the DeveloperProducts GUI should open.
When we need to open a GUI, we use the UIHandler module, which is a child of the StarterGui service. In this module, we can use the :ToggleFrame() function. The UIHandler module will ensure that frames do not overlap, as required by the requirements in the Introduction to the game section.
Follow these steps to program the SideButtons GUI:
- Create a new LocalScript inside the SideButtons GUI.
- Listen to the .MouseButton1Click event on the Upgrading button. When this event gets fired, open the Upgrades GUI.
- Listen to the .MouseButton1Click event on the PurchasingCurrency button. When this event gets fired, open the DeveloperProducts GUI.
- Listen to the .MouseButton1Click event on the TeleportSell button. When this event gets fired, fire the TeleportClosestSellPoint RemoteEvent.
We have now implemented all the buttons that we previously discussed. However, there is one more thing we should do. In the Implementing rebirths section, we created an OpenFrame RemoteEvent. When this event on this RemoteEvent gets fired, we should open the Rebirthing GUI. Let us implement this into our current script.
- Listen to the .OnClientEvent event on the OpenFrame RemoteEvent. When this event gets fired, open the Rebirthing GUI.
We have now implemented our SideButtons GUI. First, check whether all the buttons work and that they do what they should do. If it does not work instantly, try to fix possible errors that show up in the Developer Console frame or the Output frame. If, for whatever reason, you are unable to understand what is going on, look at the example answer, which can be found on the GitHub page for this chapter.
We can move on to the next section when you have tested that the buttons work. Next, we will program the Rebirthing GUI.
Programming the Rebirthing GUI
Next, we will move to a more complex GUI, the Rebirthing GUI. As displayed in Figure 10.9, we need to display the price for each rebirth in the GUI. Back in the Implementing rebirths section, we made a GetRebirthData RemoteFunction, which we could invoke to get a dictionary containing the rebirth price.
Figure 10.9 – The Rebirthing GUI
Besides this, we also made a RebirthDataUpdated RemoteEvent. When this RemoteEvent gets fired, the price in the GUI should be updated. Let us start by implementing the code related to updating the information displayed in the GUI. Follow these steps:
- Create a new LocalScript inside the Rebirthing GUI.
- Create a function named updateButton(). The parameter of this function should be named rebirthData. This parameter contains the dictionary made by our GetRebirthData RemoteFunction and our RebirthDataUpdated RemoteEvent.
- Inside the updateButton() function, change the Text property of the RebirthButton, so it displays the new price to rebirth.
Tip for 3: If you forgot what data is inside the rebirthData parameter, look at the dictionary we made inside the GetRebirthData RemoteFunction.
- Listen to the .OnClientEvent event on the RebirthDataUpdated RemoteEvent. When this event gets fired, start the updateButton() function.
- Create a setup() function. In the setup() function, do the following things:
- Invoke the GetRebirthData RemoteFunction and store the result in a rebirthData variable
- Check whether the rebirthData variable is nil or not
- If the result is not nil, start the updateButton() function and provide the rebirthData variable as the argument
The data in our GUI should now be updated. Try walking to the rebirth building and wait until the Rebirthing GUI shows up. When it does, ensure that the correct price is displayed.
Next, we need to make our RebirthButton work. To do this, we must listen to the .MouseButton1Click event on the RebirthButton. When this happens, fire the Rebirth RemoteEvent. Besides being able to rebirth, we must also program the Close button. When a player presses this button, the frame should close. To do this, use the :CloseFrame() function on the FrameHandler module that you inserted into the Rebirthing GUI.
Now that we know this, let us start programming the GUI.
- Listen to the .MouseButton1Click event on the RebirthButton. When this event gets fired, fire the Rebirth RemoteEvent.
- Listen to the .MouseButton1Click event on the Close button. When this event is fired, close the frame using the :CloseFrame() function.
Closing frames
All the GUIs we will program for this game will have a close button. To prevent repetition, we will not include a step to close each frame in the upcoming sections. However, this does not mean that you should not implement it.
We have now programmed our second GUI. In the next section, we will program our DeveloperProducts GUI.
Programming the DeveloperProducts GUI
In the previous sections, the complexity of the GUIs slowly built up. In this section, we will do something we have never done before. We will generate GUI Elements.
Inside the Storage folder, there is a Template TextButton. Each developer product gets its own template. Inside of each template, we must change the Title, the Description, and the ImageLabel, so it displays accurate information for the developer product.
Follow these steps to program our DeveloperProducts GUI:
- Create a new LocalScript inside the DeveloperProducts GUI.
- Create a table inside a developerProducts variable that contains all the developer product IDs.
- Create a setup() function. The setup() function should do the following:
- Loop through the developerProducts table.
- Clone the Template TextButton for each developer product using the :Clone() function.
- Change the Name property of the TextButton to the developer product ID.
- Get the developer product info for the current developer product using the MarketplaceService:GetProductInfo() function and store the result in a devProductInfo variable.
- Update the Title TextLabel inside the Template TextButton so that it displays the name of the developer product using the Name key from the devProductInfo variable.
- Update the Description TextLabel inside the Template TextButton so that it displays the price of the developer product and a default text that informs the player that the product can be purchased multiple times. To get the price of the developer product, use the PriceInRobux key from the devProductInfo variable. See Figure 10.10 for an example.
- Update the ImageLabel inside the Template TextButton so that it displays the icon of the developer product. To get the icon image asset ID, use the IconImageAssetId key from the devProductInfo variable.
Tip: Add rbxassetid:// in front of the IconImageAssetId key.
- Change the Visible property on the Template TextButton to true.
- Parent the Template TextButton to the Body ScrollingFrame.
- Listen to the .MouseButton1Click event on the Template TextButton. When this event gets fired, prompt the correct developer product.

Figure 10.10 – The Currency GUI
We now prompt and generate buttons for the developer products. However, there is one more button on our GUI. At the bottom of the GUI, as shown in Figure 10.10, there is a button allowing users to purchase game passes. This button will close the DeveloperProducts GUI and open the GamePasses GUI. To change to the GamePasses frame, use the :ToggleFrame() function in the UIHandler module inside the StarterGui. Follow these instructions:
- Listen to the .MouseButton1Click event on the SwitchGamePasses TextButton. When this event gets fired, open the GamePasses GUI using the :ToggleFrame() function.
We have now implemented the DeveloperProducts GUI. First, open the DeveloperProducts GUI by pressing the Currency button on the left side of your screen. Once it is open, press any developer products for your game. When you purchase a developer product, your money should increase. You can check the leader stats to see whether this happens.
If it does not work, try to fix possible errors that show up in the Developer Console frame or the Output frame. If, for whatever reason, you are unable to understand what is going on, look at the example answer, which can be found on the GitHub page for this chapter.
We can move on to the next section when you have tested that the developer products work. Next, we will program our Game Passes GUI.
Programming the GamePasses GUI
Creating the GamePasses GUI will be very similar to how we created our DeveloperProducts GUI. However, there are a few slight changes. Follow these steps:
- Create a new LocalScript inside the GamePasses GUI.
- Create a table inside a gamePasses variable that contains all the game pass IDs.
- Create a setup() function. The setup() function should do the following:
- Loop through the gamePasses table.
- Clone the Template TextButton for each game pass using the :Clone() function.
- Change the Name property of the TextButton to the game pass ID.
- Get the game pass info for the current game pass using the MarketplaceService:GetProductInfo() function and store the result in a gamePassInfo variable.
- Update the Title TextLabel inside the Template TextButton so that it displays the name of the game pass using the Name key from the gamePassInfo variable.
- Update the Description TextLabel inside the Template so that it displays the price and description of the game pass. To get the price of the game pass, use the PriceInRobux key from the gamePassInfo. To get the description of the game pass, use the Description key from the gamePassInfo variable.
- Update the ImageLabel inside the Template so that it displays the icon of the game pass. To get the icon image asset ID, use the IconImageAssetId key from the gamePassInfo variable.
Tip: Add rbxassetid:// in front of the IconImageAssetId key.
- Change the Visible property on the Template TextButton to true.
- Parent the Template TextButton to the Body ScrollingFrame.
- Listen to the .MouseButton1Click event on the Template TextButton. When this event gets fired, prompt the correct game pass.
We have now implemented the GamePasses GUI. Open the GamePasses GUI. Once it is open, press any created game pass buttons and confirm that a prompt appears. If it does not work, try to fix possible errors that show up in the Developer Console frame or the Output frame. If, for whatever reason, you are unable to understand what is going on, look at the example answer, which can be found on the GitHub page for this chapter.
You can move on to the next section when you have tested that the game pass buttons work. Next, we will program the Upgrade GUI.
Programming the Upgrade GUI
Finally, we must also program the Upgrade GUI. This will be the most complex GUI to script but do not worry, we will do this together. In the Implementing character upgrades section, we created a few RemoteEvents and RemoteFunctions. We will use these to make our GUI. But, first, we need to generate a TextButton for each upgrade, similar to how we did so in the previous chapters.
Before we can start generating TextButtons, we first need to figure out which upgrades are in our game. To get this information, we must invoke the GetUpgradeData RemoteFunction. If you forgot how this RemoteFunction works, view the code we made for the RemoteFunction.
Follow these steps to generate the TextButtons for each upgrade:
- Create a new LocalScript inside the Upgrades GUI.
- Create a setup() function. The setup() function should do the following:
- Invoke the GetUpgradeData RemoteFunction to get a dictionary with the upgrade data and save it in an upgradeData variable.
- Loop through the upgradeData dictionary. The dictionary’s key is the upgrade name that should be displayed to players. The value of the dictionary is another dictionary that contains all the keys discussed in the Implementing character upgrades section.
Your loop code could look like this:
for upgradeName, upgradeInfo in pairs(upgradeData) do
- Clone the Template TextButton from the Storage folder using the :Clone() function.
- Change the Name property of the Template TextButton to the value of the upgrade_name key inside the upgradeInfo variable.
- Change the Text property of the Title TextLabel inside the Template TextButton to the value of the upgradeName variable.
- Parent the Template TextButton to the Body ScrollingFrame.
- Listen to the .MouseButton1Click event on the TextButton. When this event gets fired, fire the Upgrade RemoteEvent. The argument of the :FireServer() function should be upgradeInfo.upgrade_name.
So far, we have generated TextButtons that display the title of each upgrade. Besides this, we made it so that players are able to upgrade once they press the TextButton. However, the progress bar and Progress TextLabels do not receive updated information yet. Why not? Are we not supposed to show the latest data in the GUI instantly? Yes, we are. However, there is a RemoteEvent that will do this as well. This is the UpgradeDataUpdated event. We will create a new function that both the setup() function and the UpgradeDataUpdated RemoteEvent will use to prevent duplicate code.
Follow these next steps to make our update function.
- Create a new updateButtons() function. This function has a parameter named upgradeData. This parameter contains the same data as the variable we made in Step 2A. This function should do the following:
- Loop through the upgradeData variable the same way we did in Step 2B.
- Look for the TextButton that matches the upgradeInfo.upgrade_name.
- If this TextButton can be found, change the Text property for the UpgradeText TextLabel so that it displays the correct price to upgrade. To get the price, use the upgrade_cost key in the upgradeInfo dictionary.
- Change the Text property for the Progress TextLabel. The TextLabel should display the current progress out of the maximum progress. For instance: 1/10. To get the current progress, use the current_progress key in the upgradeInfo dictionary. To get the maximum progress, use the max_progress key in the upgradeInfo dictionary.
- Change the Size property of the Bar Frame so that it displays the correct progress length. If you want to take this to the next level, use the :TweenSize() function.
Tip for 3E: To calculate the correct size, use the following code snippet:
UDim2.new(upgradeInfo.current_progress / upgradeInfo.max_progress, 0, 1, 0)
- In the setup() function, call the updateButtons() function once all the TextButtons have been generated.
- Listen to the .OnClientEvent event on the UpgradeDataUpdated RemoteEvent. When this event gets called, start the updateButtons() function.
Now, we also update the TextButtons to display the most accurate information. To test whether it works, open the Upgrading GUI. If all the information is generated and updated correctly, test whether this is also the case when you try to upgrade. Make sure that all the information updates instantly. If it does not work, try to fix possible errors that show up in the Developer Console frame or the Output frame. Once again, this is the most complex GUI in the game. If you did not manage to implement this system, please take a look at the example answer, which can be found on the GitHub page for this chapter.
We have now programmed all the GUIs for the entire game. In the next section, we will take a look at the next steps you must take before releasing your game.
Updating your game
You have now finished your very own game. Congratulations! But, before you can release games, you must test them. How well you test your game can determine how many bugs end up in the final product. It is highly recommended that you play your game with a few friends and listen to their feedback. Once you have fixed all known bugs and implemented the feedback from your friends, you can release your game.
You might think your work is done now. However, this could not be further from the truth. The actual journey of your game starts now. Hopefully, many players will play and enjoy your game. At some point, these players will have finished their game. However, to prevent them from ever finishing your game, you must update your game with new content. Luckily, there are many things that you can include in your simulator.
Throughout the previous sections, we implemented many systems into our game, which we had previously learned about throughout the entire book. However, not everything we learned was used in this chapter but that does not mean that we cannot still implement it.
Here is a list of things that you could update your game with:
- A leaderboard of the richest players.
- A leaderboard for the most rebirths.
- Adding particles when collecting orbs.
- Different orb prices; currently, all orbs have a base value of 1. However, some orbs could be worth more.
- New regions for players to unlock.
- Daily rewards.
- Group rewards.
- Sounds when buttons are pressed.
- Sounds when orbs are collected.
- Sound when orbs are sold.
- Pets for an additional orb and sell multiplier.
- Badges.
- And much more.
Besides these features, there is still so much to explore in programming and the best part is that it’s constantly evolving. Cool stuff is constantly added for you to explore and improve your games with.
Summary
Throughout this chapter, you learned how to make your very own simulator game. Together, we made a fully functioning game that uses data stores, server scripts, GUIs, developer products, and game passes based on a set of requirements.
Once we knew the requirements for our game, we started creating the data stores for our game. We saw how to analyze which keys we need to store in the data stores. In addition, we saw why it is a bad practice to store multipliers inside the data stores. Instead, we should save the amount of, for example, rebirths the players did. Then, we can convert the number of rebirths into a multiplier.
After implementing our data stores, we started creating the server scripts for our game. First, we analyzed what information should be displayed in the GUIs and which actions players can perform. Based on this, we created RemoteEvents and RemoteFunctions. These RemoteEvents and RemoteFunctions perform certain actions, such as converting orbs into money. While implementing these, we looked at server checks that we needed to implement to secure our game.
Because we implemented the RemoteEvents and RemoteFunctions before creating the GUIs, we could use these and directly display the correct information or perform the right actions. Furthermore, while creating these GUIs, we learned how to generate information that was displayed. This way, we have GUIs that automatically update to display the latest information without having to change anything for our GUIs.
Finally, we also looked at possible updates for our game. We have seen that we can still implement many cool features for our players to enjoy.
This wraps up the Mastering Roblox Coding book. In Chapter 1, Getting Up To Speed with Roblox and Luau Basics, we learned the first things to know about Roblox and Roblox Luau. Remember how we started with learning what data types are and how to do simple math operations with numbers? Look where you are now! We just finished our very first simulator game. You should be incredibly proud of yourself for achieving this. This proves that anything is possible if you invest enough time into it. Your future looks bright.
Roblox is constantly evolving and changing. It is important to stay up to date with what is going on. The following links are useful resources that every Roblox programmer uses:
- Stay up to date with the latest changes that are happening to Roblox by reading the Announcements channel on the Developer Forum:
https://devforum.roblox.com/
- View the documentation and code examples for every function, event, and service on the documentation site:
https://create.roblox.com/docs
- Hire a team to create other games on the Talent Hub:
https://talent.roblox.com/